Types of Notifications
Alert notifications: Visible alerts, delivered in a way that allows customer to interact with it
Background notifications: Received while your app is not running, in order to keep the application content updated
Alert Notifications
Visible alerts
Display new information
Can be interactive
Foreground or background app state
Customizable
To implement the notifications:
Register for remote notifications in your
didFinishLaunchingWithOptionsusing:
UIApplication.shared.registerForRemoteNotifications()This allows the app to register for a remote notification and sends back a device token to be used to interact with the app through the user notification delegate
Implement
UNUserNotificationCenterDelegateand assign theAppDelegateas theUNUserNotificationCenter.currentdelegate
Example of previous two steps implemented in AppDelegate:
class AppDelegate: UIResponder, UIApplicationDelegate, UNUserNotificationCenterDelegate {

    func application(_ application: UIApplication,
                     didFinishLaunchingWithOptions launchOptions: [UIApplication.LaunchOptionsKey: Any]?) -> Bool {
        UIApplication.shared.registerForRemoteNotifications()
        UNUserNotificationCenter.current().delegate = self
        return true
    }
	...
}
When registering for remote notifications, you’ll receive a callback on one of two delegate methods:
func application(_ application: UIApplication,
                   didFailToRegisterForRemoteNotificationsWithError error: Error) {
    // The token is not currently available.
    print("Remote notification is unavailable: \(error.localizedDescription)")
}

func application(_ application: UIApplication,
                   didRegisterForRemoteNotificationsWithDeviceToken deviceToken: Data) {
     // Forward the token to your provider, using a custom method.
     self.forwardTokenToServer(token: deviceToken)
}
If retrieving a device token has failed, you will receive a callback in
didFailToRegisterForRemoteNotificationsWithErrorletting you know what went wrong. If it succeeds, you will receive the device token indidRegisterForRemoteNotificationsWithDeviceToken, which you will need to send your backend to be used later to send notifications to the app.
Forwarding device token can be done in a way similar to this:
func forwardTokenToServer(token: Data) {
    let tokenComponents = token.map { data in String(format: "%02.2hhx", data) }
    let deviceTokenString = tokenComponents.joined()
    let queryItems = [URLQueryItem(name: "deviceToken", value: deviceTokenString)]
    var urlComps = URLComponents(string: "www.example.com/register")!
    urlComps.queryItems = queryItems
    guard let url = urlComps.url else {
        return
    }

    let task = URLSession.shared.dataTask(with: url) { data, response, error in
        // Handle data
    }

    task.resume()
}
Lastly, you need to ask for the user’s permission to send push notifications before doing so, this can be done using
UNUserNotificationCenter:
let userNotificationCenter = UNUserNotificationCenter.current()
userNotificationCenter.requestAuthorization(options: [.alert, .sound, .badge]) { (granted, error) in
    print("Permission granted: \(granted)")
}
And that’s it. Now you just have to send the notifications from your backend to the previously saved device token. Here is a notification payload example of a restaurant app that wants to promote a daily special:
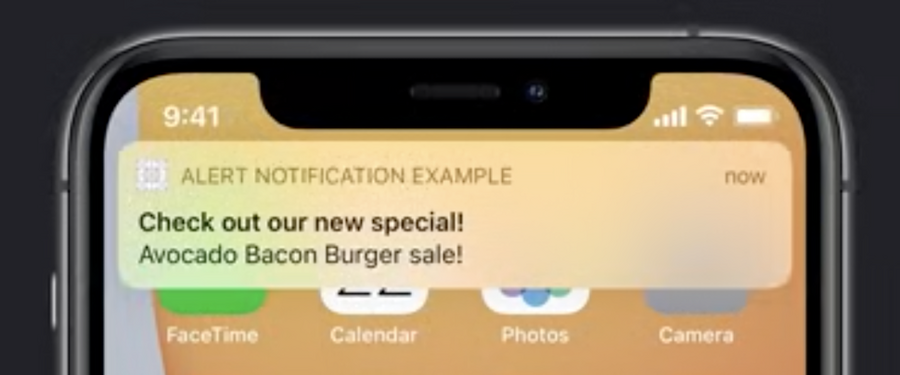
{
    "aps" : {
       "alert" : {
            "title" : "Check out our new special!",
            "body" : "Avocado Bacon Burger on sale"
        },
        "sound" : "default",
        "badge" : 1,
   },
    "special" : "avocado_bacon_burger",
    "price" : "9.99"
}
The
apsdictionary is a standard Apple Push Notification Service object that contains information about how the notification should be rendered. Inside we have:alertobject, this tells the system what text to use inside the notificationsoundis an optional field which should be included if you want the device to play a sound upon delivering the notification, other values can be provided for custom soundsbadgeis also optional field that’s used to modify the badge of your app icon, this is an absolute value which will be displayed on the app icon, also this value can be modified by the app programmatically
specialandpriceare examples of custom data that you can provide to your application
Parsing The Notification Payload
Here is how you can parse the previous sample notification payload:
func userNotificationCenter(_ center: UNUserNotificationCenter,
                            didReceive response: UNNotificationResponse,
                            withCompletionHandler completionHandler: @escaping () -> Void) {
    let userInfo = response.notification.request.content.userInfo
    guard let specialName = userInfo["special"] as? String,
          let specialPriceString = userInfo["price"] as? String,
          let specialPrice = Float(specialPriceString) else {
        // Always call the completion handler when done.
        completionHandler()
        return
    }

    let item = Item(name: specialName, price: specialPrice)
		addItemToCart(item)
  	showCartViewController()
    completionHandler()
 }
It is important to call
completionHandlerbefore returning from the function.
Background Notifications
Fetch data in background
Keep application up to date
Will launch the application if needed
Managed by the system
To implement Background Notifications:
you just have to follow the same steps 1, 3, and 4 from Alert Notifications steps.
implementing the delegate in step 2 isn’t required because there won’t be any user response to those notifications
Background Notifications don’t require asking for user’s permission as in step 5 of Alert Notifications.
An example of a Background Notification payload is this:
{
    "aps" : {
       "content-available" : 1
    },
    "myCustomKey" : "myCustomData"
}
It’s a much simpler version of Alert Notifications payload, where you only have to provide the content-available: 1 key-value pairs inside the aps dictionary, which tells the system that this is a Background Notification.
As in Alert Notification, you can also send custom data inside your payload.
Handling a Background Notification is done by implementing the application delegate function application(_ :didReceiveRemoteNotification:fetchCompletionHandler:
func application(_ application: UIApplication,
                     didReceiveRemoteNotification userInfo: [AnyHashable : Any],
                     fetchCompletionHandler completionHandler:
                     @escaping (UIBackgroundFetchResult) -> Void) {
    guard let url = URL(string: "www.example.com/todays-menu") else {
        completionHandler(.failed)
        return
    }

    let task = URLSession.shared.dataTask(with: url) { data, response, error in
        guard let data = data else {
            completionHandler(.noData)
            return
        }

        updateMenu(withData: data)
        completionHandler(.newData)
    }
}
This function also requires calling the completionHandler, but you will have sometime before the application is terminated by the system. Call the complettionHandler with the result of your background process. This helps the system determines when it’s the best time to delivery your next Background Notifications.
Here are sample apps that shows implementing Alert and Background notifications.
