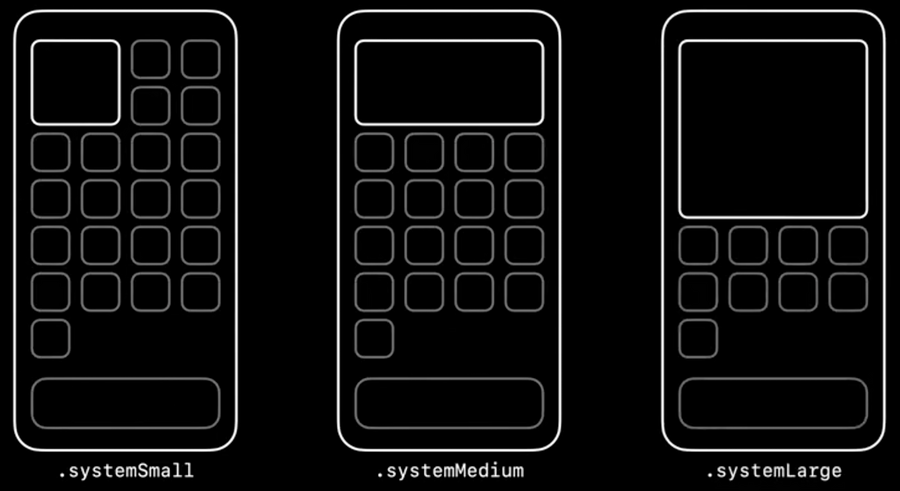
Families
Three available families:
When drawing our widget, we can detect which widget family we’re drawing the .widgetFamily environment variable:
struct WWDCNotesWidgetEntryView : View {
  var entry: Provider.Entry
  @Environment(\.widgetFamily) var family

  var body: some View {
    Text(entry.date, style: .time)
  }
}
Timelines
The IntentTimelineProvider is the engine of the widget.
When our TimelineProvider is asked to provide a Timeline, we also need to define our reload policy:
atEnd: tellsWidgetKitto request a new timeline only after the date of the last entry has passedafter(date: Date): tellsWidgetKitto request a new timeline only after a specified dateNever: tellsWidgetKitto never request a new timeline, the app will letWidgetKitknow when a new timeline is available.
When creating a timeline, we can also set an optional relevance to each entry, TimelineEntryRelevance, in order to let the system know how important each entry is (compared to other entries from the same widget).
Configuration
WidgetKit configuration is driven by SiriKit, the core technology for configuration is a custom INIntents.
For more, refer to session
Add configuration and intelligence to your widgets.
To create a new configuration/intent go to File > New File and choose SiriKit Intent Definition File..
This will create a .intentdefinition file whose target membership must be both the widget target and the main app.
After opening this file create a new intent and:
set its category to
Viewcheck the
is elegible for widgetsoptionadd your configuration parameters
Once the intent/configuration setup is complete, we need to go back to our widget definition and make sure that our widget configuration is a IntentConfiguration, the difference from the default StaticConfiguration (beside that one allows configuration and the other doesn’t) is that IntentConfiguration requires an extra intent parameter where we can define set our intent as if it was a class/struct:
@main
struct WWDCNotesWidget: Widget {
  private let kind: String = "WWDCNotesWidget"

  public var body: some WidgetConfiguration {
    IntentConfiguration(
      kind: kind,
      intent: WWDCNotesCustomIntent.self, // this is our intent
      provider: Provider(),
      placeholder: PlaceholderView()
    ) { entry in
      WWDCNotesWidgetEntryView(entry: entry)
    }
    .configurationDisplayName("My Widget")
    .description("This is an example widget.")
  }
}
If we use an IntentConfiguration, we also need to make sure that we declare a IntentTimelineProvider instead of a TimelineProvider, the difference with the base TimelineProvider is that both the snapshot(for:with:completion:) and timeline(for:with:completion:) functions have an extra configuration parameters (that matched our intent type)
struct Provider: IntentTimelineProvider {
  typealias Intent = WWDCNotesCustomIntent
  public typealias Entry = SimpleEntry

  public func snapshot(
    for configuration: WWDCNotesCustomIntent, // extra parameter
    with context: Context,
    completion: @escaping (SimpleEntry) -> Void
  ) {
      ...
  }

  public func timeline(
    for configuration: WWDCNotesCustomIntent, // extra parameter
    with context: Context,
    completion: @escaping (Timeline<Entry>) -> Void
  ) {
    ...
  }
}
Deep linking
Widgets do not have animation or custom interactions, but we can deep-link from our widget into our app:
.systemSmallwidgets are one large tap area.systemMediumand.systemLargecan use the new SwiftUILinkAPI to create tappable zones within the widget.
To add deep links into our app, we use the .widgeturl(_:) modifier.
In our app then we apply the new .onOpenURL(perform:) to the right view to manage deeplinks.
