Overview
This detailed guide explains everything you need to know to contribute to the WWDC Notes project. Anyone with a Mac can help, your experience level doesn’t matter. Our goal is to cover 100% of all WWDC sessions with notes to save developers time. We can’t reach that goal without your help, so thank you for contributing!
Introduction
Creating notes for a WWDC session is as simple as writing some basic Markdown, a super simple text format. Markdown allows you to easily create titles, lists and code blocks. And Xcode will show you a live preview of how things will look on the website, which also means you get live feedback about broken links to images if you misspelled the file name.
WWDC Notes is using Swift-DocC, Apples own Markdown documentation renderer, to generate this website. Here are Apples official short guides to get you started:
Note that while it’s possible to provide image variants at different resolutions and for dark mode, most notes will probably just need a simple singular image. No need to overcomplicate things.
Useful DocC Directives
You can also use the @Image directive of DocC to include images rather than using Markdown:
@Image(source: "Name-of-Image-File", alt: "Optional image description.")To place an image side by side with some text (like done in the Getting Started section below), you can utilize the @Row and @Column directives:
@Row(numberOfColumns: 3) {
   @Column(size: 2) {
      Some markdown text with full support for:

      - [Links](https://wwdcnotes.com)
      - Lists
      - **Bold text**
      - And more!
   }

   @Column(size: 1) {
      @Image(source: "Contributing-Row-Column-Example")
   }
}
You can even put contents like images in separate tabs to better highlight differences, see Demystify SwiftUI containers for an example use case:
@TabNavigator {
   @Tab("Variant 1") {
      @Image("WWDC24-101-Variant1", alt: "Optional description")
   }

   @Tab("Variant 2") {
      @Image("WWDC24-101-Variant2", alt: "Optional description")
   }

   @Tab("Variant 3") {
      @Image("WWDC24-101-Variant3", alt: "Optional description")
   }
}
Use the @Video directive to show short videos showcasing things like animations, see Whats new in SF Symbols 6 for an example use case:
@Video(source: "WWDC24-10188-Variable-Color", alt: "Optional video description.")Comments can be added with the @Comment directive like so:
@Comment { This text will not be rendered on the final page. }If you want to link to other sessions, you can use the <doc:name-of-other-session> directive which even gives you auto-completion while you’re typing the name of the session (without whitespaces). For example, the above ‘What’s New in SF Symbols 6’ link was created via <doc:WWDC24-10188-Whats-new-in-SF-Symbols-6> under the hoods.
Getting Started
The first step to edit or create notes is to check out the WWDCNotes Git repository. The easiest way to do this is to press the “Clone Repo in Xcode” button at the top of this page. Then, just confirm the main branch and choose the folder you want to clone it to. Alternatively, you can manually clone the repository from GitHub and open the project in Xcode.
From there, there are two possible paths for you:
If you already know which session you want to provide notes for, you can simply search for the session title by using
Cmd+Shift+Oin Xcode and open the note. We auto-generate a page for every session, so there should be at least an empty file with stubs. When entering your search query, avoid whitespaces. For example, when looking for ‘Migrate your app to Swift 6’, enter something like ‘migrateswift6’ – Xcodes fuzzy matching doesn’t ignore whitespaces (yet).If you’re looking for sessions that have no notes yet, check out this page which lists all missing notes.
If the WWDC week just recently happened (= less than 2 weeks ago), then please additionally look into this discussion to avoid ongoing work in parallel on the same session.
Once your note is written, you need to create a Pull Request on GitHub to get your changes onto this website. Detailed Steps:
Add your GitHub handle into the
@GitHubUser(<replace this with your GitHub handle>)stub (e.g.@GitHubUser(Jeehut))Commit your changes locally in Xcode (see Apple’s Guide)
Fork the WWDCNotes repo on GitHub
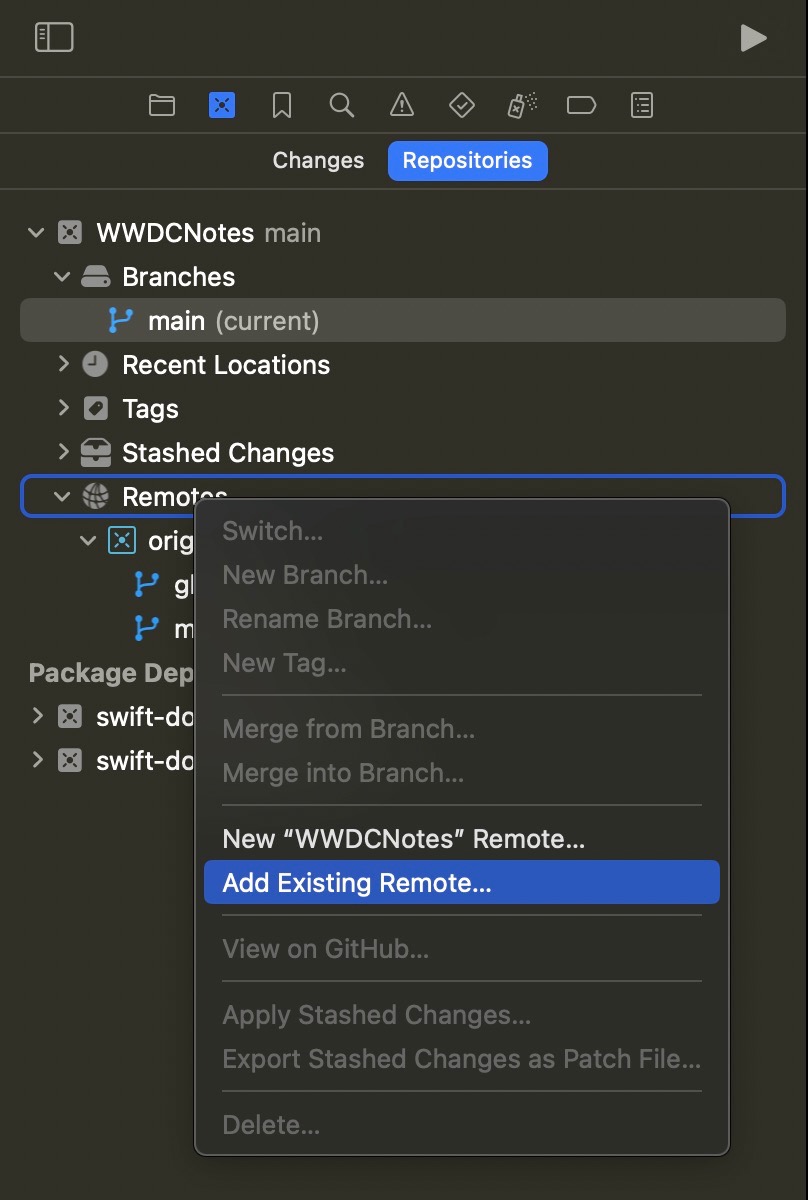
Add your fork as another remote in Xcode (see image →/↓)
Push your local changes to the fork
Open your forks’ GitHub page, navigate to “Pull Requests” and press “New pull request”
Make sure the correct branch is selected in your repo, then press “Create pull request”
Adjust the title to either “Create note ‘<Session Title>’” or “Update note ‘<Session Title>’” and press “Create” 🎉
Now one of the WWDC Notes maintainers will review your note, leave feedback if needed, or directly merge it. Thank you for your help!
Live Previews in Xcode
To preview a note in Xcode while editing it, you need to open the Assistant Editor. Just hold all three keys left of the space bar on your keyboard (⌃ ⌥ ⌘) and press the ⏎ return key to toggle the Assistant Editor.

Sometimes the Assistant Editor might not refresh or show a blank screen. In those cases, you can quickly close & reopen the Assistant Editor by using the shortcut twice. And make sure that “Documentation Preview” is selected in the Dropdown at the top of the Assistant Editor.
Image Name & Format
Place images always in the folder with the same name as the session Markdown file.
Please avoid whitespaces in image file names. The web renderer doesn’t handle them well.
Prefix your image file names with the year and number of the session, e.g.
WWDC23-10187-Image.Avoid adding high-res PNG images. Prefer JPEG (if possible) and resolutions <= 1600 pixels.
Simply (batch-)convert images to JPEG (large) via the Quick Actions menu in Finder.
Structure & Length
Besides the technical requirements from using DocC, there are no strict rules for note-taking. Everyone learns and prioritizes differently. Focus on creating notes that you personally find useful for each session.
You can look at existing notes for inspiration, but remember that sessions vary. Some are broad overviews, while others are deep dives into specific topics. If you skip sections of a video because they’re not relevant, document that in the notes so others can fill in the gaps.
There isn’t one right structure or length for all notes. Don’t feel obliged to follow a specific style or length. Create notes that will be most beneficial to you in the future, as this will likely be helpful to others too. The goal is to make useful notes. Generally, concise notes are more helpful than overly detailed ones, but there are exceptions.
Guidelines
Having this said, there are a few guidelines that make sure that what we are hosting are notes:
While quoting of individual phrases is fine, don’t quote entire blocks of text.
While taking individual screenshots of the sessions is fine, avoid creating a picture book.
Avoid screenshots where the presenters are front and center – focus on the contents instead.
While a short personal take can help clarify context, stay close to the session in general.
Community Support
If you still have any questions after reading this guide, or need help with Markdown, DocC, or Git, join our friendly Slack community! Experienced contributors and maintainers are ready to help:
Key Takeaways
This step is completely optional. If you are short on time, feel free to skip it.
To save developers even more time, we try to provide a “Key Takeaways” section at the very top of every note. The goal is to keep this summary as short as ~250 characters so the takeaways can be posted on X and Mastodon with the session title and a link to the note added. See this thread on X or this thread on Mastodon for examples of key takeaways of WWDC23. And don’t forget to add - in front of each line to make it a list.
You can use this online tool to check the length. Don’t forget to prepend the session title on an extra line for the check and keep the total characters at 252 (28 chars are reserved for the link).
The takeaways section should not contain any links. It is good practice to provide a fitting Emoji for every point listed. In the best case, the list is followed by 4 images that help summarize the session together with the points listed. Place the images in a grid like so:
@Row {
   @Column {
      @Image(source: "WWDC23-101-Overview1")
   }
   @Column {
      @Image(source: "WWDC23-101-Overview2")
   }
}
@Row {
   @Column {
      @Image(source: "WWDC23-101-Overview3")
   }
   @Column {
      @Image(source: "WWDC23-101-Overview4")
   }
}