Video profiles
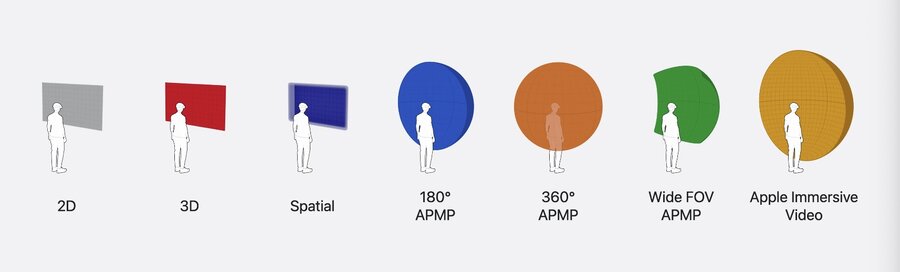
New: 180º, 360º, and wide FOV supported besides 2D, 3D, Spatial, and Apple Immersive Video
Quick Look: Use to quickly present any kind of media, including immersive video
AVKit: Consistent video experience on all platforms with enhanced playback options
RealityKit: Designed for apps with one-of-a-kind immersive playback experience
WebKit and Safari: See Whats new for the spatial web
Learn more: Explore video experiences for visionOS
Playback in Quick Look and AVKit
Quick Look
PreviewApplication: Out-of-process window for media presentation – now supports immersive video formatsQLPreviewController: Preview media in apps window or modally – now supports spatial photos & videos
Learn more in Discover Quick Look for spatial computing and Whats new in Quick Look for visionOS.
AVKit
AVExperienceController: New.immersiveexperience besides.expandedBy default,
expandedcan now transition toimmersive, but configurable
To disable automatic transition to immersive:
import AVKit

let controller = AVPlayerViewController()

let experienceController = controller.experienceController
experienceController.allowedExperiences = .recommended(including: [.expanded, .immersive])

experienceController.configuration.expanded.automaticTransitionToImmersive = .none

await experienceController.transition(to: .expanded)
Also new
Configuration.Placementwith options.unspecifiedand.over(scene:)
To transition to immersive with placement configuration:
import AVKit

let controller = AVPlayerViewController()

let experienceController = controller.experienceController
experienceController.allowedExperiences = .recommended(including: [.immersive])

let myScene = getMyPreferredWindowUIScene()
experienceController.configuration.placement = .over(scene: myScene)

await experienceController.transition(to: .immersive)
Use the
AVExperienceController.Delegateprotocol to handle transition experiencesdidChangeAvailableExperiencesnotifies when possible available experiences changeprepareForTransitionUsingnotifies when experience controller is about to transition (last chance to prepare)didChangeTransitionContextnotifies when transition to new experience has finalizedUse
didChangeAvailableExperiencesto determine whether immersive experience is available
Checkout sample code to learn more.
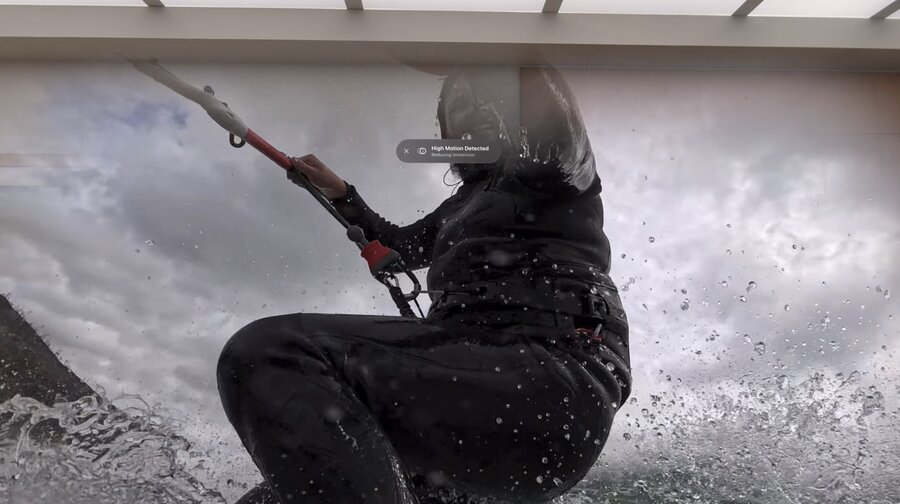
Comfort mitigation
Substantial camera motion now auto-detected in APMP profile content using QuickLook & AVKit
Automatically reduces immersion level to avoid sickness, adjustable by user in Settings app
Custom playback in RealityKit
Use RealityKit for custom playback, like video in an immersive game, or rendering video with custom UI
RealityKit now supports native playback of immersive video
Progressive immersion
Use
VideoPlayerComponentfor rendering video with immmersive modes – mesh updates & animations auto-handledLearn more: Enhance your spatial computing app with RealityKit
Now also supports same 180/360/Wide FOV formats like QuickLook and AVKit

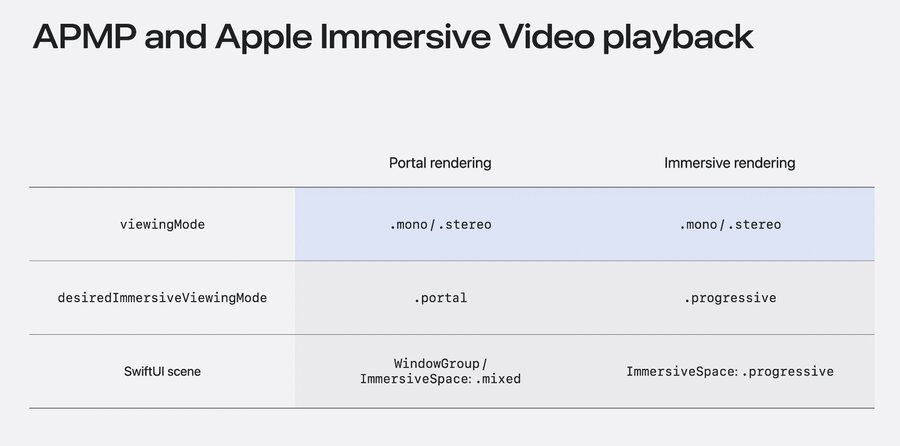
Portal mode renders video in a windows presentation
Progressive mode is new, allows people to dial own immersion level with digital crown
Progressive with 100% immersion equal to full immersive viewing mode
Progressive is preferred over full immersive viewing mode for APMP & Apple Immersive video
To render a video in portal mode:
import AVFoundation
import RealityKit
import SwiftUI

struct PortalVideoView: View {
    var body: some View {
        RealityView { content in
            guard let url = URL(string: "https://cdn.example.com/My180.m3u8") else { return }
            let player = AVPlayer(playerItem: AVPlayerItem(url: url))
            let videoEntity = Entity()
            var videoPlayerComponent = VideoPlayerComponent(avPlayer: player)
            videoPlayerComponent.desiredImmersiveViewingMode = .portal  // set to .progressive if desired
            videoEntity.components.set(videoPlayerComponent)
            videoEntity.scale *= 0.4  // 1m height by default, scaling to 0.4m – no effect with .progressive
            content.add(videoEntity)
        }
    }
}
To use the .progressive mode, the view has to be put into an ImmersiveSpace with `.progressive style:
import AVFoundation
import RealityKit
import SwiftUI

@main
struct ImmersiveVideoApp: App {
    var body: some Scene {
        ImmersiveSpace {
            ProgressiveVideoView()
        }
        .immersionStyle(selection: .constant(.progressive(0.1...1, initialAmount: 1.0)), in: .progressive)
    }
}
This code allows immersion from 10% to 100% and starts with 100% initially.
Learn more: Dive deep into volumes and immersive spaces
To transition between portal & immersive viewing modes, wait for
VideoPlayerEvents.ImmersiveViewingModeDidChangeToggle scene/UI visibility upon
VideoPlayerEvents.ImmseriveViewingMode(Will|Did)Transitionto reduce motionLearn more in this sample code project
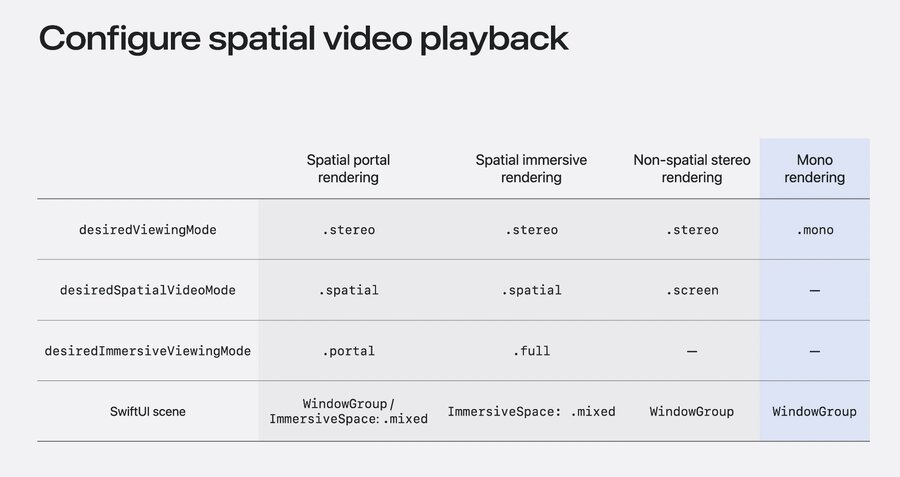
Spatial video rendering
For spatial styling set
VideoPlayerComponent.desiredSpatialVideoModeto.spatialRead
VideoPlayerComponent.spatialVideoModeto learn how it is currently being rendered.spatialsupports both .portal and .full immersive viewing modesSet to
.screen(which is default) to use traditional stereo on a screen meshSubscribe to
VideoPlayerEvents.SpatialVideoModeDidChangeevent or observe to get notified on changes
Render a spatial video in portal mode like this:
import AVFoundation
import RealityKit
import SwiftUI

struct PortalSpatialVideoView: View {
    var body: some View {
        RealityView { content in
            let url = Bundle.main.url(forResource: "MySpatialVideo", withExtension: "mov")!
            let player = AVPlayer(url: url)
            let videoEntity = Entity()
            var videoPlayerComponent = VideoPlayerComponent(avPlayer: player)
            videoPlayerComponent.desiredViewingMode = .stereo
            videoPlayerComponent.desiredSpatialVideoMode = .spatial
            videoPlayerComponent.desiredImmersiveViewingMode = .portal  // can also be .full for .spatial
            videoEntity.components.set(videoPlayerComponent)
            videoEntity.scale *= 0.4  // not needed when set to .full
            content.add(videoEntity)
        }
    }
}
For .full viewing mode set videoEnity.position to something like [0, 1.5, -1] for a meter forward (or head anchor), and put view into an ImmsersiveSpace like this:
import AVFoundation
import RealityKit
import SwiftUI

@main
struct SpatialVideoApp: App {
    var body: some Scene {
        ImmersiveSpace {
            ContentSimpleView()
        }
        .immersionStyle(selection: .constant(.mixed), in: .mixed)
        .immersiveEnvironmentBehavior(.coexist)
    }
}
Comfort mitigation
RealityKit automatically applies comfort mitigation during playback for APMP videos
New
VideoPlayerEvents.VideoConfortMitigationDidOccurevent signals upon detectionOnly applied for
.progressiveviewing mode (not.full), not needed for.portalUse
VideoPlayerEvents.ContentTypeDidChangeevent to detect kind of video – react to update UI
SwiftUI integration
Managing scale of a mesh important for placing media alongside UI
In portal mode, mesh size reflected by
VideoPlayerComponent.playerScreenSizeDefault height is 1m – make sure to scale always with keeping aspect-ratio intact
Window scenes smaller than 1m in height will cause mesh to be clipped (unless entity scaled down)
Scaling can be done based on windows size using
GeometryReader3DSee this sample project for an example of scaling to fit scene
Add a
ModelSortGroupComponentto the entity withModelSortGroup.planarUIto avoid inambiguity
Next steps:
