Overview
Alarm is a permanent alert for pre-determined timely alerts, based on schedule or countdown
Breaks through silent mode and focus, therefore users have to consent a permission dialog
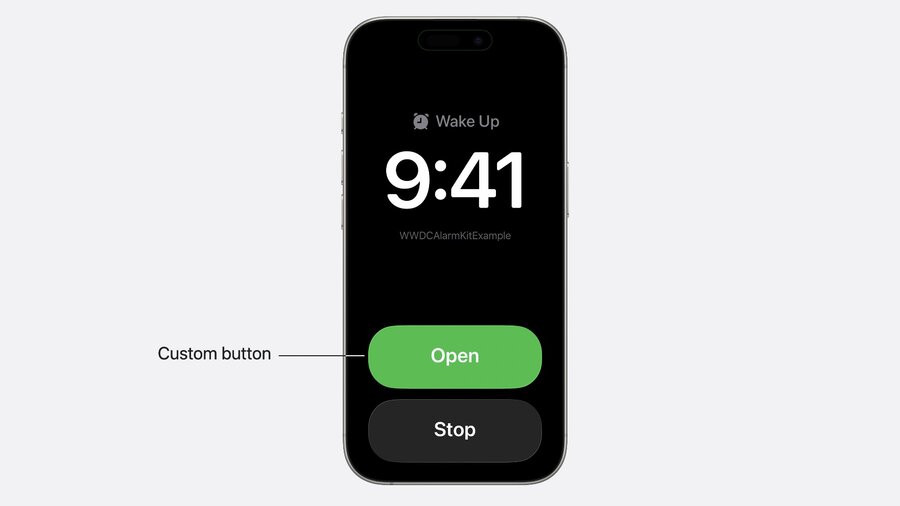
Constists of: Title, app name, stop button, optional snooze button – alternatively custom button
Alarms also supported in Standby and on Apple Watch
Custom countdown interface using live activities supported, too (lock screen, dynamic island, standby)
Authorization
Request authorization manually via
AlarmManageror automatically (upon creating first alarm)Users can change authorization in Settings app anytime
Add
NSAlarmKitUsageDescriptionto your Info.plistCheck state via
AlarmManager.shared.authorizationStatelike here:
import AlarmKit

func checkAuthorization() {

  switch AlarmManager.shared.authorizationState {
    case .notDetermined:
      // Manually request authorization
    case .authorized:
      // Proceed with scheduling
    case .denied:
      // Inform status is not authorized
  }

}
Creation
Countdown duration
You can specify a countdown duration for before and after the alert:
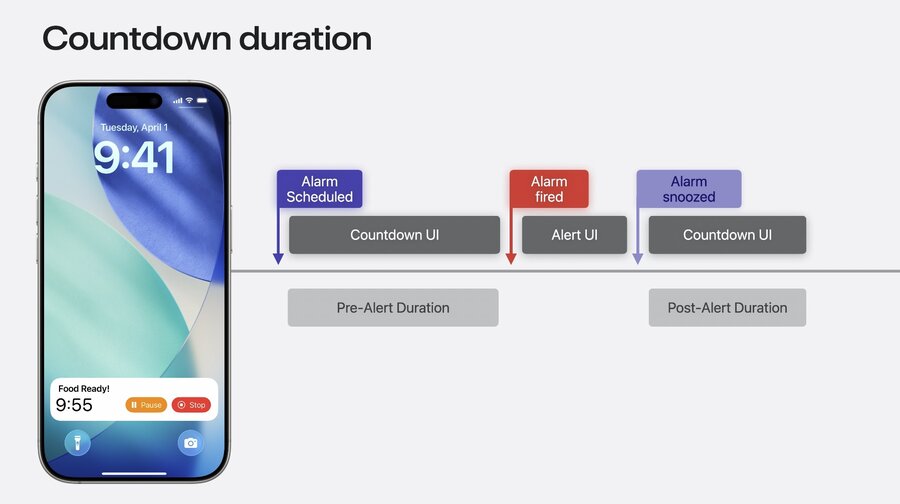
Set it like this:
import AlarmKit

func scheduleAlarm() {
  /* ... */
  let countdownDuration = Alarm.CountdownDuration(preAlert: (10 * 60), postAlert: (5 * 60))
  /* ... */
}
Schedule
Schedules can be fixed or relative
A fixed schedule alarm is set to an absolute specific date that doesn’t react to timezone changes
Use a relative schedule to account for timezone changes
import AlarmKit

func scheduleAlarm() {
  /* ... */
  let keynoteDateComponents = DateComponents(
    calendar: .current,
    year: 2025,
    month: 6,
    day: 9,
    hour: 9,
    minute: 41)
  let keynoteDate = Calendar.current.date(from: keynoteDateComponents)!
  let scheduleFixed = Alarm.Schedule.fixed(keynoteDate)
  /* ... */
}
import AlarmKit
func scheduleAlarm() {
/* ... */¥
let time = Alarm.Schedule.Relative.Time(hour: 7, minute: 0)
let recurrence = Alarm.Schedule.Relative.Recurrence.weekly([
.monday,
.wednesday,
.friday
])
let schedule = Alarm.Schedule.Relative(time: time, repeats: recurrence)
/* ... */
}Appearance
Create
AlarmButtonwhich takestext,textColor, andsystemImageName(symbol used in dynamic island)Create an
AlarmPresentation.Alertwhich takestitleandstopButton(theAlarmButton)Extra rendering information provided via
AlarmAttributes, containing the alarm presentation, andtintColorPut everything into an
AlarmConfiguratonwhich takescountdownDurationandattributes
Actions
You can create another
AlarmButtonsuch as for Snooze/Repeat etc.Pass it to
AlarmPresentation.Alertinitializer viasecondaryButtonandsecondaryButtonBehaviorYou can pass
.countdownto the latter parameter, or a custom behaviorTo use countdown functionality, you’re required to provide a live activity for it
Learn more: Meet ActivityKit
Code sample:
import AlarmKit
import ActivityKit
import WidgetKit

struct AlarmLiveActivity: Widget {
  var body: some WidgetConfiguration {
    ActivityConfiguration(for: AlarmAttributes<CookingData>.self) { context in
      switch context.state.mode {
      case .countdown:
        countdownView(context)
      case .paused:
        pausedView(context)
      case .alert:
        alertView(context)
      }
    } dynamicIsland: { context in
      DynamicIsland {
        DynamicIslandExpandedRegion(.leading) {
          leadingView(context)
        }
        DynamicIslandExpandedRegion(.trailing) {
          trailingView(context)
        }
      } compactLeading: {
        compactLeadingView(context)
      } compactTrailing: {
        compactTrailingView(context)
      } minimal: {
        minimalView(context)
      }
    }
  }
}
Conform a struct to the
AlarmMetadataprotocol to pass custom metadata to the context attributesThis is how you can add extra UI to give context about your alarm (such as “Fry”)
Sometimes (like until device is unlocked upon restart) live activity will not be available
Use
AlarmPresentation.Pausedfor a paused state in system alarm UI, add to attributesThe tint color is used to associate your alarm to your app, passed as part of attributes
For custom buttons, you need to specify an (open) app intent like this:
public struct OpenInApp: LiveActivityIntent {
    public func perform() async throws -> some IntentResult { .result() }

    public static var title: LocalizedStringResource = "Open App"
    public static var description = IntentDescription("Opens the Sample app")
    public static var openAppWhenRun = true

    @Parameter(title: "alarmID")
    public var alarmID: String

    public init(alarmID: String) {
        self.alarmID = alarmID
    }

    public init() {
        self.alarmID = ""
    }
}
Sound
Default system sounds useds if nothing specified, providing custom sound is possible
Define custom sound by using
AlertConfiguration.AlertSound.namedFile must be in apps main bundle or library sounds folder in app container
Pass it to the
soundparameter of theAlarmConfiguration
Lifecycle
Schedule an alarm using
AlarmManager.shared.schedulewith anidand theconfigurationYou can adjust the countdown, or cancel, stop, pause, and resume it programmatically
Best to use for things like a cooking timer or wake up alarm
Not a replacement for critical alerts or time-sensitive notifications
Make sure to keep things clear, in your button titles and in your live activity
Author note: AlarmKit is only available on iOS, iPadOS, and Mac Catalyst
