
Key Takeaways
On-device inference framework for Apple Intelligence
Convert PyTorch models to .aimodel with coreai-torch
Run via AIModel, InferenceFunction, NDArray
Cut latency with KV cache and AOT compilation
Presenters
Ben Levine, Core AI Engineer
What is Core AI?
Core AI is the inference framework powering on-device Apple Intelligence
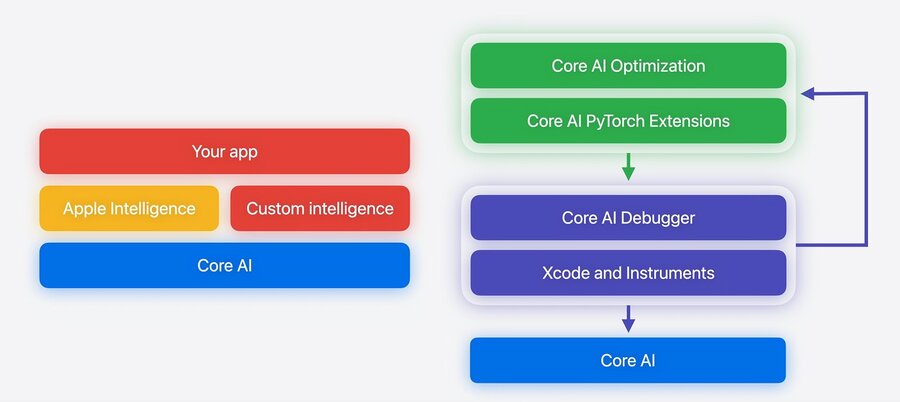
It covers the whole model deployment lifecycle
Swift API surface for loading and running Core API models
Runs locally on device, private, and free (no server cost)
Model authoring
Core AI is designed to support iteration (try things → evaluate by requirements → refine)
Covers the deployment lifecycle — convert → optimize → verify → deploy
Convert a PyTorch model with the
coreai-torchPython packagetorch.exportto capture the graph (declaredynamic_shapesfor variable inputs) → run decompositions →TorchConverter→ save as a.aimodel
import torch
import coreai_torch
# Export the torch program (declare a dynamic input shape)
seq_len = torch.export.Dim("seq_len", min=1, max=256)
exported = torch.export.export(
    pt_model, args=(example,),
    dynamic_shapes={"features": {1: seq_len}}
)
exported = exported.run_decompositions(coreai_torch.get_decomp_table())

# Convert torch graph → Core AI graph, then save as a .aimodel
ai_program = coreai_torch.TorchConverter().add_exported_program(
    exported, input_names=["features"], output_names=["logits"],
).to_coreai()
ai_program.save_asset("SnakeTransformer.aimodel")
Verify with the Core AI Python bindings that the converted numerics match the original before deploying
import torch
import numpy as np
from coreai.runtime import AIModel, NDArray

pt_model = SnakeTransformer().load_checkpoint("snake.pt")
ai_model = await AIModel.load("SnakeTransformer.aimodel")
function = ai_model.load_function("main")

# PyTorch reference vs Core AI inference
with torch.no_grad():
    pytorch_logits = pt_model(torch.from_numpy(features)).numpy()[0, -1]
result = await function({ "features": NDArray(data=features) })
coreai_logits = result["logits"].numpy()[0, -1]

# Validate they match
max_diff = np.max(np.abs(pytorch_logits - coreai_logits))
assert max_diff < 0.01
App integration with Core AI Model
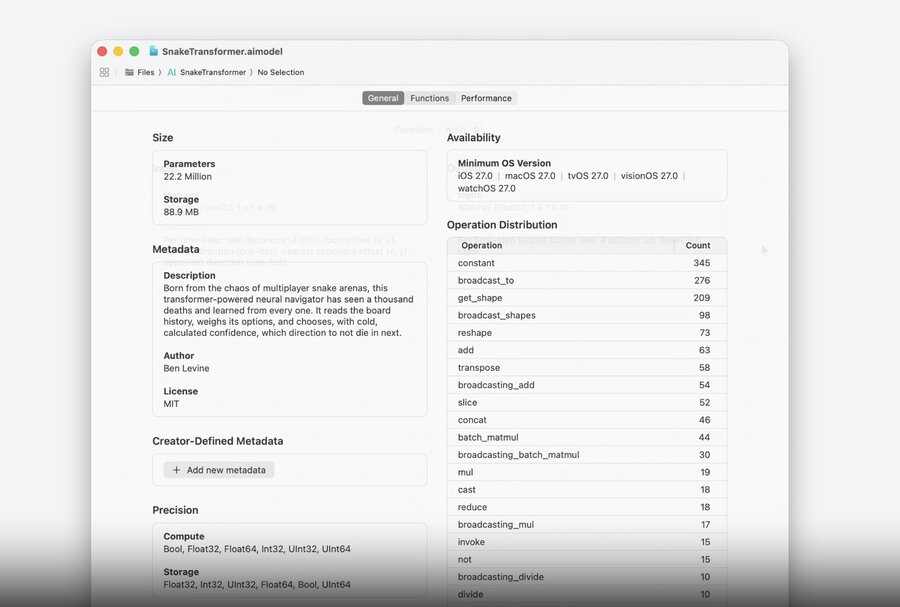
Step 1. Open the AI model file with Xcode
Add the
.aimodelto your project and open it to inspect size, op distribution, metadata, and each function’s signatureAhead-of-time compilation and optimization happen automatically at build time
Step 2. Use the Core AI framework to run the model
Three core types
AIModel: loaded from the.aimodelURL; used to inspect and load inference functionsInferenceFunction: a runnable object representing a single loaded compute graph (usually onemain)NDArray: holds multi-dimensional input and output data
Flow: load
AIModel→loadFunction(named:)→ buildNDArrayinputs →run(inputs:)→ read outputs
import CoreAI

// Load the '.aimodel' file
let model = try await AIModel(contentsOf: modelURL)

// Load the main inference function
let mainFunction: InferenceFunction = try model.loadFunction(named: "main")!

// Construct the n-dimensional input data
let inputNDArray: NDArray = nextInput()

// Run inference
var outputs = try await mainFunction.run(inputs: ["input": inputNDArray])

guard let outputNDArray = outputs.remove("output")?.ndArray else {
    // Handle unexpected missing output
}
Real-world use: load the model once at init and keep the
InferenceFunctionto reuse for every prediction
struct ModelPlayer {
    let nextActionFunction: InferenceFunction

    init(modelURL: URL) async throws {
        let model = try await AIModel(contentsOf: modelURL)
        self.nextActionFunction = try model.loadFunction(named: "main")!
    }
}

extension ModelPlayer: SnakePlayer {
    mutating func chooseAction(game: SnakeGame) async throws -> Direction {
        // Create an NDArray for the next input and write board features into it
        var inputFeatures = NDArray(shape: [game.stepCount, hiddenDim], scalarType: .float32)
        writeFeatures(of: game, into: inputFeatures.mutableView())

        // Run inference and extract the expected logits output NDArray
        var outputs = try await nextActionFunction.run(inputs: ["features": inputFeatures])
        guard let logits = outputs.remove("logits")?.ndArray else {
            throw ModelError.missingOutput
        }

        return predictedDirection(from: logits.view())
    }

    func writeFeatures(of game: SnakeGame, into view: consuming NDArray.MutableView<Float>) { ... }
    func predictedDirection(from logits: NDArray.View<Float>) -> Direction { ... }
}
Optimizing performance
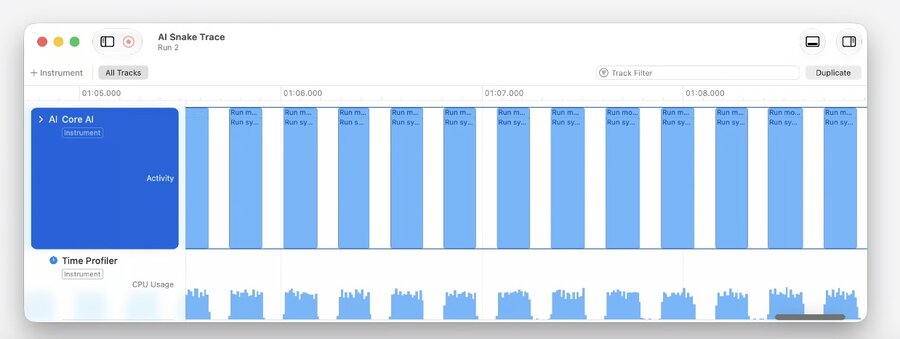
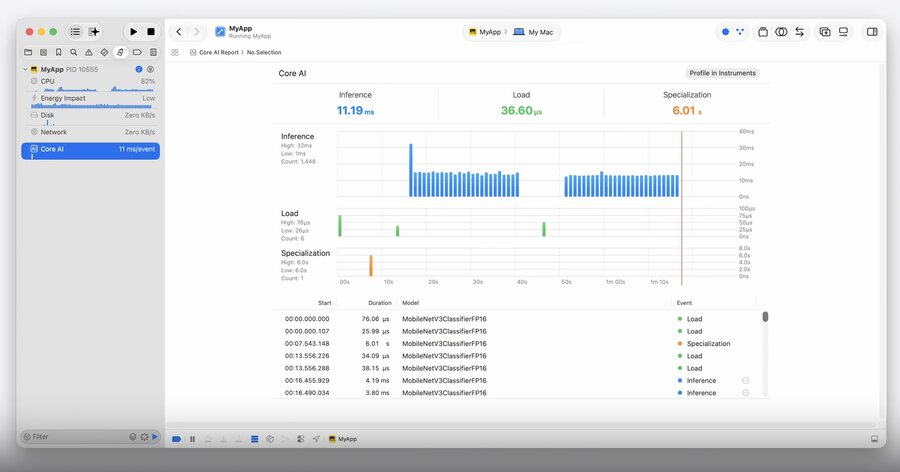
Profile model latency with the new Core AI instrument in Xcode
Key-value cache
Decoding loops (like transformers) recompute keys/values for tokens already seen → cache them to avoid redundant work and keep latency stable
Authoring (PyTorch): declare the caches with
register_bufferso the exported program treats them as mutable state
class SnakeTransformerStateful(nn.Module):
    def __init__(self, ...):
        super().__init__()
        self.register_buffer("k_cache", torch.zeros(N_LAYERS, 1, MAX_SEQ_LEN, D_MODEL))
        self.register_buffer("v_cache", torch.zeros(N_LAYERS, 1, MAX_SEQ_LEN, D_MODEL))
In
forward, read previous keys/values from the caches and write the updated ones backConversion: expose the buffers as named states via
state_names
ai_program = coreai_torch.TorchConverter().add_exported_program(
    exported,
    input_names=["features", "position_ids"],
    state_names=["keyCache", "valueCache"],
    output_names=["logits"],
).to_coreai()
App (Swift): add
NDArraystored properties for the caches (keyCache,valueCache), then pass them as mutable state views torun
extension ModelPlayer: SnakePlayer {
    mutating func chooseAction(game: SnakeGame, snakeID: Int) async throws -> Direction {
        var stateViews = InferenceFunction.MutableViews()
        stateViews.insert(&keyCache, for: "keyCache")
        stateViews.insert(&valueCache, for: "valueCache")

        // Run inference with the KV cache states
        var outputs = try await nextActionFunction.run(
            inputs: ["features": inputFeatures],
            states: stateViews)
        // …
    }
}
Additional features of Core AI
Directly authoring self model with
Core AI PyTorch ExtensionsOptimizing the model for Apple silicon with
Core AI OptimizationDefine custom kernel implementations with
Metal 4Learn more, Dive into Core AI model authoring and optimization
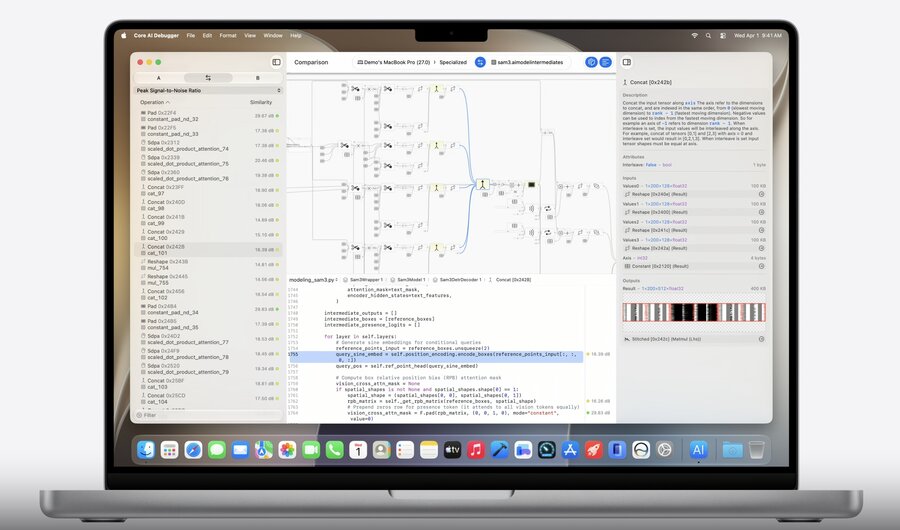
Debug the numerics of a converted model with the
Core AI Debugger
See streaming Core AI activity while the app runs with the
Core AI debug gauge
Specialization
A
.aimodelis device-independent → it must be specialized (compiled) for the target device before its first run, which can take a while for large modelsCore AI specializes lazily on first use and caches the result (later loads are fast); you control when it happens
Check the cache first, and if it isn’t ready, inform the user while it prepares
// Check if your model can be loaded from the cache
let cache = AIModelCache.default

guard let model = try cache.model(for: modelURL, options: .default) else {
    Task { @MainActor in
        informUser("Preparing AI features. This may take a while…")
    }
}
Or trigger specialization ahead of time (e.g. after downloading assets) so the first inference isn’t blocked
// Explicitly request specialization
try await AIModel.specialize(contentsOf: modelURL)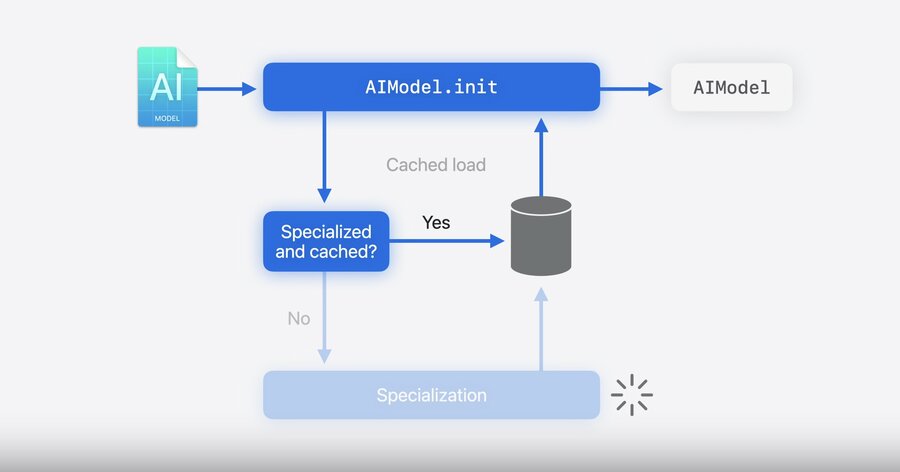
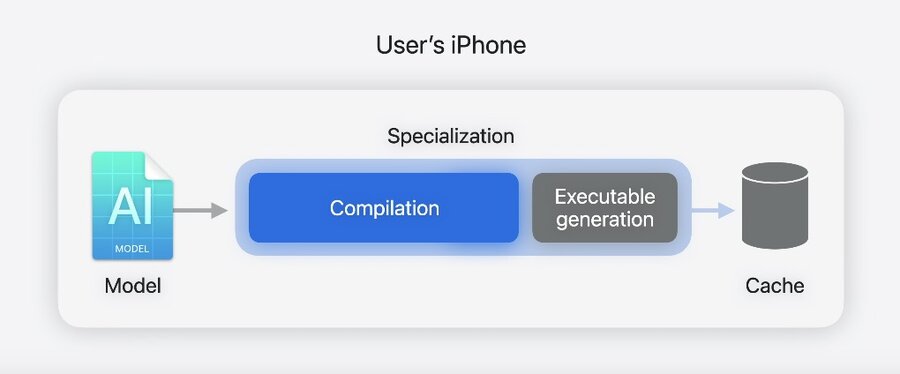
Specialization does two things: compilation (most of the cost — segment, plan, optimize) and executable generation (artifacts tied to the device and OS)
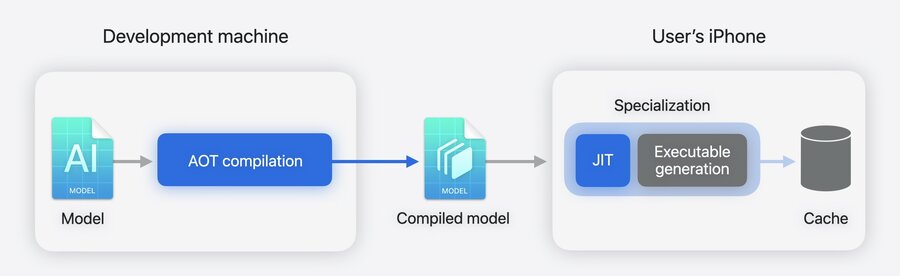
Shift that cost off-device with ahead-of-time (AOT) compilation → a pre-compiled model specializes much faster on the user’s device
Wrap up
Core AI runs on all Apple silicon: Python tools you already know, a modern Swift framework, and debugging tools
Explore the Core AI Models repository — popular models are one command away from being converted and optimized
Learn more in Dive into Core AI model authoring and optimization
