Grouped Notifications
Thread Identifier
Automatic Grouping (no need to do anything)
If you want your own custom group, you need to set the
UNMutableNotificationContent’s Thread Identifier property local notification:
let content = UNMutableNotificationContent()
content.title = "New Photo"
content.body = "Jane Doe posted a new photo"
content. threadIdentifier = "thread-identifier"
remote notification:
{
  "aps": {
    "alert": {
      "title": "New Photo",
      "body": "Jane Doe posted a new photo",
      "thread-id": "thread-identifier"
    }
  }
}
If you don’t have a notification Thread Identifier, all your notifications will be grouped in a group named after your app.
The Thread Identifier is never shown to the end user, it can be something meaningless (numbers, letters ..)
If your notification has a Thread identifier, all your notification will be grouped per thread identifier per app (different apps with the same thread identifier will be grouped in two different groups).
Obviously this means that you can get different groups for the same application
Multiple group usage example: The Message.app has one thread per chat, therefore multiple notifications from the same person will be grouped together
In the Settings.app the user can override the grouping behavior of our app
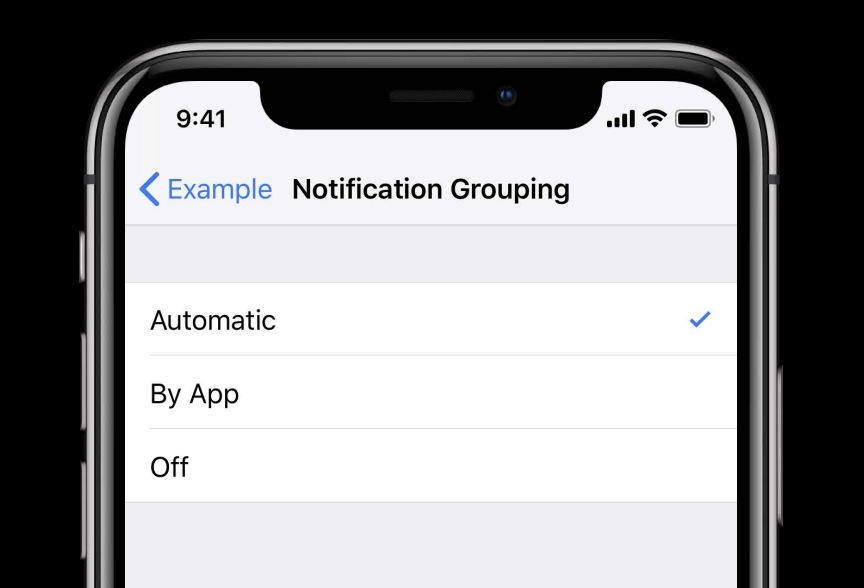
Automatic: our defined behavior
per app: grouped by app (ignores our thread identifiers)
off: no grouping at all
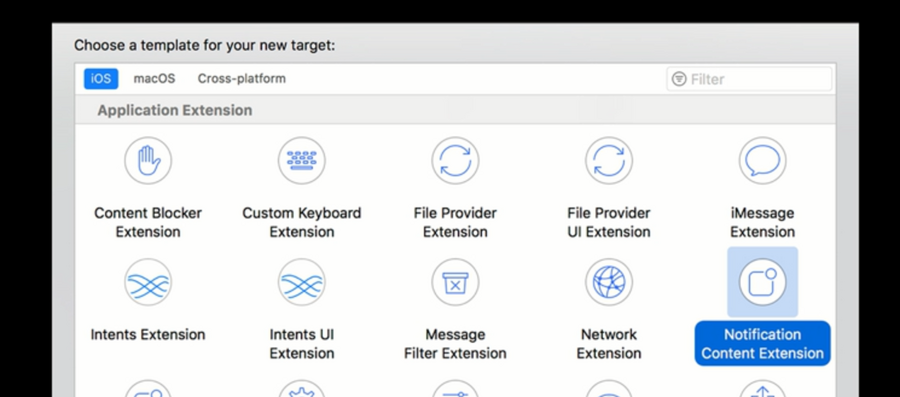
Notification Content Extension (from iOS 10)
Allows you to have rich notification (allows you to have custom and interactive notification)
In order to do so you need to create a new target:
This new target will create a
UIViewControllerthat will have adidReceive(notification:)function. This function is our entry point for setting up the view associated with the content extension, and we can use the notification object past here to get all the information around that notification to set up the custom view.info.plistoptionsIn the new target info.plist we need to set the category identifier, this has to match the category identifier of the notification request so iOS knows which content extension to launch with which notification. There are also other options as well:

Actions
We can set actions per notifications category as shown here:
let likeAction = UNNotificationAction(
  identifier: "like-action",
  title: "Like",
  options: []
)

let commentAction = UNTextInputNotificationAction(
  identifier: "comment-action",
  title: "Comment",
  options: [],
  textInputButtonTitle: "Comment",
  textInputPlaceholder: "Type here..."
  )

let category = UNNotificationCategory(
  identifier: "extension-example",
  actions: [likeAction, commentAction],
  intentIdentifiers: [],
  options: []
)

UNUserNotificationCenter.current().setNotificationCategories([category])
Two ways to react to actions:
Via
AppDelegate:
extension AppDelegate: UNUserNotificationCenterDelegate {
  func userNotificationCenter(
    _ center: UNUserNotificationCenter,
    didReceive response: UNNotificationResponse,
    withCompletionHandler completionHandler: () -> Void
  ) {
    // Handle action response here
  }
}
Via our Content Extension (note that the Content Extension can then forward the action to the app delegate. (but not viceversa)
class NotificationViewController: UIViewController,UNNotificationContentExtension {
  @IBOutlet var likeLabel: UILabel?

  func didReceive(
    _ response: UNNotificationResponse,
    completionHandler completion: (UNNotificationContentExtensionResponseOption)-> Void
  ) {
    if response.actionIdentifier == "like-action" {
      likeLabel?.text = "You liked this photo"
      likedPhoto()
    }
    completion( .doNotDismiss)
  }
}
(iOS 11) Actions Limitations:
not dynamic (can’t be updated)
tied to the category
(iOS 12) Actions Awesomeness:
extension NSExtensionContext {
  @available (iOS 12.0, *)
  var notificationActions: [UNNotificationAction]
}
Basically we can create new actions on the fly:
class NotificationViewController: UIViewController, UNNotificationContentExtension {
  func didReceive (
    _ response: UNNotificationResponse,
    completionHandler completion: (UNNotificationContentExtensionResponseOption) -> Void
  ) {
    if response. actionIdentifier == "like-action" {
      // Update state...
      let unlikeAction = UNNotificationAction(
        identifier: "unlike-action",
        title: "Unlike",
        options: []
      )
      let currentActions = extensionContext?.notificationActions
      let commentAction = currentActions![1]
      let newActions = [unlikeAction, commentAction]
      extensionContext?.notificationActions = newActions
    }
  }
}
…which means you can set the notifications actions directly on the content extension itself! So Actions are not tied any longer to the notification category but can change per notification
From iOS 12 you can now tap on the Custom notifications UI!
Just add this property in the
info.plist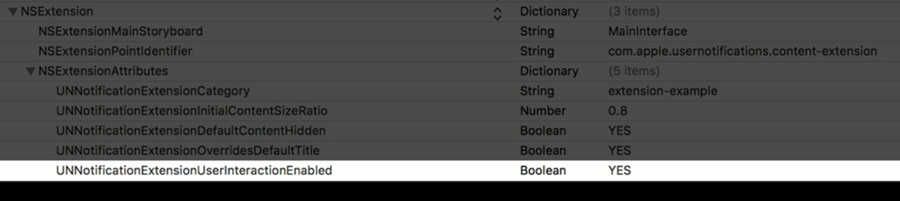
This basically removes the need of actions (at least in some kind of notifications): all interactions are just normal
UIKitinteractions etcLaunching the app from a notification
by default this is done when:
the user taps on the notification app icon

the user taps in the notification custom UI (when the user interactions are not enabled)
or via a default action
from iOS 12 we can do so programmatically as well (because we might want to launch the app after a user interaction) via:
extensionContext?.performNotificationDefaultAction()We launch the app
We call the Notification Center with
userNotificationCenter(_ center: UNUserNotificationCenter, didReceive response: UNNotificationResponse, withCompletionHandler completionHandler: () -> Void)where the response identifier isUNNotificationDefaultActionIdentifier
Dismissing the custom UI notification
by default we:
have a cross on the top right of the notification
can add an action do do so (completion block with
completion(.dismiss))
from iOS 12 we can do so programmatically via
extensionContext?.dismissNotificationContentExtension()- Note that this just dismisses the custom UI notification, it doesn’t withdraw the notification (aka the notification still exists).If we want to do so, we must use:
class UNUserNotificationCenter {
func removeDeliveredNotifications(withIdentifiers identifiers: [String])
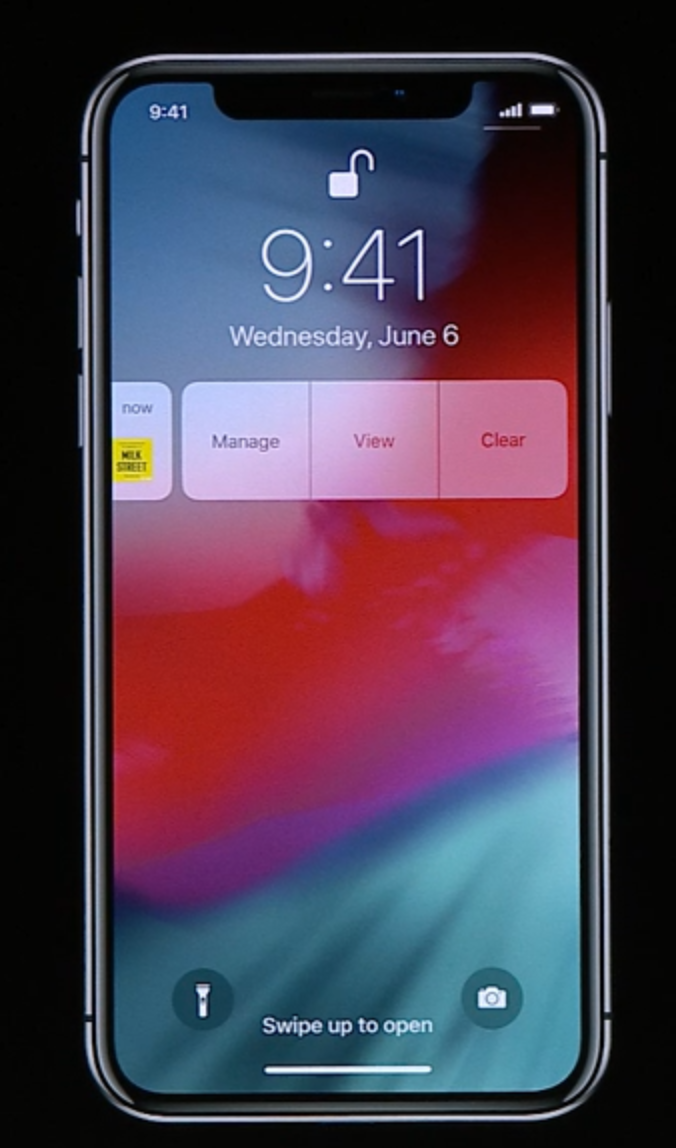
}Notification Management
Ways to Manage notification settings:
Via the Settings app (like iOS 11)
now users can manage notification settings directly in the lock screen, just swipe left:
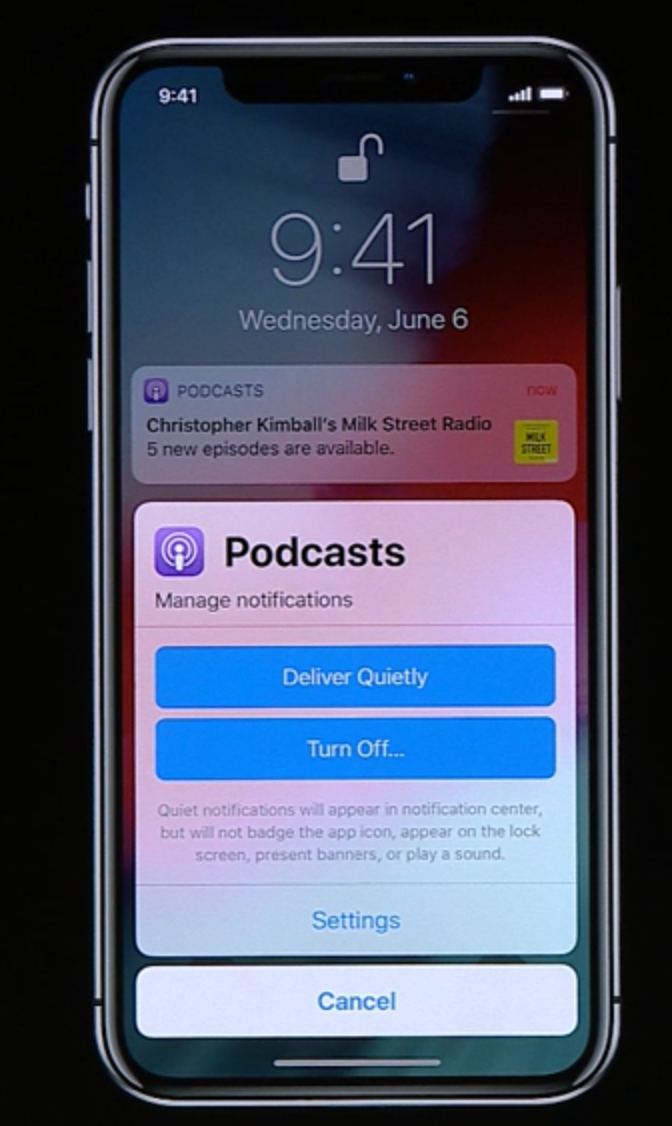
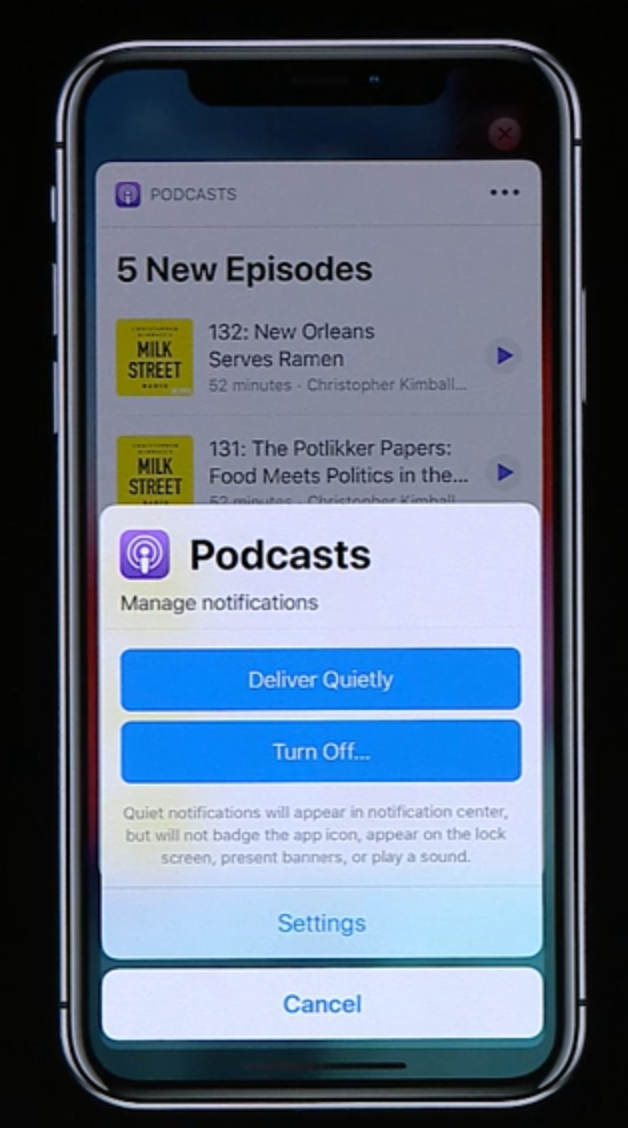
Another way to open the same dialog is opening a rich notification and the tapping the dots icon on the top right:
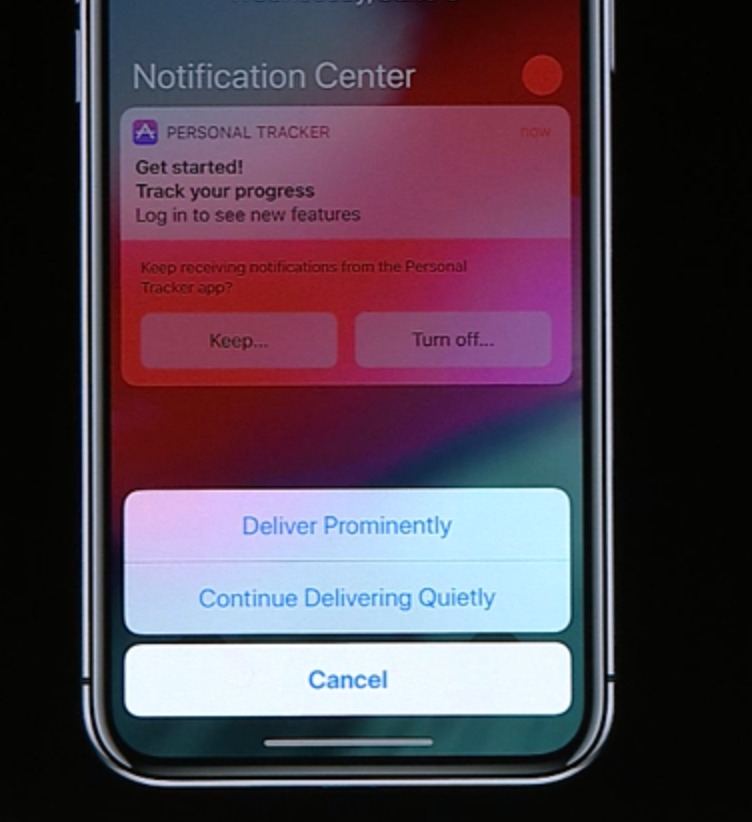
Depending on how much spam we send to the user, iOS might propose an even more easy way to manage our notifications:
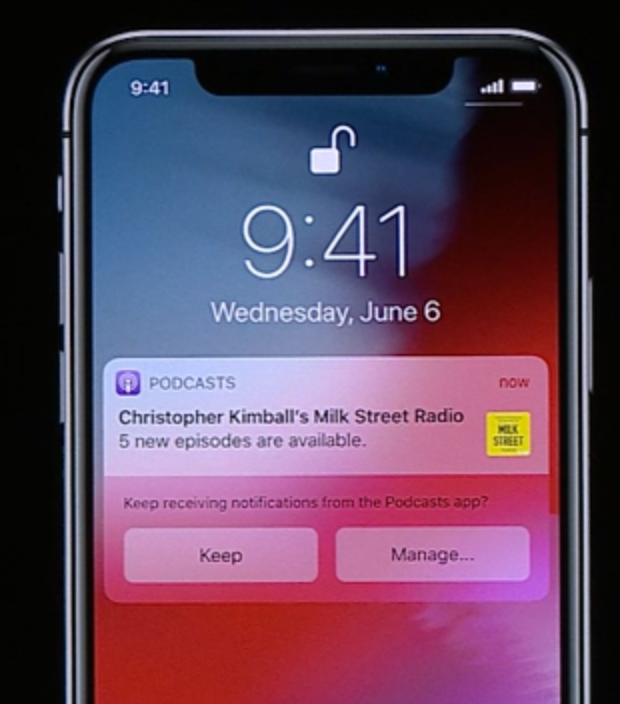
Two main ways that we should start thinking about notifications:
Deliver Prominently (the ones we used to until iOS 11):
show up on lock screen
show up in the notification center
play sound
show up as banner
increment the badge count
Deliver Quietly
only show up in the notification center
no sound
Custom Settings
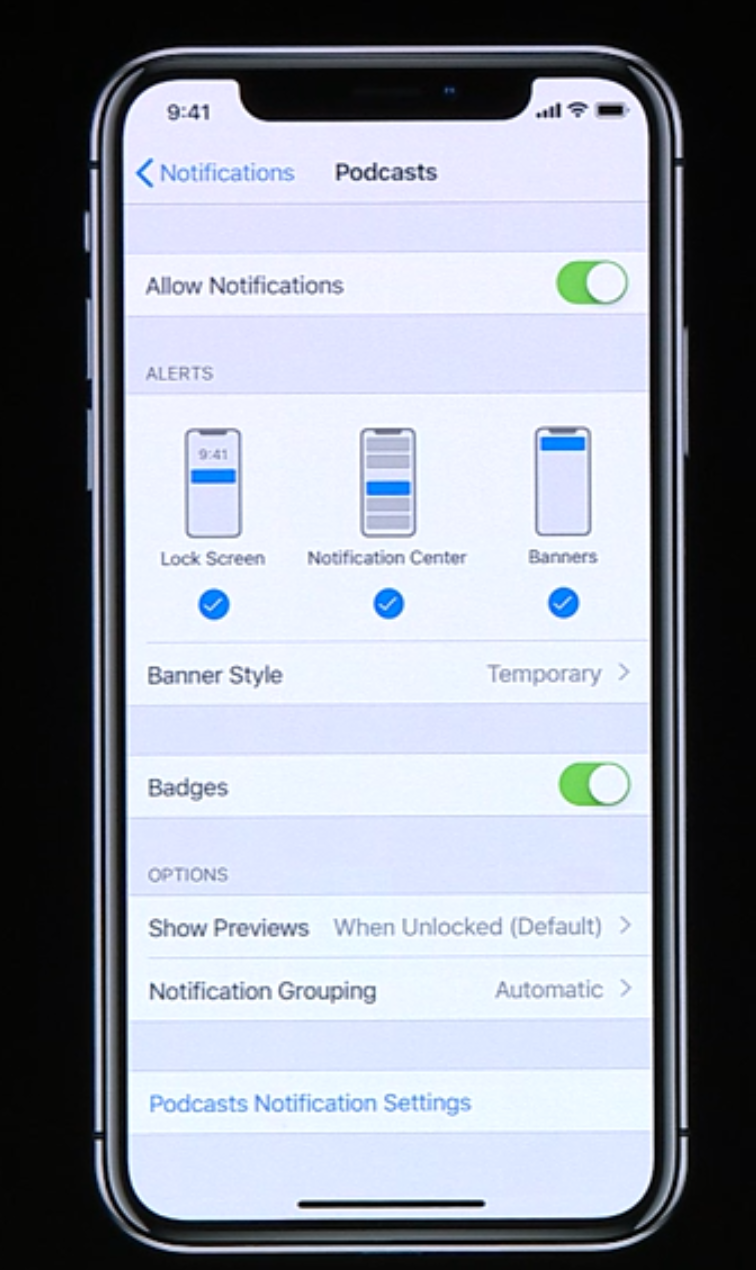
The sheet can also jump to a custom view controller within the app to further tweak/customize the notifications (for example a podcast app can let you choose for which podcasts you want the notification):
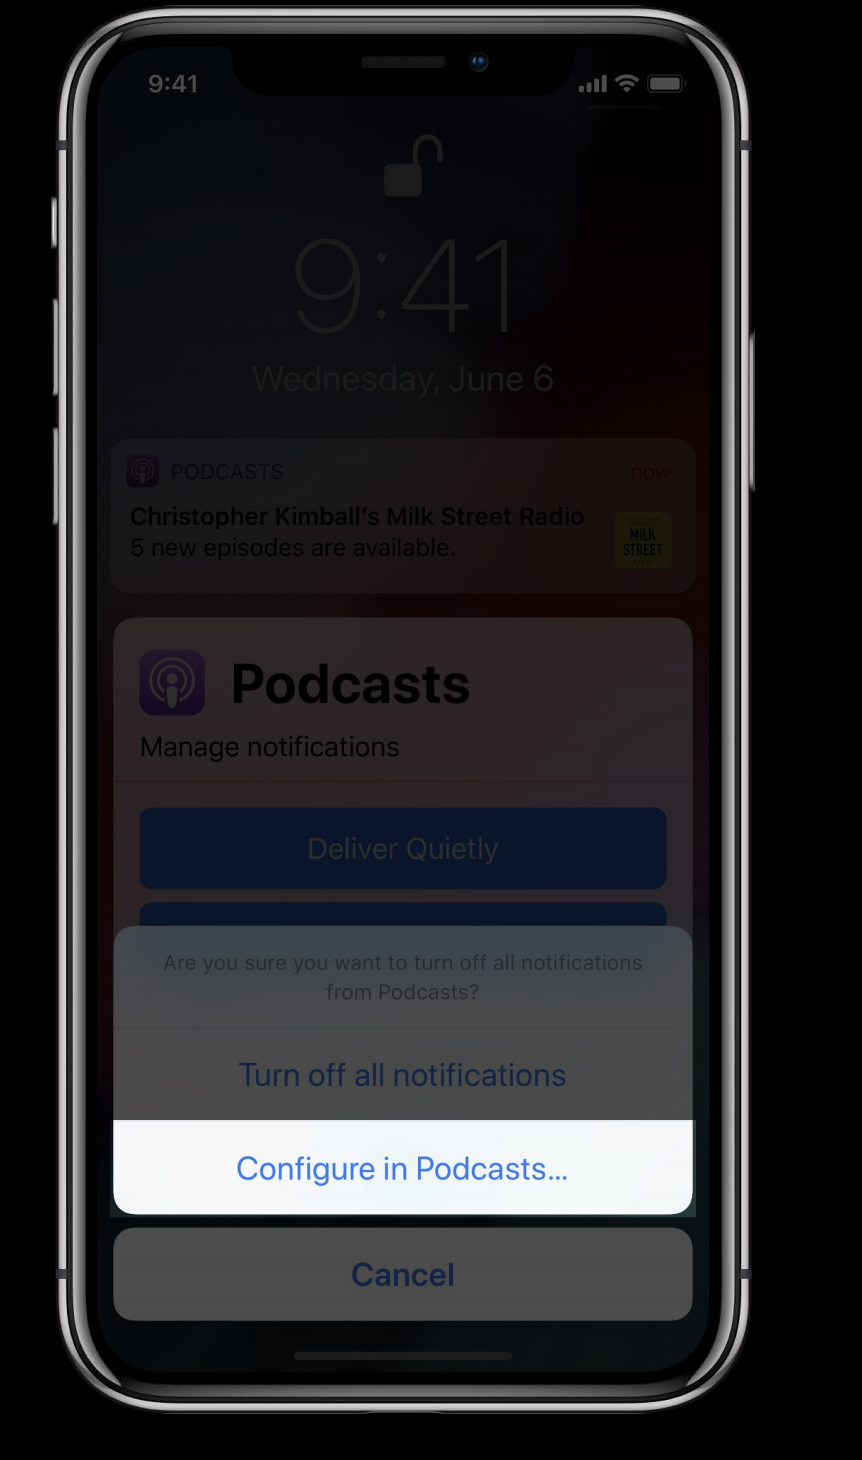
This link in your app can also be accessed from the settings app (look at the bottom of the pic):
Implementation via yet another method in the app delegate
import UIKit
import UserNotifications

class AppDelegate: UIApplicationDelegate, UNUserNotificationCenterDelegate {
  func userNotificationCenter(
    _ center: UNUserNotificationCenter,
    openSettingsFor notification: UNNotification?
  ) {
    // ..
  }
}
Provisional Authorization
before iOS 12 the only way to deliver notifications is to ask for authorization first, from iOS 12 we have an automatic trial, no authorization required….the only problem is that those notifications are delivered quietly
after receiving these, the user can choose to turn them off or keep them…and keep them receiving quietly or prominently:
to participate to this trial, all you need to do is add the
.provisionalqualifier option in addition to the usual options in your notification auth request and automatically you’ll join the trial
let notificationCenter = UNUserNotificationCenter.current()
notificationCenter.requestAuthorization(
options: [.badge, .sound, .alert, .provisional]
) {
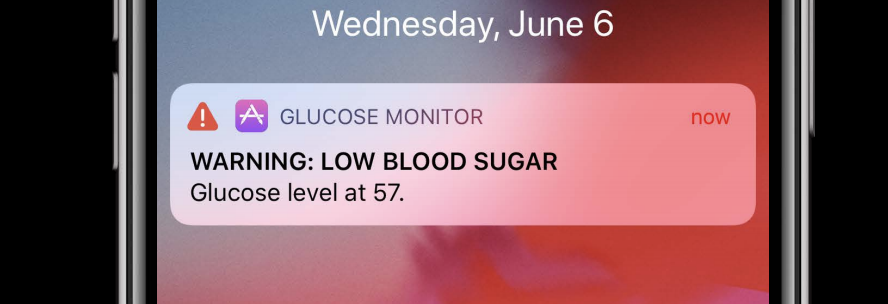
}Critical Alerts
these notifications break off the do not disturb mode, meaning the user will get them even when the user is in do not disturb mode.
should be used only for critical things, like health/home/security/public-safety notifications, not likes on Facebook.
These are the kind of alerts that always require the user to take an action immediately
They by-pass both the do-not-disturb and the ringer switch (didn’t know it was called that)
They are very disruptive
They can play custom sound
You need to apply for an entitlement to be able to send critical alerts
here’s how they look:
they even have their own setting in the settings.app:
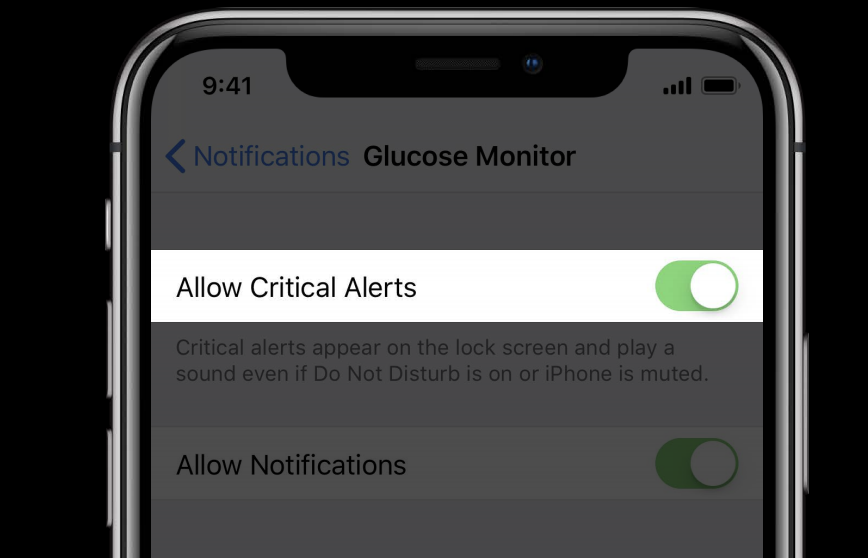
a user can choose to allow only critical alerts from one app, and not allow any other kind of alerts
we need to ask for permission (like any other thing) for critical notifications:
notificationCenter.requestAuthorization(
  options: [.sound, .badge, .alert, .criticalAlert]
) {
  // ..
}
the only difference with other alerts is the sound:
let content = UNMutableNotificationContent()
content.title = "WARNING: LOW BLOOD SUGAR"
content.body = "Glucose level at 57."
content.categoryIdentifier = "low-glucose-alert"
content.sound = UNNotificationSound.defaultCritical
// Or
content.sound = UNNotificationSound.criticalSoundNamed(@"warning-sound" withAudioVolume: 1.00)