Explore SwiftUI animation
 Cécile Lebleu
Description: Explore SwiftUI’s powerful animation capabilities and find out how these features work together to produce impressive visual effects. Learn how SwiftUI refreshes the rendering of a view, determines what to animate, interpolates values over time, and propagates context for the current transaction.
Speaker: Kyle Macomber, SwiftUI Engineer
This is an overview of SwiftUI's animation capabilities.
Anatomy of an update
SwiftUI tracks a view's dependencies, like state variables. When an event happens, an update transaction is opened. If any dependencies change, the view is invalidated, and at the end of the transaction, the framework calls body to refresh the rendering.
SwiftUI maintains a dependency graph that manages the lifetimes of views and their data, storing each piece of the UI in attributes. When state changes, the value of each attribute becomes stale, and the new view value is unwrapped to refresh the view.
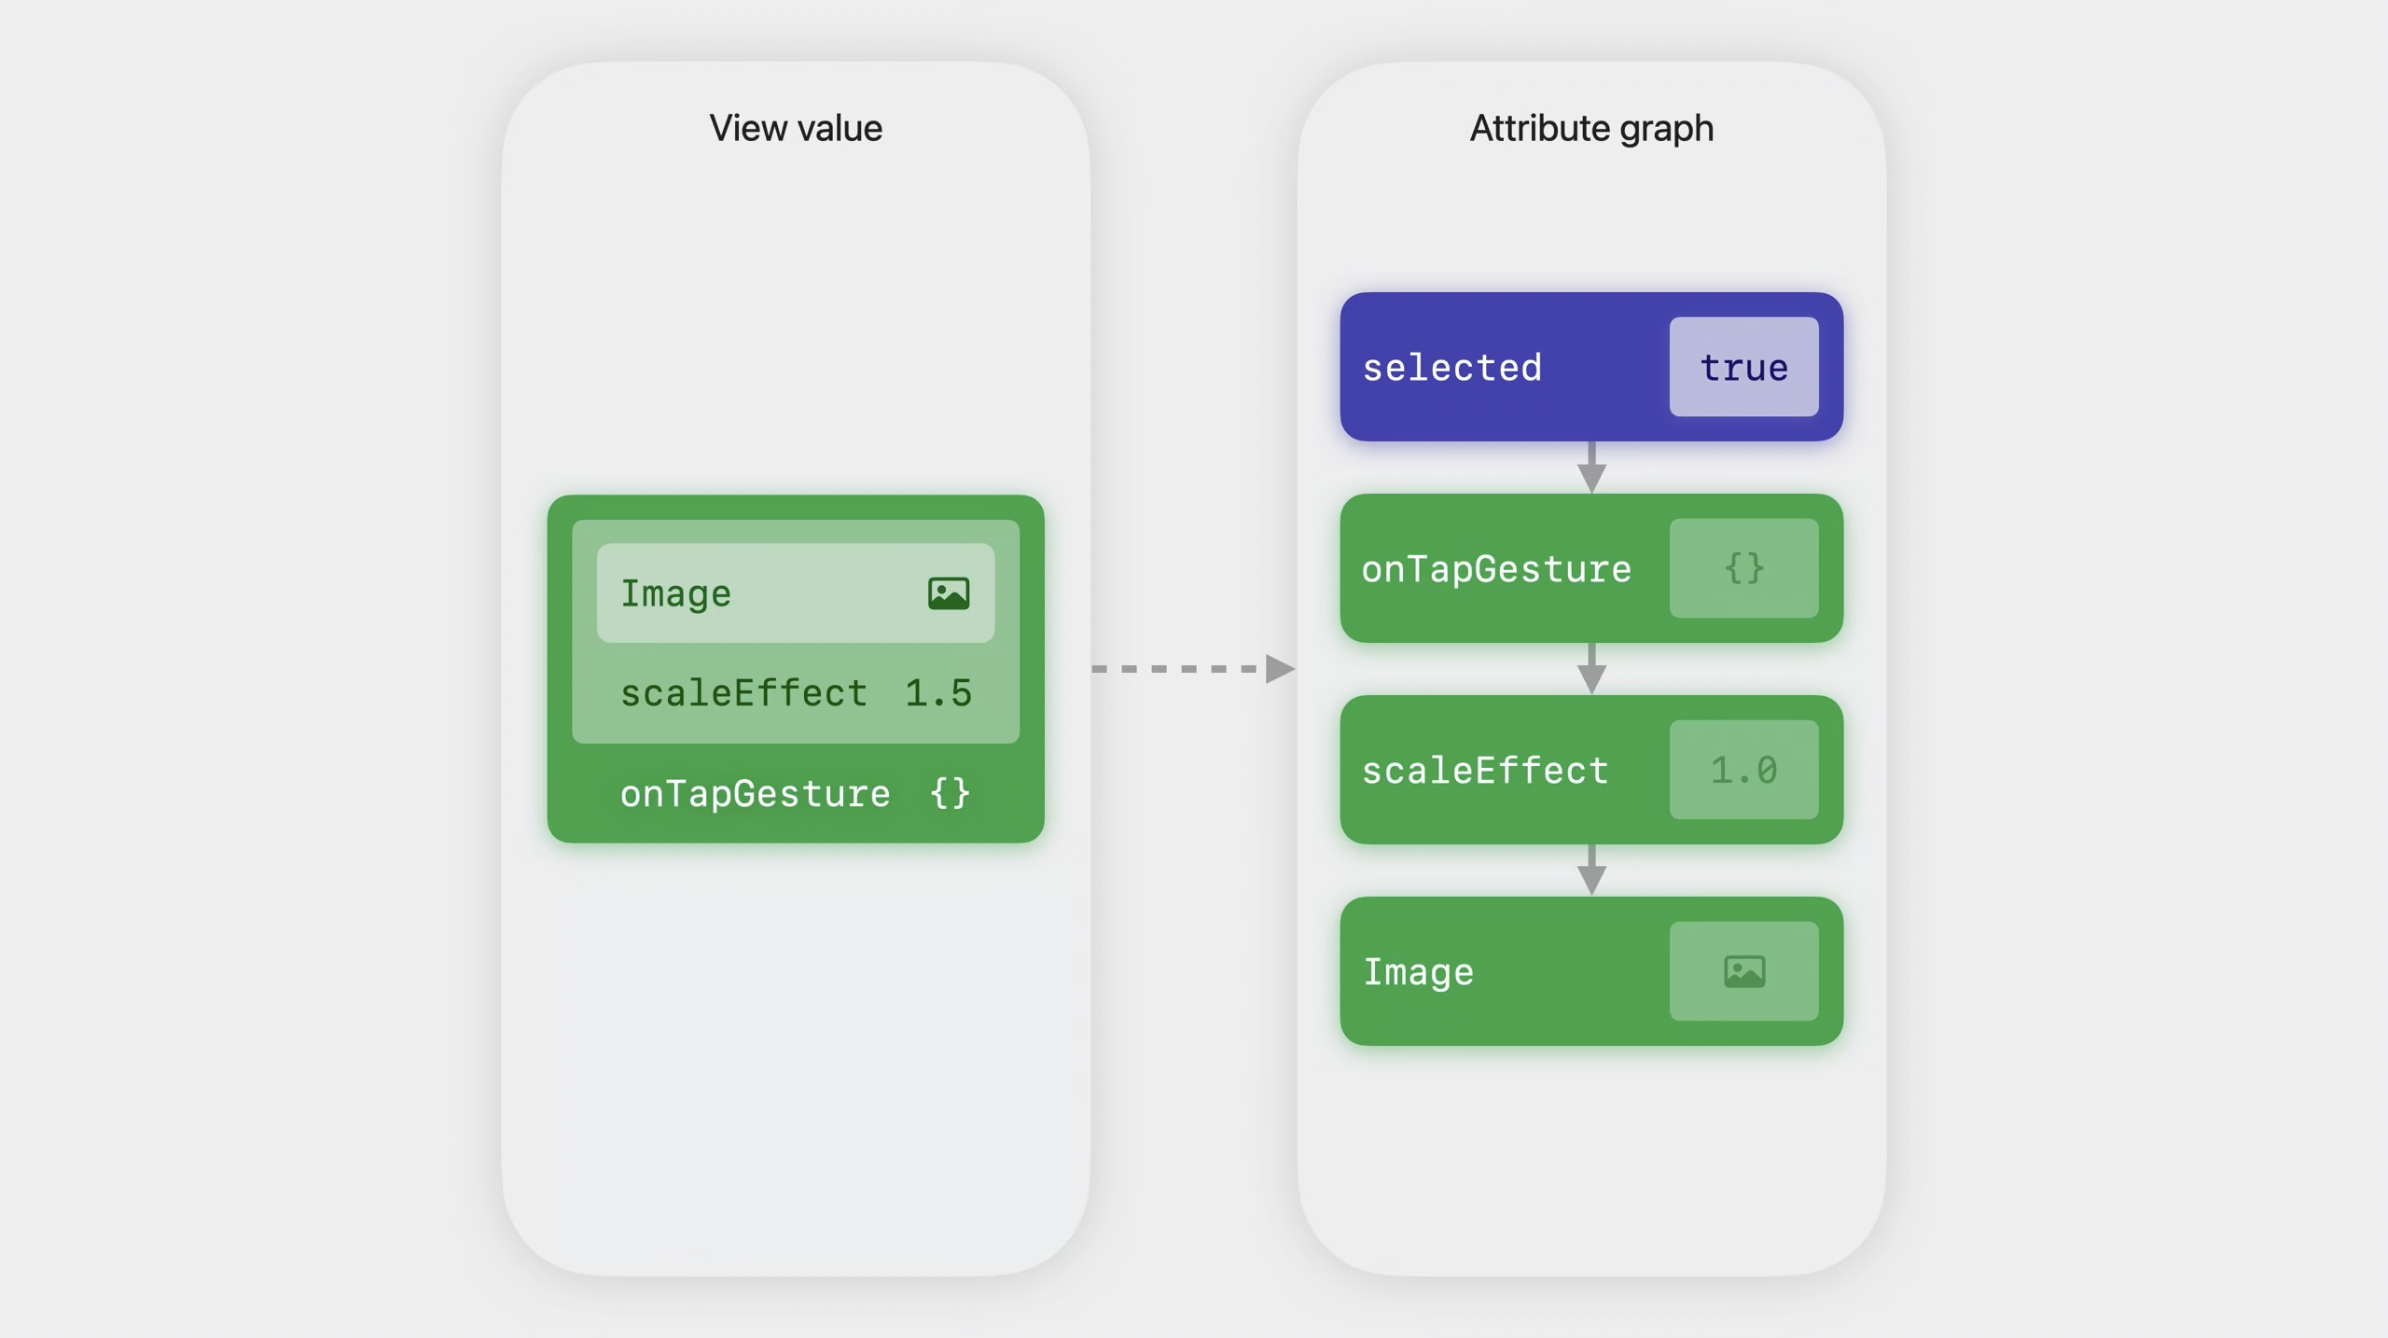
Then the view's body value is discarded, and drawing commands are emitted to update the rendering.
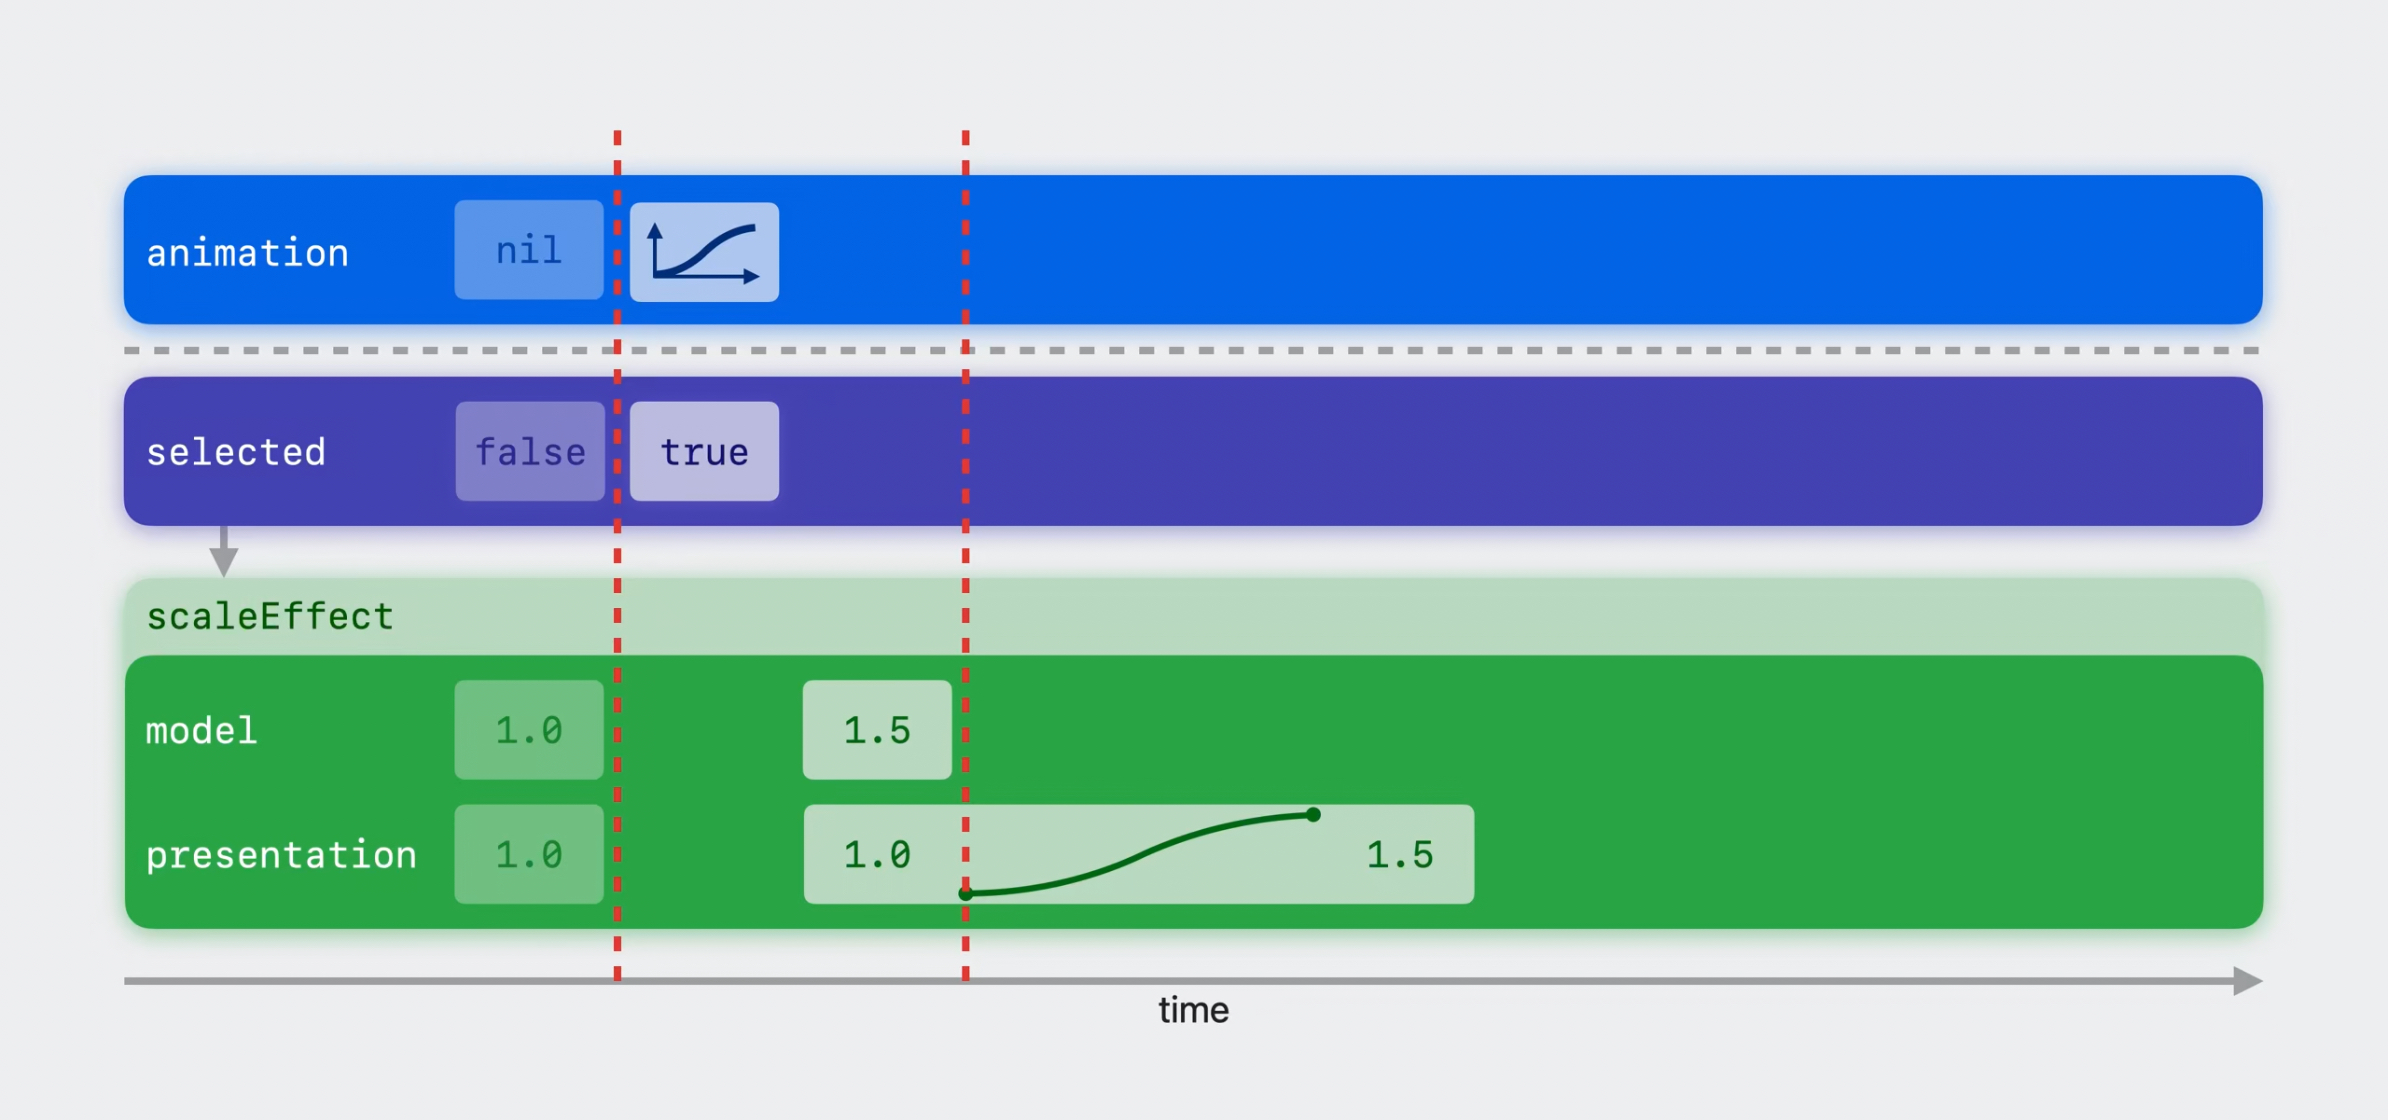
If the state change is wrapped in withAnimation, any attributes that are animatable will check if an animation is set for the transaction, and if so, it makes a copy and uses the animation to interpolate between old and new value over time. Built-in animatable attributes like scaleEffect are very efficient.
Animatable
Animatable attributes (like scaleEffect) determine the data being animated.
SwiftUI builds an animatable attribute for any view conforming to the Animatable protocol — which requires that the view define a readwrite vector of the data it wants to animate. The data must conform to VectorArithmetic.
VectorArithmetic deals in vectors, a fixed-length list of numbers that support vector addition and scalar multiplication. They allow abstracting over the length of that list. (CGFloat and Double are one-dimensional vectors; CGPoint and CGSize are two-dimensional; and CGRect is a four-dimensional vector). Using vectors, SwiftUI can animate with a single generic implementation.
scaleEffect might seem really simple, but in reality is a four-dimensional vector. It fuses together width, height, and anchor point, using AnimatablePair. AnimatablePair is what you'll want to use if you need to conform a view to Animatable.
Most of the time, it's best to use SwiftUI's built-in animatable visual effects, since it's far more expensive to create our own. When animating a custom layout or drawing code, this might be the only way to achieve the desired effect.
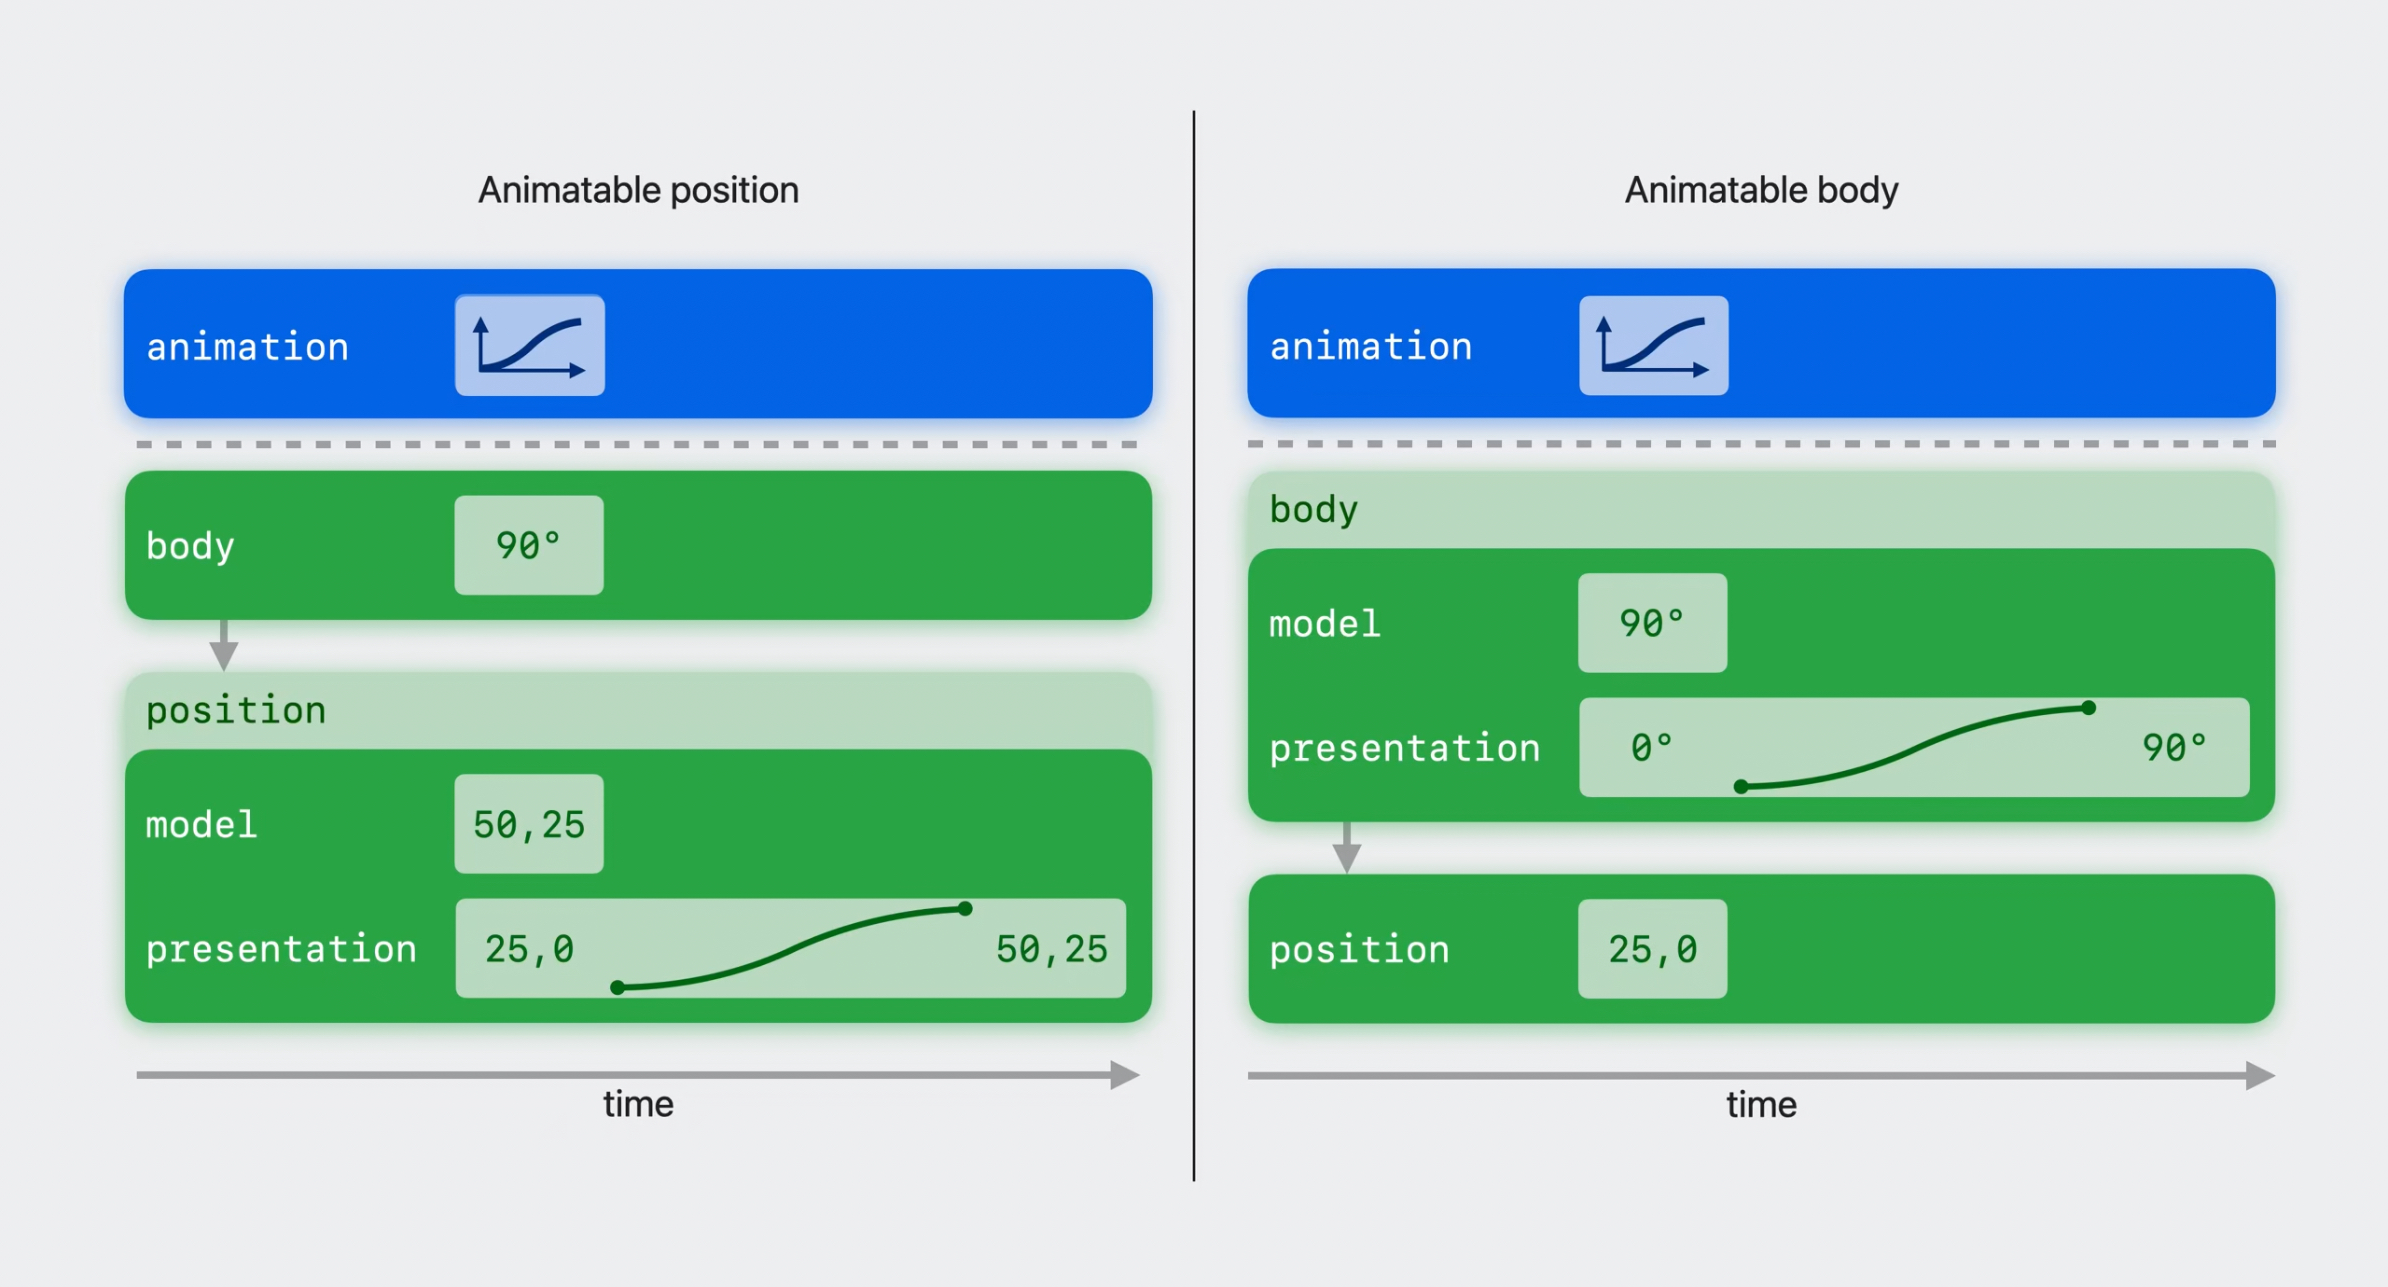
The example shown is for animating three images moving along a custom RadialLayout: with automatic animation, the images move to their end positions in a straight line, while with custom animation, they go around the perimeter. The main difference between the two is that the default version animates each of the child subviews independently, moving each one's position, while the custom version moves the body itself instead of the position: body is called each frame with a new offset angle.
Animation
Animation determines how data changes over time (or, the generic algorithms that interpolate animatable data over time).
Choose an animation by passing it to withAnimation:
struct Avatar: View {
	var pet: Pet
	@State private var selected: Bool = false

	var body: some View {
		Image(pet.type)
			.scaleEffect(selected ? 1.5 : 1)
			.onTapGesture {
				withAnimation(.bouncy) { // HERE
					selected.toggle()
				}
			}
	}
}
Timing curve
The most commonly seen animations. All timing curve animations take a curve and a duration. Curves are defined with bezier control points.
SwiftUI comes with: - linear - easeIn - easeOut - easeInOut They can all take in an optional custom duration.
Spring (recommended)
Springs determine the value at a given point in time by running a spring simulation. They are traditionally specified using mass, stiffness, and damping, but in SwiftUI, duration and bounce are preferred.
SwiftUI comes with: - smooth (no bounce, default in withAnimation since iOS 17) - snappy (small bounce) - bouncy (medium bounce) They can all take in optional duration and extraBounce.
Higher order
Modify a base animation: slow down / speed up, add a delay, repeat, playing forwards / in reverse.
NEW: Custom animations
Gives developers access to the same entry points used to implement the animations included in SwiftUI.
The protocol has three requirements: animate, shouldMerge (optional), velocity (optional).
public protocol CustomAnimation: Hashable {
    func animate<V: VectorArithmetic>(
        value: V, // vector to animate towards
                  // comes from view's animatable data
        time: TimeInterval, // time elapsed since animation began
        context: inout AnimationContext<V> // additional animation state
    ) -> V? // current value of the animation, or nil if finished

    func shouldMerge<V: VectorArithmetic>(
        previous: Animation,
        value: V,
        time: TimeInterval,
        context: inout AnimationContext<V>
    ) -> Bool

    func velocity<V: VectorArithmetic>(
        value: V, time: TimeInterval, context: AnimationContext<V>
    ) -> V?
}
With vector addition and scalar multiplication, animations don't actually happen from start value to end value, but over the delta between the two. For instance, if an animation starts and 1 and ends at 1.5, the actual animation is 0.5. This makes the animate method more convenient.
- shouldMerge comes in when the animation is interrupted: for instance, if the user taps again while a toggle animation is running. In timing curve animations, it returns false, and the vectors are added together. In spring animations, it returns true, so it preserves velocity and retargets to a new value, which feels more natural. - velocity: implementing it preserves velocity when a running animation is merged with a new one.
Transaction
In this talk, transaction has meant "the set of work that's performed for a given update to the UI". It also refers to a related data-flow construct and family of APIs. It's a dictionary SwiftUI uses to implicitly propagate all the context for the current update, most notably the animation.
Let's look through the earlier example of how an animatable attribute reads the value, in more detail. - withAnimation sets the animation in the root transaction dictionary. - body updates the attribute values. - The transaction dictionary is propagated - When it reaches an animatable attribute, the attribute checks for an animation: if it finds one, it makes a copy for presentation. - The transaction is discarded at the end up the update.
To change state programmatically, and make that change still be animated, add the transaction modifier:
struct Avatar: View {
	var pet: Pet
	// @State changed to @Binding to change it externally
	@Binding var selected: Bool

	var body: some View {
		Image(pet.type)
			.scaleEffect(selected ? 1.5 : 1.0)
			.transition { // this attribute will override the animation.
				$0.animation = .bouncy
			}
			.onTapGesture {
				withAnimation(.bouncy) {
					selected.toggle()
				}
			}
	}
}
[!warning] This can lead to accidental animation.
To fix that, SwiftUI provides the animation view modifier. In the example, the animation will only run if selected has changed. withAnimation is no longer needed, it can be removed.
struct Avatar: View {
	var pet: Pet
	@Binding var selected: Bool

	var body: some View {
		Image(pet.type)
			.scaleEffect(selected ? 1.5 : 1.0)
			.animation(.bouncy, value: selected) // HERE
			.onTapGesture {
				selected.toggle()
			}
	}
}
The animation modifier is also useful to apply different animations to different parts of a view. In the example, a shadow is added, which has a different animation. A different animation modifier, with a value of smooth, is added immediately after the shadow.
struct Avatar: View {
	var pet: Pet
	@Binding var selected: Bool

	var body: some View {
		Image(pet.type)
			.shadow(radius: selected ? 12 : 8)
			.animation(.smooth, value: selected) // HERE
			.scaleEffect(selected ? 1.5 : 1.0)
			.animation(.bouncy, value: selected)
			.onTapGesture {
				selected.toggle()
			}
	}
}
Animation modifiers are only active when their value changes, reducing the odds of accidental animation. But if another change happens in the same transaction, it would inherit the same animation. Depending on the component structure, this can be a problem: if the component may contain arbitrary child content, accidental animations may happen. In this case, we can use a new version of the animation modifier.
struct Avatar: View {
	var pet: Pet
	@Binding var selected: Bool

	var body: some View {
		Image(pet.type)
			.animation(.smooth) {
				$0.shadow(radius: selected ? 12 : 8)
			}
			.animation(.bouncy) {
				$0.scaleEffect(selected ? 1.5 : 1.0)
			}
			.onTapGesture {
				selected.toggle()
			}
	}
}
When the transaction propagates through the attributes and finds an animation view modifier, a copy is made that populated with the specified animation. Then, the copy is discarded, and the transaction continues down the attributes.
New: Custom transaction keys can be defined, to leverage the transaction dictionary and implicitly propagate custom update-specific data. It's similar to declaring a custom environment key, and the only requirement is a defaultValue. Then, declare a computed property as an extension on Transaction, that reads and writes from the transaction dictionary using the custom key.
In this example, a boolean key is defined to track whether the image was tapped or not, which will determine which animation is used.
private struct AvatarTappedKey: TransactionKey {
	static let defaultValue: false
}

extension Transaction {
	var avatarTapped: Bool {
		get { self[AvatarTappedKey.self] }
		set { self[AvatarTappedKey.self] = newValue }
	}
}

struct Avatar: View {
	var pet: Pet
	@Binding var selected: Bool

	var body: some View {
		Image(pet.type)
			.scaleEffect(selected ? 1.5 : 1.0)
			.transaction {
				// If the image was tapped, the animation will be more
				// lively than if it was changed programmatically.
				$0.animation = $0.avatarTapped
					? .bouncy : .smooth
			}
			.onTapGesture {
				withTransaction(\.avatarTapped, true) { // HERE
					selected.toggle()
				}
			}
	}
}
withAnimation is a wrapper around withTransaction: The arguments passed to withTransaction are a key path to a computed property on the Transaction and the value to set.
This can again lead to accidental animations, which is why the transaction modifier has two new variants: One to scope using a value...
struct Avatar: View {
	var pet: Pet
	@Binding var selected: Bool

	var body: some View {
		Image(pet.type)
			.scaleEffect(selected ? 1.5 : 1.0)
			.transaction(value: selected) { // HERE
				$0.animation = $0.avatarTapped
					? .bouncy : .smooth
			}
			.onTapGesture {
				withTransaction(\.avatarTapped, true) {
					selected.toggle()
				}
			}
	}
}
And another to scope to a sub-hierarchy defined in a body closure:
struct Avatar: View {
	var pet: Pet
	@Binding var selected: Bool

	var body: some View {
		content
			.transaction {
				$0.animation = $0.avatarTapped
					? .bouncy : .smooth
			} body: {
				$0.scaleEffect(selected: 1.5 : 1.0)
			}
			.onTapGesture {
				withTransaction(\.avatarTapped, true) { // HERE
					selected.toggle()
				}
			}
	}
}
Recommended: - WWDC23 Animate with Springs - WWDC23 Wind your way through advanced animations in SwiftUI
 GitHub
 cecilelebleu.com