Animate with springs
 Kyaw Zay Ya Lin Tun
Description: Discover how you can bring life to your app with animation! We'll show you how to create amazing animations when you take advantage of springs and help you learn how to use them in your app.
Transitions, Gestures & Animations
Transitions → where we move from one scene to another.
Gestures → where we're directly interacting with the device.
Animations → where an on screen object moves, grows, or changes visual properties.
Above three factors work together and help to make a fluid, interactive UI.
Linear animations
We use animations because they give us a better sense of continuity. Linear animations can be useful as a specialized tool in some places, like a repeating spinning indicator (warning ⚠️: you should be cautious about using them as they don’t have non-physical behavior that generally feels out of place).
Why “springs” are a good fit for animations
A spring can start with any initial velocity, so we get a natural feeling. SwiftUI will now automatically track velocities any time a gesture is changing properties, so you can get this for FREE. Springs are the only type of animation that maintains continuity both for static cases and cases with an initial velocity. A spring animation doesn’t ONLY mean a bouncy animation. It is based on the behavior of an object attached to a spring in the physical world, so it feels more natural to us when we see it move.
How springs work

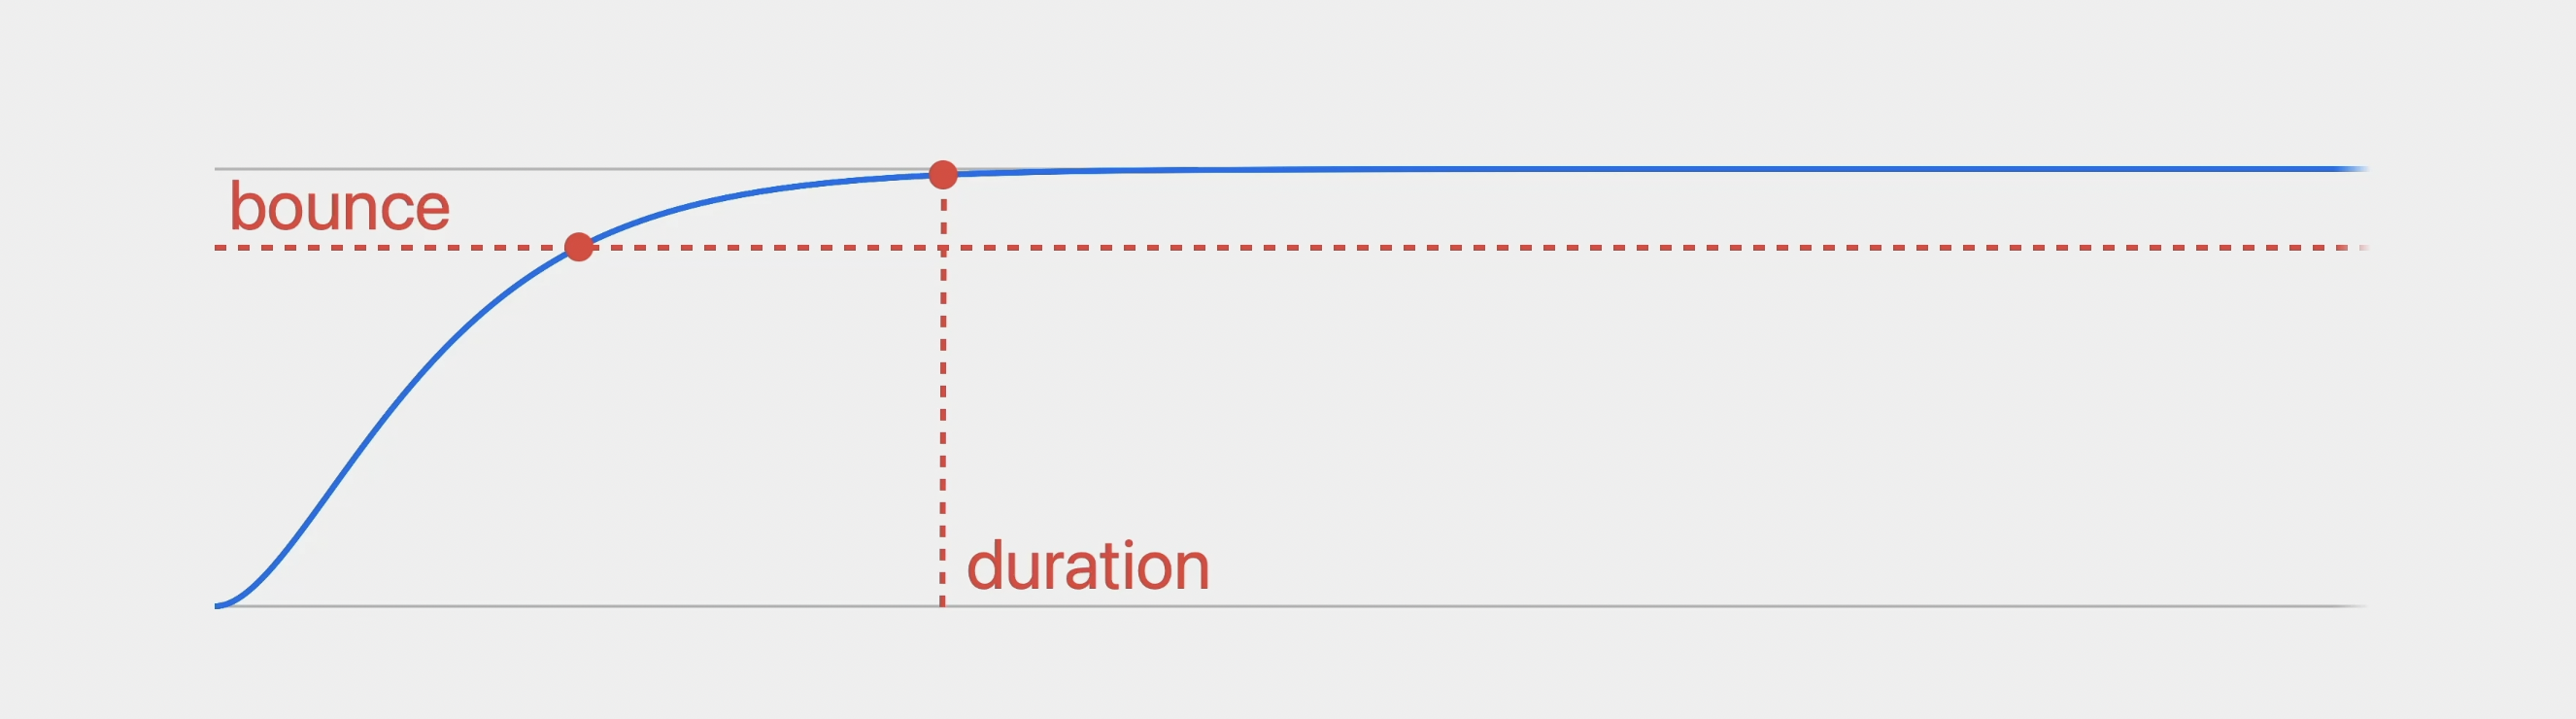
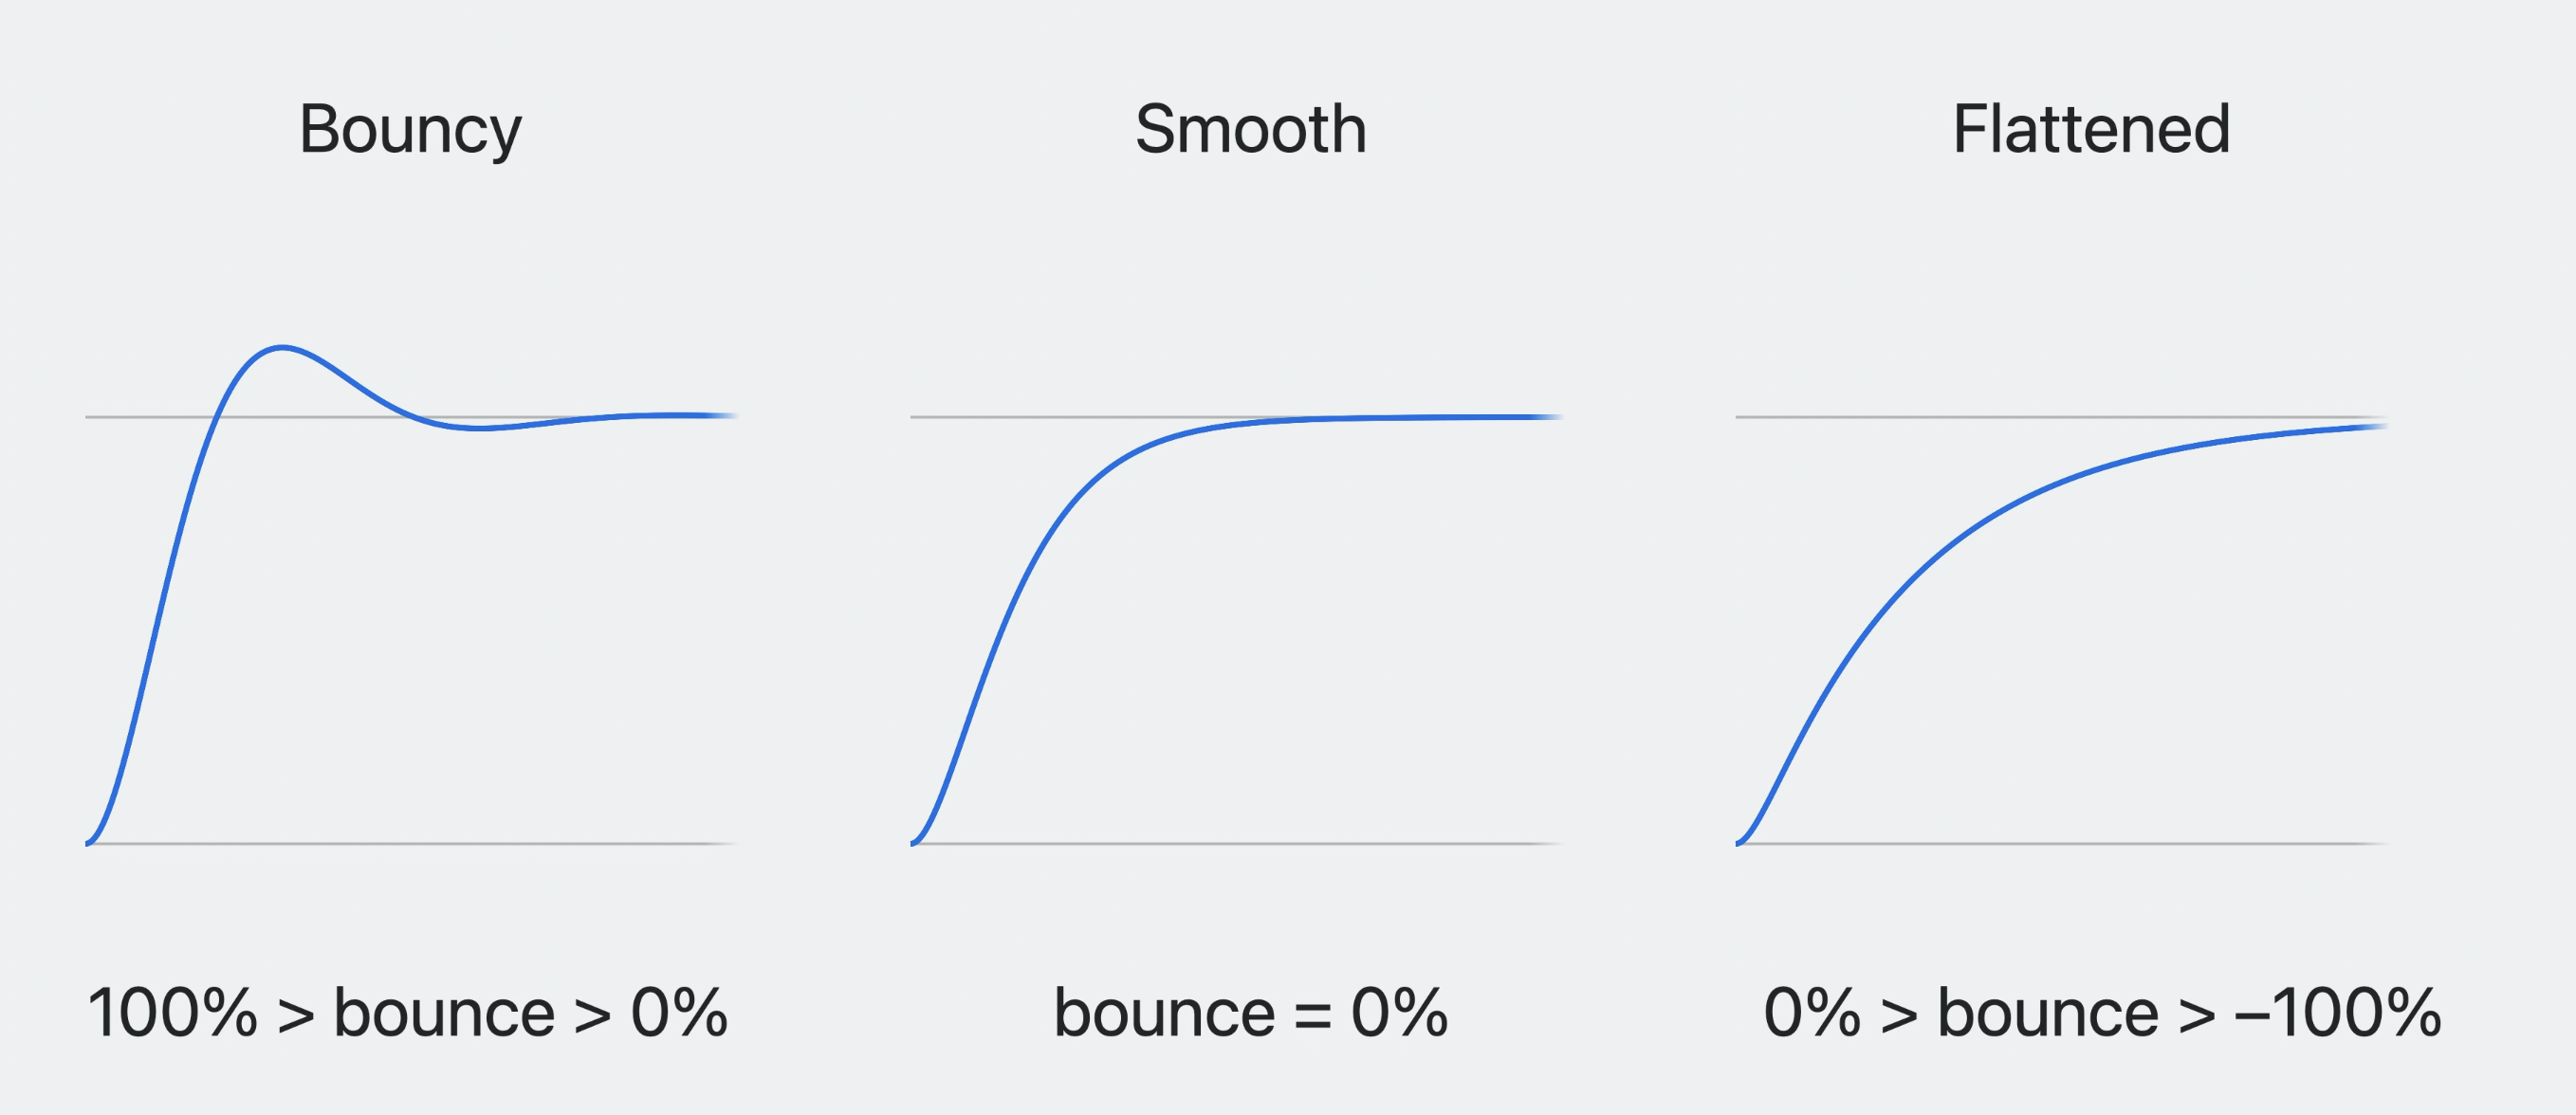
Apple has been refining a new way to configure springs that's easier to understand and to work with. It uses just 2 parameters: duration and bounce. Increasing the duration makes the animation take longer. And increasing the bounce adds bounce to the animation. All of their frameworks that support springs will use them.
Being able to understand the math that's behind these curves helps make springs feel more approachable, but if math just makes your head spin, don't worry, it's completely optional. They’ve implemented all of this math for you.
Sometimes, while an animation hasn't yet finished, a new animation begins that changes to a new target value. When that happens, a spring animation uses the velocity it had when it was retargeted as the initial velocity towards its new destination and this same velocity preservation makes these kind of interruptions feel smooth and natural.
Because of its unpredictable nature, you shouldn't wait for the settling duration for user-facing changes. If you want to make a UI change when a spring is mostly done, you can use the new completion handler support in SwiftUI, which uses a perceptual duration instead of a settling duration.
Show me the code!
SwiftUI now uses spring animations as the default animation.
withAnimation {
	isActive.toggle()
}
If you're not sure what spring parameters to use, there are three presets; smooth, snappy and bouncy.
// Default (spring) animation with snappy preset
withAnimation(.snappy) {
	isActive.toggle()
}
Theses presets can also be used as tunable starting points. You can take a preset and specify that its duration should be different, or give it a little more or less bounce.
withAnimation(.snappy(duration: 0.4)) {
	...
}

withAnimation(.snappy(extraBounce: 0.1)) {
	...
}
If you want to go further, you can also make a completely custom spring with the .spring animation which allow you to fully specify the duration and the bounce of the spring. And these bounce values have a range from -1.0 to 1.0. You can also use these same parameters to create spring animations in UIKit and Core Animation.
// Custom sprints
withAnimation(.spring(duration: 0.6, bounce: 0.2)) {
	...
}

// UIKit
UIView.animate(duration: 0.6, bounce: 0.2) {
	...
}

// Core Animation
CASpringAnimation(perceptualDuration: 0.6, bounce: 0.2)
Spring model type lets you create a representation of a spring, including its parameters. This lets you programmatically convert parameters between the different ways to specify them.
// Spring Model
let mySpring = Spring(duration: 0.5, bounce: 0.2)
let (mass, stiffness, damping) = (mySpring.mass, mySpring.stiffness, mySpring.damping)
You can also create a spring model with a set of parameters, like mass, stiffness, and damping, and then use it as a spring animation directly.
let otherSpring = Spring(mass: 1, stiffness: 100, damping: 10)
withAnimation(.spring(otherSpring)) {
	...
}
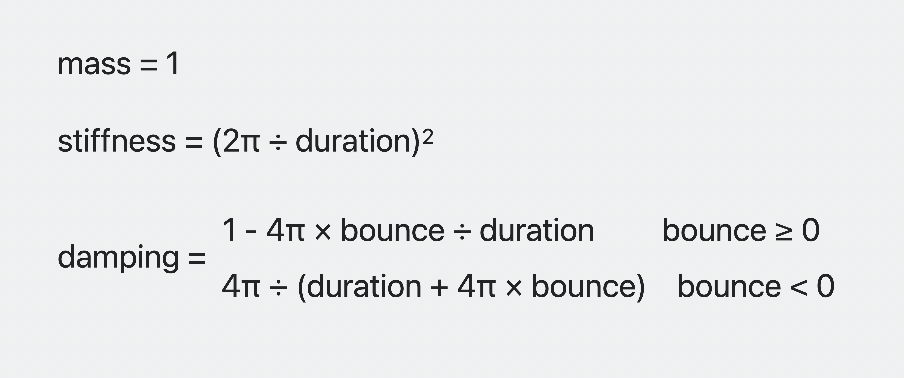
But if you really want to do a conversion yourself, here are the three equations to convert from bounce and duration values to mass, stiffness, and damping. In addition to converting parameters, you can use spring models to build your own advanced spring behaviors.
You can call value to get the position of the spring. You just pass in a target, which is what the spring is moving towards, and the time you want to evaluate it at. You can also use the same inputs on a velocity method to evaluate the spring's velocity over time.
let mySpring = Spring(duration: 0.4, bounce: 0.2)
let value = mySpring.value(target: 1, time: time)
let velocity = mySpring.velocity(target: 1, time: time)
You can even use this to build your own custom animations. Just call into the spring model, and you can modify the inputs or outputs to apply customization to a spring animation.
// Custom spring animation
func animate<V: VectorArithmetic>(value: V, time: Double, context: inout AnimationContext<V>) -> V? {
	spring.value(
		target: value, initialVelocity: context.initialVelocity, time: effectiveTime(time: time, context: context)
	)
}
A small bounce, like around 15%, doesn't feel very bouncy. For larger bounce values like 30%, you do start to feel some noticeable bounciness. You should be cautious about using values higher than around 0.4, since they may feel too exaggerated for a UI element.
When you're not sure, use a spring with bounce 0, which is also what you get if you don't specify the bounce. This gives you a great general purpose spring that's the most versatile. Bounce can make sense when you want an animation to feel more physical.
 Twitter
 GitHub
 linktr.ee