Wind your way through advanced animations in SwiftUI
 laurent b
Description: Discover how you can take animation to the next level with the latest updates to SwiftUI. Join us as we wind our way through animation and build out multiple steps, use keyframes to add coordinated multi-track animated effects, and combine APIs in unique ways to make your app spring to life.
SwiftUI animations are interruptible, physics-based, and integrated throughout the framework.
First: A quick review of the animation tools in SwiftUI
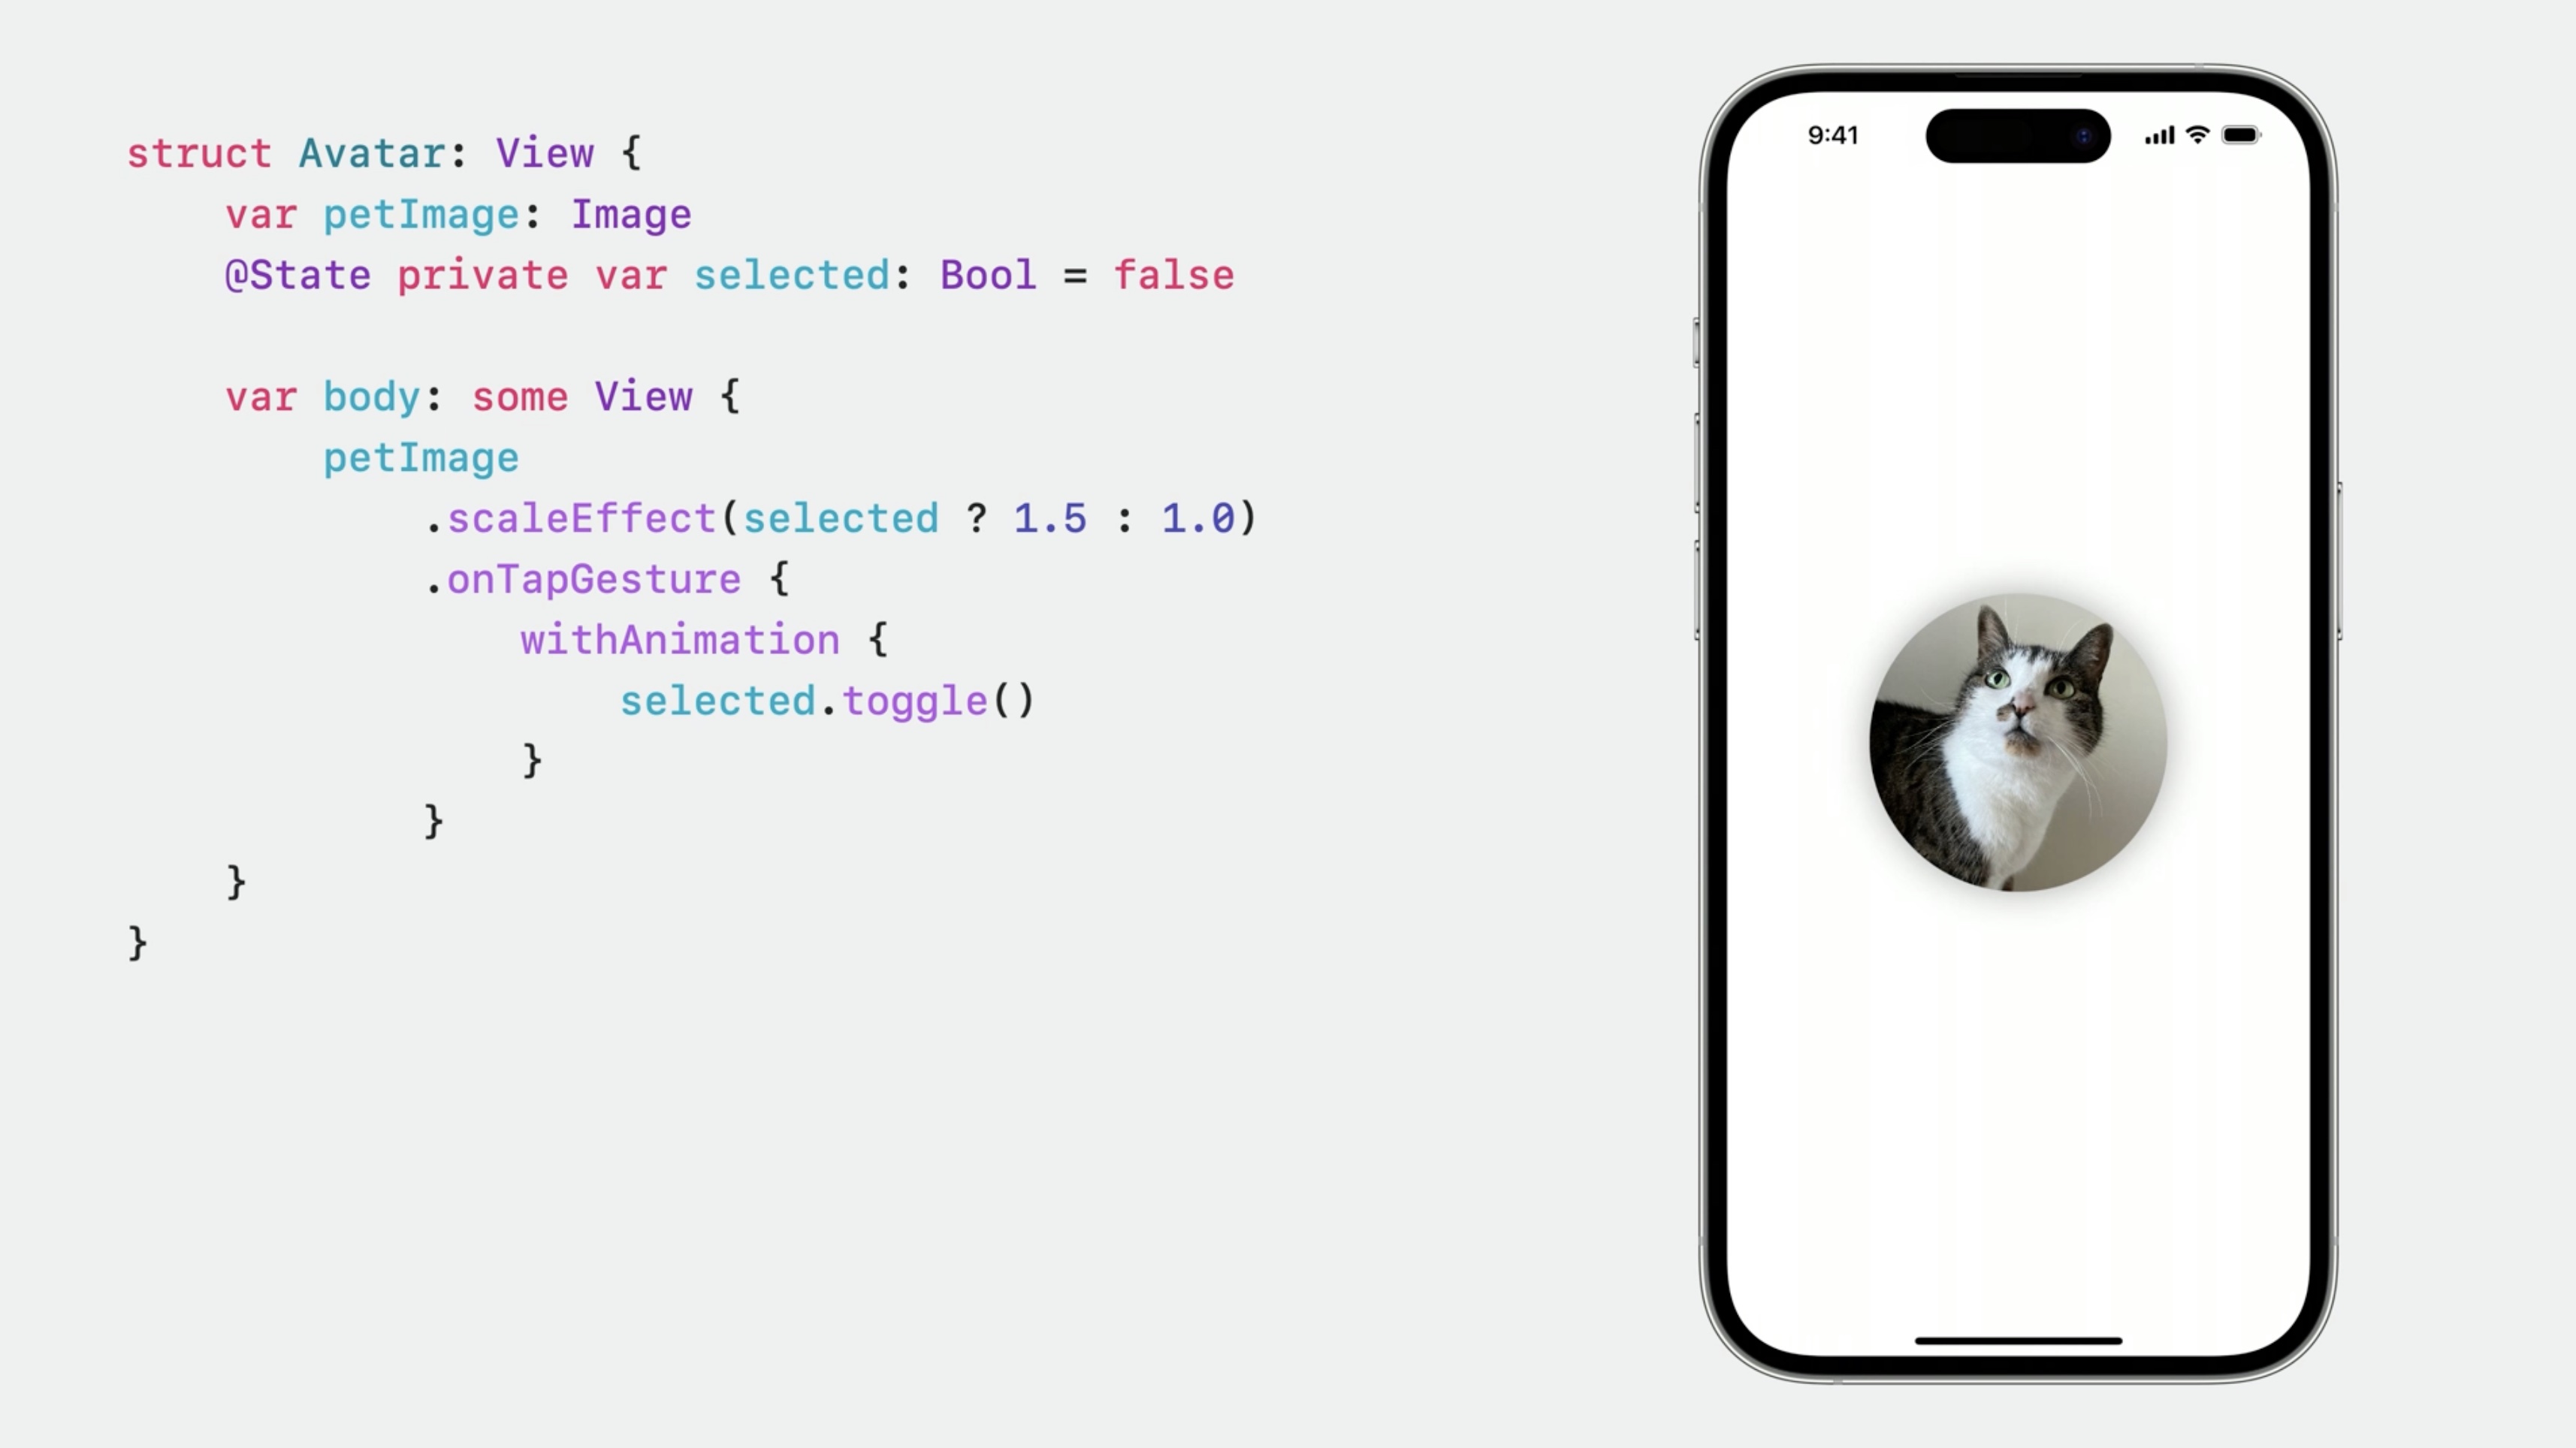
Scale Animation
struct Avatar: View {
    var petImage: Image
    @State private var selected: Bool = false

    var body: some View {
        petImage
            .scaleEffect(selected ? 1.5 : 1.0)
            .onTapGesture {
                withAnimation {
                    selected.toggle()
                }
            }
    }
}
Adding animation is as easy as using "withAnimation" or adding an "animation" modifier.
After the state of the application changes, SwiftUI applies animations that interpolate from the previous state to the new state.
But some animations don’t simply animate from a previous state into a new state.
Rather than animating between two states, these animations can define multiple steps that happen in sequence. Especially great in two situations: - repeating animations, that loop continuously while a view is visible... - and with event-driven animations, such as a view that pulses when an event occurs.
There a new family of APIs that makes animations easier to build.
In this session:
- Animation phases, which let SwiftUI automatically advance through a set of pre-planned states that make up your animation.
- Keyframes
- Some tips and tricks to get the most out of this API.
Animation phases
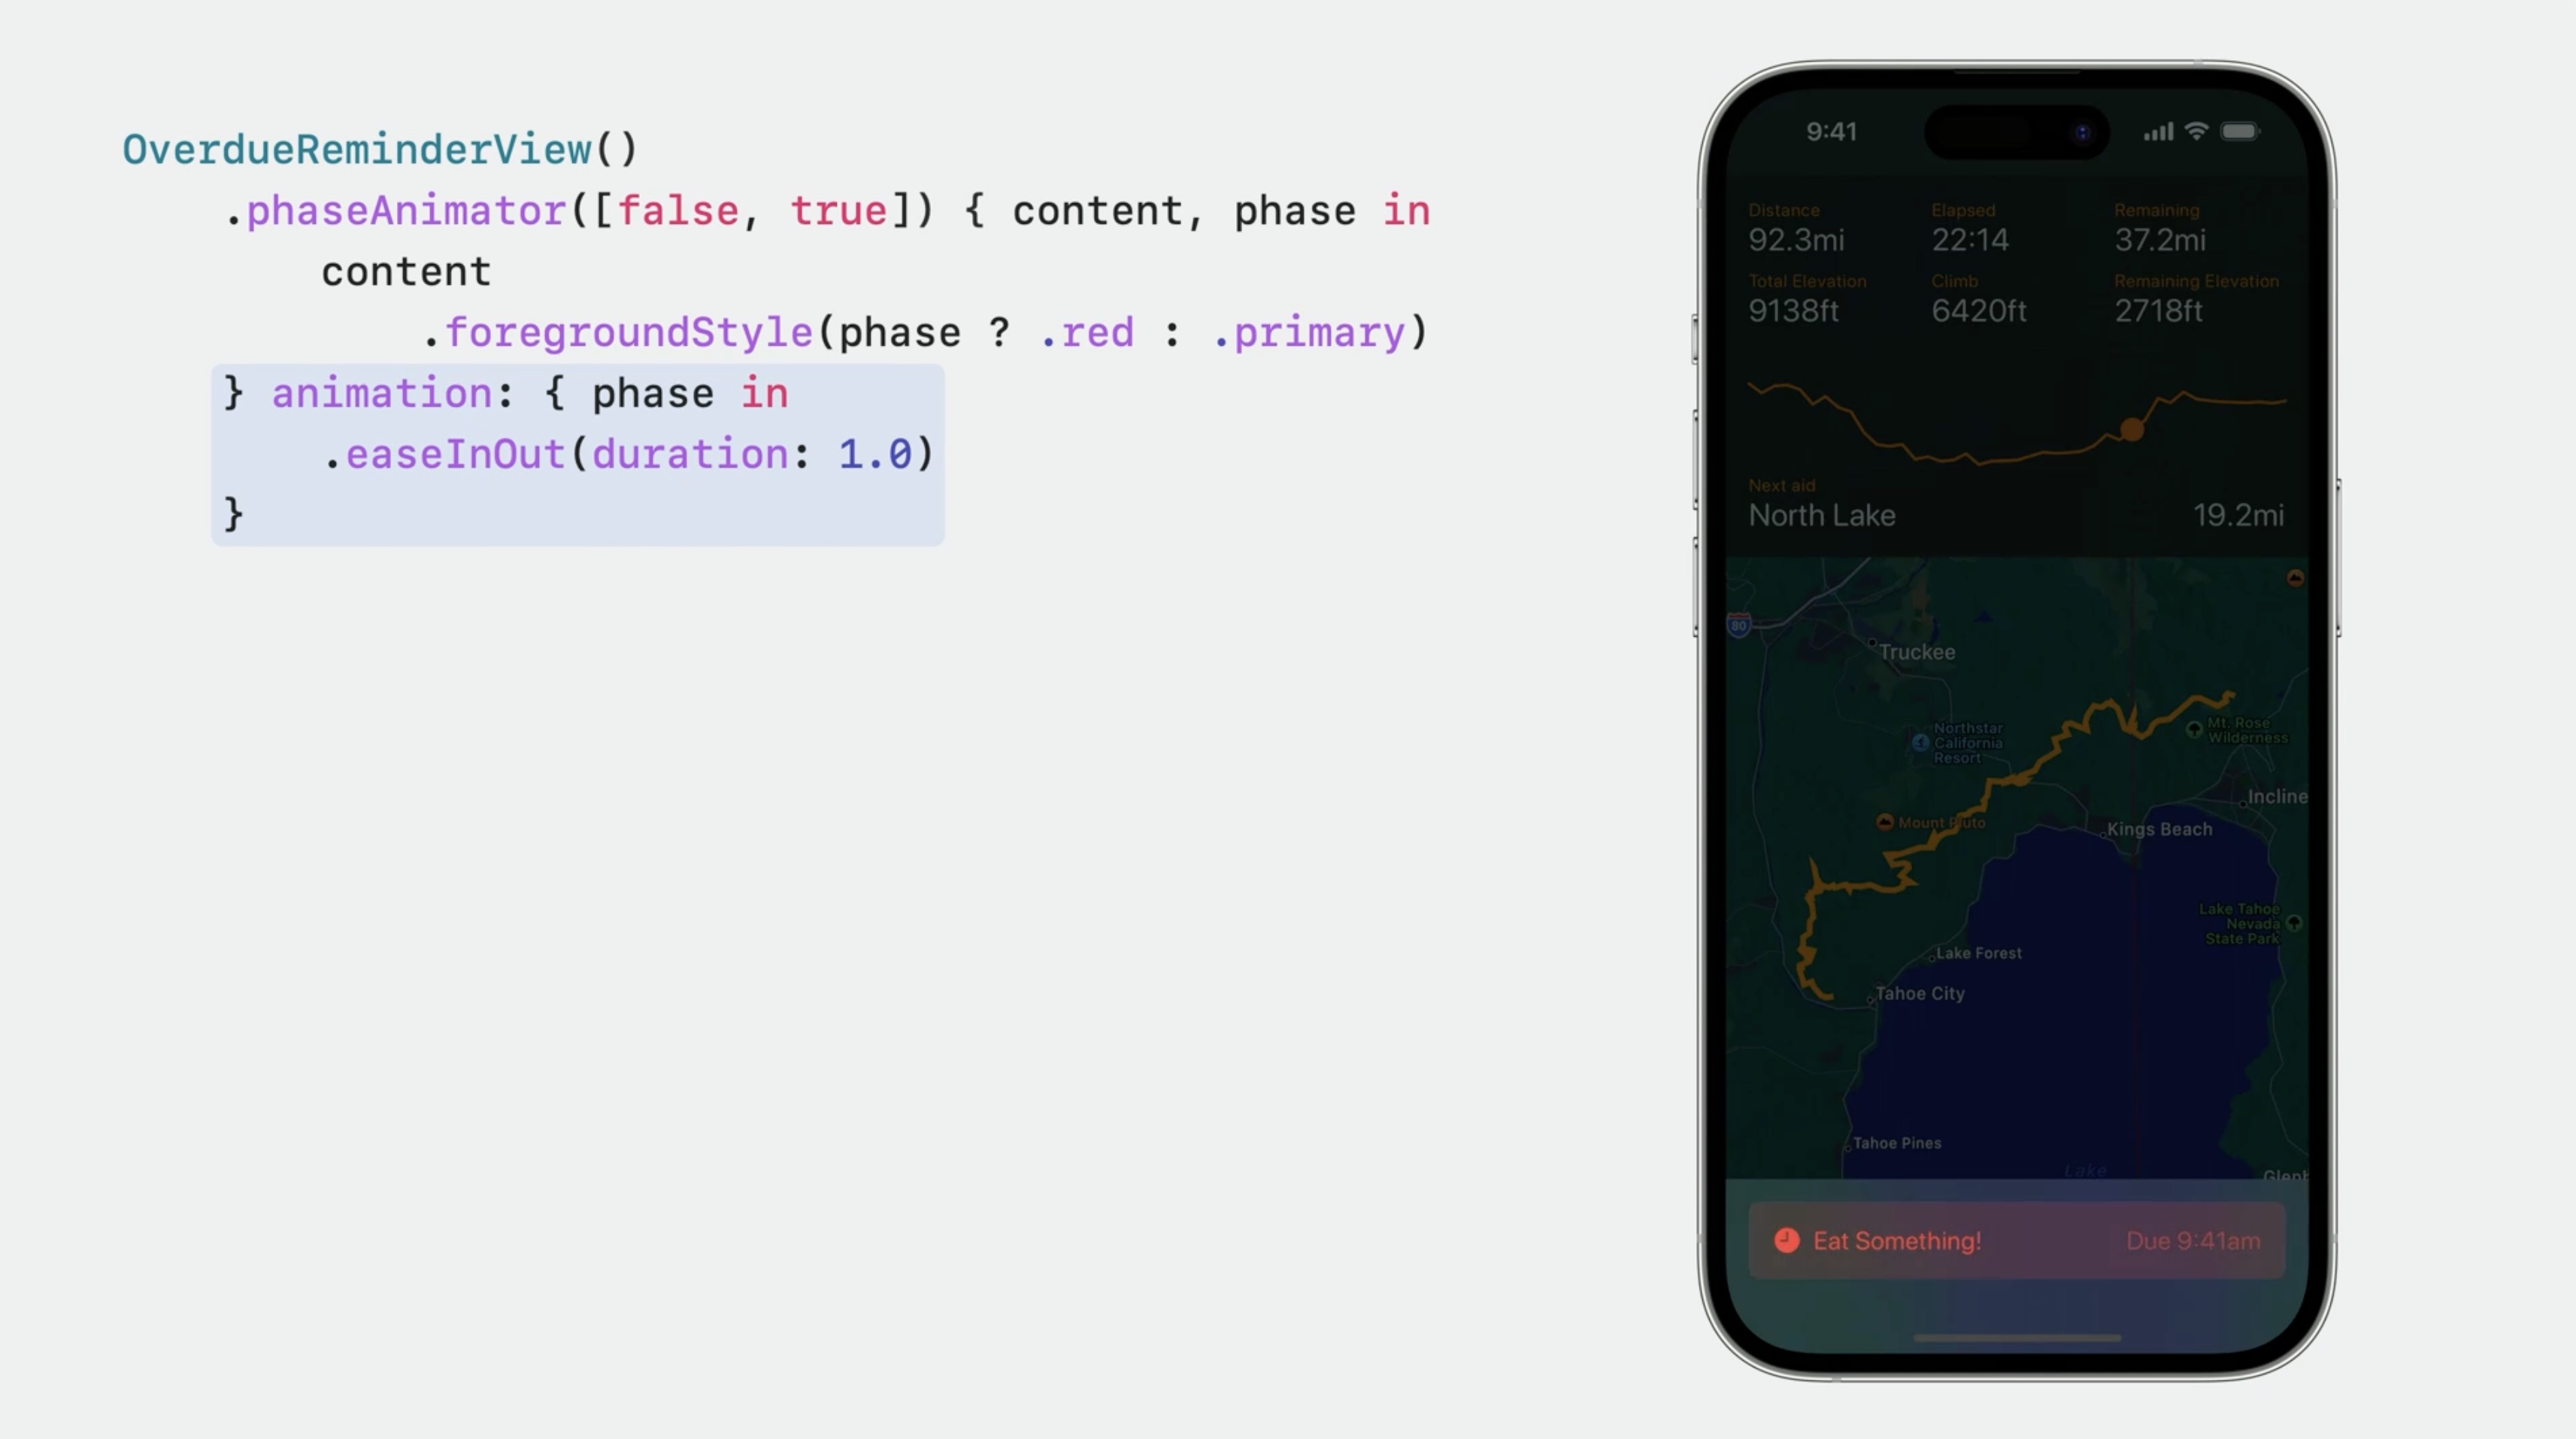
Ex with trail running.
Trail races can be very long. Ultramarathons can take a whole day, or even multiple days to finish, so he is showing an app to plan events.
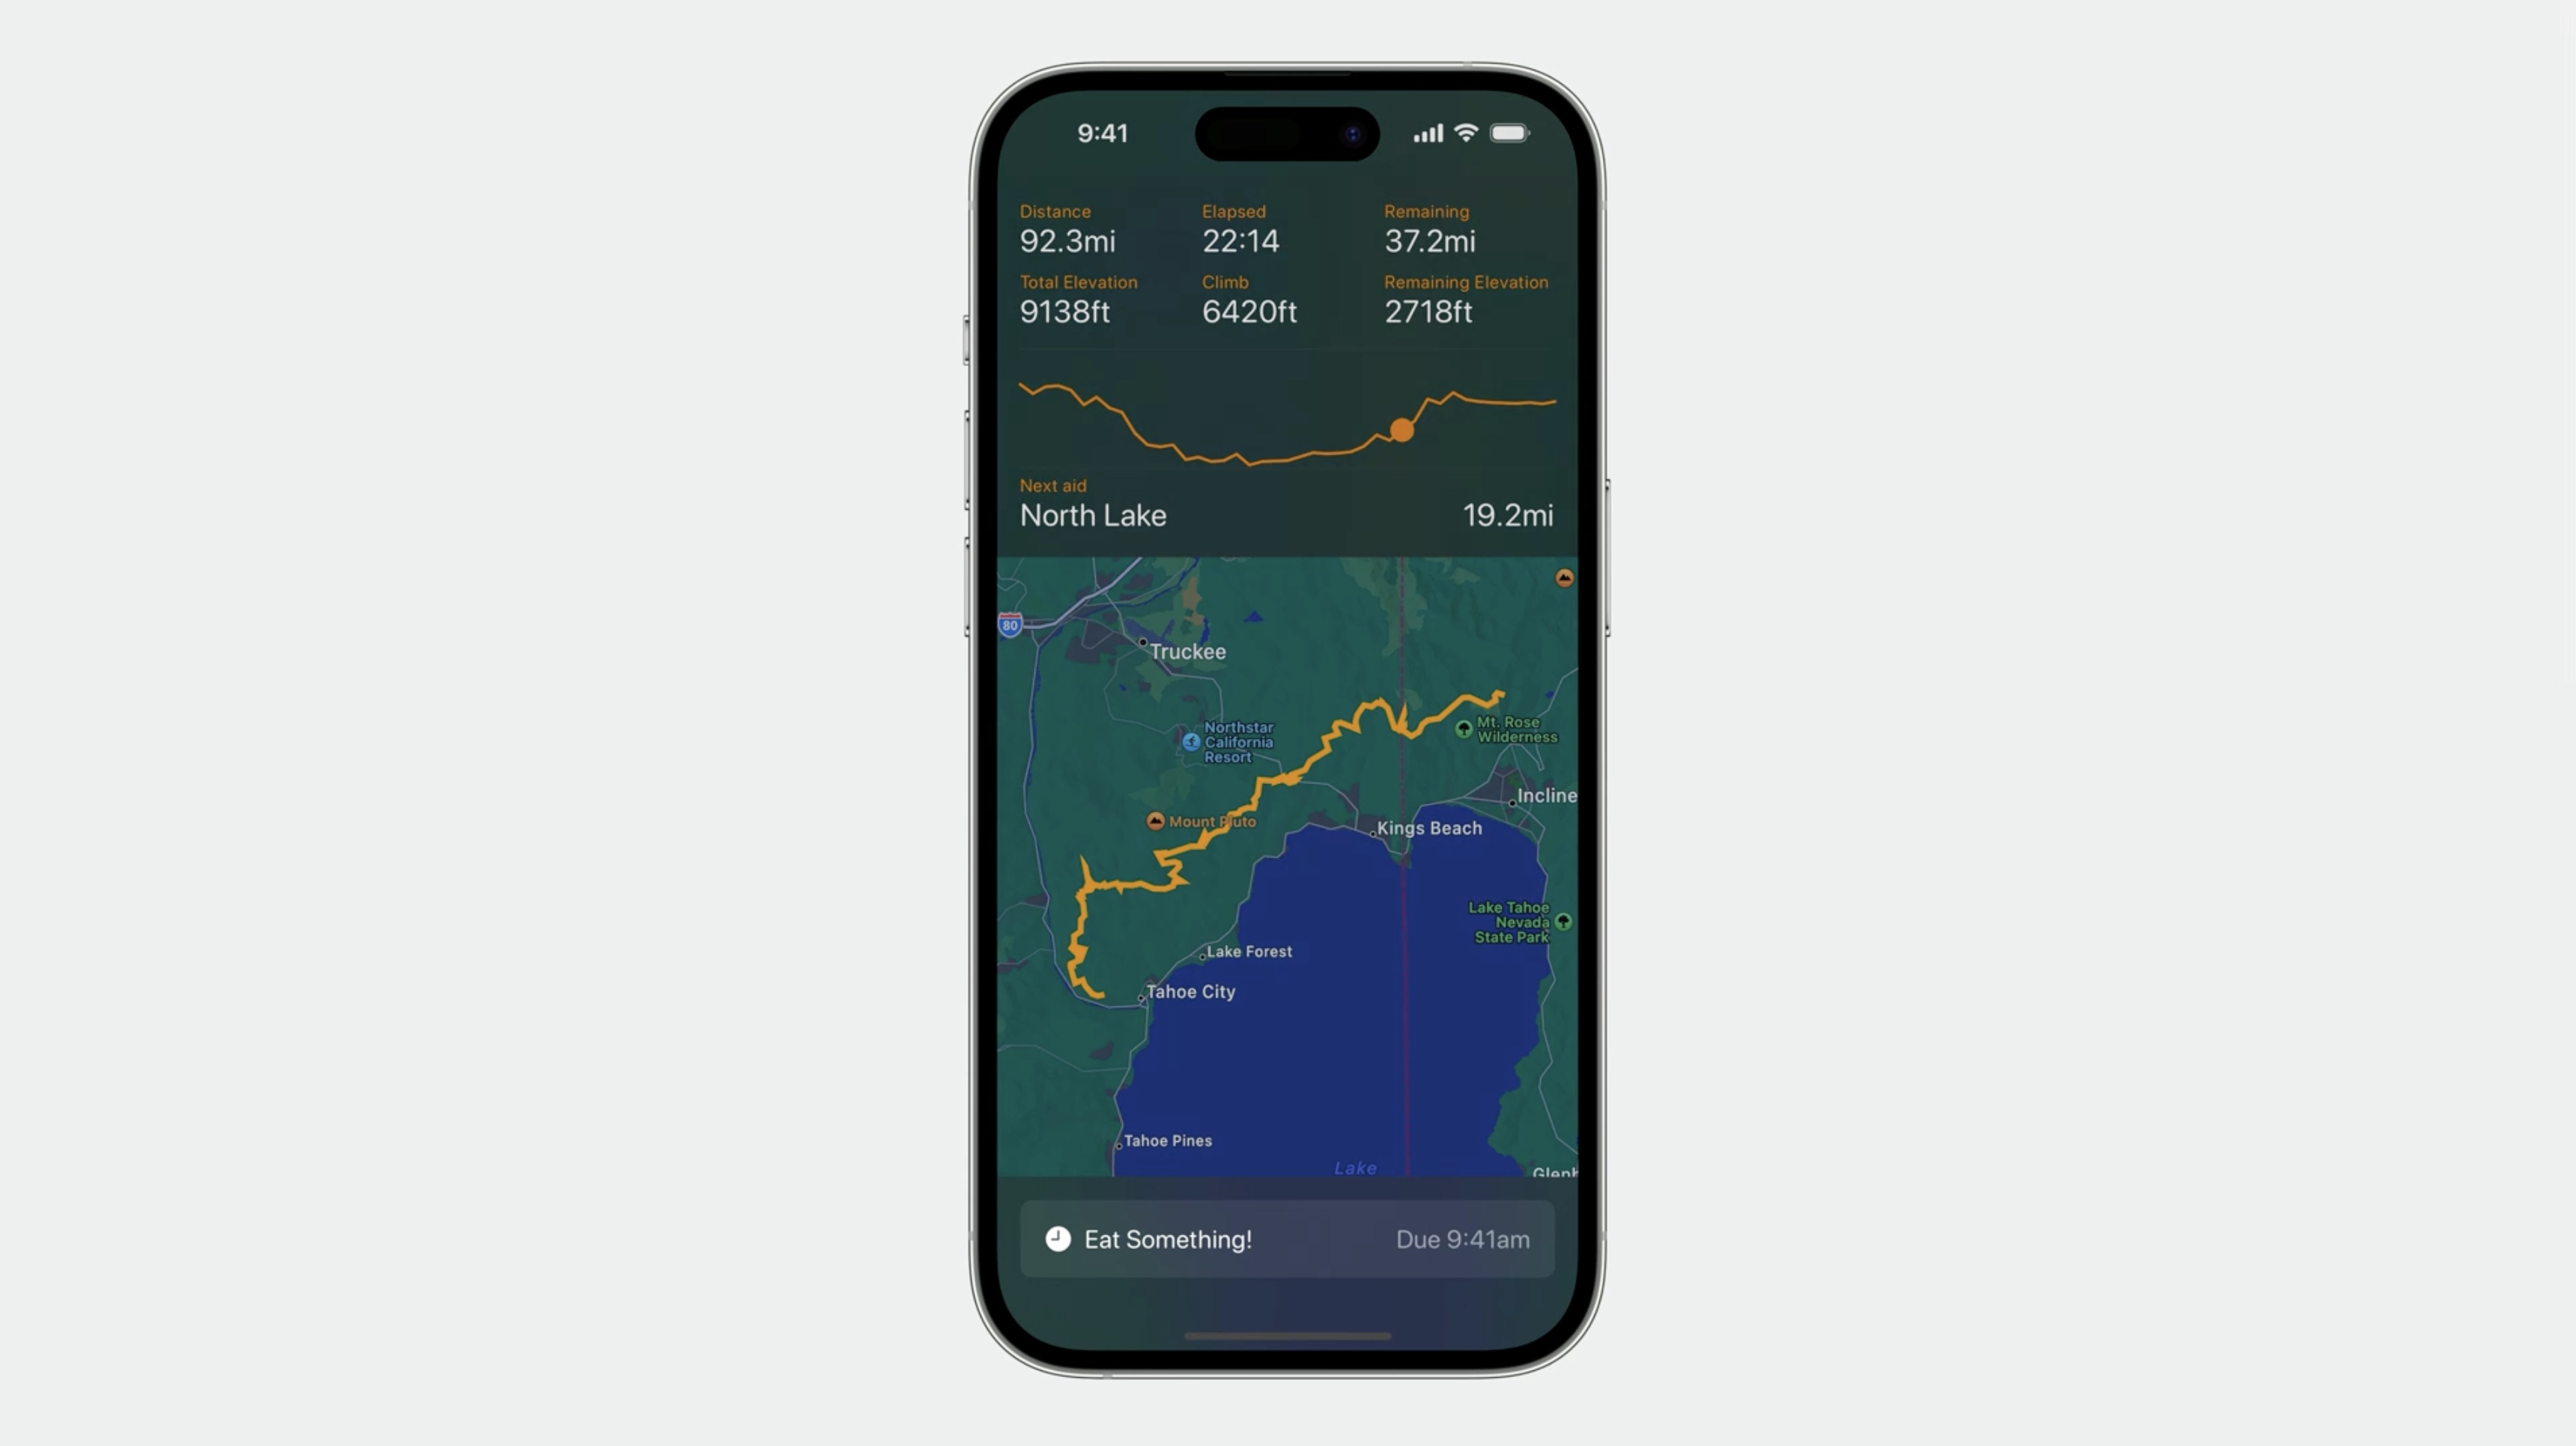
Here, the reminder at the bottom of the screen is letting know that it is time for a meal. We want to give it an animated highlight effect to make it extra visible.
To make this view animate, we can apply the .phaseAnimator modifier.
OverdueReminderView()
        .phaseAnimator([false, true]) { content, phase in
            content
        }
Using the phase animator modifier, we need to provide a sequence of states that define the individual steps in a multipart animation. SwiftUI then animates between these states automatically.
In this case, we’ll just be animating between two states: highlighted, and not highlighted, so we can simply use a boolean values.
Next, we’ll apply an opacity modifier: This will make the view fully opaque when highlighted, and 50% transparent otherwise.
OverdueReminderView()
        .phaseAnimator([false, true]) { content, phase in
            content
                .opacity(phase ? 1.0 : 0.5)
        }
We provided two phases to the phase animator modifier: false, and true.
When the view first appears, the first phase is active, causing the view to be 50% transparent. SwiftUI then immediately begins an animated transition to the next phase, where the view is fully opaque.
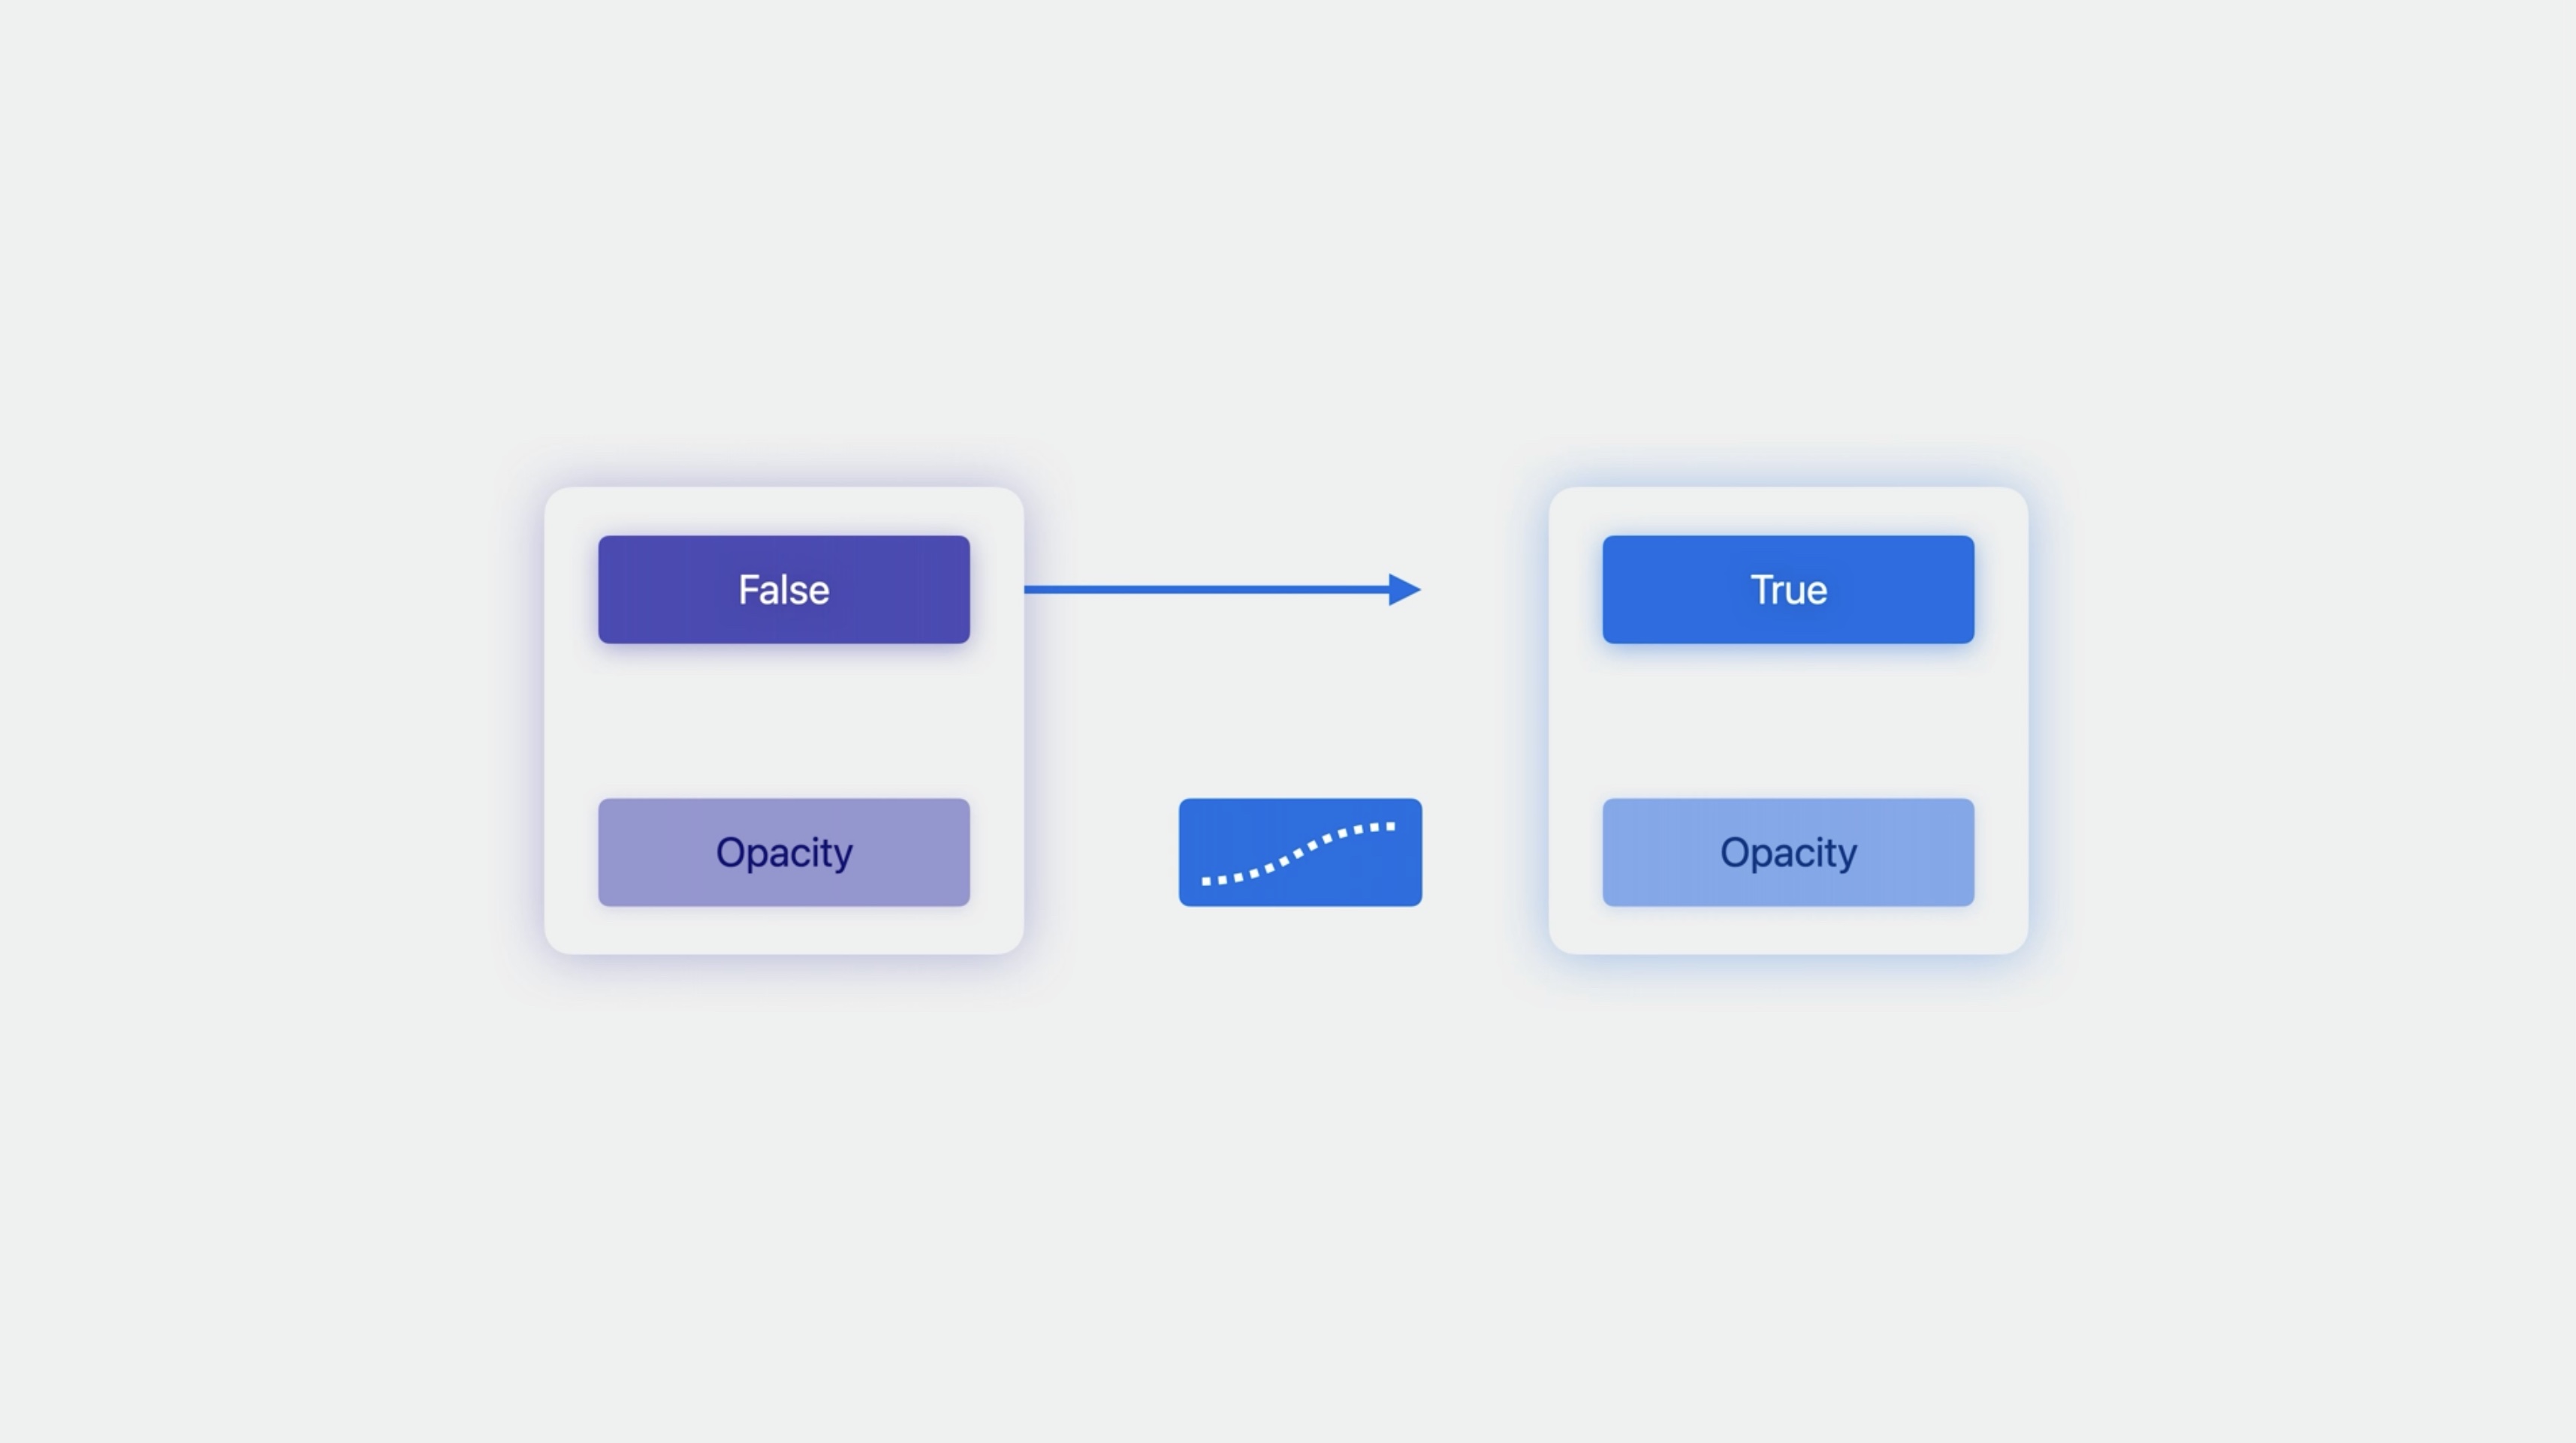
Then when that animation is finished, SwiftUI advances again.
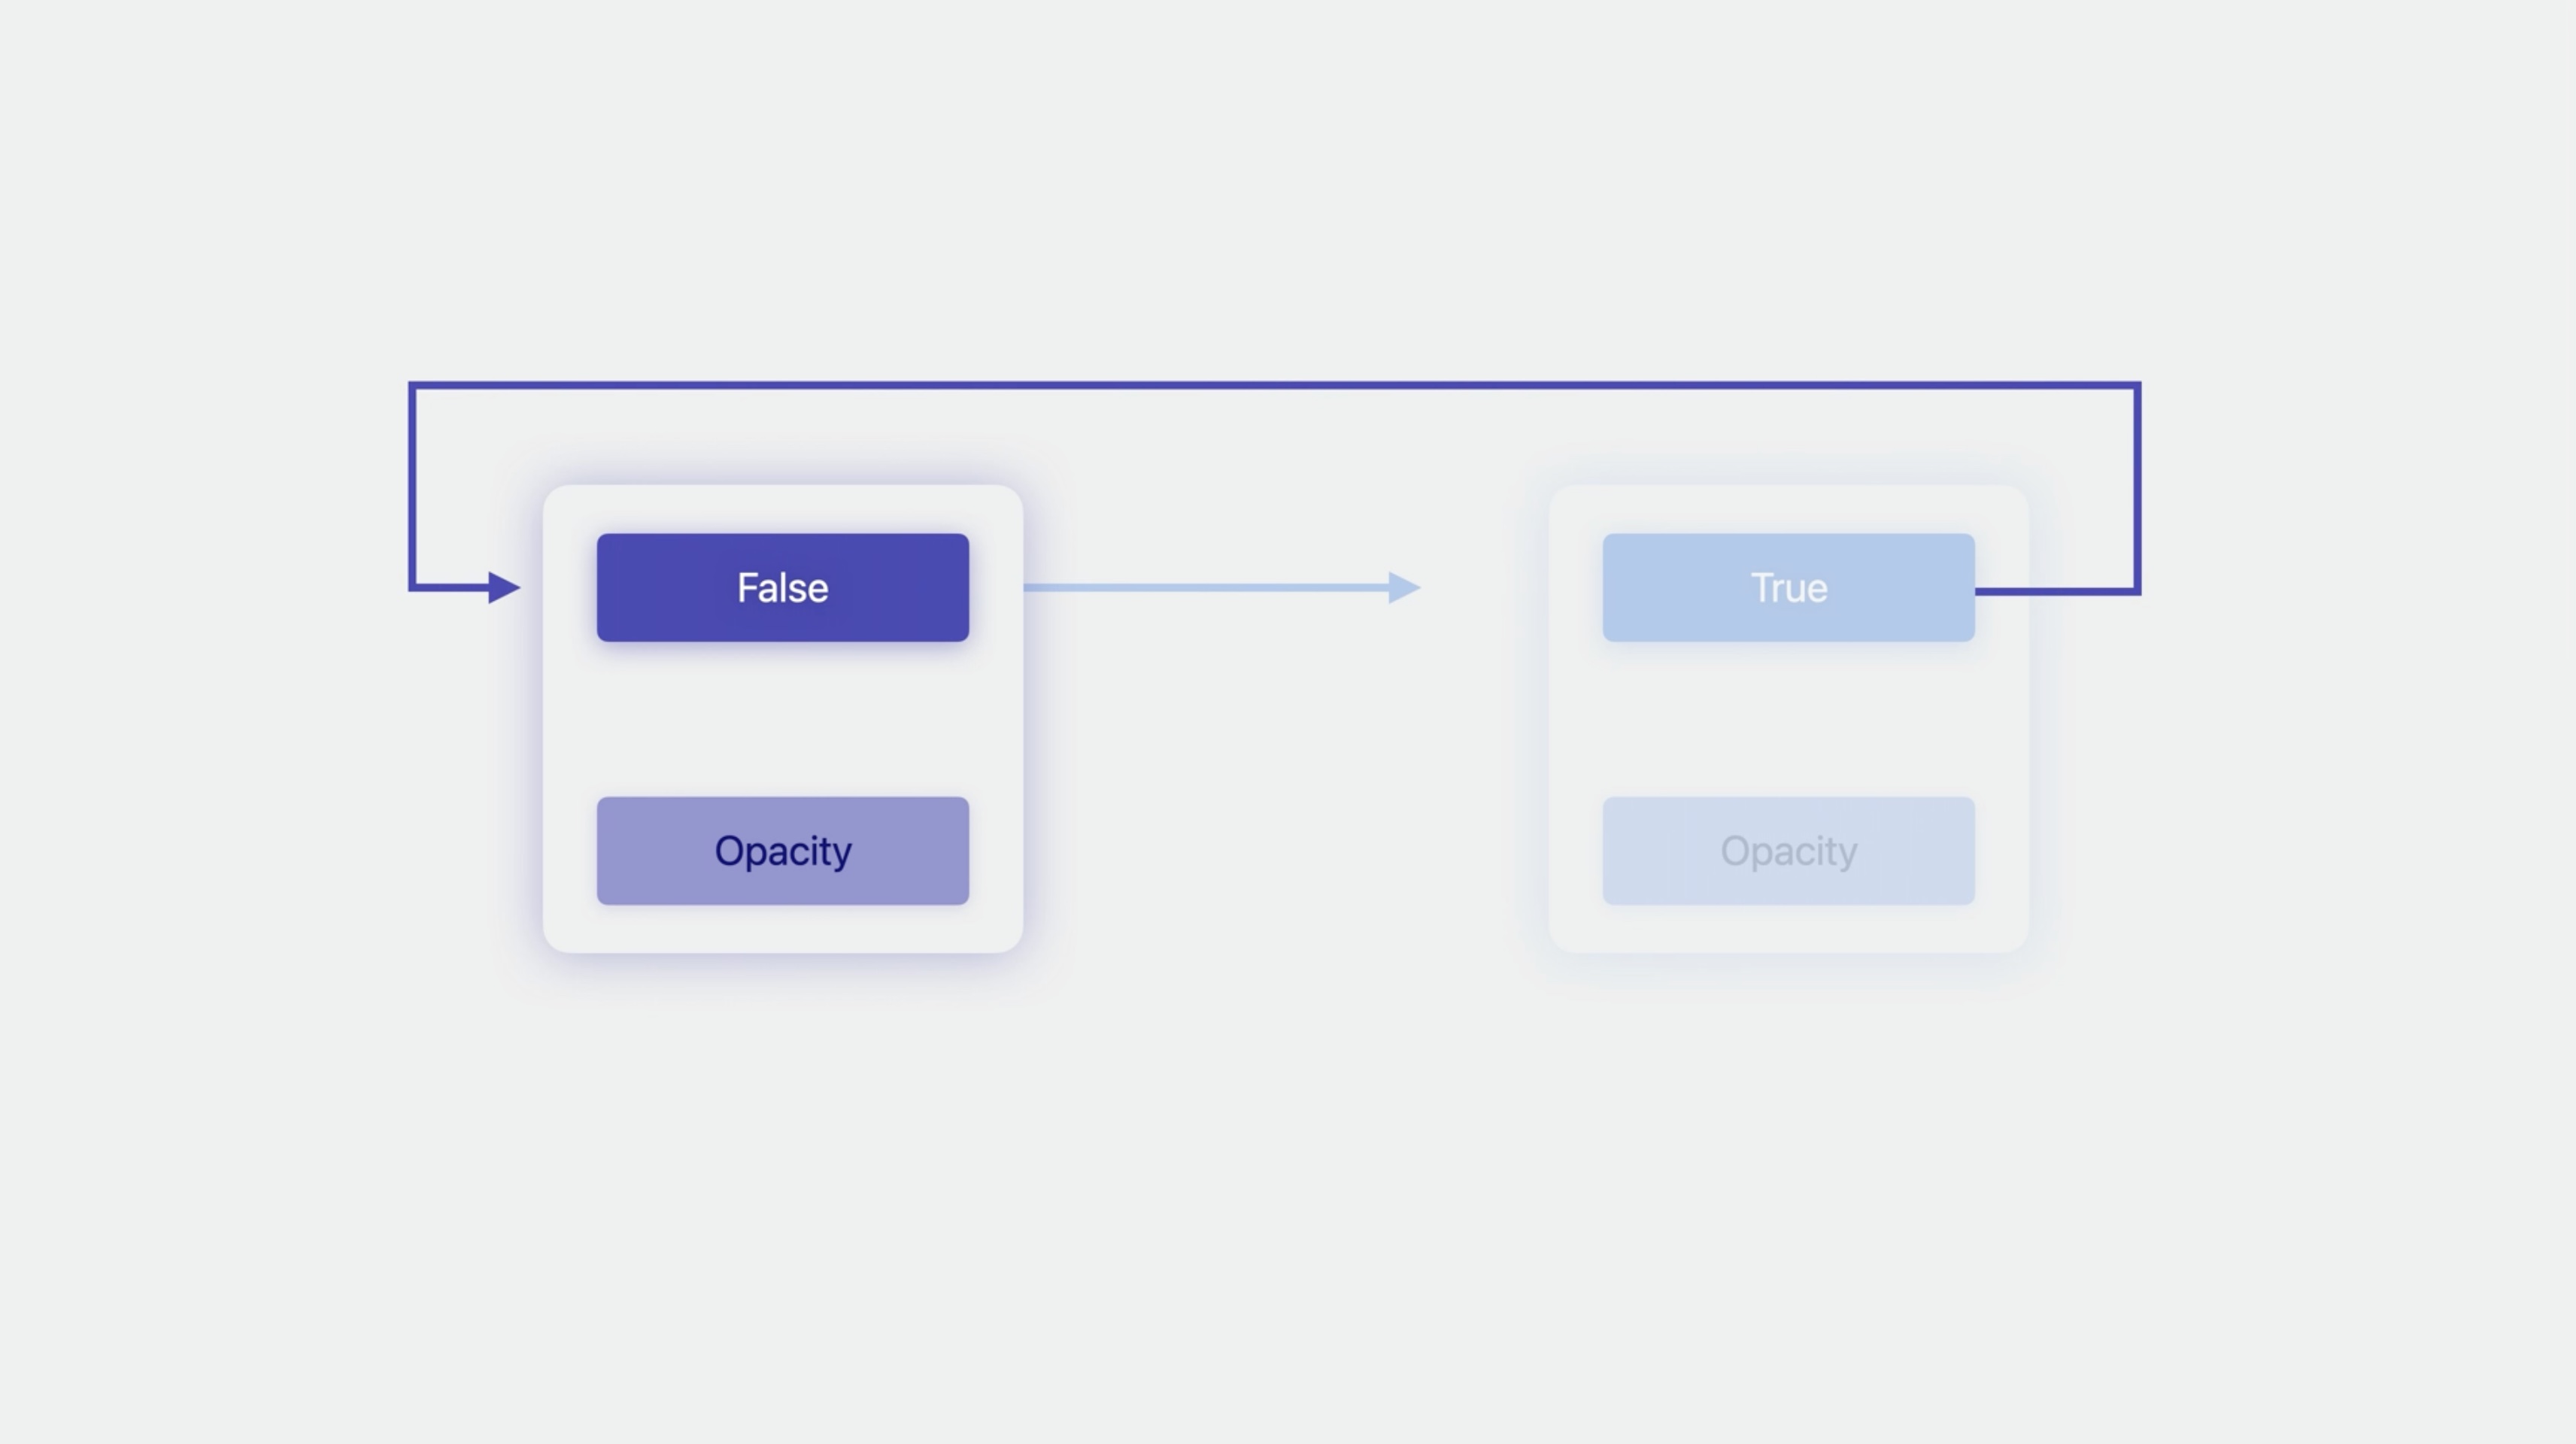
There are only have two phases, so this causes the animation to cycle between the two states. Of course, we can also define animations that include more than two phases, and any number of additional view modifiers.
Now, instead of changing the opacity, this changes the foreground style, using red when highlighted, and otherwise the primary foreground style.
OverdueReminderView()
        .phaseAnimator([false, true]) { content, phase in
            content
                .foregroundStyle(phase ? .red : .primary)
        }
By default, SwiftUI uses a spring animation. And while springs are great for handling dynamic state changes, in this case we can change the animation by adding a trailing "animation" closure.
OverdueReminderView()
        .phaseAnimator([false, true]) { content, phase in
            content
                .foregroundStyle(value ? .red : .primary)
        } animation: { phase in
            .easeInOut(duration: 1.0)
        }
The phase that is being animated to is passed in, in case we want to use a different animation for each phase.
Animations that are triggered by events.
Animating the emoji show reactions left by others.
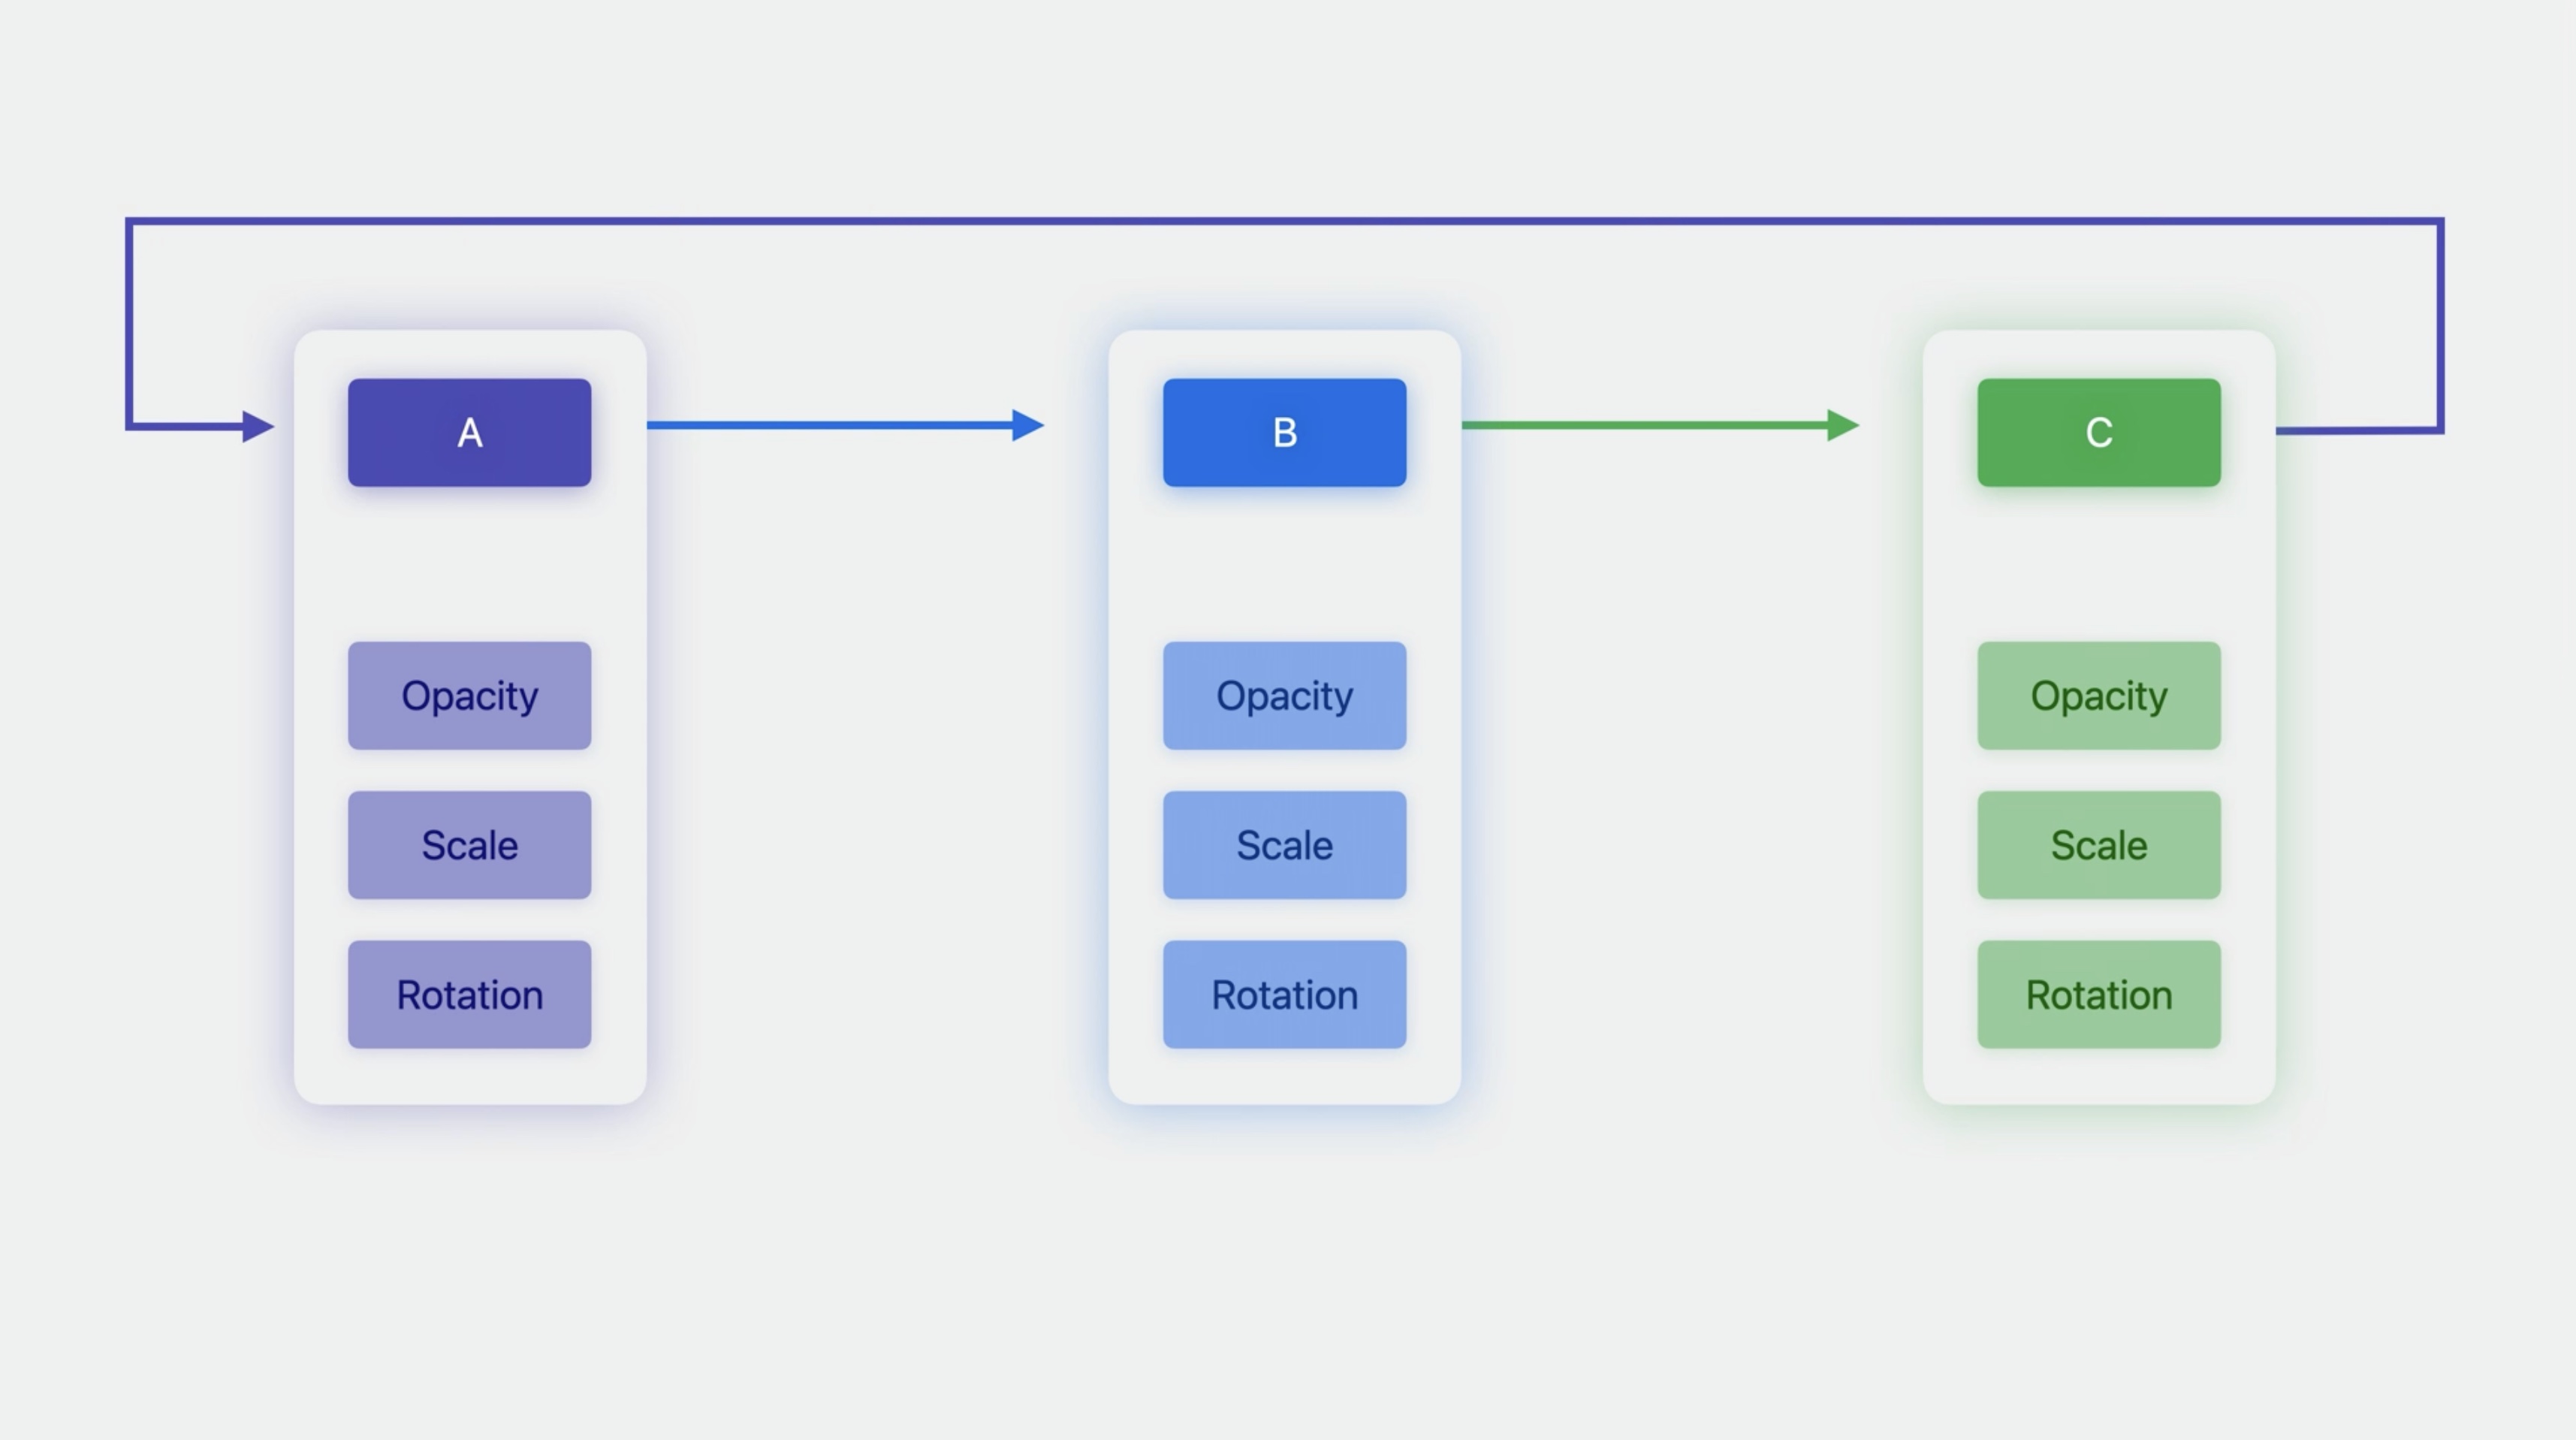
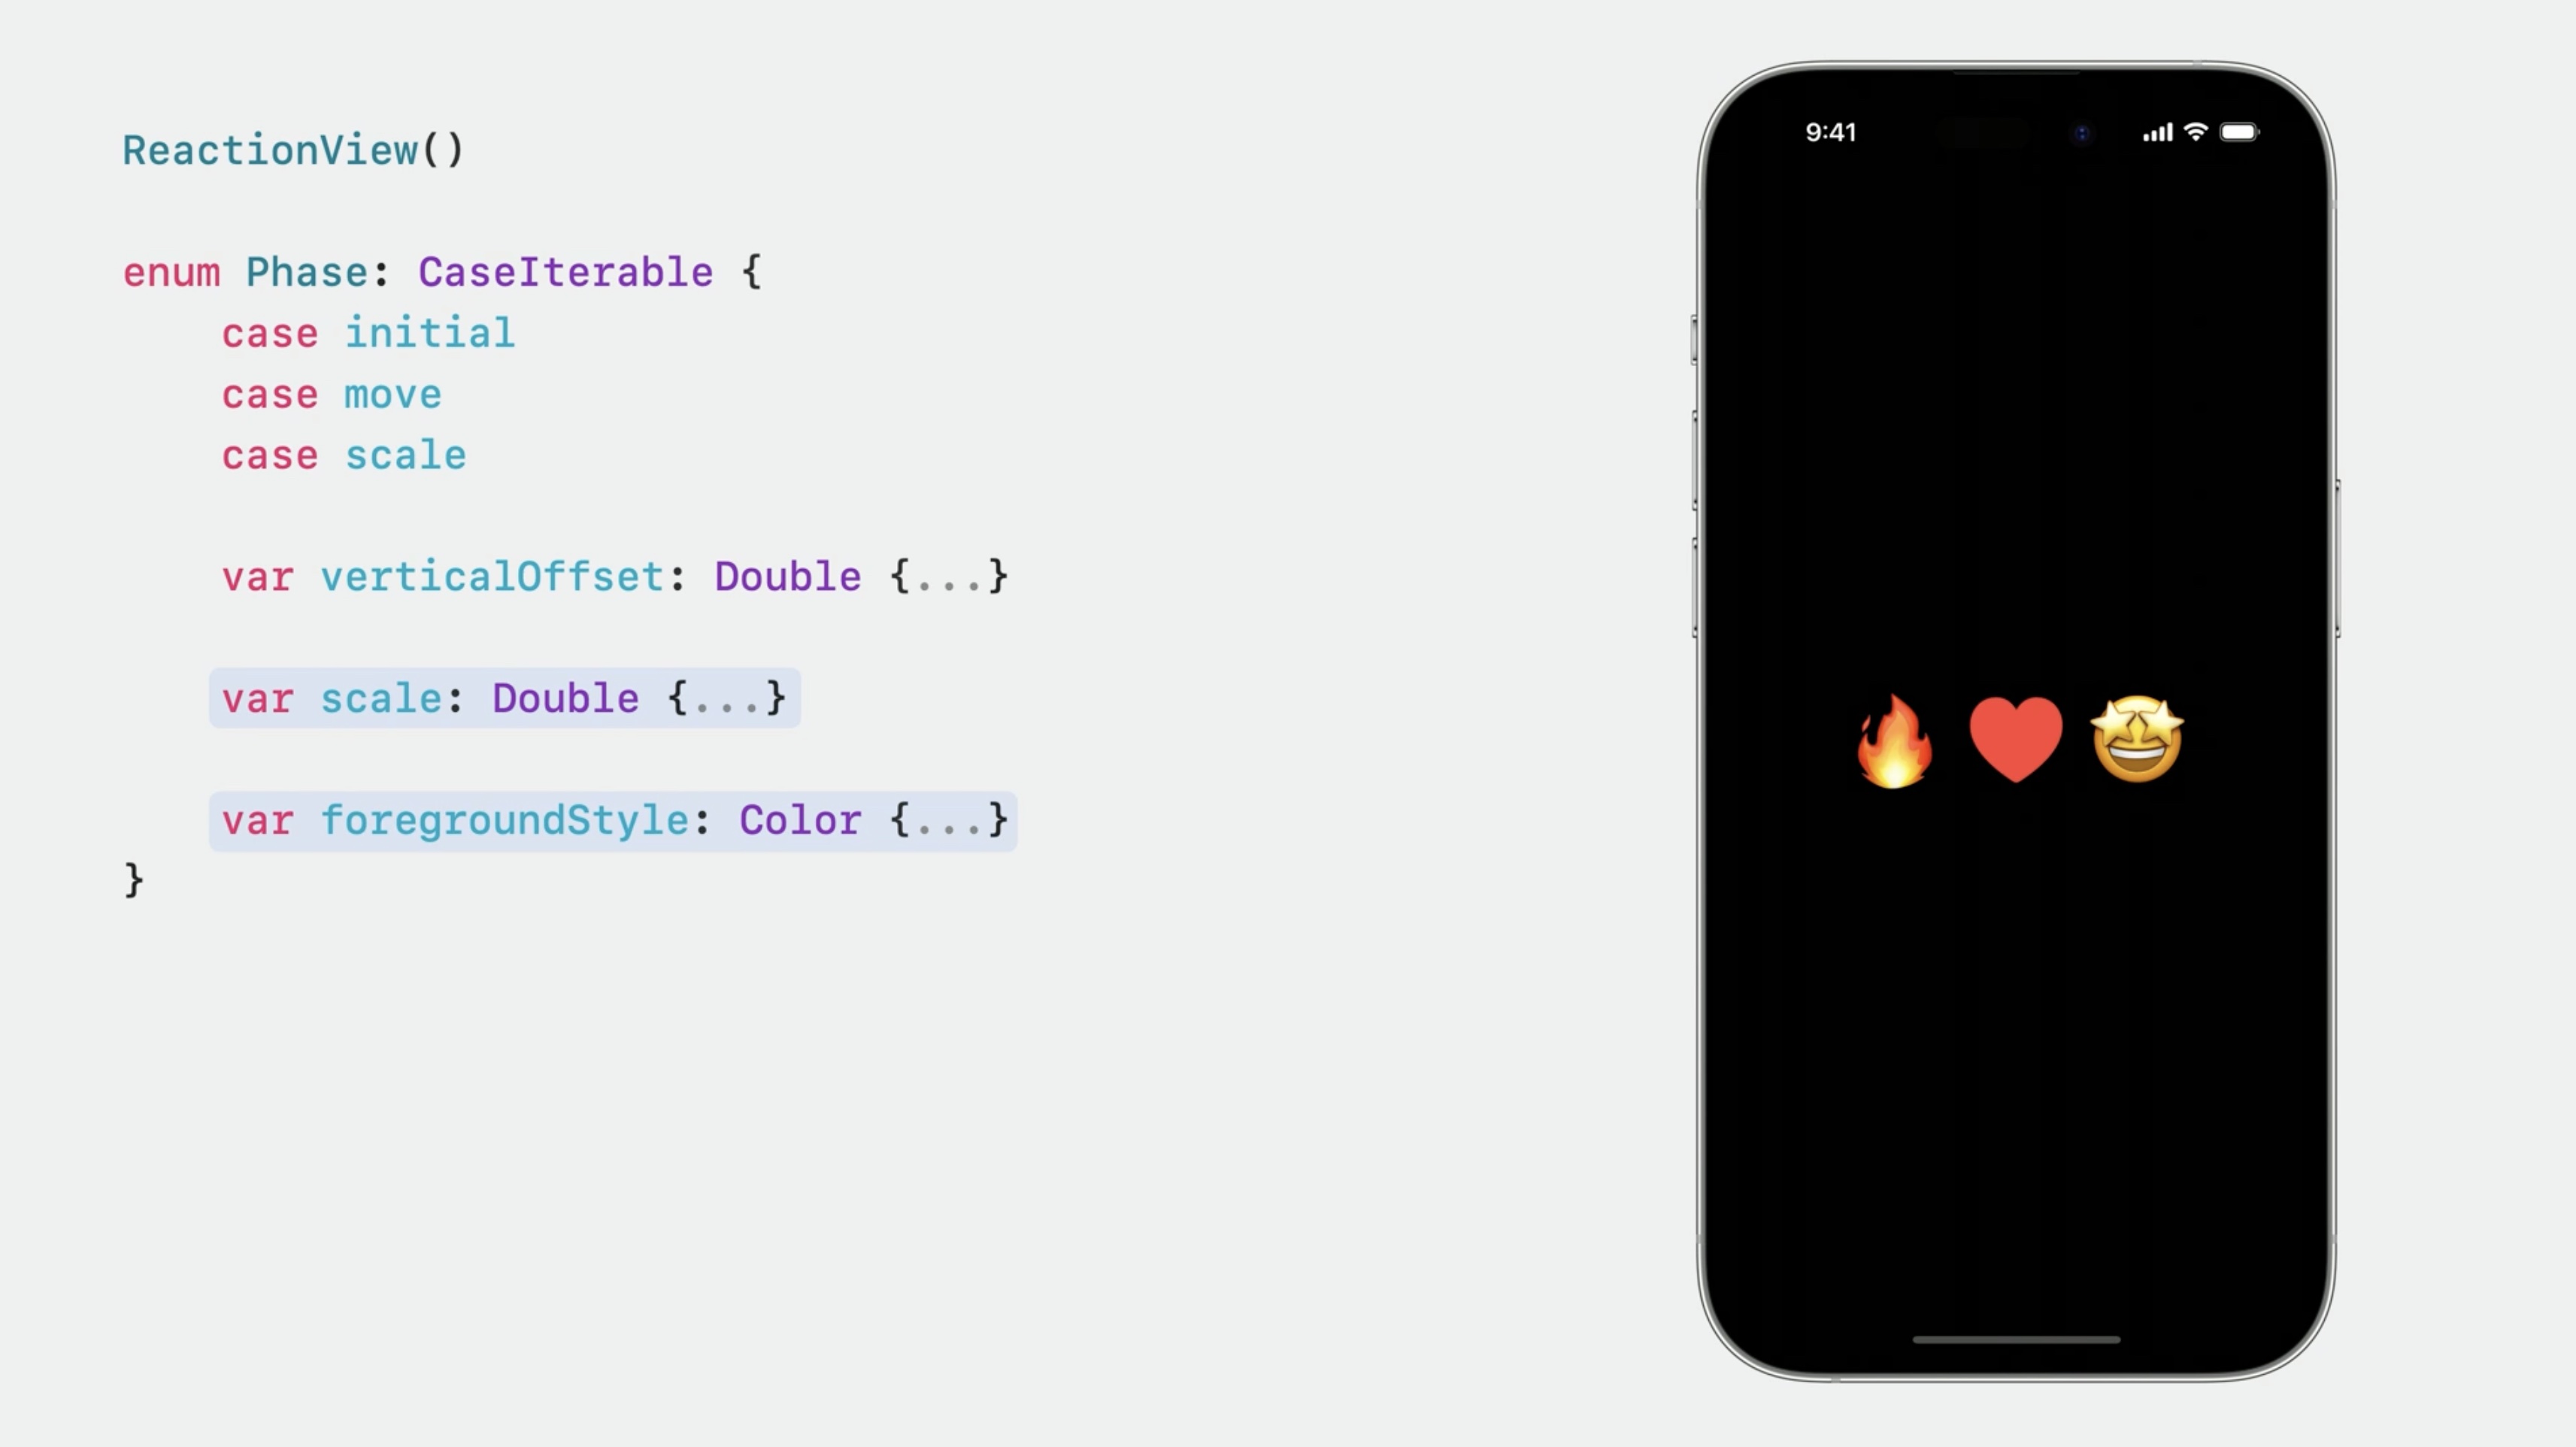
Unlike in the previous example that simply alternated between two states, we want a more complex animation. An enum is a great way to define a list of steps for the animation.
ReactionView()

enum Phase: CaseIterable {
    case initial
    case move
    case scale
}
Three cases:
- for the initial appearance, - to move the view up, - and scale it up .
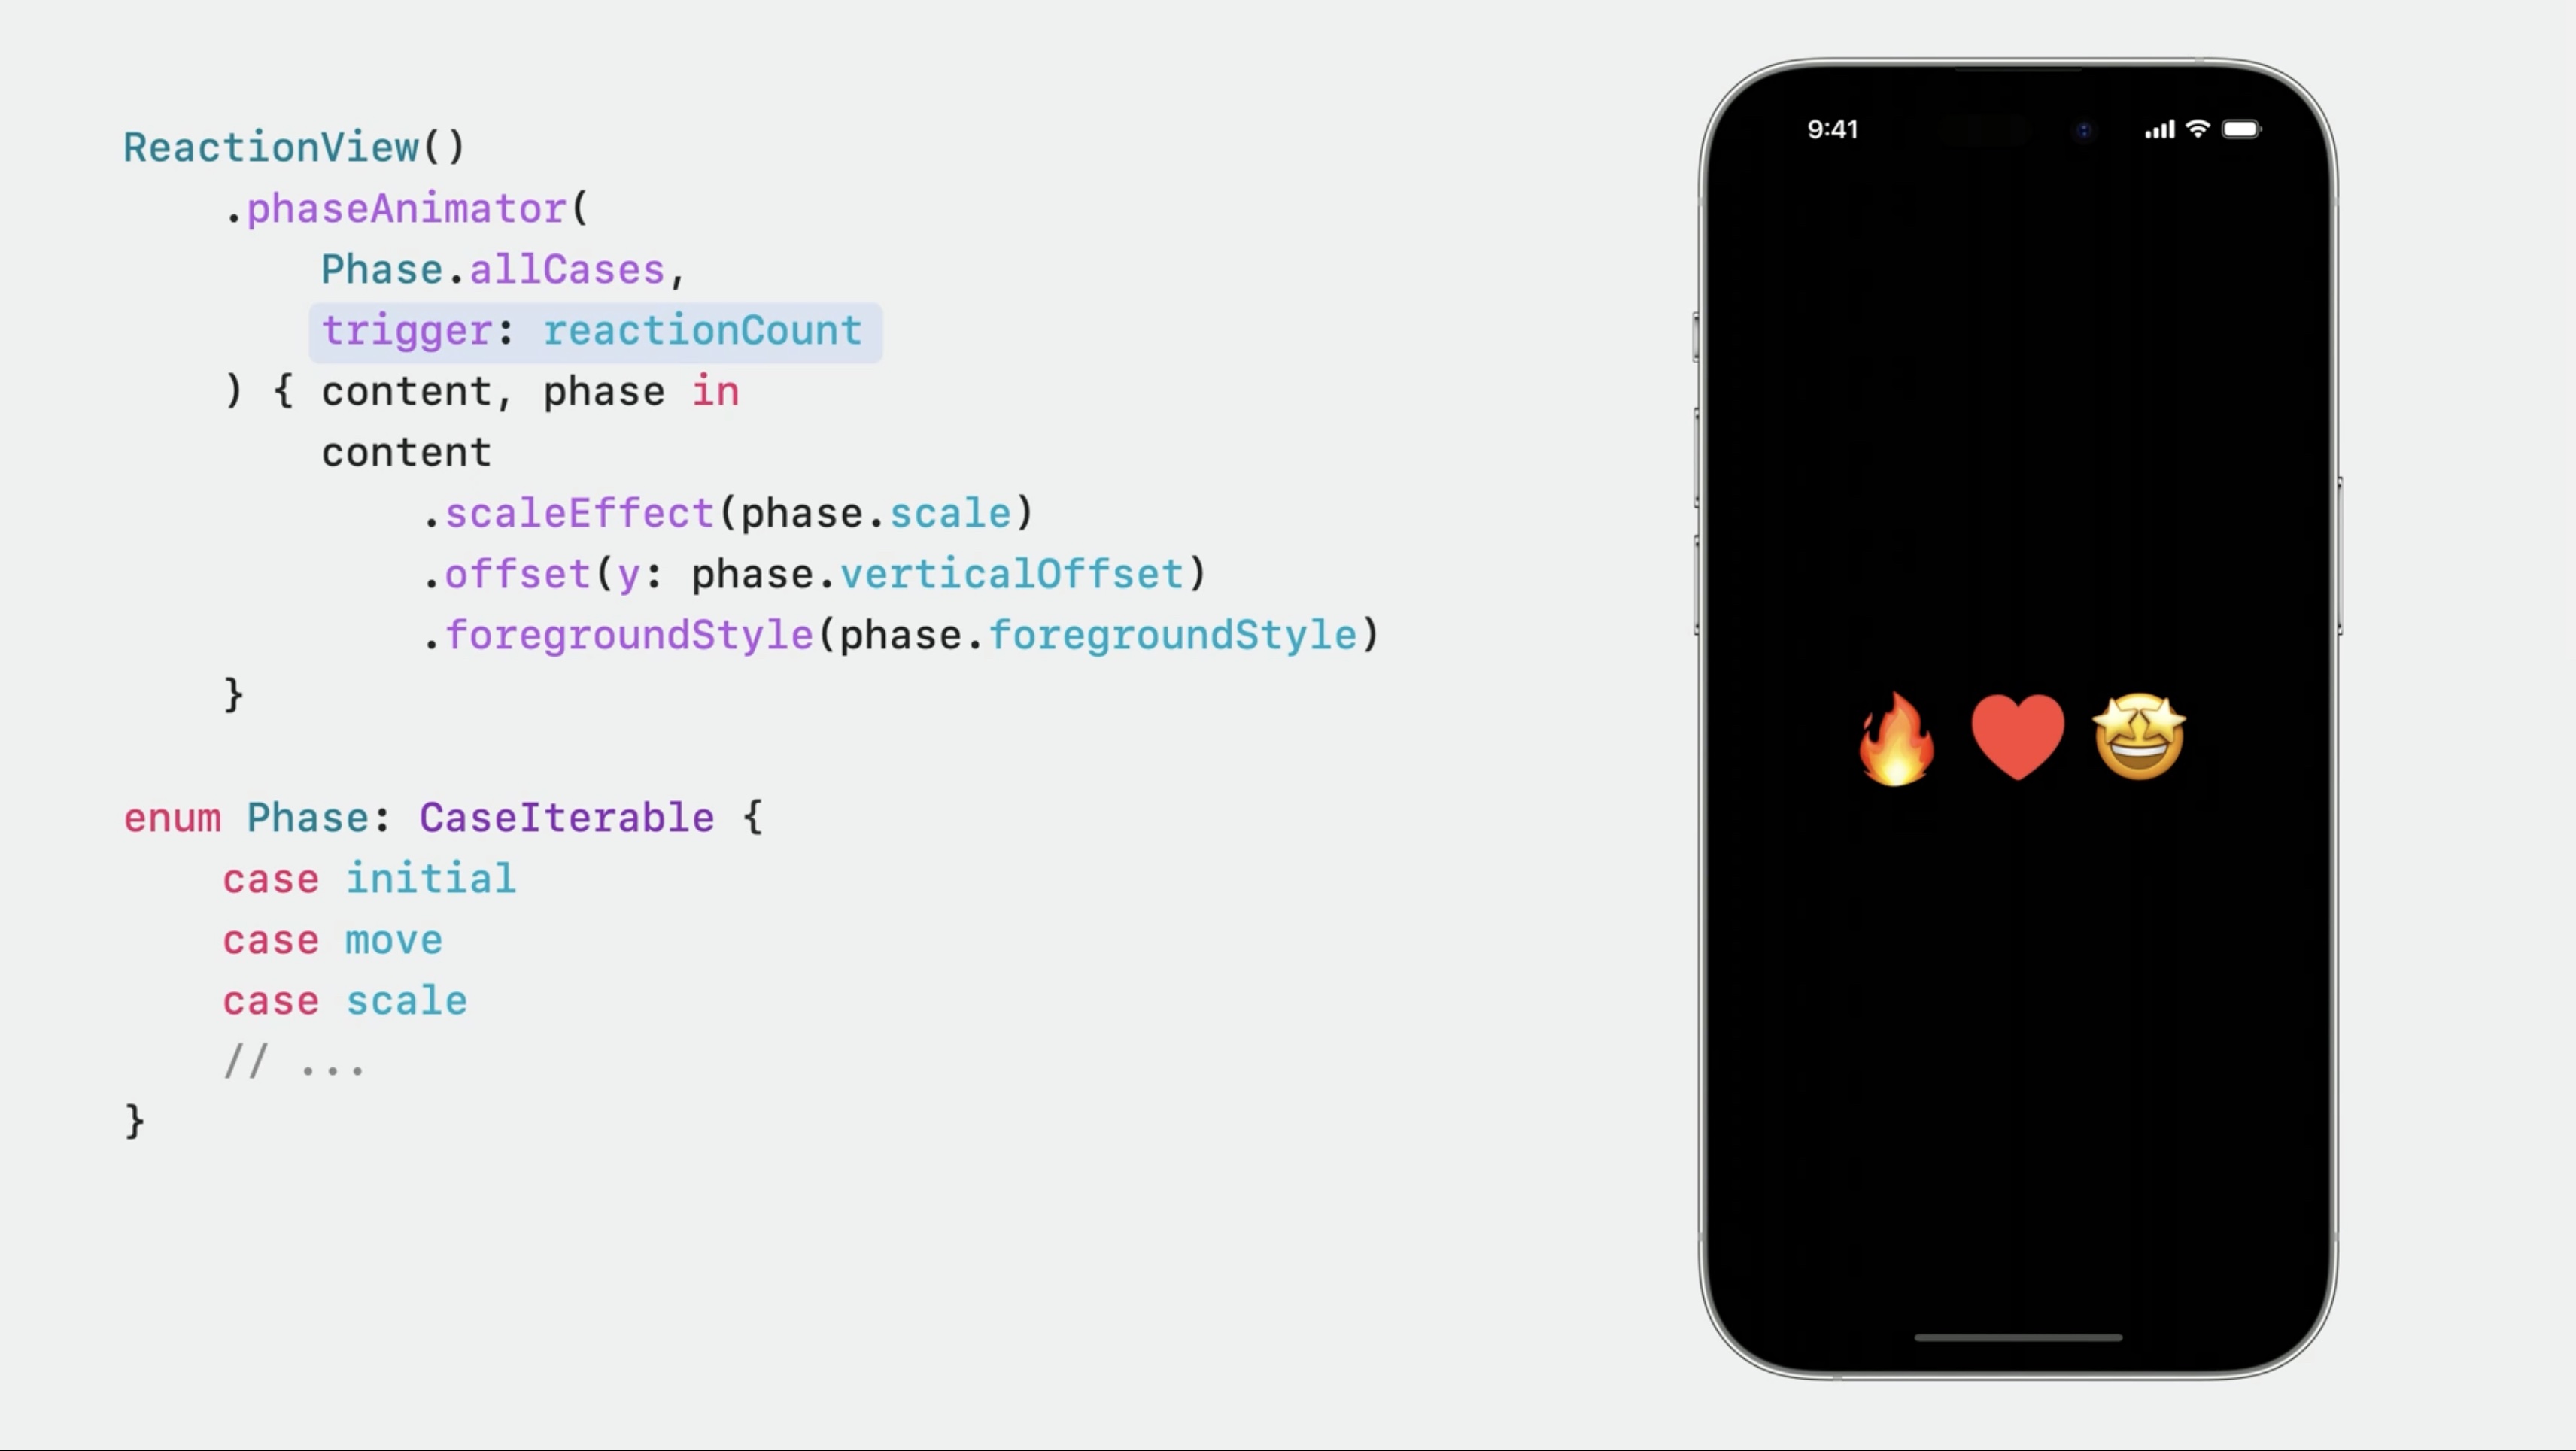
To simplify the view body, we will add computed properties to this enum that define the different effects that we will apply. for instance a computed vertical offset property. We switch over the enum to return the right offset for each case.
Likewise, there are two additional computed properties to determine the view’s scale and foreground style.
ReactionView()

enum Phase: CaseIterable {
    case initial
    case move
    case scale

    var verticalOffset: Double {
        switch self {
        case .initial: 0
        case .move, .scale: -64
        }
    }

    var scale: Double {
        switch self {
        case .initial: 1.0
        case .move: 1.1
        case .scale: 1.8
        }
    }

    var foregroundStyle: Color {
        switch self {
        case .initial: .white
        case .move, .scale: .red
        }
    }
}
We add the phaseAnimator modifier, but this time, we give it a "trigger" value which observes the value that we specify for changes. And when a change occurs, it begins animating through the phases. Using the computed properties that we defined on the phase type, we apply modifiers to the view.
ReactionView()
    .phaseAnimator
        Phase.allCases,
        trigger: reactionCount
    ) { content, phase in
        content
            .scaleEffect(phase.scale)
            .offset(y: phase.verticalOffset)
            .foregroundStyle(phase.foregroundStyle)
    }
}
Customizing the animation for each transition to get the effect that we want...
ReactionView()
    .phaseAnimator
        Phase. allCases,
        trigger: reactionCount
    ) { content, phase in
        content
            .scaleEffect(phase.scale)
            .offset(y: phase.verticalOffset)
            .foregroundStyle(phase.foregroundStyle)
    } animation: { phase in
        switch phase {
        case initial: .smooth
        case .move: .easeInOut(duration: 0.3)
        case .scale: .spring(
            duration: 0.3, bounce: 0.7)
        }
}

Keyframes
Keyframes provide complex, coordinated animations with complete control over timing and movement.
Keyframes are different from phases. Phases define discrete states that are provided to your view one at a time. And SwiftUI animates between those states, using the same animation types that we already know. When a state transition occurs, all of the properties are animated at the same time.
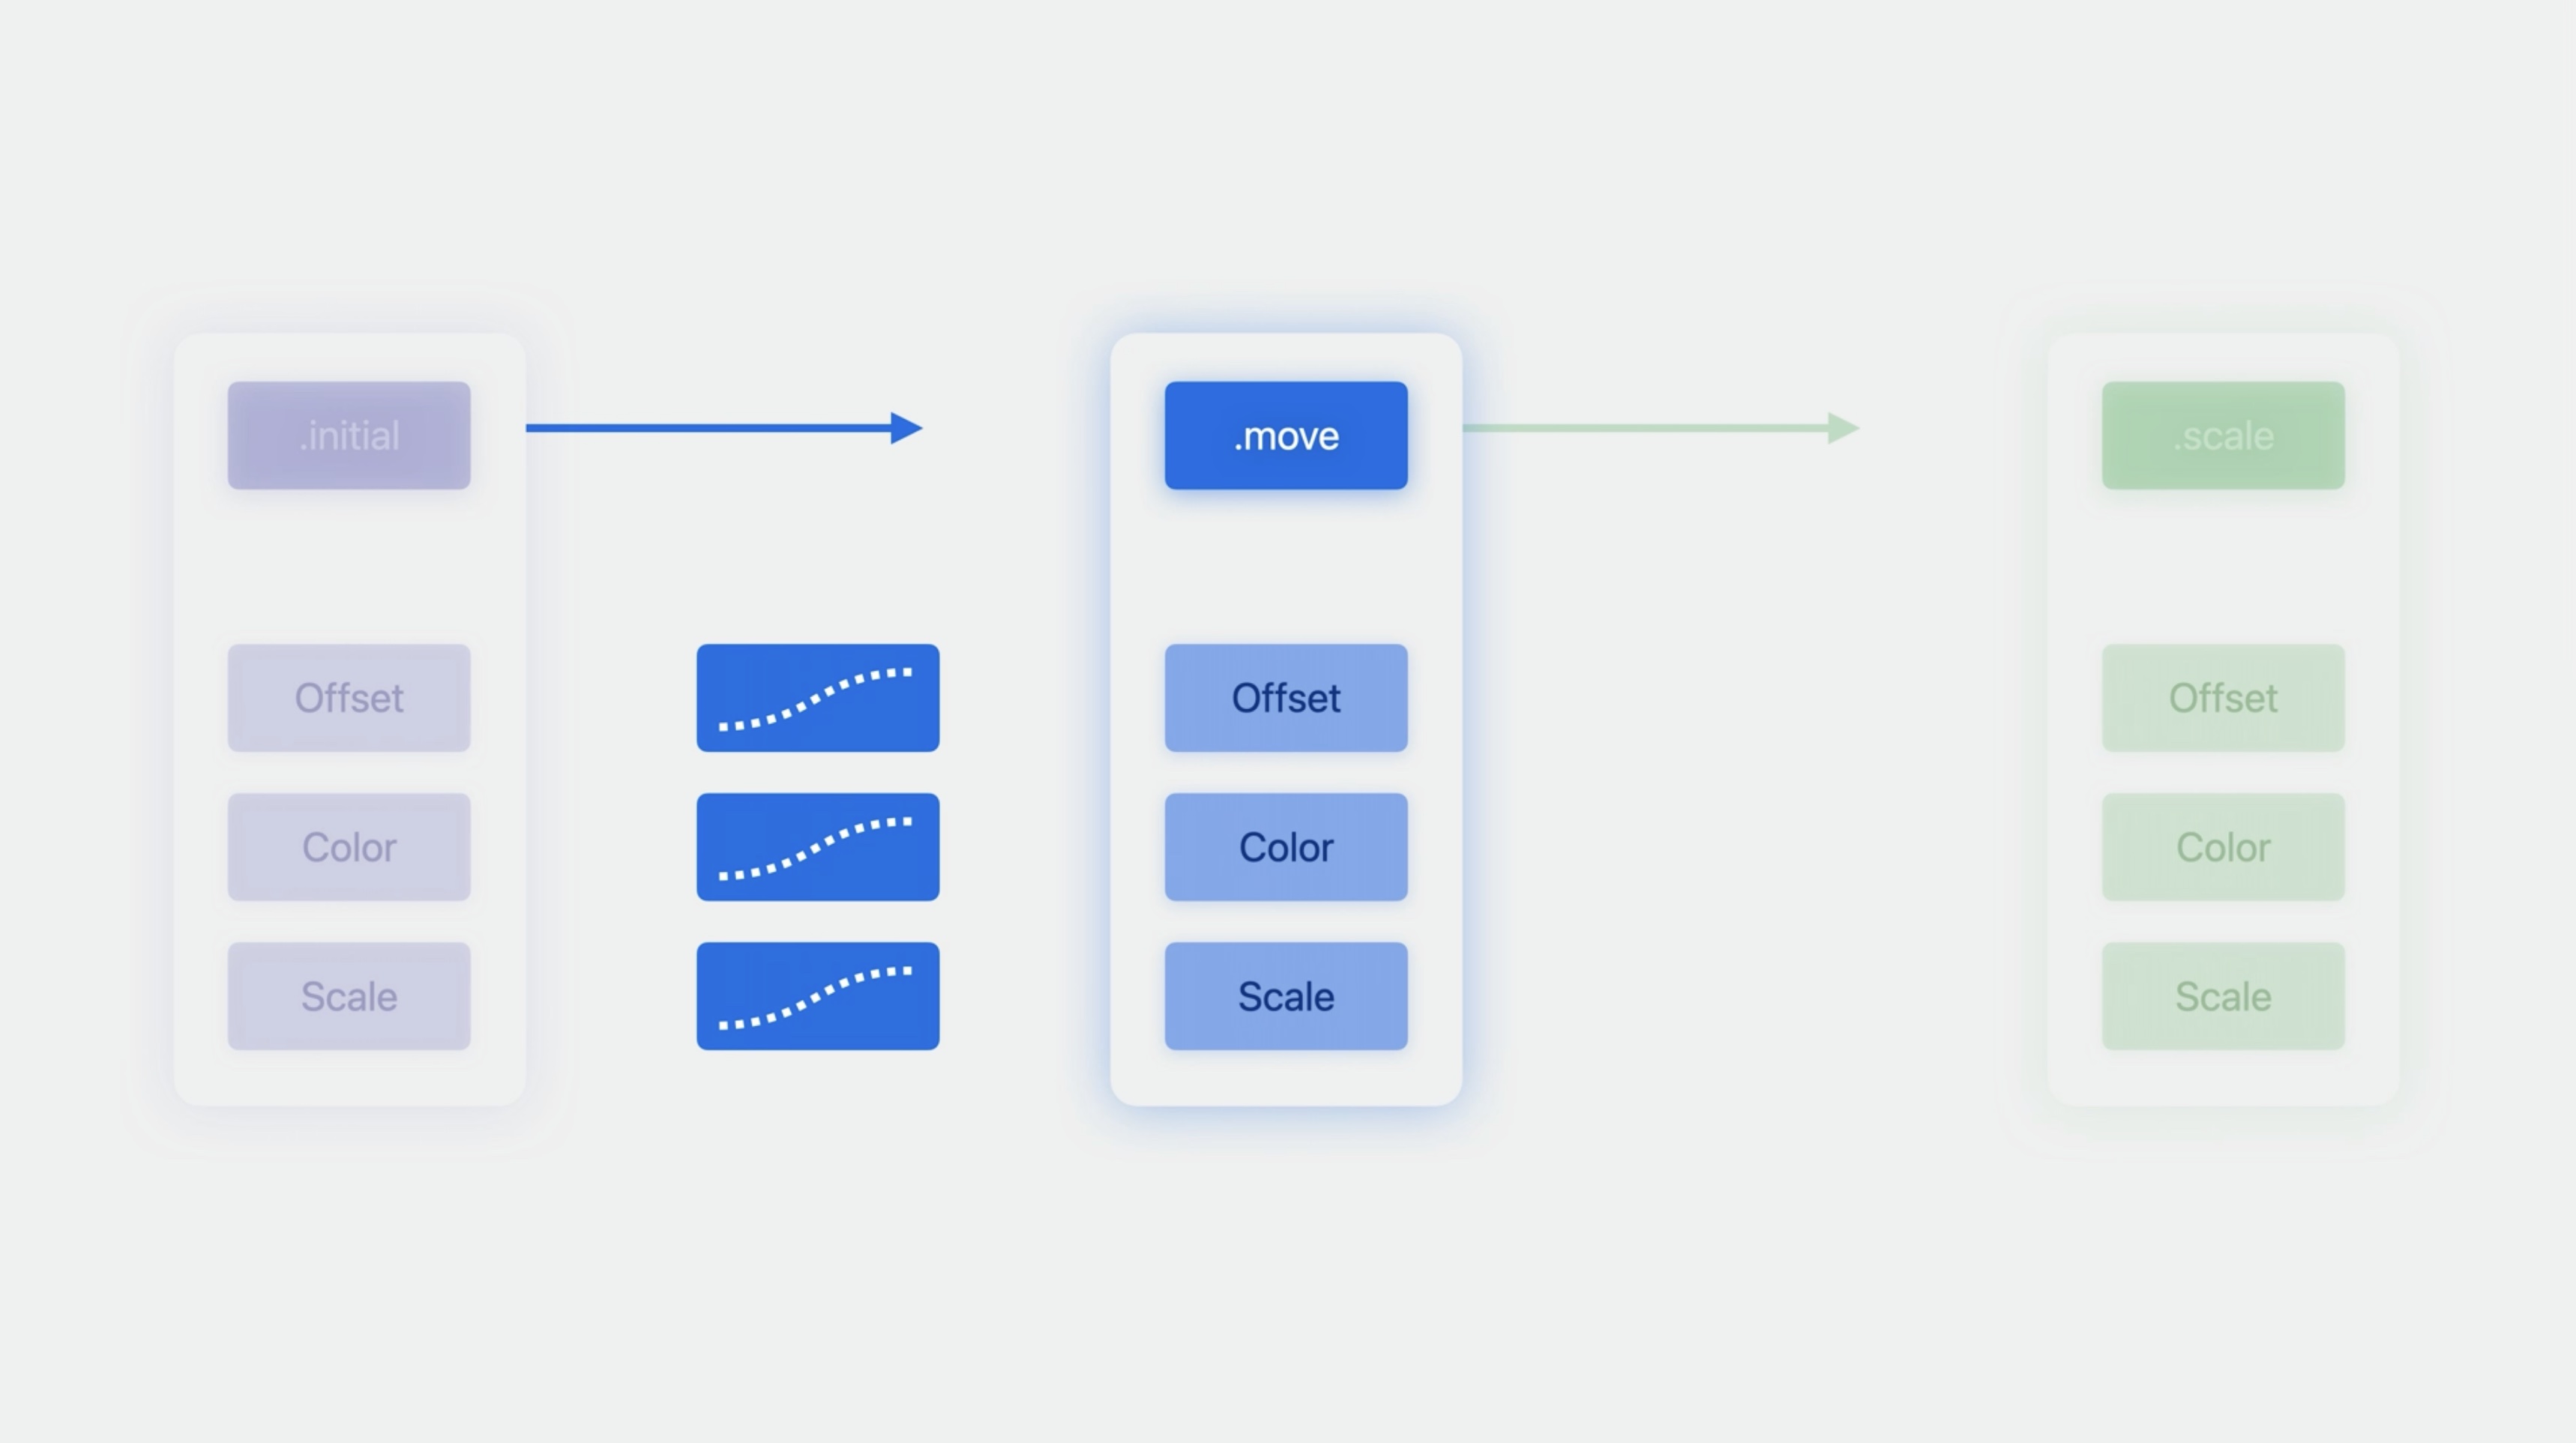
And then, when that animation is finished, SwiftUI animates to the next state.
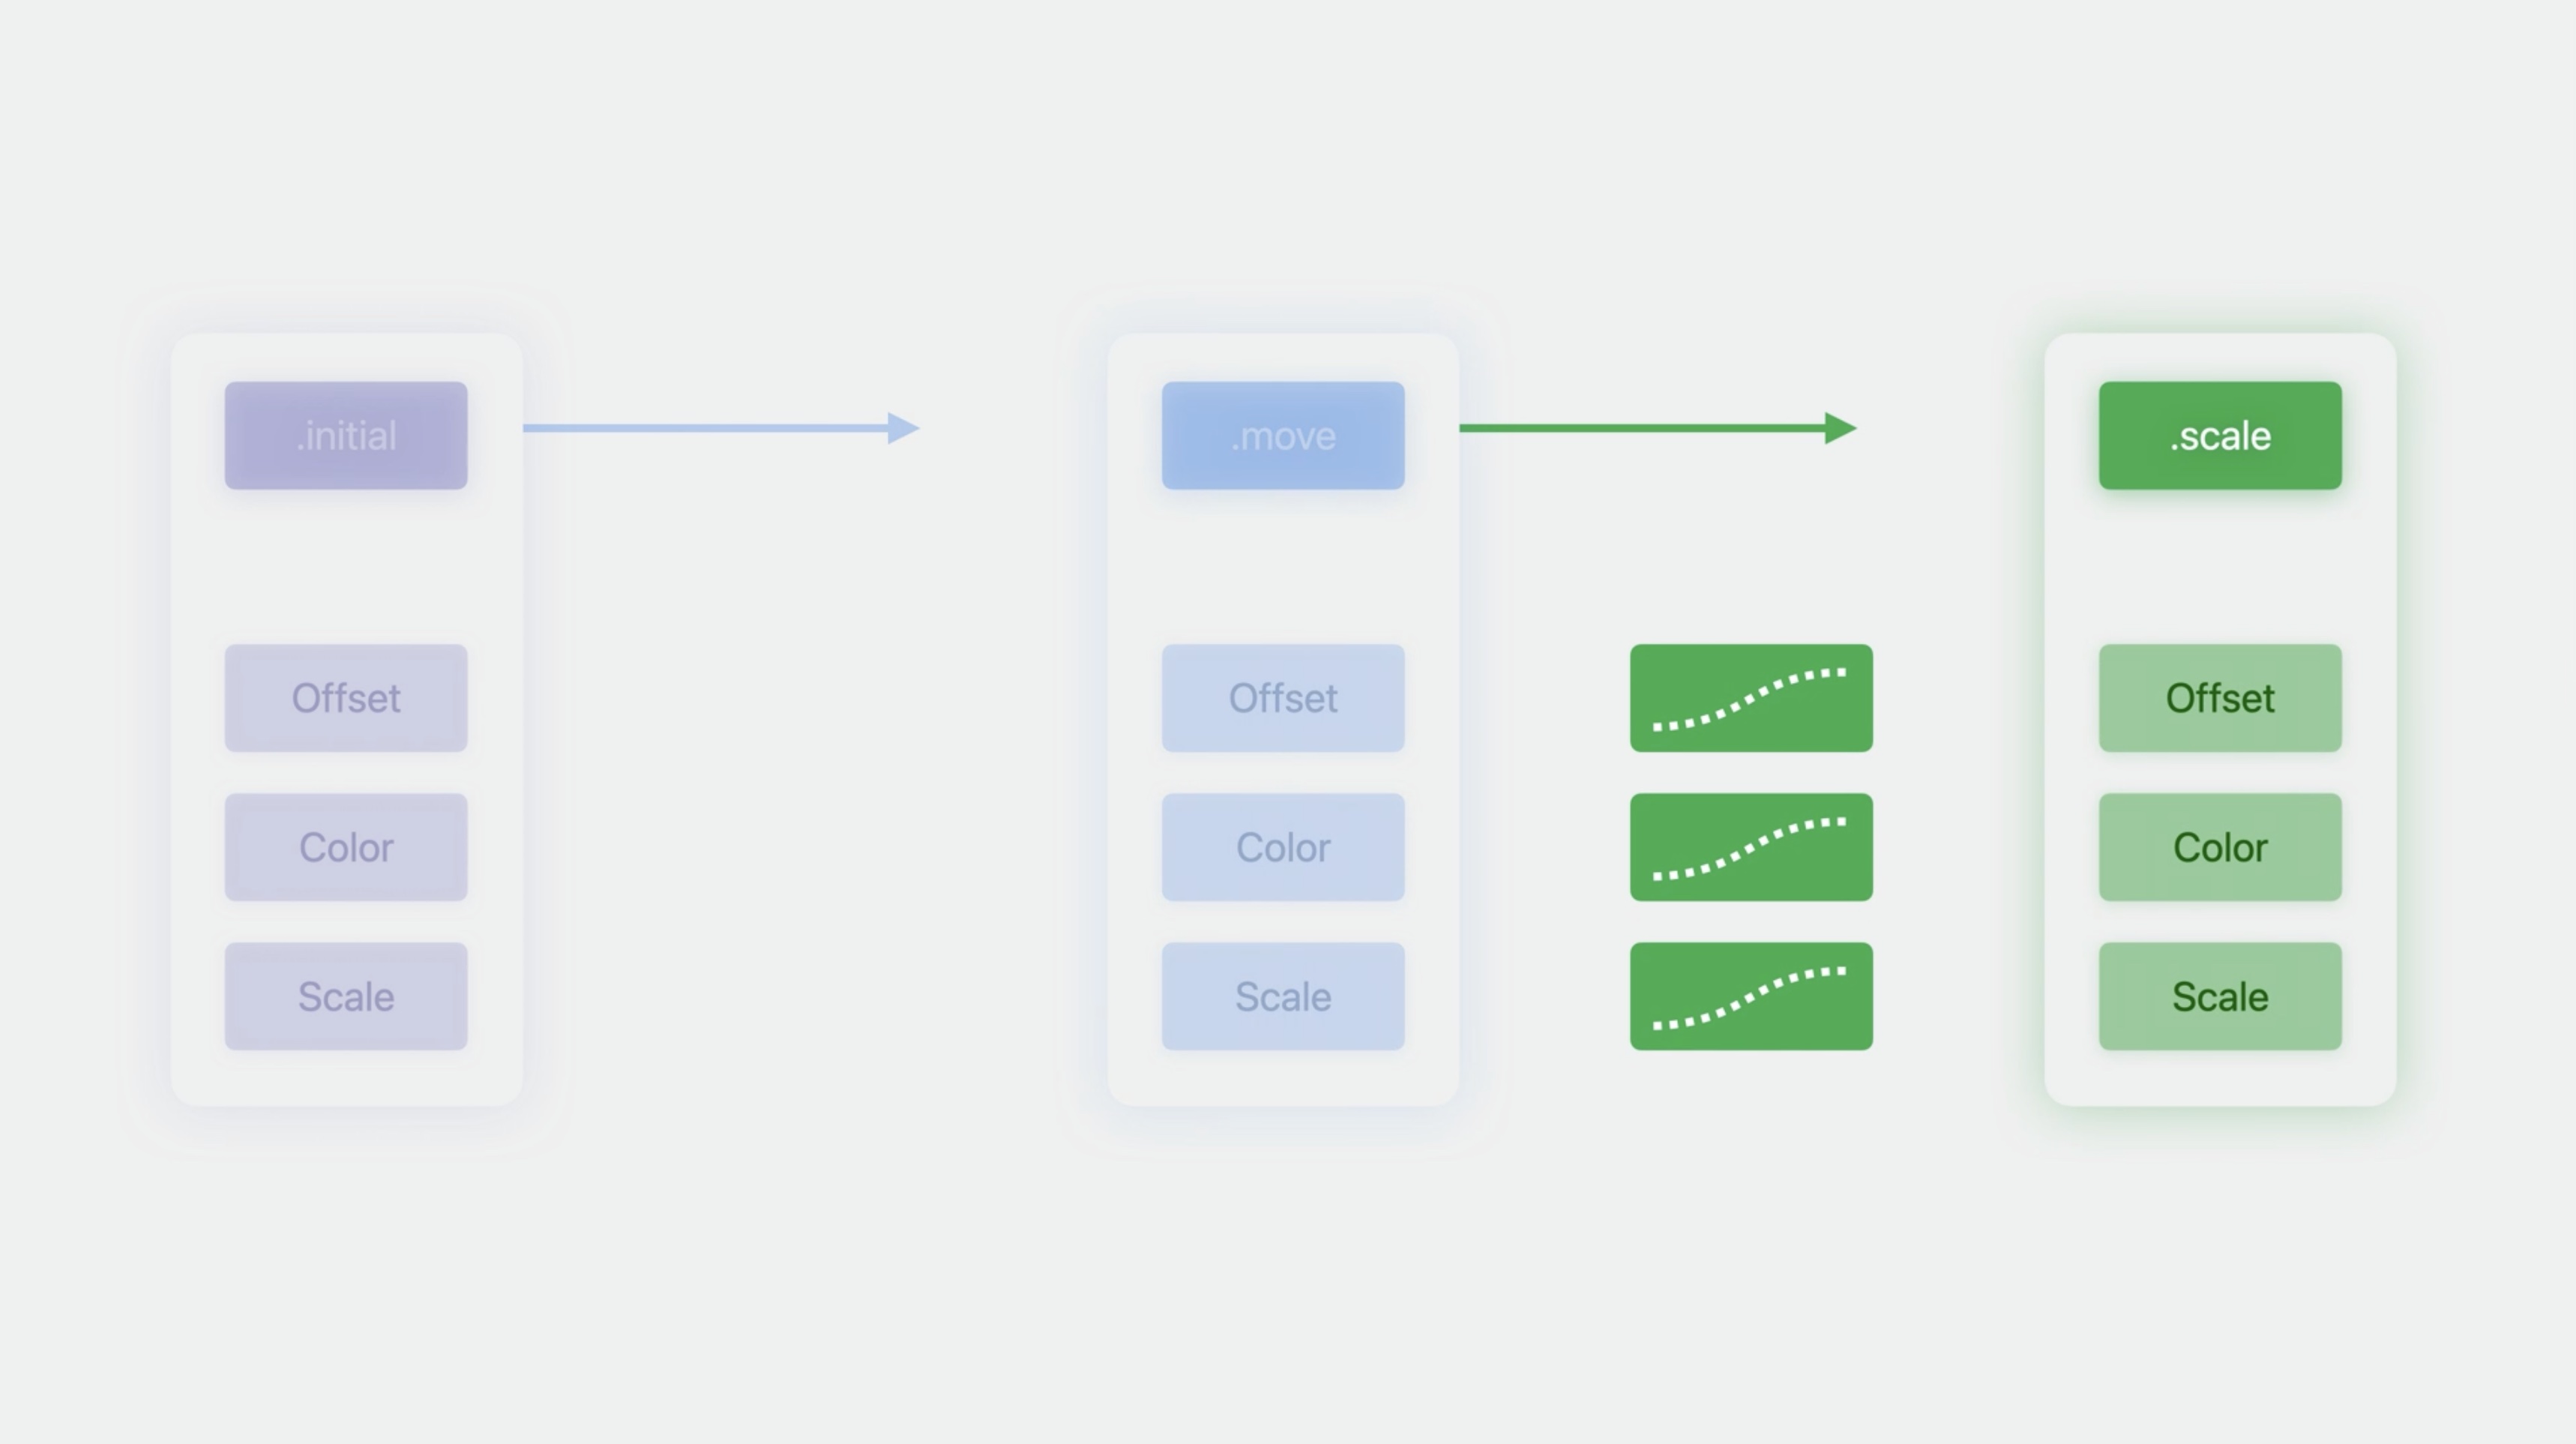
And this continues across all of the phases of the animation.
Keyframes allow us to animate each property independently, defining values at specific times within an animation.
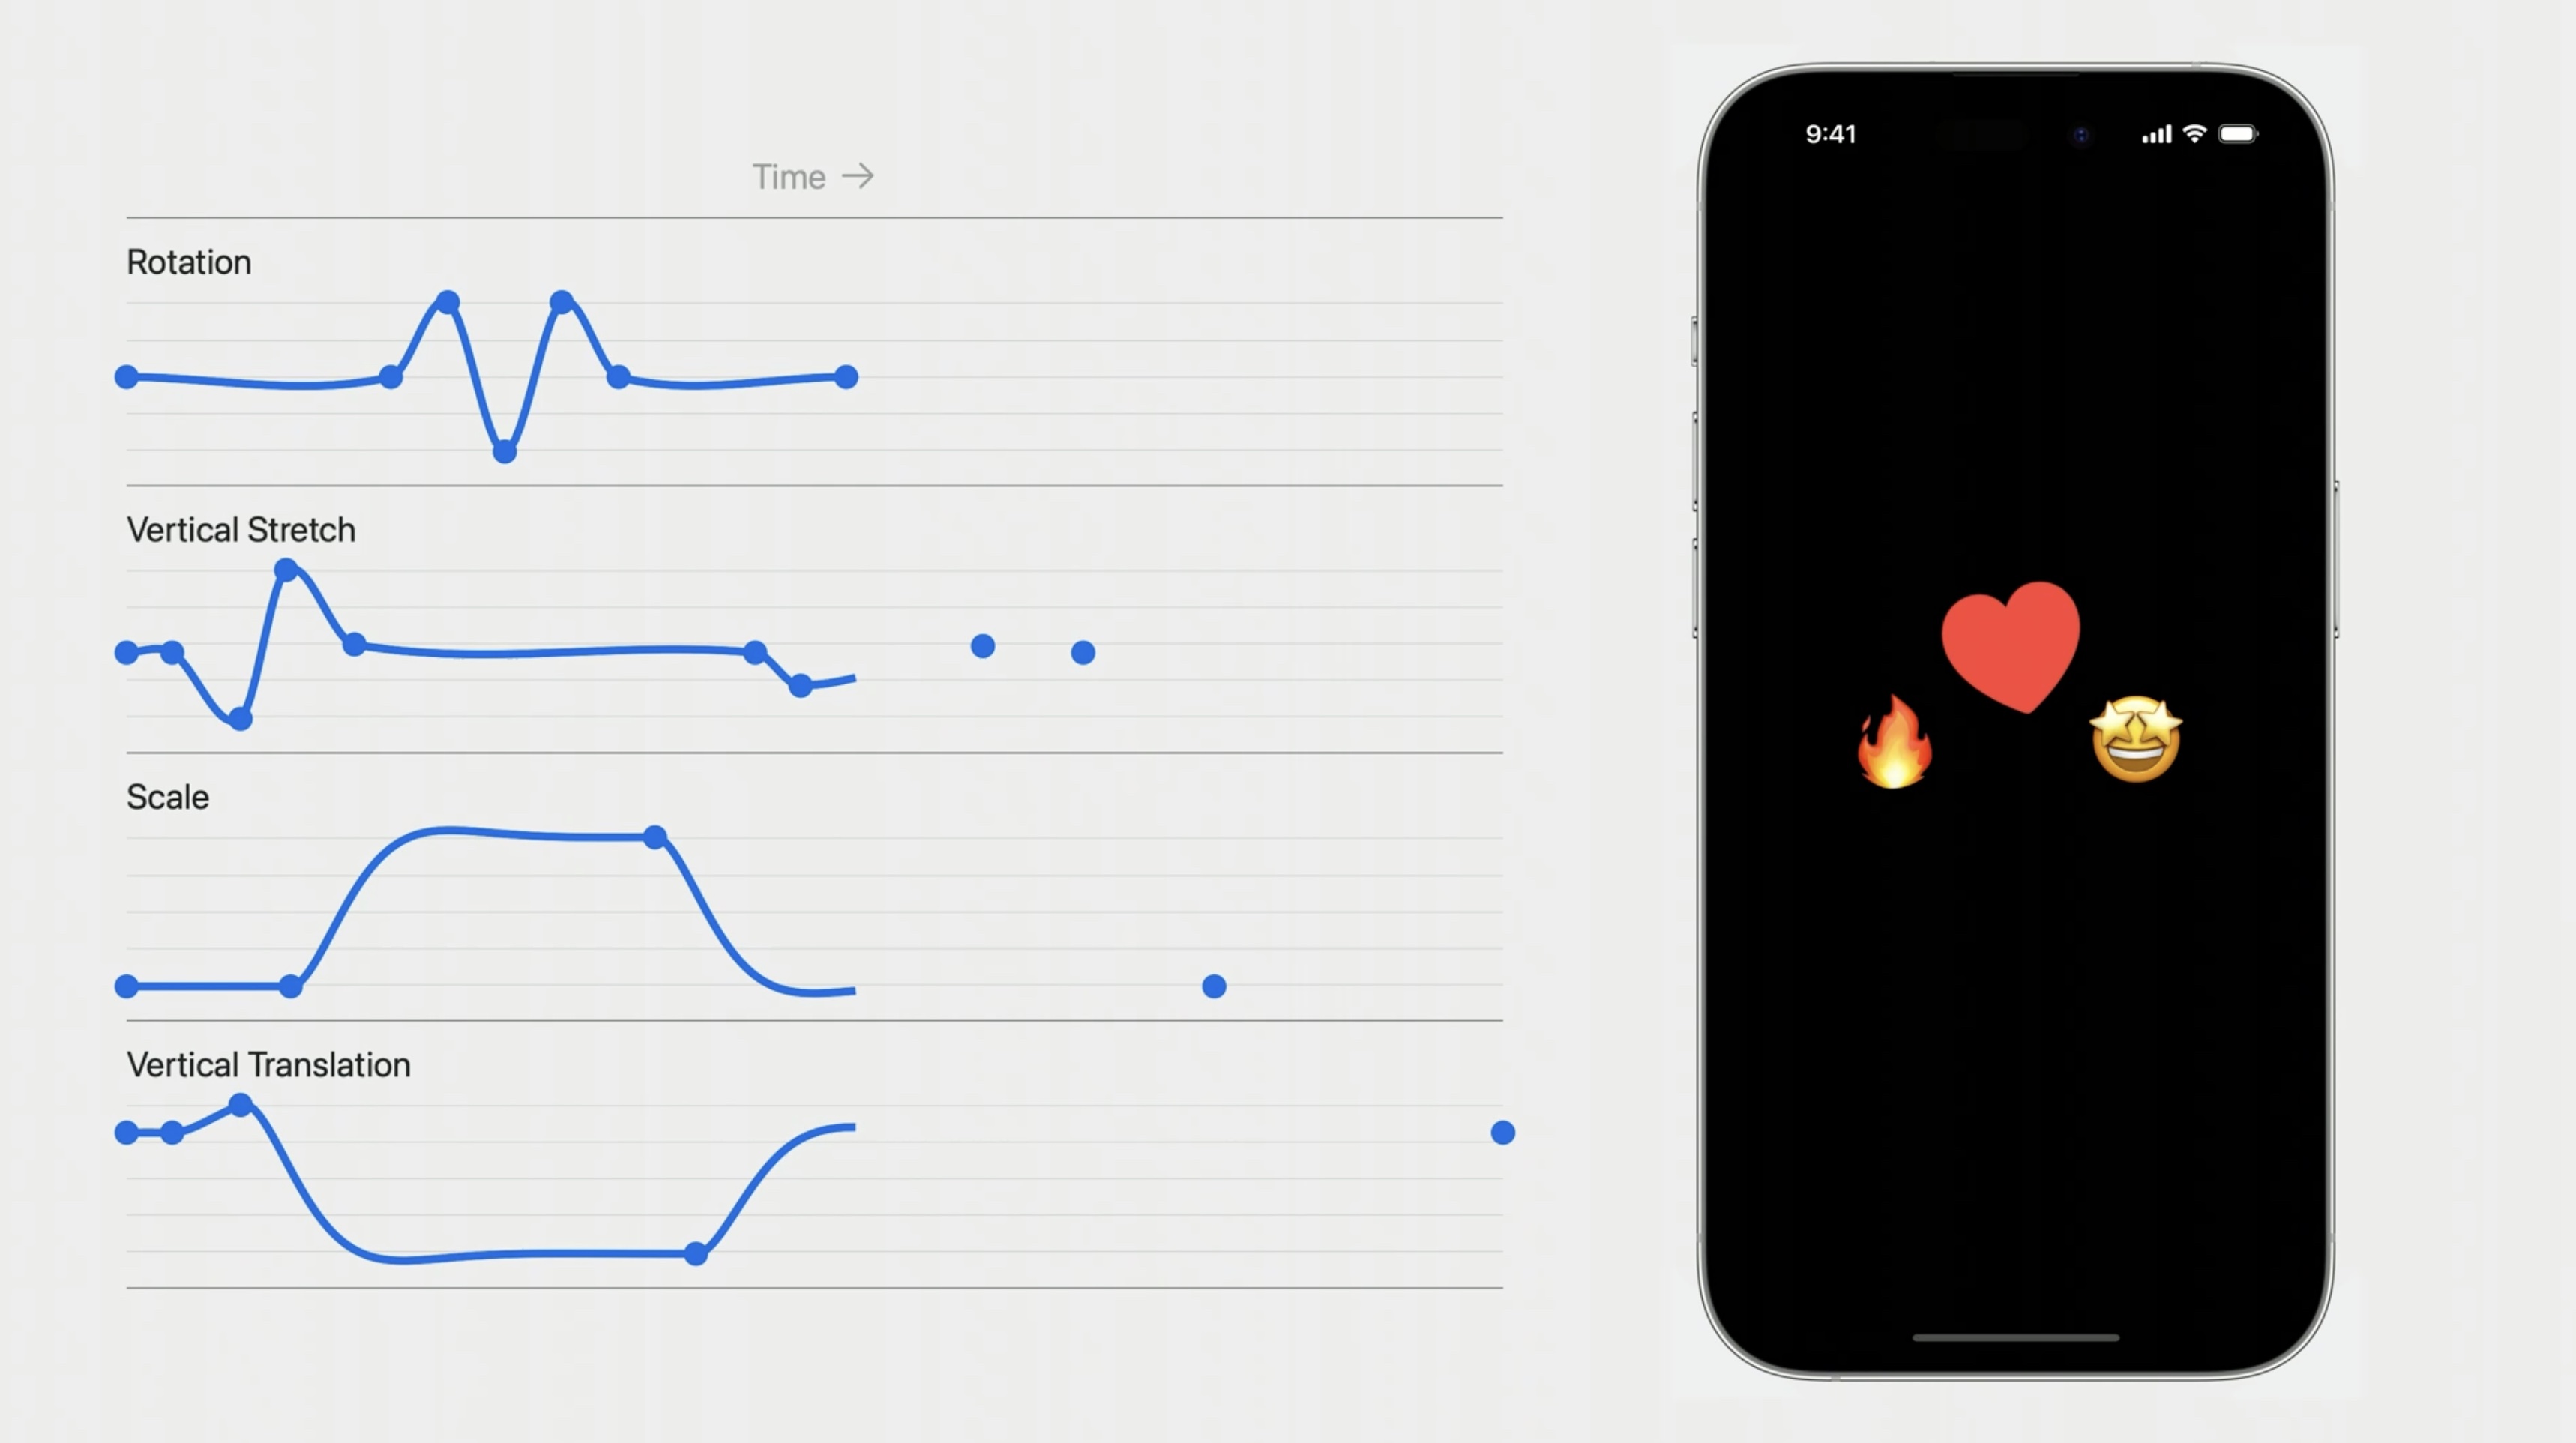
The dots here indicate keyframes: angles to use at each point during the animation.
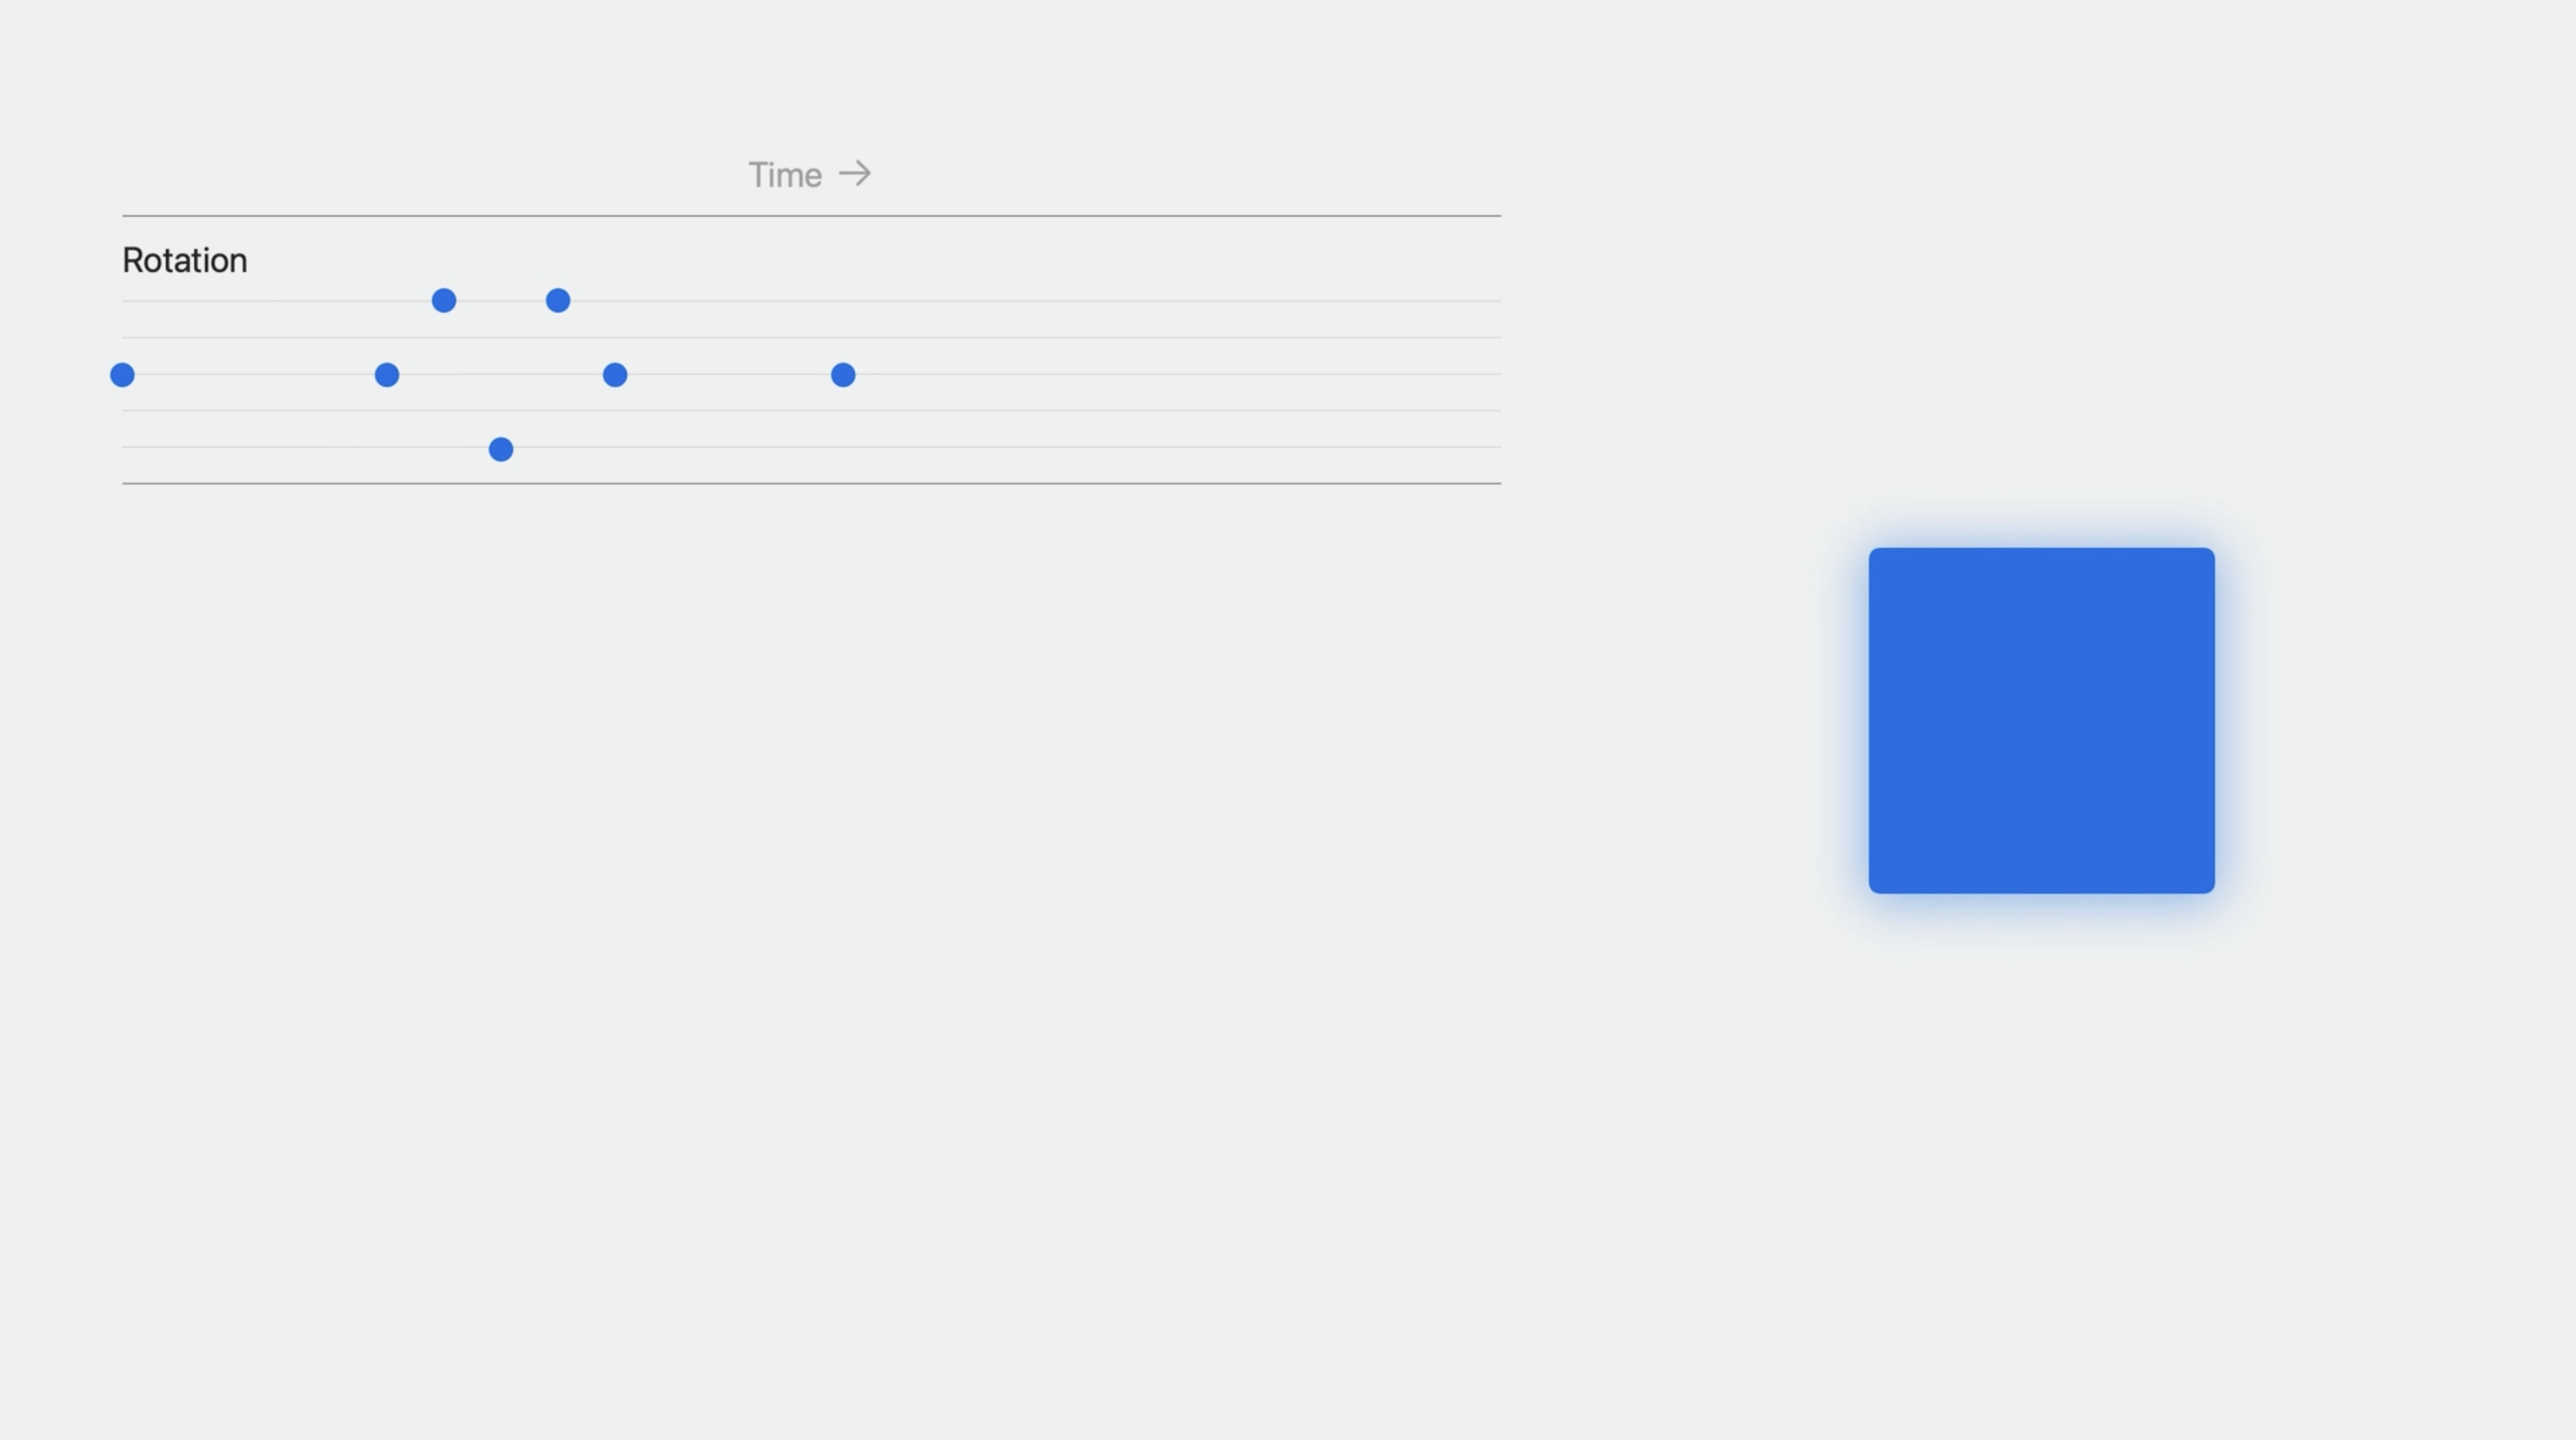
When the animation plays back, SwiftUI interpolates values in between these keyframes, which we can then use to apply modifiers to the view.
And keyframes allow to independently animate multiple effects at the same time by defining separate tracks, each with their own unique timing.
In this example, keyframes are driving several other tracks, including vertical stretch, scale, and translation.
Getting back to the code:
ReactionView()

struct AnimationValues {
    var scale = 1.0
    var verticalStretch = 1.0
    var verticalTranslation = 0.0
    var angle = Angle.zero
}
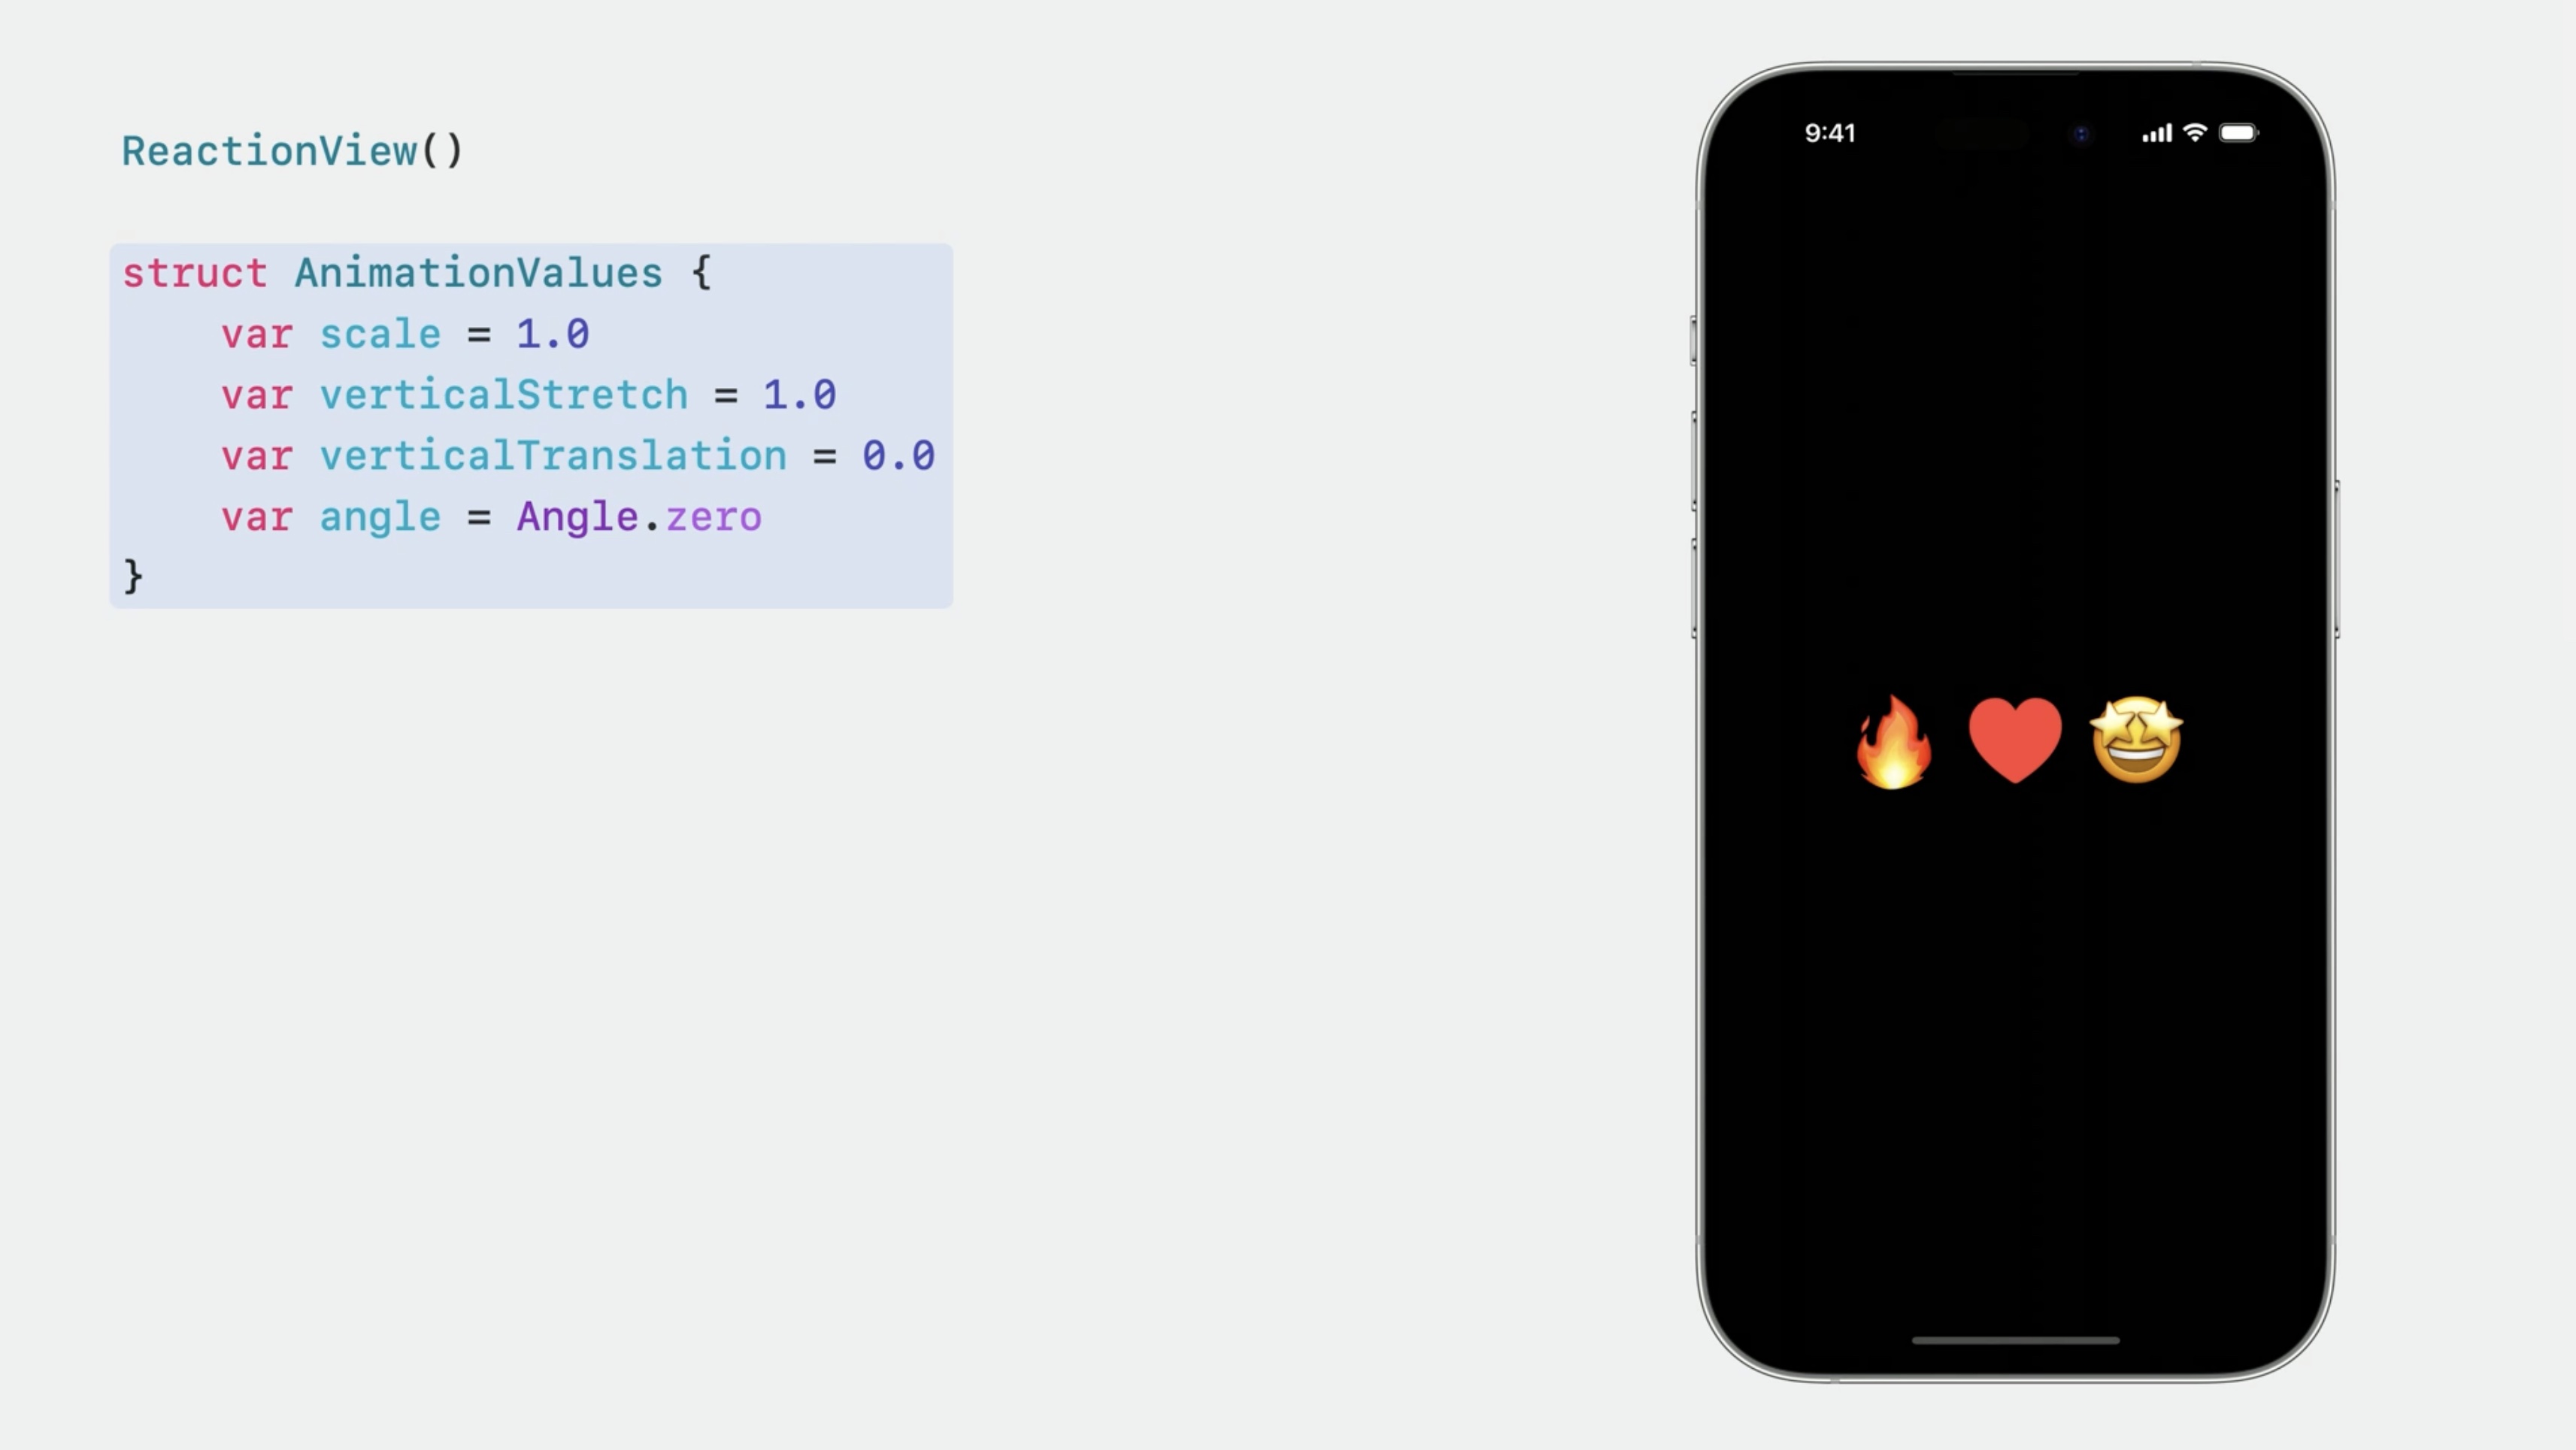
Keyframes can animate any value conforming to the "Animatable" protocol.
Unlike phases, keyframes generate interpolated values of the type that we specify. While an animation is in progress, SwiftUI will provide us with a value of this type on every frame so that we can update the view.
Next, we add the keyframeAnimator modifier.
ReactionView()
    .keyframeAnimator(
        initialValue: AnimationValues(),
        trigger: reactionCount
    ) { content, value in
        content
    } keyframes: {_ in
       // ...
    }
This modifier is similar to the phase animator that we used earlier, but accepts keyframes.
We provide an instance of the struct to use as the initial value. The keyframes that we define will apply animations onto this value. Next, we’ll apply modifiers to the view for each of the properties on the struct.
ReactionView()
    .keyframeAnimator(
        initialValue: AnimationValues(),
        trigger: reactionCount
    ) { content, value in
        content
            .rotationEffect(value.angle)
            .scaleEffect(value.scale)
            .scaleEffect(y: value.verticalStretch)
            .offset(y: value.verticalTranslation)
    } keyframes: {_ in
       // ...
    }
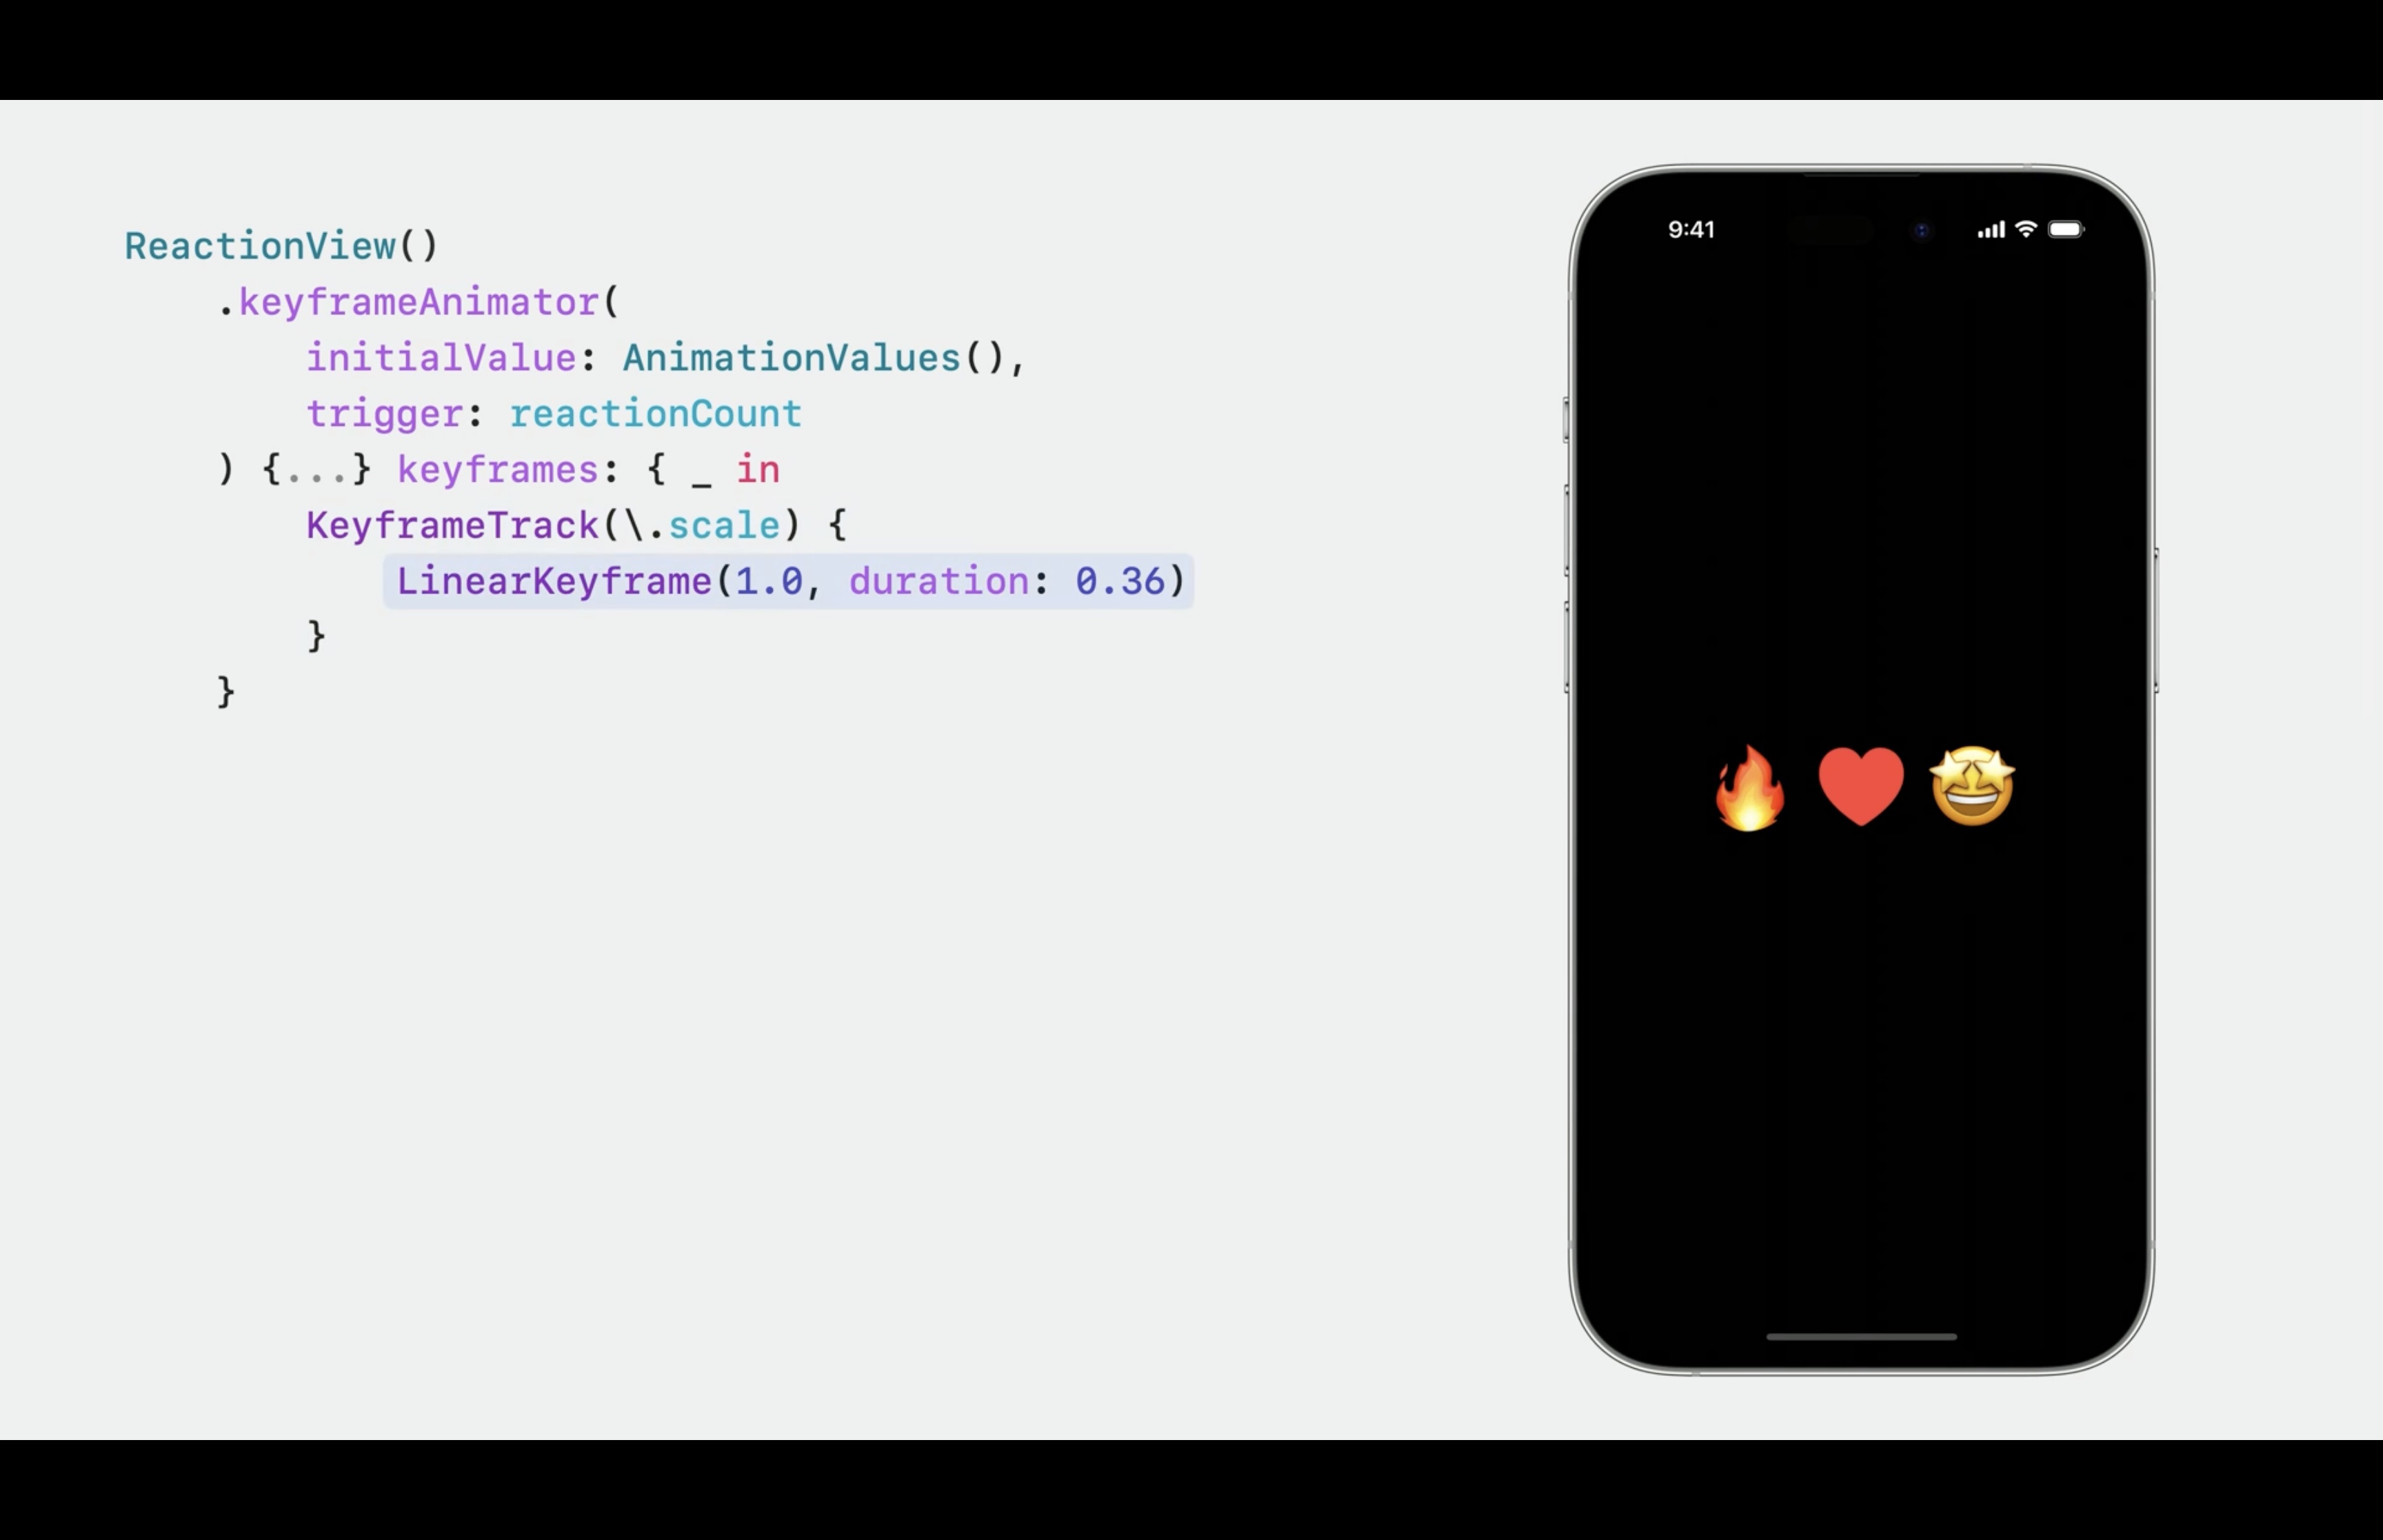
And finally, defining keyframes:
ReactionView()
    .keyframeAnimator(
        initialValue: AnimationValues(),
        trigger: reactionCount
    ) { ... } keyframes: {_ in
        KeyframeTrack(\.scale) {
            //...
    }
Keyframes are organized into tracks. Each track controls a different property of the type that we are animating, which is specified by the key path that we provide when creating the track.
Here, We first add a linear keyframe, repeating the initial scale value and holding it for 0.36 seconds.
ReactionView()
    .keyframeAnimator(
        initialValue: AnimationValues(),
        trigger: reactionCount
    ) { content, value in
        content
    } keyframes: {_ in
        KeyframeTrack(\.scale) {
            Linearkeyframe(1.0, duration: 0.36)
    }
Previews in Xcode can be a great way to fine-tune animations...
Adding a "SpringKeyframe.". This uses a spring function to pull the value toward the target.
ReactionView()
    .keyframeAnimator(
        initialValue: AnimationValues(),
        trigger: reactionCount
    ) { content, value in
        content
    } keyframes: {_ in
        KeyframeTrack(\.scale) {
            Linearkeyframe(1.0, duration: 0.36)
            SpringKeyframe(1.5, duration: 0.8,
                spring: bouncy)
    }
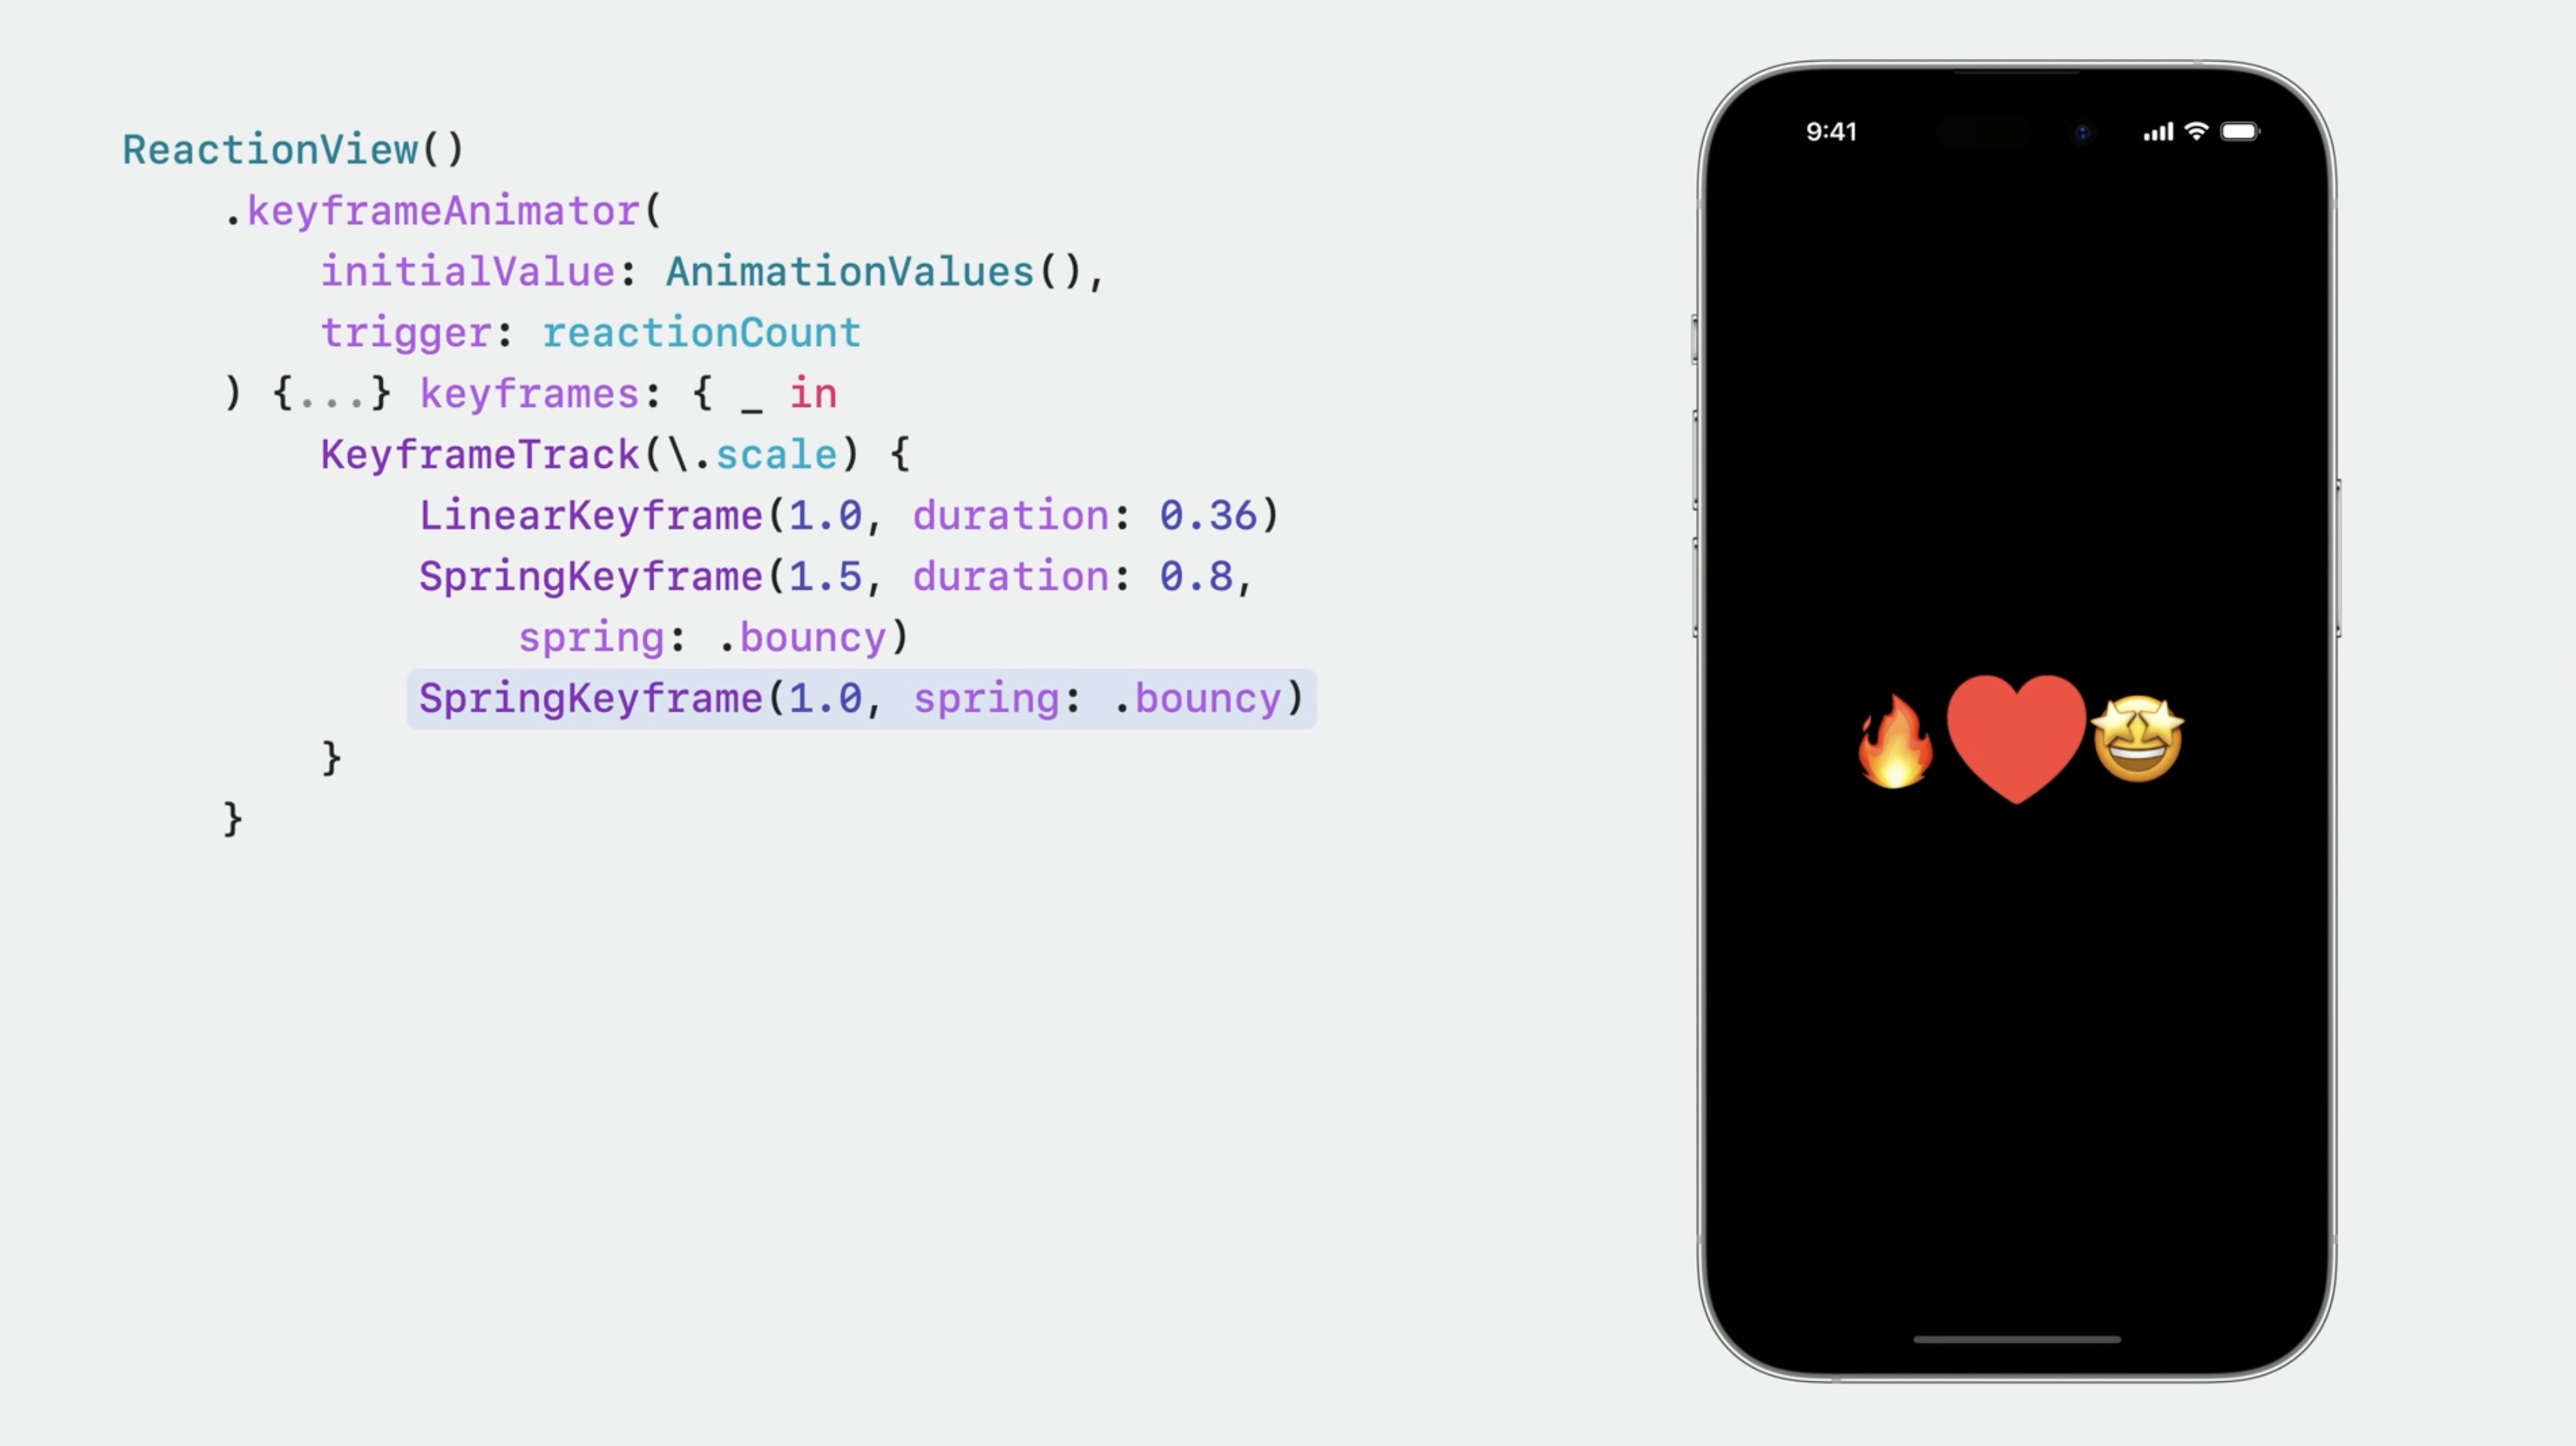
Then adding another spring keyframe that animates the scale back to 1.0.
ReactionView()
    .keyframeAnimator(
        initialValue: AnimationValues(),
        trigger: reactionCount
    ) { content, value in
        content
    } keyframes: {_ in
        KeyframeTrack(\.scale) {
            Linearkeyframe(1.0, duration: 0.36)
            SpringKeyframe(1.5, duration: 0.8,
                spring: bouncy)
            SpringKeyframe (1.0, spring: .bouncy)
    }
There are actually four different types of keyframes.

- LinearKeyframe interpolates linearly in vector space from the previous keyframe.
- SpringKeyframe, as its name suggests, uses a spring function to interpolate to the target value from the previous keyframe.
- CubicKeyframe uses a cubic Bézier curve to interpolate between keyframes. Combiniung multiple cubic keyframes in sequence, the resulting curve is equivalent to a Catmull-Rom spline.
- MoveKeyframe immediately jumps to a value without interpolation.
Each kind of keyframe supports customization and we can mix and match different kinds of keyframes within an animation.
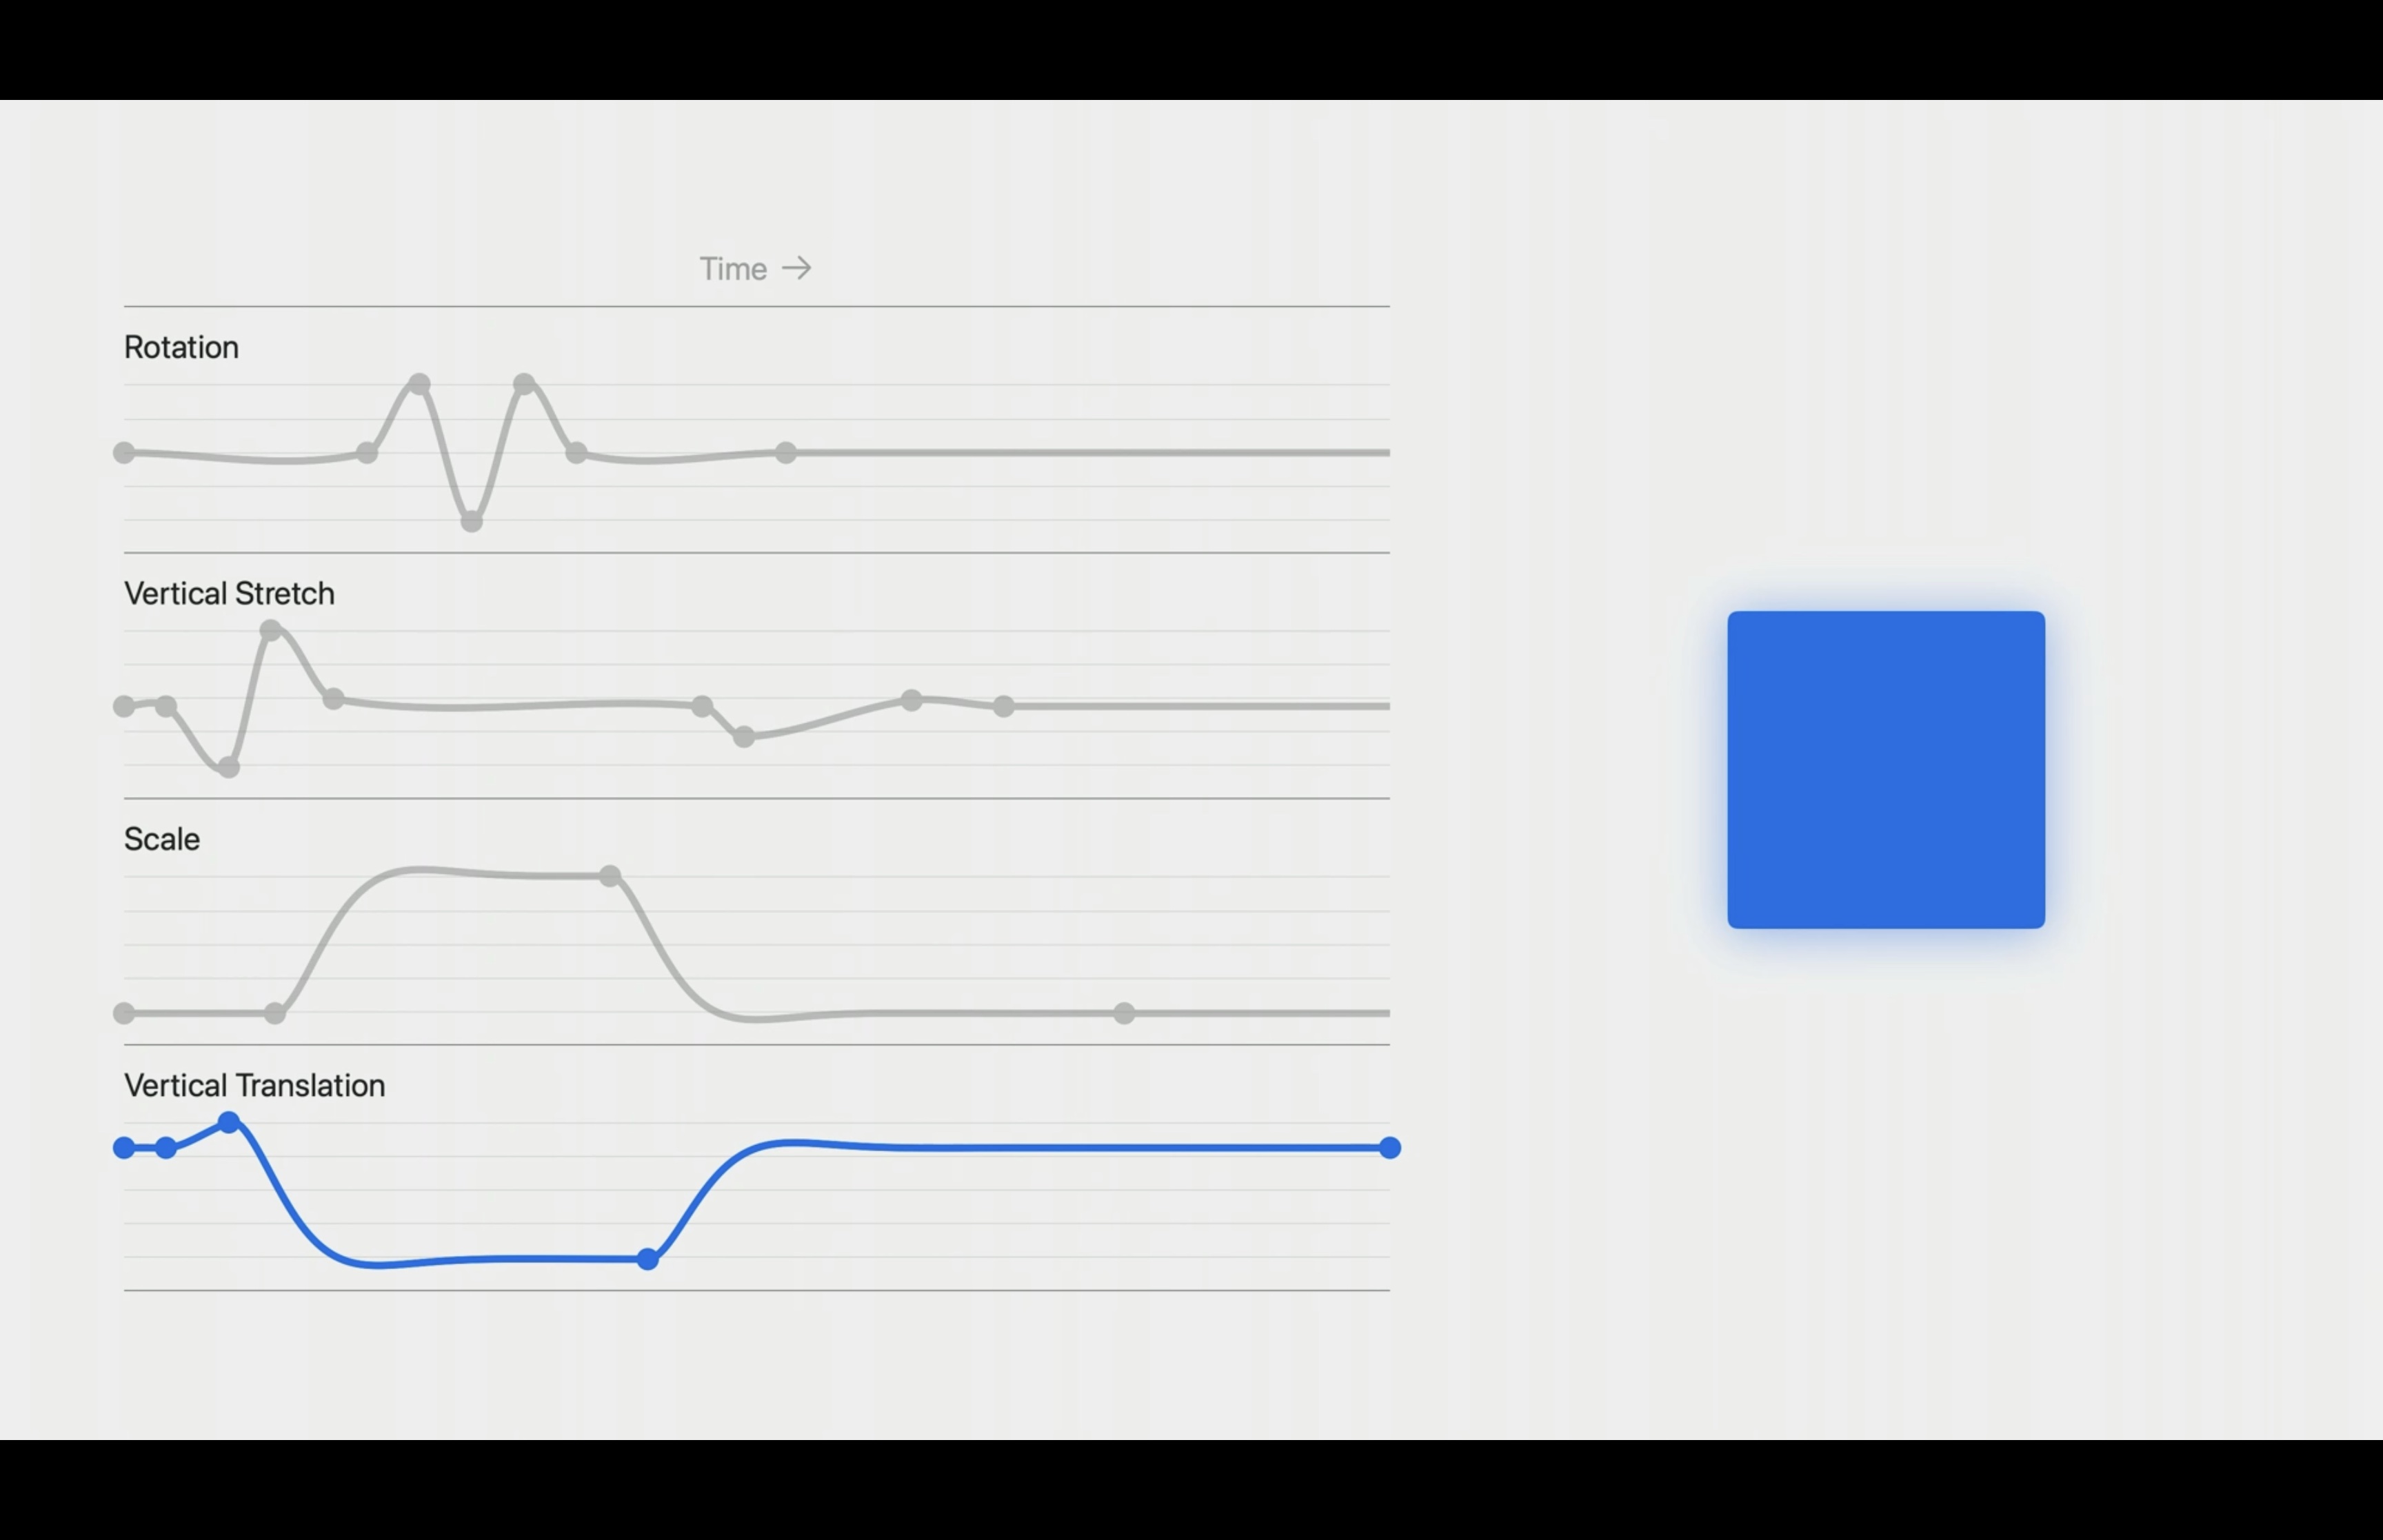
SwiftUI maintains velocity between keyframes.
Using linear and spring keyframes to animate the vertical translation.
ReactionView()
    .keyframeAnimator(
        initialValue: AnimationValues(),
        trigger: reactionCount
    ) { content, value in
        content
    } keyframes: {_ in
        KeyframeTrack(\.scale) { //... }

        KeyframeTrack(\.verticalTranslation) {
            LinearKeyframe(0.0, duration: 0.1)
            SpringKeyframe(20.0, duration: 0.15,
                spring: .bouncy)
            SpringKeyframe(-60.0, duration: 1.0,
                spring: .bouncy)
            SpringKeyframe(0.0, spring: .bouncy)
            }
    }
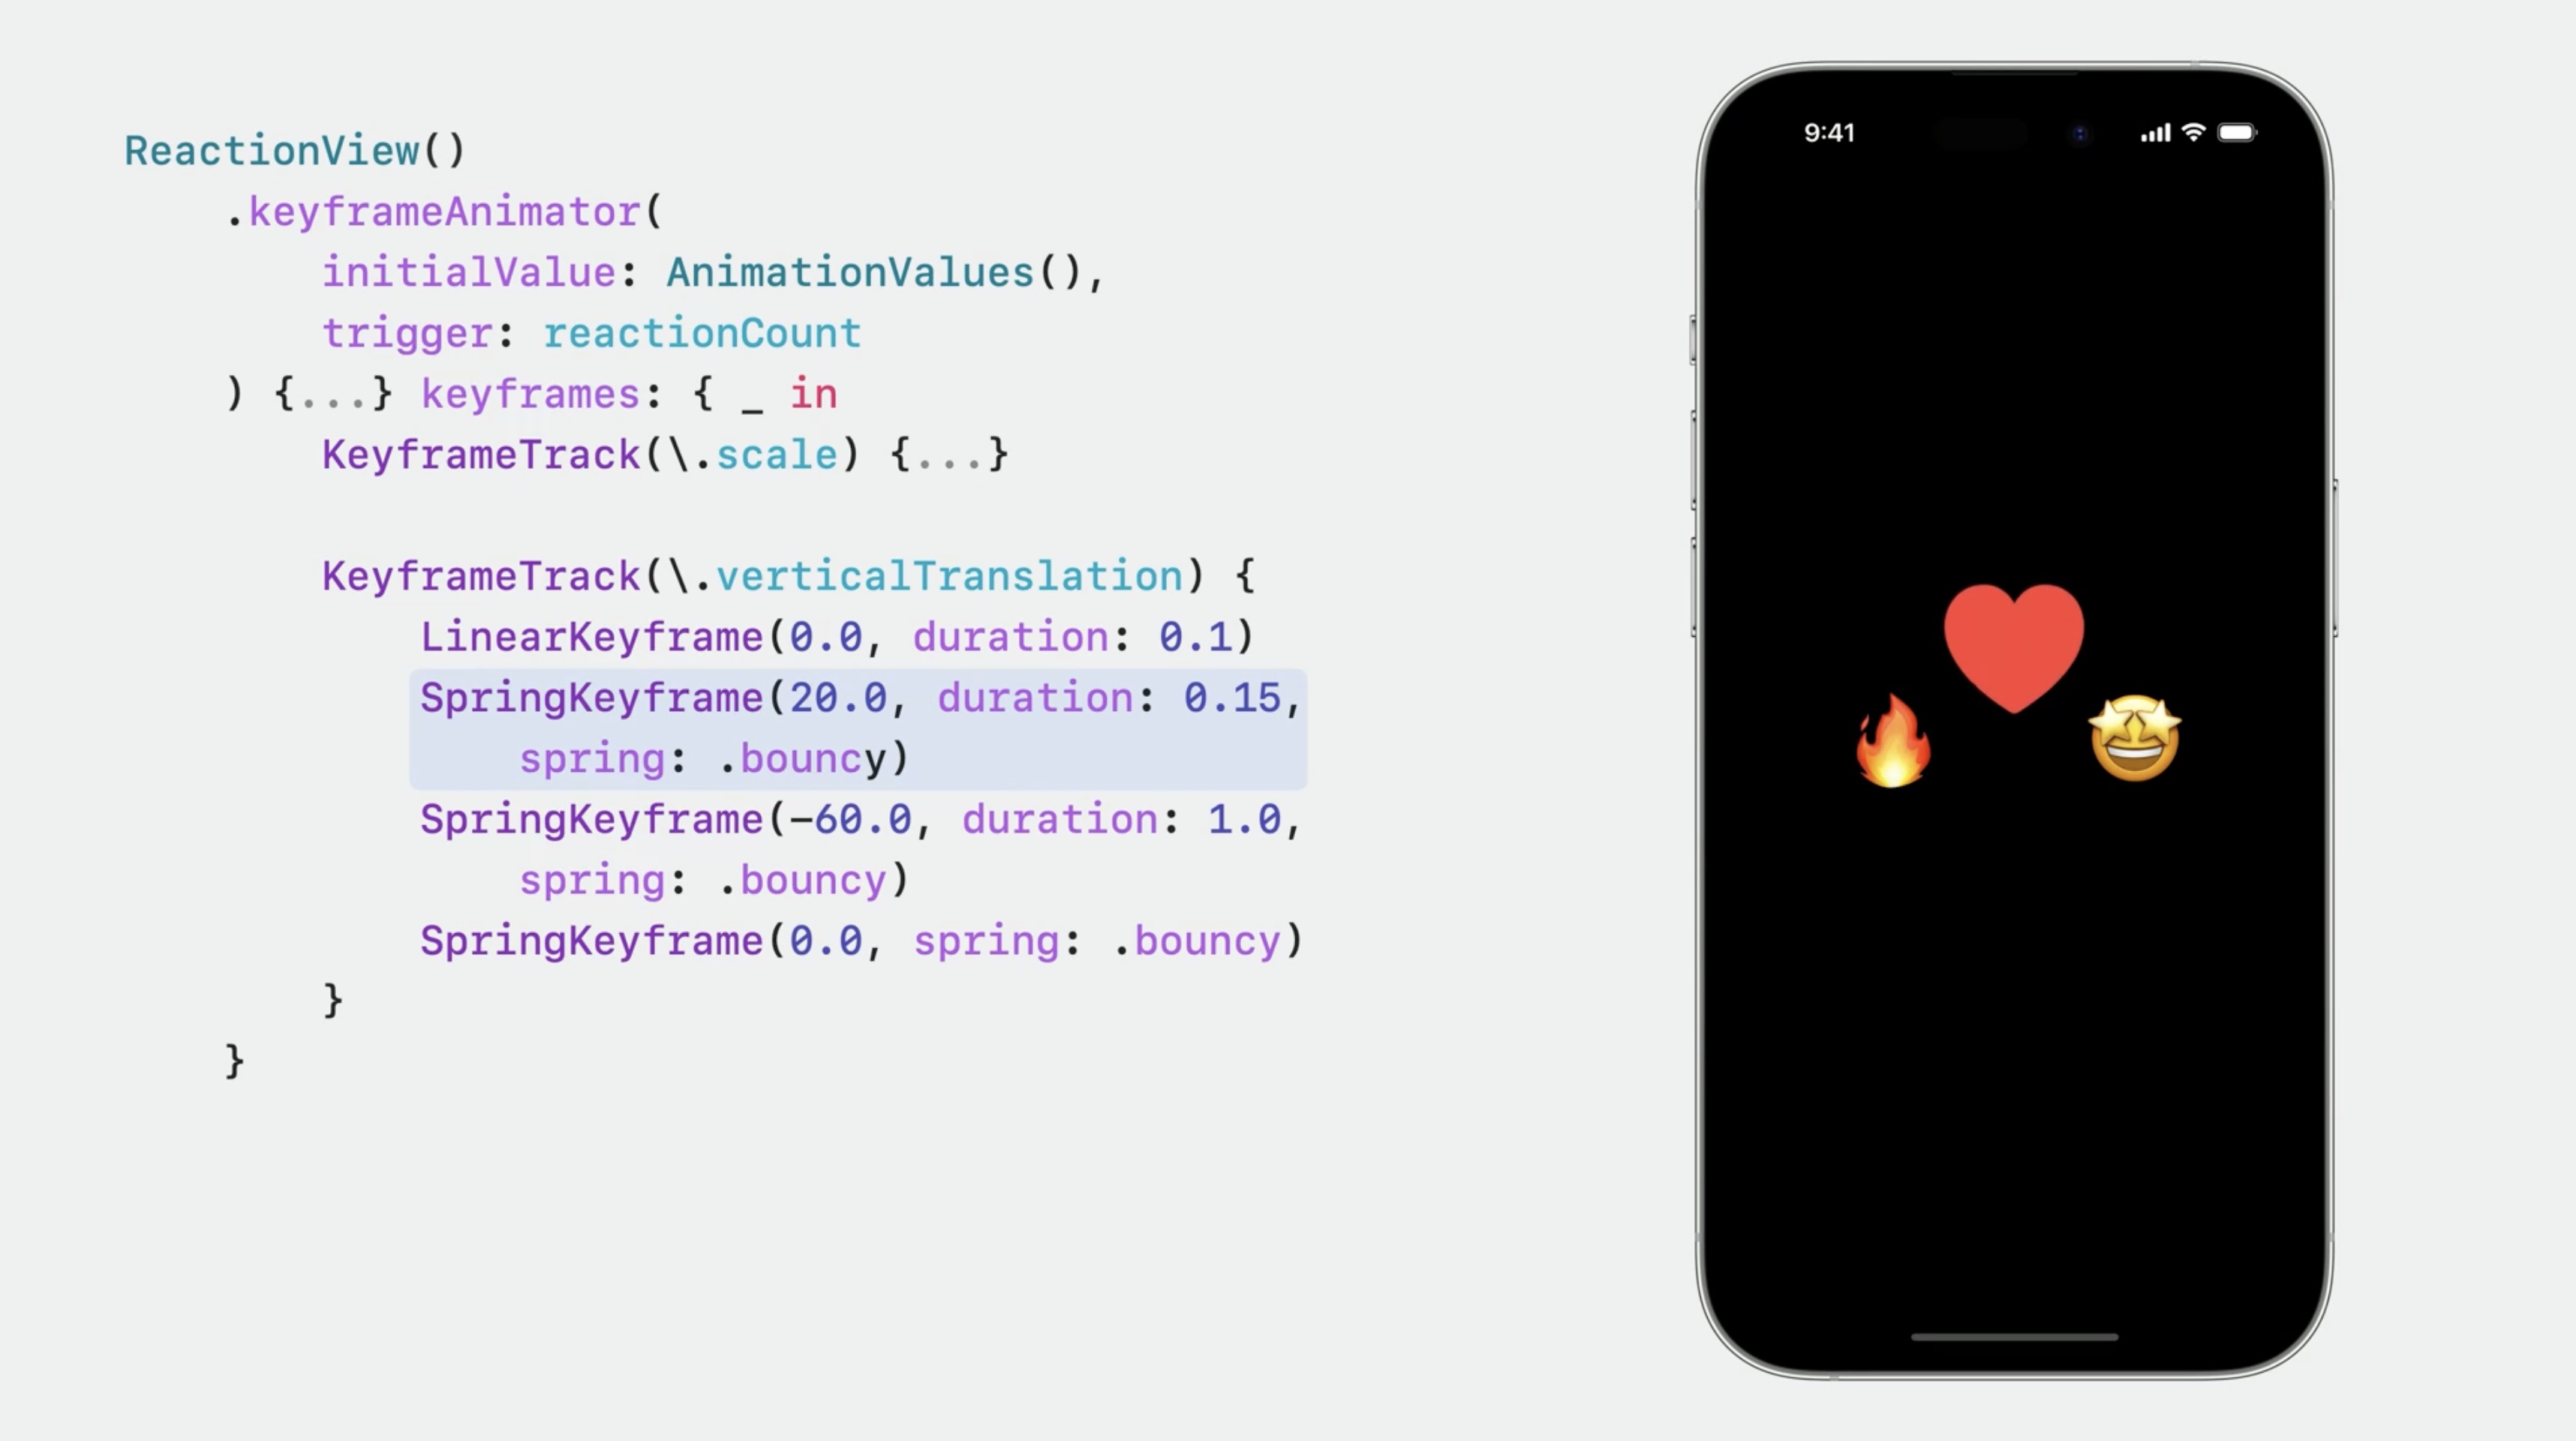
Right before the view jumps up, it pulls back.
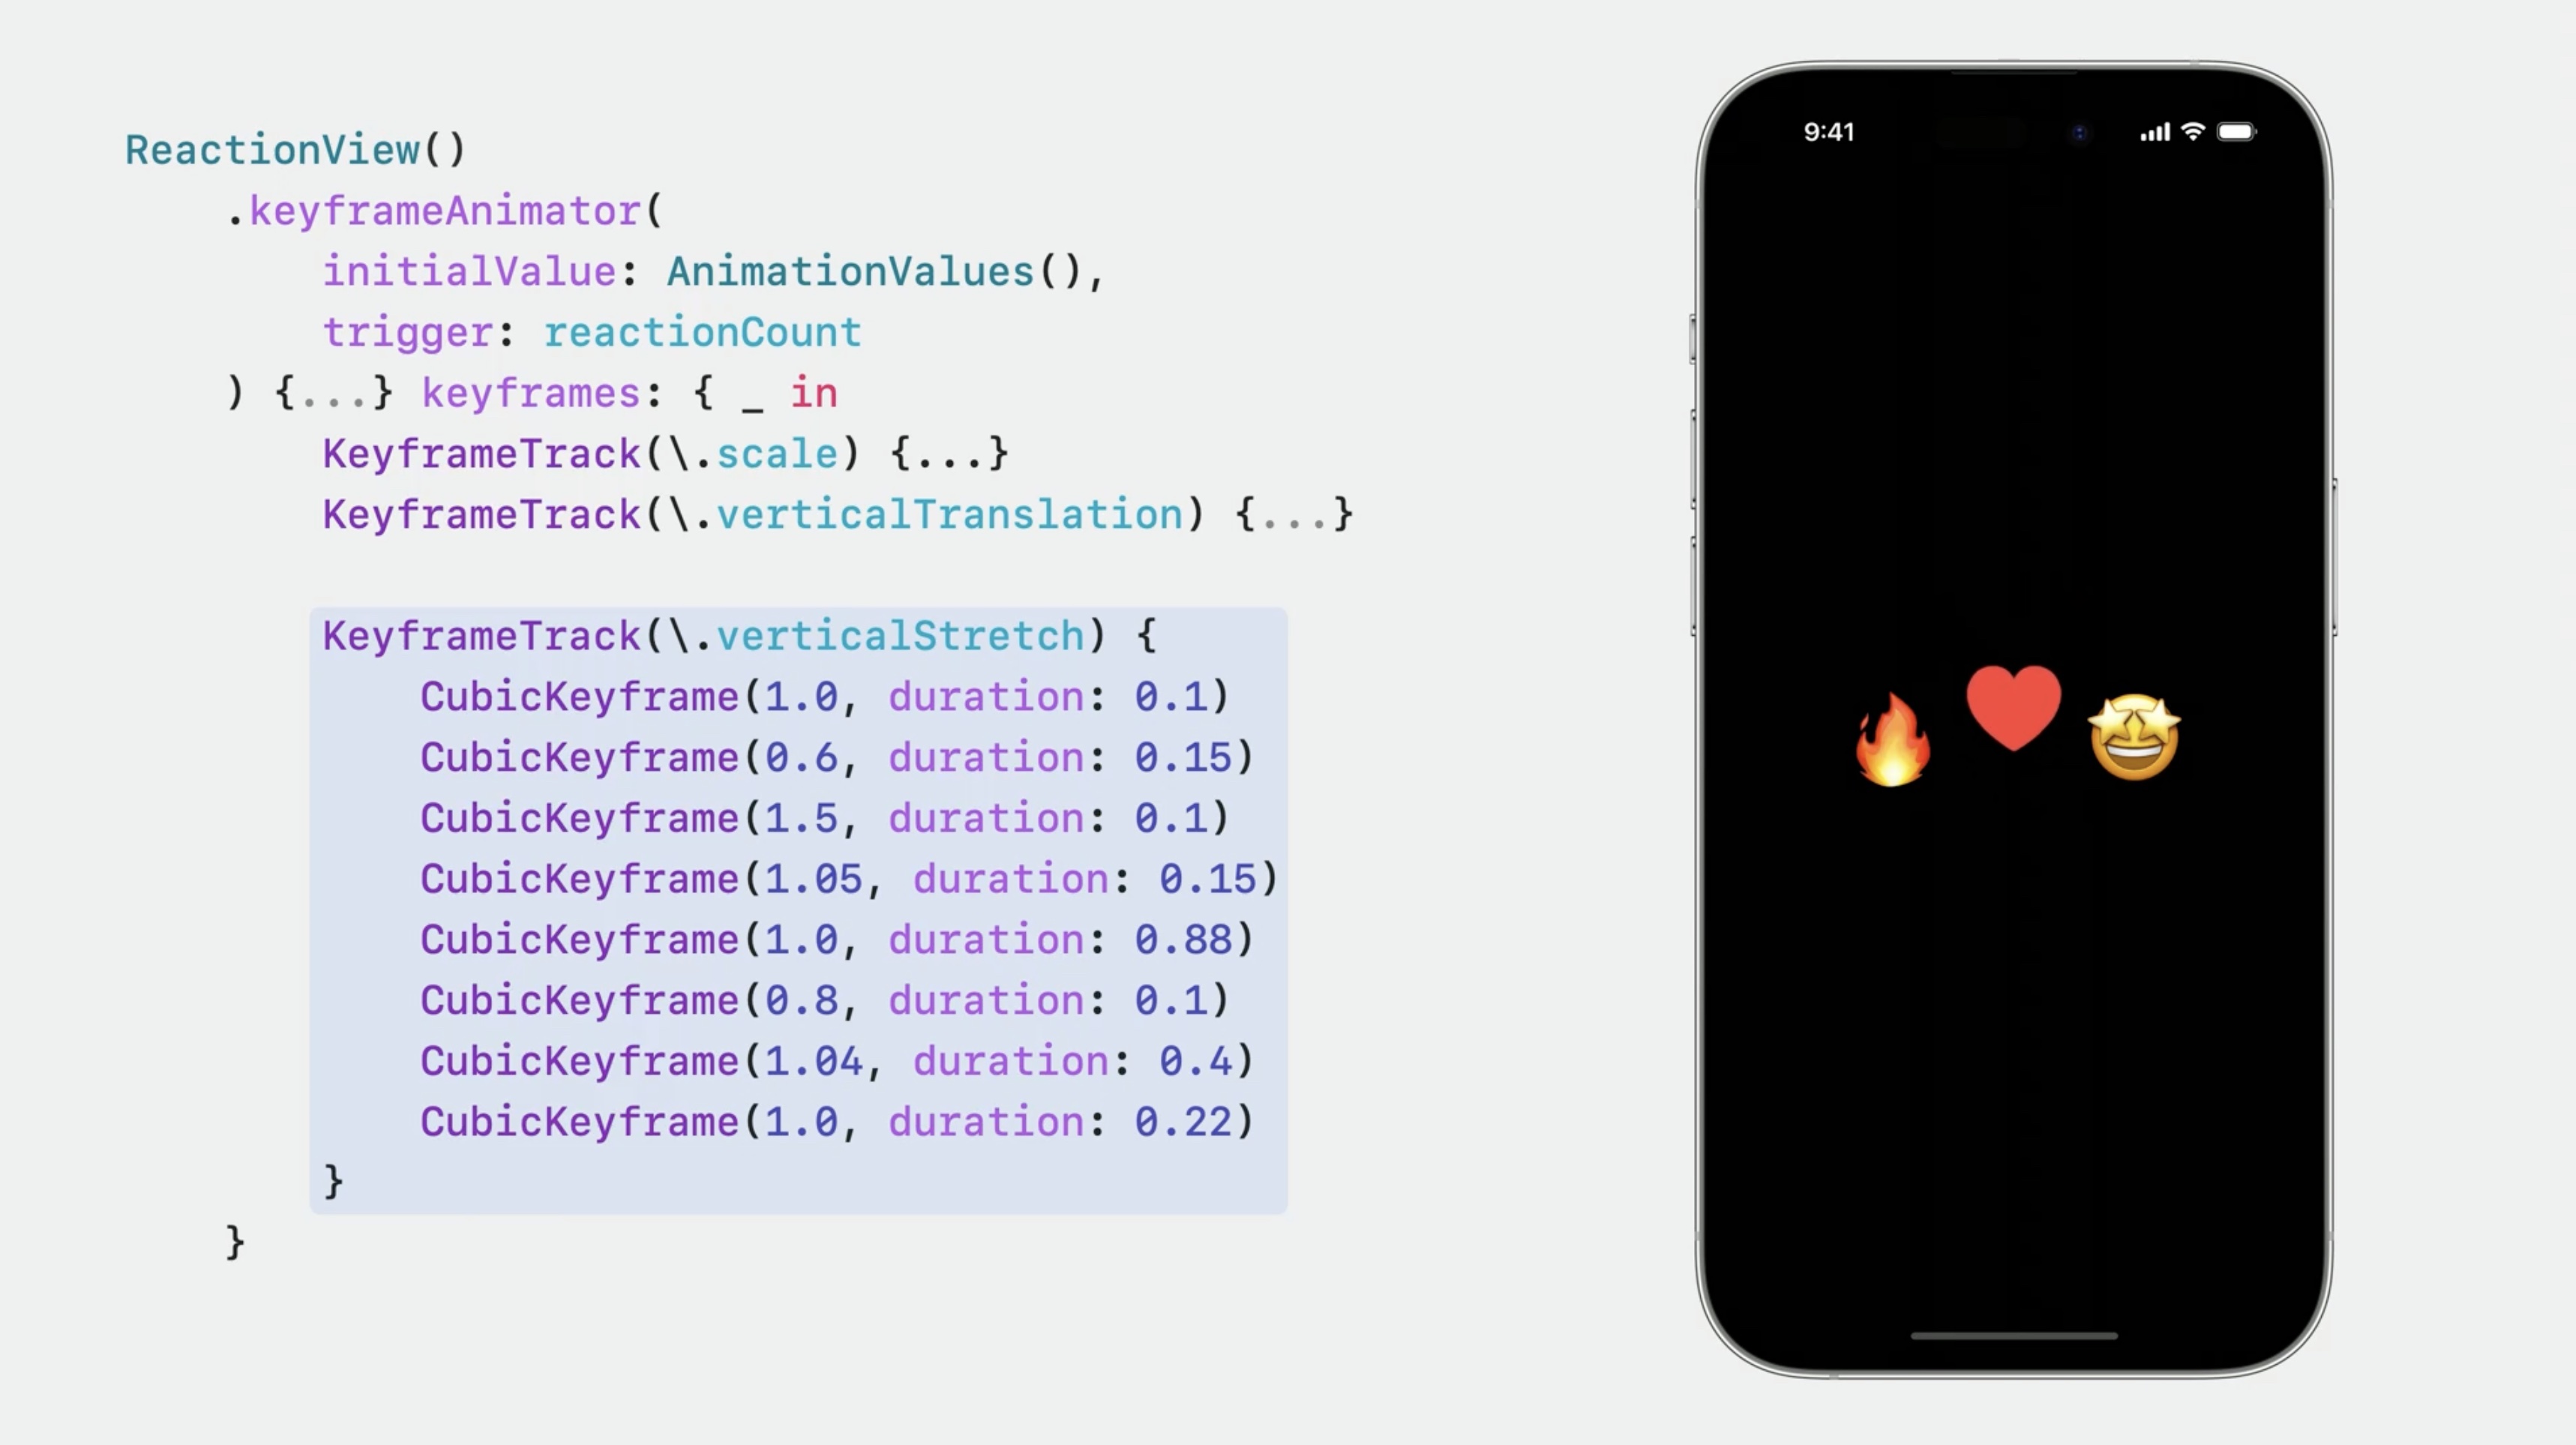
This starts with vertical stretch, with a cubic keyframe.
ReactionView()
    .keyframeAnimator(
        initialValue: AnimationValues(),
        trigger: reactionCount
    ) { content, value in
        content
    } keyframes: {_ in
        KeyframeTrack(\.scale) { //... }

        KeyframeTrack(\.verticalTranslation) { //... }

        KeyframeTrack(\.verticalStretch) {
            CubicKeyframe(1.0, duration: 0.1)
            CubicKeyframe(0.6, duration: 0.15)
            CubicKeyframe(1.5, duration: 0.1)
            CubicKeyframe(1.05, duration: 0.15)
            CubicKeyframe(1.0, duration: 0.88)
            CubicKeyframe(0.8, duration: 0.1)
            CubicKeyframe(1.04, duration: 0.4)
            CubicKeyframe(1.0, duration: 0.22)
        }
    }
Finally, the rotation will be animated.
ReactionView()
    .keyframeAnimator(
        initialValue: AnimationValues(),
        trigger: reactionCount
    ) { content, value in
        content
    } keyframes: {_ in
        KeyframeTrack(\.scale) { //... }

        KeyframeTrack(\.verticalTranslation) { //... }

        KeyframeTrack(\.verticalStretch) { //... }

        KeyframeTrack(\.angle) {
            CubicKeyframe(.zero, duration: 0.58)
            CubicKeyframe(.degrees(16), duration: 0.125)
            CubicKeyframe(.degrees(-16), duration: 0.125)
            CubicKeyframe(.degrees(16), duration: 0.125)
            CubicKeyframe(.zero, duration: 0.125)
            }
    }
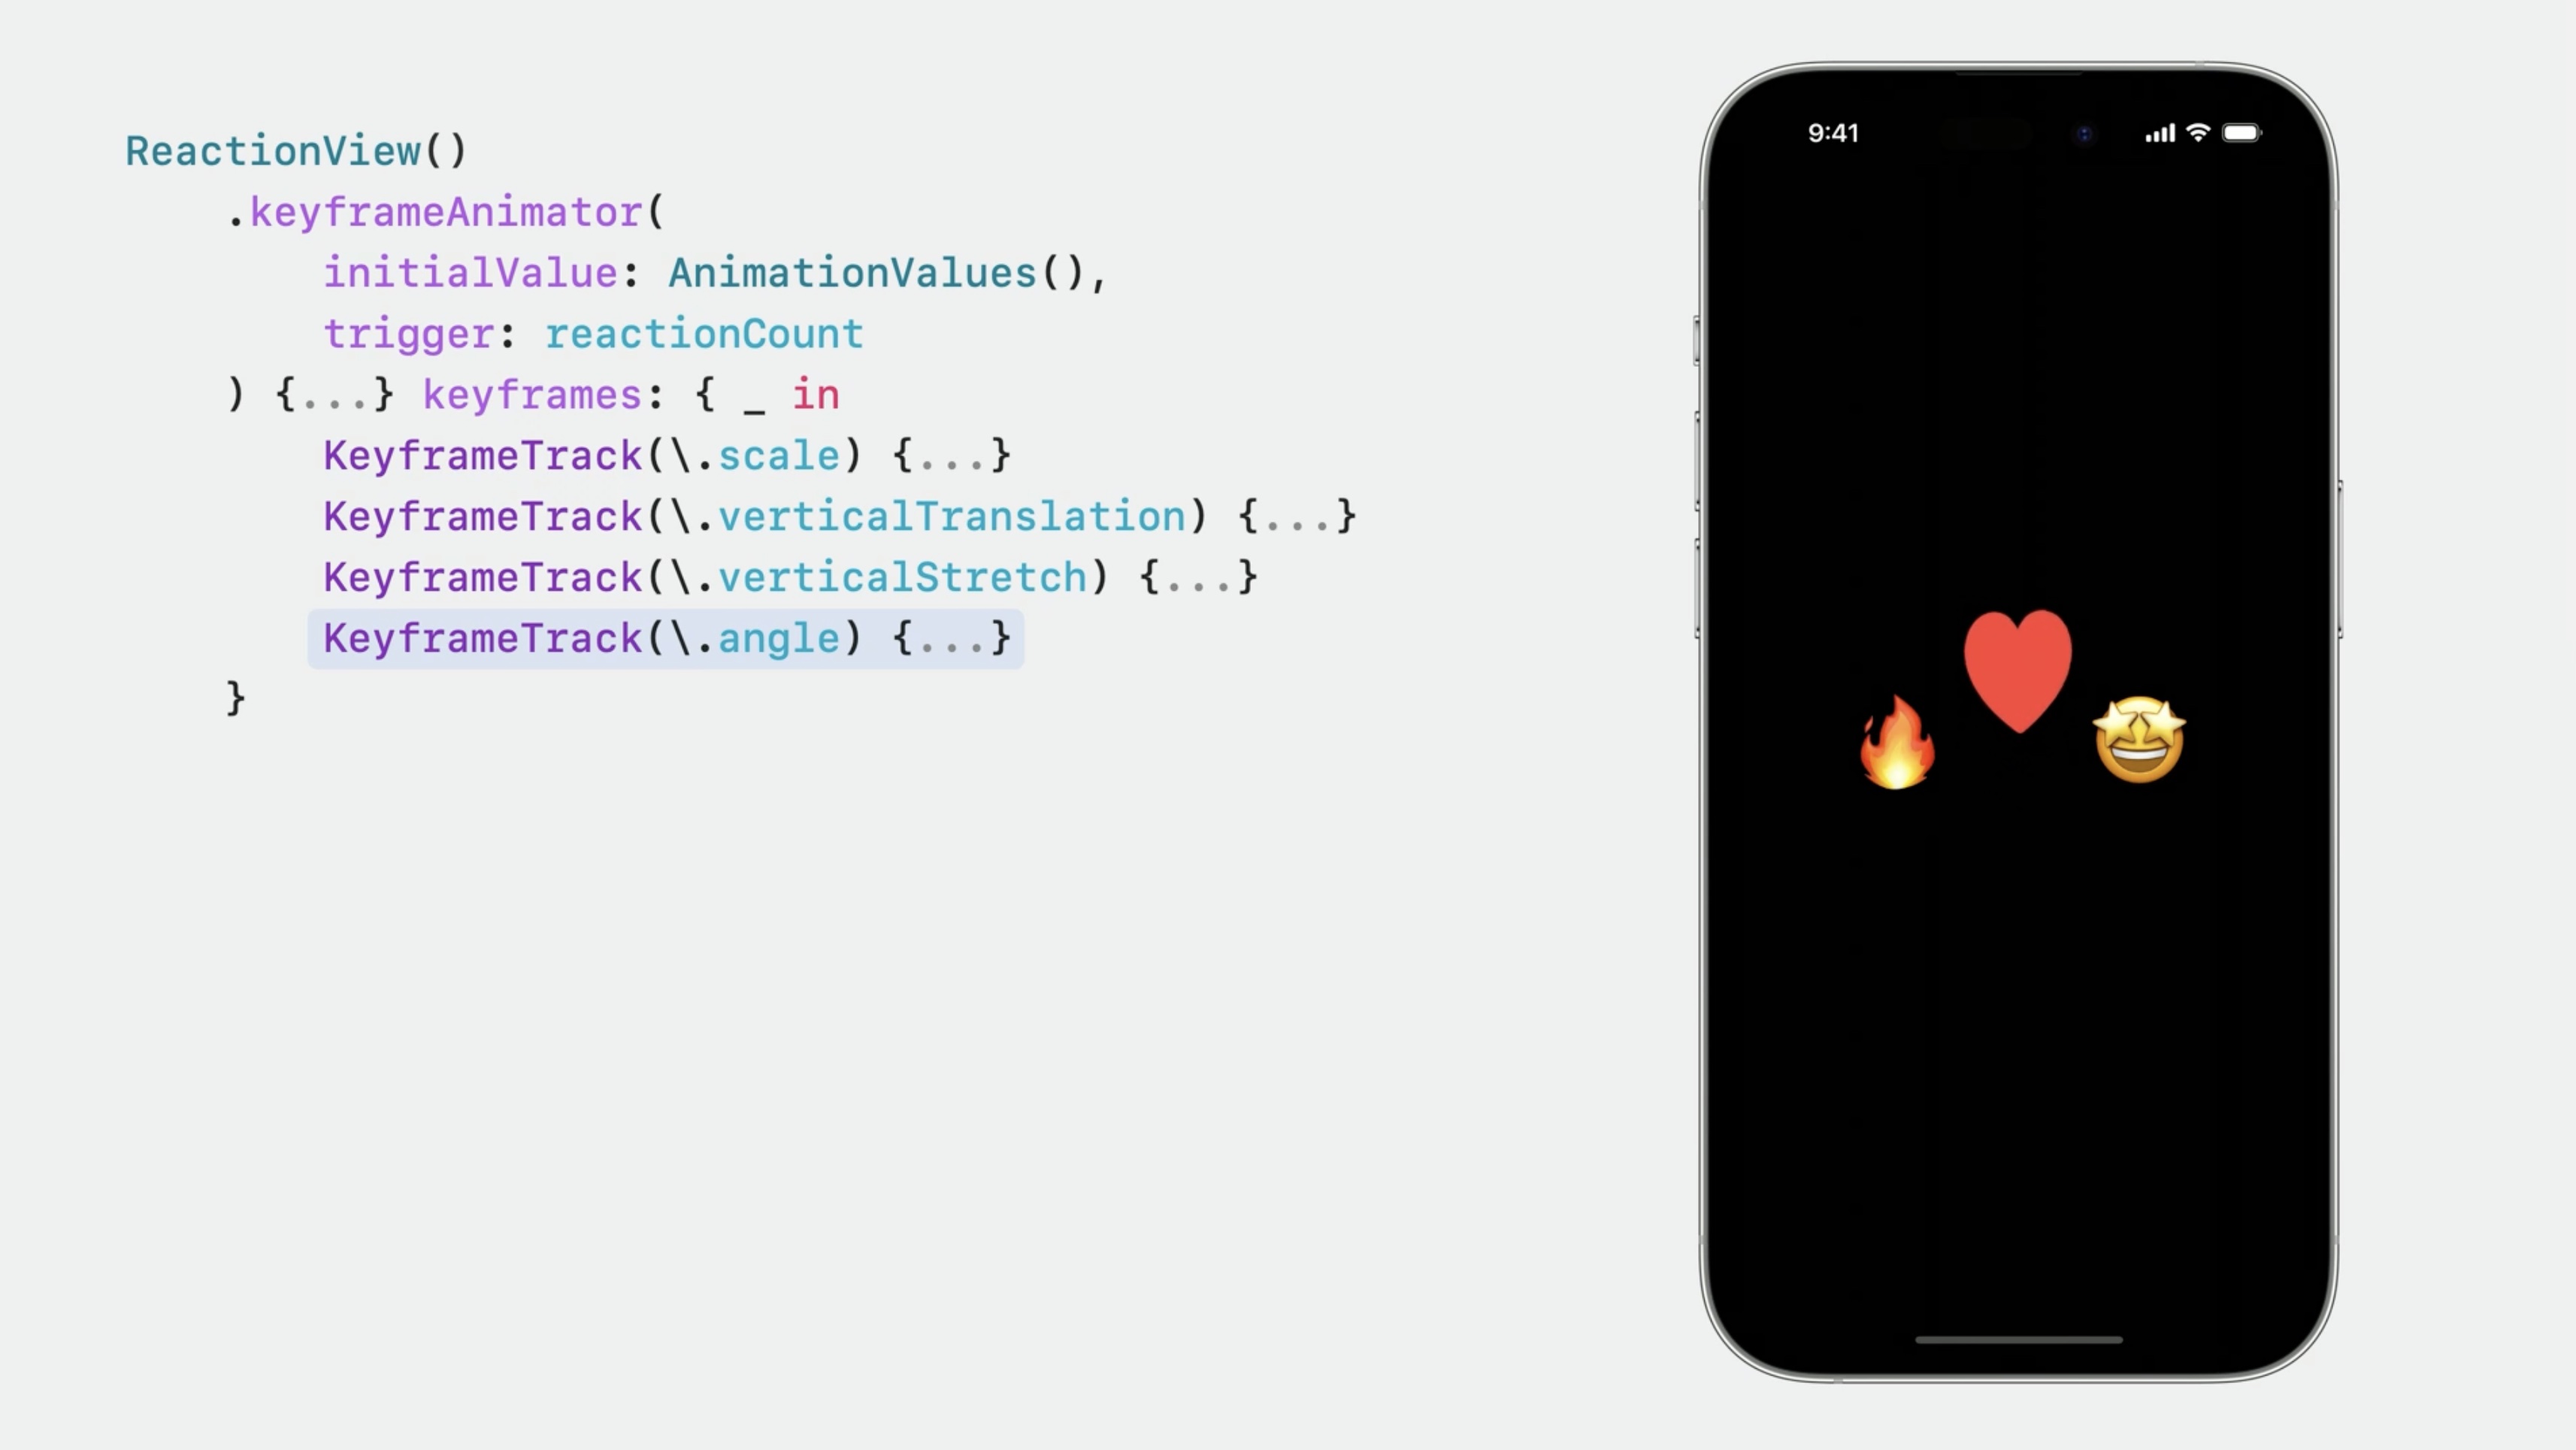
And those curves? Those are a visualization of the animation
Keyframes are like video clips that can be played. They give you a ton of control, but there’s a tradeoff. Keyframe animations can’t gracefully retarget the way that springs can, so it’s generally best to avoid changing keyframes mid-animation.
Updates happen on every frame, so we should avoid performing any expensive operations while applying a keyframe animation to the view.
Tips and tricks
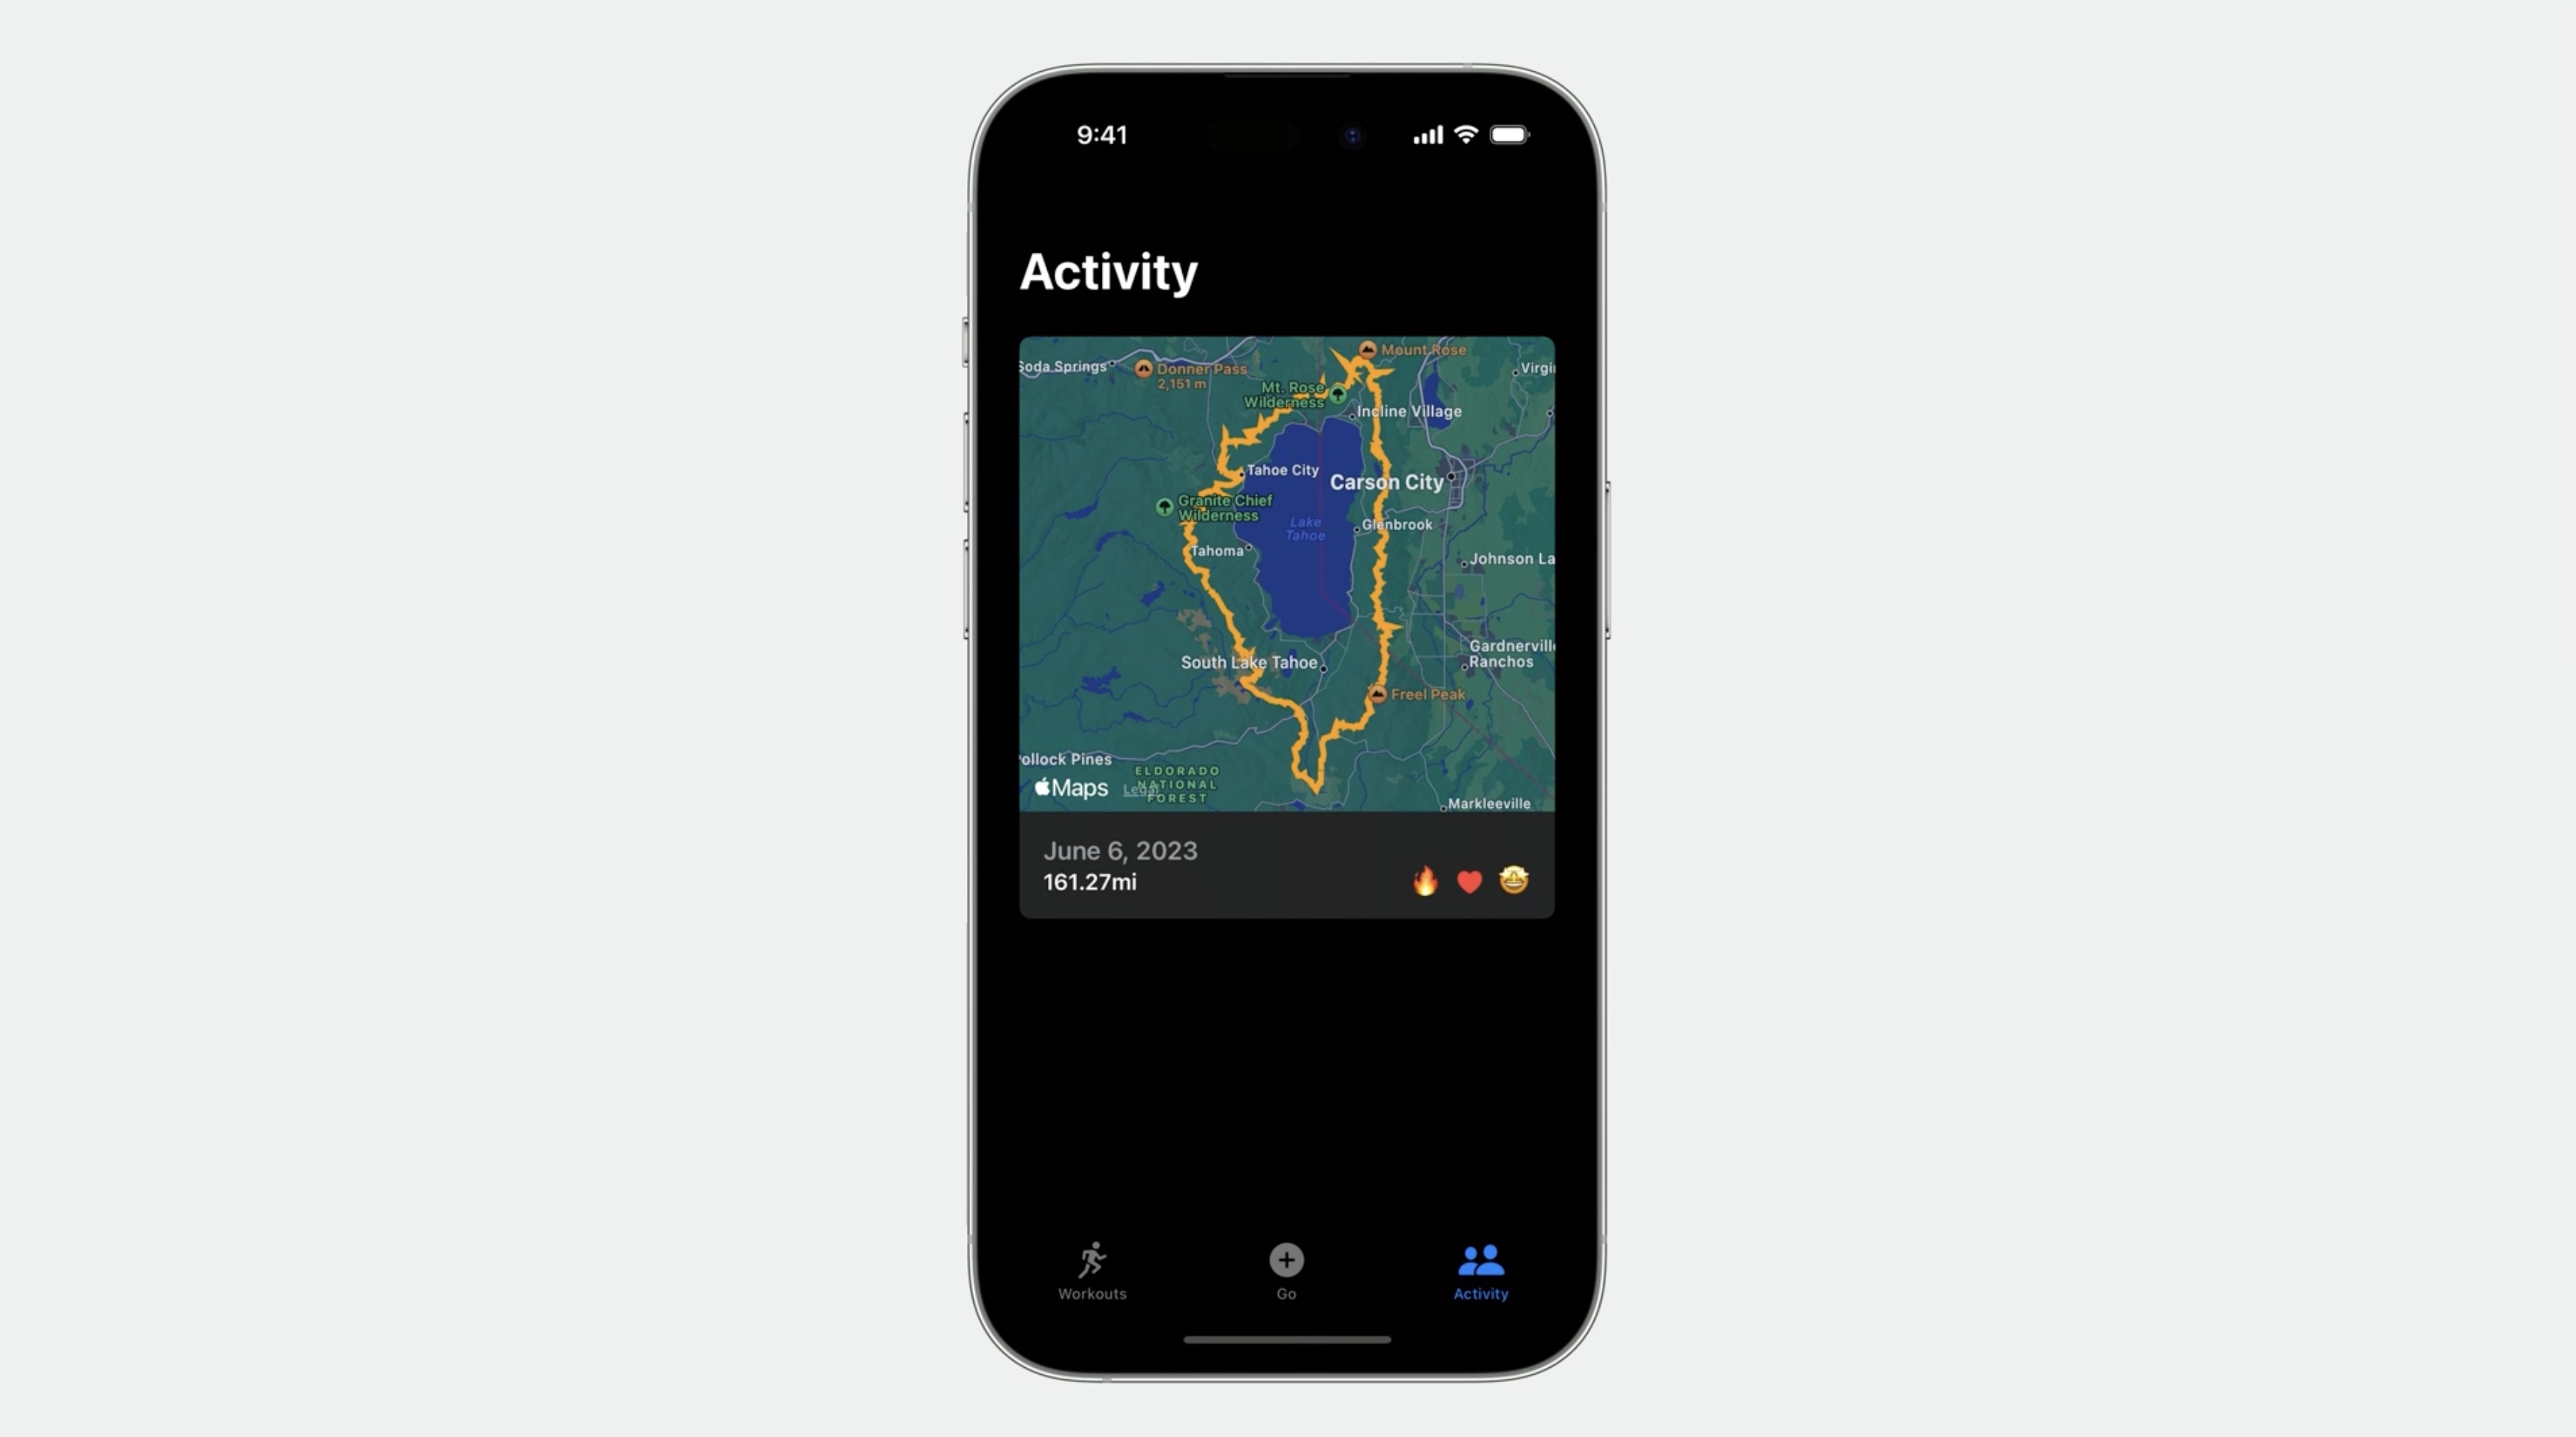
The race map example, showing the route.
lets add an animation that automatically zooms in and follows the course. MapKit now allows to use keyframes to move the camera!
struct RaceMap: View {
    let route: Route

    var body: some View {
        Map(initialPosition: .rect(route.rect)) {
            MapPolyline (coordinates: route.coordinates)
                .stroke(.orange, lineWidth: 4.0)
            Marker("Start", coordinate: route.start)
                .tint(.green)
            Marker ("End", coordinate: route.end)
                .tint (.red)
        }
    }
}
Here, we use a "Map" view to show the course.
The view already has a route, which is a model that contains all of the coordinates along one leg of the race.
To build the tour, we’ll add a state property and a button to change it.
struct RaceMap: View {
    let route: Route

    @State private var trigger = false

    var body: some View {
        Map(initialPosition: .rect(route.rect)) {
            MapPolyline (coordinates: route.coordinates)
                .stroke(.orange, lineWidth: 4.0)
            Marker("Start", coordinate: route.start)
                .tint(.green)
            Marker ("End", coordinate: route.end)
                .tint (.red)
        }
        .toolbar {
            Button("Tour") { trigger.toggle() }
        }
    }
}
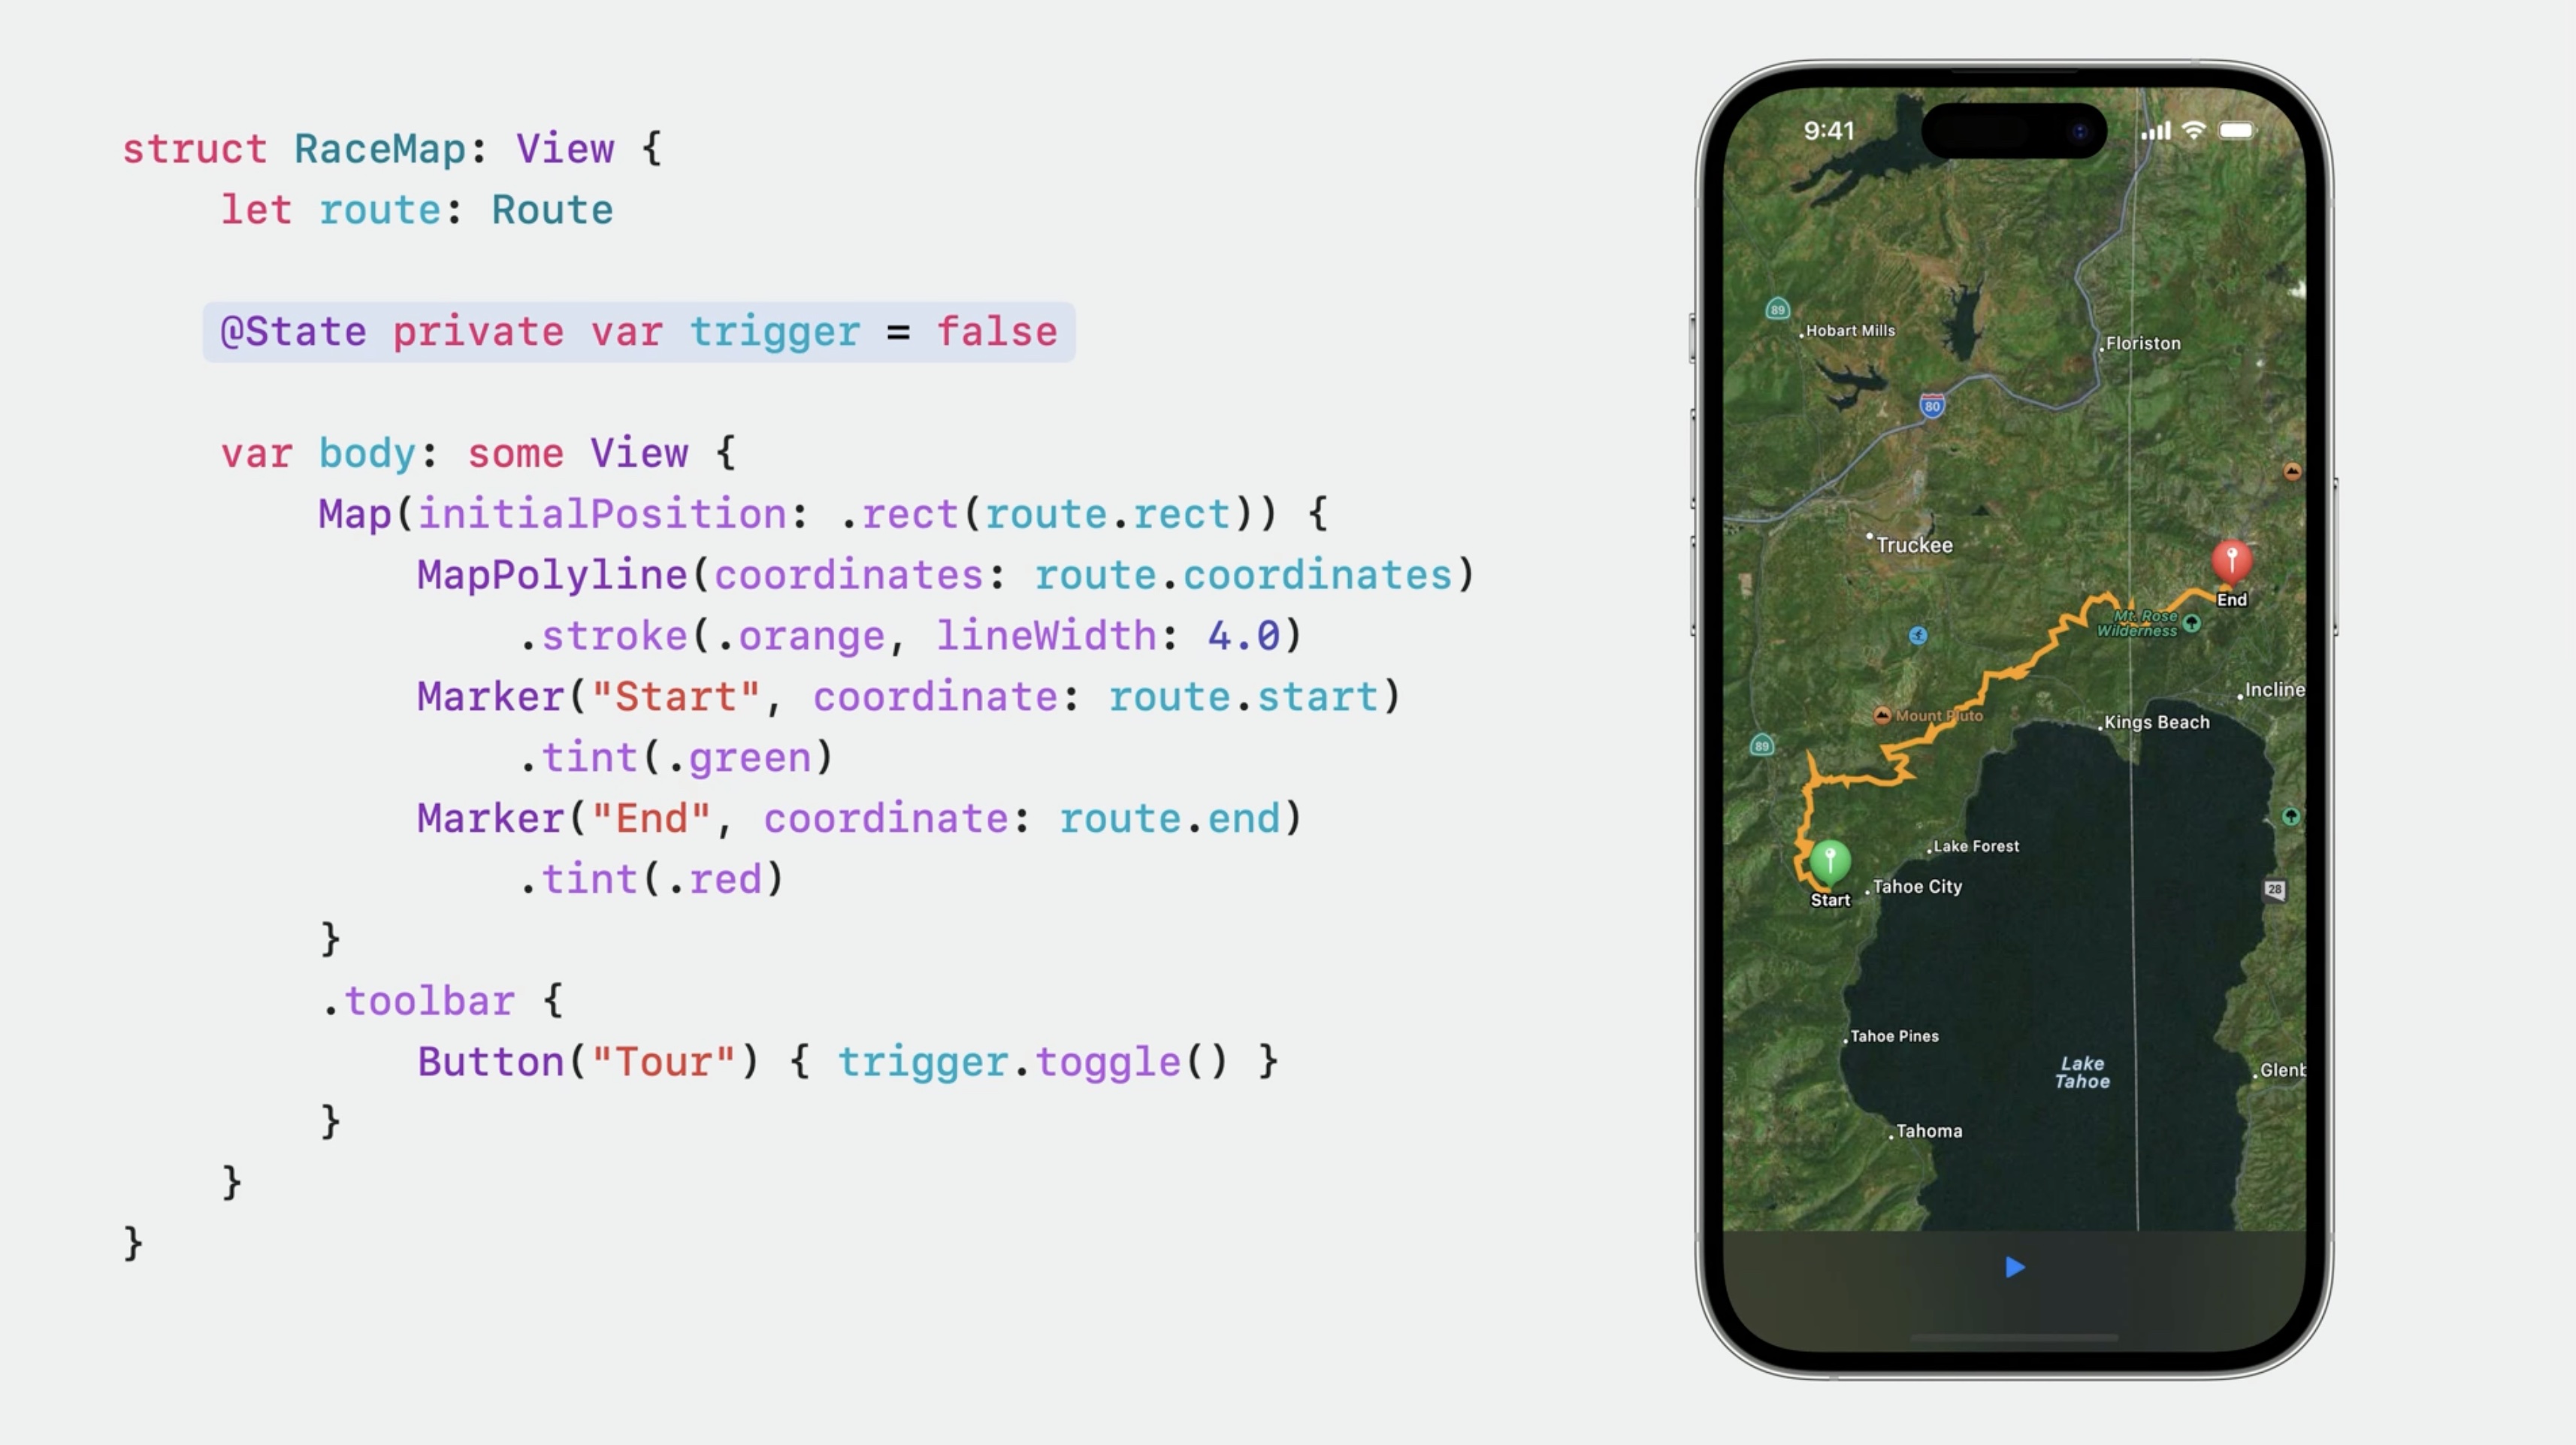
Lets use the new "mapCameraKeyframeAnimator" modifier, giving the trigger value to it, then adding keyframes.
struct RaceMap: View {
    let route: Route

    @State private var trigger = false

    var body: some View {
        Map(initialPosition: .rect(route.rect)) {...}
            .toolbar {...}
            .mapCameraKeyframeAnimator(trigger: trigger) {
                KeyframeTrack(\.centerCoordinate) {...}
                KeyframeTrack(\.heading) {...}
                KeyframeTrack(\.distance) {...}
        }
    }
}
Every time the trigger value changes, maps will use these keyframes to animate.
The final value of the keyframes determines the camera value that is used at the end of the animation.

If the user performs a gesture while animating, the animation will be removed and the user will have full control over the camera.
We can independently animate the center coordinate, heading, and distance.
There is more. We’ve seen the "keyframeAnimator" modifier. Outside of the modifier, we can use the "KeyframeTimeline" type to capture a set of keyframes and tracks. We initialize this type with an initial value, and the keyframe tracks that define the animation, just like with the view modifier.
// Keyframes
let myKeyframes = KeyframeTimeline(initialValue: CGPoint.zero) {
    KeyframeTrack(\.x) {...}
    KeyframeTrack(\.y) {...}
}
KeyframeTimeline provides API that gives the duration, which is equal to the duration of the longest track.
// Duration in seconds
let duration: TimeInterval = myKeyframes.duration
And we can calculate values for any time within the range of the animation.
// Value for time
let value = myKeyframes.value (time: 1.2)
This makes it easy to visualize keyframes with Swift Charts, This also means that we can use keyframe-defined curves however you want, or to creatively combine keyframes with other APIs, for example, with a geometry proxy to scrub keyframe-driven effects using scroll position, or with a "TimelineView" to update based on time.
Conclusion
Use keyframes for more complex animations where we need complete control.
Check out also
What's new in SwiftUI
Explore SwiftUI animations
Some of the code examples included in the talk
Boolean Phases
OverdueReminderView()
        .phaseAnimator([false, true]) { content, value in
            content
                .foregroundStyle(value ? .red : .primary)
        } animation: { _ in
            .easeInOut(duration: 1.0)
        }
Custom Phases
ReactionView()
    .phaseAnimator(
        Phase.allCases,
        trigger: reactionCount
    ) { content, phase in
        content
            .scaleEffect(phase.scale)
            .offset(y: phase.verticalOffset)
    } animation: { phase in
        switch phase {
        case .initial: .smooth
        case .move: .easeInOut(duration: 0.3)
        case .scale: .spring(
            duration: 0.3, bounce: 0.7)
        }
    }

enum Phase: CaseIterable {
    case initial
    case move
    case scale

    var verticalOffset: Double {
        switch self {
        case .initial: 0
        case .move, .scale: -64
        }
    }

    var scale: Double {
        switch self {
        case .initial: 1.0
        case .move: 1.1
        case .scale: 1.8
        }
    }
}
ReactionView()
    .keyframeAnimator(initialValue: AnimationValues()) { content, value in
        content
            .foregroundStyle(.red)
            .rotationEffect(value.angle)
            .scaleEffect(value.scale)
            .scaleEffect(y: value.verticalStretch)
            .offset(y: value.verticalTranslation)
        } keyframes: { _ in
            KeyframeTrack(\.angle) {
                CubicKeyframe(.zero, duration: 0.58)
                CubicKeyframe(.degrees(16), duration: 0.125)
                CubicKeyframe(.degrees(-16), duration: 0.125)
                CubicKeyframe(.degrees(16), duration: 0.125)
                CubicKeyframe(.zero, duration: 0.125)
            }

            KeyframeTrack(\.verticalStretch) {
                CubicKeyframe(1.0, duration: 0.1)
                CubicKeyframe(0.6, duration: 0.15)
                CubicKeyframe(1.5, duration: 0.1)
                CubicKeyframe(1.05, duration: 0.15)
                CubicKeyframe(1.0, duration: 0.88)
                CubicKeyframe(0.8, duration: 0.1)
                CubicKeyframe(1.04, duration: 0.4)
                CubicKeyframe(1.0, duration: 0.22)
            }

            KeyframeTrack(\.scale) {
                LinearKeyframe(1.0, duration: 0.36)
                SpringKeyframe(1.5, duration: 0.8, spring: .bouncy)
                SpringKeyframe(1.0, spring: .bouncy)
            }
            KeyframeTrack(\.verticalTranslation) {
                LinearKeyframe(0.0, duration: 0.1)
                SpringKeyframe(20.0, duration: 0.15, spring: .bouncy)
                SpringKeyframe(-60.0, duration: 1.0, spring: .bouncy)
                SpringKeyframe(0.0, spring: .bouncy)
            }
        }

struct AnimationValues {
    var scale = 1.0
    var verticalStretch = 1.0
    var verticalTranslation = 0.0
    var angle = Angle.zero
}
map keyframes
struct RaceMap: View {
    let route: Route

    @State private var trigger = false

    var body: some View {
        Map(initialPosition: .rect(route.rect)) {
            MapPolyline(coordinates: route.coordinates)
                .stroke(.orange, lineWidth: 4.0)
            Marker("Start", coordinate: route.start)
                .tint(.green)
            Marker("End", coordinate: route.end)
                .tint(.red)
        }
        .toolbar {
            Button("Tour") { trigger.toggle() }
        }
        .mapCameraKeyframeAnimation(trigger: playTrigger) { initialCamera in
            KeyframeTrack(\MapCamera.centerCoordinate) {
                let points = route.points
                for point in points {
                    CubicKeyframe(point.coordinate, duration: 16.0 / Double(points.count))
                }
                CubicKeyframe(initialCamera.centerCoordinate, duration: 4.0)
            }
            KeyframeTrack(\.heading) {
                CubicKeyframe(heading(from: route.start.coordinate, to: route.end.coordinate), duration: 6.0)
                CubicKeyframe(heading(from: route.end.coordinate, to: route.end.coordinate), duration: 8.0)
                CubicKeyframe(initialCamera.heading, duration: 6.0)
            }
            KeyframeTrack(\.distance) {
                CubicKeyframe(24000, duration: 4)
                CubicKeyframe(18000, duration: 12)
                CubicKeyframe(initialCamera.distance, duration: 4)
            }
        }
    }
}
keyframe timeline
// Keyframes
let myKeyframes = KeyframeTimeline(initialValue: CGPoint.zero) {
    KeyframeTrack(\.x) {...}
    KeyframeTrack(\.y) {...}
}

// Duration in seconds
let duration: TimeInterval = myKeyframes.duration

// Value for time
let value = myKeyframes.value(time: 1.2)
 Twitter
 GitHub
 iosdev.space