Core Animation pipeline
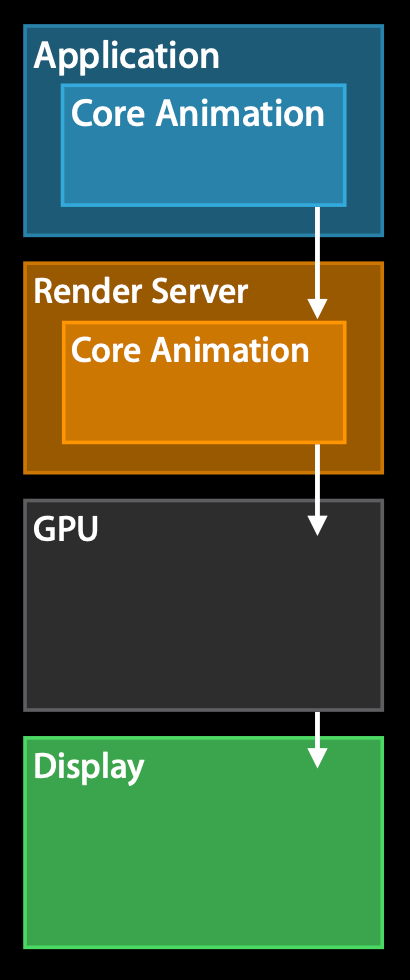
It all starts in the application, which builds a view hierarchy.
This view hierarchy is defined indirectly via UIKit or directly with Core Animation.
The application process does not do the actual rendering work for Core Animation. Instead, this view hierarchy is committed to the render server, which is a separate process, and this render server has a server side version of Core Animation that receives the view hierarchy.
The view hierarchy is then rendered with Core Animation with OpenGL or metal. This is ran in the GPU, hence it’s GPU accelerated.
Once the view hierarchy is being rendered, we can finally display it to the user.
How does this look like time wise within the application?
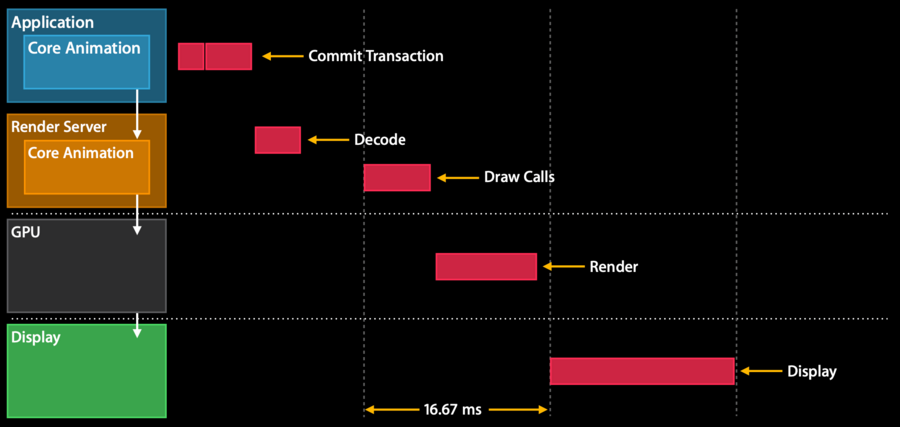
the chart assumes a refresh rate of 60 hertz, hence each cycle lasts 16.67ms.
First the app receives an event (e.g., a touch) and the application decides that it wants to update a view hierarchy.
The actual update of the view hierarchy happens in a phase called the Commit Transaction phase.
Once this Commit Transaction phase ends, the view hierarchy is encoded and sent to the render server.
Then the render server decodes this view hierarchy and wait for the next resync, in order to wait for buffers to get back from a display that they can actually render to. Once the resync stars, the render server starts issuing Draw Calls for the GPU (OpenGL or metal).
Once the Draw Calls complete, the GPU starts doing its rendering work (as soon as its resources are available).
Ideally this rendering work finishes before the next resync, because then we can swap in the frame buffer and show the new view hierarchy to the user.
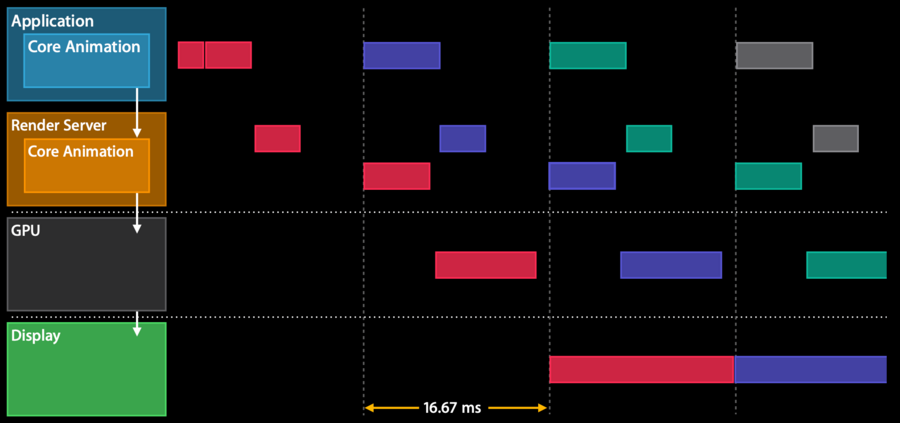
All the steps/phases above span over multiple frames, however the pipeline overlay all the steps so that they can run in parallel, hence the application will be able to refresh at a higher refresh rate:
Commit Transaction
The commit transaction is separated in four phases:
Layout - Set up the views
Display - Draw the views
Prepare - Additional Core Animation work
Commit - Package up layers and send them to render server
Layout phase
layoutSubviewsoverrides are calledThis phase is where we add layers to the view hierarchy with
addSubviewPopulate content and do some lightweight database lookups (e.g., for localized strings - as they’re needed for the content to be placed).
Usually CPU and I/O bound
Display phase
drawRectoverrides are calledString drawing
Apple uses core graphics for this rendering via CGContext
Usually CPU or memory bound
Prepare phase
Image decoding (if there are any images in the view hierarchy)
Image conversion (if there are any images that are on a format that is not supported by the GPU
Commit phase
Package up layers and send to render server
Recursive
Expensive if layer tree is complex
Keep the layer tree as flat as possible to make sure that this phase is as efficient as it can be.
Animation
An animation is a three-stage process:
(Application) Create animation and update view hierarchy (e.g., via
UIView.animate(withDuration:animations:completion:))(Application) Prepare and commit animation (this is the coming transaction that we’ve seen above, where
layoutSubviewsanddrawRect:are called)(Render server) Once the animation is committed, we give it to the render server that will render each frame appropriately (without the need for inter-process communication between application and render server)
Rendering concepts
Tile Based Rendering
Screen is split into tiles of NxN pixels
Each tile fits into the SoC cache
Geometry is split in tile buckets
Rasterization can begin after all geometry is submitted
Example, render of an app icon (a CALayer):
The CALayer in CoreAnimation is two triangles.
If you look at the two (blue) triangles (in the image above), they are spanning multiple tiles.
The GPU will start splitting up those (blue) triangles in each tile (forming the red triangles), so that each tile can be rendered individually.
Rendering pass
Once the render server decoded the committed view hierarchy, it needs to render it and it will use OpenGL or metal.
The render server will submit a command to the GPU.
The GPU will receive this command buffer and start doing its work.
Tiler stage: vertex processing is where the vertex shader runs, this transforms all vertices into screen space, so that we can then do the second stage, which is the actual tiling
the output of the Tiler stage is called Parameter Buffer
the GPU will wait until either:
all geometry is processed and sits in the parameter buffer
the parameter buffer is full (this is a performance hit because we need to flush the buffer and stall the vertex processing)
Renderer stage: where the pixel processing is done
the output of the Renderer stage is called Renderer buffer
Rendering examples
these passes are what are usually referred to “offscreen passes”.
Masking:
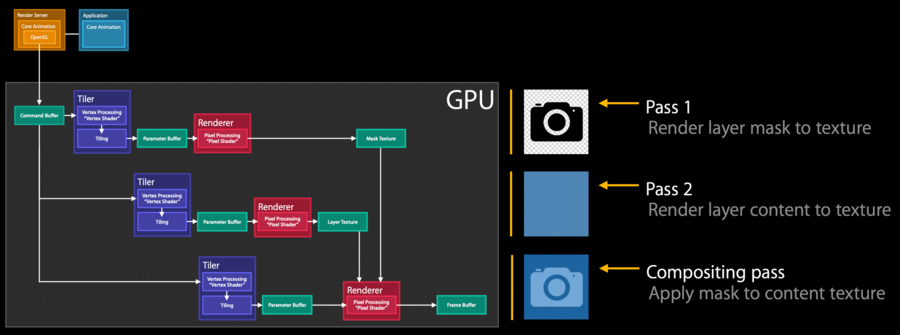
In the first pass we render the layer mask to a texture
In the second pass we render the layer content to a texture
in the last pass, called the compositing pass, we apply the layer mask texture to the content texture and composite to the reside to screen and end up with this light blue camera icon
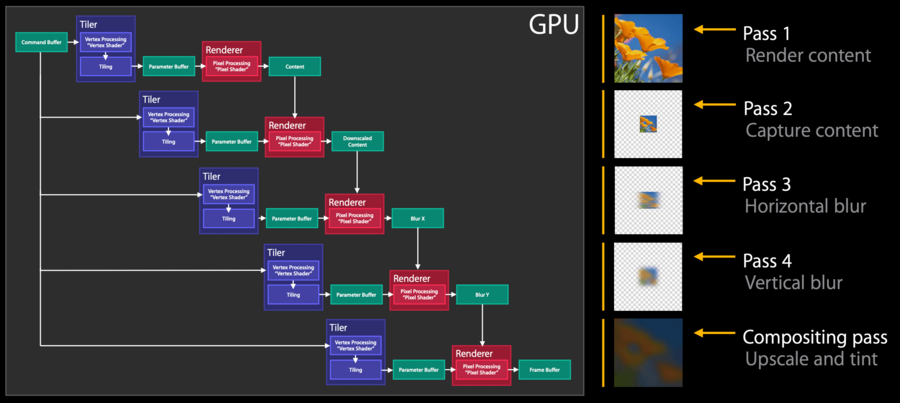
In the first pass we render the content
in the second pass we downscale the rendered content, this downscale depends on the hardware
in the third and fourth passes the horizontal and vertical blur is applied, these two passes could have been done together, but it saves a lot of memory if done one by one
in the last pass we upscale the blurred image and tint it
Performance-wise:
the first and last passes are the ones that require more GPU time (the content rendering and upscale + tint)
between passes, there will be a small GPU idle time for content switching, the more passes we have, the more idle time we will get. These idle times are about 0.1-0.2 ms each, meaning that applying a
UIBlurEffectwill have around 0.4-0.8ms of GPU idle time. This starts to be significant when we want to accomplish everything within 16.67ms.the darker the
UIBlurEffect, the more performant.
UIBlurEffect + UIVibrancyEffect:
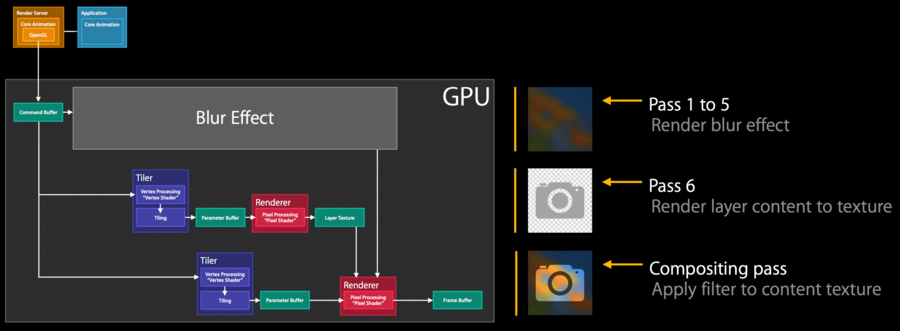
the first five passes are used for the blur
then we render the layer content to a texture
then we compose the blur output with the layer texture with a filter
Performance-wise:
like before the first and last passes of the blur phase are expensive
like the fist blur pass, the rendering of the layer content phase can also be expensive (depending on the content size)
lastly the filer pass is the most expensive pass of all
these two extra passes add even more GPU idle time for context switching, which now adds up to 0.6-1.2ms of GPU idle time
Tips:
apply vibrancy only to small parts of the screen
enable rasterization (CALayer’s
shouldRasterize), used to composite to image once with the GPU.extra offscreen passes are added when updating the content, hence enable it only for static content
don’t over use it, as its cache is limited to 2.5x of the screen size
rasterized images evicted from cache if unused for more than 100ms
always disable CALAyer’s
allowsGroupOpacityproperty onCALayer
Performance Investigation Mindset
What is the frame rate? Core Animation or OpenGL ES Driver instrument
CPU or GPU bound? OpenGL ES Driver and Time Profiler instrument
Any unnecessary CPU rendering? Time Profiler instrument
Too many offscreen passes? Core Animation instrument
Too much blending? Core Animation instrument
Any strange image formats or sizes? Core Animation instrument
Any expensive views or effects? Xcode View Debugger
Anything unexpected in hierarchy? Xcode View Debugger
