Build programmatic UI with Xcode Previews
 Darren Ford
 laurent b
Description: Learn how you can use the #Preview macro on Xcode 15 to quickly iterate on your UI code written in SwiftUI, UIKit, or AppKit. Explore a collage of unique workflows for interacting with views right in the canvas, find out how to view multiple variations of UI simultaneously, and discover how you can travel through your widget’s timeline in seconds to test the transitions between entries. We’ll also show you how to add previews to libraries, provide sample assets, and preview your views in your physical devices to leverage their capabilities and existing data.
Chapters
1:26 - What are previews
3:42 - Preview syntax basics
4:44 - Writing SwiftUI previews
5:50 - Writing UIKit & AppKit previews
6:08 - Demo: Putting writing previews into action
11:39 - Writing previews for widgets
15:58 - Previewing in library targets
20:28 - Passing sample data into previews
22:08 - Previewing on devices for full fidelity and access to data
25:50 - Wrap-up
## Intro Building software, is an iterative and creative process, and the fastest way to test our code.
What are previews
A preview is a snippet of code that makes and configures a view. They are written at the top level of a source file.
#Preview {
  MyView()
}

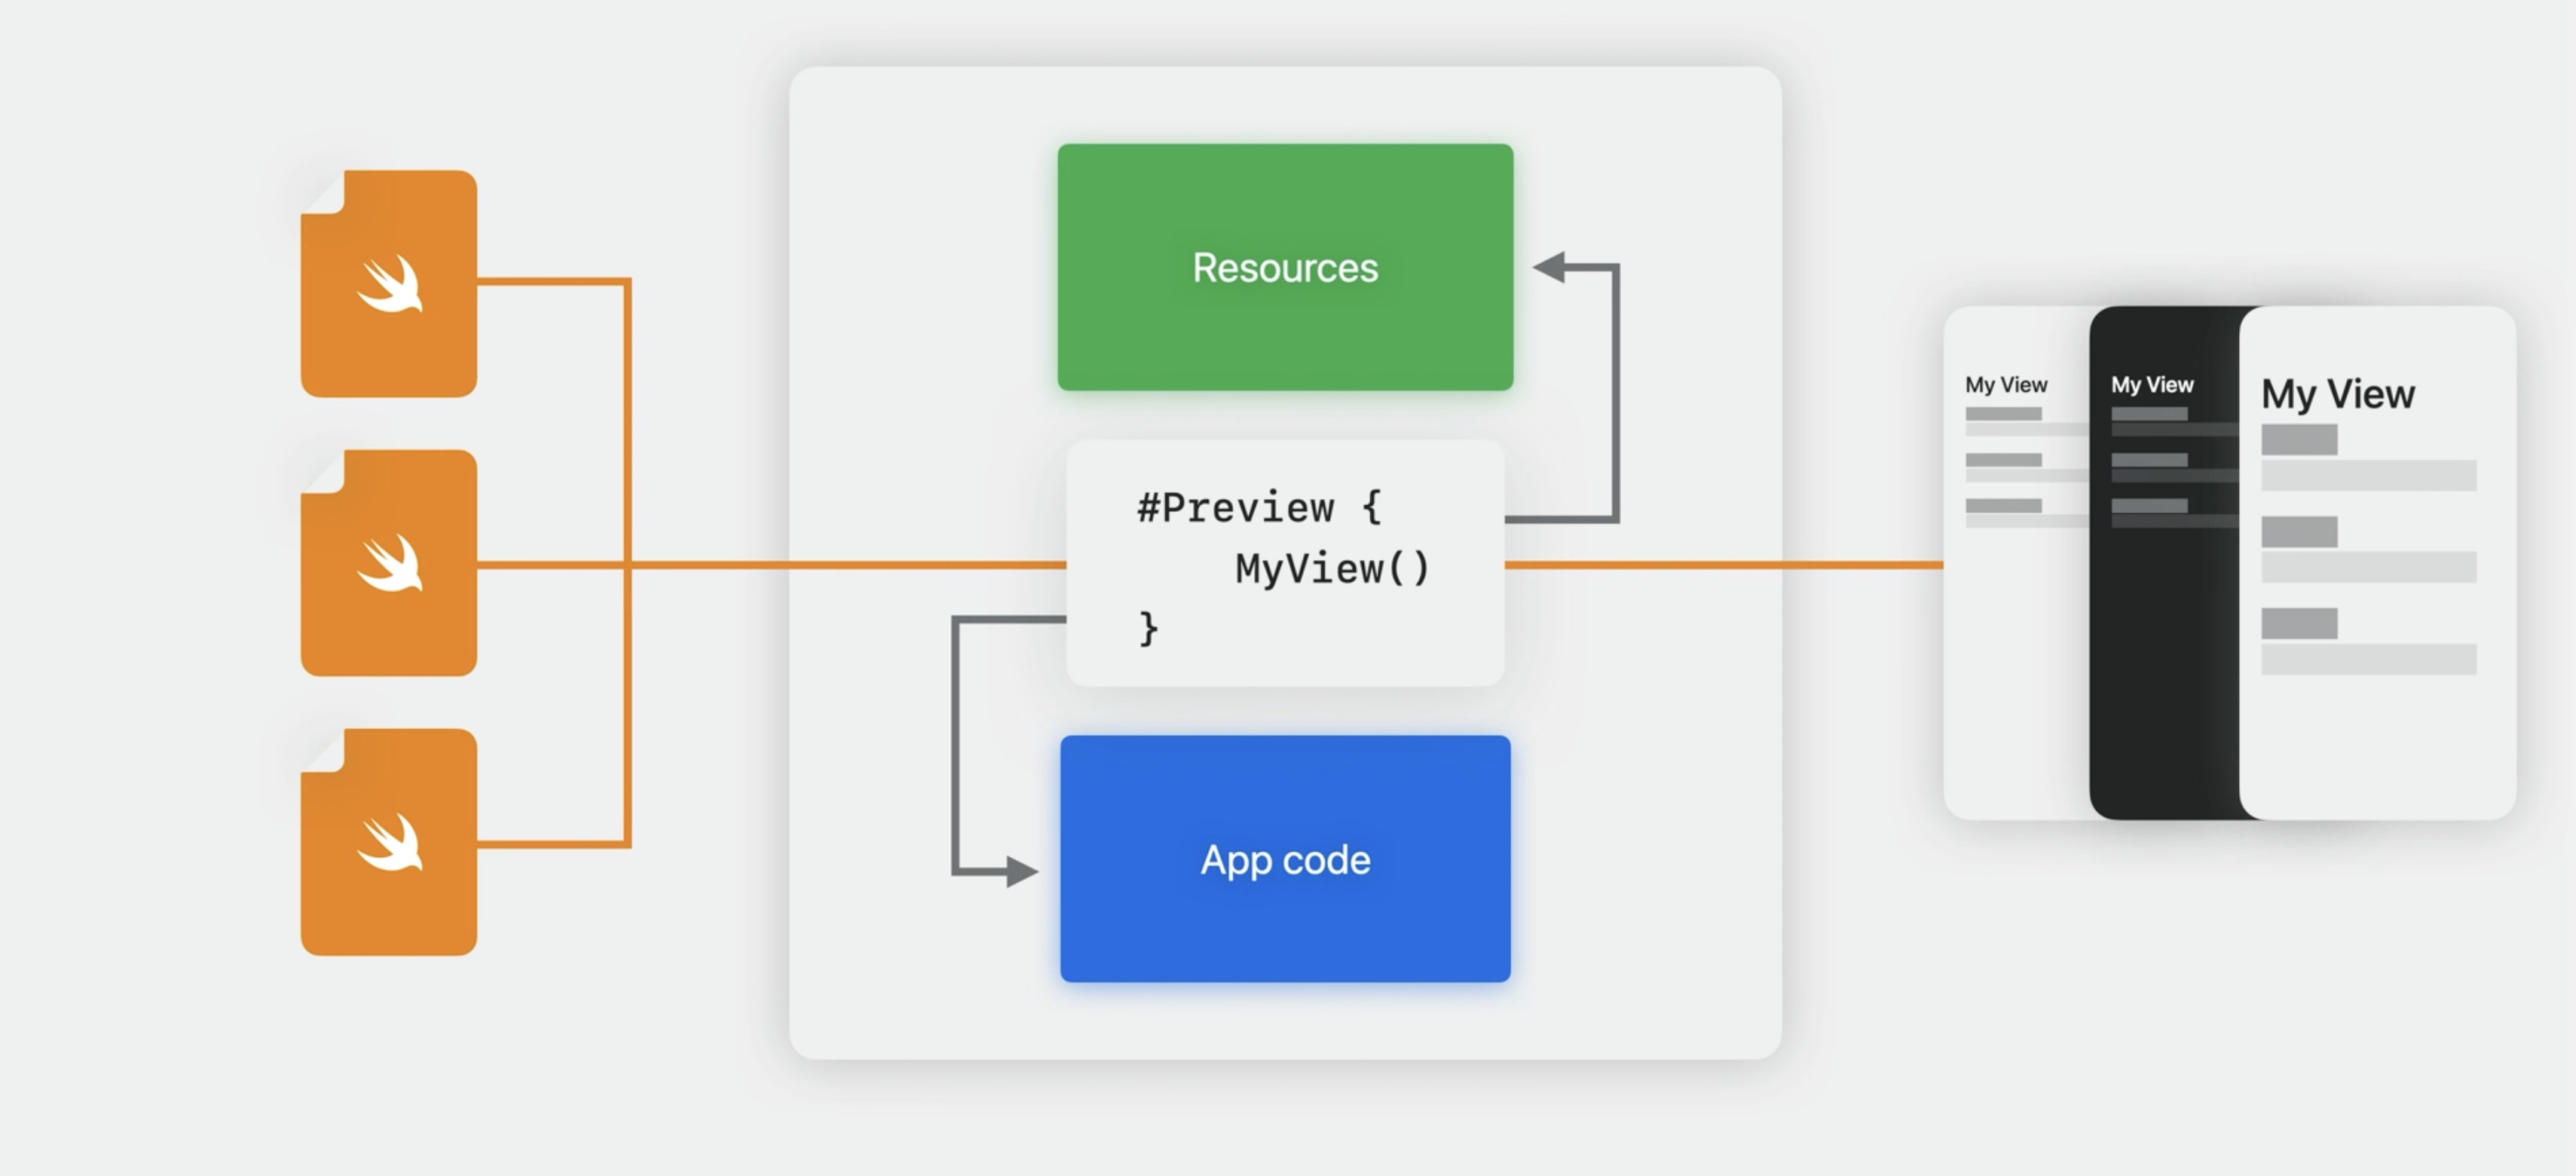
Previews are compiled into the app, right alongside the rest of the code and the resources.
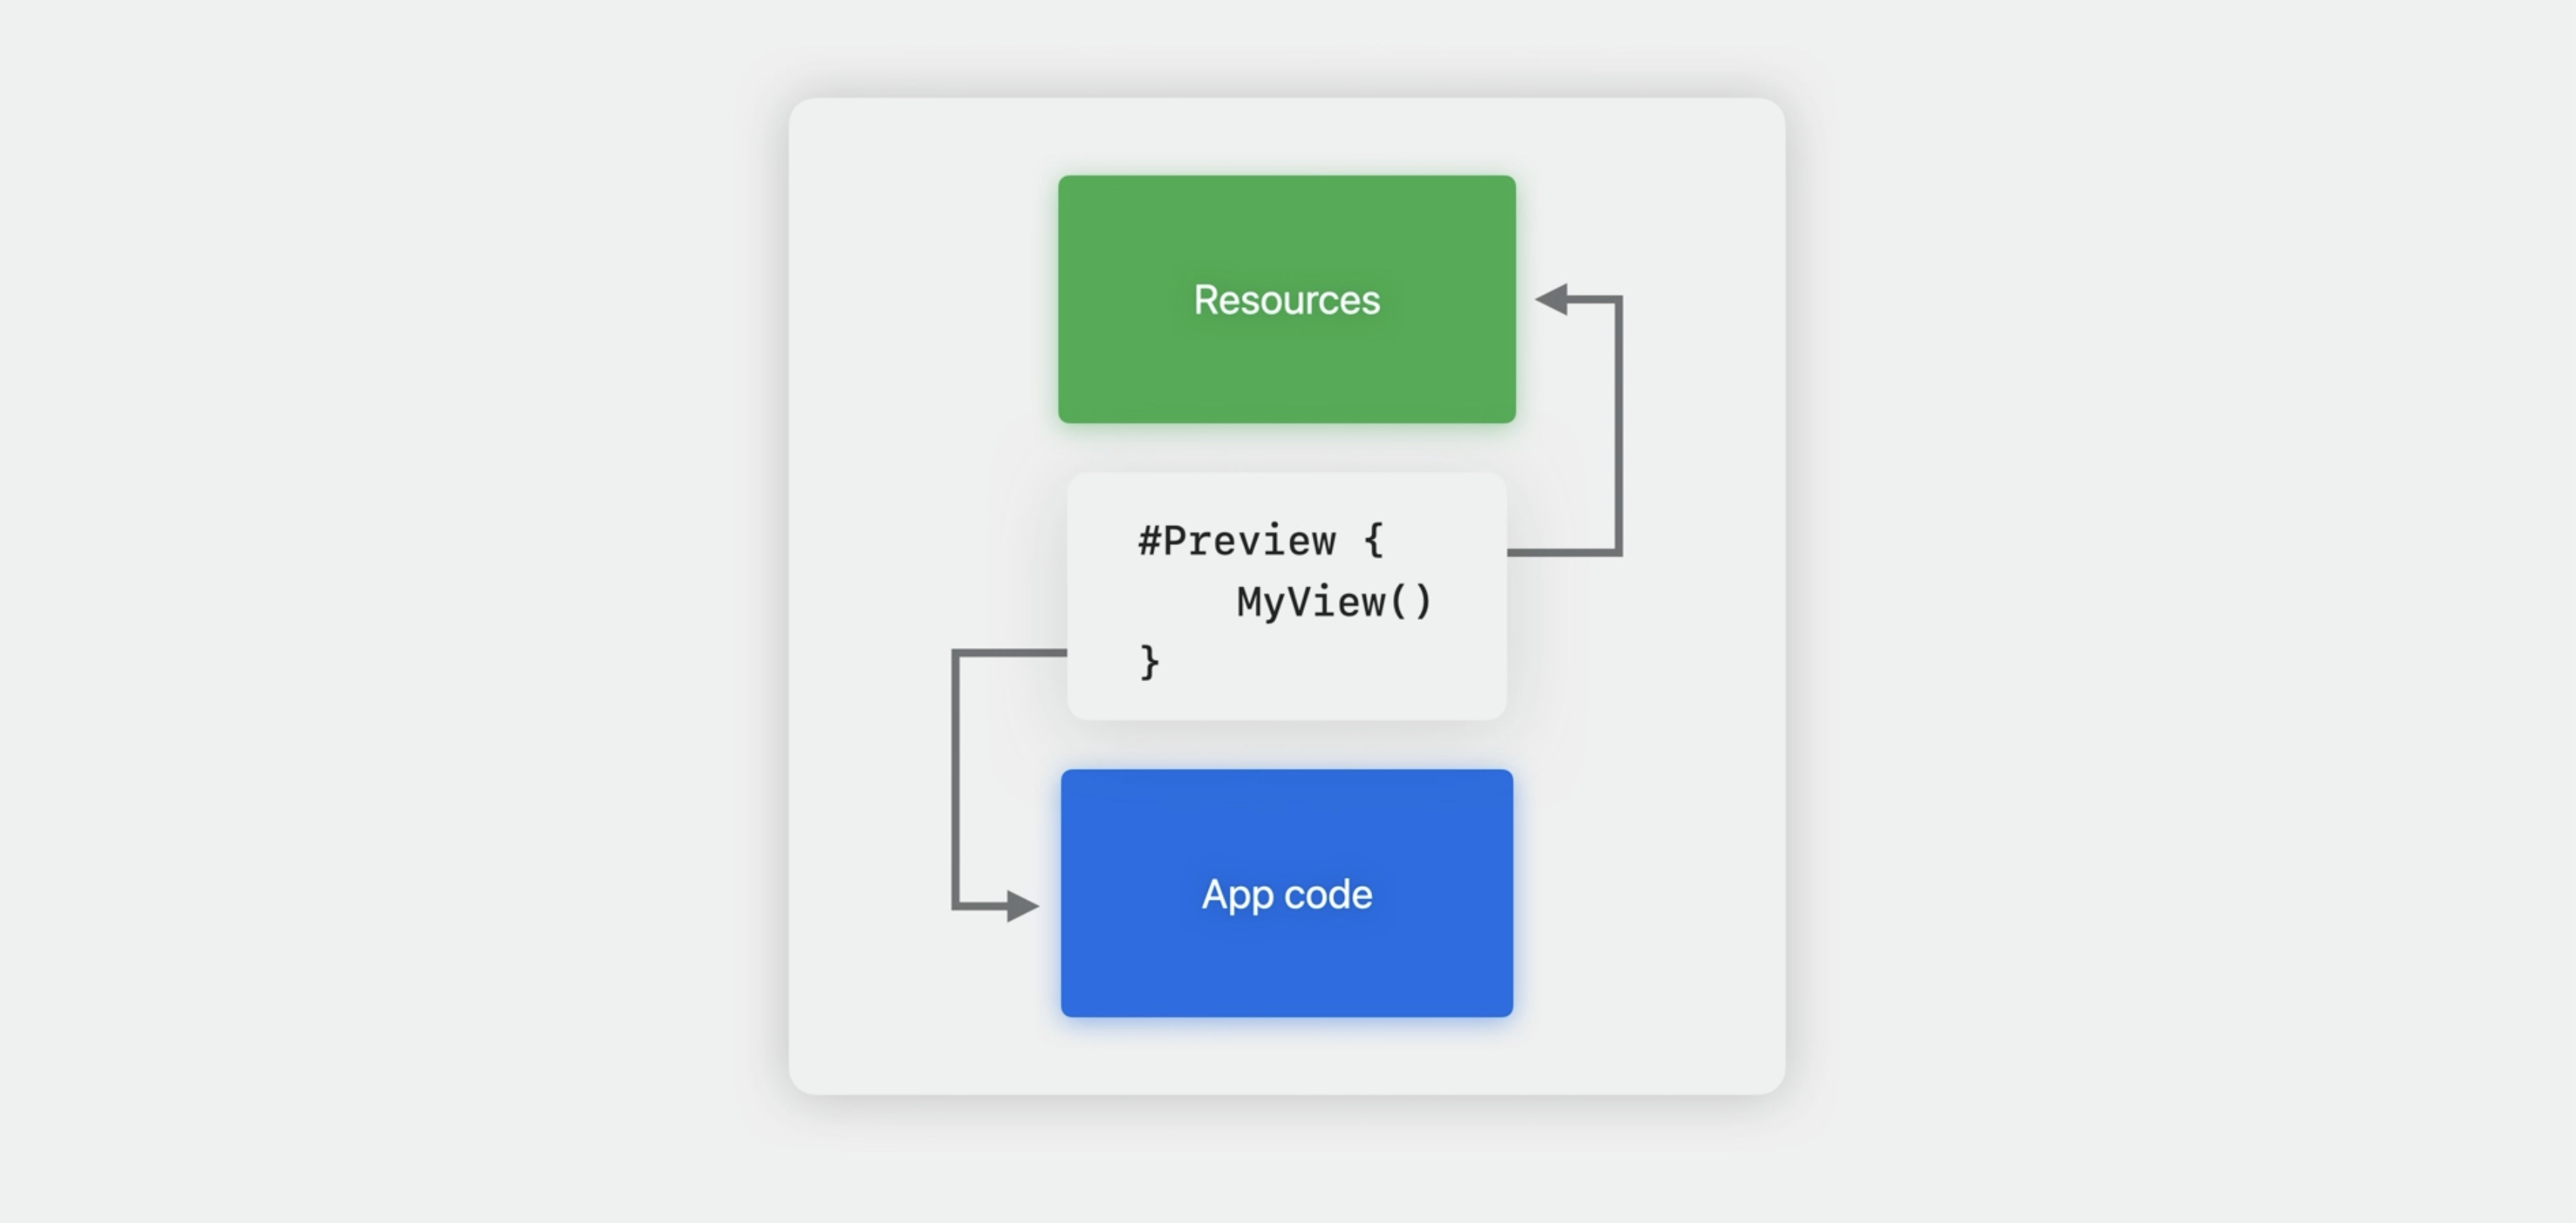
When editing any of the Swift code in our project, Xcode will examine the changes made and recompile the minimal amount of code. And then, re-run the preview.
Previews are like tests
- They execute code in our project
- Help us develop faster
- Preview all layers of our app
It might be helpful to think of previews similar to tests. Like tests, previews run real code in real project.
Investing in writing tests and previews, ultimately helps develop faster.
Writing previews
Every preview has the same basic shape.
// Anatomy of a preview initializer

#Preview {
  Content()
}
Start with the Preview macro initializer at the top level of a source file. Then, return one or more trailing closures of content. This is where we can configure our UI.
// Anatomy of a preview initializer
#Preview("Name", configuration) {
  Content()
}
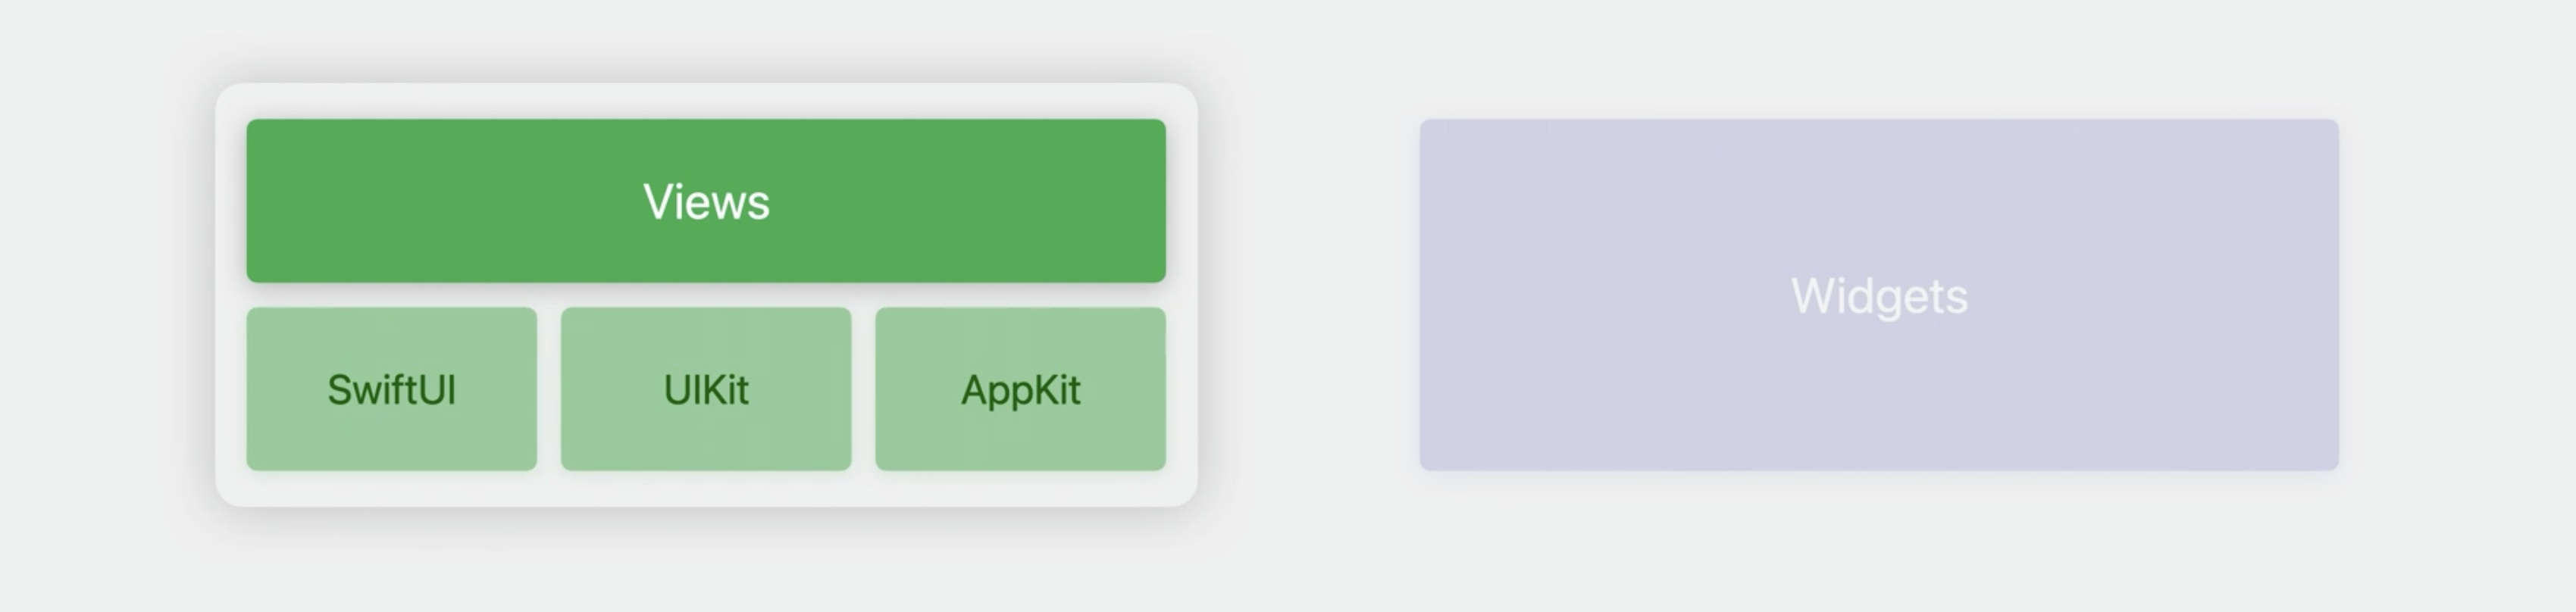
There are two main kinds of previews: views and widgets. Views can come from SwiftUI, UIKit, or AppKit.
For SwiftUI, we can just return any view that we are working on. or we can place it in whatever other views that we need. Like a List.
// SwiftUI
#Preview {
  List {
   CollageView(layout: .twoByTwoGrid)
  }
}
This is also the place to attach modifiers that provide data through the environment if the views need it.
// SwiftUI
#Preview {
  List {
   CollageView(layout: .twoByTwoGrid)
  }
  .environment(CollageLayoutStore.sample)
}
Previews are kind of like the scenes that we define at the top level of the app. Scenes serve as the entry points to the app. When it comes to configuring the preview, we can give it a name. Previews support passing one or more configuration traits as a variadic argument list.
#Preview(“2x2 Grid”, traits: .landscapeLeft) {
  List {
    CollageView(layout: .twoByTwoGrid)
  }
  .environment(CollageLayoutStore.sample)
}
For example, Instead of a SwiftUI view, just make a view controller, and configure it as needed.
#Preview {
  var controller = SavedCollagesController()
  controller.dataSource = CollagesDataStore.sample
  controller.layoutMode = .grid
  return controller
}
Beyond view controllers, we can also preview a UIView or NSView directly.
#Preview(“Filter View”) {
  var view = CollageFilterDisplayView()
  view.filter = .bloom(amount: 15.0)
  view.imageData = …
  return view
}
Example of an app that makes collages of images.

Let's go to Xcode and explore the features of the Preview canvas. There are views that lets us add a filter to an image.
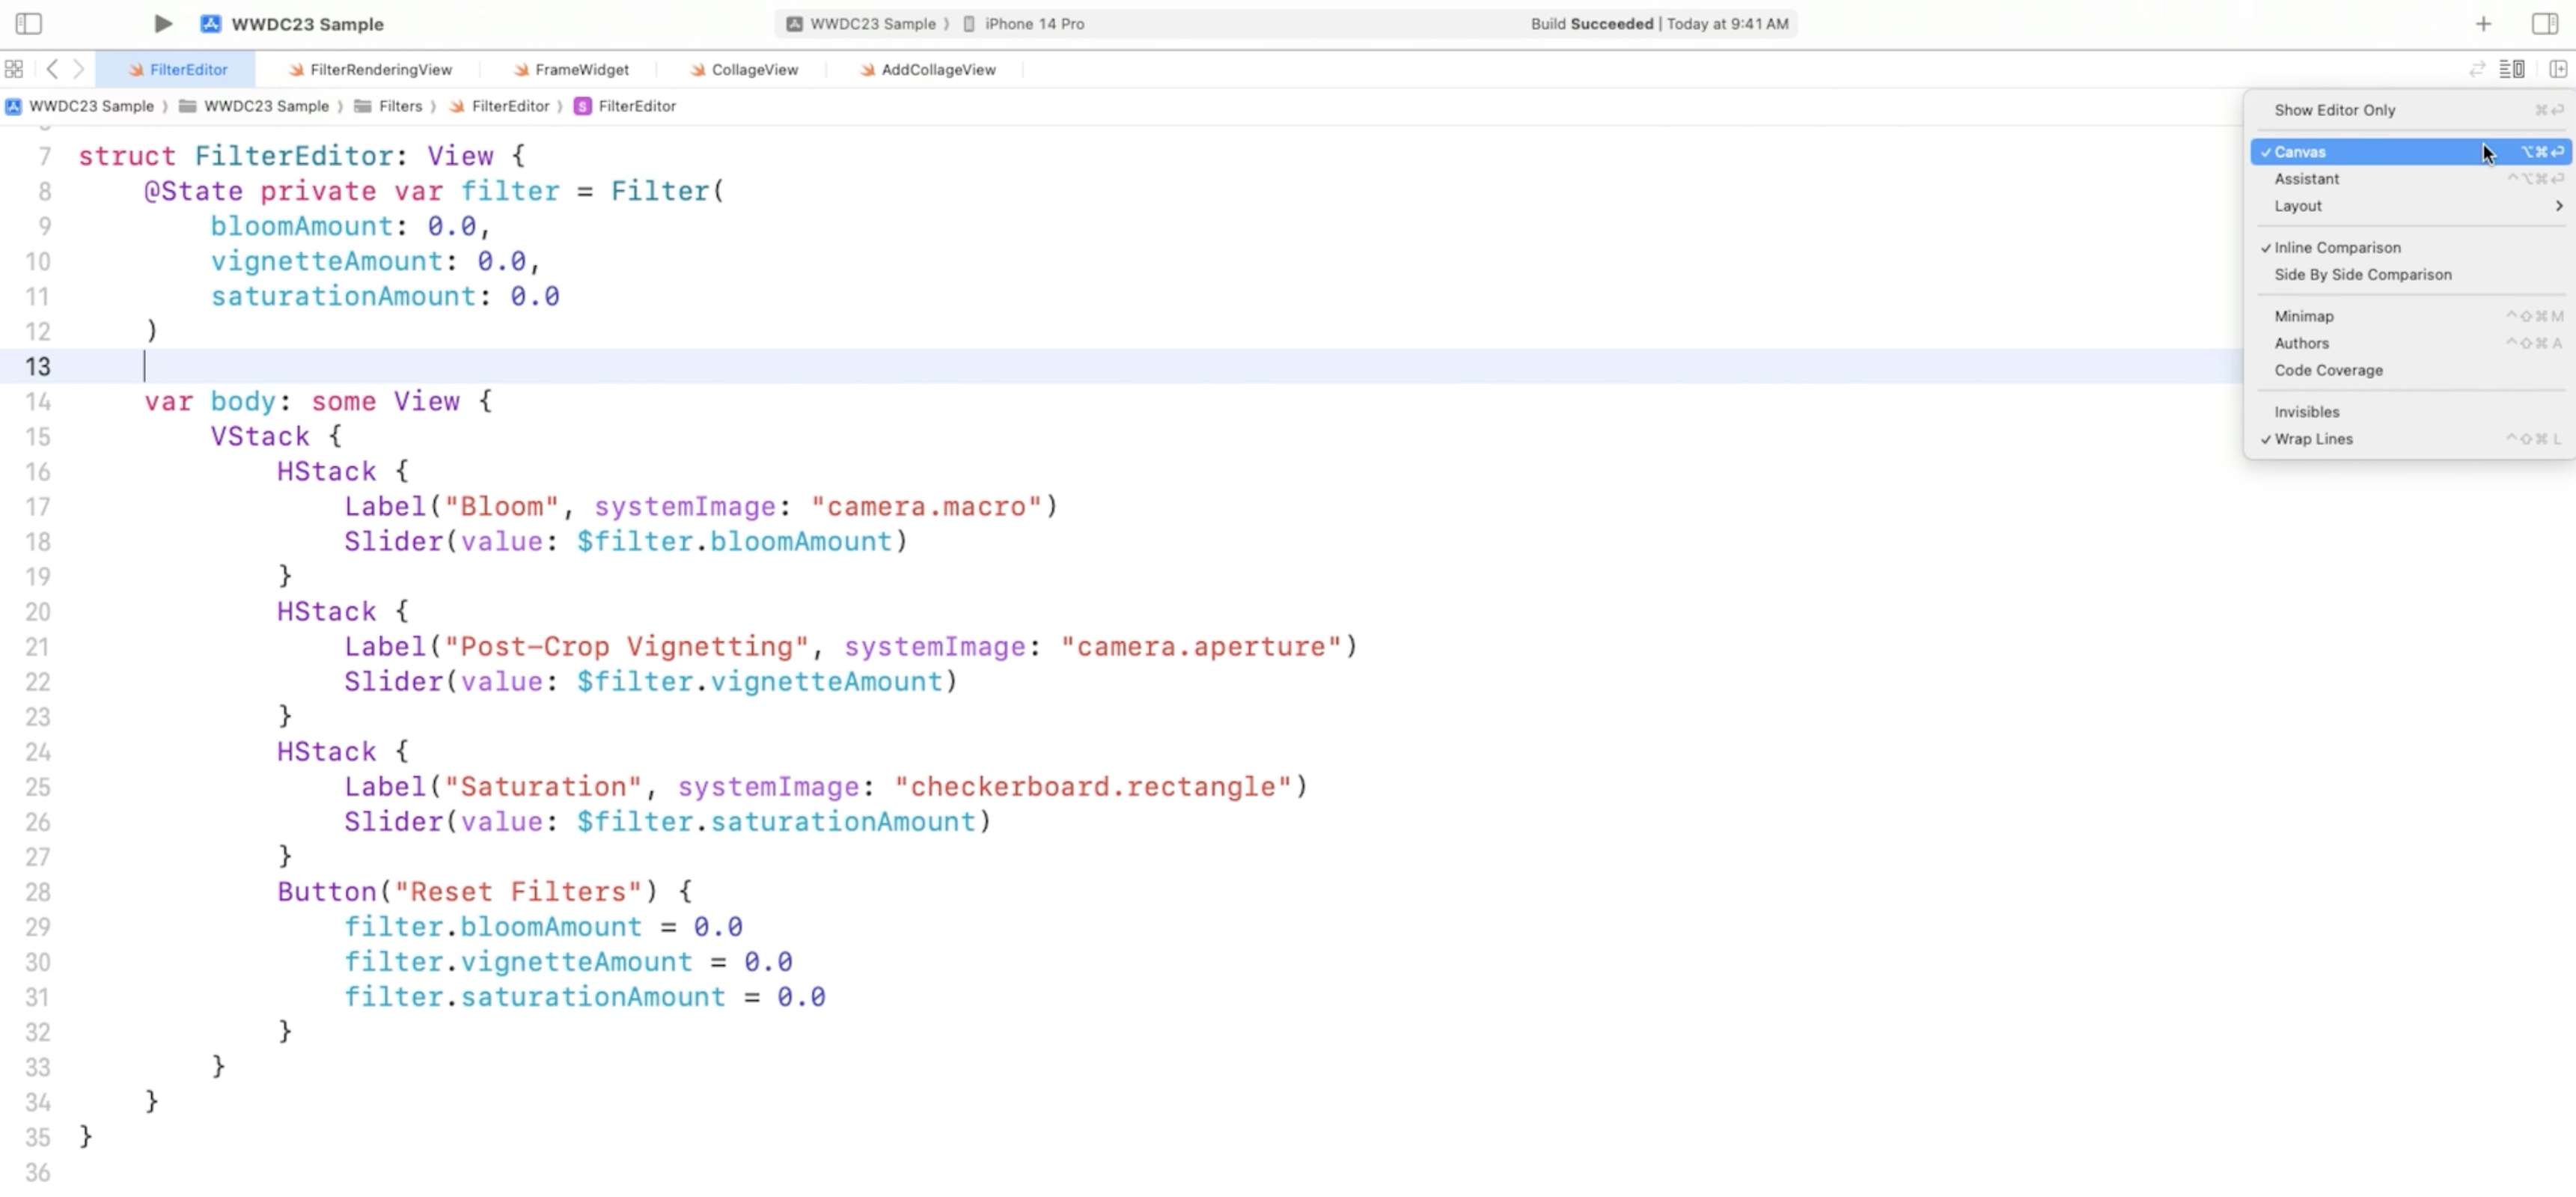
Even with the canvas mode enabled, the canvas stays hidden unless there is a preview defined in the file.
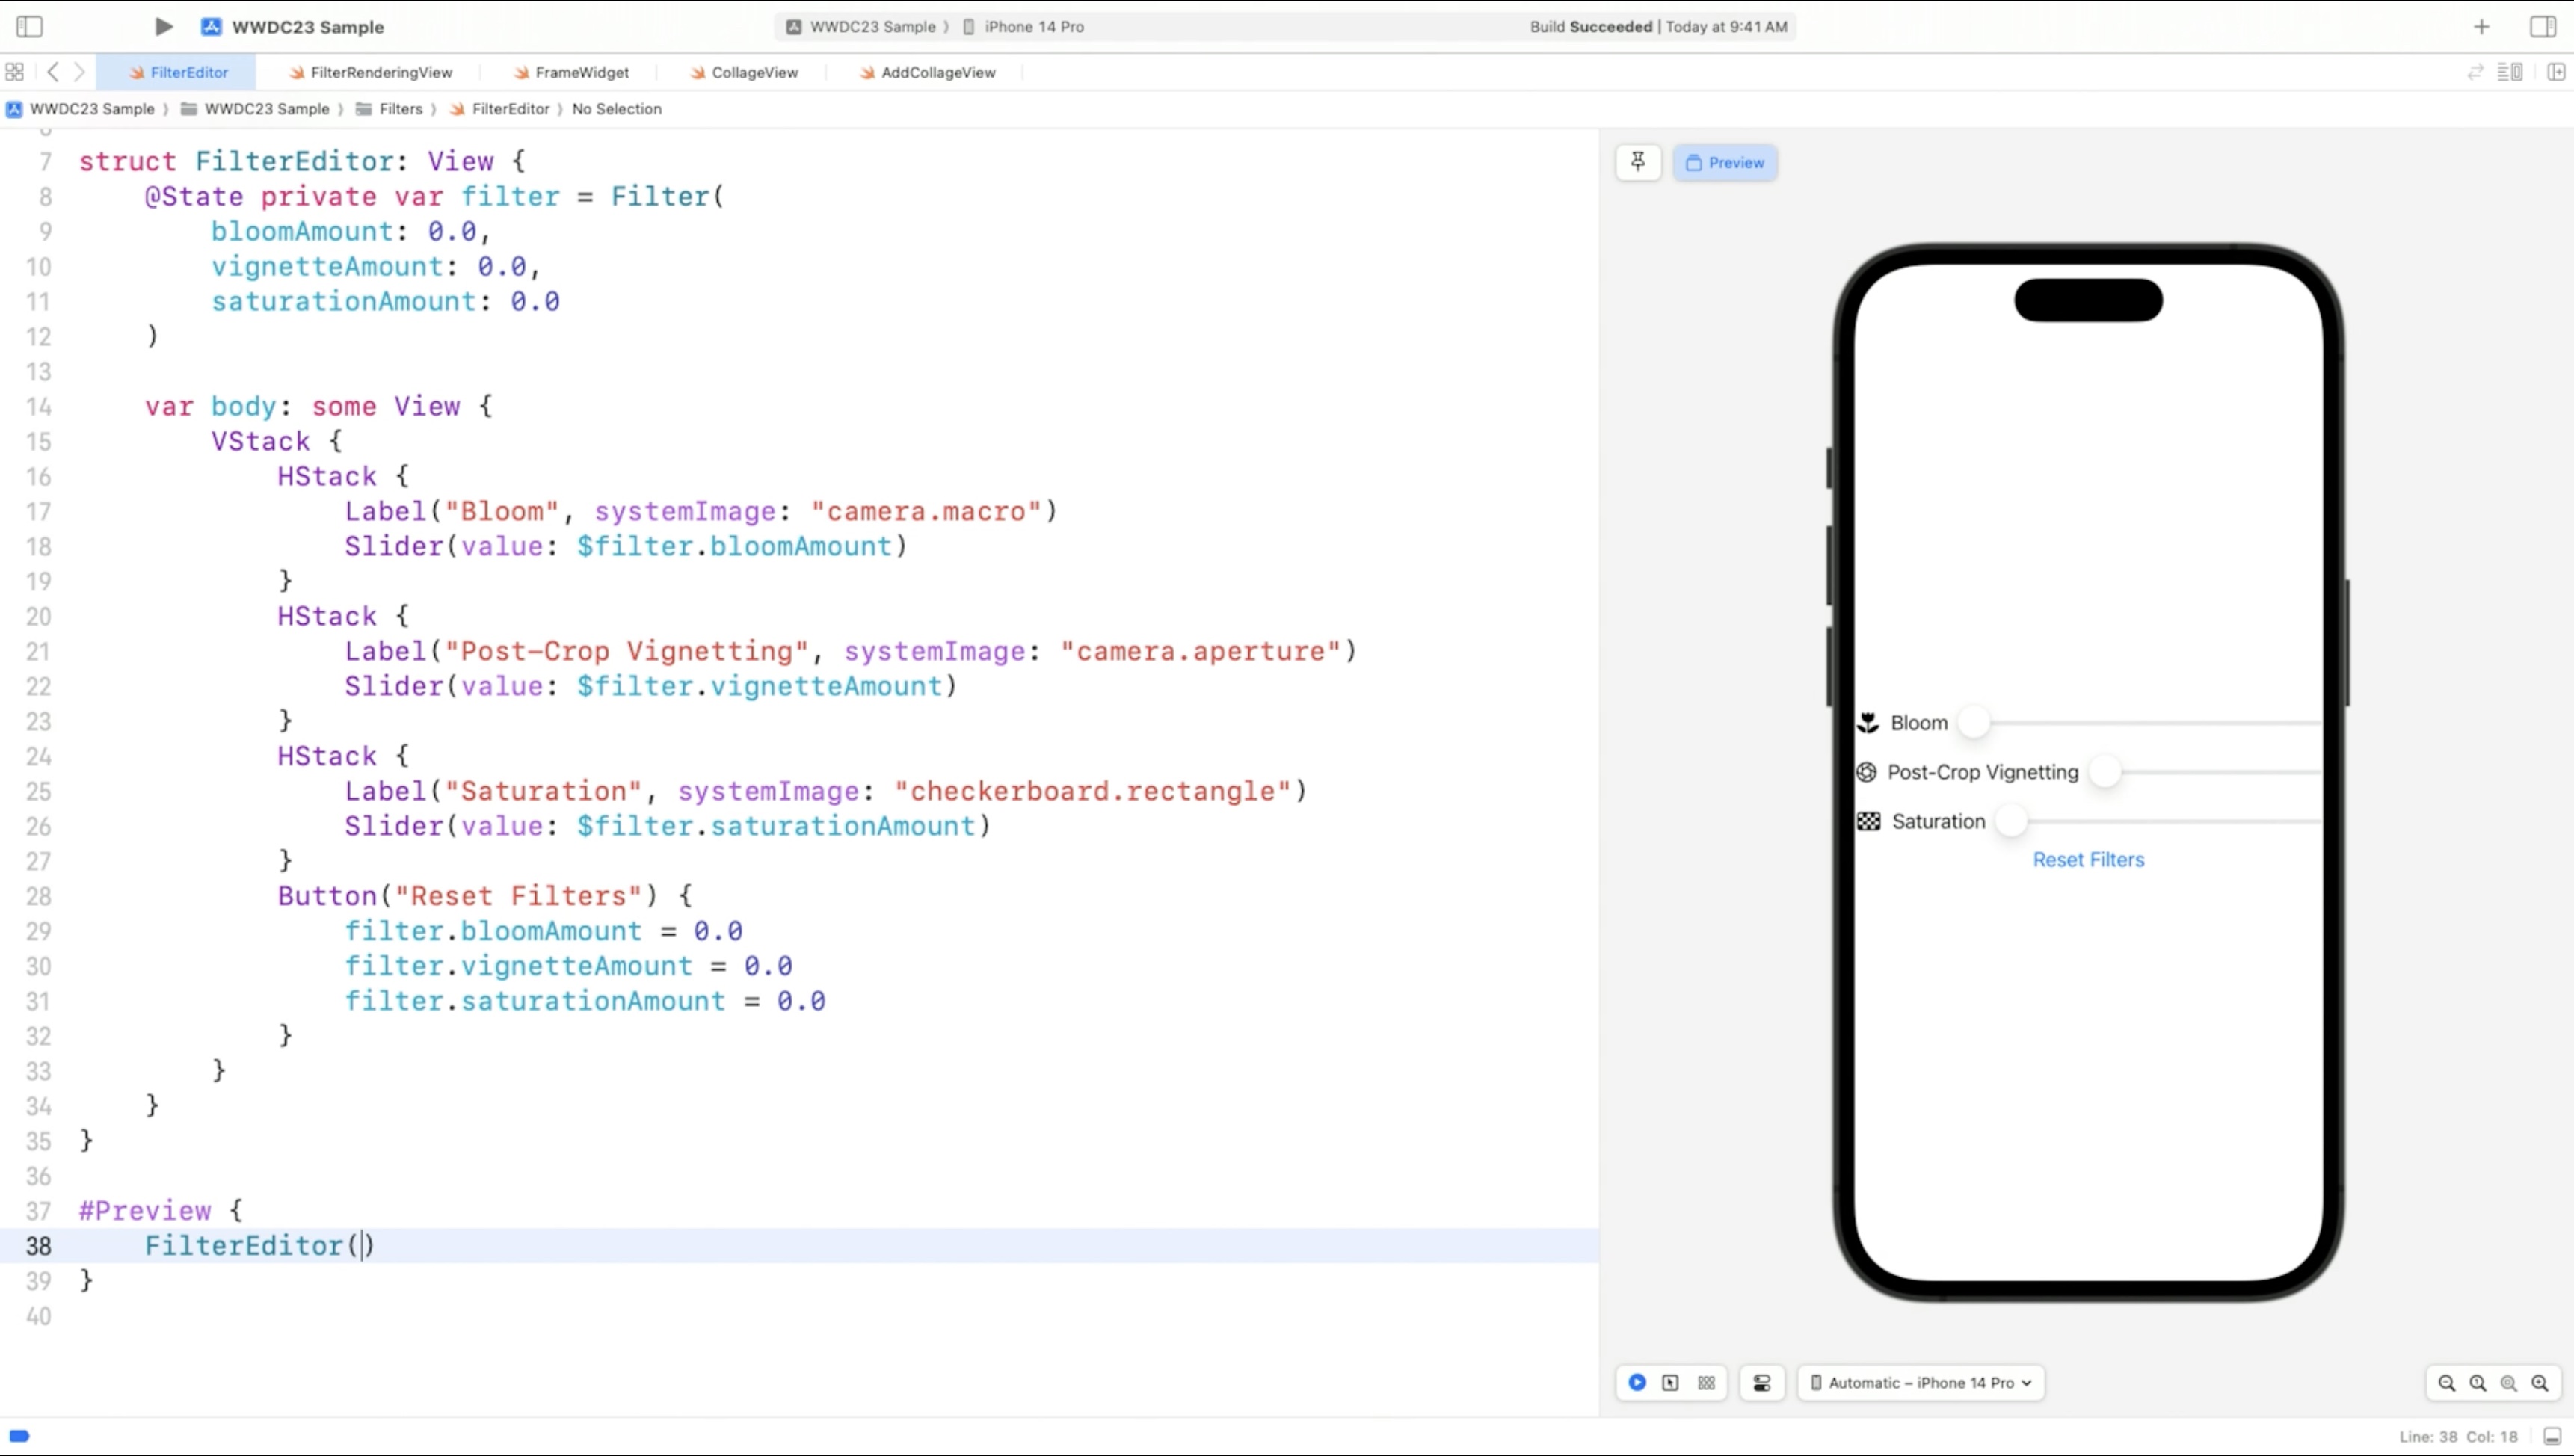
There are three different modes we can use to work on my view. These appear in the bottom left corner of the canvas. The first and default mode is the live or interactive mode. I can test animations and I can call and respond to asynchronous code.
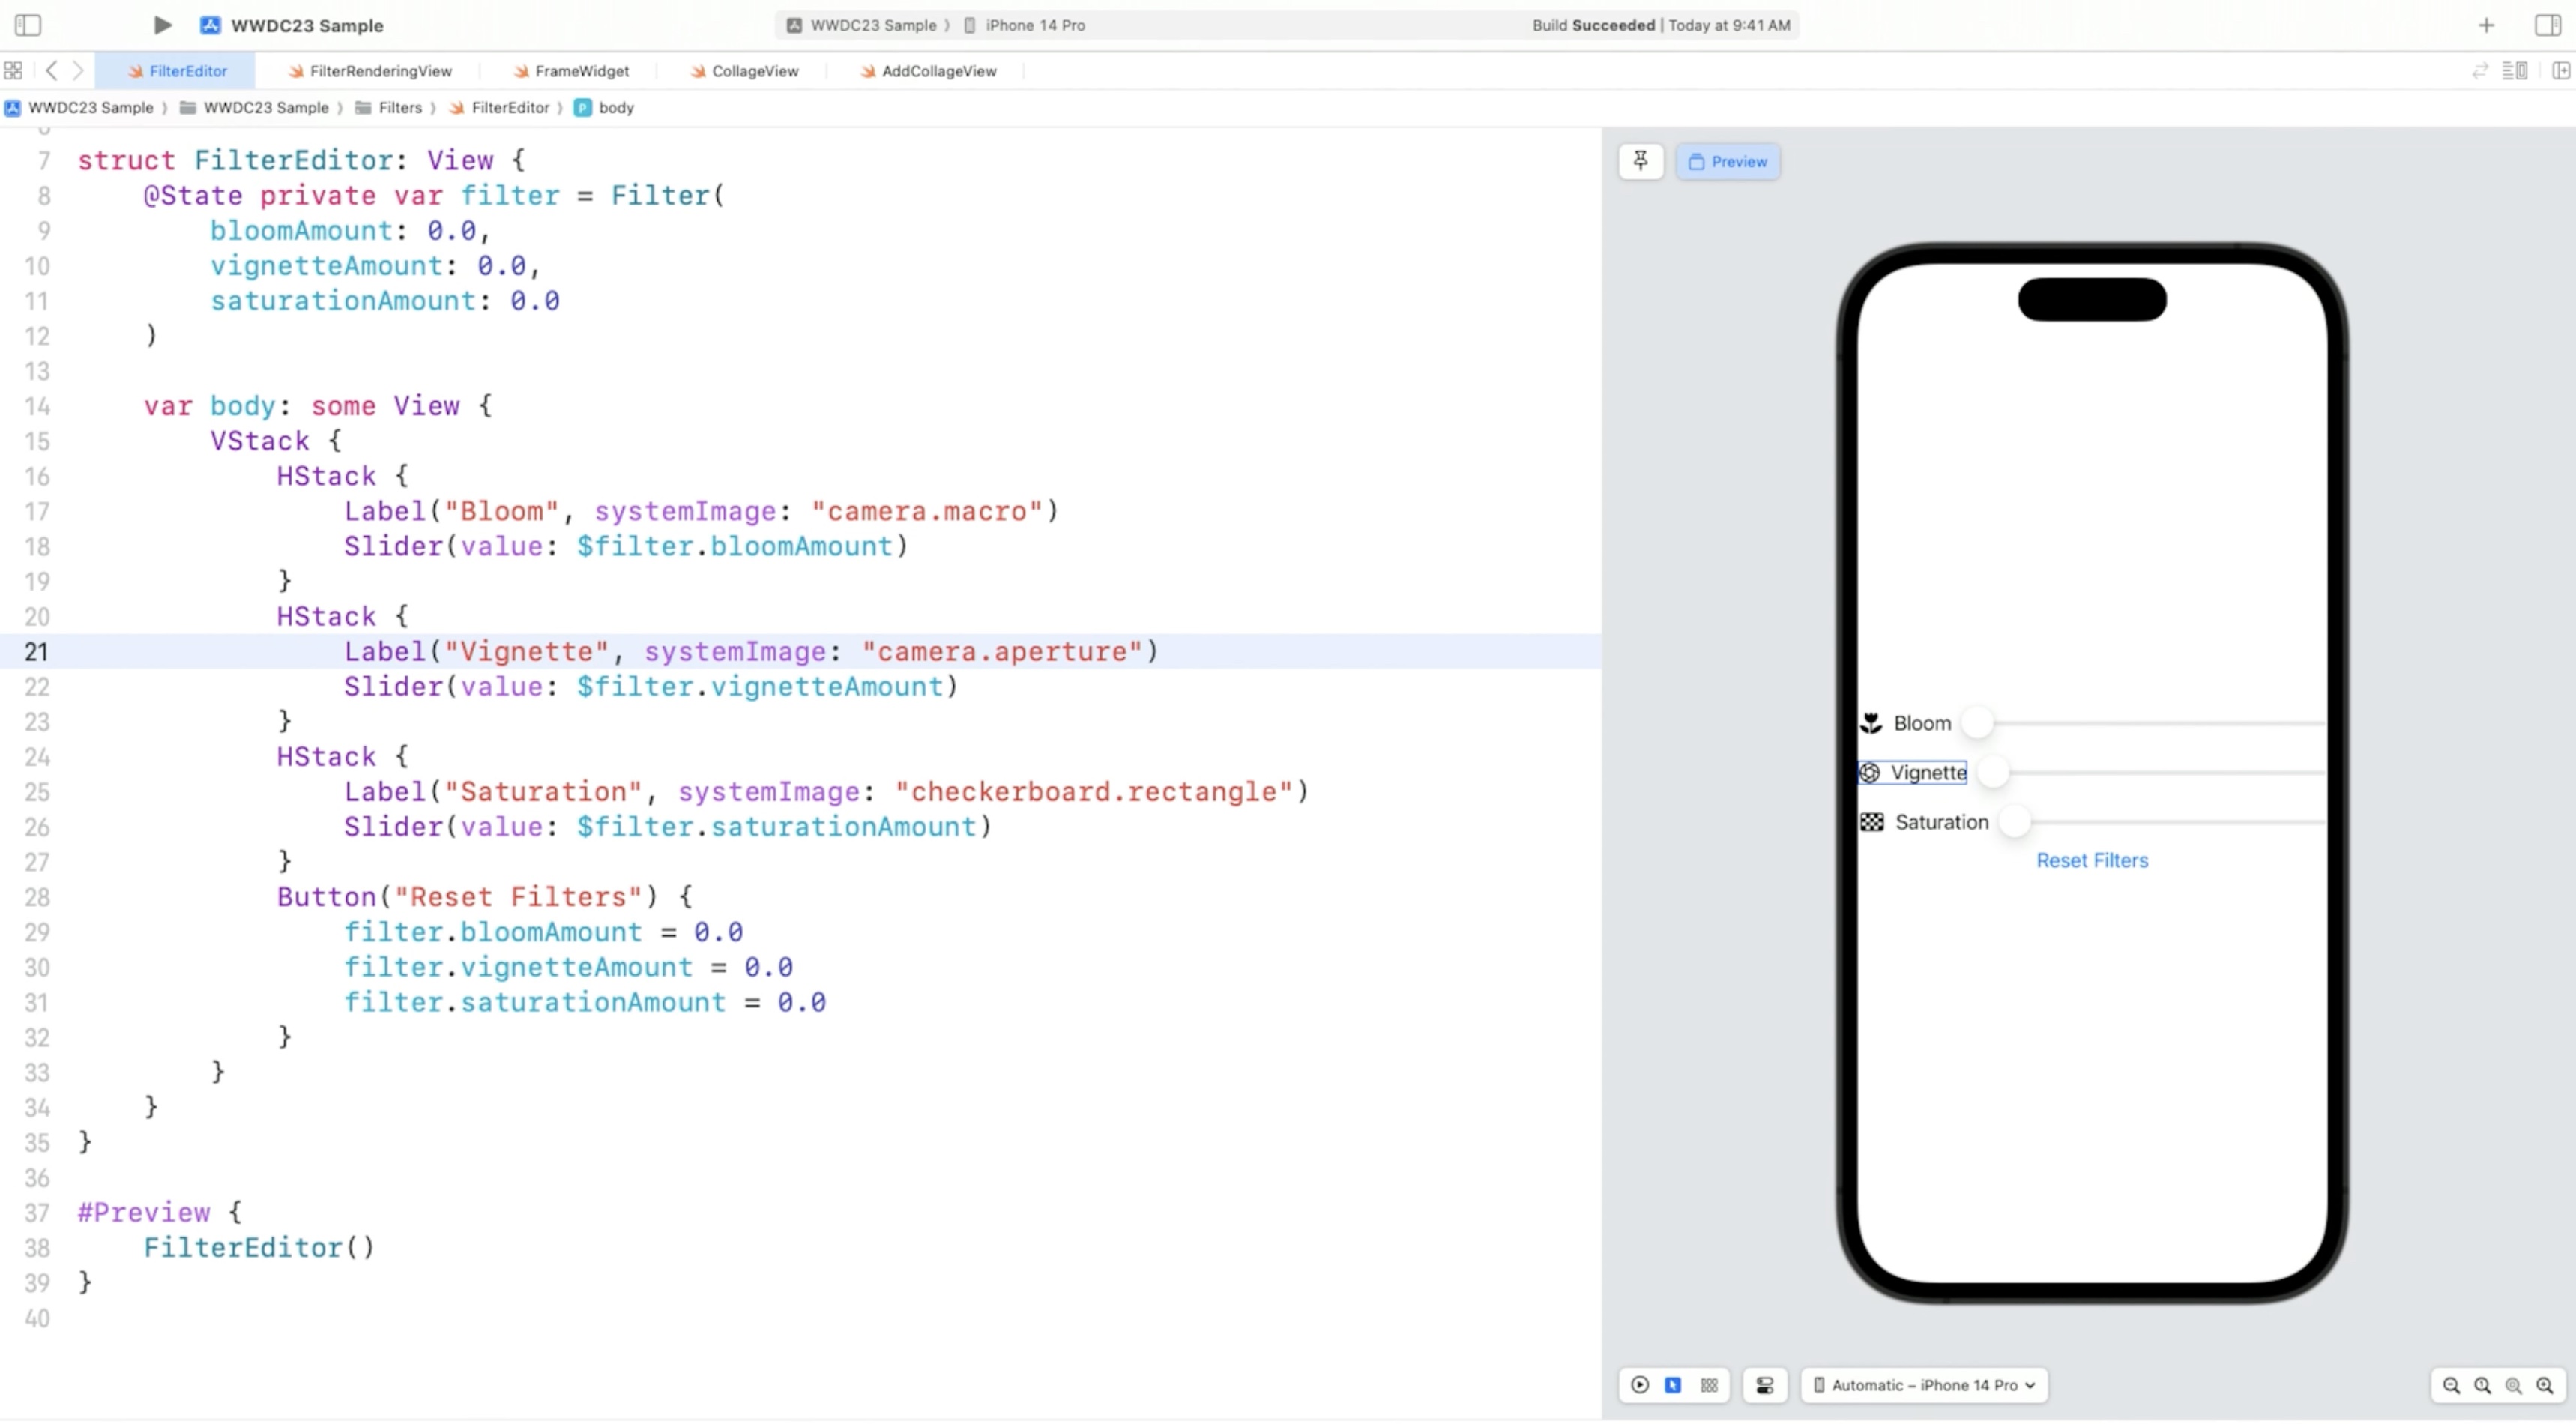
The second mode is the selection, or static mode. This mode takes a snapshot of the view and allows to interact with the elements in the canvas. Clicking a view highlights the line of code that made it in the source editor.
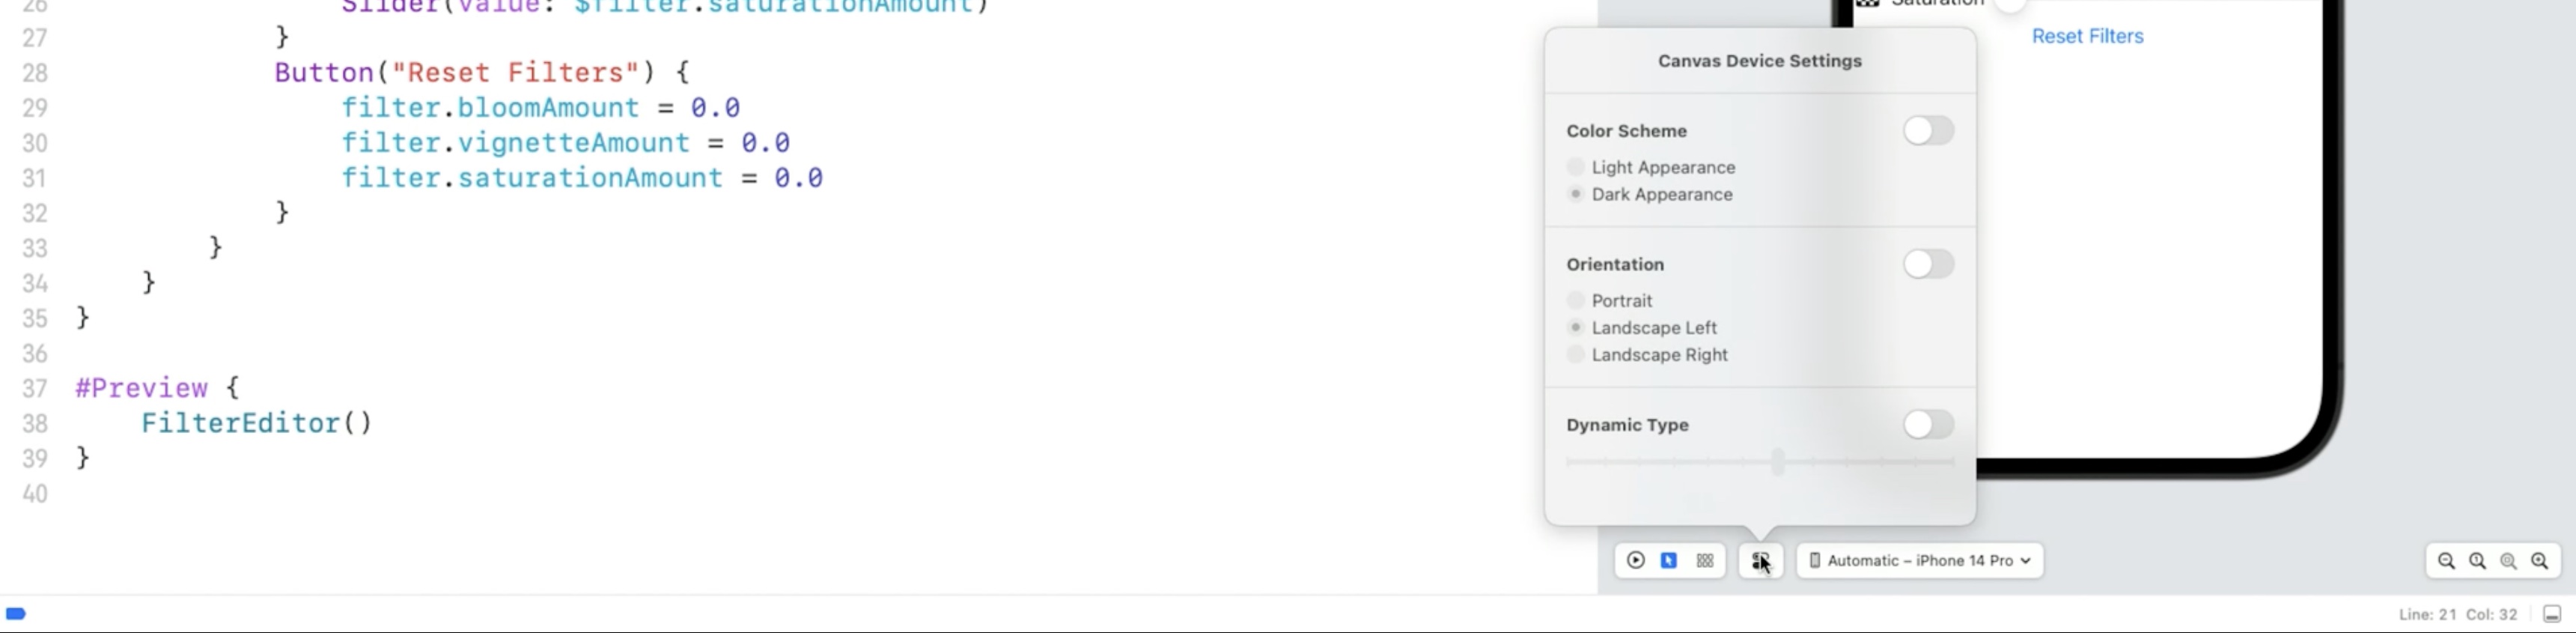
The preview environment. We can use the Device Settings popover in the canvas clicking the controls icon to bring up the settings and enable dark mode or a specific dynamic type size.
The third mode of previews: variants.

There we can pick which device setting we’d like to see all the values for, like color scheme, or all of the dynamic type sizes.
Instead of a VStack, we are gonna use a Form, and we make each HStack be a Section. We can make these changes across all of the HStack instances by taking advantage of multi-cursor editing. Select the first HStack, then press Command-Option-E to find and insert a cursor for each instance of HStack.
We add a header for each Section, which is provided in a second trailing closure.

We’ll switch tab to the view controller that renders a filter using CoreImage, and switch the canvas back to live mode. In the preview macro, we created a view controller and passed it a sample image.
#Preview {
  let viewController = FilterRenderingViewController ()
  if let image = UIImage(named: "sample-001")?.cgImage {
   viewController.imageData = image
  }
  return viewController
}
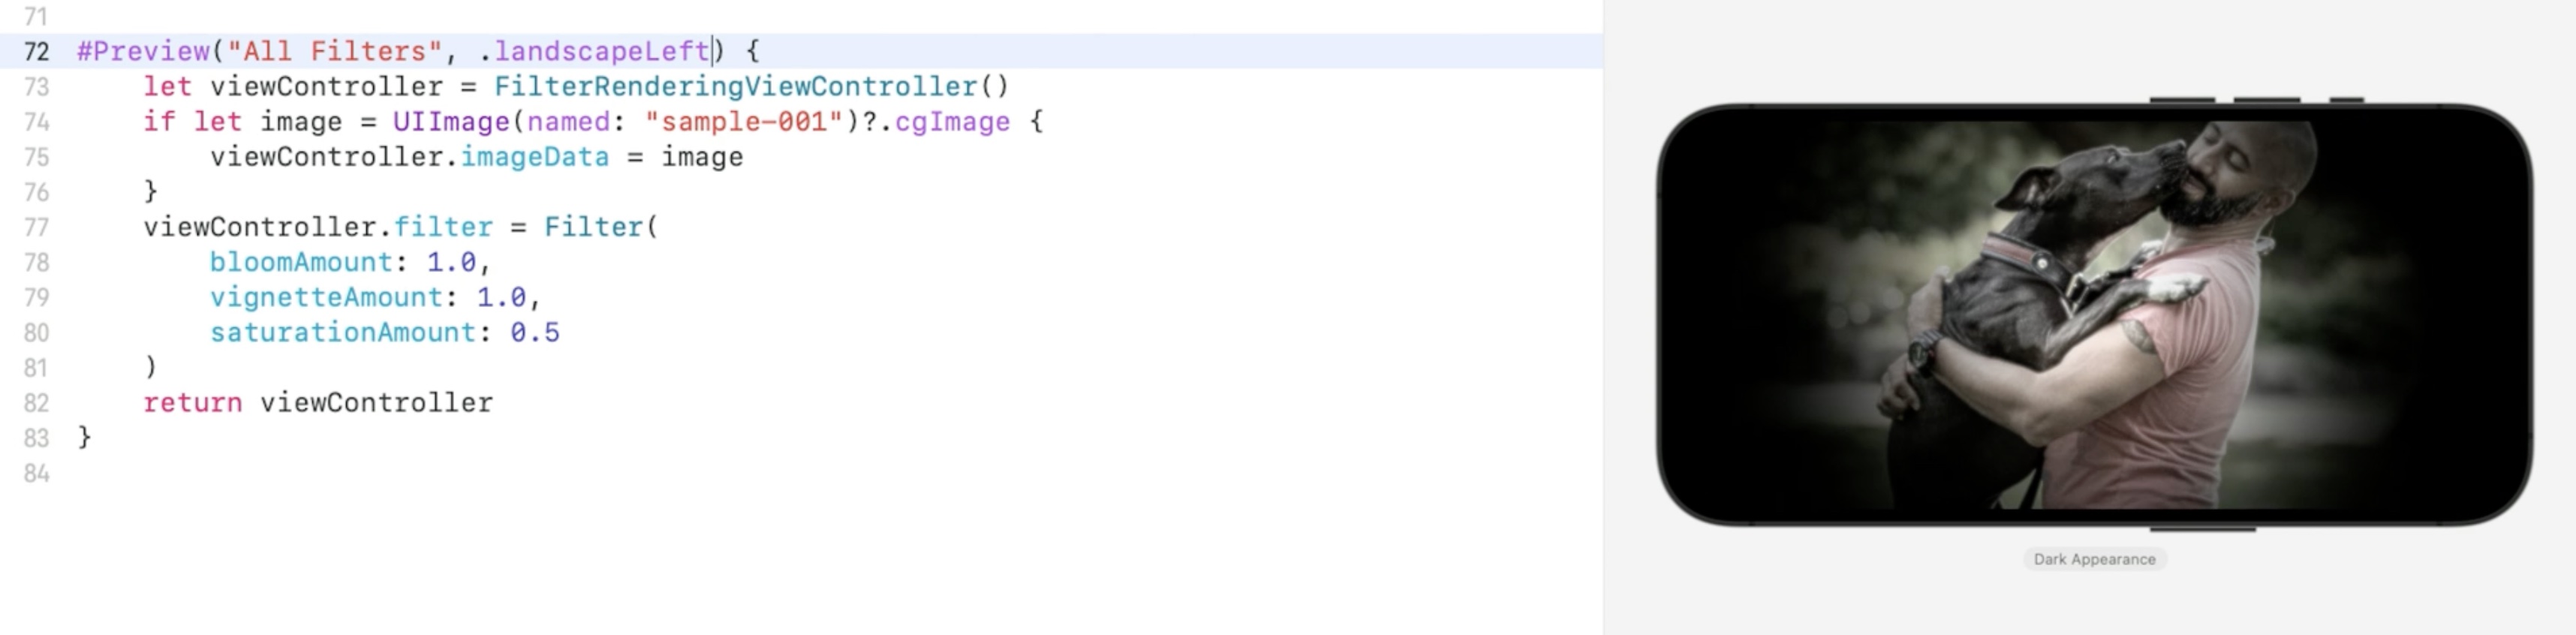
But now we add the code to pass a filter to the view controller.
#Preview {
  let viewController = FilterRenderingViewController ()
  if let image = UIImage(named: "sample-001")?.cgImage {
   viewController.imageData = image
  }
  viewController.filter = Filter (
   bloomAmount: 1.0,
   vignetteAmount: 1.0,
   saturationAmount: 0.5
  }

  return viewController
}
Besides configuring the view controller, we can also configure the preview. Any preview can have an optional name as the first argument. And with view previews, like SwiftUI and UIKit, we can add one or more traits in a variadic list after the name.
For example, we can set the preview to start in landscape.
Widgets
Timeline provider which produce individual entries.
In Xcode, we can preview either an entire timeline provider, or make our own timeline of entries in the preview.
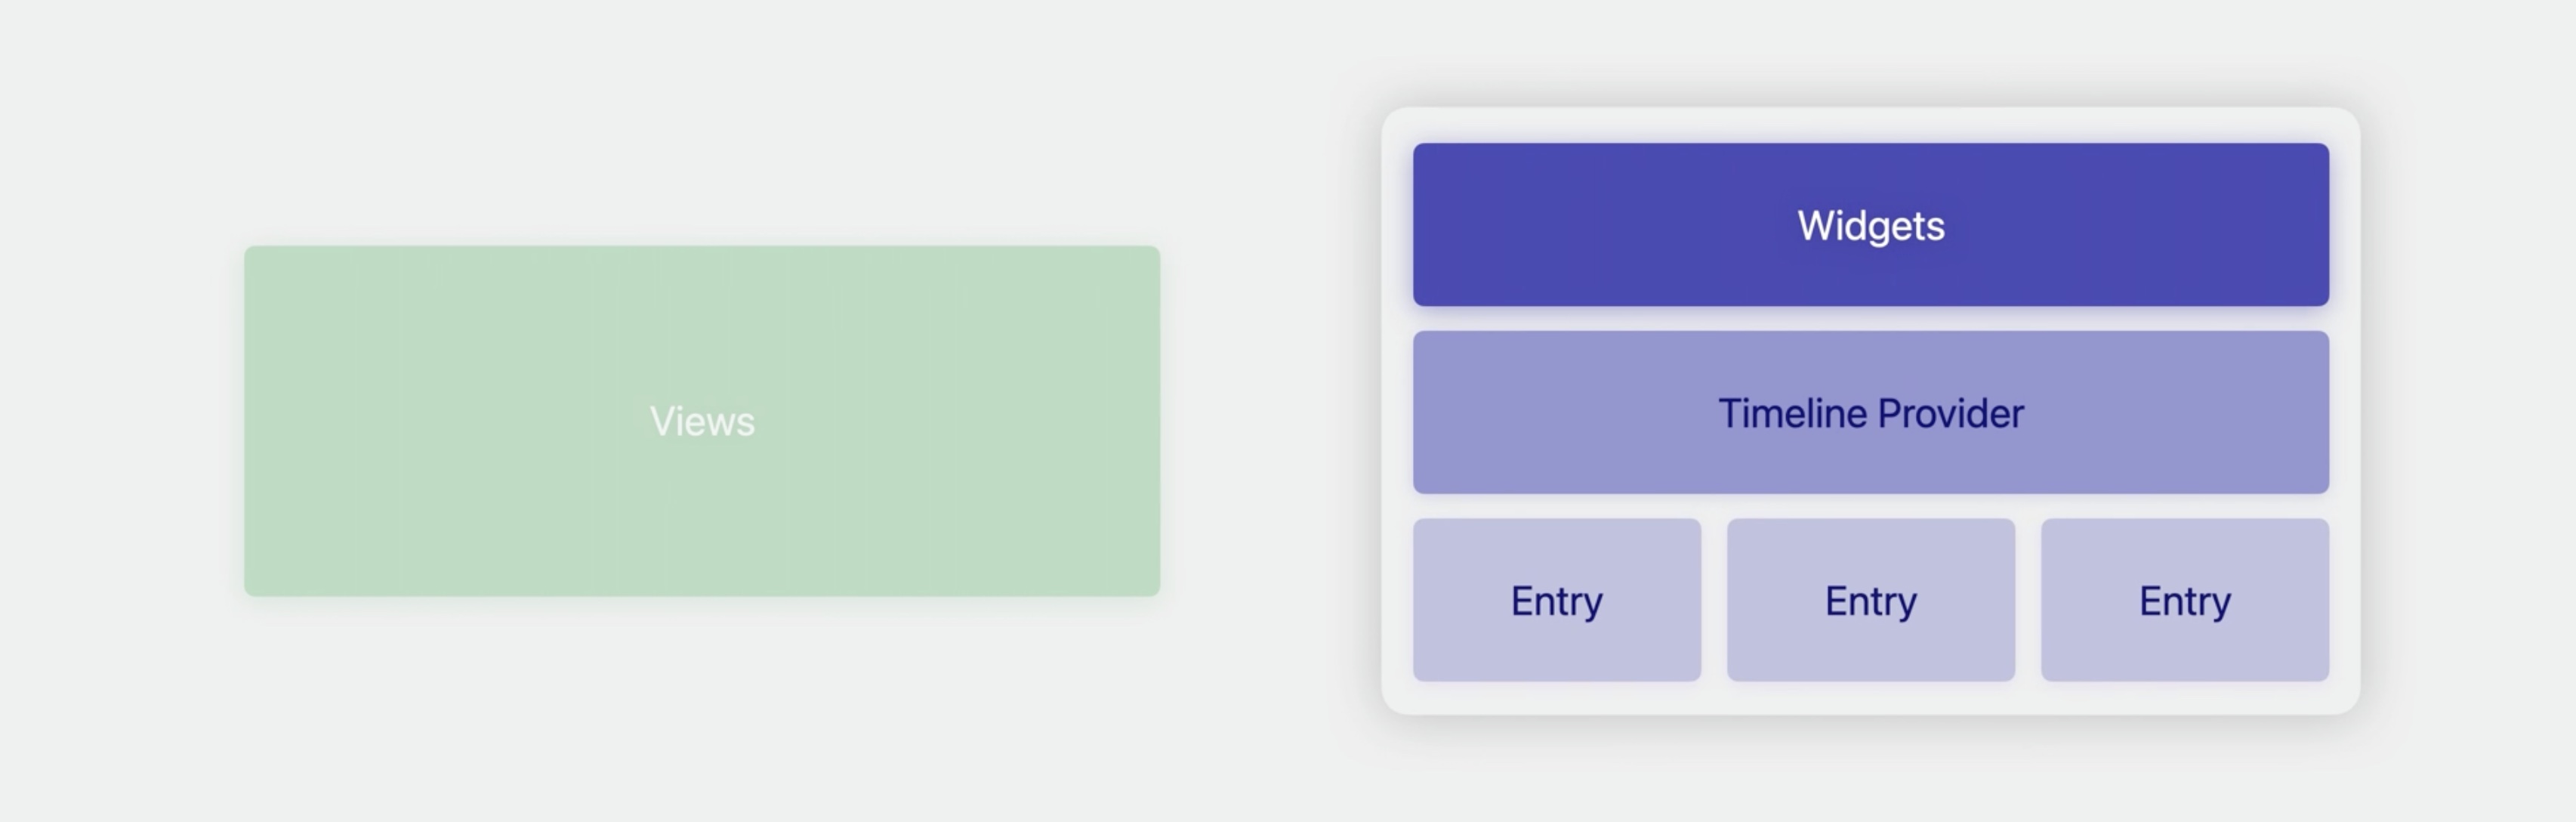
The image collage app has a widget with a timeline provider that shows a randomly built collage every hour. For the timeline provider, we’ll make a preview with three things: First, the widget to preview. Second, the timeline provider. And, third, the widget family to use for previewing.
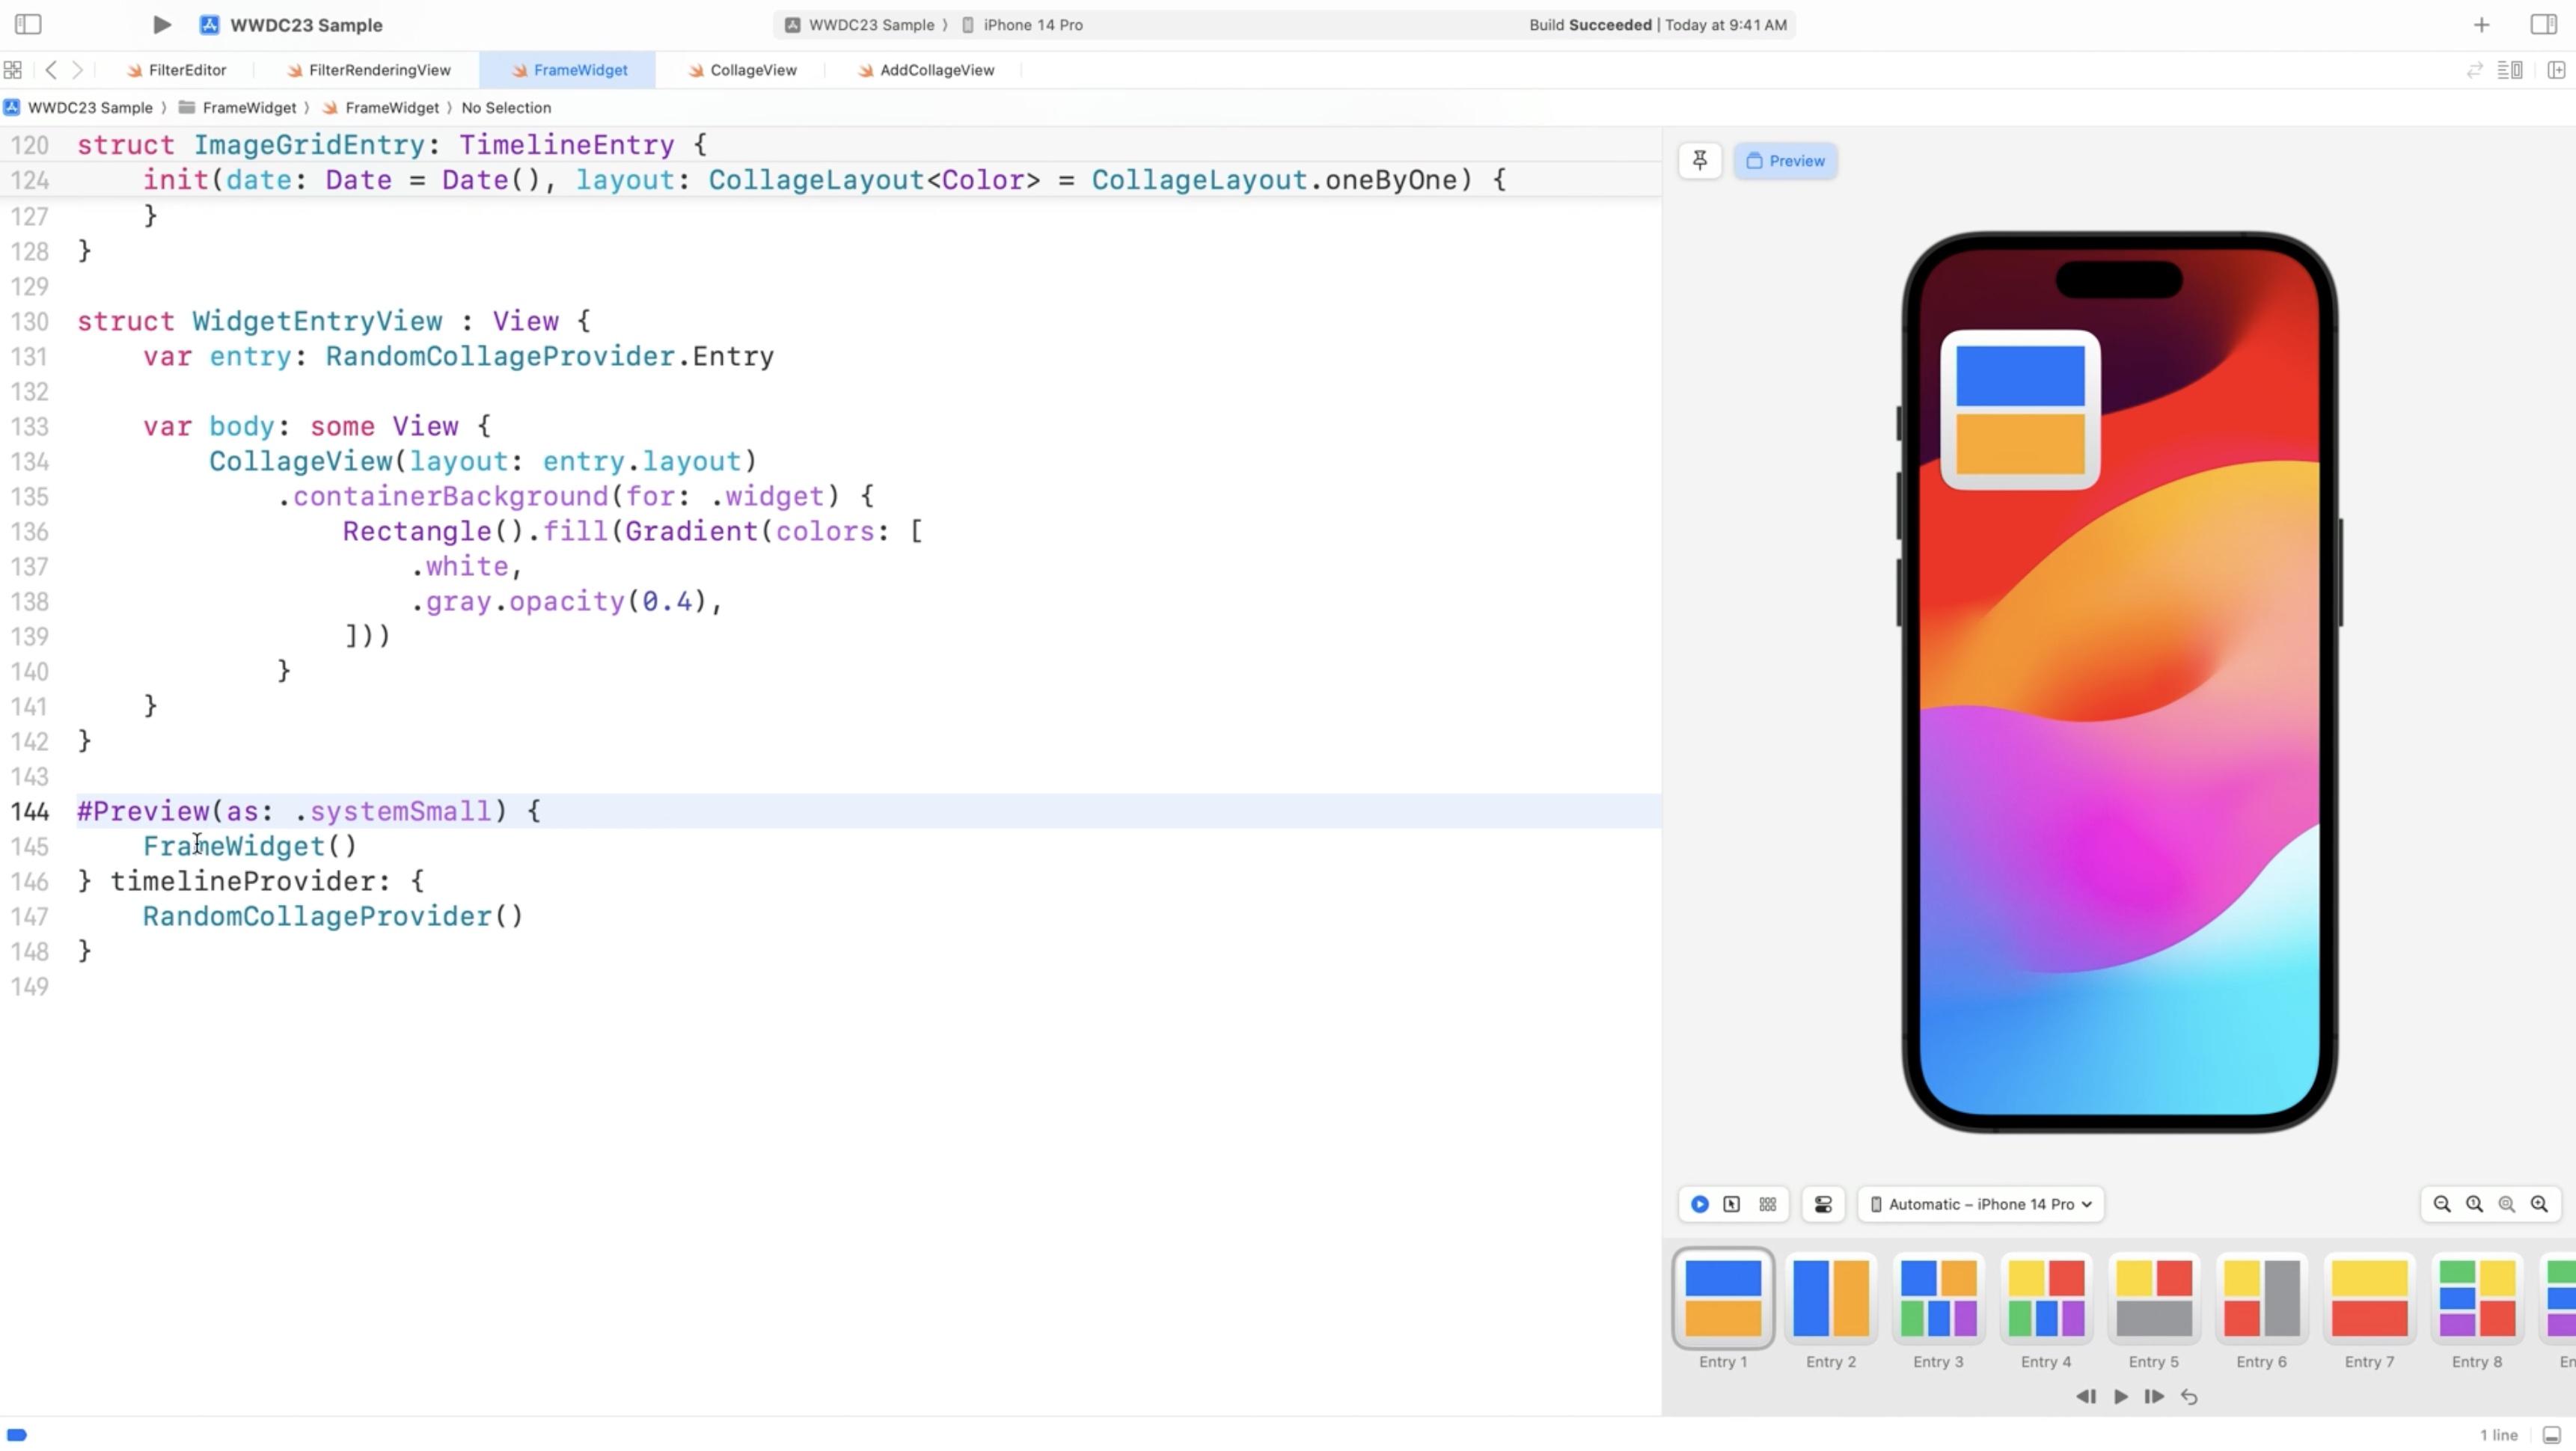
We don’t need to wait to see every entry in the timeline. Previews snapshots each timeline entry and shows them in the canvas. we can click through them, or use the arrow keys. Xcode shows the transitions with animations between these entries, allowing us to spot any issues. Like here, between entries 8 and 9. The animation just cross fades. We want to fix it but the timeline provider is random.
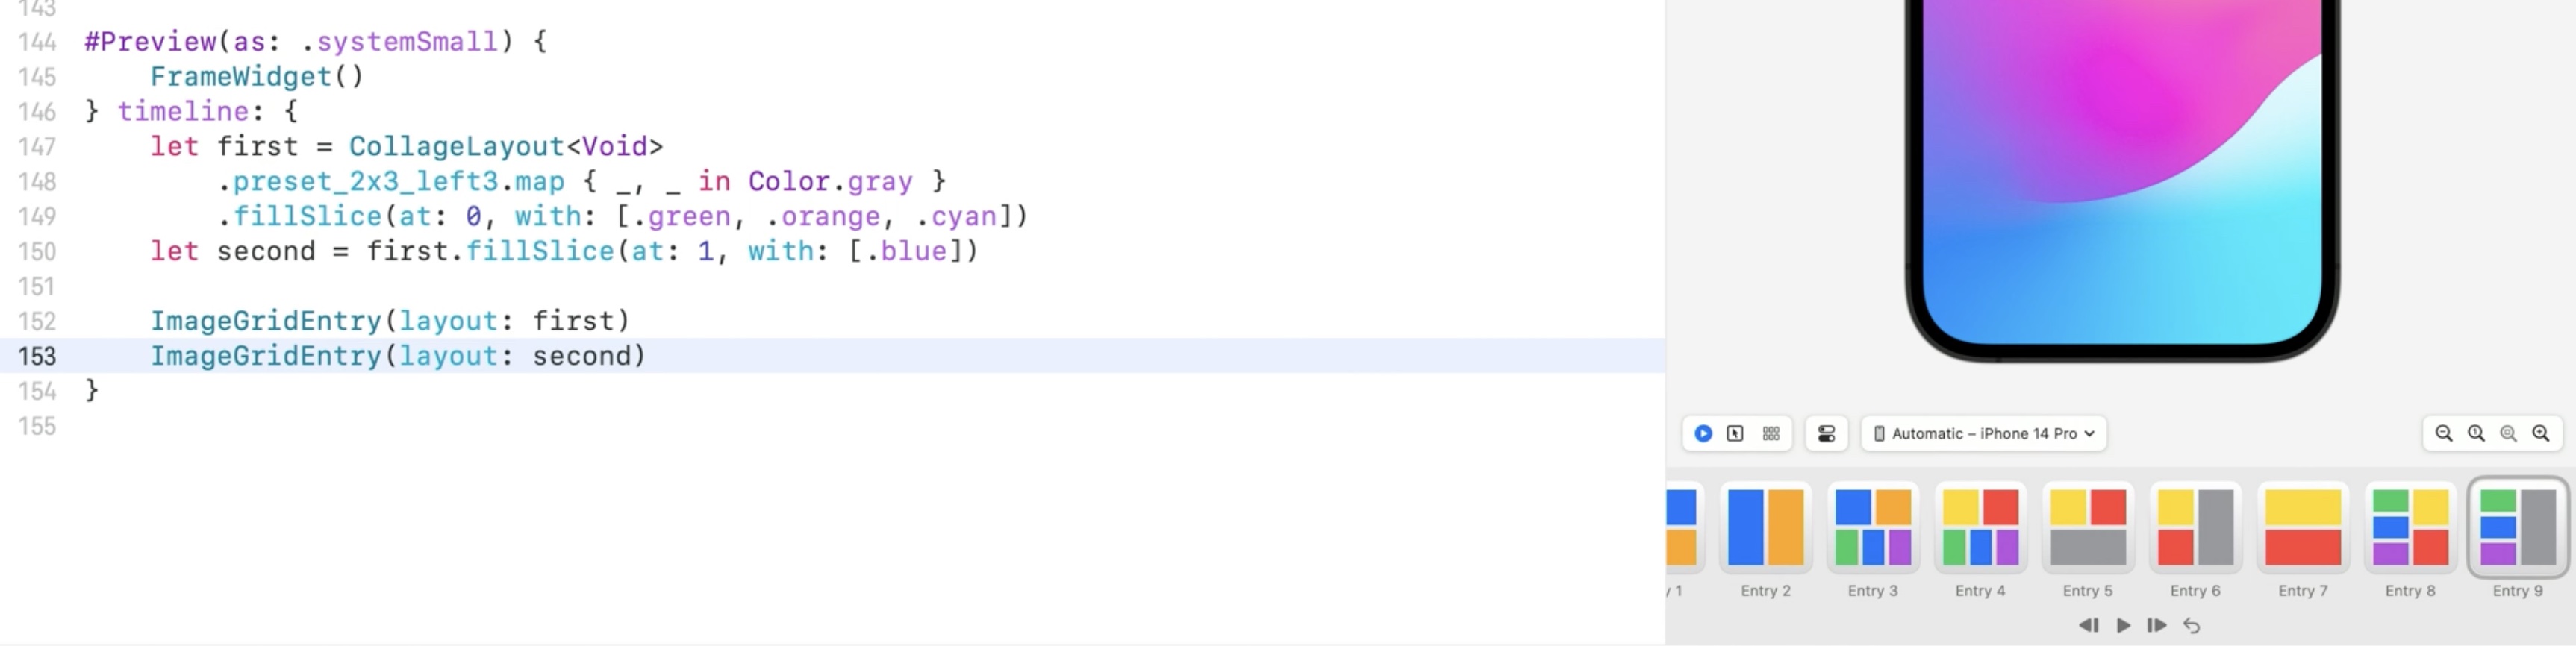
This is where a timeline of specific entries comes in handy. We can craft the exact scenario we’d like to iterate on. Change timelineProvider: in the Preview to just timeline, and instead of returning a timeline provider, return the two entries that replicate the case I want to fix.
#Preview(as: systemSmall) {
  FrameWidget()
} timeline: {
  let first = CollageLayout<Void>
   .preset_2x3_left3.map { _, _ in Color.gray }
   .fillSlice(at: 6, with: [.green, .orange, .cyan])
  let second = first.fillslice(at: 1, with: [.blue])

  ImageGridEntry(layout: first)
  ImageGridEntry(layout: second)
}
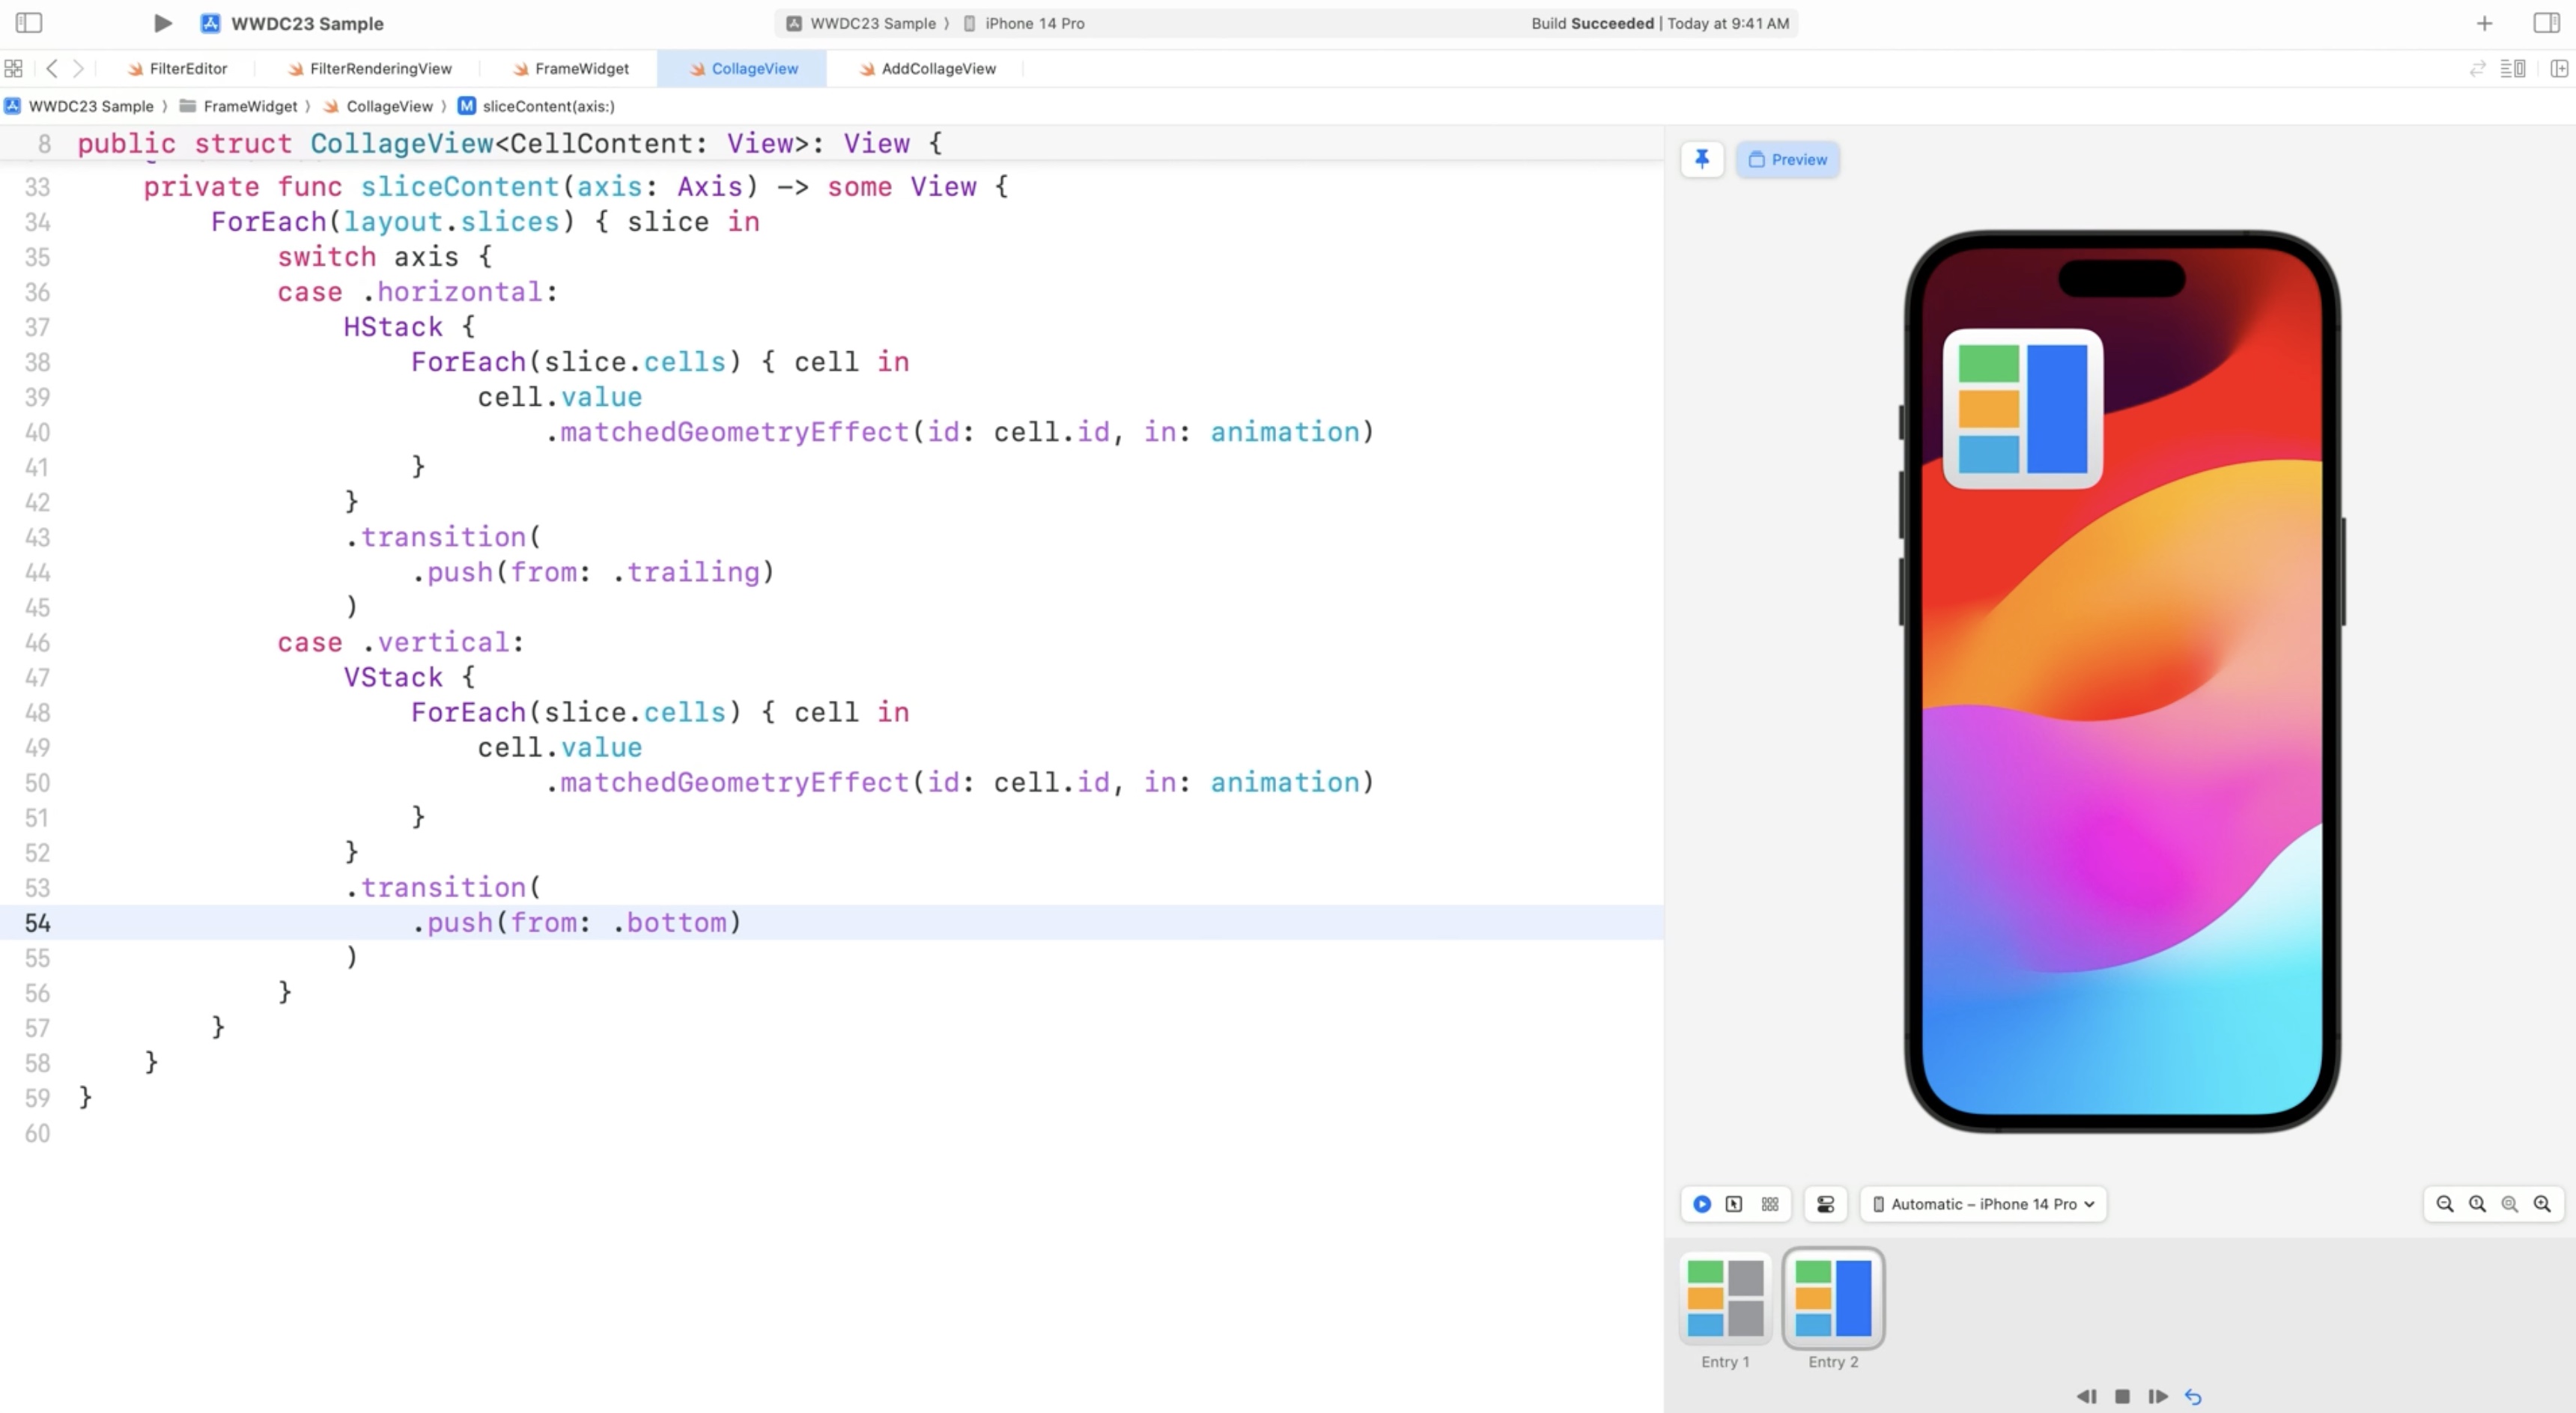
But the code we need lives in another file, and we don’t want to lose this preview when I navigate away. Can keep the preview in the canvas by using pinning. Clicking on the pin button in the upper left of the canvas, it'll keep the preview active even when we navigate to another file.
In the canvas, there is a play button in the timeline, and a loop button. Now Xcode will keep replaying this transition while we fix the code.
Live Activities
The API looks nearly the same but instead of providing a timeline provider and entries, you provide a set of live activity attributes and a set of states.

Another example. First, we pass in the attributes we want to use in the initializer. Then, we pass in content states for those attributes. For example, building a widget for ordering pizza, we could provide a custom set of states for how the baking and the delivery of that pizza is going, and then test the animations between all of those states.
// Previewing widgets
// Live activities
#Preview(as: .dynamicIsland(.compact), PizzaDeliveryAttributes()) {
  FoodOrderWidget()
} contentStates: {
  PizzaState.preparing
  PizzaState.baking
  PizzaState.outForDelivery
}
Check out the session "Bring Widgets to Life" to learn more (WWDCNotes)
Previews in your project
There are three different scenarios that affect setting up a project, providing data, and leveraging the capabilities of our devices.

Previewing content in library targets
This includes frameworks, Swift packages, or dynamic libraries.
How previews find an executable
- Edited source files
- Target dependencies
- Selected scheme
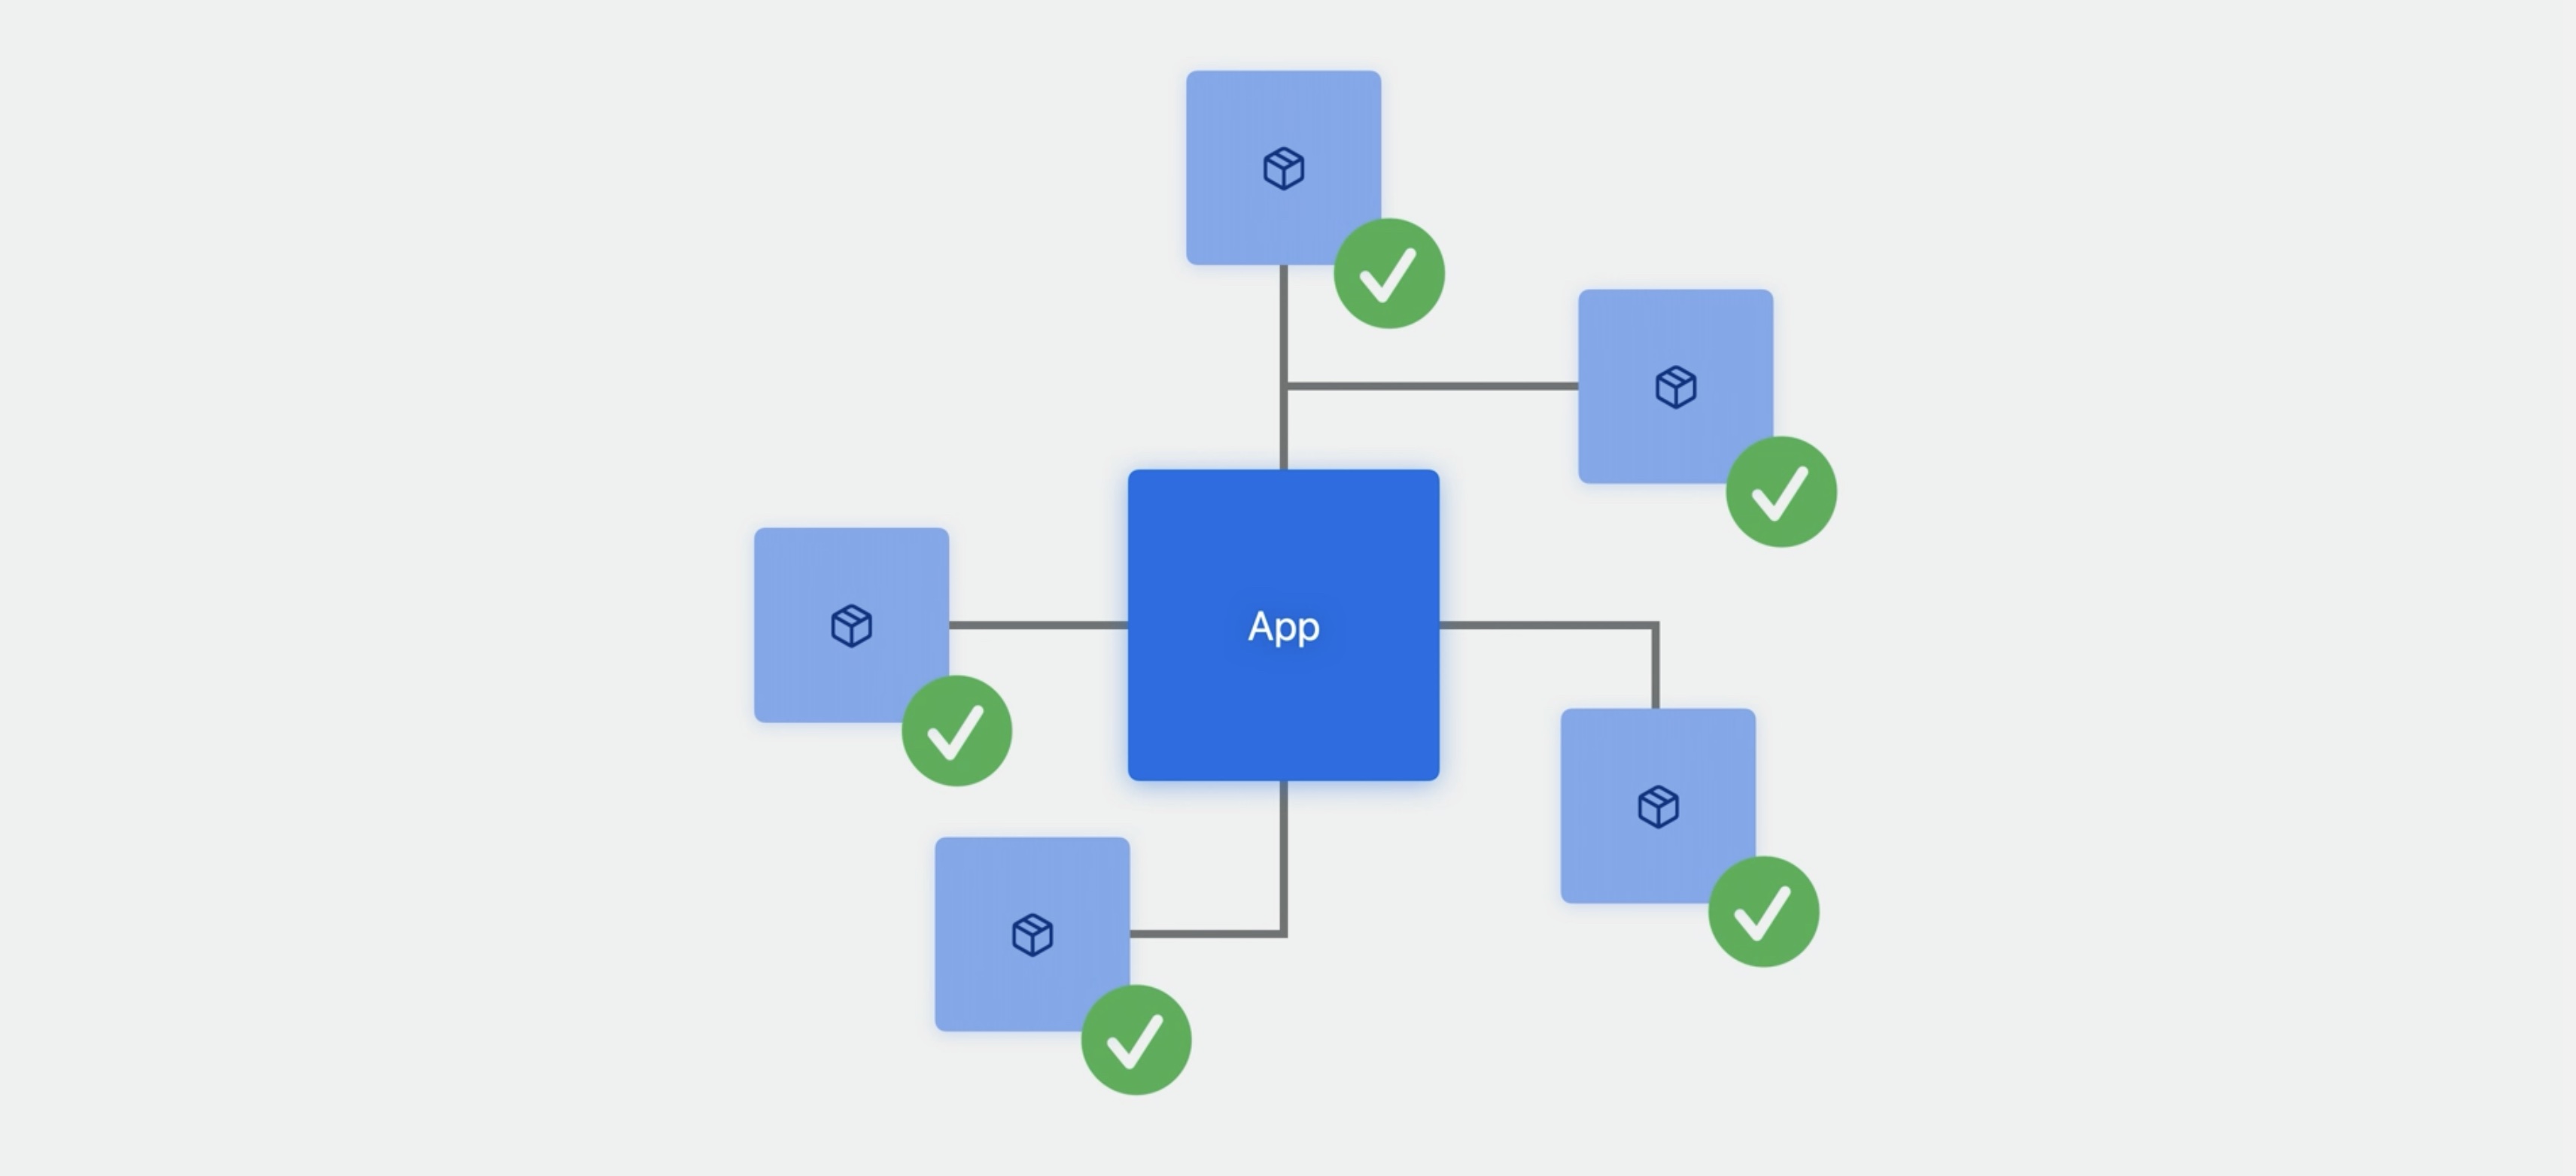
Previews need an executable, an app or a widget, to launch and render previews. Normally this is our app, but if we don’t have an app, how does this work?
Previews uses three things to figure out which executable to use. One, the source files that we are working in. Second, the targets containing those files and all the dependencies of those targets. Then third, previews intersects those target dependencies with the targets in the scheme that we have selected. Previews will only select an app that's in the active scheme.
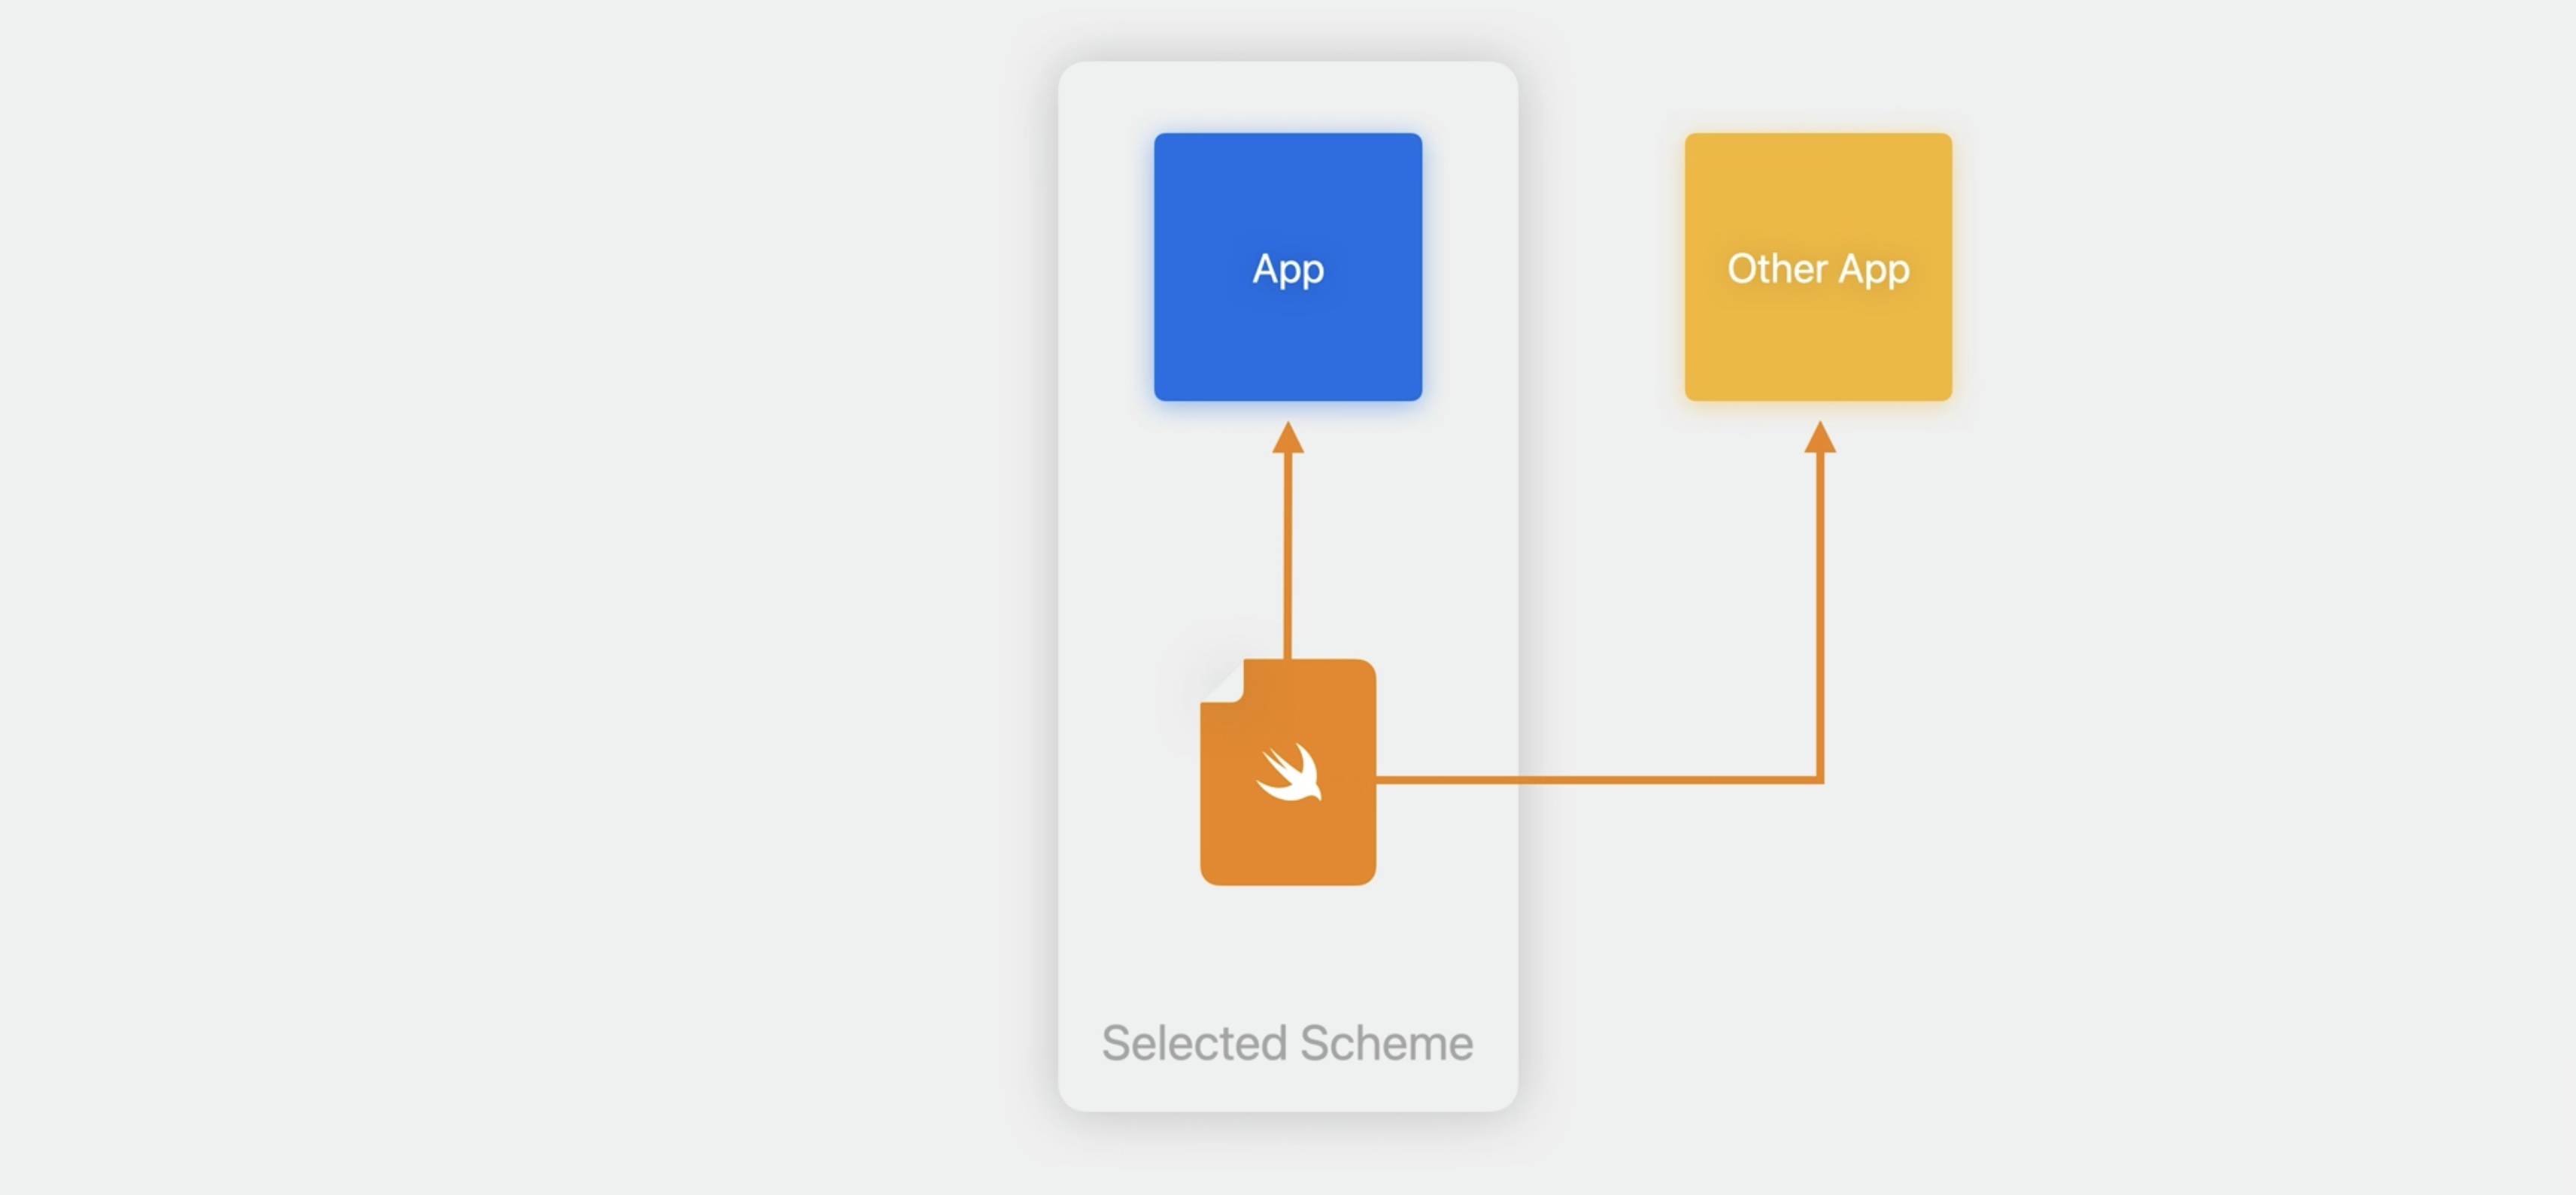
Let’s look at a few examples. In the simplest case, we might be working in a single source file that’s the member of an application target. It’s probably not a surprise that this is the app we’ll use for previews. But what if we have that source file in two targets? For example, a trial version of the app and the full version of the app. This is where the scheme comes in. Previews will only use the app that is in the active scheme.
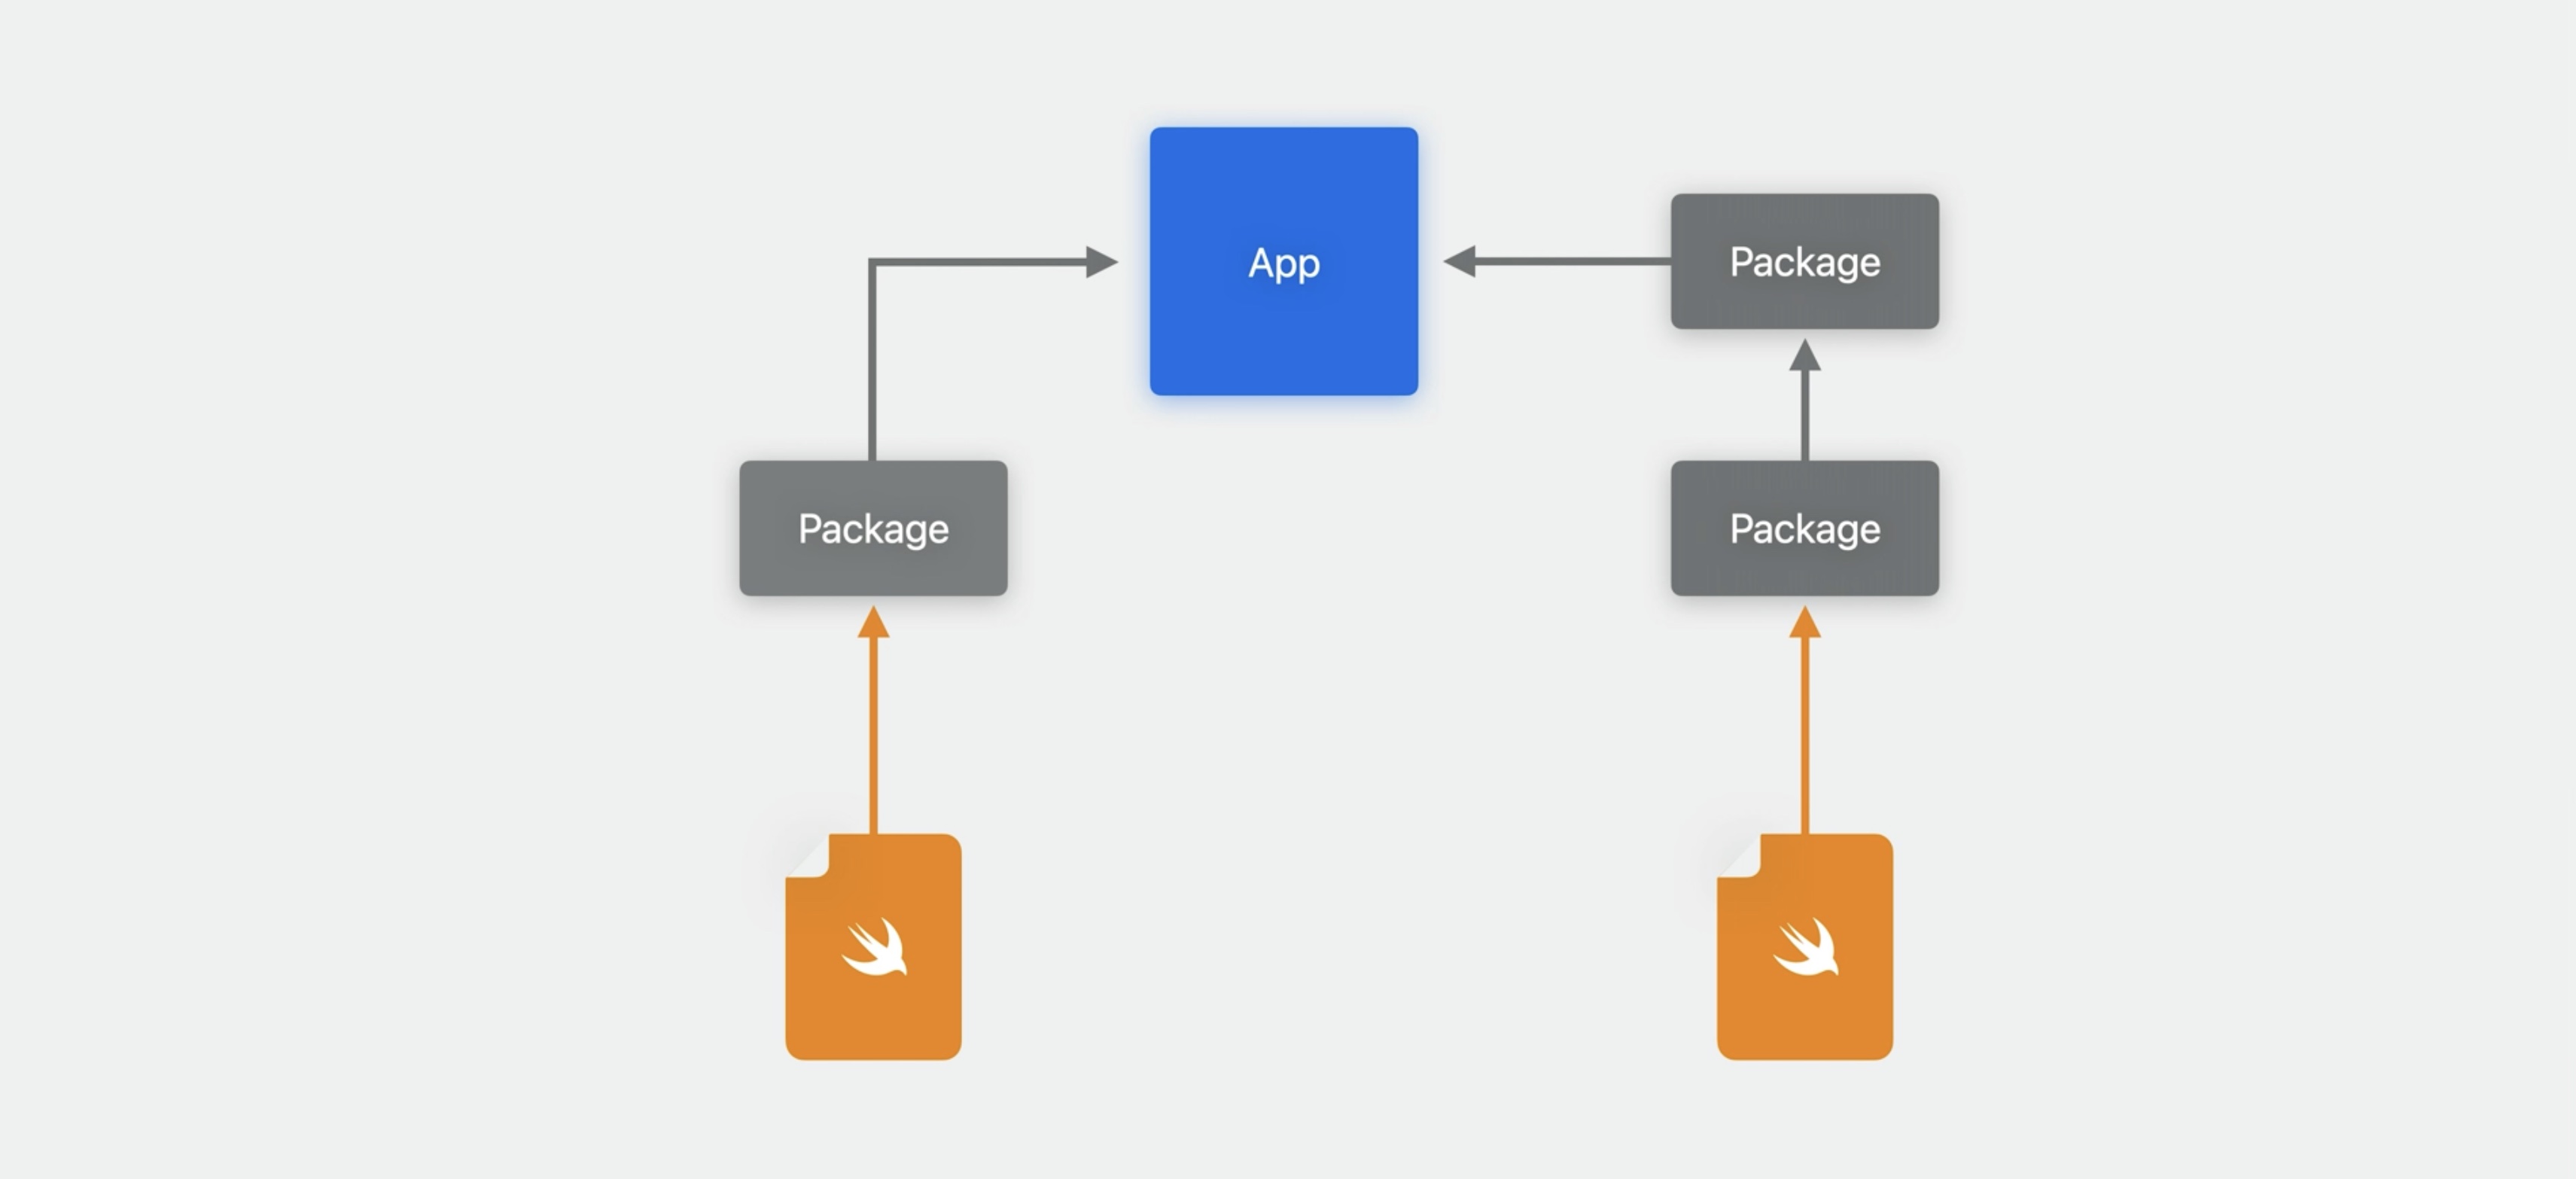
Here’s another example: Say you have two Swift files open, each belonging to a package that might also be imported by another package, which are then all imported by an app. We’ll traverse up from those files to find the first common executable at the top.
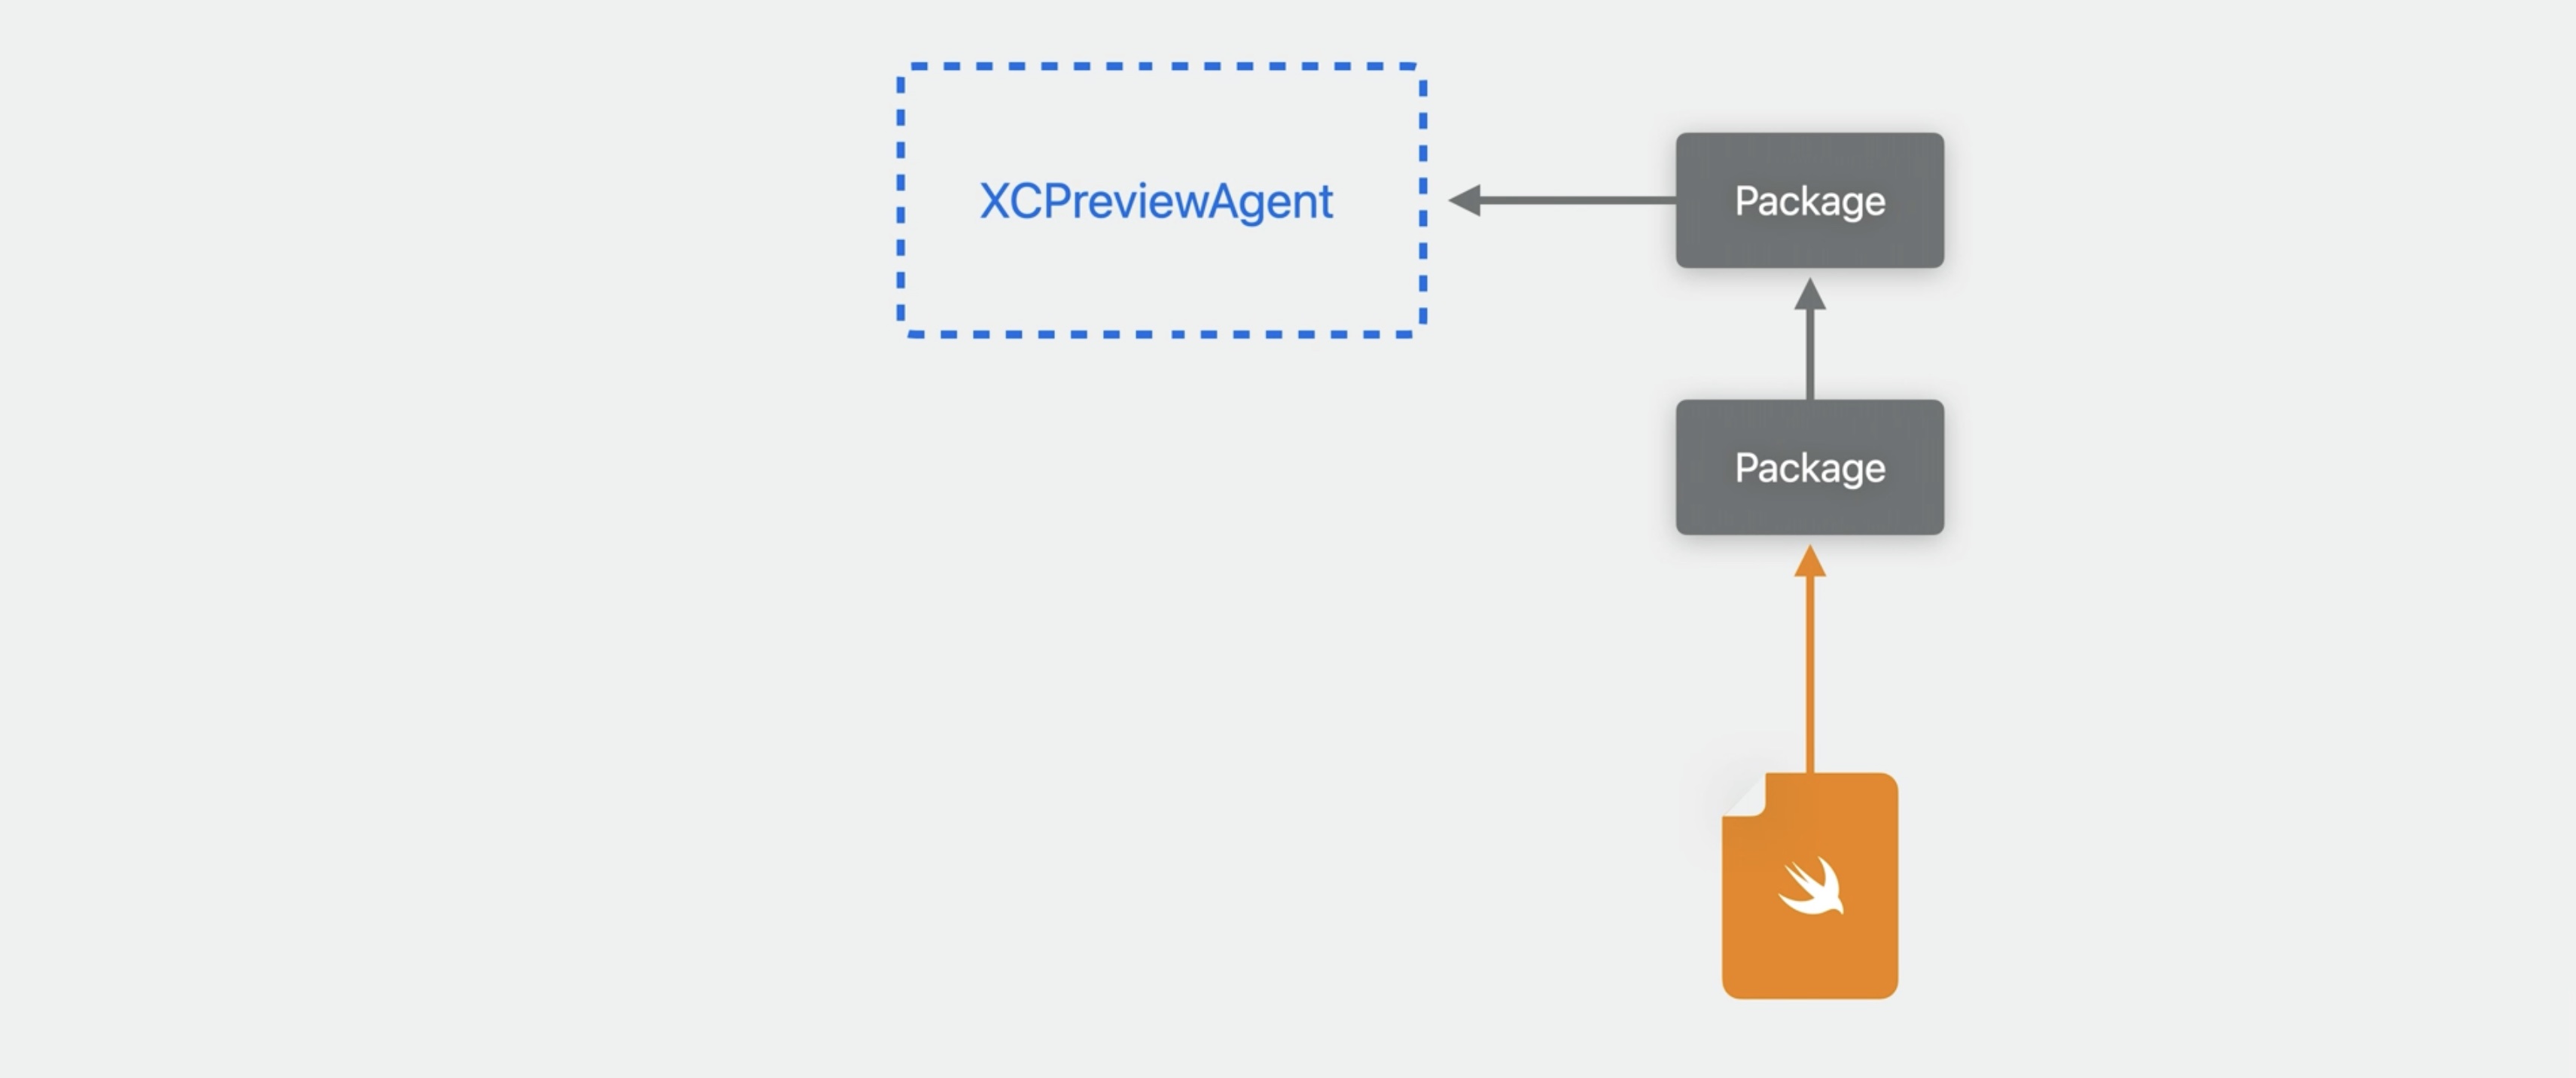
What if we don’t have an app at all? In this case, previews makes an app on our behalf, called the XCPreviewAgent, which will load our library. This all happens automatically, but it’s helpful to know how this works and especially the name of this process.
Previewing in libraries
How to use libraries to your advantage
- Modularize our code into libraries and create smaller schemes
- Create preview-only apps to specify needed entitlements
For example, if there's a crash report for XCPreviewAgent, we can know it’s happening in our code and find where the problem is. But, we can take advantage of library targets to make previews work better in our project in at least two ways.
First, if we modularize our app into libraries, we can create smaller schemes to get better build times.
Second, if we then modularize code into libraries, there might be views that need required entitlements or Info.plist keys that our app target was providing. We can still preview these views by creating a small app just for previewing.
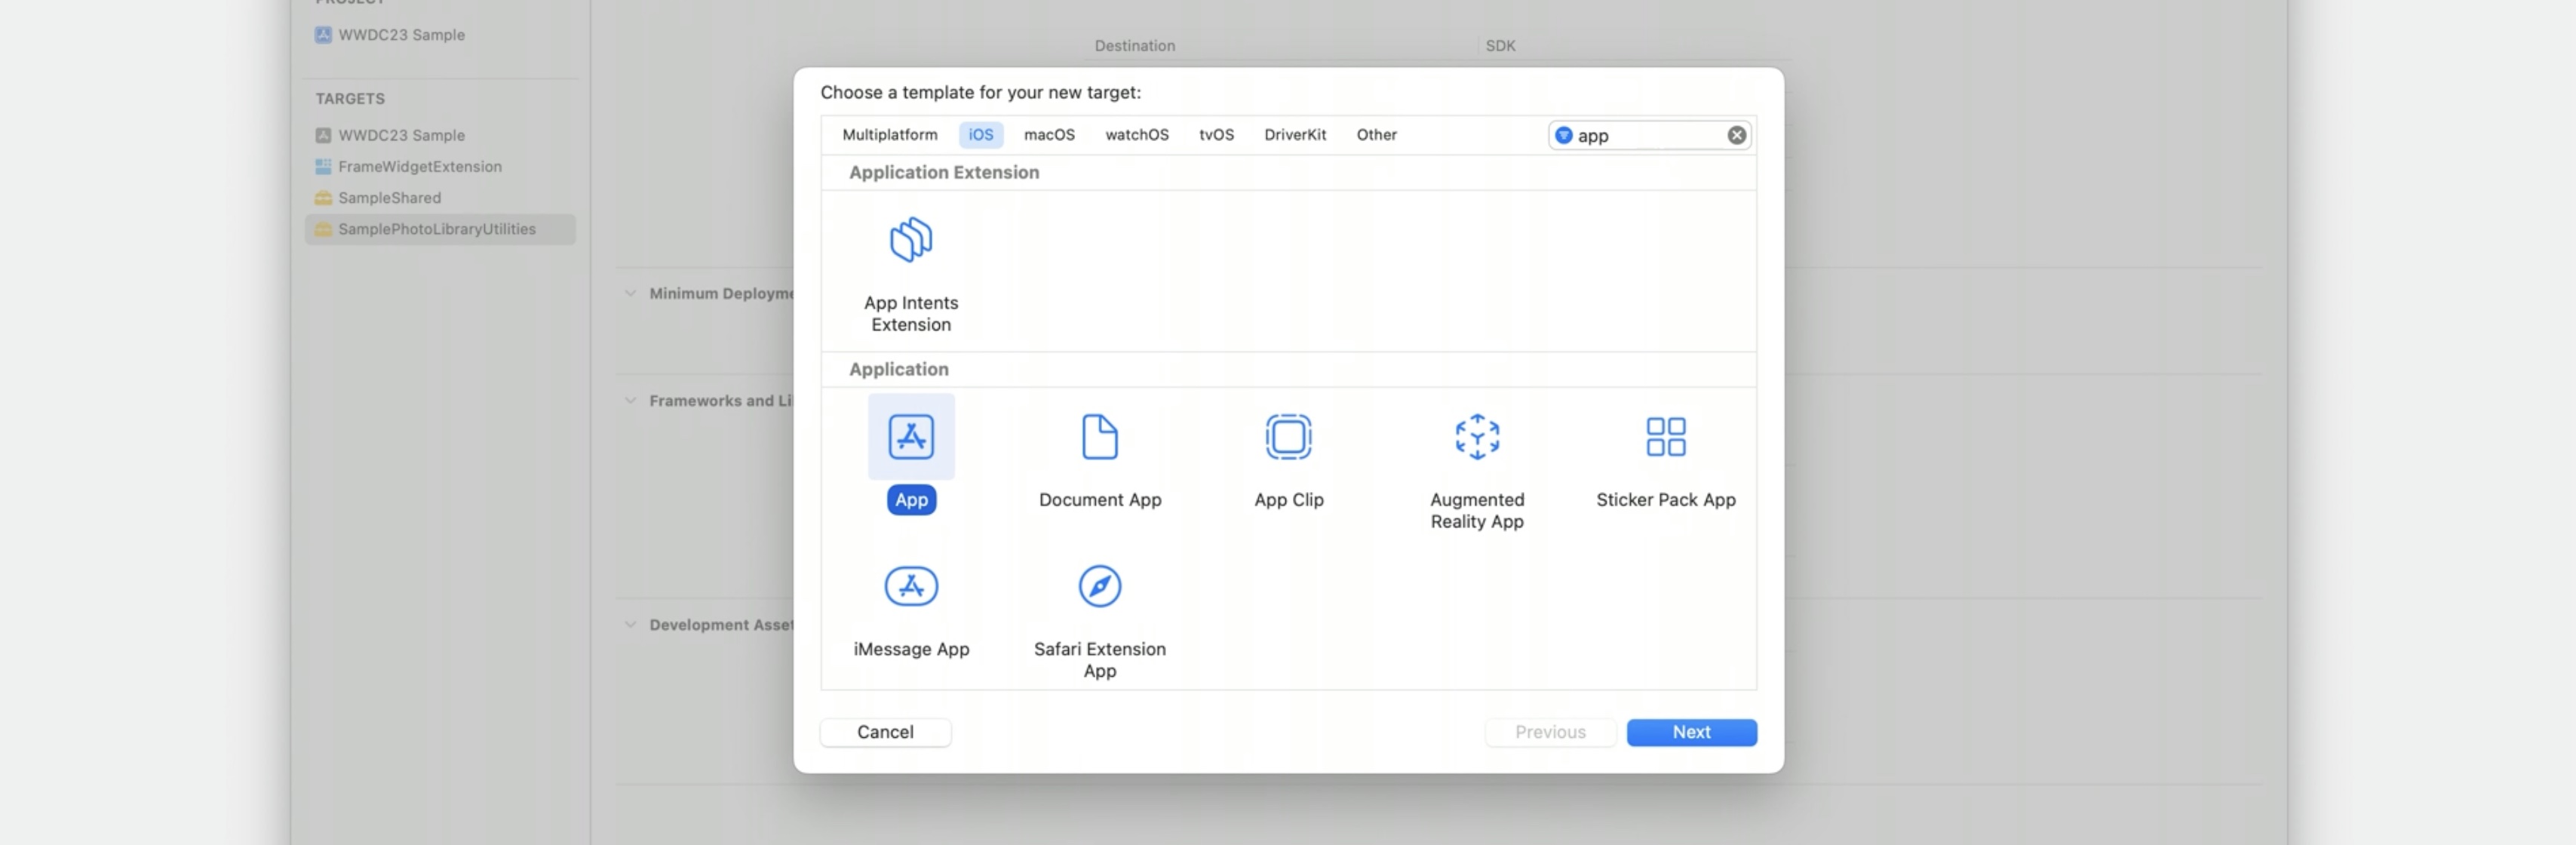
Example of making a view that uses the Photo library, which requires a specific Info.plist key, and we’ve put that view in a library-- for example, SamplePhotoLibraryUtilities.

Preview with the right capabilities by making a new app target.
Then, we’ll add whatever capabilities we need. In this case, we need to add an Info.plist key, so we’ll go to the build settings, filter for the Photo library usage string,

and set it.

Next, we’ll make sure the library with the view is embedded into our app. Using the build phases tab,
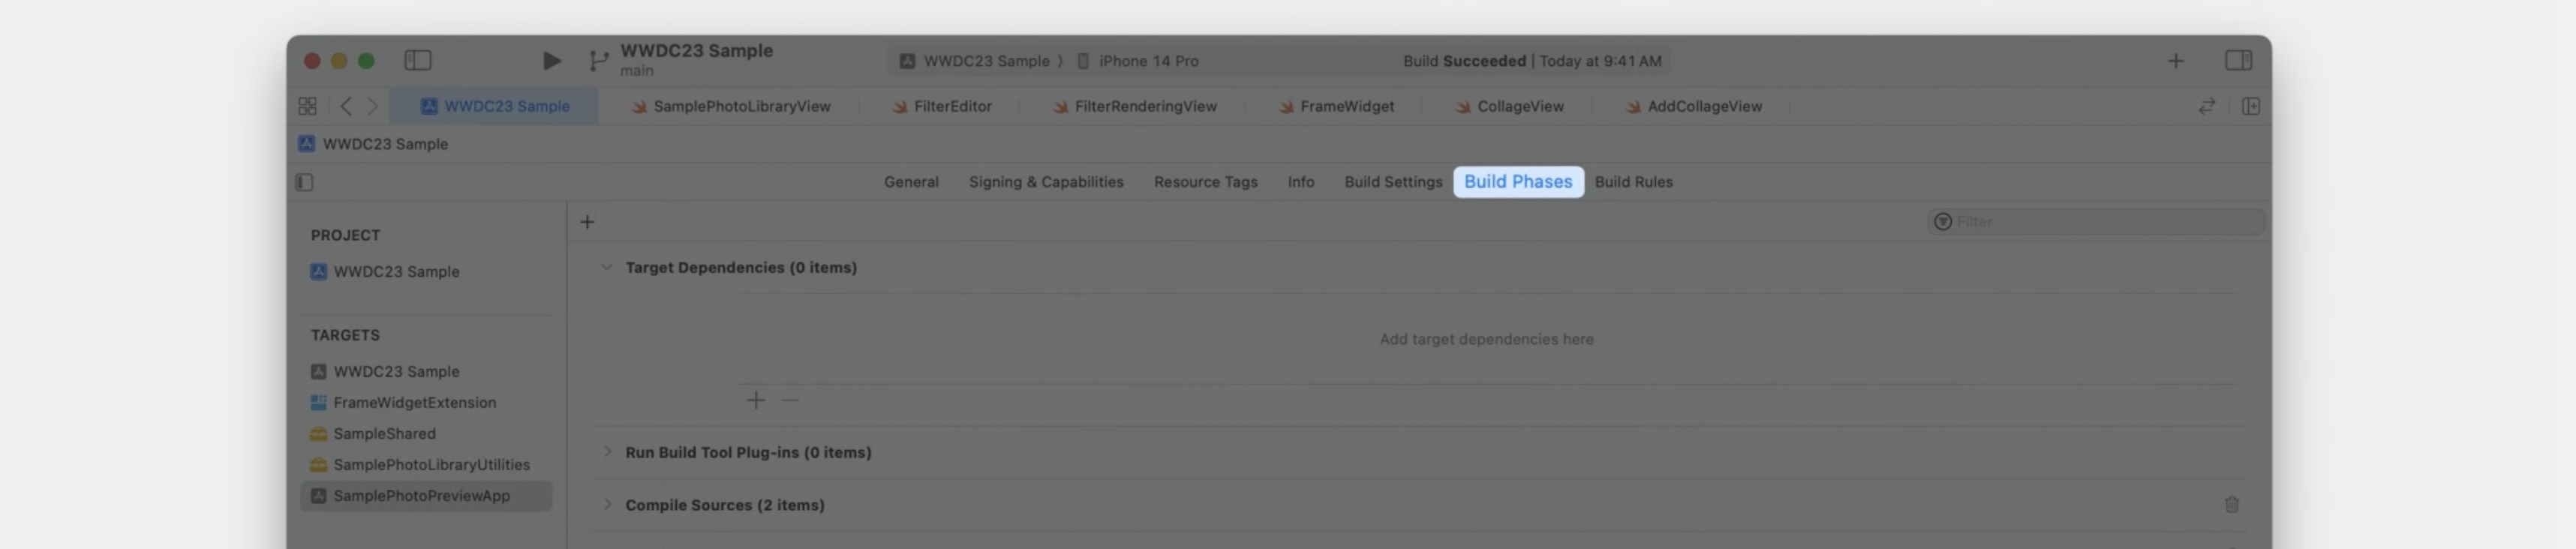
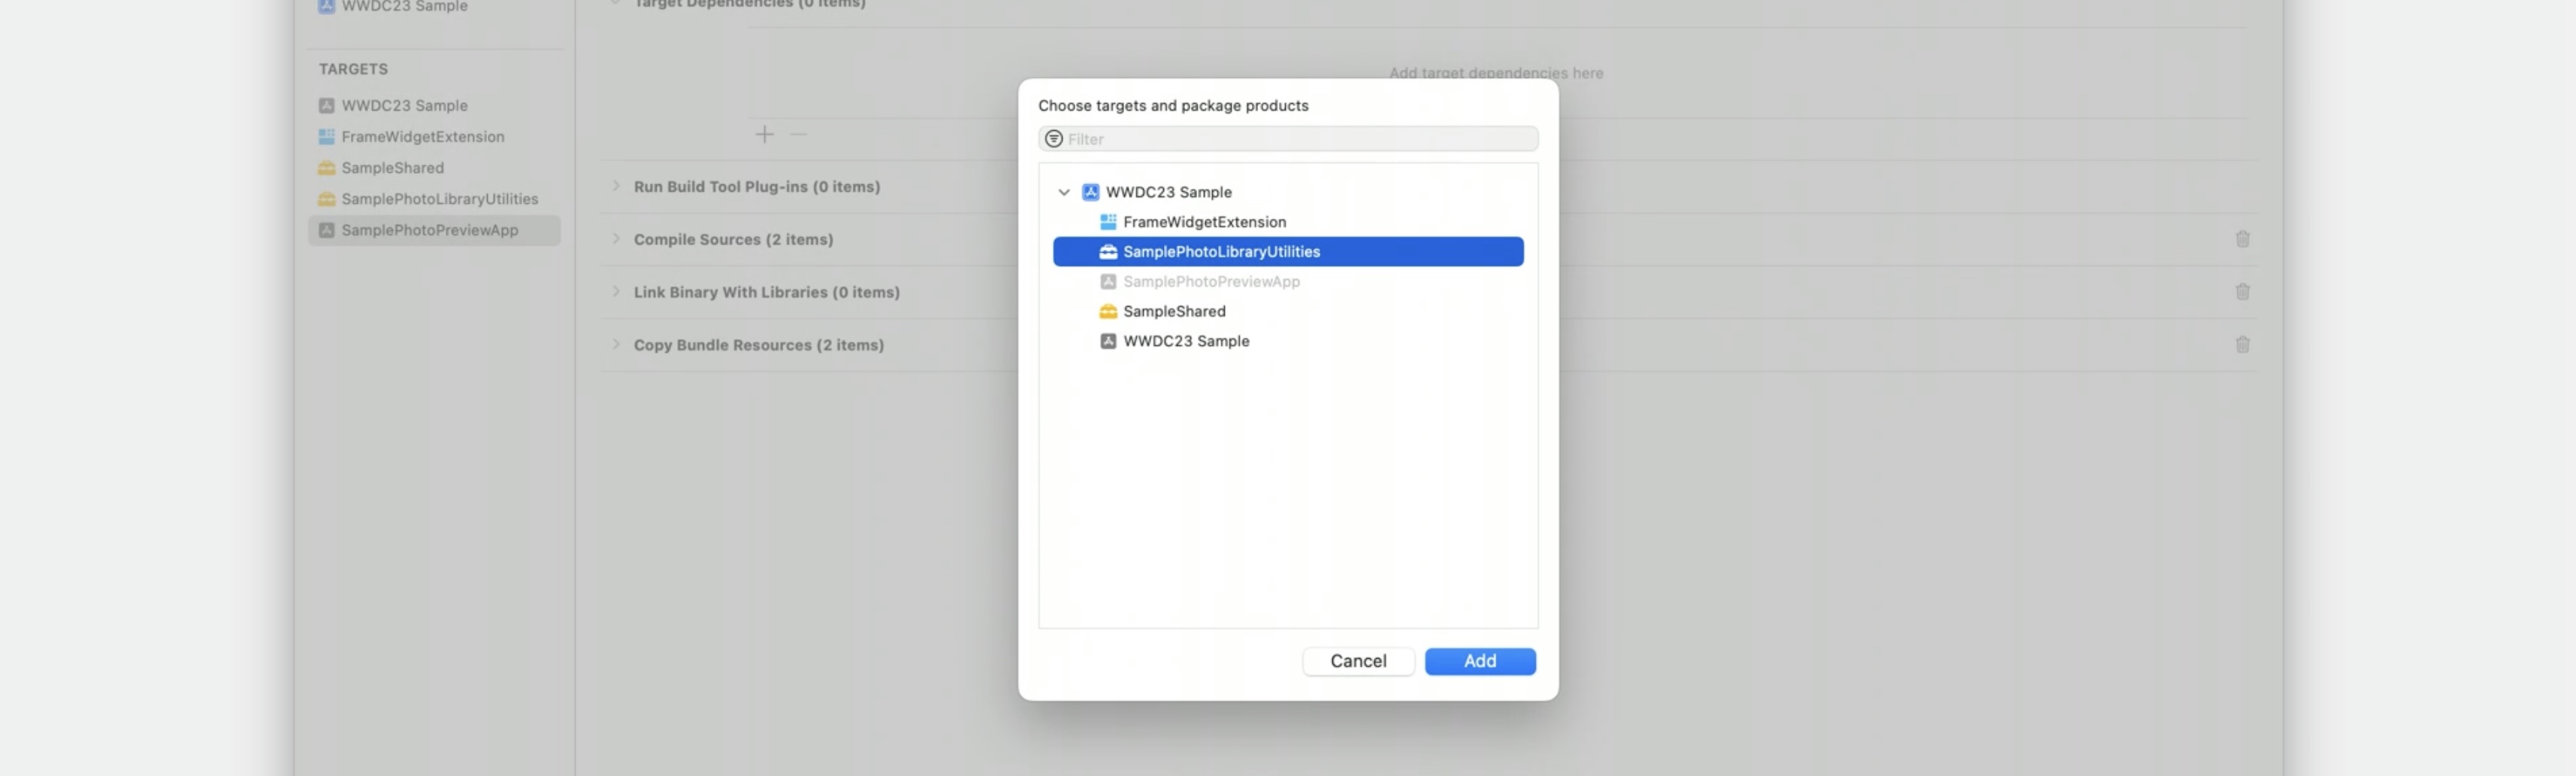
we’ll add it as a target dependency,
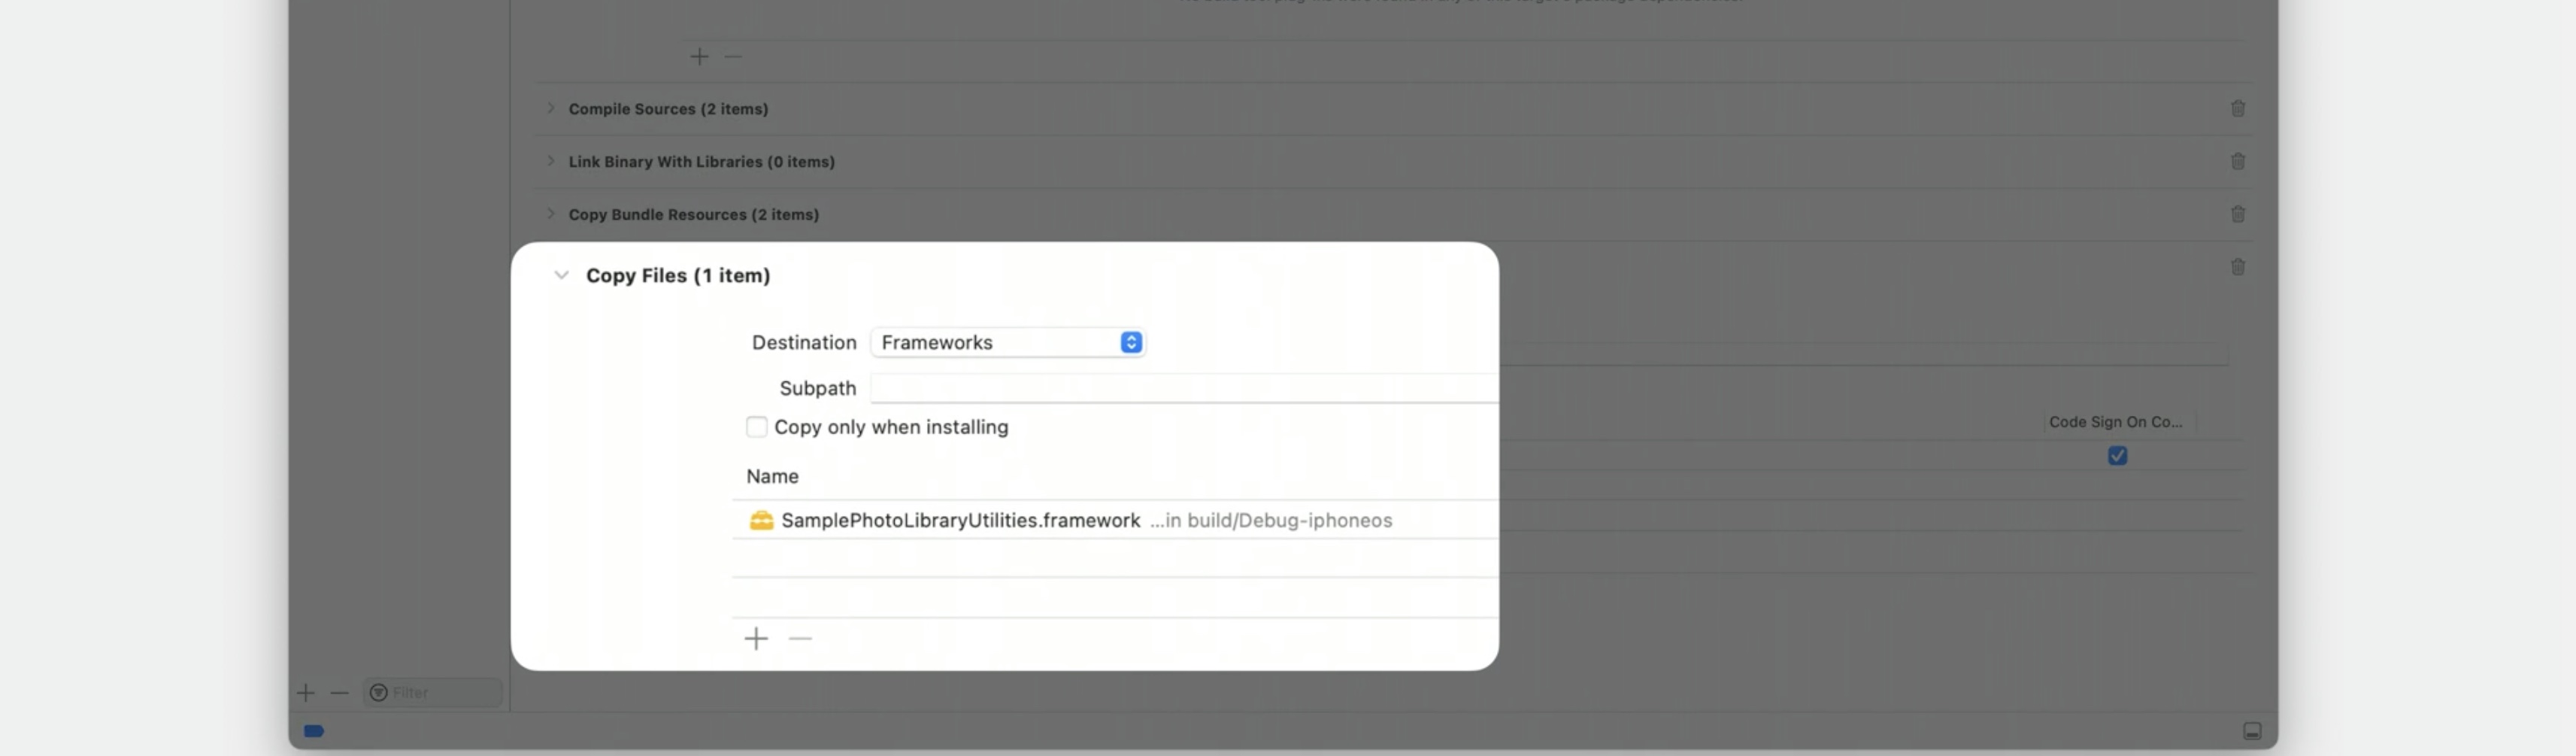
and embed it with a copy files phase.
Now select the scheme that contains just this preview app and our library.

When previewing the view, it'll use the app we just made for previewing, and all of the right Info.plist keys will be in place.

This lets us take advantage of smaller schemes with faster build times while keeping the ability to preview all of the views we are working on.
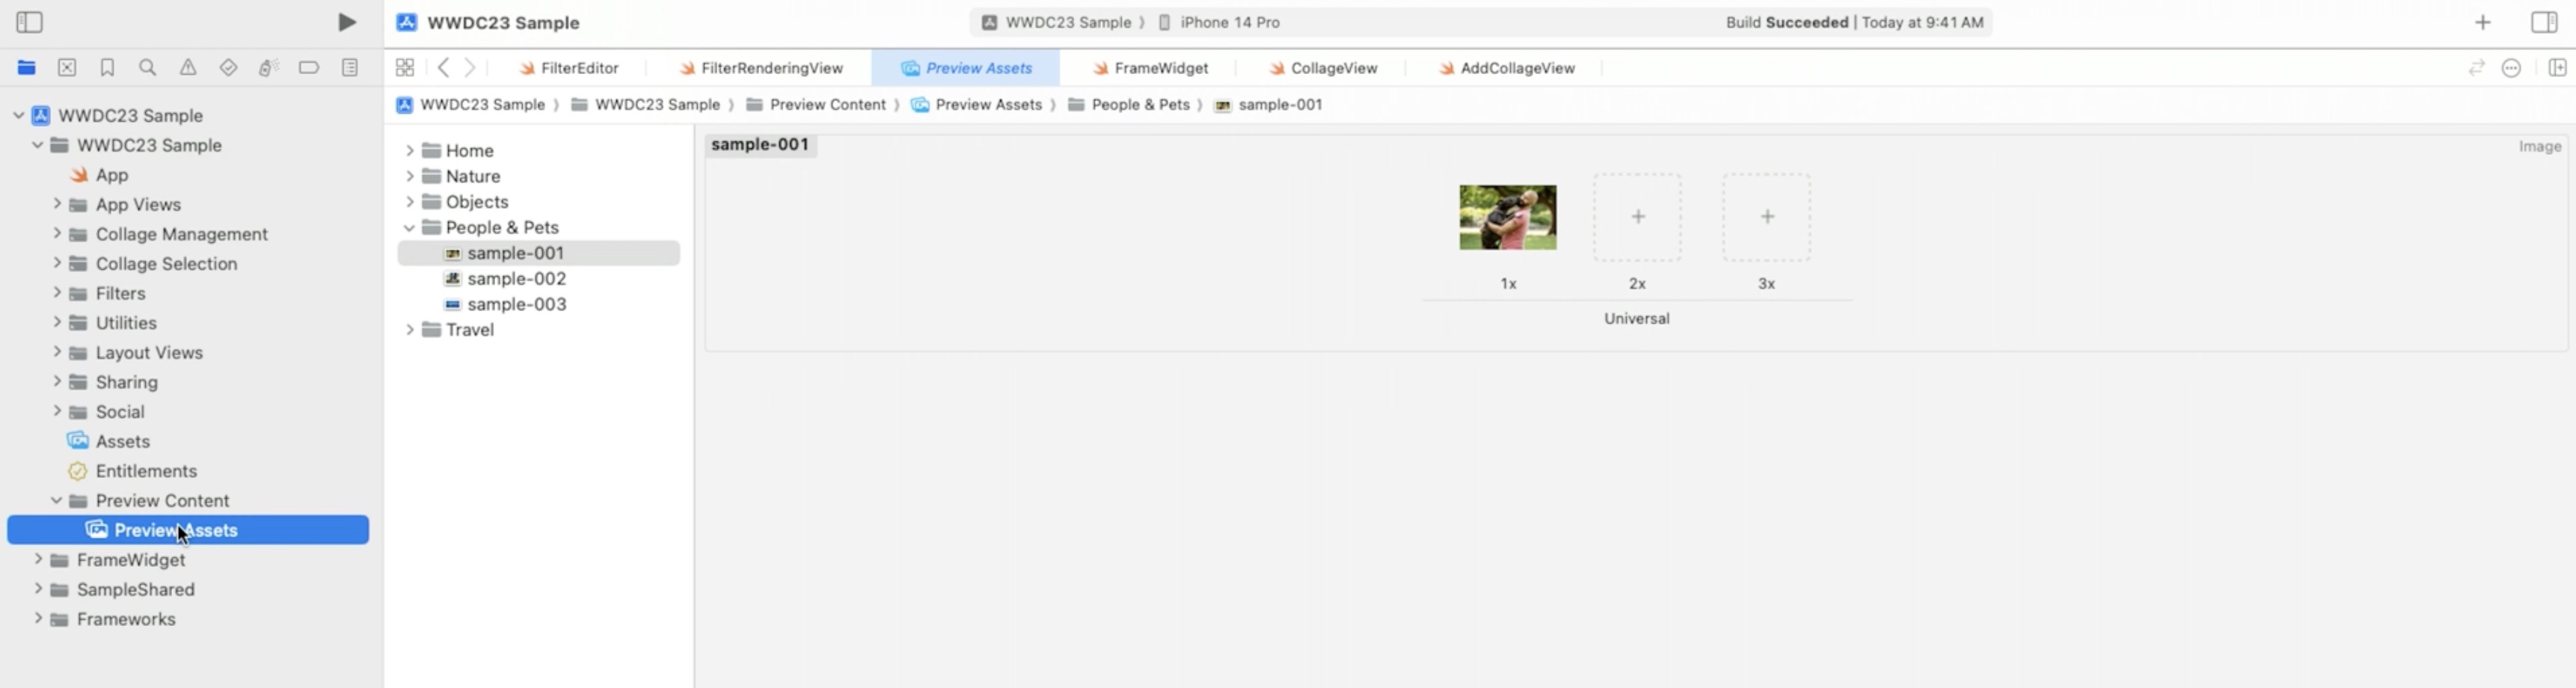
Providing sample assets
When we configured the preview, I passed in a sample image. This image is coming from an asset catalog in our project. The asset catalog is located here, in the project navigator, inside of a previews Contents folder. These images are great during development to help me test different scenarios and not require configuring every device I test with photos.
But if we don’t want to ship these in the app we can avoid that with a feature called Development Assets. These are folders in my project that we configure in our build settings, and anything in those folders is removed from thr app when submitted to the App Store. This could include asset catalogs or any resources we use to help the previews.
In the project settings, go to the build settings tab, and filter for the development assets.

After double clicking to edit, manually type in a path or drag the Preview Content folder into the popover.
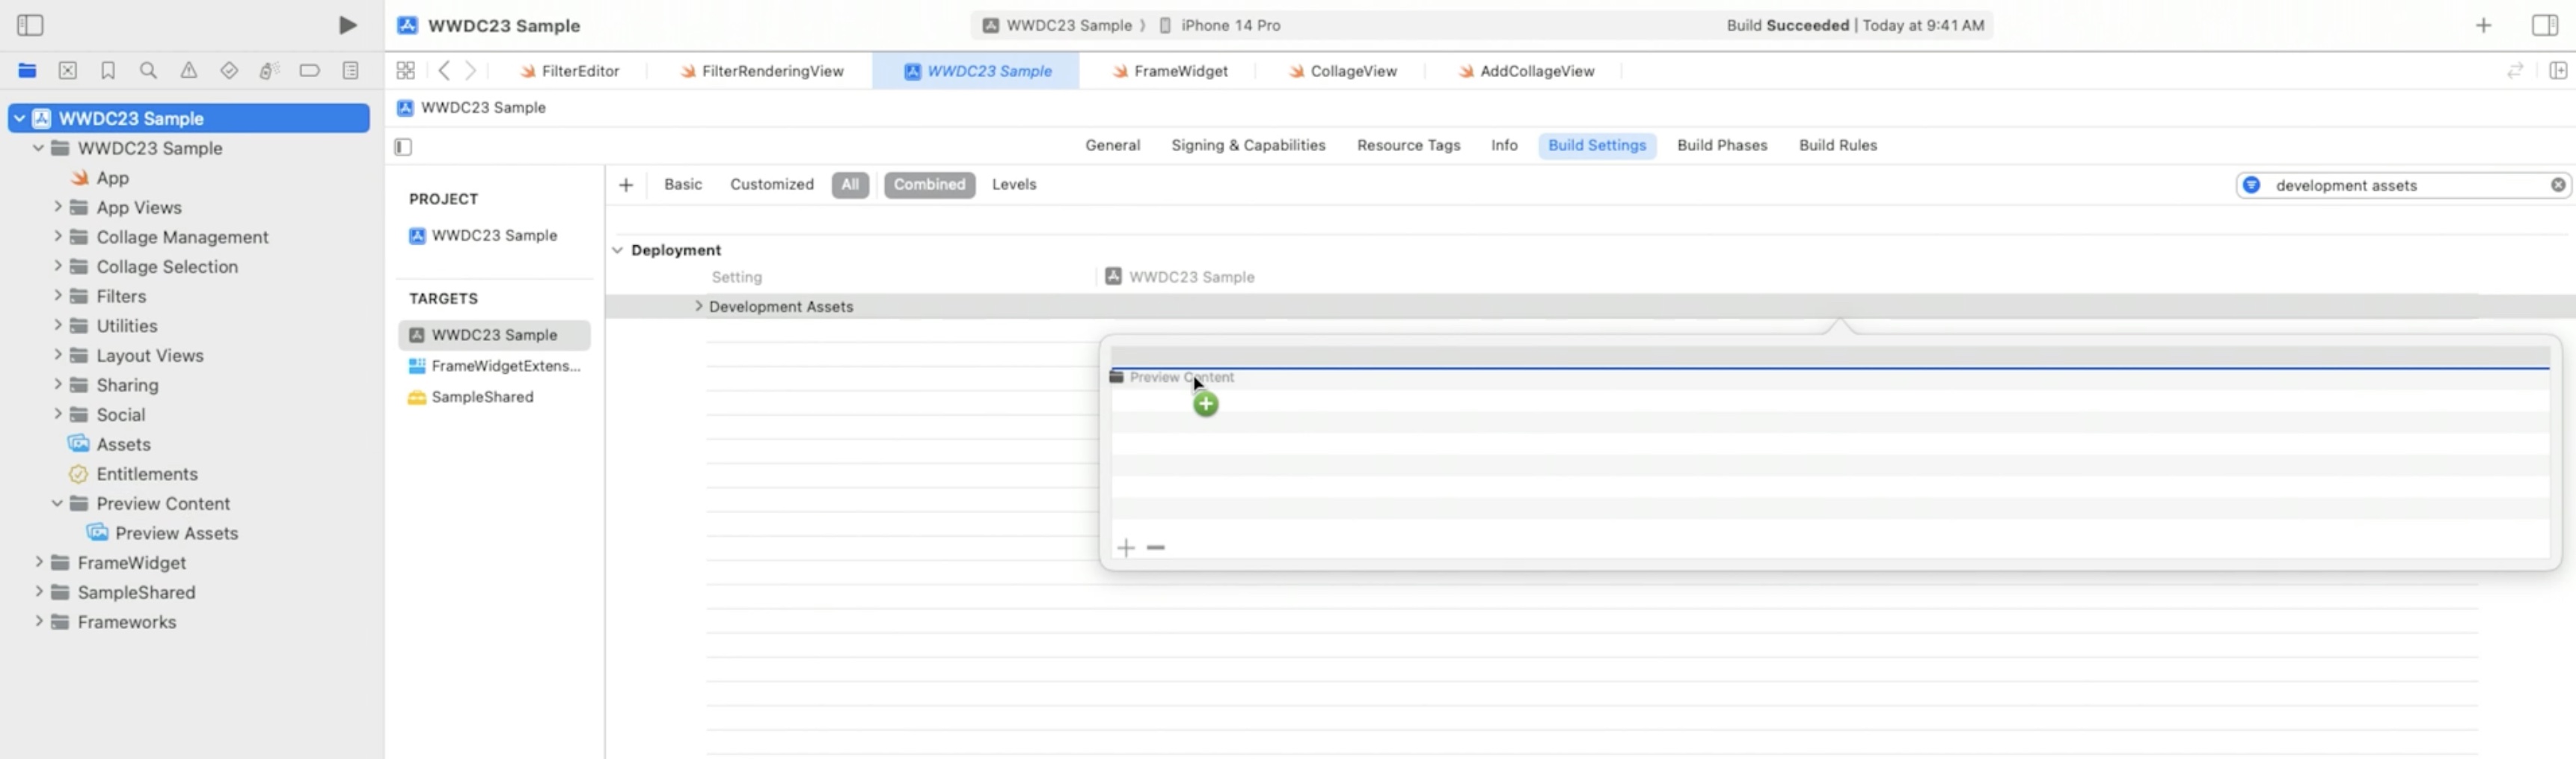
With that added, now this path will be removed from the app when we submit to the App Store. A development asset path is set up automatically when we make a new project or app target, but we can add additional paths or add them to other target types or existing projects.
That demo highlights how one way to provide assets for our previews by adding them to the project using development assets.
Leveraging devices data
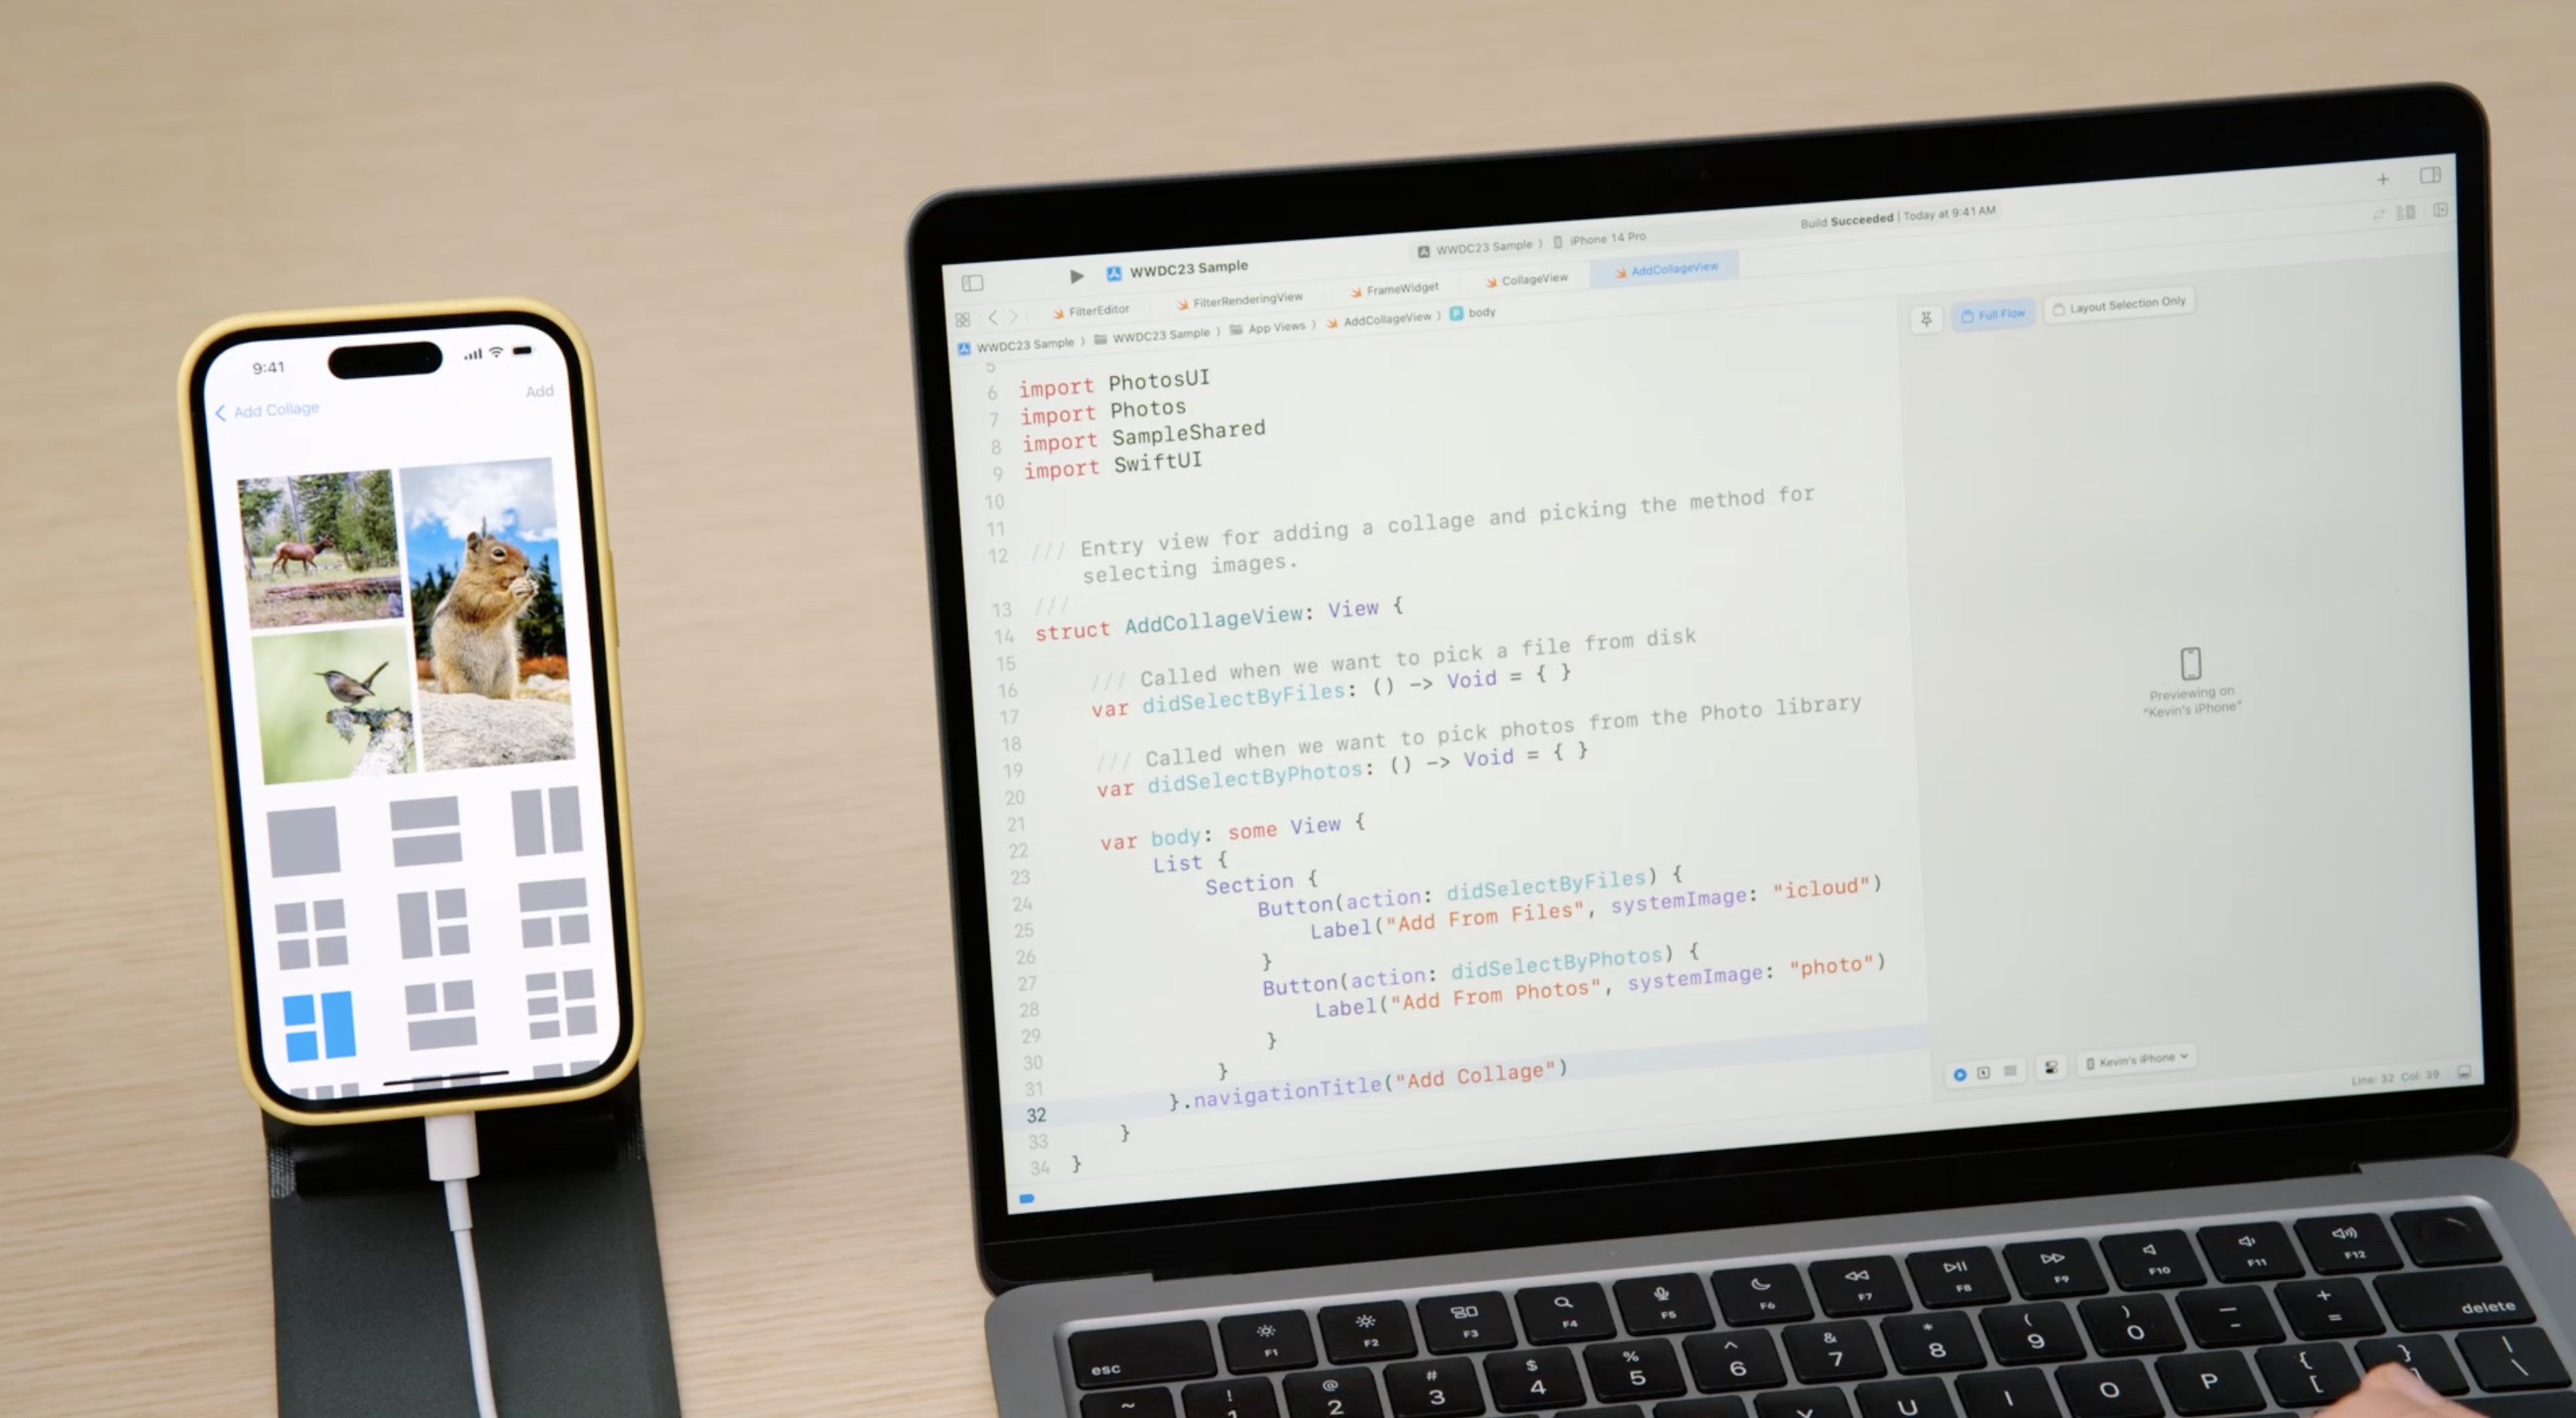
Another view that has a button that allows to pick photos from the iCloud photo library and then pick a layout to make a new collage. Changing which device is used for previewing using the preview device picker in the bottom of the canvas.
On the literal opposite side of the menu is the More submenu. This lists all of the simulator devices we've added in the Devices window, so we can pick exactly which model we want.
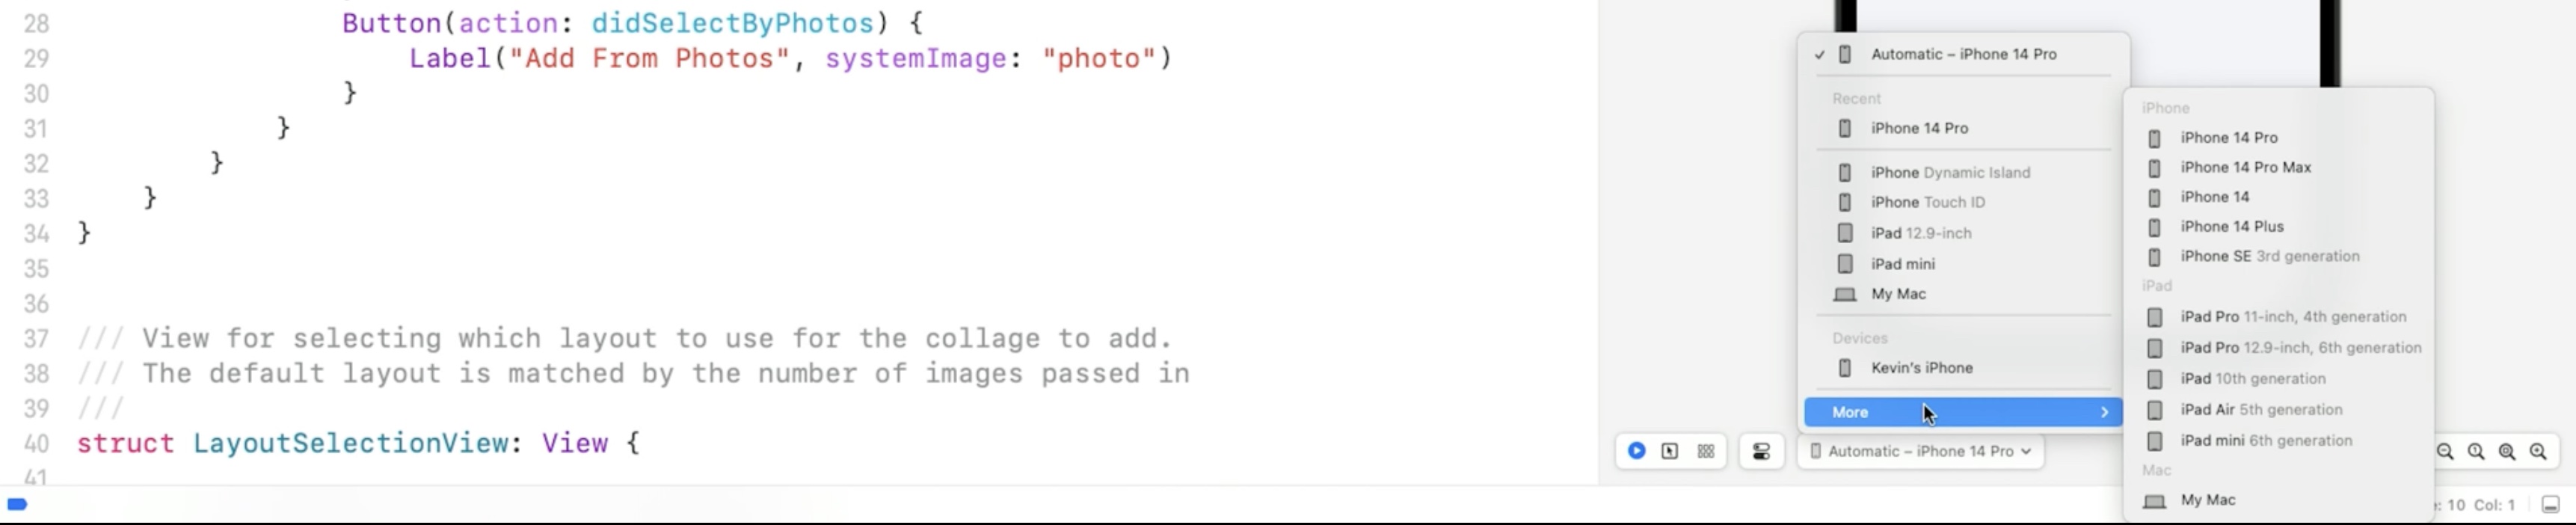
The middle section of the menu offers devices by common features...
The preview device picker also includes any devices connected to our Mac. Picking one of these connected devices, Xcode will build and preview exclusively for this device, bypassing the simulator entirely.
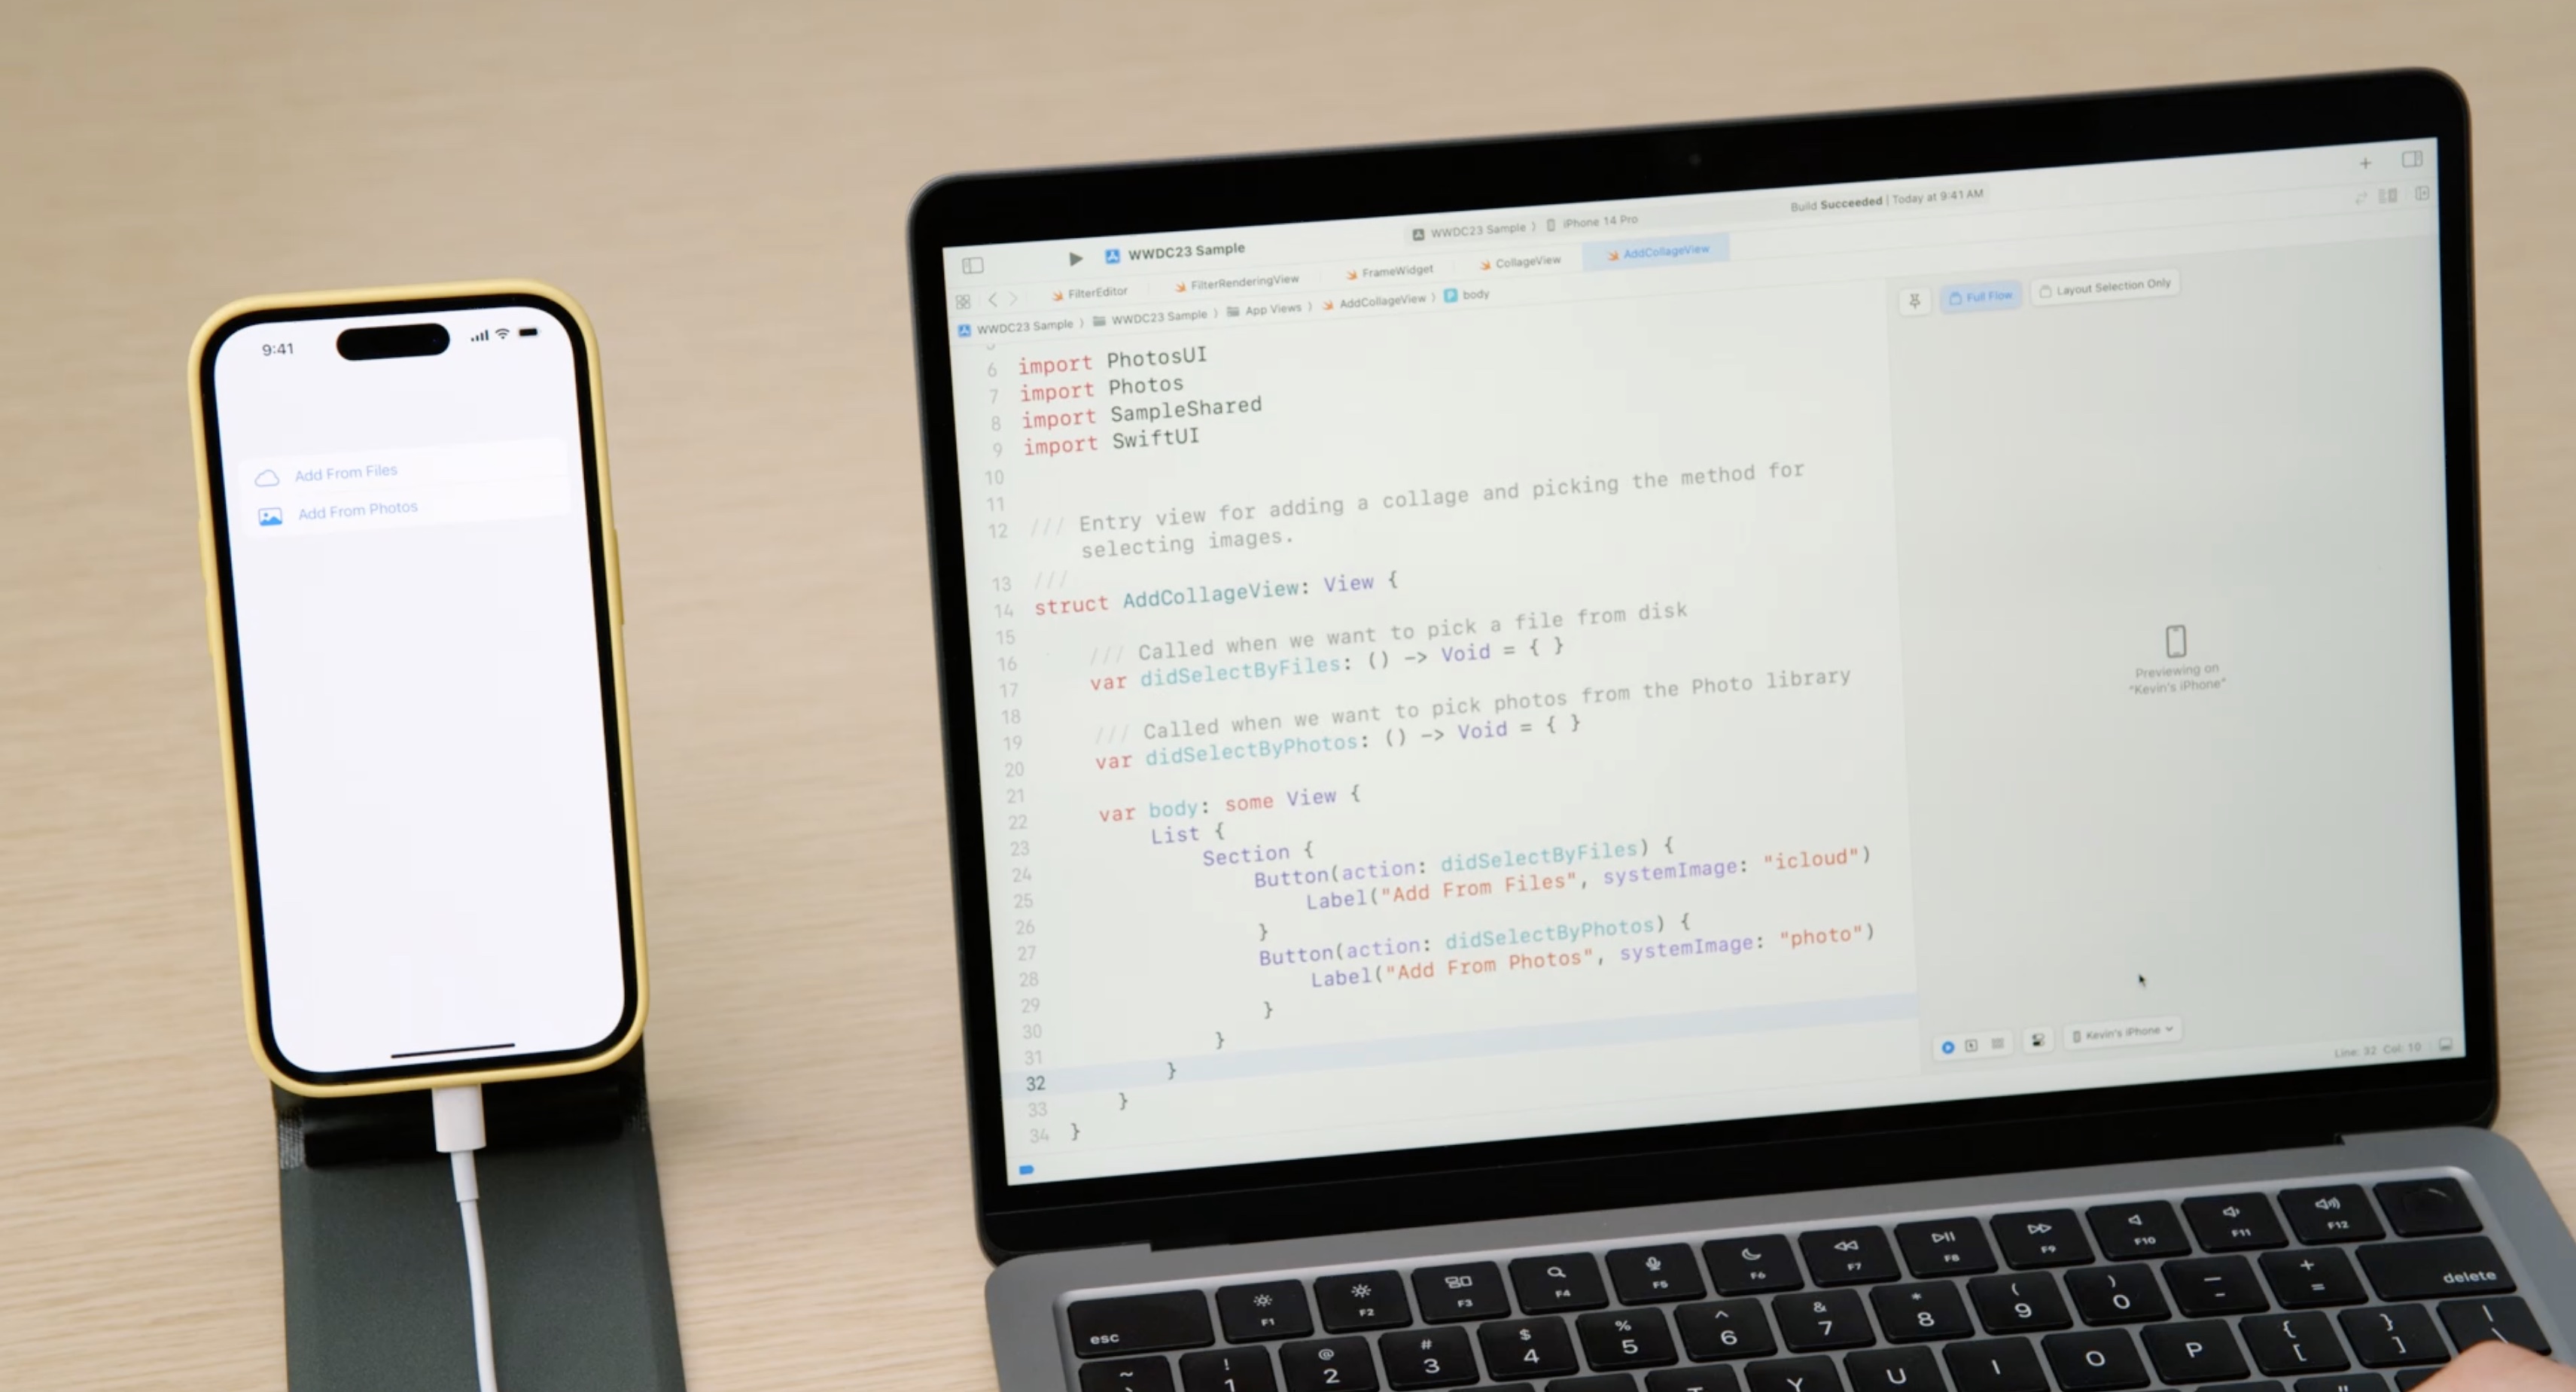
Previewing using the photos on the iphone:
Wrap up
- Define previews with Preview for SwiftUI, UIKit and Appkit, and widgets
- Setup environment, sample data, and sample assets in your Preview
- Preview on devices to access data and capabilities
- Modularize your application for faster build times and focused development
Resources
Have a question? Ask with tag wwdc2023-10252
Search the forums for tag wwdc2023-10252
Related Videos
Bring widgets to life
What’s new in AppKit
What’s new in SwiftUI
What’s new in Xcode 15
 GitHub
 www.linkedin.com
 Twitter