Discover machine learning enhancements in Create ML
 laurent b
Description: Find out how Create ML can help you do even more with machine learning models. Learn about the latest updates to image understanding and text-based tasks with multilingual BERT embeddings. Discover how easy it is to train models that can understand the content of images using multi-label classification. We'll also share information about interactive model evaluation and the latest APIs for custom training data augmentations. To learn more about the latest updates to machine learning, watch “Explore Natural Language multilingual models” and “Improve Core ML integration with async prediction" from WWDC23.
Topics
- Create ML improvements
- Multi-label classification
- Data augmentation
Intro
We've been working on some great improvements to the Create ML app and frameworks.
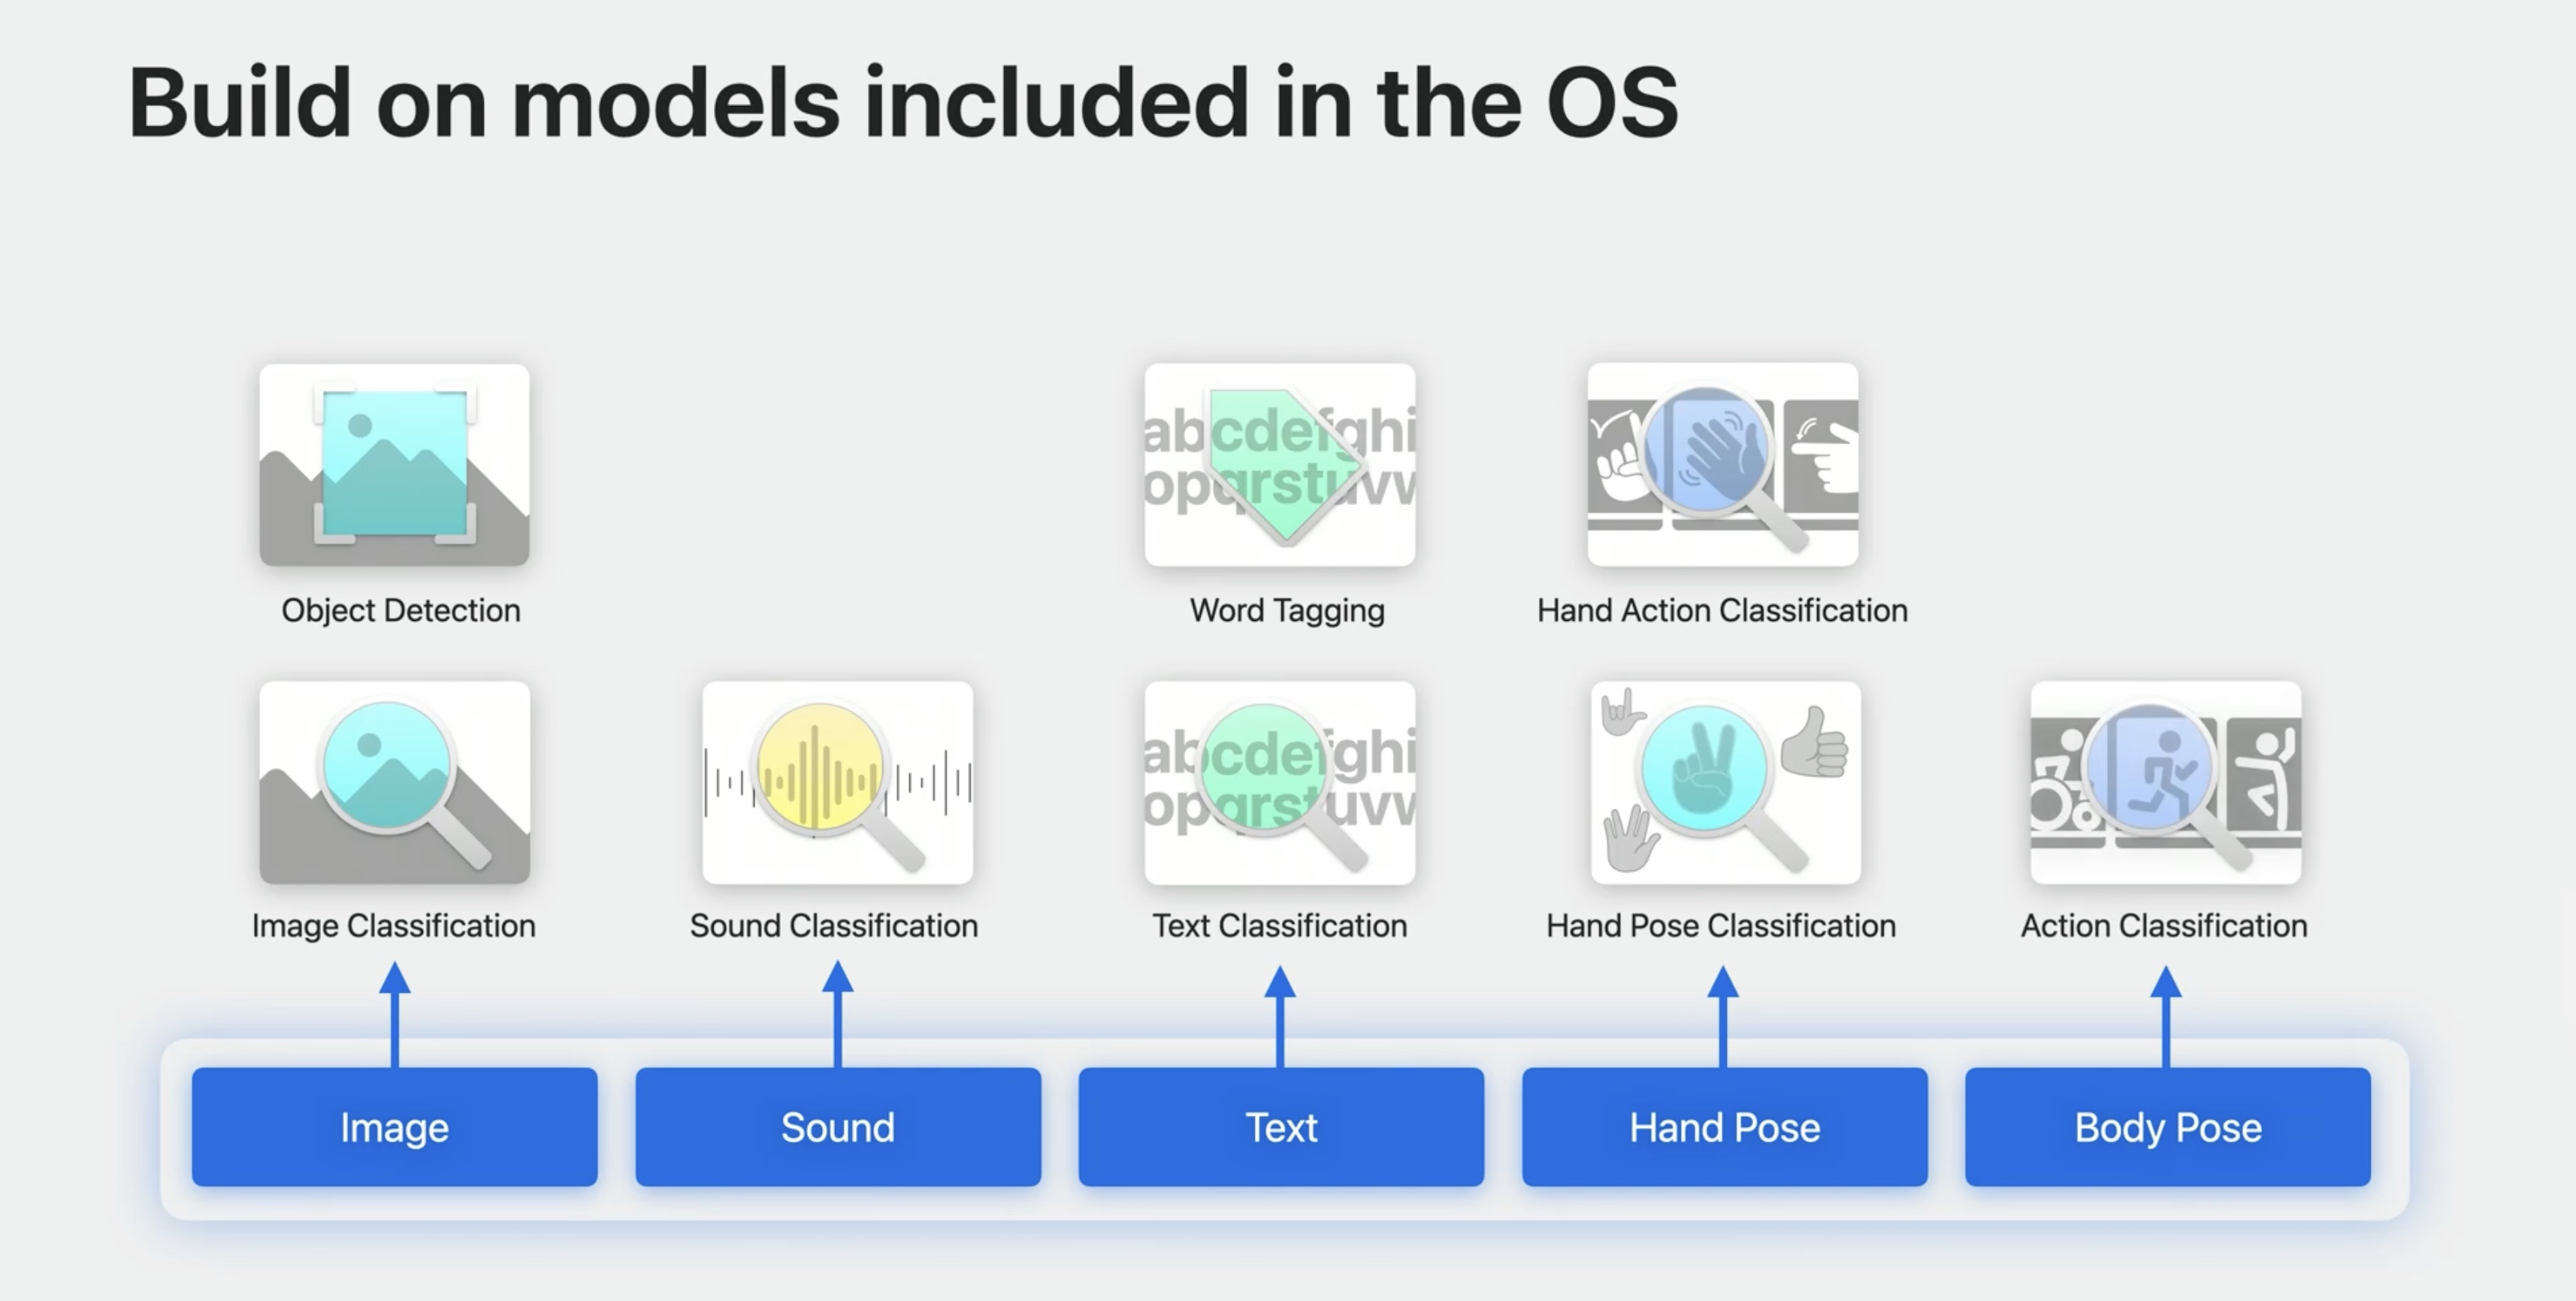
Training a large-scale model from scratch can take thousands of hours, millions of annotated files, and expert domain knowledge. Our goal is to give you the tools to build great apps that use machine learning without all of the overhead. We've gone through the process of creating state-of-the-art models that power many features, like the Search experience in the Photos app and Custom Sound Recognition in Accessibility.

Create ML gives you access to our latest technology so you can build your own custom machine learning experiences, without the hassle.
Create ML improvements
Text Classification
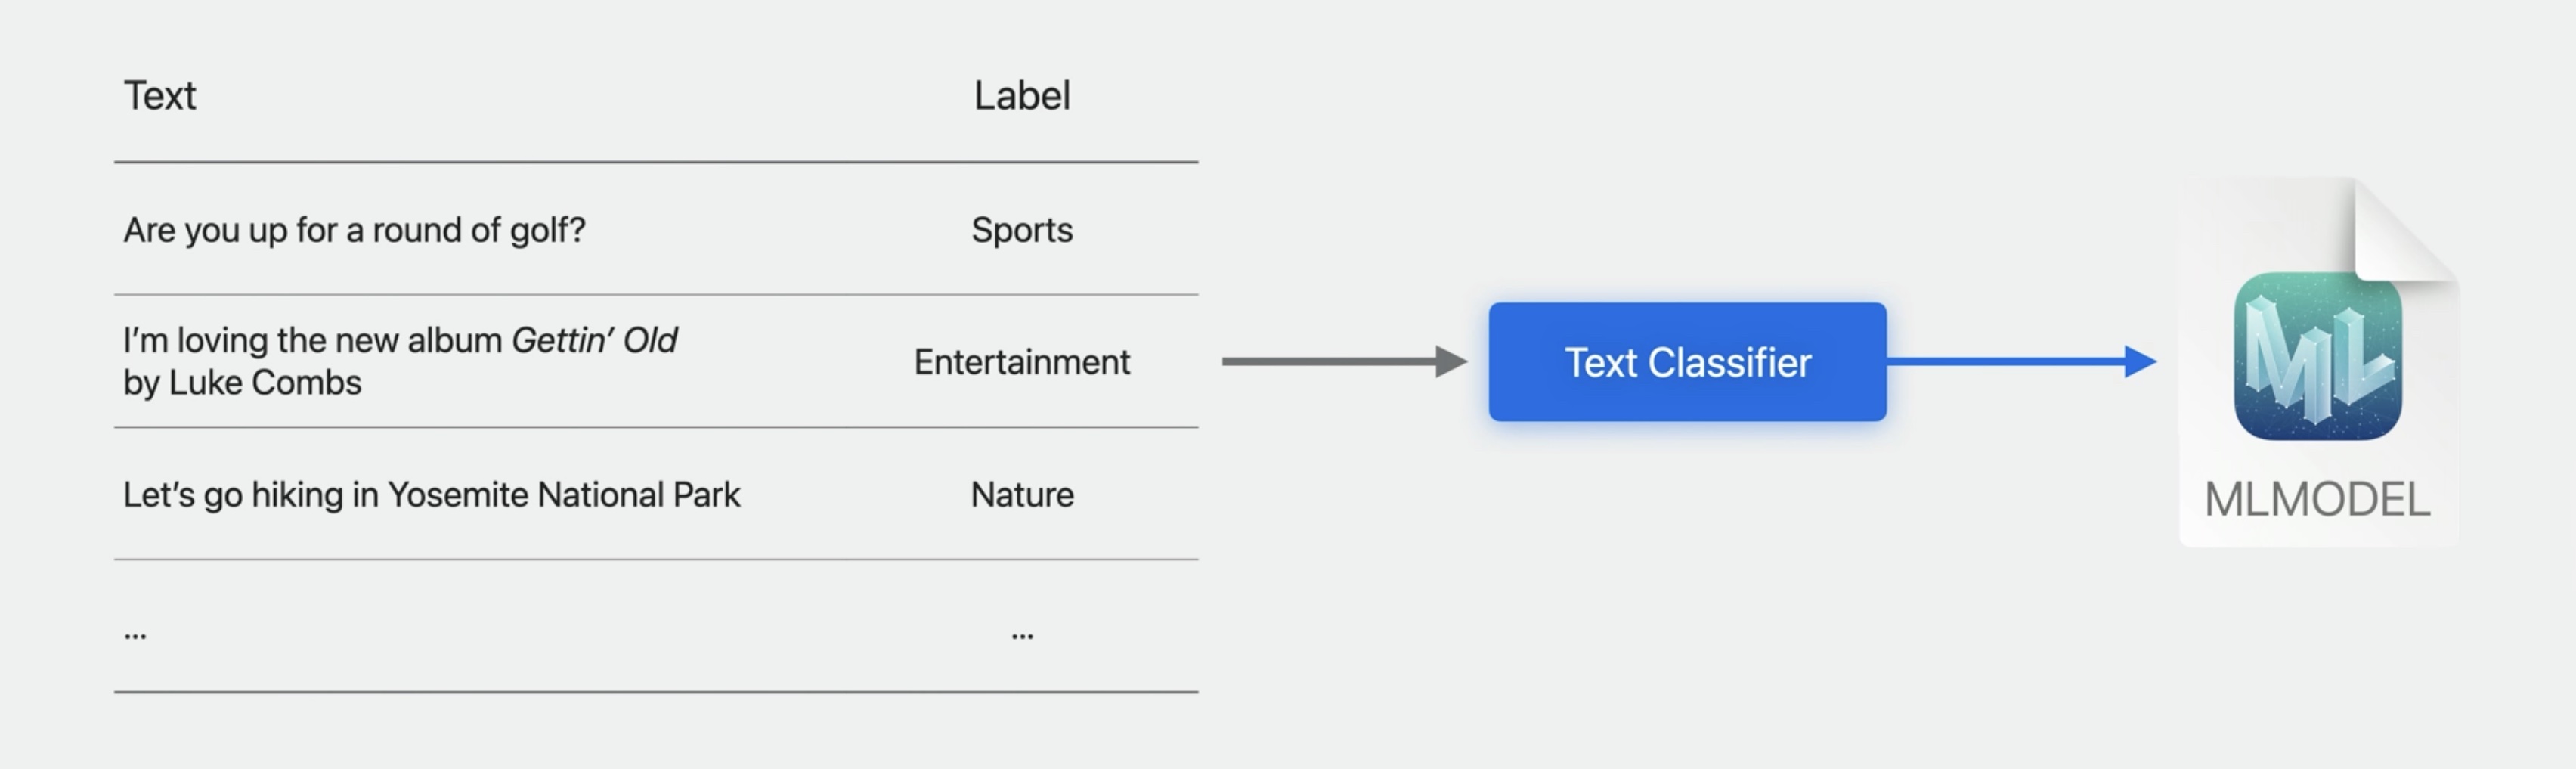
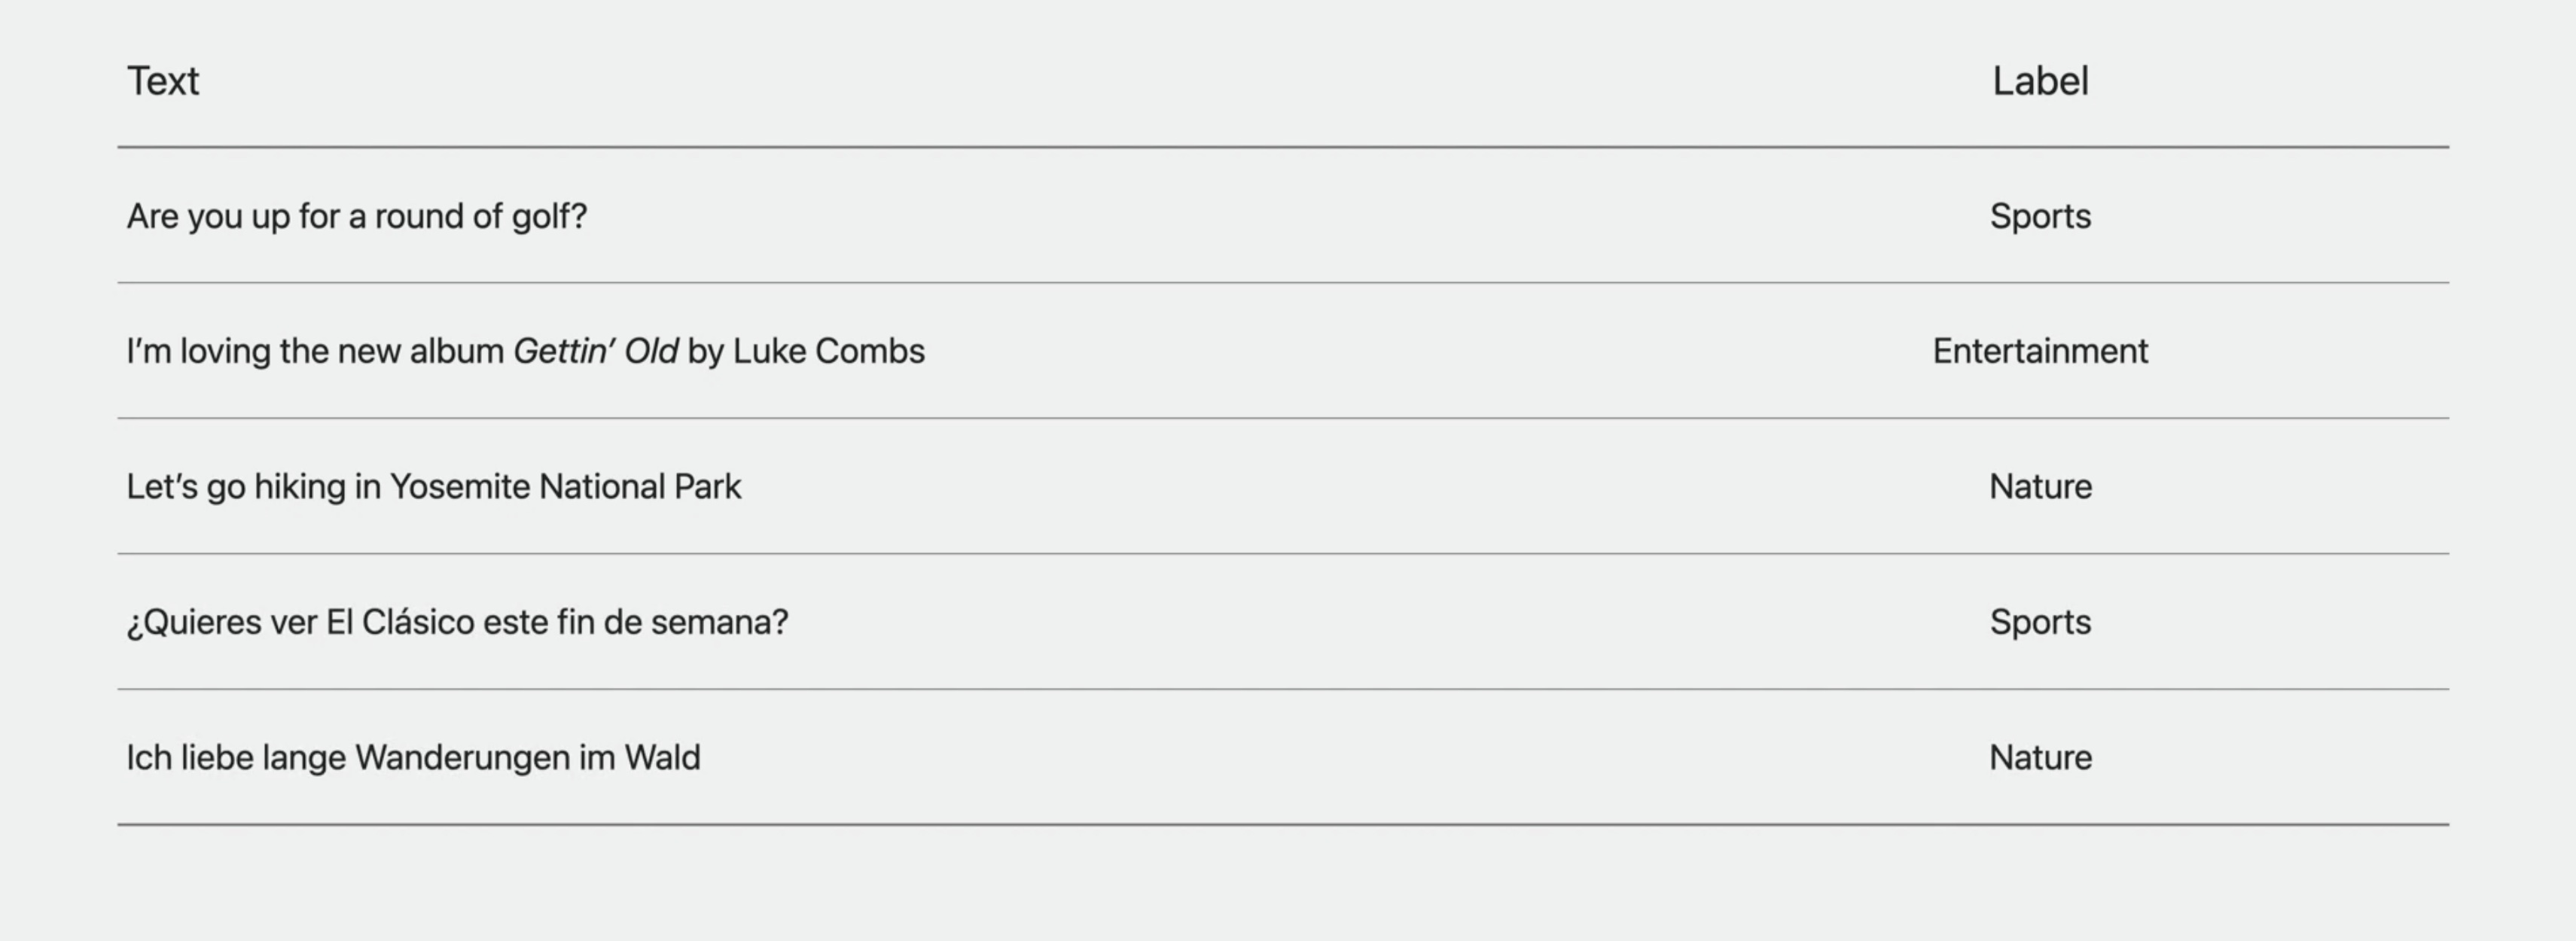
A text classifier is a machine learning task designed to recognize patterns in natural language text. To train such a model, all you need to do is provide it with a table of text and label pairs. In this example, I have sports, entertainment, and nature labels.
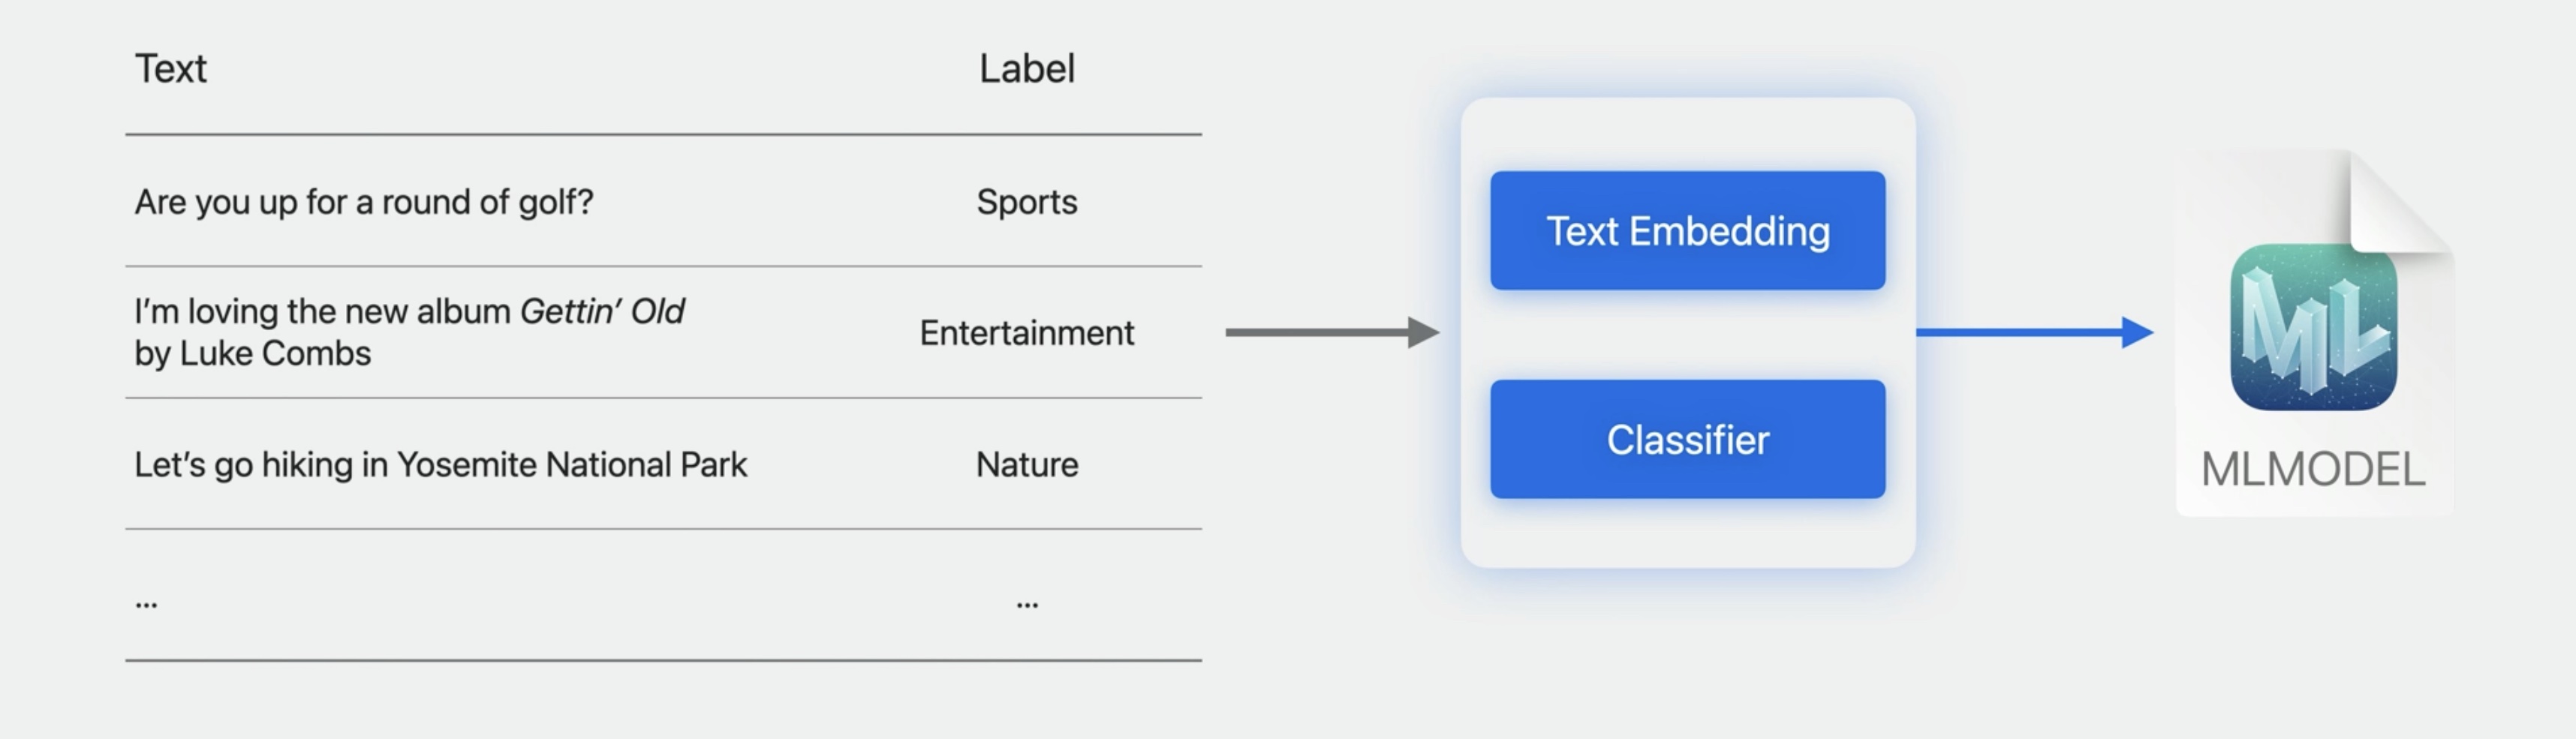
You can choose the transfer-learning algorithm that uses a pre-trained embedding model as a feature extractor.
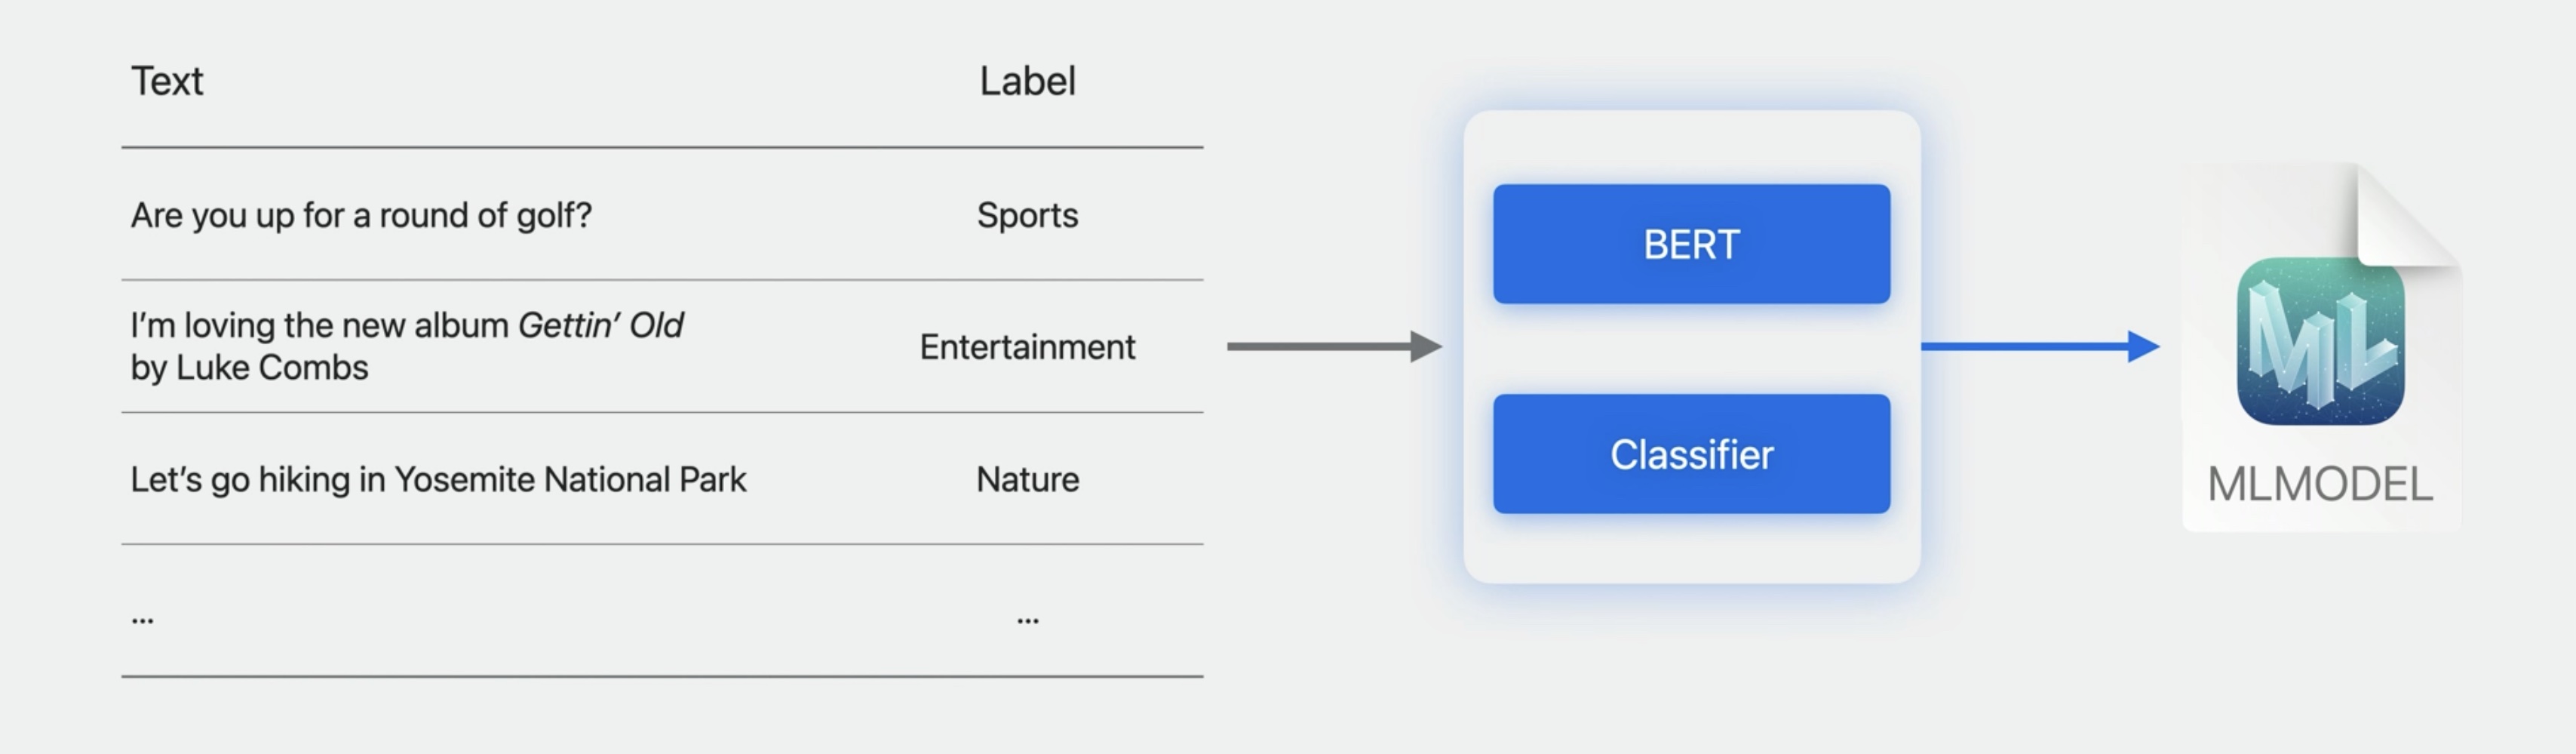
This year, we designed a new embedding model and trained it on billions of labeled text examples. It's a bidirectional encoder representations from transformers model, or BERT for short.
You can find the new option in the Create ML app in the model parameters section of the Settings tab.
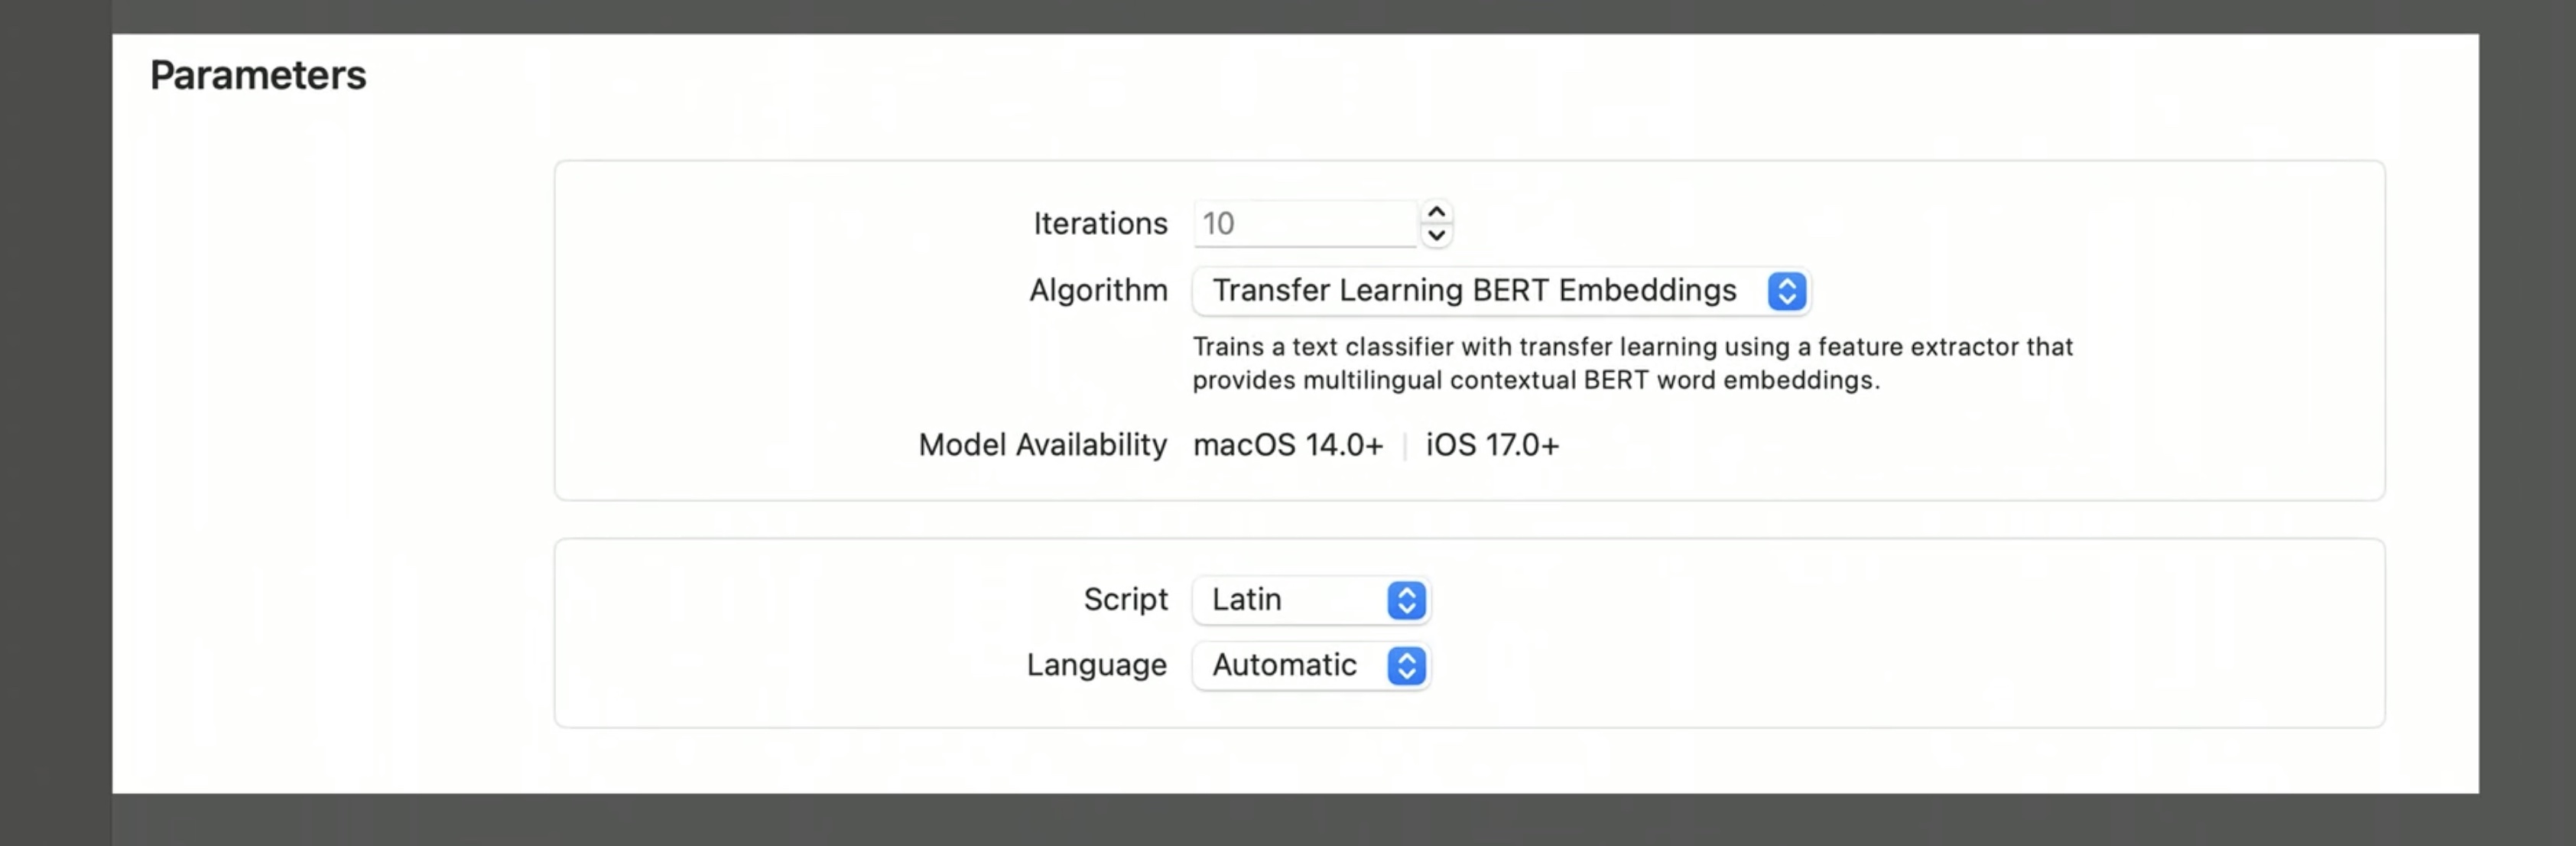
The BERT embedding model is multilingual, which means your training data can now contain more than just one language.
On top of supporting multilingual text classifiers, BERT can also boost the accuracy of your monolingual text classifiers.
You can leverage BERT on iOS 17, iPadOS 17, and macOS Sonoma.
We have a whole video that covers all of the details.
Make sure to watch:
Explore Natural Language multilingual models
## Transfer-Learning in the Image Classification Task The image classifier in Create ML is designed to help you build models to answer the question, what is the best label to describe the contents of my image?
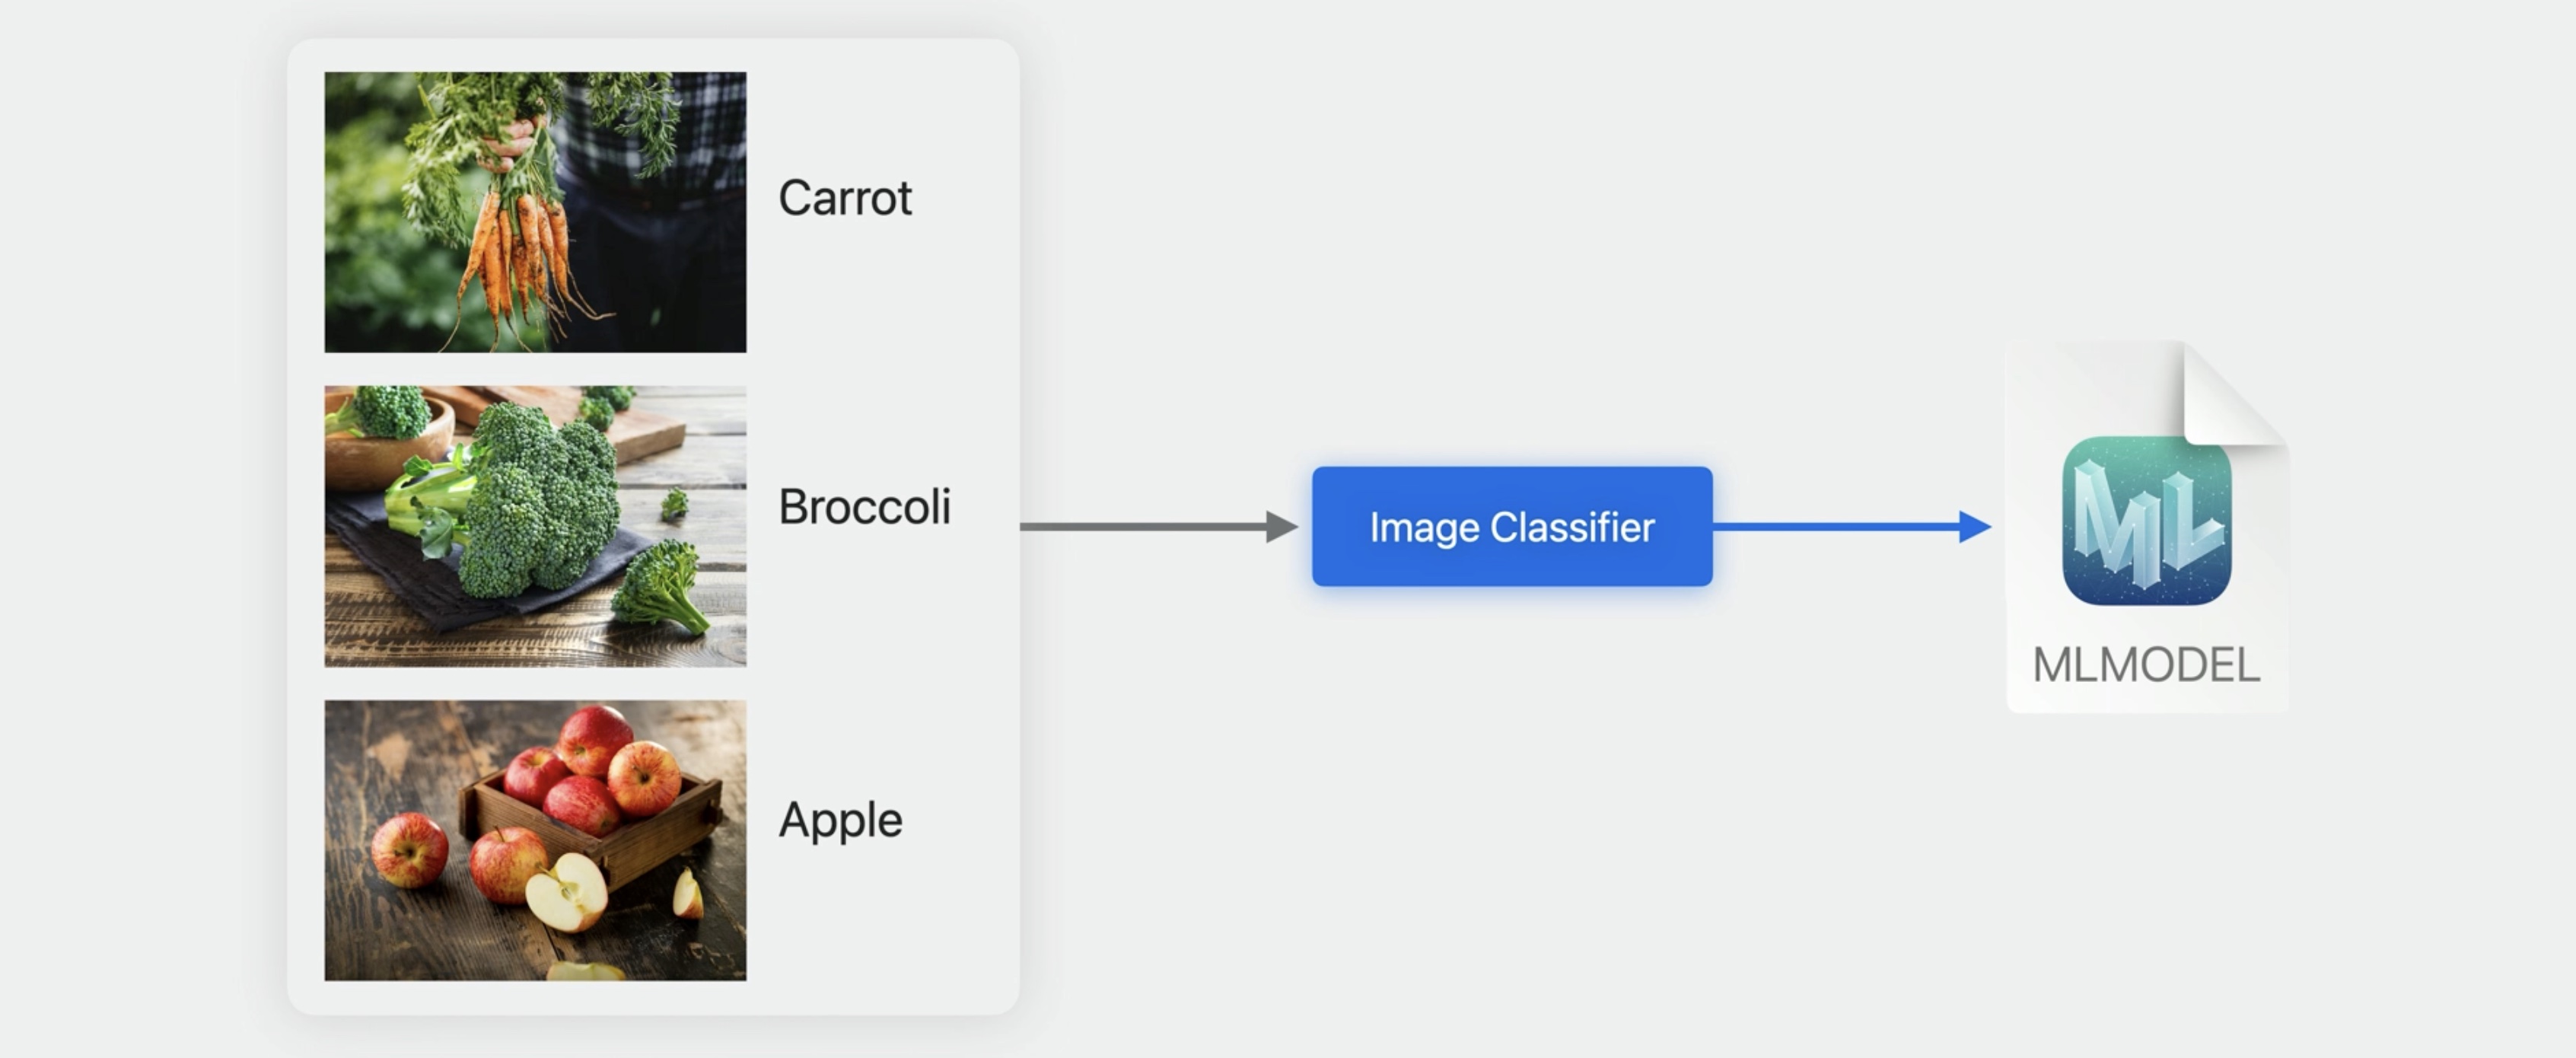
Similar to the text classifier, the image classifier leverages a pre-trained model to extract relevant information from images.
The latest version of the Apple Neural Scene Analyzer is now available to you for building state-of-the-art models with very little training data.
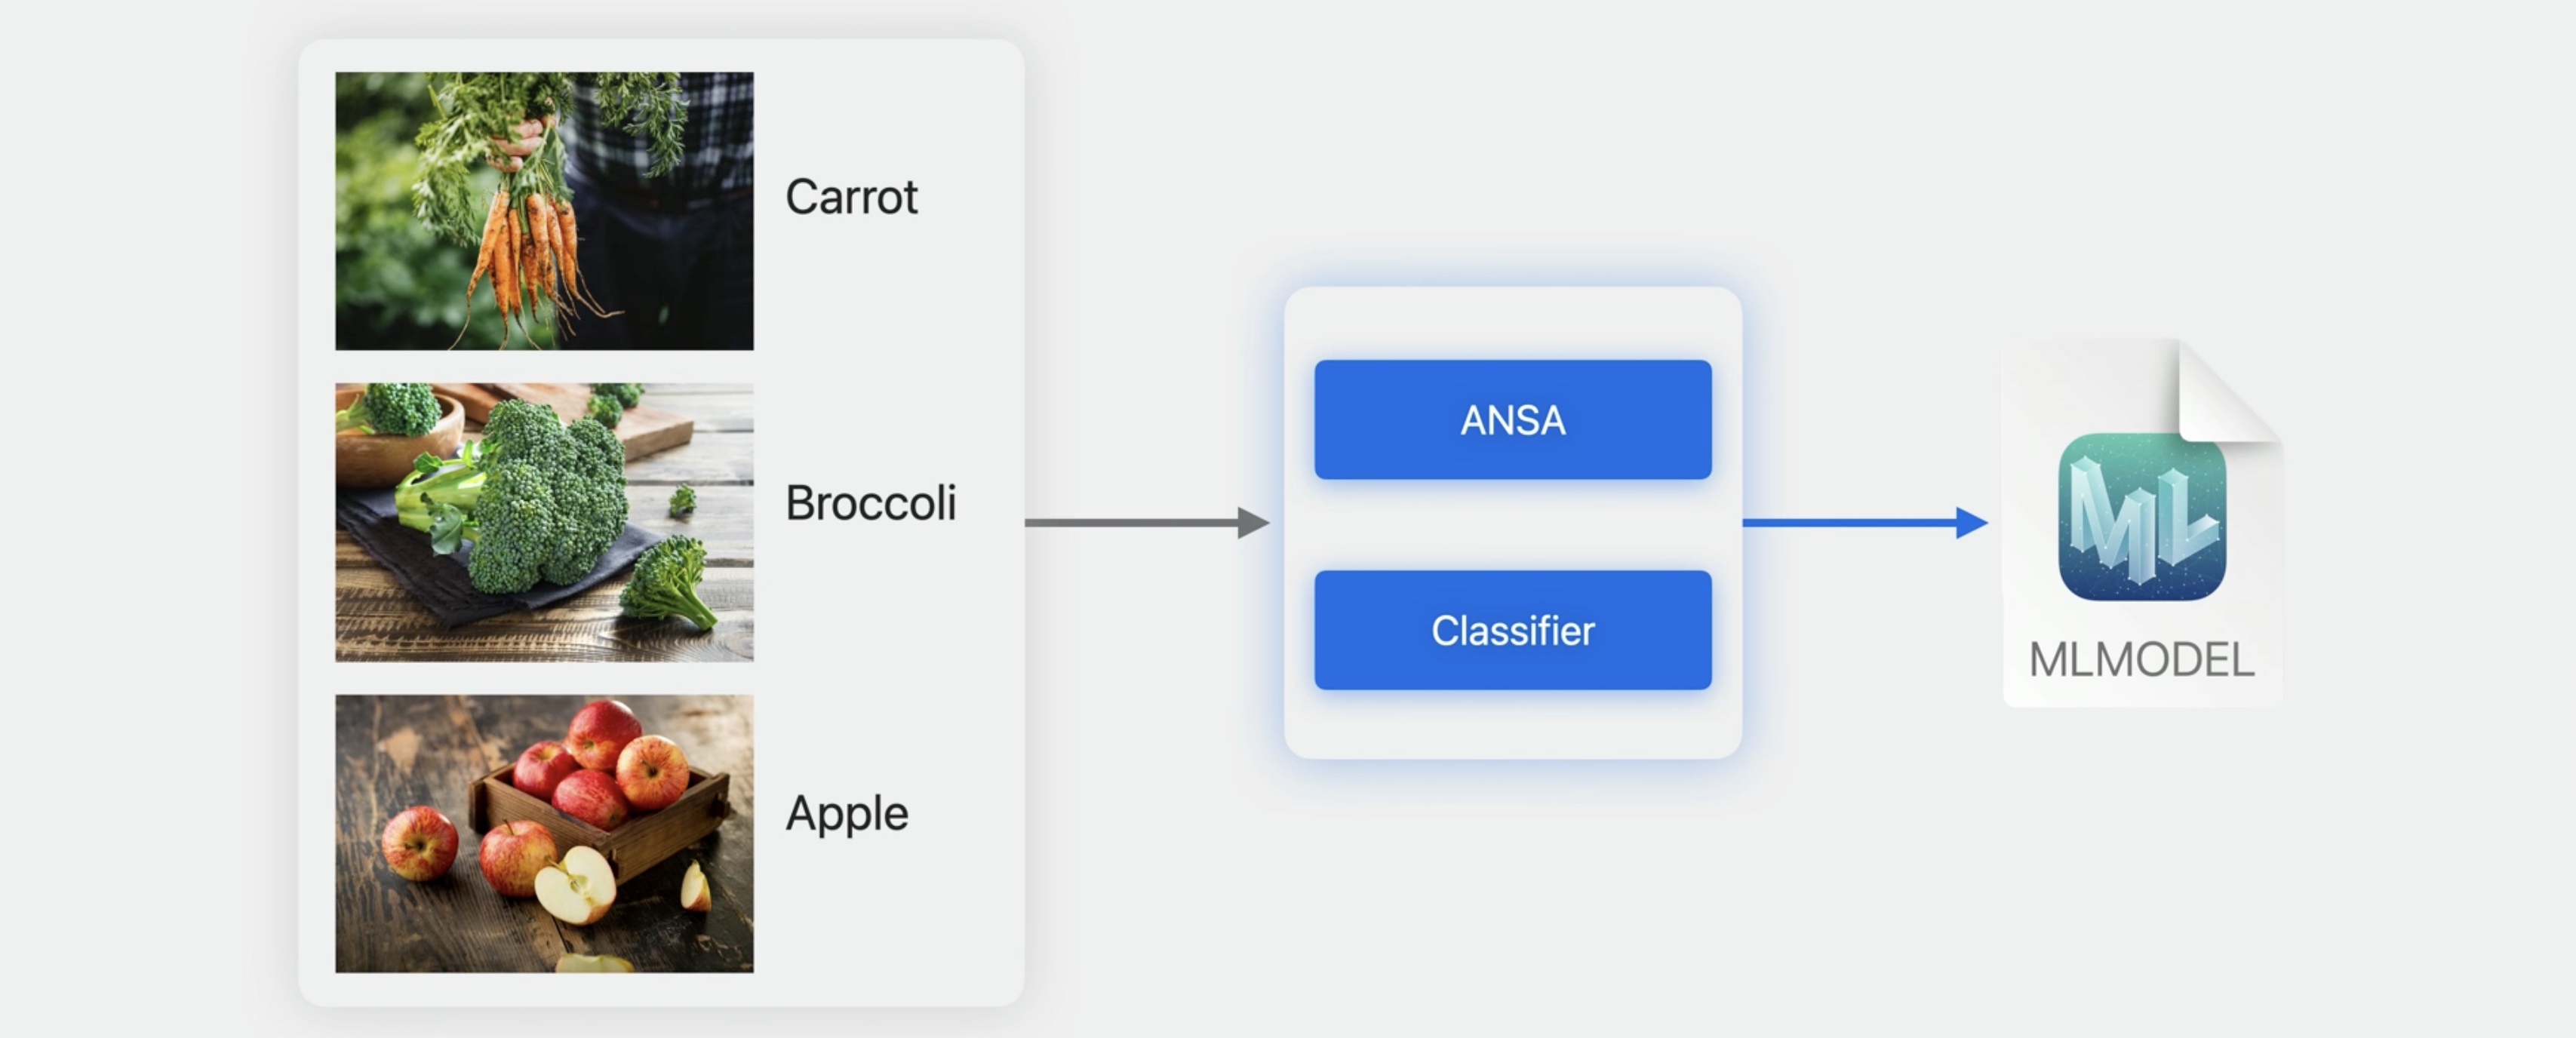
Image understanding models in the OS continue to evolve to give you the best possible experience. You can find out more by checking out our article on the machine learning research website.
A Multi-Task Neural Architecture for On-Device Scene Analysis
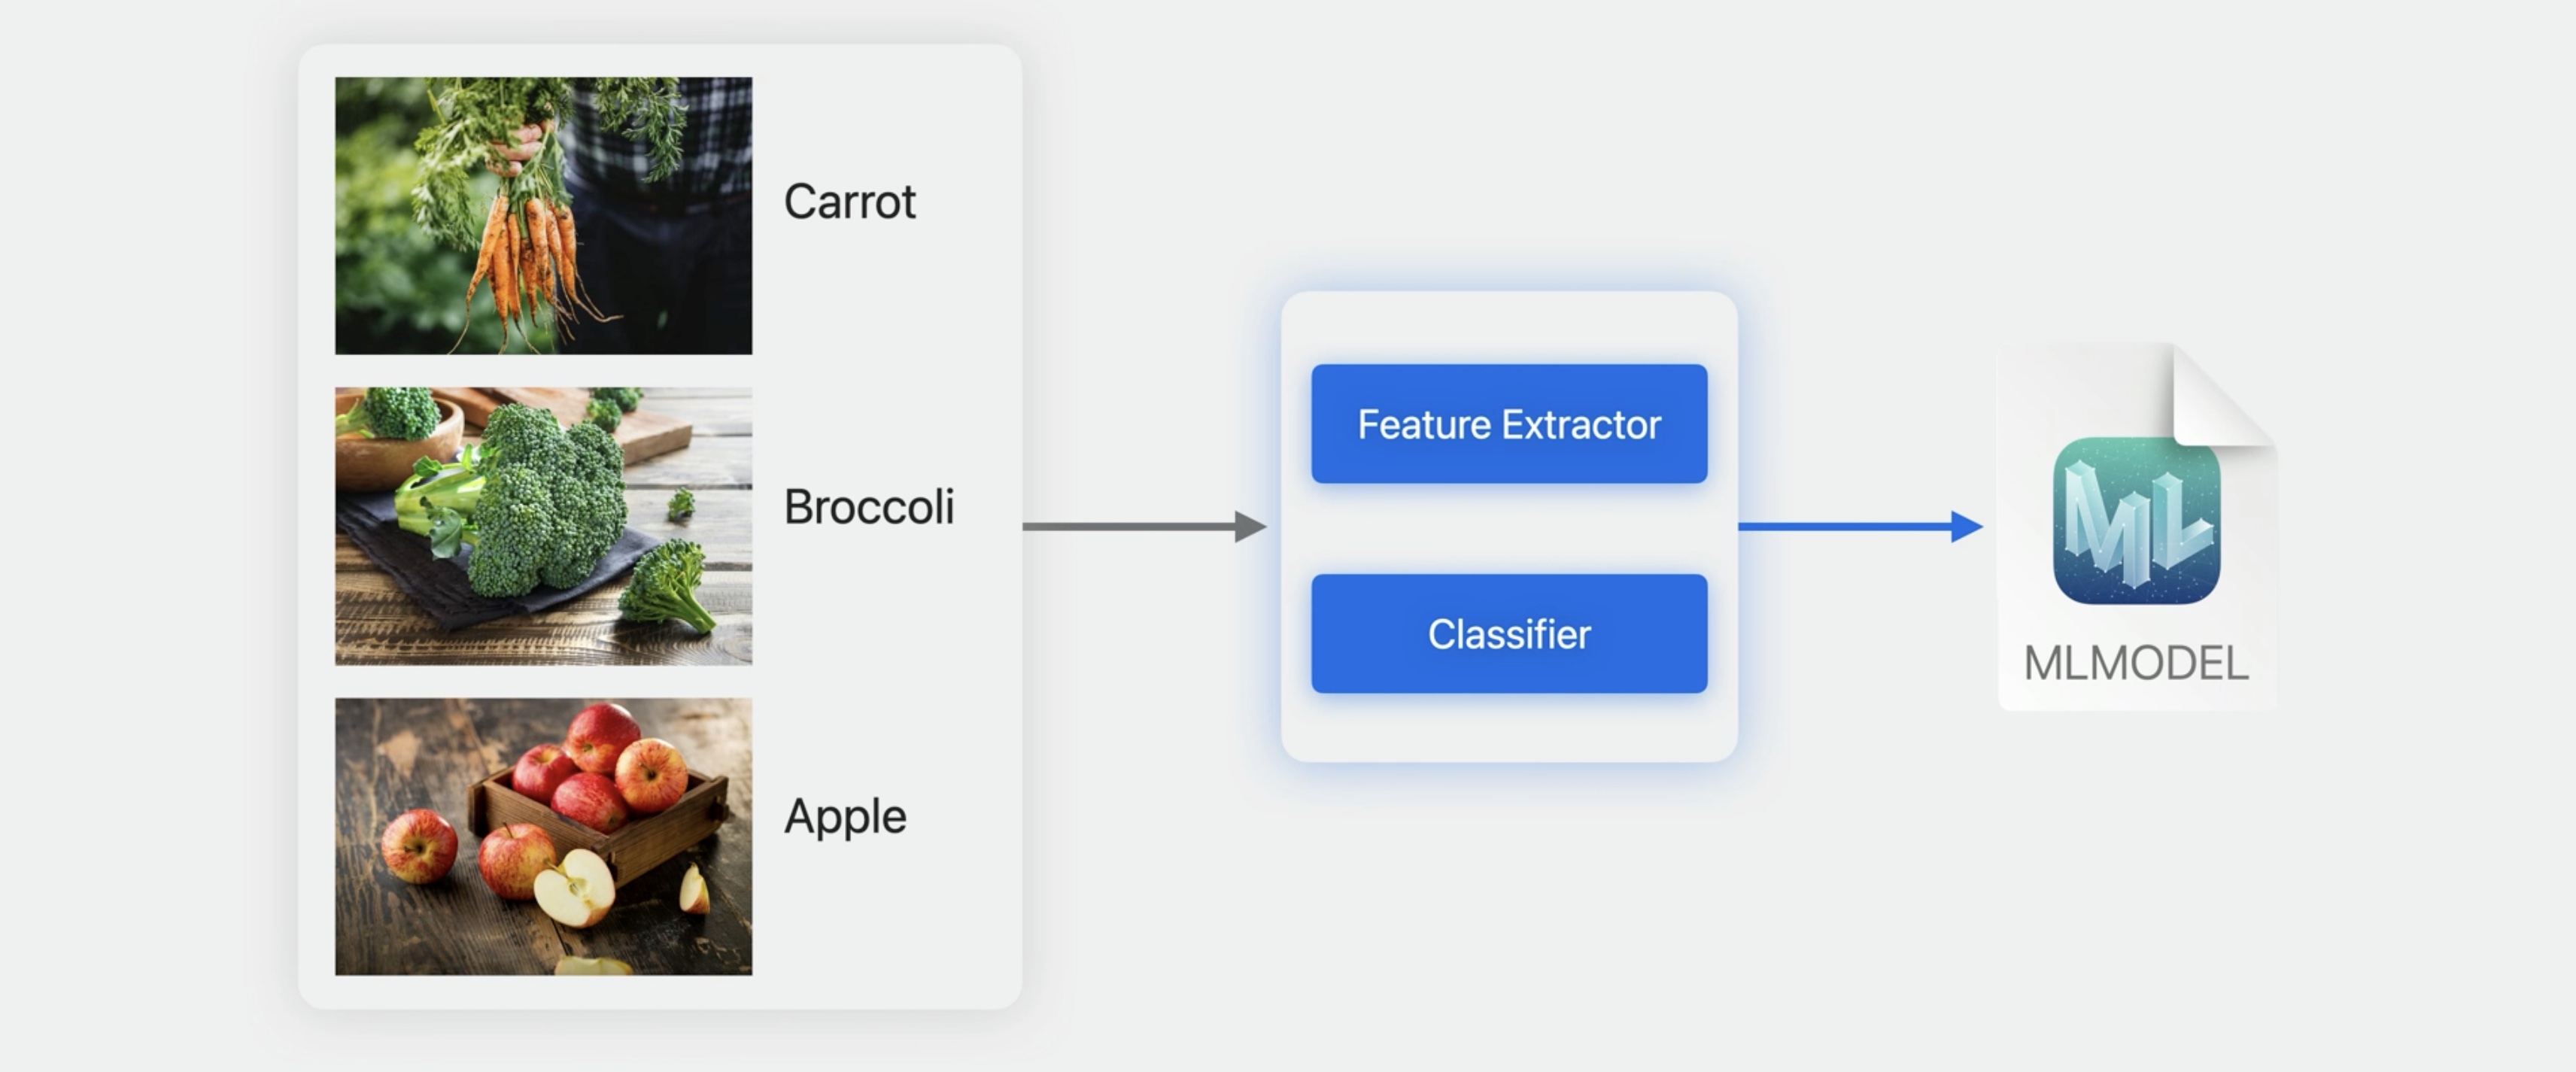
In the Create ML app, you'll notice a new feature extractor option in the model parameters section of the Settings tab.
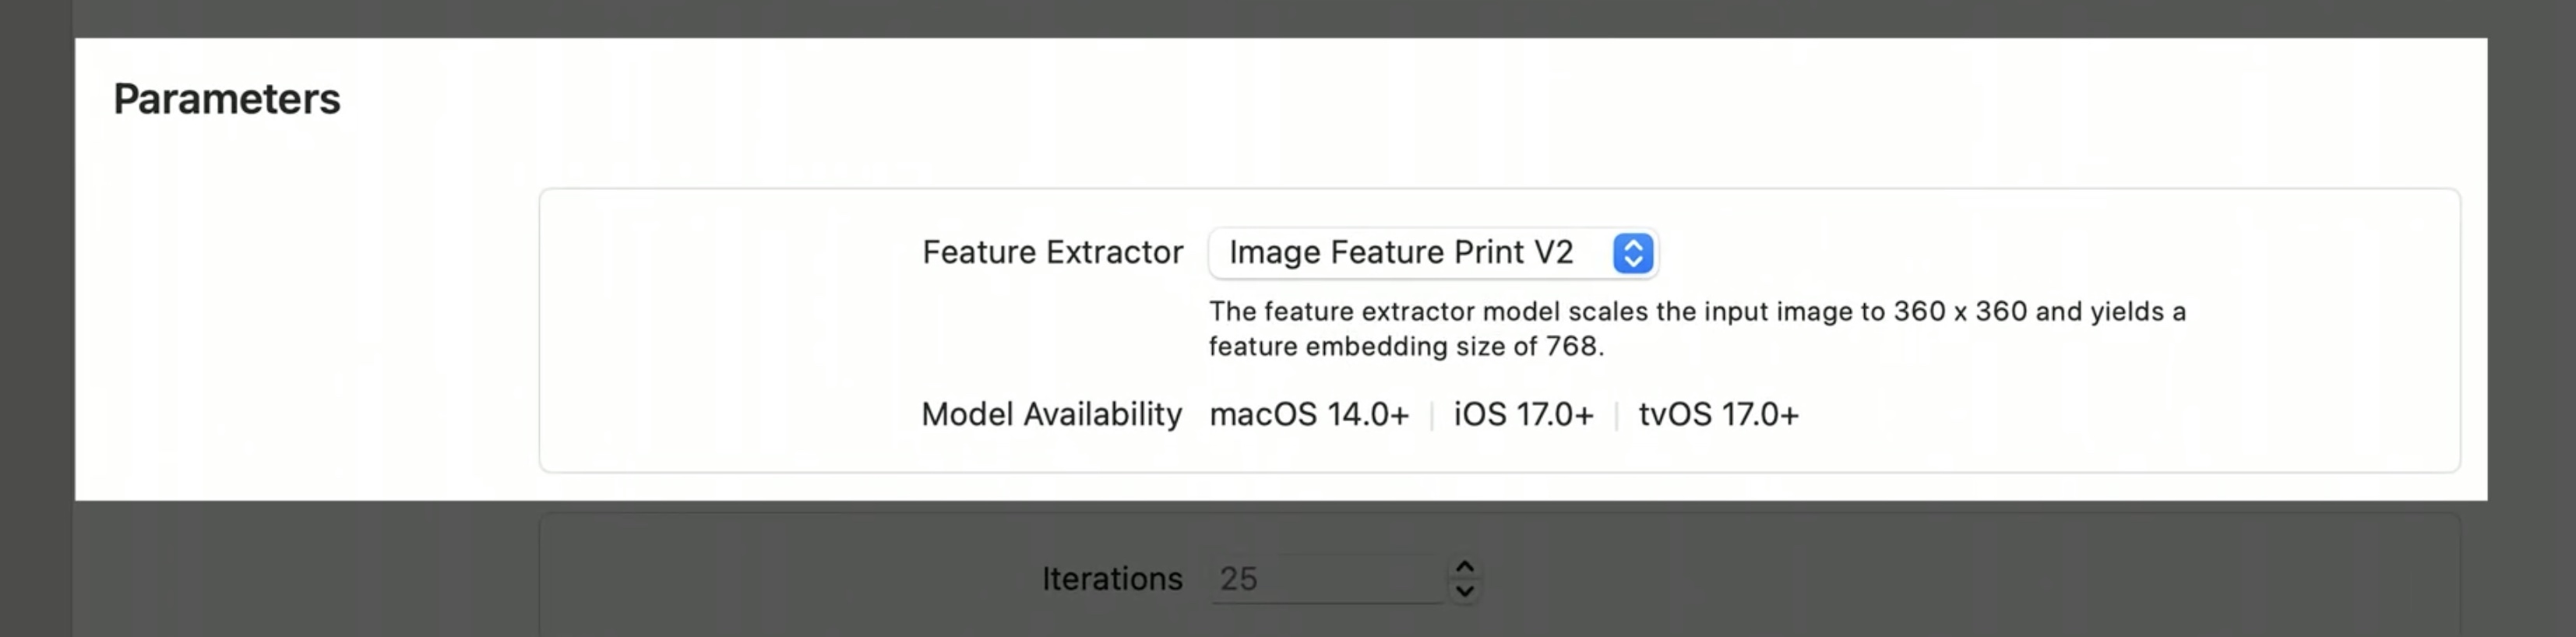
The new feature extractor has a smaller output embedding size when compared to our previous version. On top of general improvements, this can boost the accuracy of your classifier, lead to faster training time, and reduce the memory needed to store the extracted features.
the new Multi-Label Image Classifier
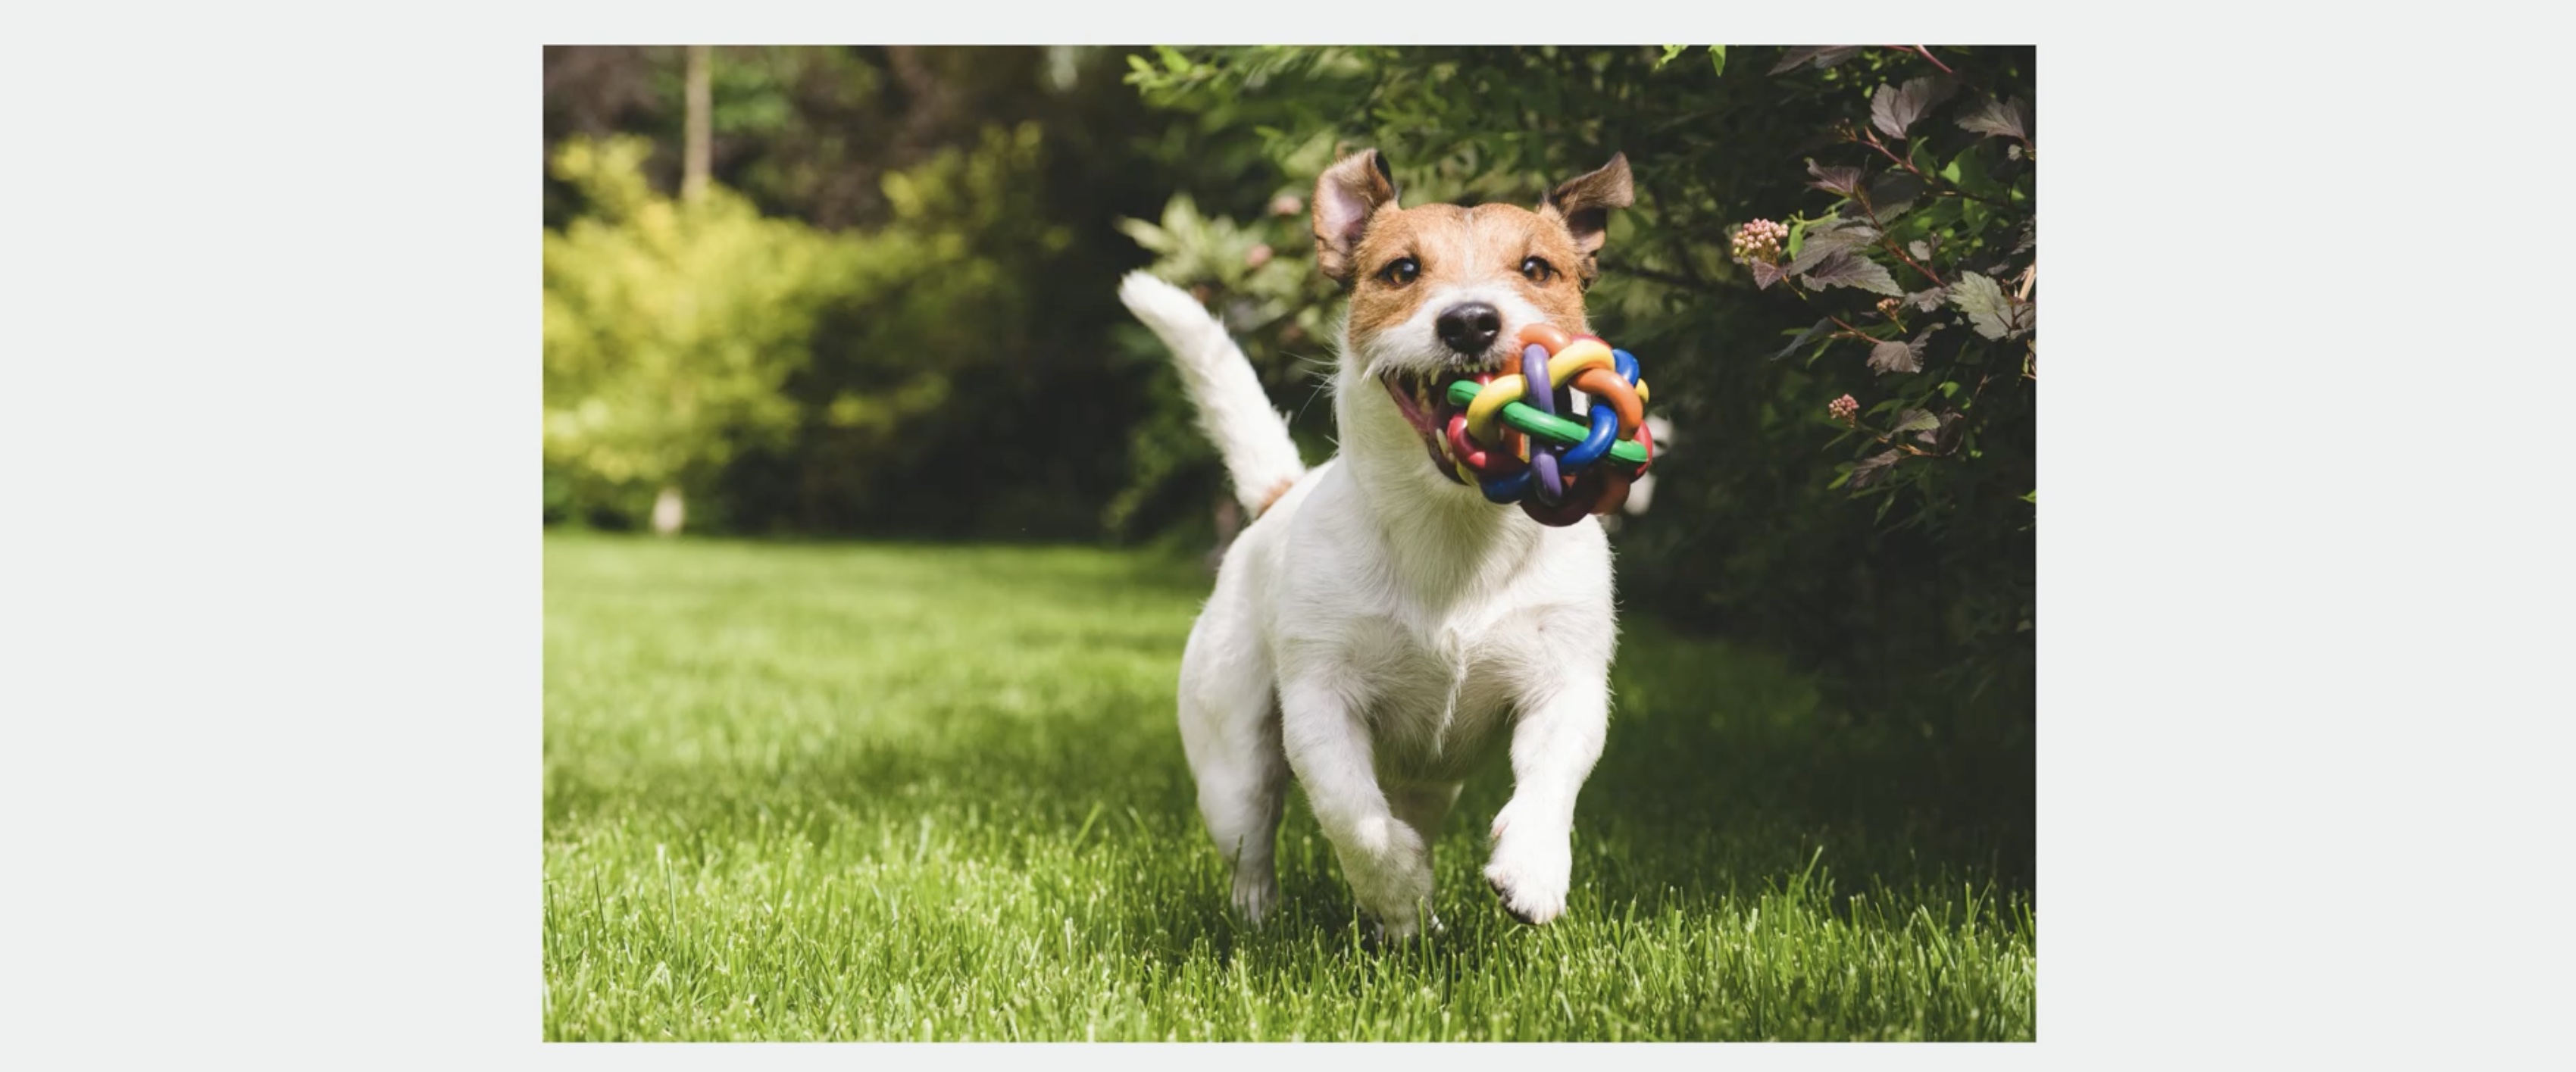
Single-label image classification is designed to predict the best label describing the contents of an image.
For example, you might describe this image as dog or maybe outdoors. But you need to pick one.
If you're interested in objects, then you can use the object detector to locate objects within a scene. For example, I've drawn a bounding box around the dog and another one around the ball.
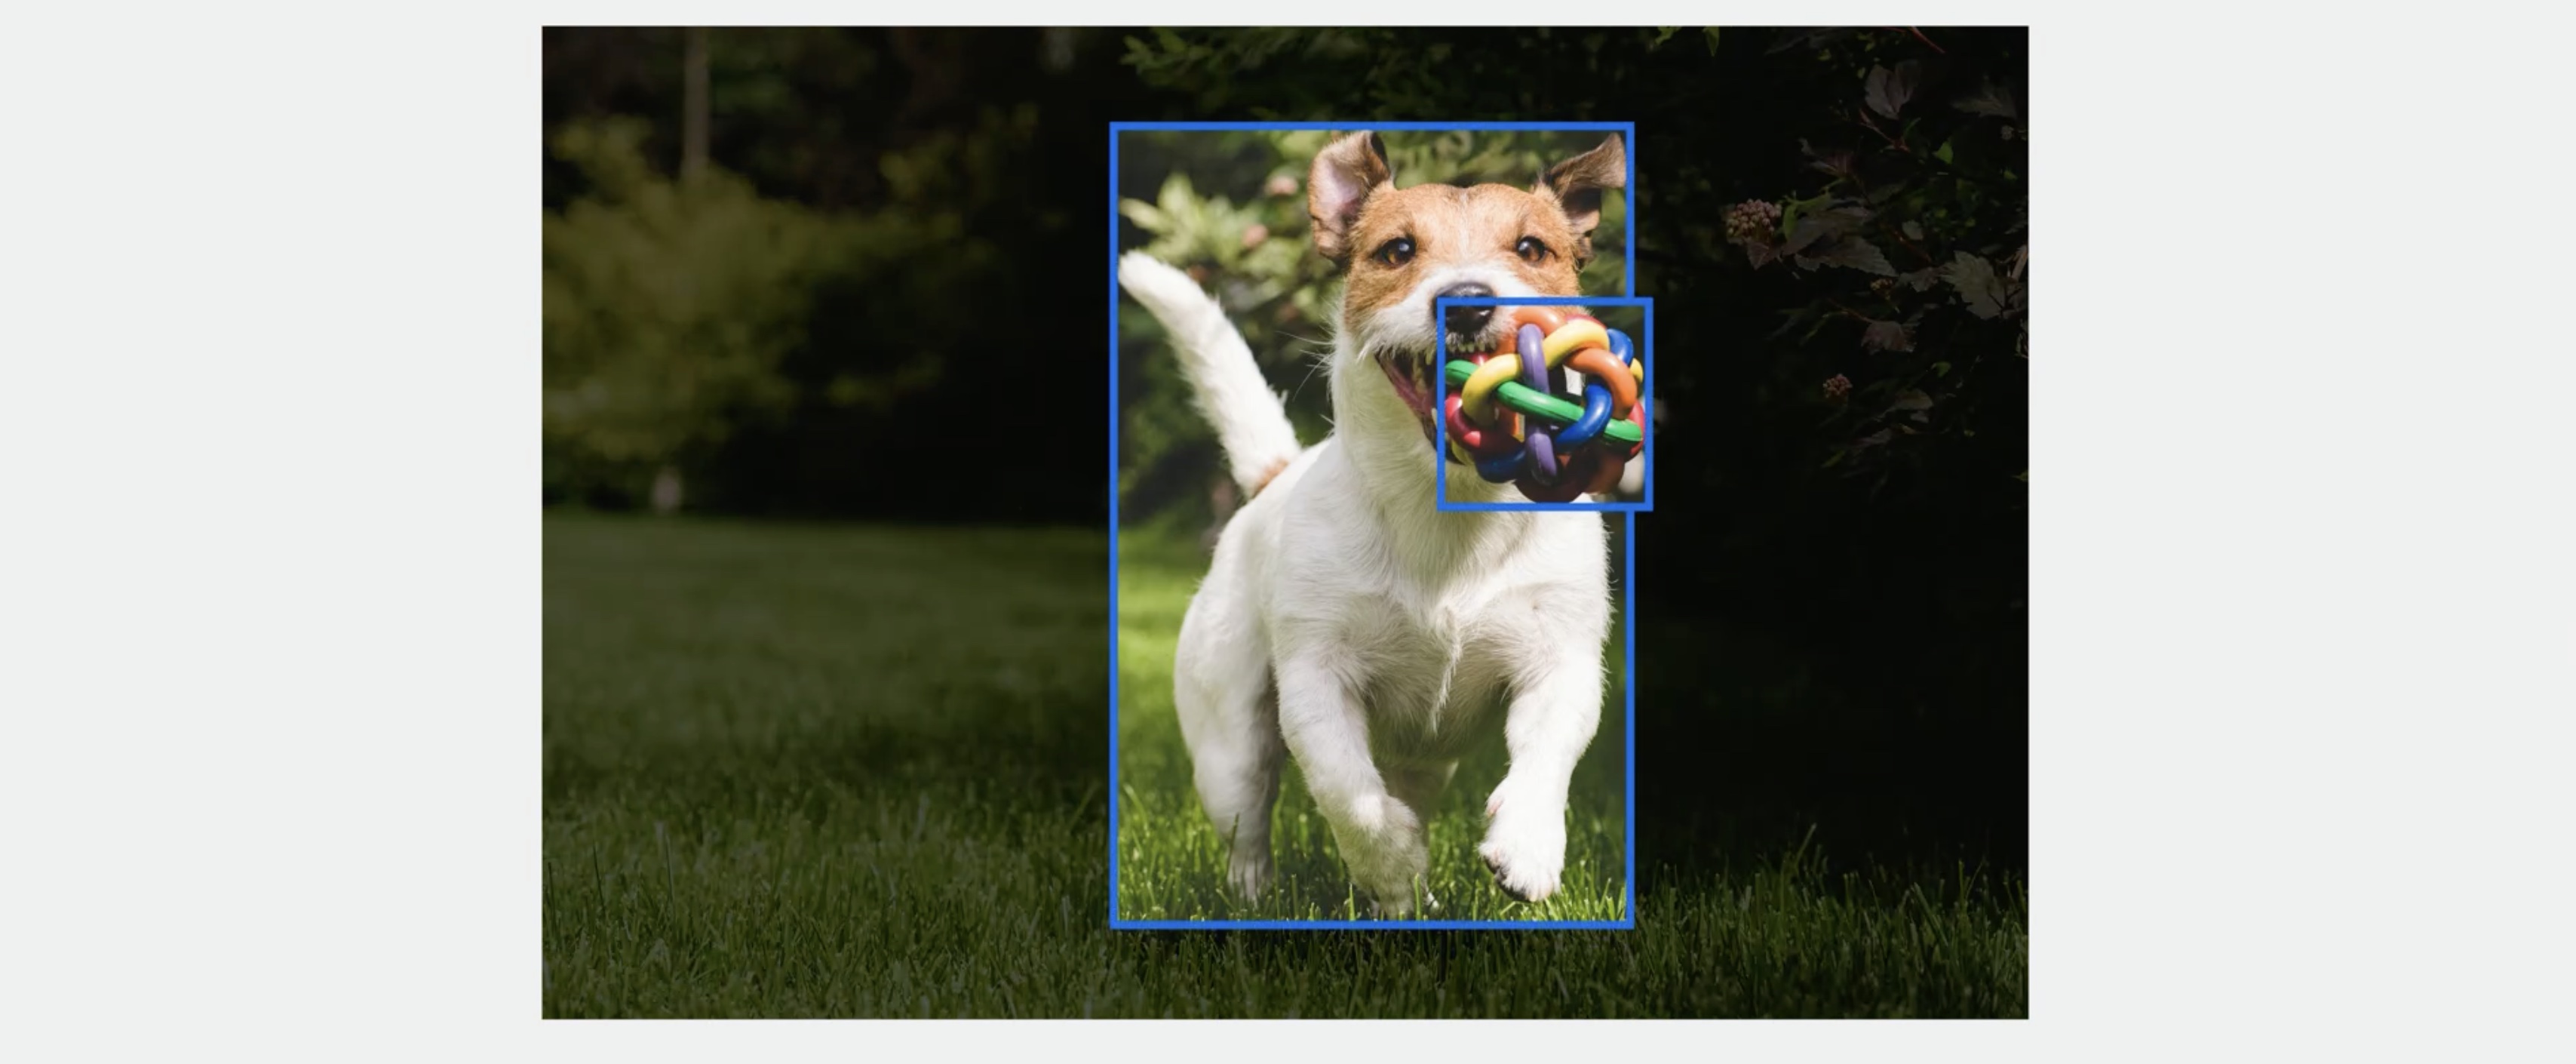
Now, this is great, but I'm also interested in the scene that the objects are in. I can't really draw a bounding box to represent that the dog is in a park or outdoors. That's where the new multi-label image classifier comes in. It allows you to predict a set of objects, attributes, or labels for your images. For example this image contains a dog, toy, grass, and park.

Let's go build one using Create ML. As usual, the first thing I'll need to do is collect some training data. I decided to have a bit of fun and build a classifier that detects multiple succulent plants in different scenes. For example, here I have an image of Haworthia, Jade, and Aloe in pots on a window sill.
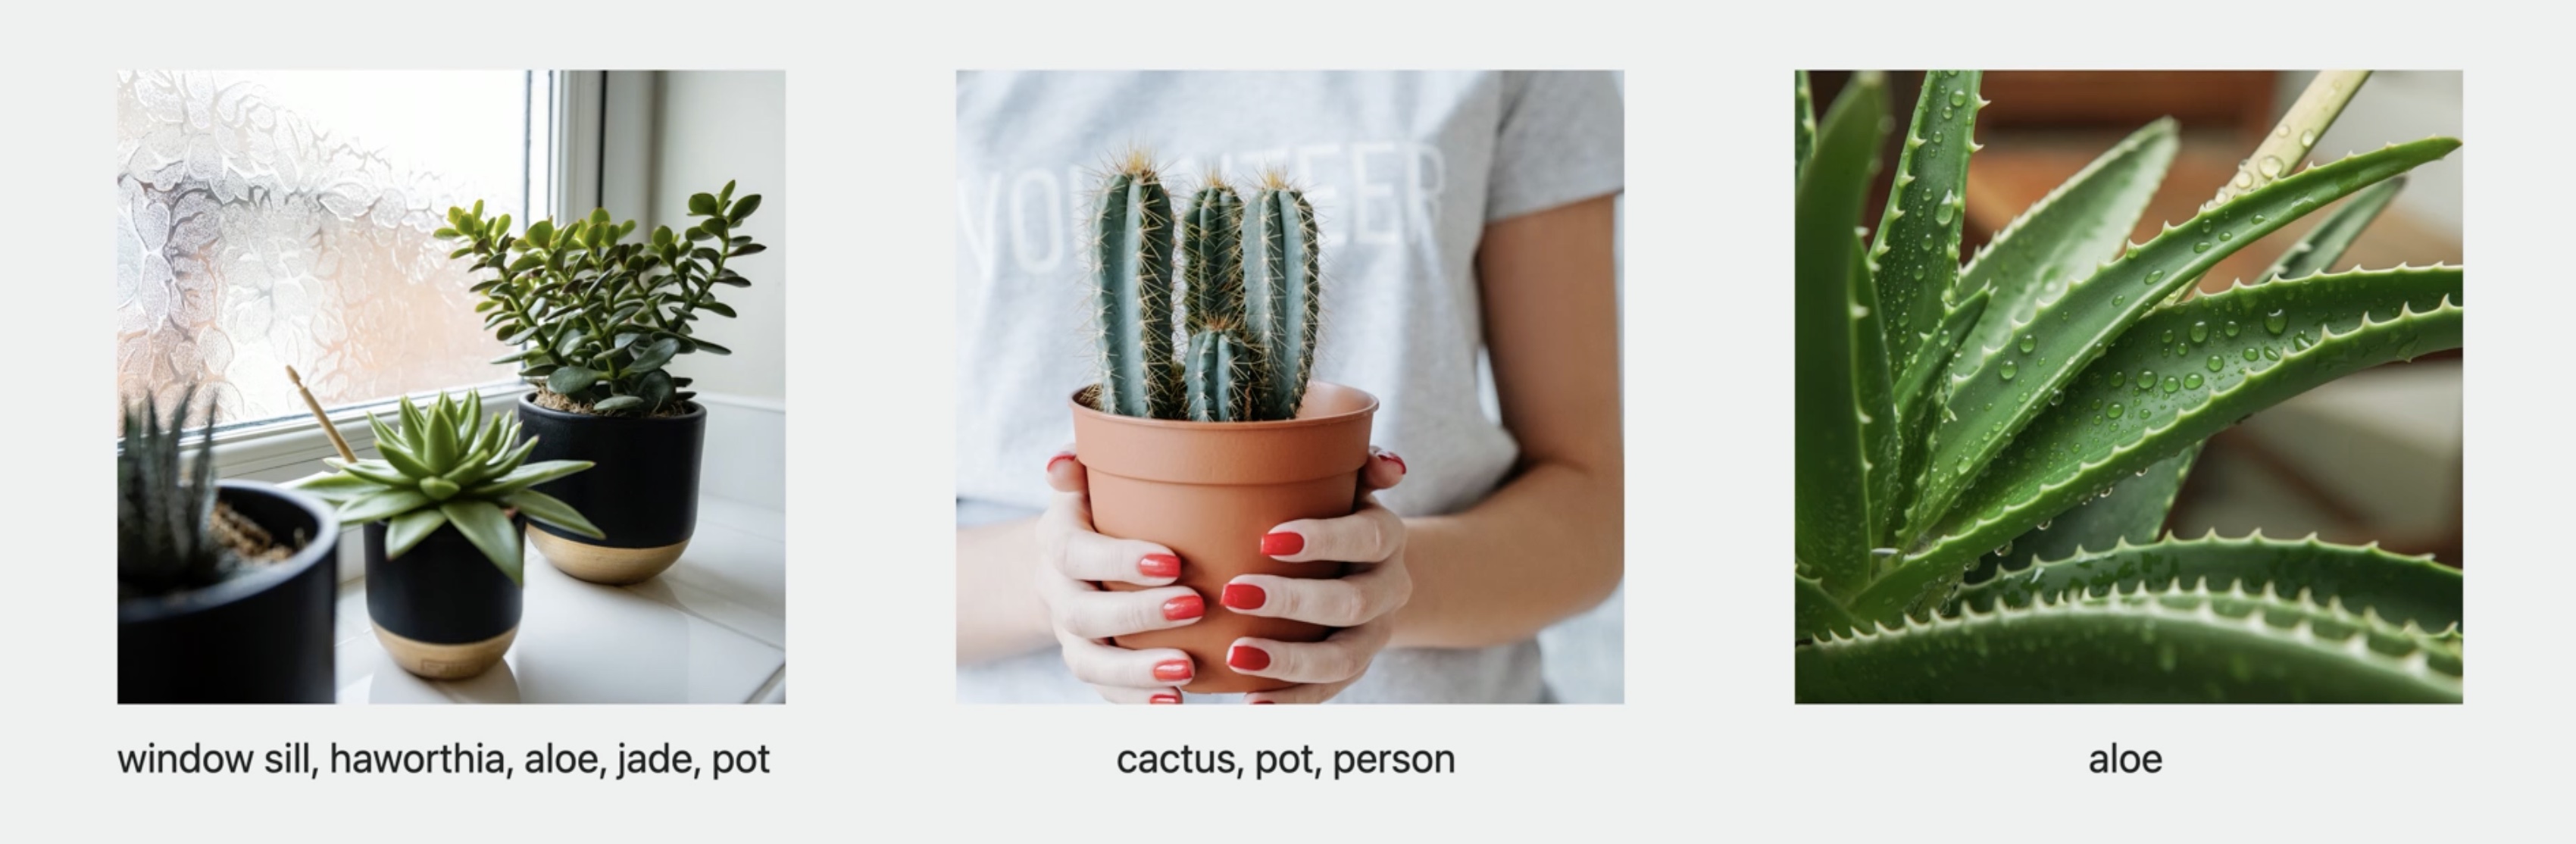
In the next image, I have a person holding a cactus in a pot. While collecting training images, it's also okay to include some images that only have a single label, like a photo of just aloe. You'll need to organize your annotations in a JSON file. All you need to do is annotate each file with a set of annotations.
// Annotation File Format
[
    {
        "image": "imagel.jpg",
        "annotations": ["window sill", "haworthia", "jade", "aloe", "pot"]
    },
    {
        "image": "image2.jpg",
        "annotations": ["cactus", "pot", "person"]
    },
    {
        "image": "image3.jpg",
        "annotations": ["aloe"]
    },
]
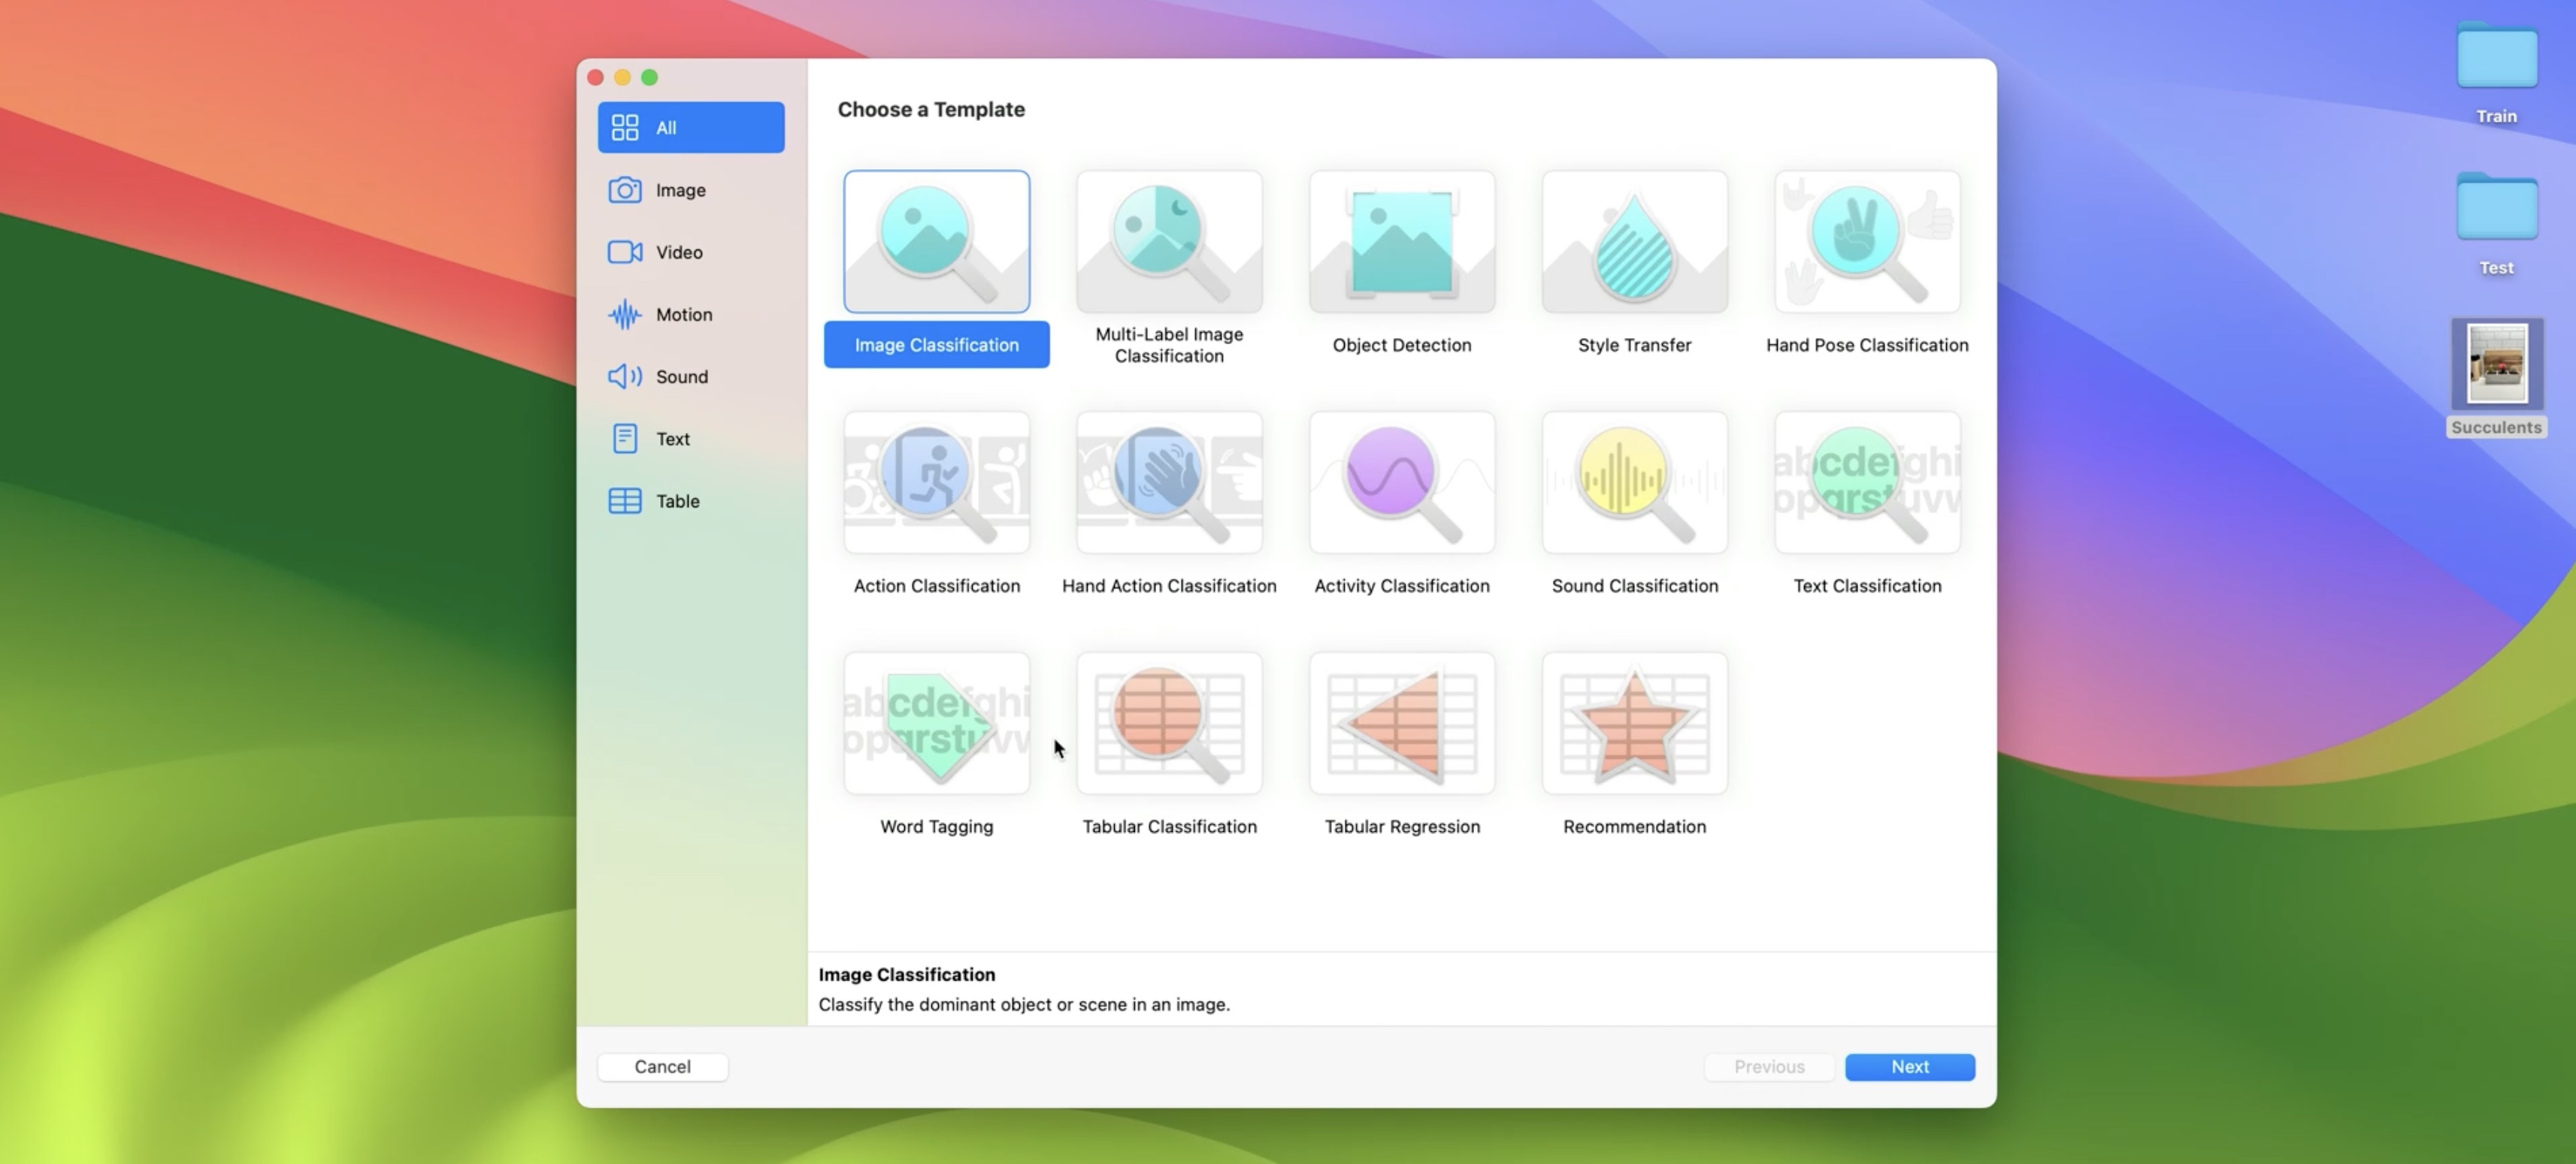
Now, let me give you a demo of building a model in the Create ML app. In the Create ML app, I'll select the new multi-label image classifier template.
And create a project named Succulent Classifier.
This takes me to the Settings tab. To start, I'll drag in my training data, which gives me a summary of the number of classes and training images.
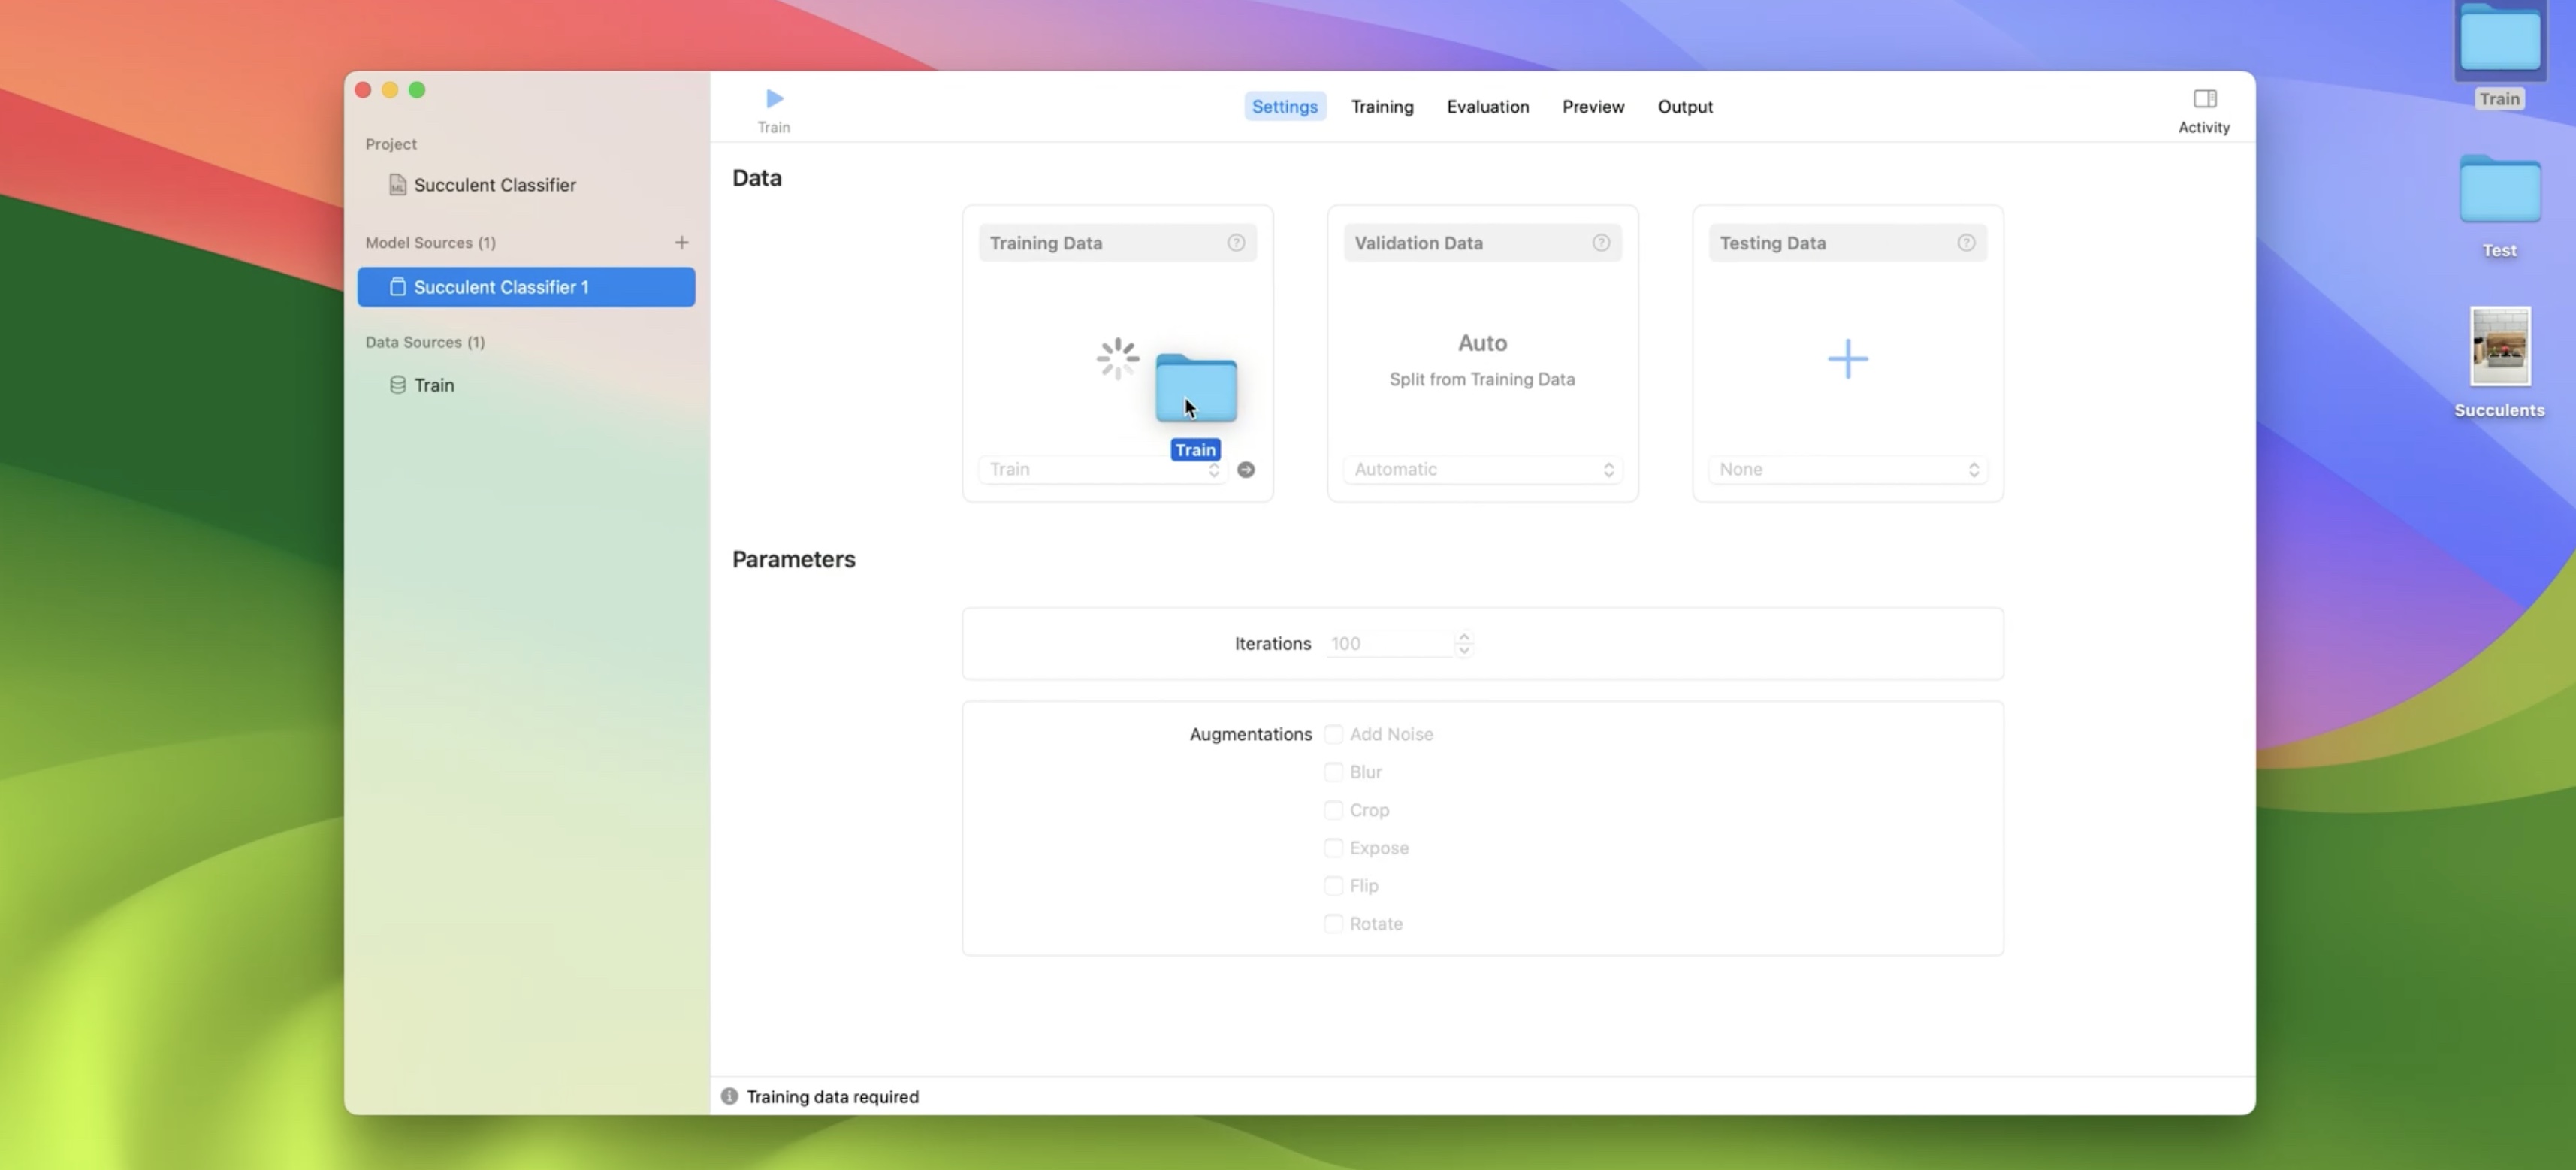
I also have the option to drag in validation data, but I'll choose to randomly split the training data for now. I'll use the default number of iterations and also leave out augmentations. I'm done setting up my model, so I'll go ahead and click Train.

This model takes only a few minutes to train on my Mac. Right away, the model starts extracting features using the new feature extractor that I introduced earlier. Once that's finished, the app starts to train a classifier. During the training process, the app measures the quality of my model by computing a mean-average precision score, or MAP for short. In general, I want to maximize the MAP score because that means my model has both a higher precision and a higher recall on average for all of the labels in my dataset. My model finished training and converged early at 74 iterations, with an MAP score of 97% on the training set and 93% on the validation set. The next step is to evaluate my model on test data.
I'll drag a folder in from my desktop and click the Test button.
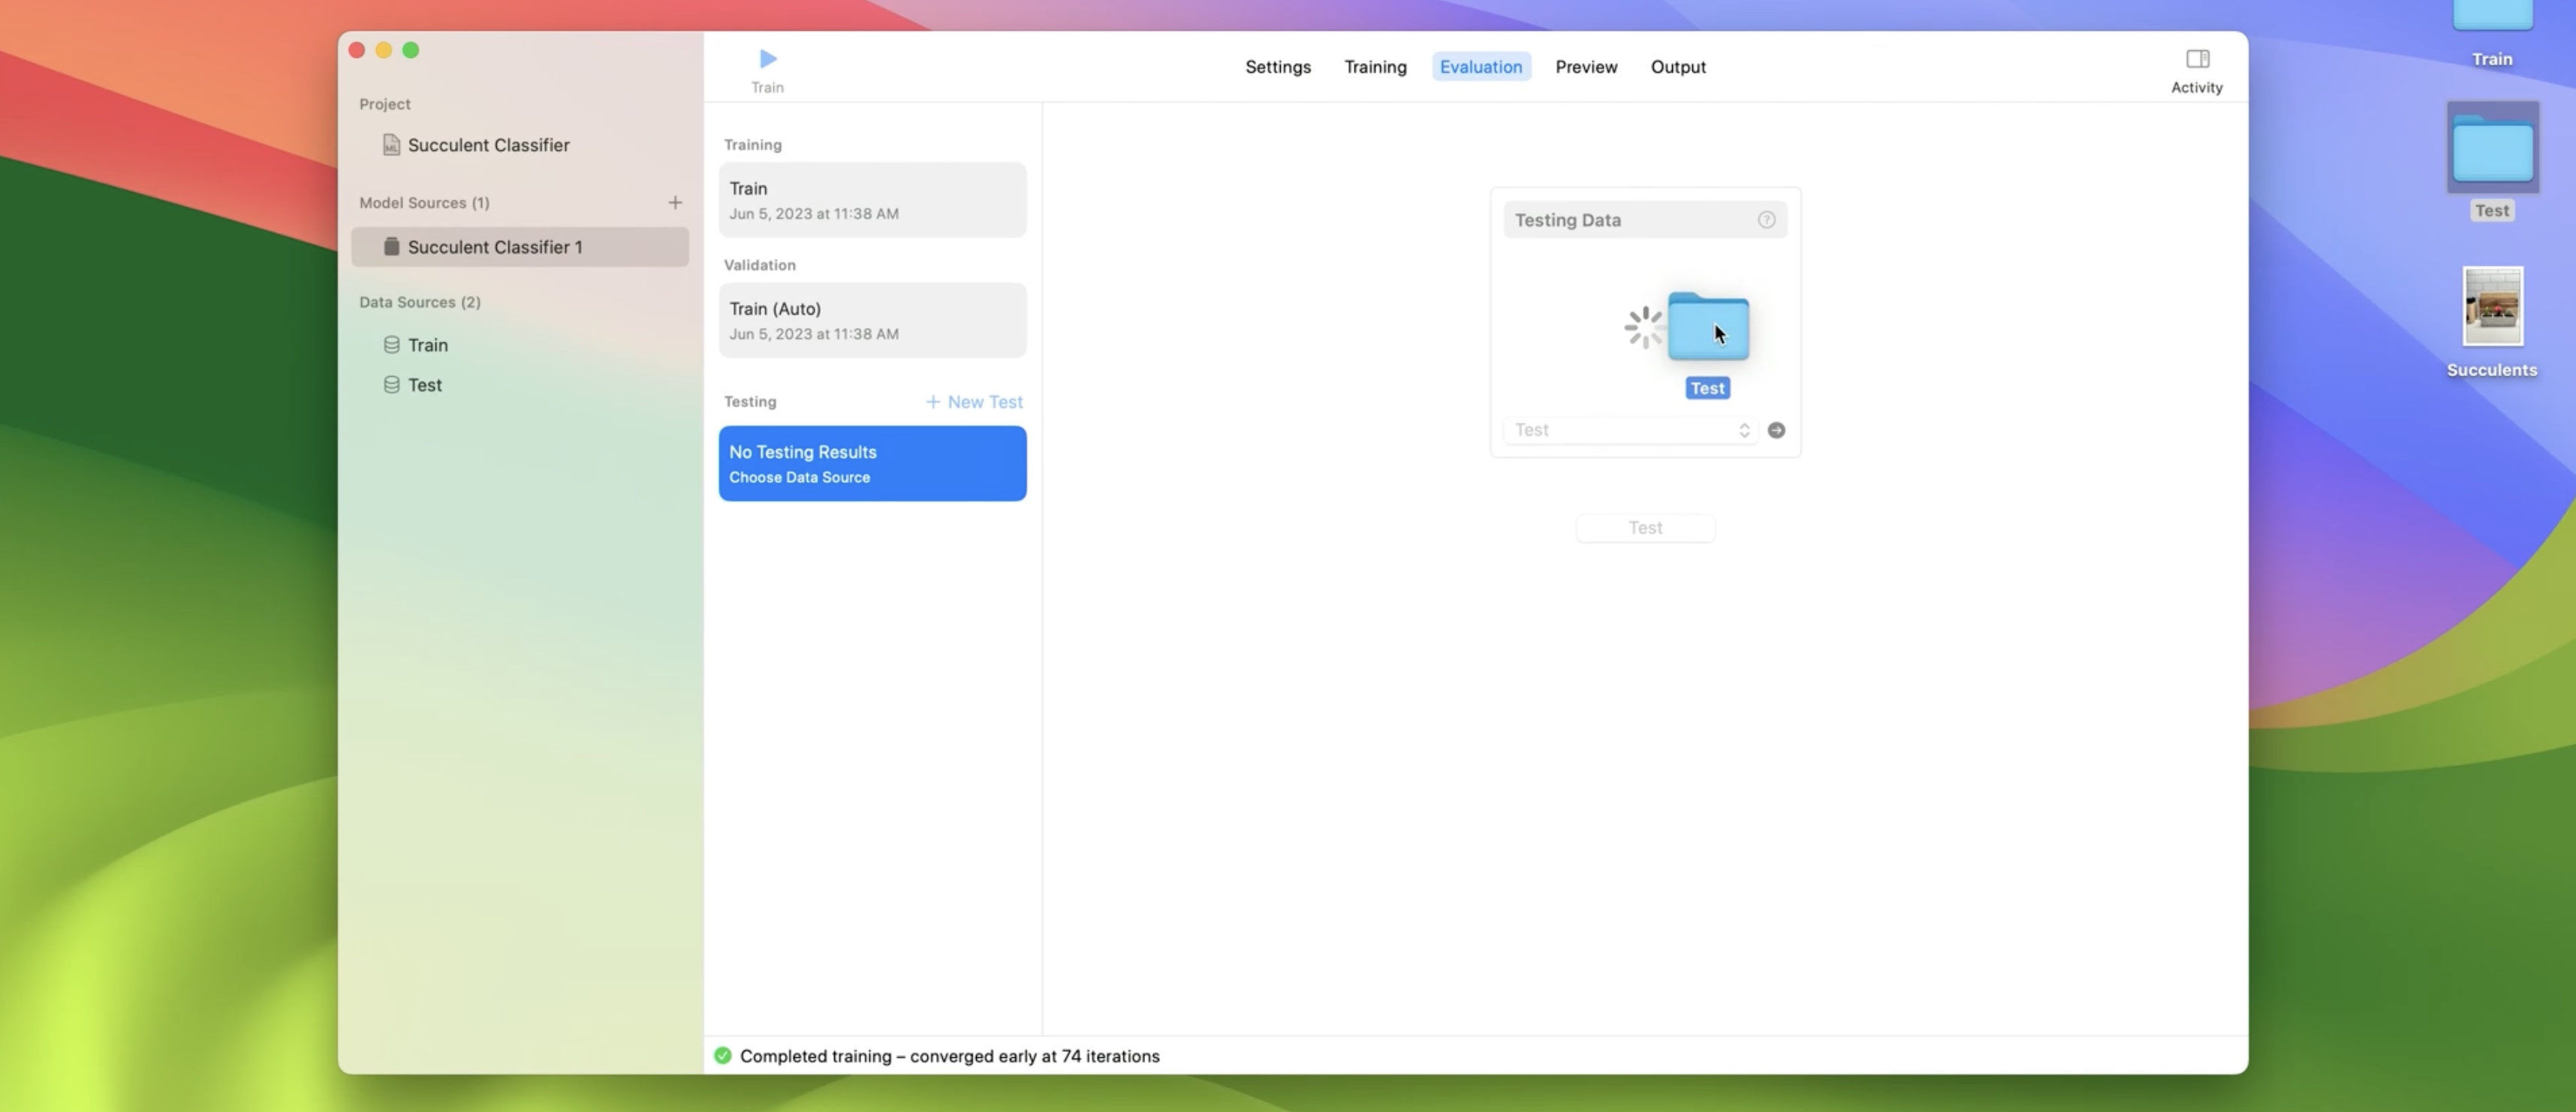
The test data should contain the same set of class labels that I used to train my model.
The app calculated a few high-level statistics, like the MAP Score and which class labels have the highest and lowest precision and recall. Let's focus on the Metrics tab.
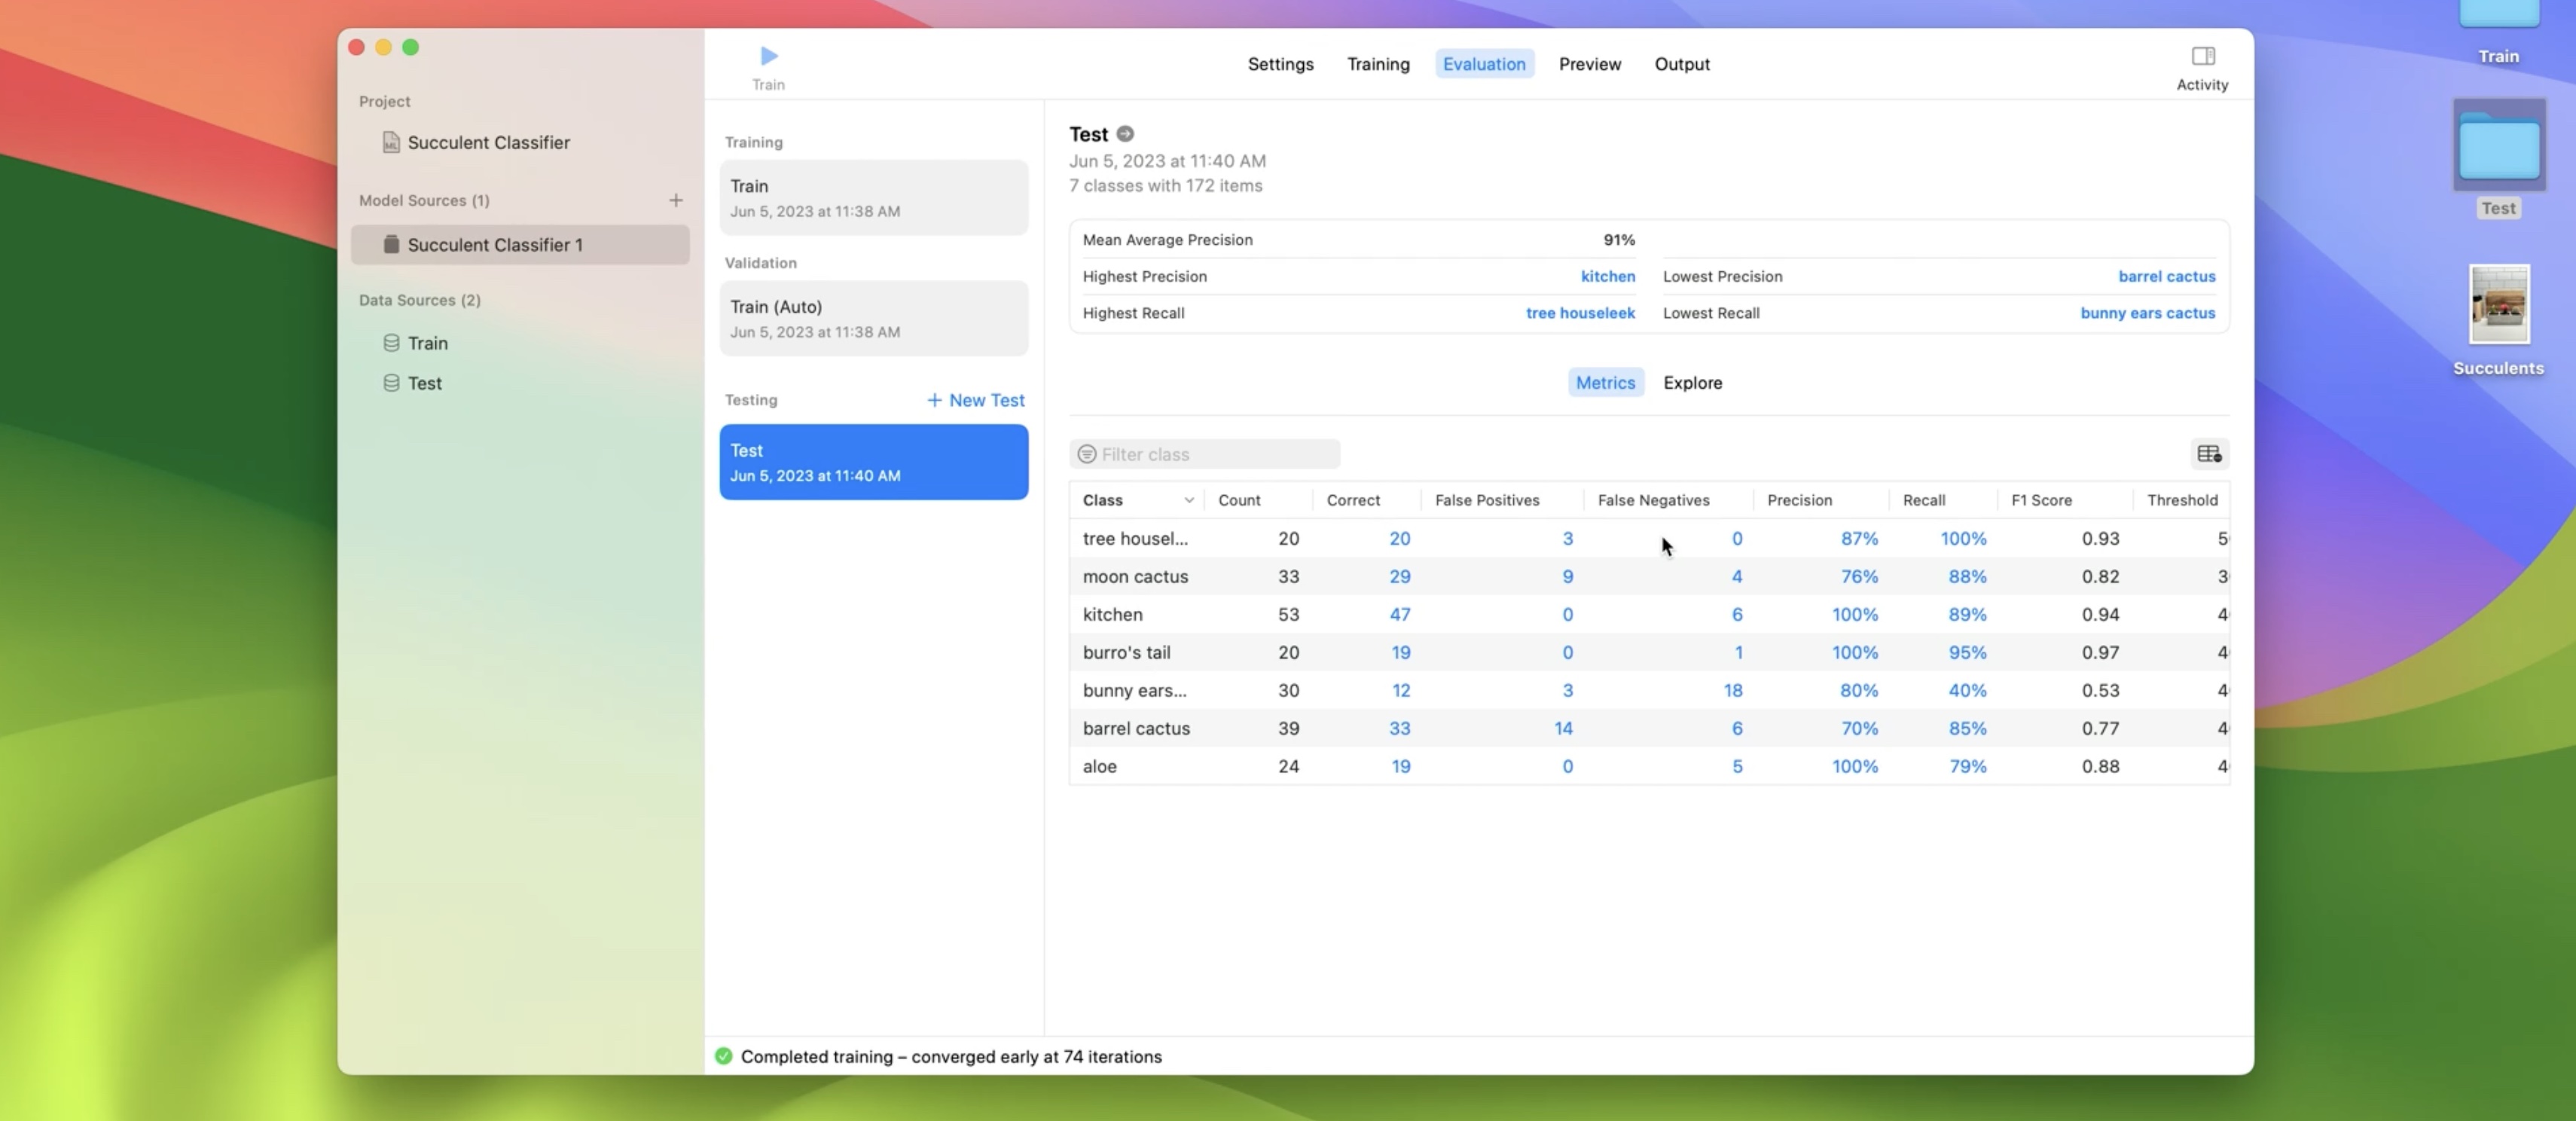
The app calculates metrics for each class label, like False Positives, False Negatives, Precision, Recall, and Confidence Threshold. When making predictions with my model, a prediction is correct if the confidence is above the threshold for a given class label. Let's explore the images that the model predicted above the confidence threshold for aloe. Now I'll click on an example.
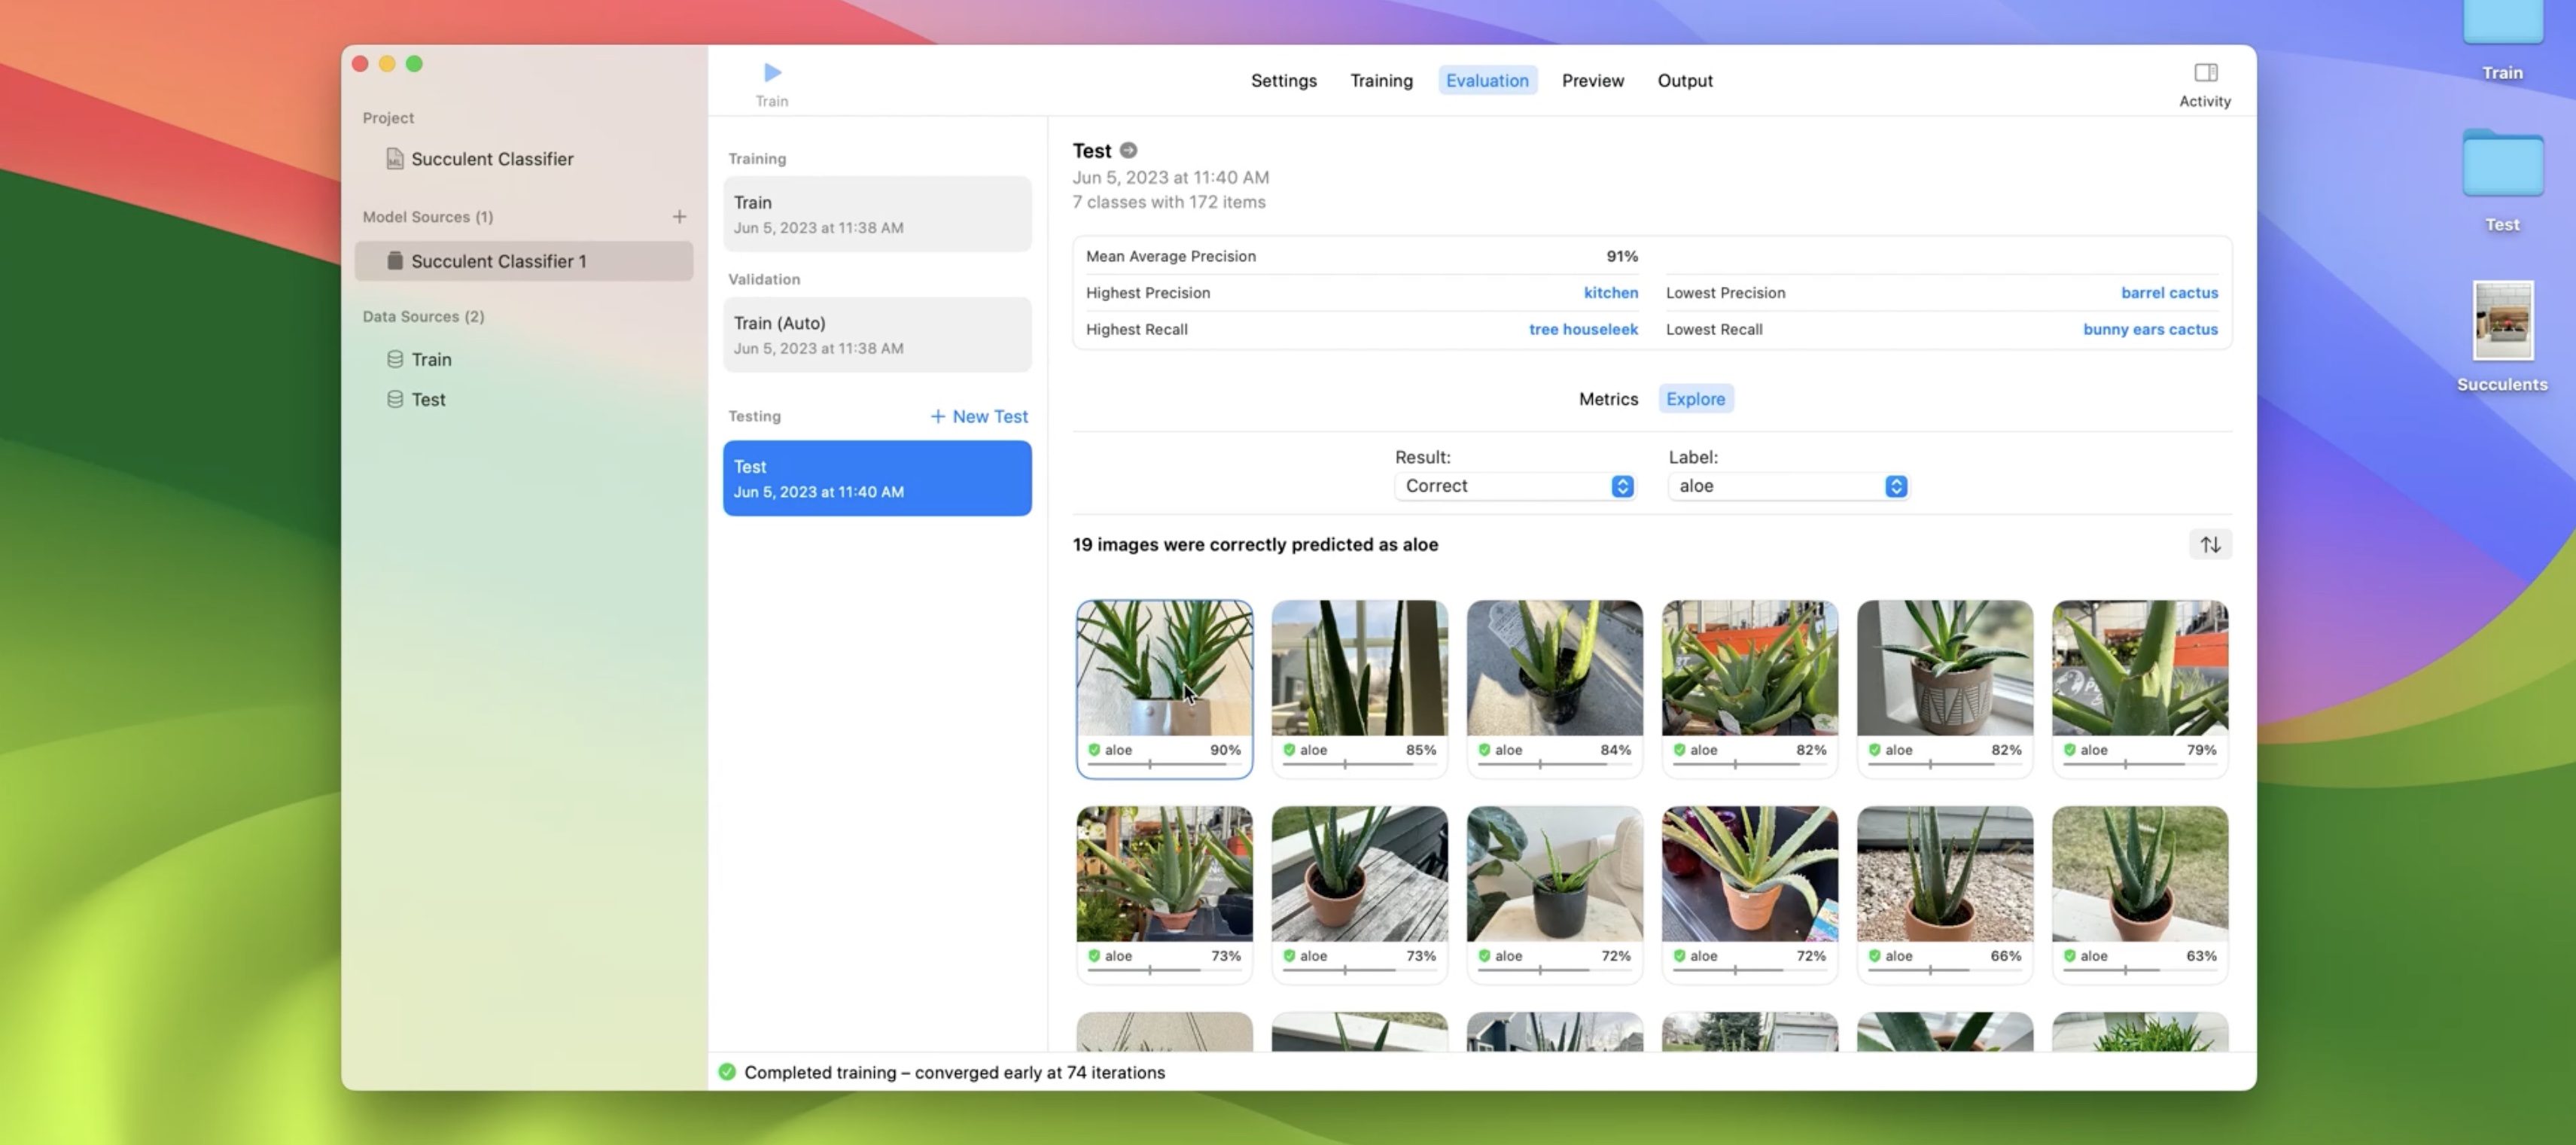
The model predicted that this image contains aloe with a 90% confidence, which is above the aloe confidence threshold of 40%. For other labels, the model predicted a confidence below their respective thresholds. In other words, the model did not predict them. Next, I want to explore images that my model did not predict aloe but are labeled as aloe. I can do that by selecting the False Negatives result type.
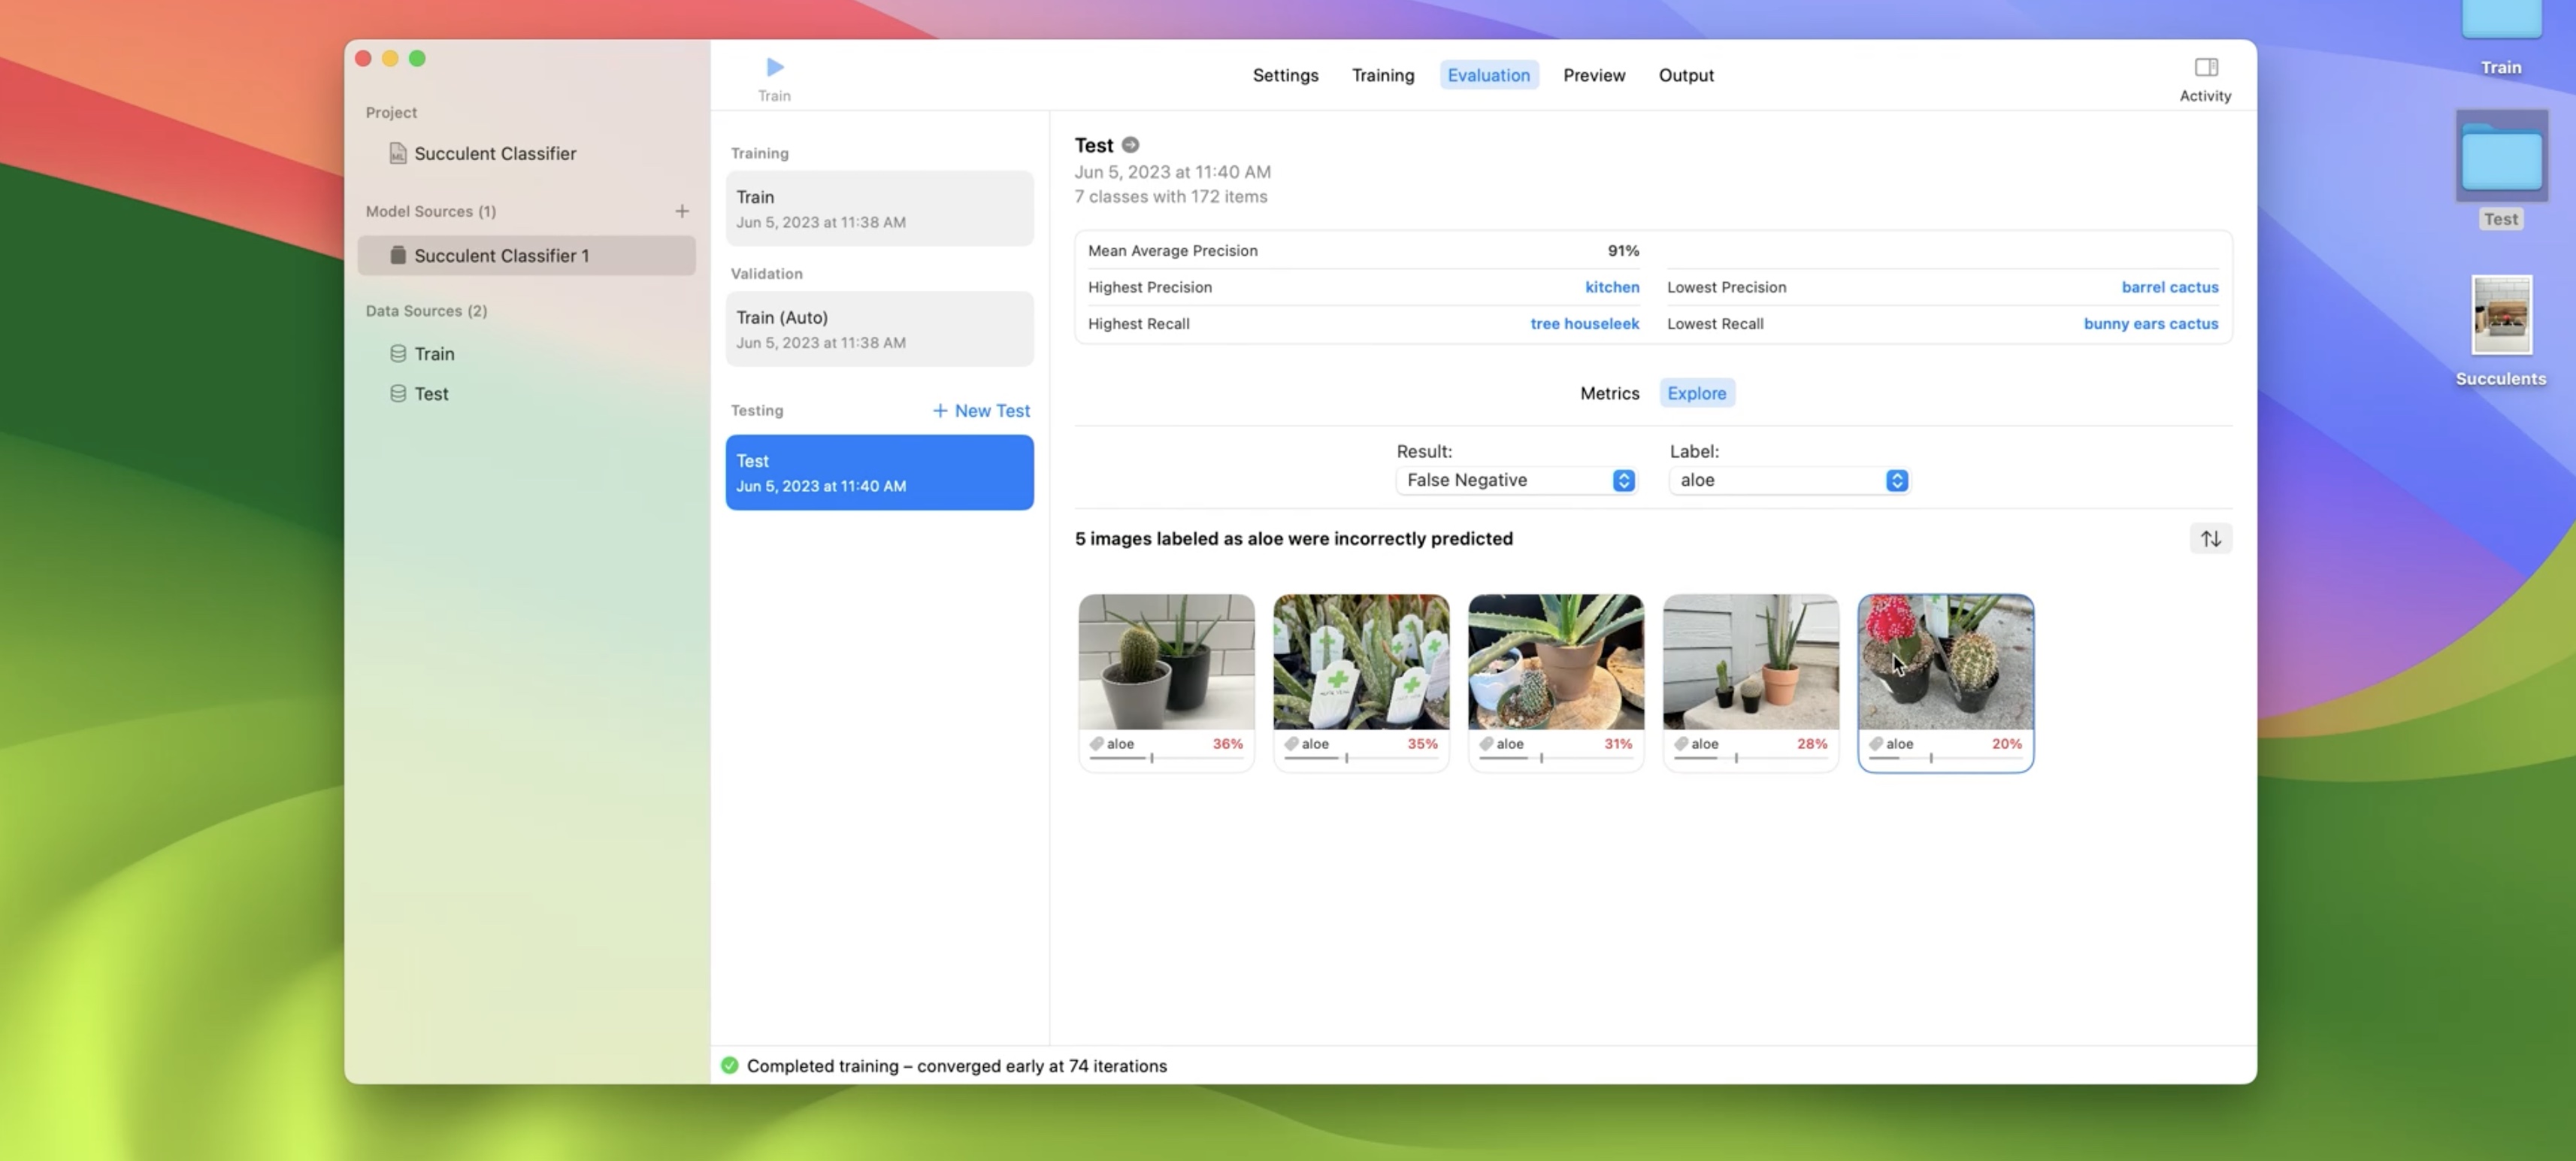
This image is interesting. Let's explore further. Here, the aloe is behind the barrel cactus and the moon cactus, so the model has a hard time predicting aloe. But the good news is that the model predicts two other labels correctly. Next, I'll head over to the Preview tab.
This is where I can preview my model predictions on images that I haven't labeled yet. I have a succulent arrangement that I planted myself that I think would be fun to try out.
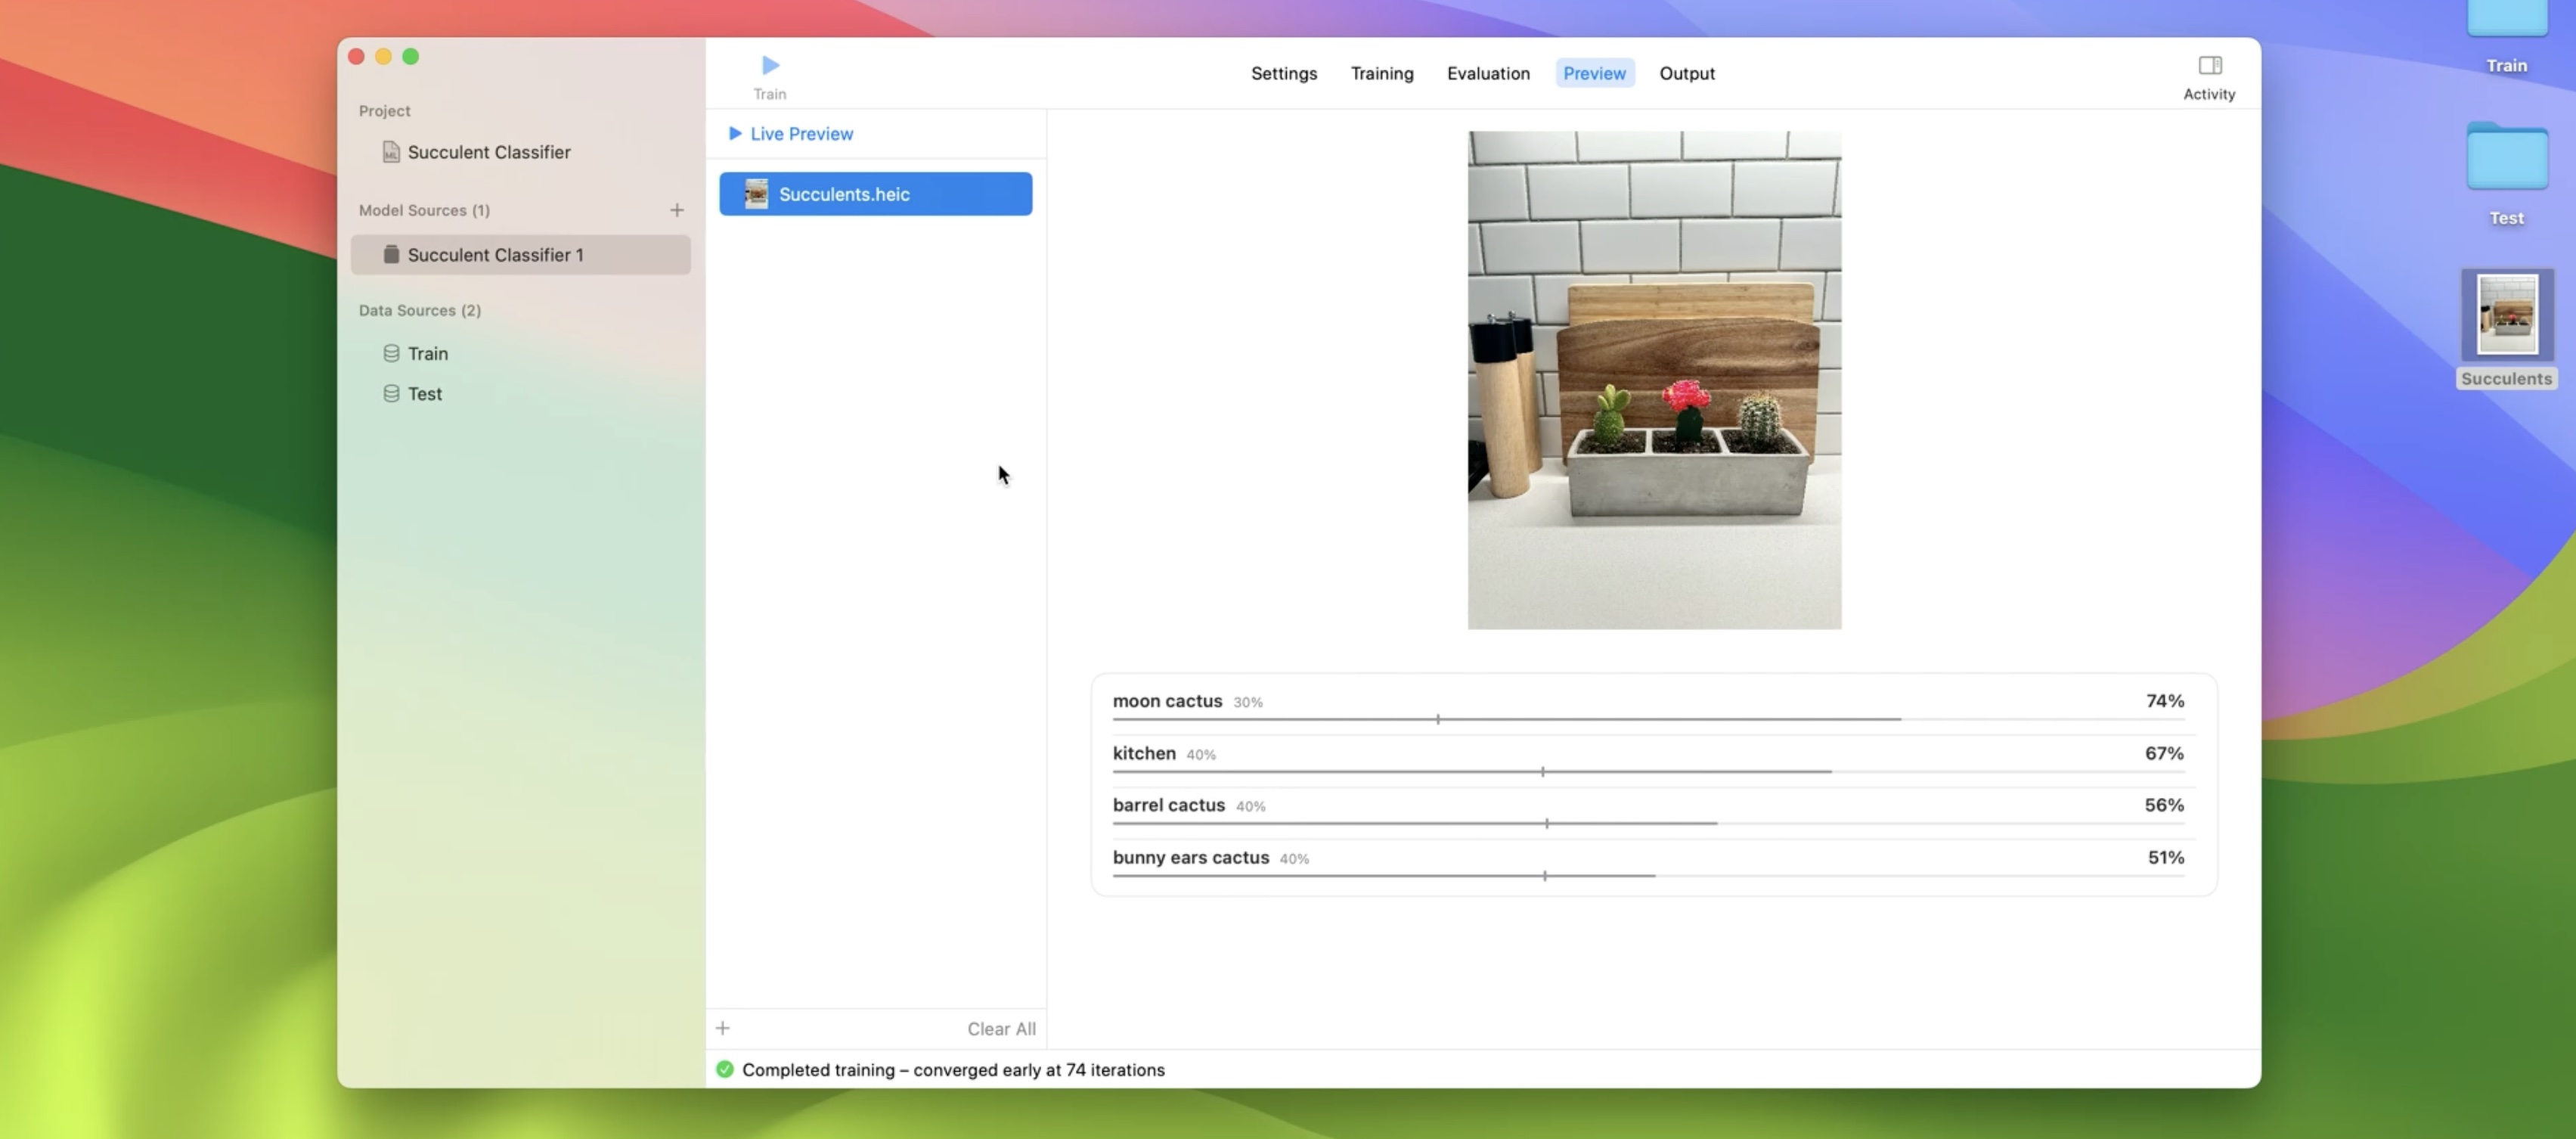
Nailed it. My model correctly predicted my moon cactus, bunny ears cactus, and barrel cactus in my kitchen. I'm pretty happy with the quality of my model, but I'll definitely continue experimenting to understand my model's limitations as well as adding more succulents and scenes to my dataset. For now, let's move on. From the Output tab, I can save the model that I trained to disk.
Let's go through some code that you'll need to write to create predictions.
// Create predictions using Vision and Core ML
import Vision

let visionModel = try VNCoreMLModel(for: compiledModel)

let handler = VNImageRequestHandler(url: URL(filePath: "image.jpg" ))
let request = VNCoreMLRequest (model: visionModel)
try handler.perform([request])

let observations = request.results as? [VNClassificationObservation]
let filteredObservations = observations?.filter {
    $0.hasMinimumPrecision(myPrecision, forRecall: myRecall)
}
The first step is to create a Vision model from the compiled Core ML model. Then using the vision framework, I'll create an image request handler with a source image and then perform a request.
Lastly, I can retrieve the classification observations and filter them using a precision and recall value that I'm interested in. To find out more about how to choose a precision and recall value that work for your use case, make sure to watch:
Understanding Images in Vision Framework - WWDC19
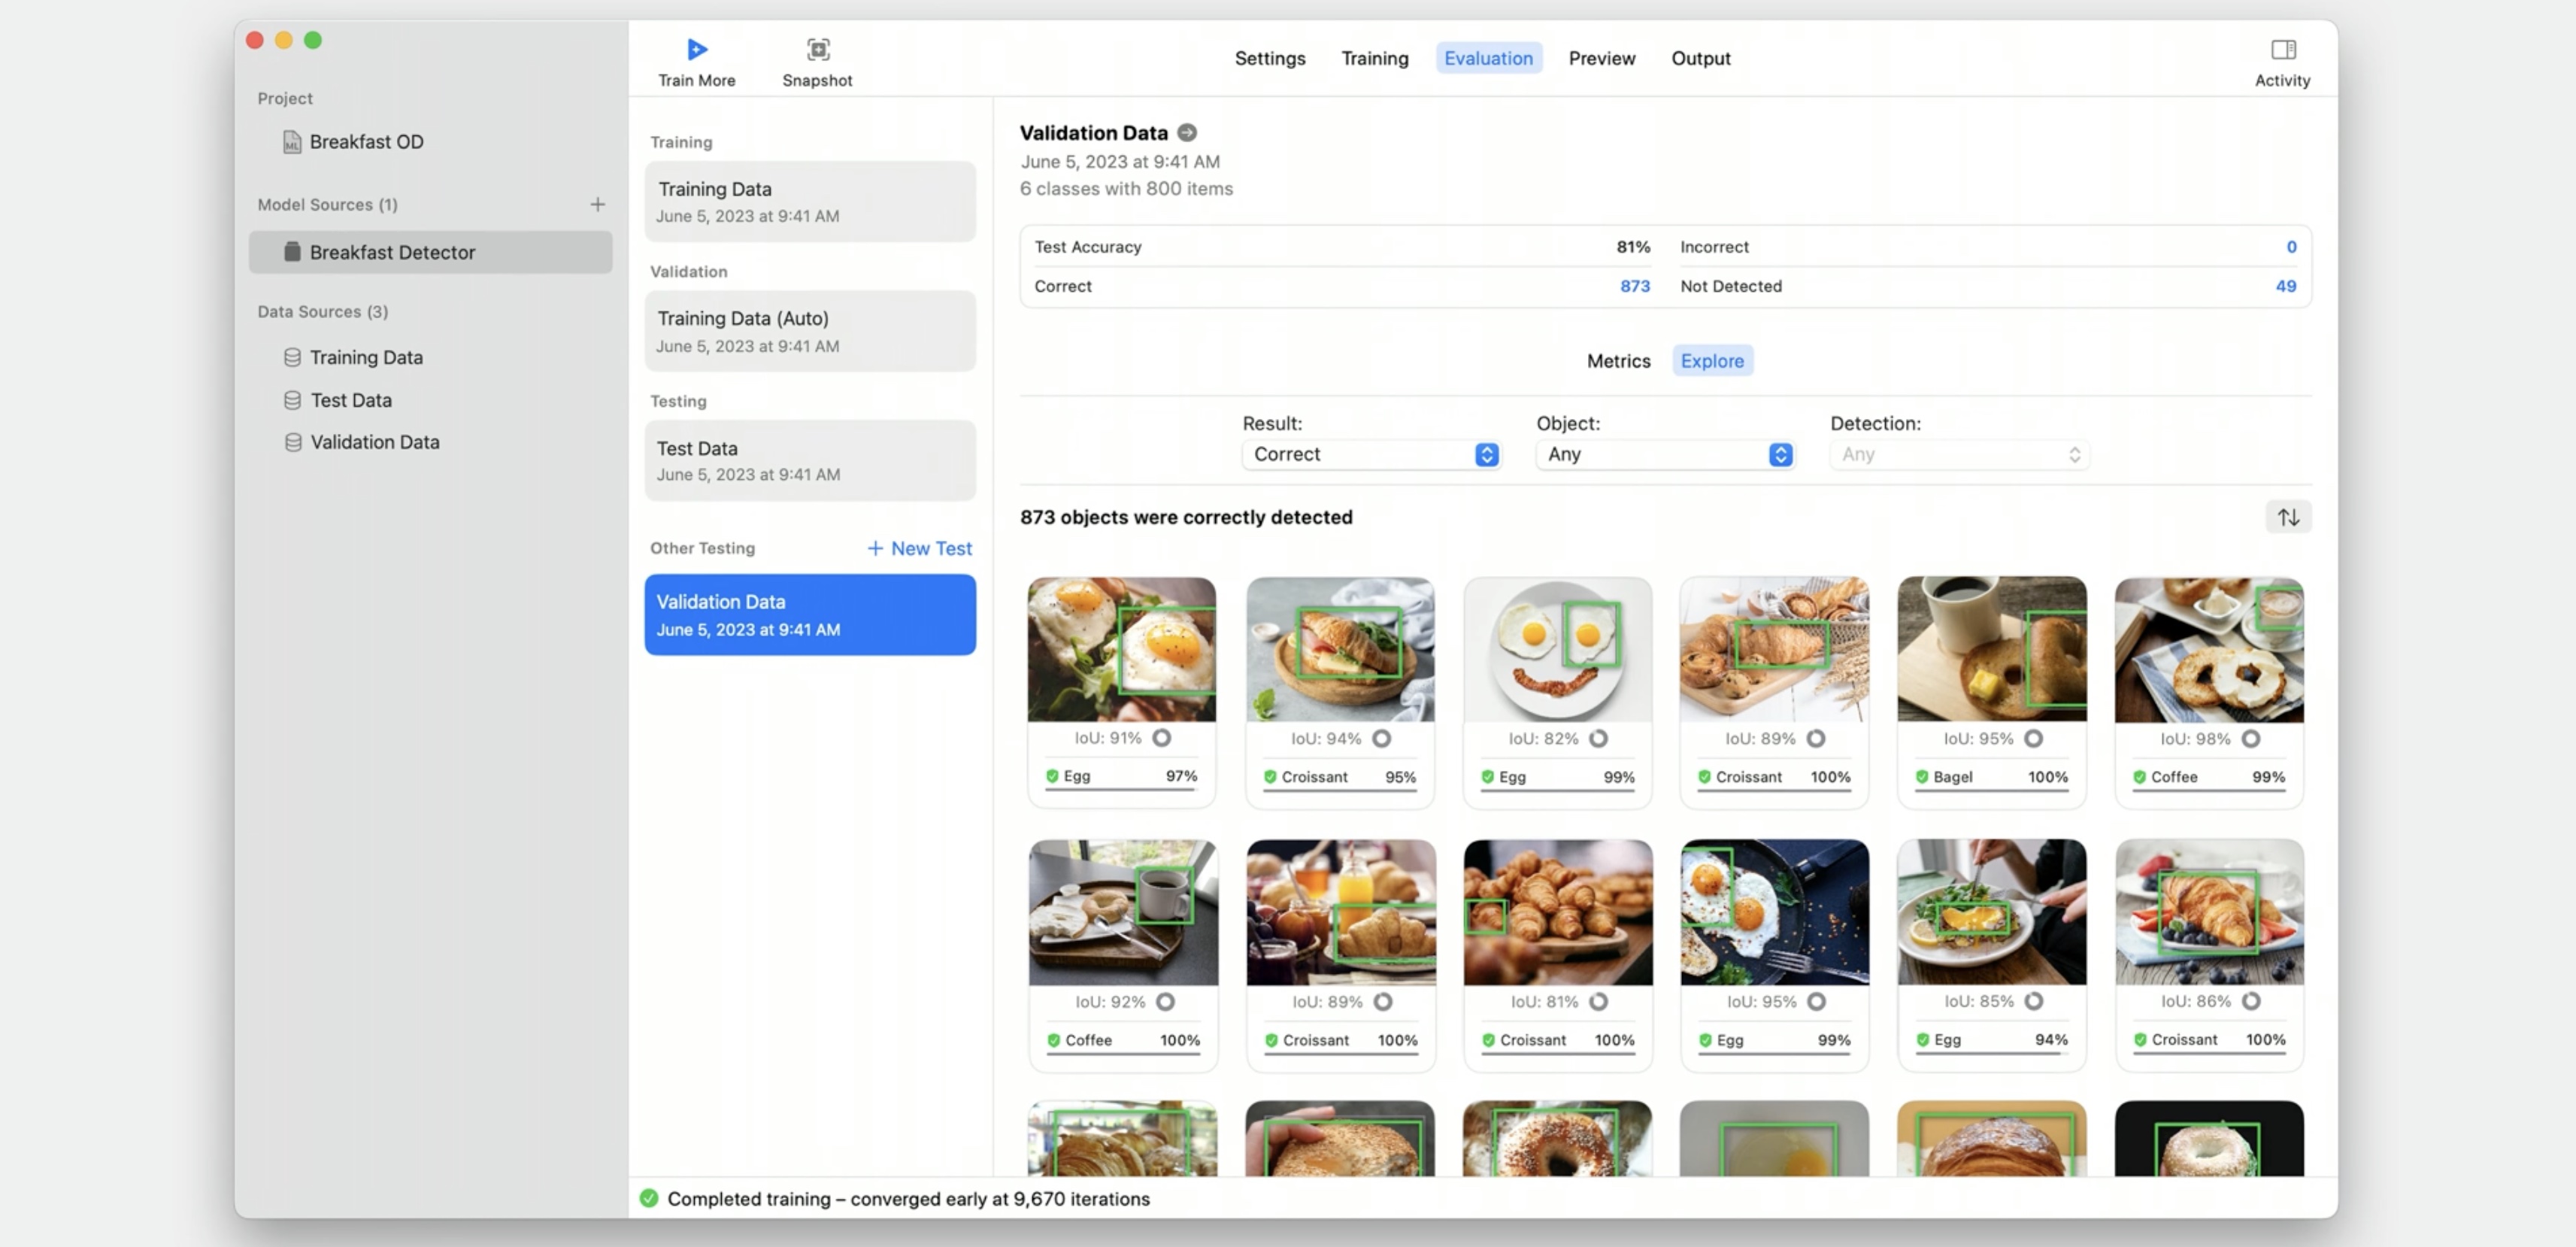
Before I move on, I want to take a moment and mention that, similar to our image classifier and multi-label image classifier, we've enhanced the evaluation tab with an explore option for object detection.
Data Augmentation
To get a model that generalizes well, the images in your training set should have a variety of characteristics like different lighting conditions, orientations, and backgrounds. But capturing and labeling training images in different situations can be time-consuming. Data augmentation is a technique that generates new training examples from your existing ones by applying transformations.
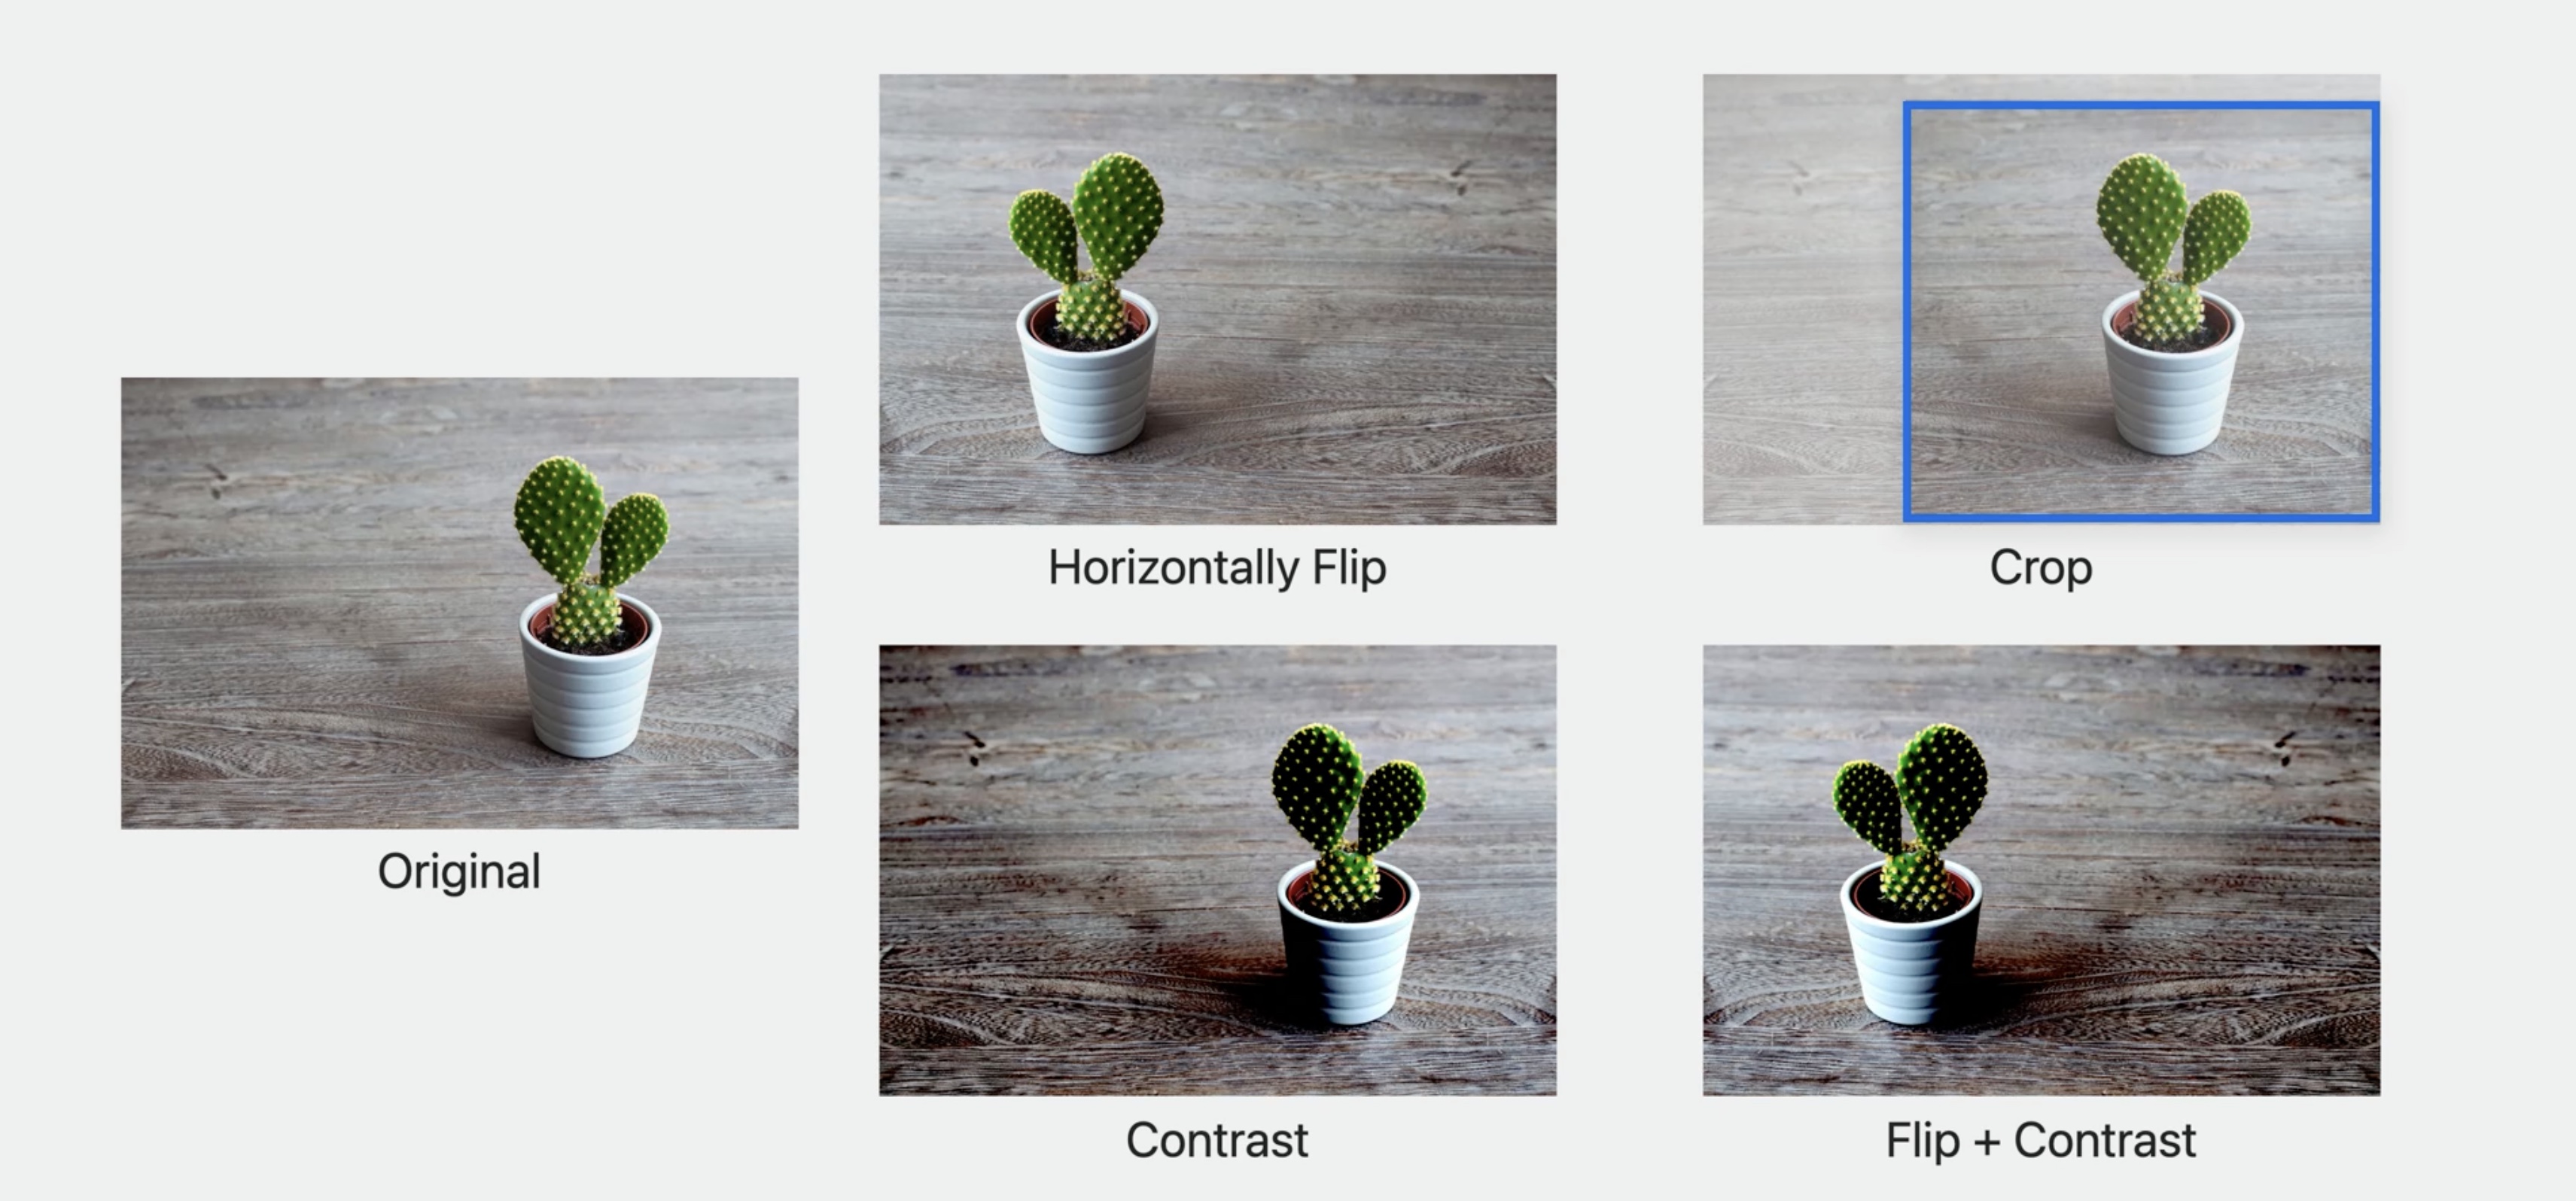
In the case of images, the transformations can be horizontal or vertical flipping, cropping, or contrast, just to name a few. In this example, I start with an image of a succulent and generate four variations. And transformations can be combined, like flipping and increasing the contrast. Augmentations can boost the quality of your model, especially when you have a small training data set. You can use them to improve your model's generalization because it prevents your model from learning attributes like the exact location of an object in a scene. However, it's important to consider that training is usually slower because feature extraction happens at each training iteration.
If you haven't already, make sure to watch:
Get to know Create ML Components - WWDC22
and Compose advanced models with Create ML Components - WWDC22
We designed the framework to help you build custom machine learning models using components like transformers and estimators. This year, we added new Augmentation APIs that you can use to design your own custom augmentation pipelines.
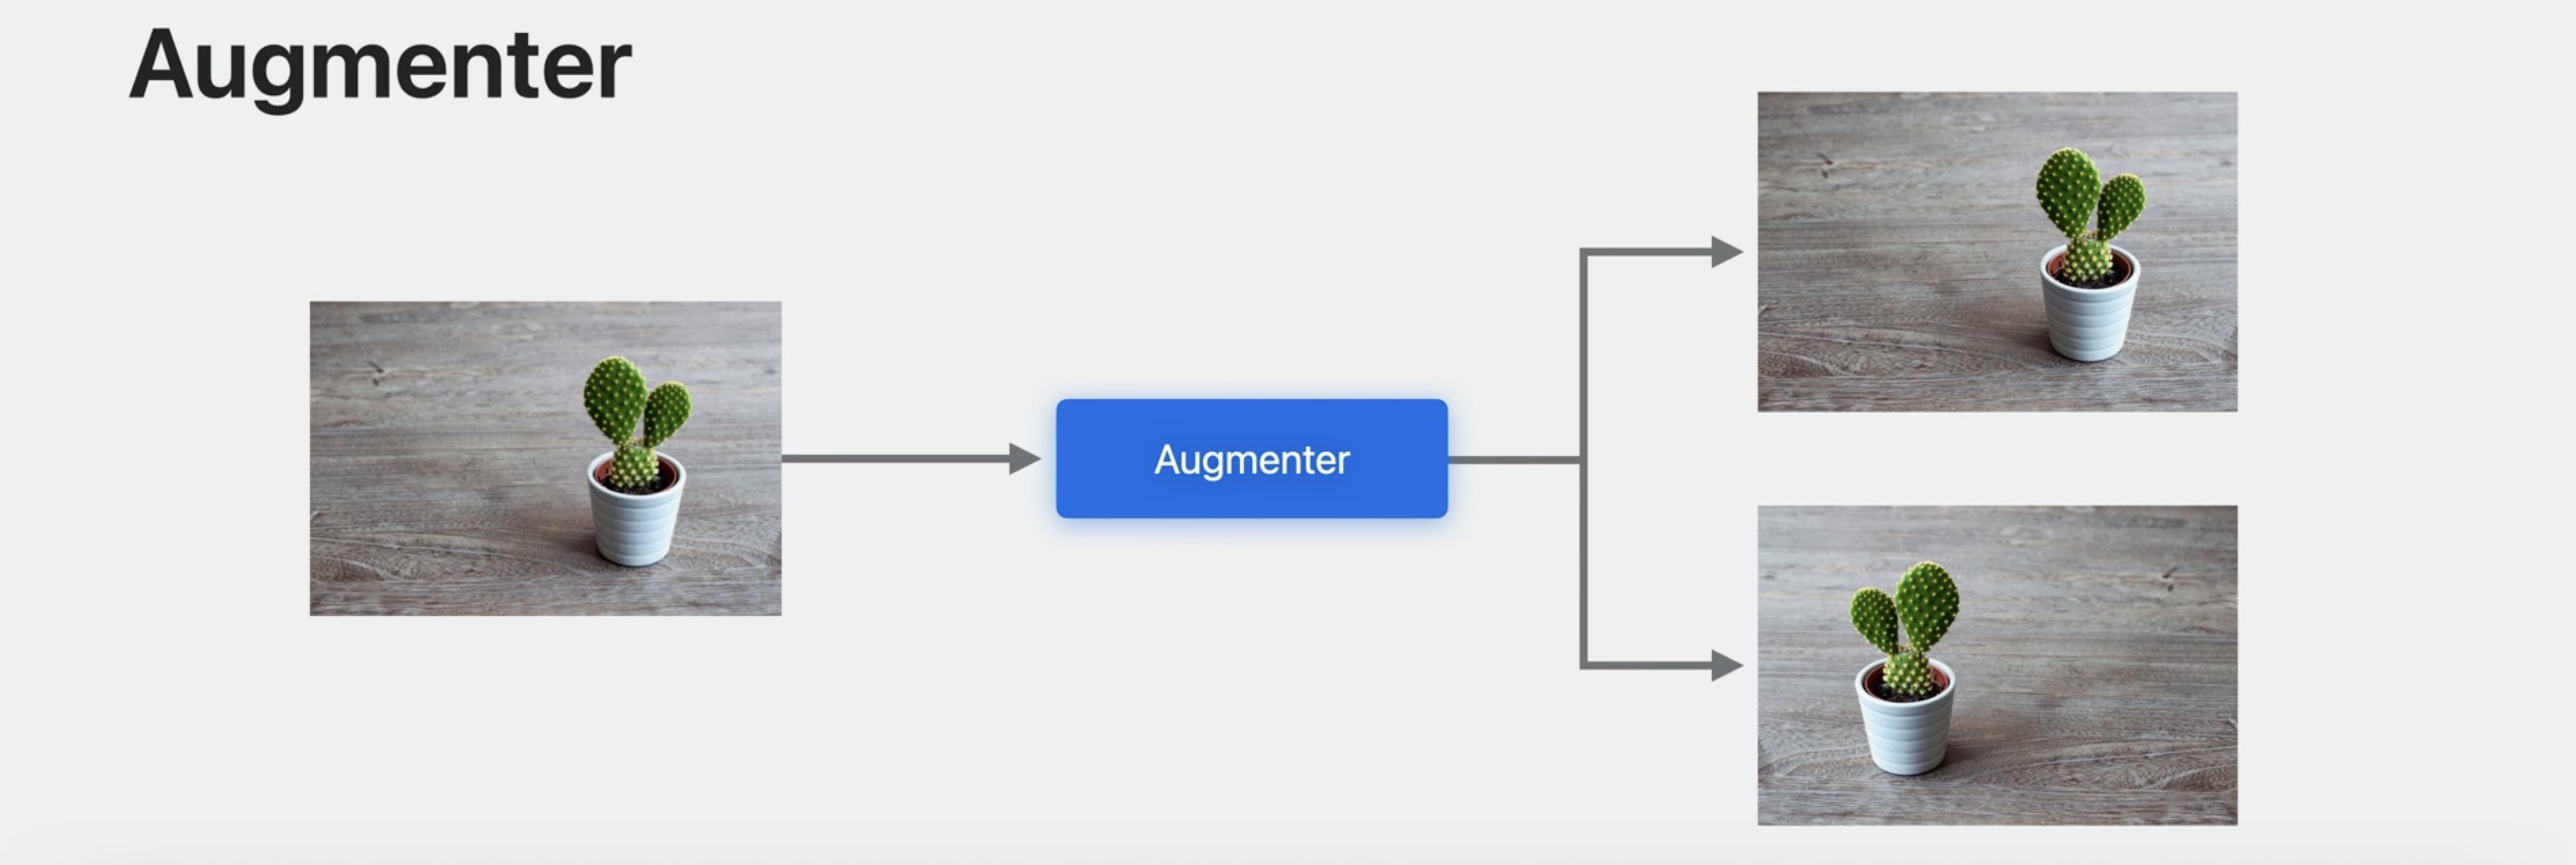
If you have experience with SwiftUI, this may be familiar to you. The first step is to create an augmenter. Similar to SwiftUI, the augmenter uses result builders.
let augmenter = Augmenter {
    ApplyRandomly (probability: 0.5) {
        ImageFlipper(orientation: horizontal)
        }
    }
    let augmentedImages = augmenter.applied(to: images)
}
In the body of the augmenter, you can add transformations to augment your data. Since the augmenter is generic, your data can be labeled images, labeled sounds, or even something else. The important part is that the input and output types of each transformation need to match. For example, taking an image and producing an image. I want to augment my images by flipping them horizontally with a 50% probability. I'll start by adding ApplyRandomly to the Augmenter. This applies a transformation with a given probability. Then I'll add a horizontal flipping transformer to its body.
Okay, now that I have my augmenter, I can use it to create augmentations by calling the applied method. When you design augmentations, it's important to carefully consider the nature of your data.
It's unlikely that you'll encounter an upside down succulent. So it doesn't make sense to apply a vertical flip augmentation in this case. Or imagine for a moment that you wanted to classify traffic signs instead. When you apply a flip augmentation, the label may no longer correctly describe your image. So remember to consider the nature of your data before designing a custom augmentation. All right, the next step is to add more transformations to the augmenter.
This time, I'll randomly rotate my images using the UniformRandomFloatingPointParameter. This generates a random angle each time that I apply the augmentation. And lastly, I'll randomly crop the images.
// Augmenter with multiple transformations
let augmenter = Augmenter {
    ApplyRandomly(probability: 0.5) {
        ImageFlipper(orientation: •horizontal)
    }
    UniformandomFloatingPointParameter(range: -0.5 ... 0.5) { angle in
        ImageRotator(angle: angle)
    }
    RandomImageCropper(scale: 0.8 ... 1.0, aspectRatio: 1.0)
}

let augmentedImages = augmenter.applied(to: images)
Note that each transformation in the augmenter is applied in sequence. So first, my image is randomly flipped. The result is randomly rotated and then randomly cropped. I've only scratched the surface of what you can do with the Augmenter. Here are some of the components that we provide to get you started. But what if you want to go even further? Let's go through an example of how you can build custom transformations and use them to augment your images.
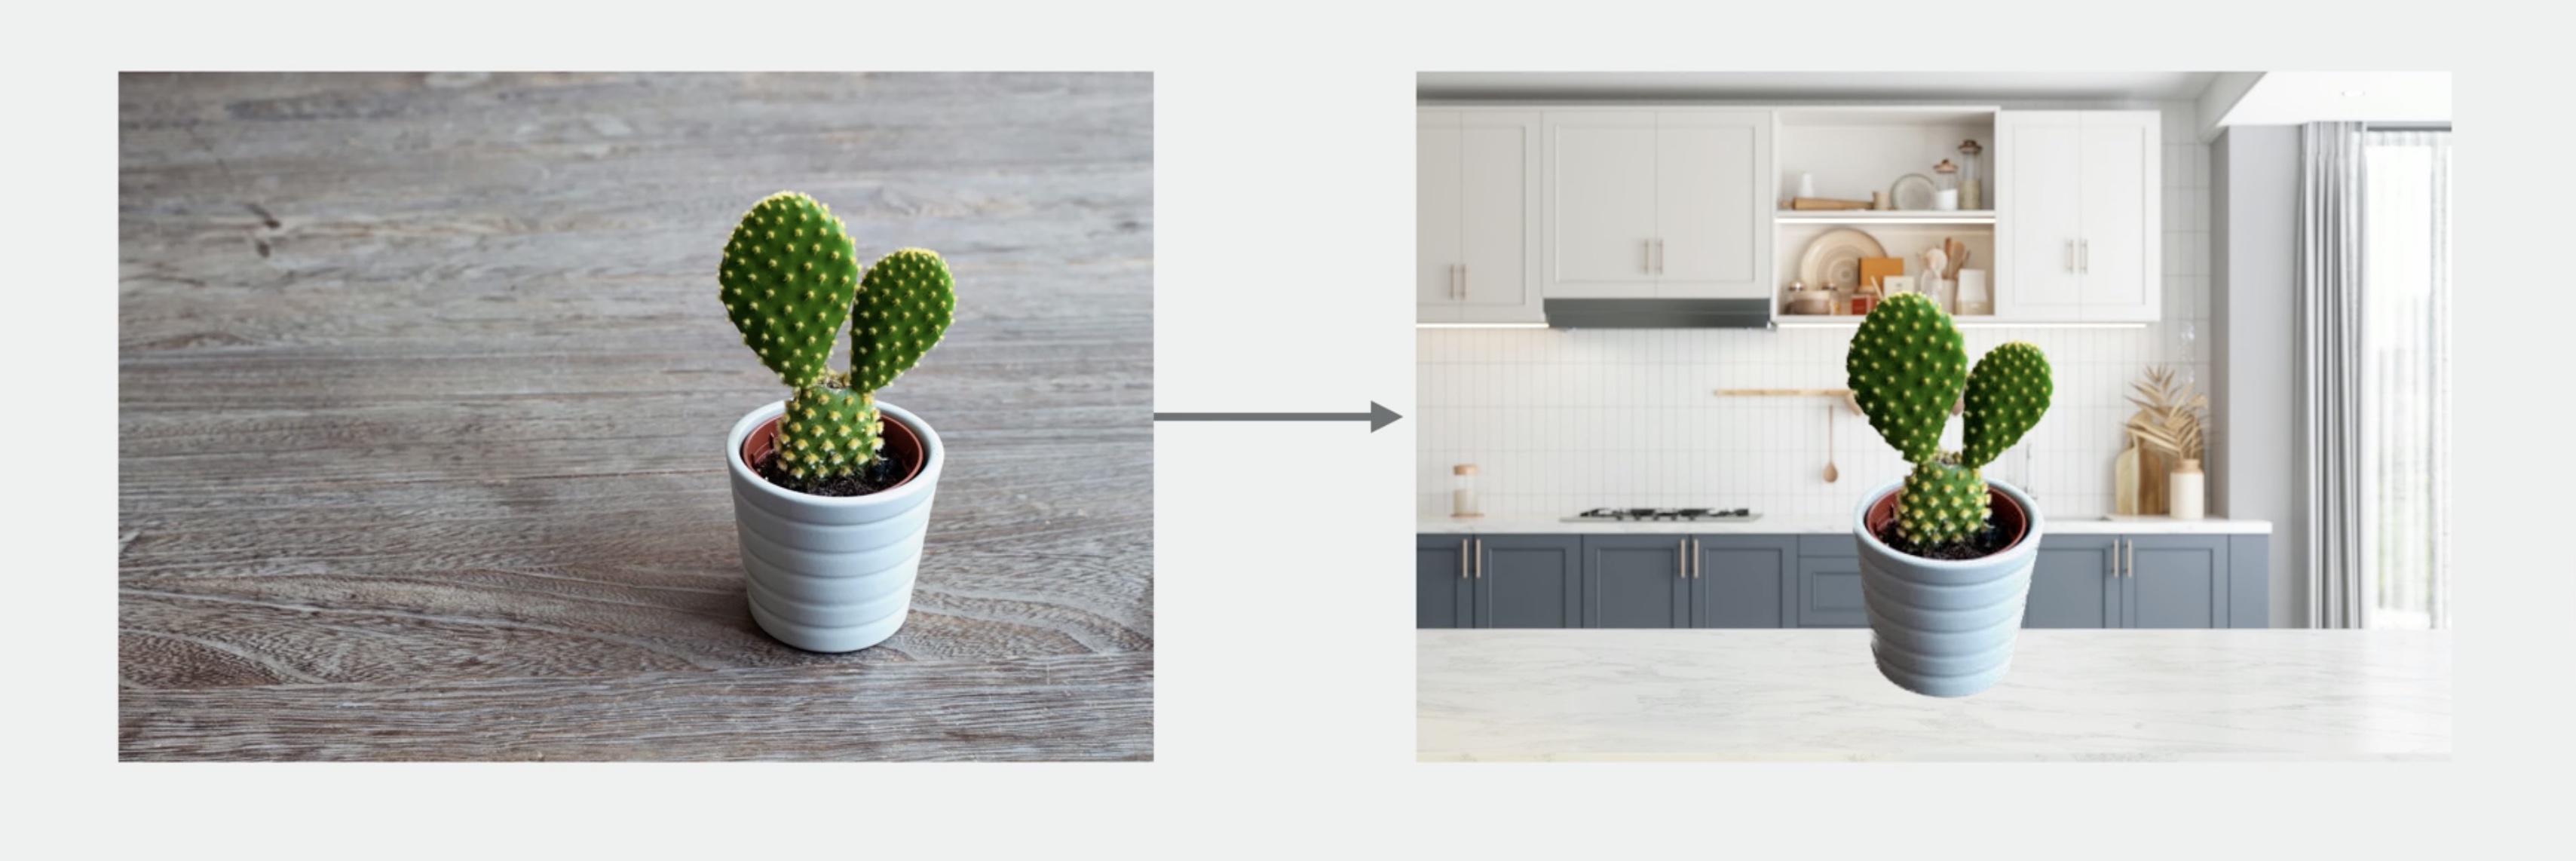
Build a custom background augmentation
In order to build a robust classifier, it's important to capture your training images in different scenes and environments. In this example, I'll create a custom augmentation that places a succulent in a random location in a random scene.
I'll start by defining a RandomImageBackground. It conforms to a new protocol, RandomTransformer, which is similar to a transformer but takes a random number generator.
Since I want my augmentations to place succulents randomly with different background scenes, I'll create an initializer that takes background images. To conform to the RandomTransformer protocol, I'll need to implement the applied method.
struct RandomImageBackground: RandomTransformer {
    var backgrounds: [CIImage]

    init(backgrounds: [CIImage]) {
        self.backgrounds = backgrounds
    }

    func applied(
        to input: CIImage,
        generator: inout some RandomNumberGenerator,
        eventHandler: EventHandler? = nil
    ) async throws -> CIImage {
        // ...
    }
}
When applying my augmentation, the first step is to randomly select a background. Then, I'll choose a random location in the background image where I'd like to place my input image, taking care not to crop it. Next, I'll translate my input image to the random location. And finally, I'll place the input image over the randomly selected background.
// Implement the applied method

let background = backgrounds.randomElement(using: &generator)!

let x = CGFloat.random(
    in: 0..<background.extent.width - input.extent.width,
    using: &generator
)

let y = CGFloat.random(
in: 0..<background.extent.height - input.extent.height,
using: &generator
)
let randomlyTranslatedInput = input.transformed(by: CGAffineTransform(translationX: x, y: y))
return randomlyTranslatedInput.composited(over: background)
I'll add my new custom augmentation to the end so that the flipping, rotating, and cropping happen before I place the succulent in different backgrounds. And this is my final augmenter.
// Build a custom augmenter
let augmenter = Augmenter {
    ApplyRandomly(probability: 0.5) {
        ImageFlipper(orientation: .horizontal)
    }

    UniformRandomFloatingPointParameter(range: -0.5 ... 0.5) { angle in
        ImageRotator(angle: angle)
    }

    RandomImageCropper (scale: 0.8 ... 1.0, aspectRatio: 1.0)

    RandomImageBackground(backgrounds: backgroundImages)
}
Using my augmenter, I can generate some really interesting images for training a classifier. That's the next step.
Training with augmentations
When using augmentations it makes more sense to train progressively using the update method.
With that in mind, let's go through an example of training using augmentations. And I won't hold back: I'll also incorporate batching, randomization, and early stopping. I'll start by creating an empty image classifier model. Then I'll create a training loop.
// Training with augmentation
var model = imageClassifier.makeTransformer()
for iteration in 0 ..< 100 {
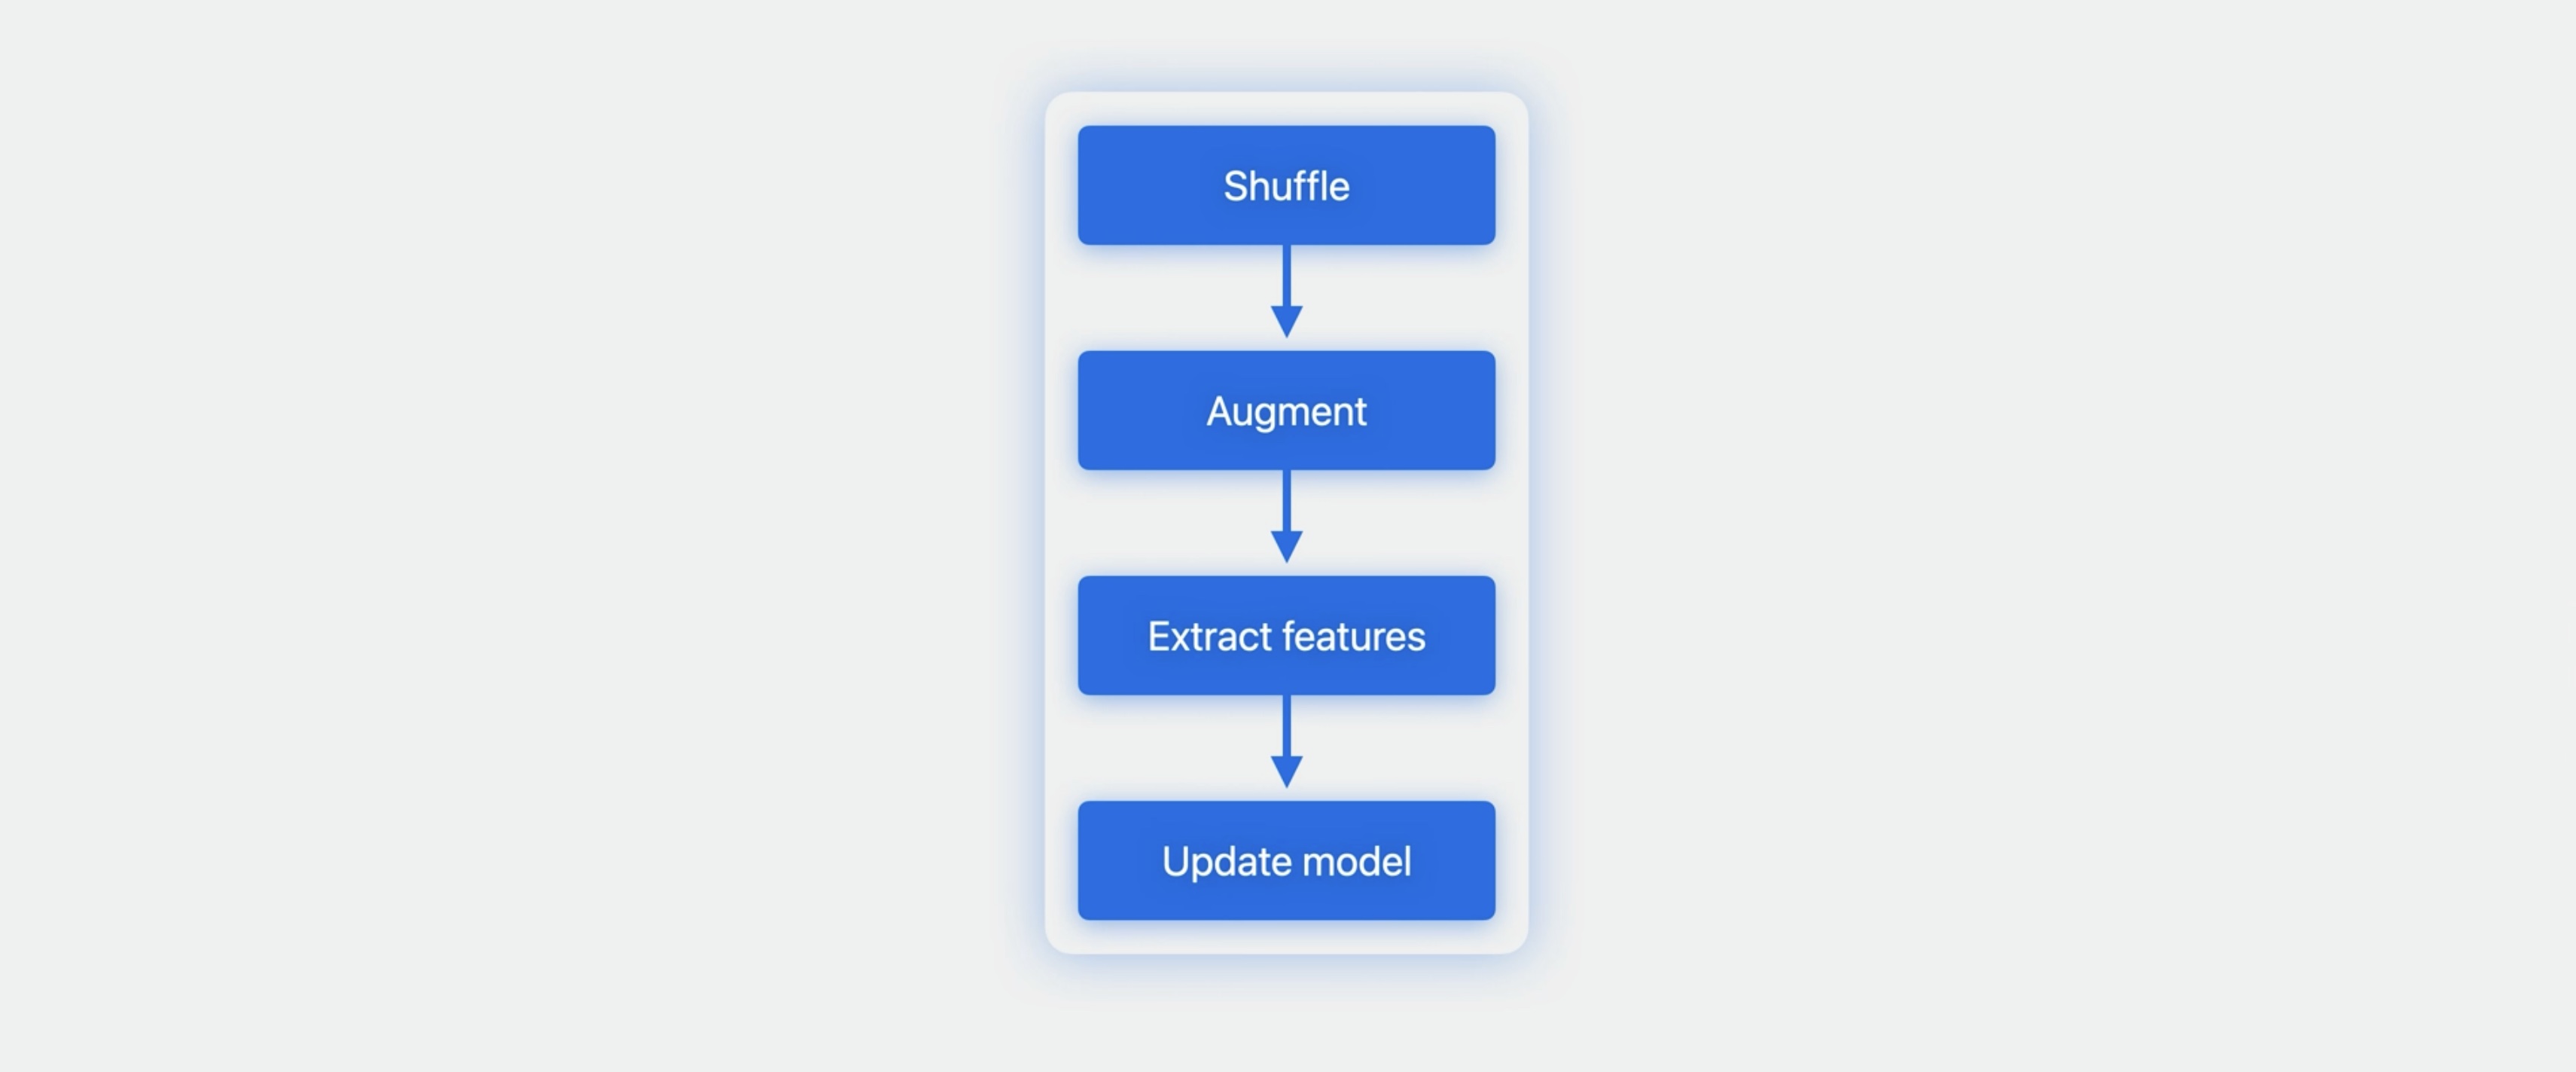
let augmentedData = augmenter.applied(to: trainingImages.shuffled())
for try await batch in augmentedData.batches(ofSize: 16, dropsLastPartialBatch: false) {
try await imageClassifier.update(&model, with: batch)
}
// ...
}
In the training loop, the first step is to shuffle and augment my training images. You'll want to shuffle before augmenting so that on each iteration, the batches contain different images. The result of the augmenter is an async sequence, which means that transformations happen lazily. Using the batches method, I can group the async sequence of augmentations into groups. In this case, I've used a batch size of 16. Finally, I'll update my model with each batch of augmented images. This is why using the update method is a good choice when doing data augmentation. On each iteration, you get a new set of images. Depending on your augmenter, the update method is unlikely to encounter the exact same image more than once. This encourages the model to generalize instead of memorize.
I selected 100 iterations, but ideally you should stop training when the validation accuracy stops improving. In this example, the training accuracy continues to improve, but notice that the validation accuracy starts to decrease after a few iterations.
Overfitting
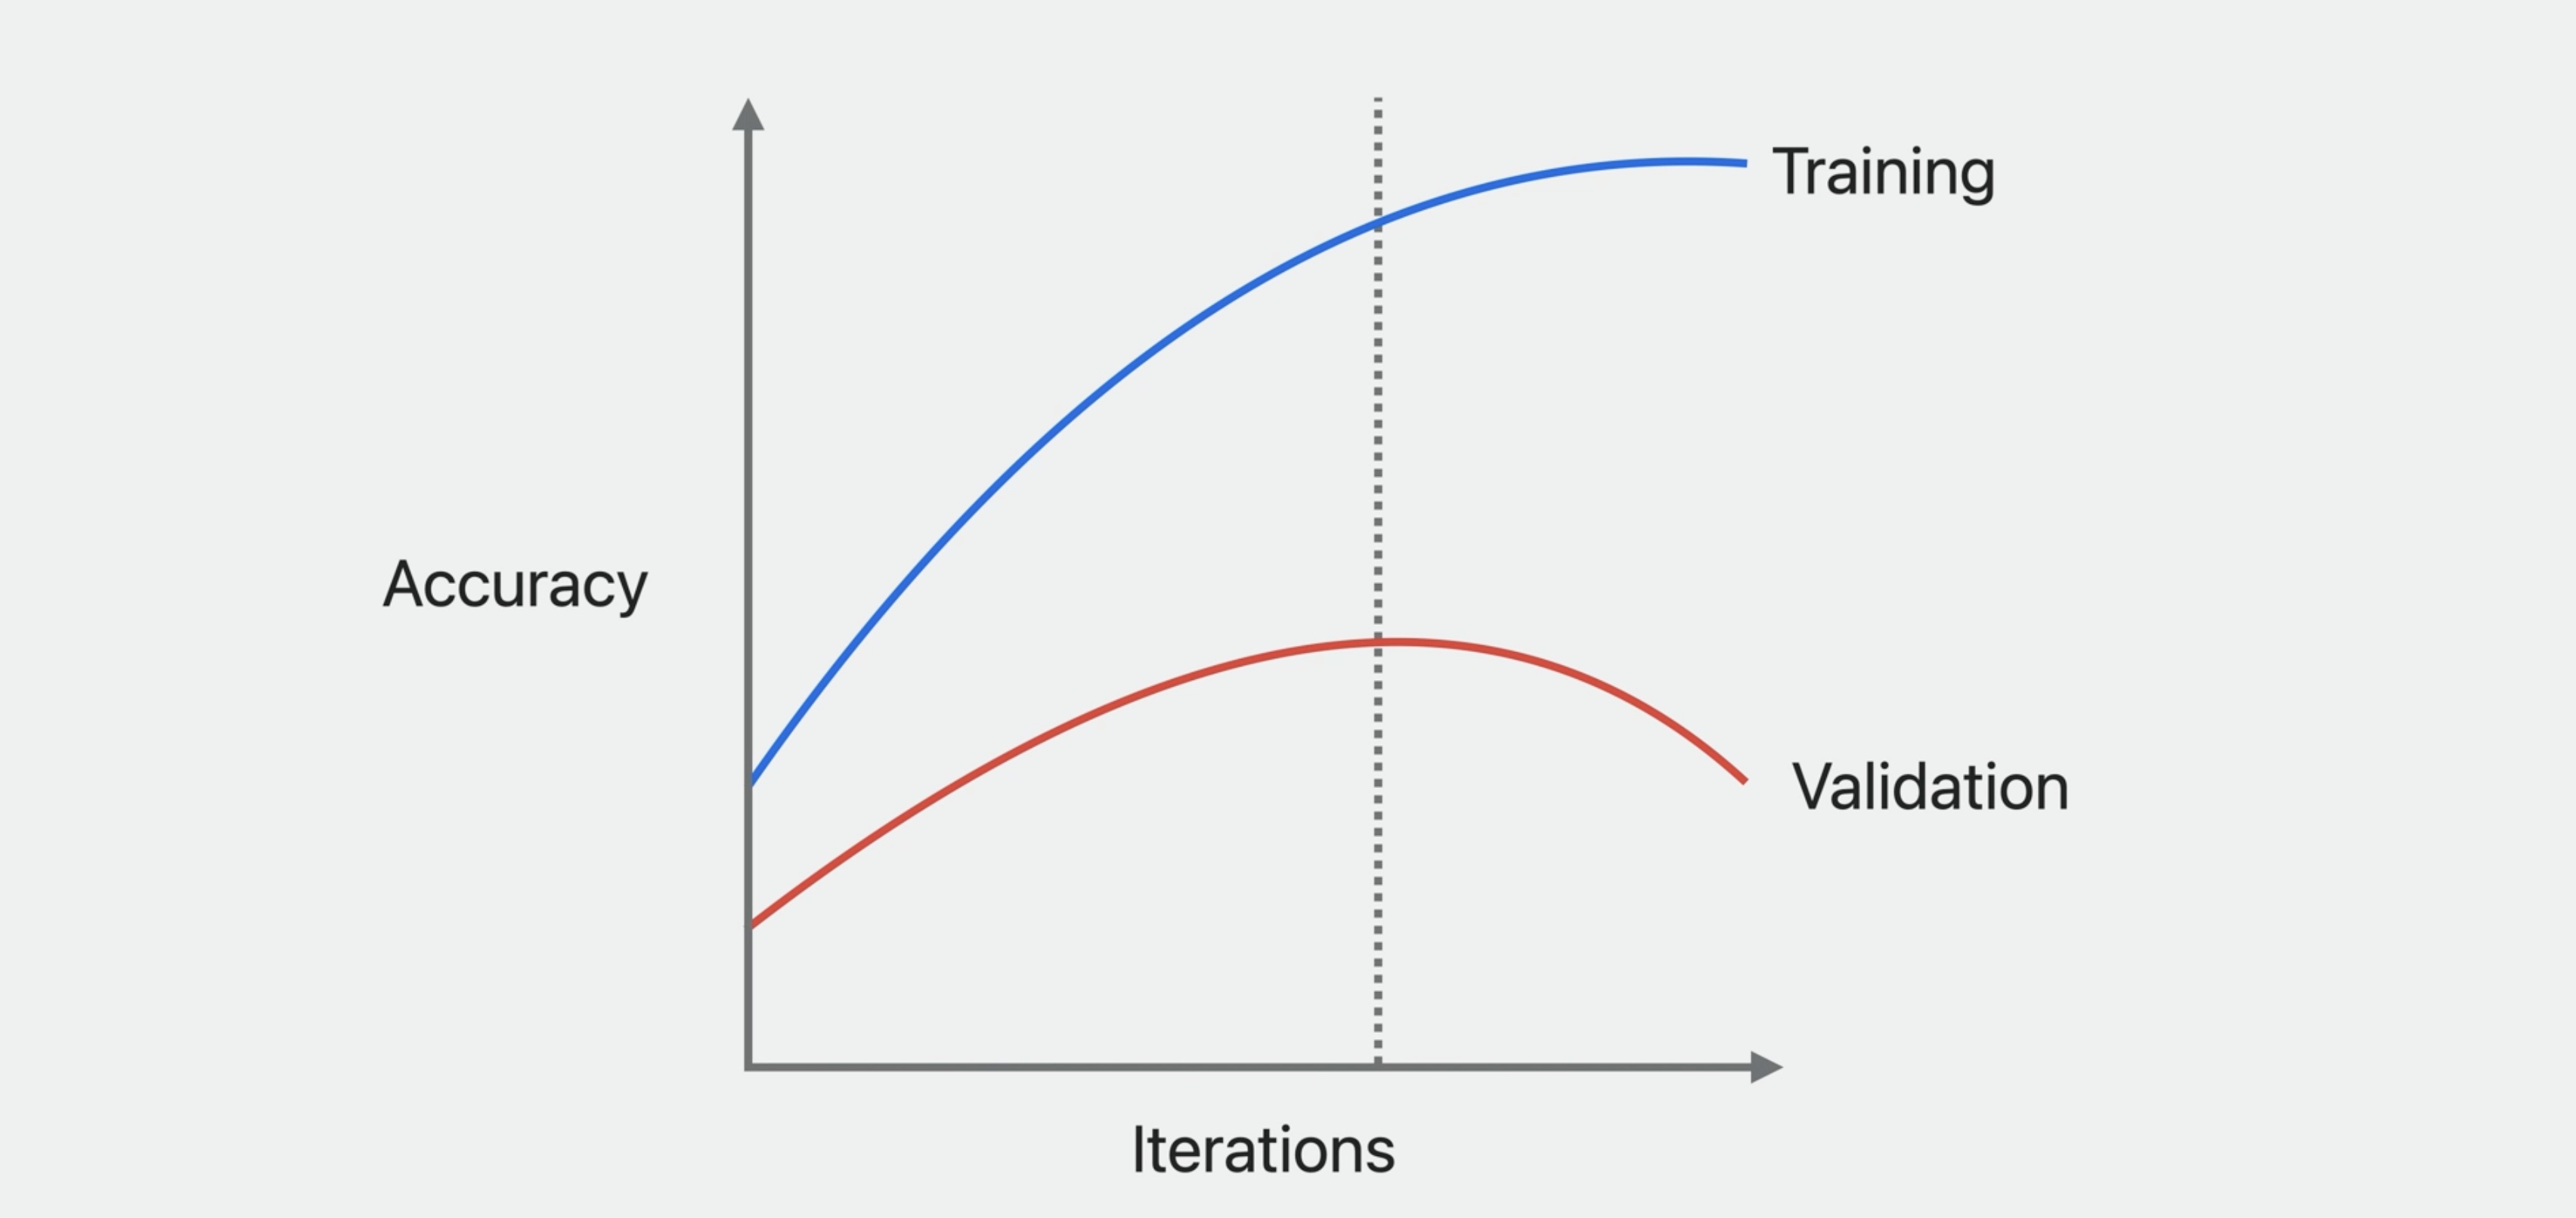
This means that the model is memorizing the training data, making it less generalizable to new data and performing worse on validation and test data. Continuing training after this is detrimental. As a final example, I'll add early stopping to the training loop. After the update step, you can compute validation metrics. I'm using validation accuracy to stop training early, which works for classifier models. But that is really up to you. You can use validation loss or even design your own metric to assess the quality of your model.
// Stop training early

var accuracies = [Double](repeating: 0, count: 5)
for iteration in 0 ..< 100 {
    // ...

    let predictions = try await model.prediction(from: validationImages)
    let validationMetrics = ClassificationMetrics(
        predictions.map(\.prediction.mostLikelyLabel!), predictions.map(\.annotation)
    )
    let validationAccuracy = validationMetrics.accuracy
    metrics[iteration % accuracies.count] = validationAccuracy

    // Stop when there has been no significant improvement.
    if accuracies.allSatisfy({ $0 >= validationAccuracy - 0.01 }) {
        break
    }
}
Then, I'll break out of the training loop when the accuracy hasn't improved for the last five iterations. And that concludes my augmented image classifier.
Wrap-up
- Create ML improvements
- Multi-label classification
- Build your own augmentations
Resources
- Search the forums for tag wwdc2023-10044
- Have a question? Ask with tag wwdc2023-10044
- Create ML
- Integrating a Core ML Model into Your App
- Core ML
Check out also
Explore Natural Language multilingual models - WWDC23
Get to know Create ML Components - WWDC22
Compose advanced models with Create ML Components - WWDC22
What's new in Create ML - WWDC22
Understanding Images in Vision Framework - WWDC19
 Twitter
 GitHub
 iosdev.space