Simplify distribution in Xcode and Xcode Cloud
 P
P
Description: Discover how to share your app using Xcode's streamlined distribution, which allows you to submit your app to TestFlight or the App Store with one click. We'll also show you how to use Xcode Cloud to simplify your distribution process by automatically including notes for testers in TestFlight, and use post-action to automatically notarize your Mac apps.
Simplify Distribution in Xcode and Xcode Cloud
Distribution Tools
Methods for building and sharing your app
Xcode Organizer Window
Provides streamlined one-click distribution options
Xcode Cloud Workflow
Provides the ability to create a workflow to automate the building and sharing of an app
Express TestFlight Distribution
Archives
The first step to distribution is to create an archive. An archive: - Is a record of the app build - Contains an optimized release build - Contains debug symbols (.dSYM) - Has its contents repackaged when uploading - Has an .xcarchive extension
Creating an archive can be done by going to the Product menu in Xcode and selecting Archive. When the archive is created, it can be found in the Organizer menu (Window > Organizer). From there, the archive can be distributed by clicking the "Distribute App" button. Xcode 15 has added new streamlined options 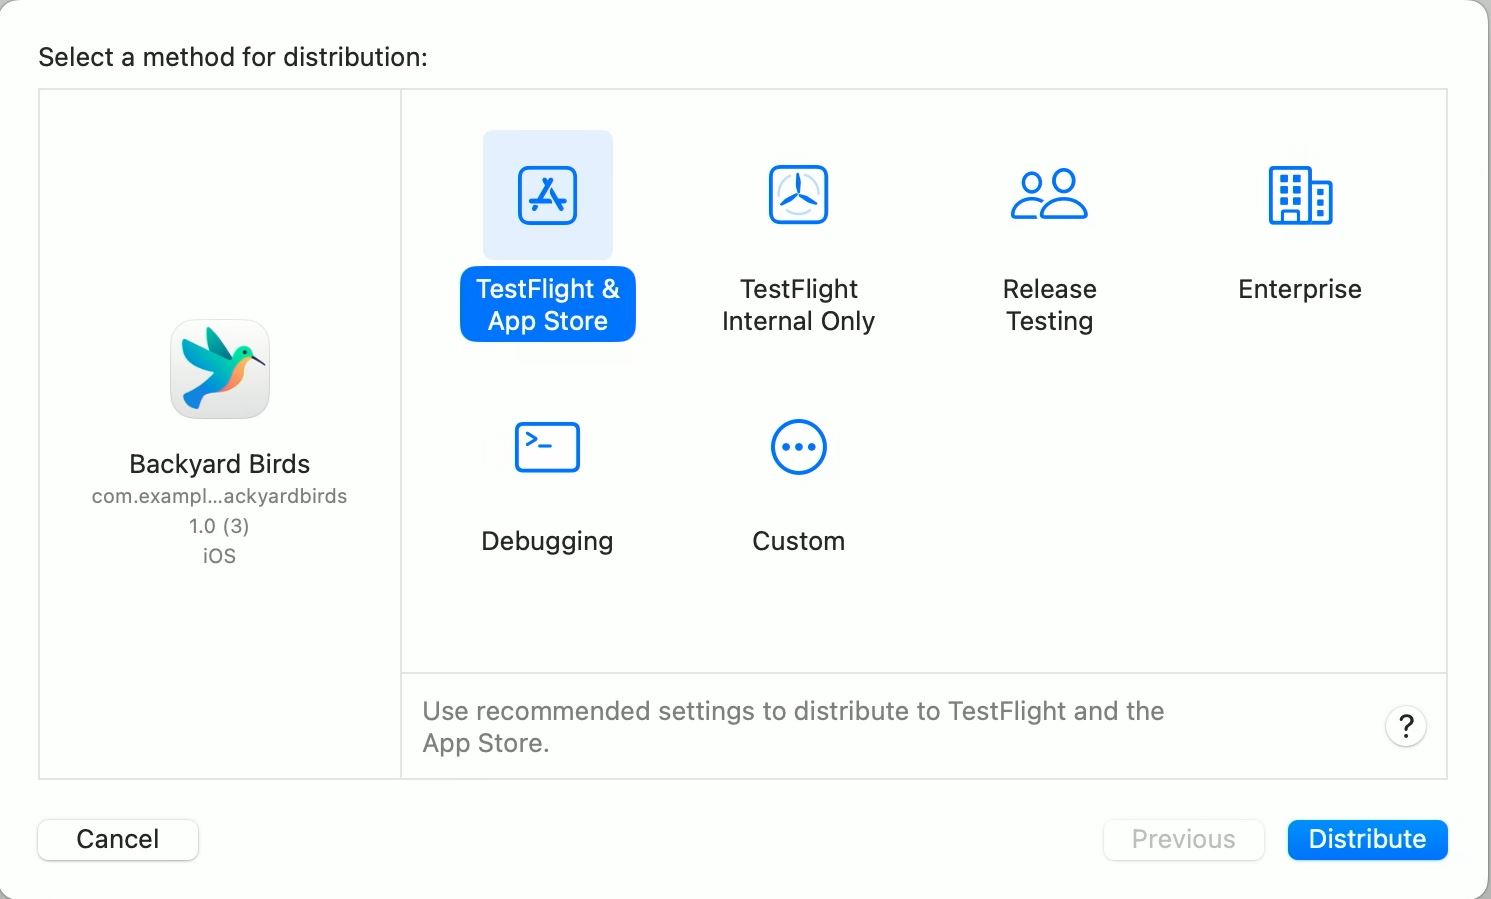
These options include: - TestFlight & App Store - has the full capabilities of TestFlight and allow App Store submission - TestFlight internal only - can be shared with team but does not allow App Store submission - Debugging - an optimized build that can be installed on registered devices - Release - similar to debug build but signed with distribution certificate - Custom - allows for configuration of settings
The streamlined options come with the recommended settings. The settings include: - Automatic signing - Symbols for crash reports - Auto-incrementing build number - Strips Swift symbols
Once the app has been distributed, it will be available to see on App Store Connect. Test Flight users will be able to see details about the new build on their device. Users can also share feedback about the build, which is available to see inside the Feedback tab on Xcode Organizer.
Xcode Cloud
Xcode Cloud is the Continuous Integration and Delivery service built by Apple. In the presentation, a workflow is created that will share a build with the team when new features are added. This is done by doing the following: 1. Going to the menu Integrate > Create Workflow or Integrate > Manage Workflow if one is already created 2. Edit the Archive action to add TestFlight (Internal Testing Only) 3. Add a TestFlight Internal Testing post-action to add a TestFlight group
Xcode Cloud can automatically update the notes for what to test. More information about this can be found here:
https://developer.apple.com/documentation/Xcode/including-notes-for-testers-with-a-beta-release-of-your-app
Automating Notarization
Notarization is the process by which Apple verifies software. This allows developers to directly distribute their Mac application to users while giving them confidence that it is safe.
The notirization process is as follows: 1. An archive is created for the app and uploaded to Apple's Notary Service 2. The Notary Service scans the app for malicious content 3. A ticket is provided that can be stapled to the app 4. The app is distributed to customers 5. When the app is launched for the first time, it will verify the stapled ticket and a ticket provided by the Notary Service
More information about notarization can be found here:
https://developer.apple.com/videos/play/wwdc2022/10109
Choosing the Direct Distribution option from Organizer will notarize the app. Xcode Cloud also supports notarization during automation. This can be done by adding a notarize post action inside the workflow editor.
 GitHub