Meet Object Capture for iOS
 Pedro Rojas
Description: Discover how you can offer an end-to-end Object Capture experience directly in your iOS apps to help people turn their objects into ready-to-use 3D models. Learn how you can create a fully automated Object Capture scan flow with our sample app and how you can assist people in automatically capturing the best content for their model. We’ll also discuss LiDAR data and provide best practices for scanning objects.
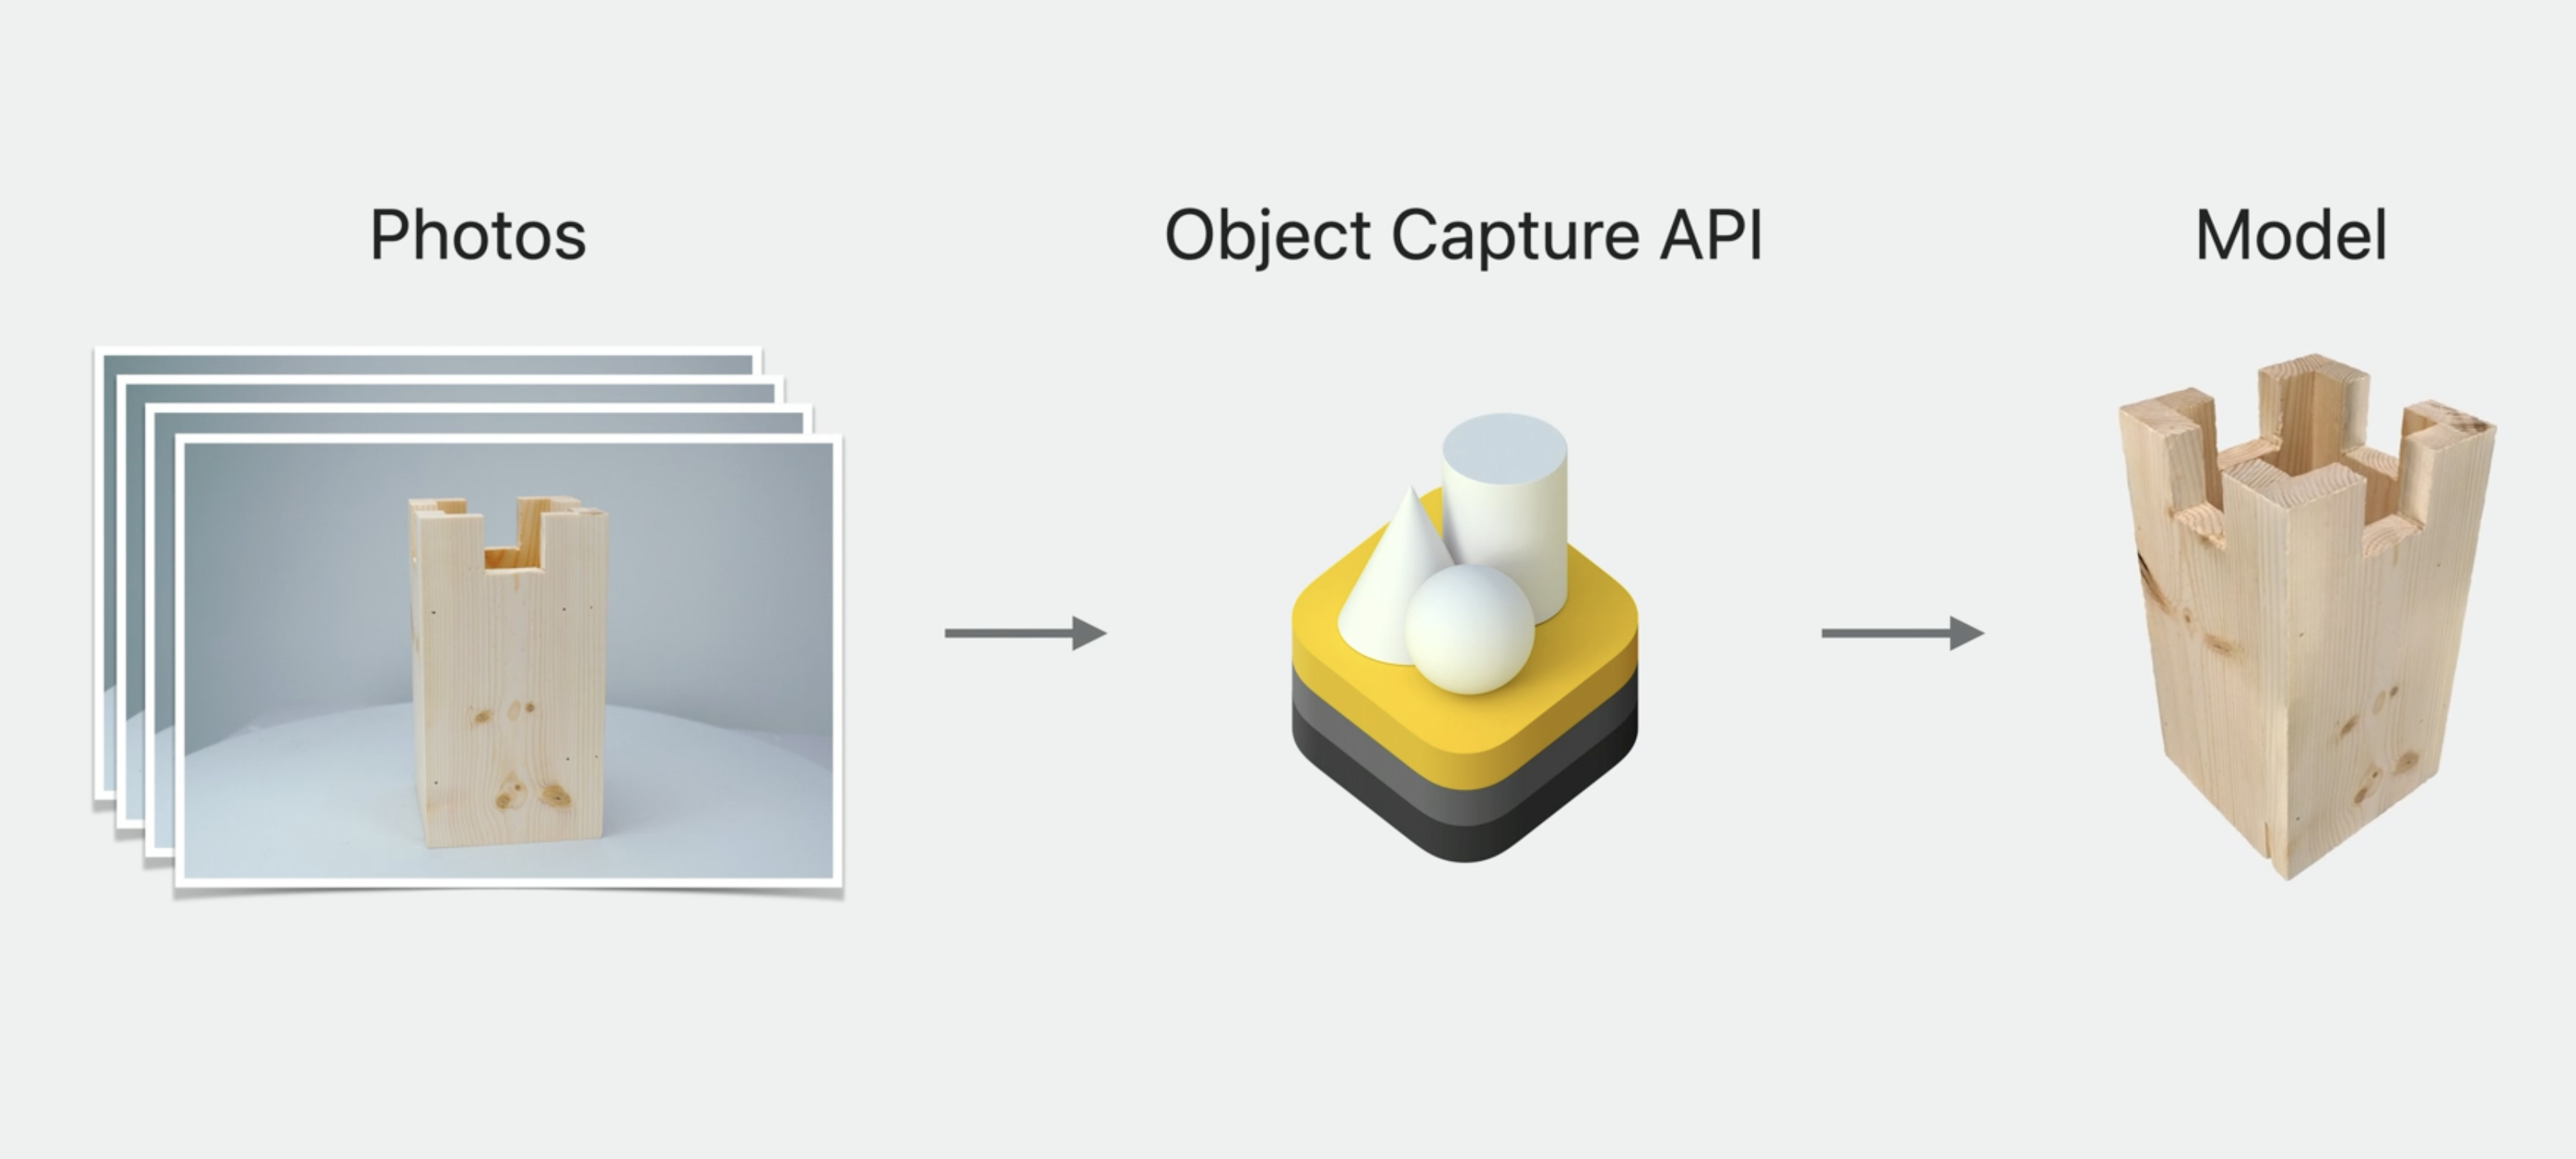
Object Capture utilizes cutting-edge computer vision technologies to generate realistic 3D models from a series of images captured from different angles. Initially introduced for macOS in WWDC21, it is now also available for iOS 17 and above.
For a recap, watch Create 3D models with Object Capture.
To showcase this new capability for iOS, Apple has provided a sample app that allows you to learn and adapt it to your own apps. Follow this link to download the project and read the explanation below to understand how to capture objects and how this sample app works internally.
System Requirements
The sample cannot run on a simulator, if you want to try it out, you will meet the following requirements:
- iOS or iPadOS 17 or later.
- iPhone or iPad with a LiDAR Scanner and an A14 Bionic chip or later.
You can even compile the sample app on a device that doesn't meet those requirements, but it will crash when attempting to start capturing
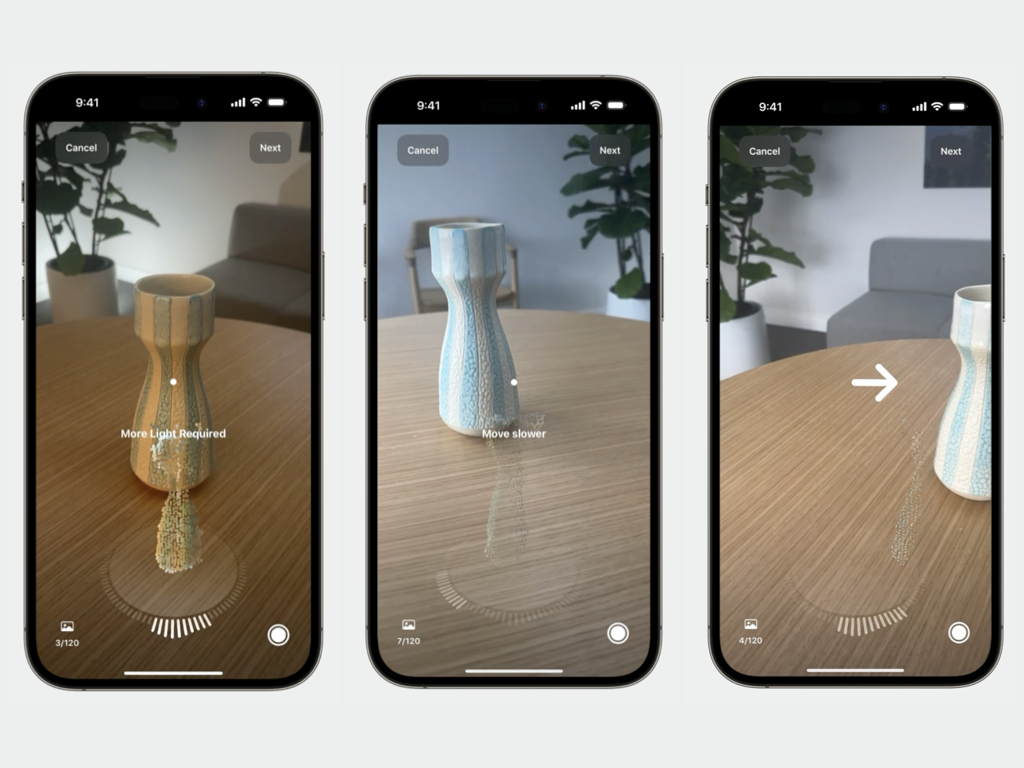
Steps to scan objects using the demo app
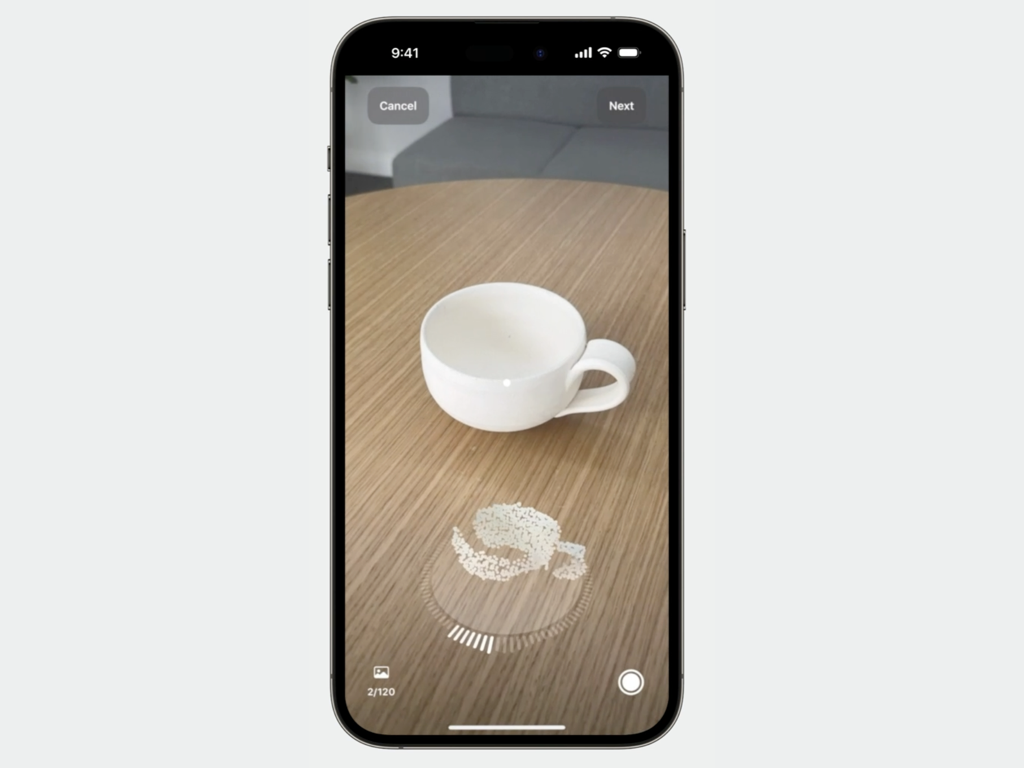
- Open the app and point it at the object.
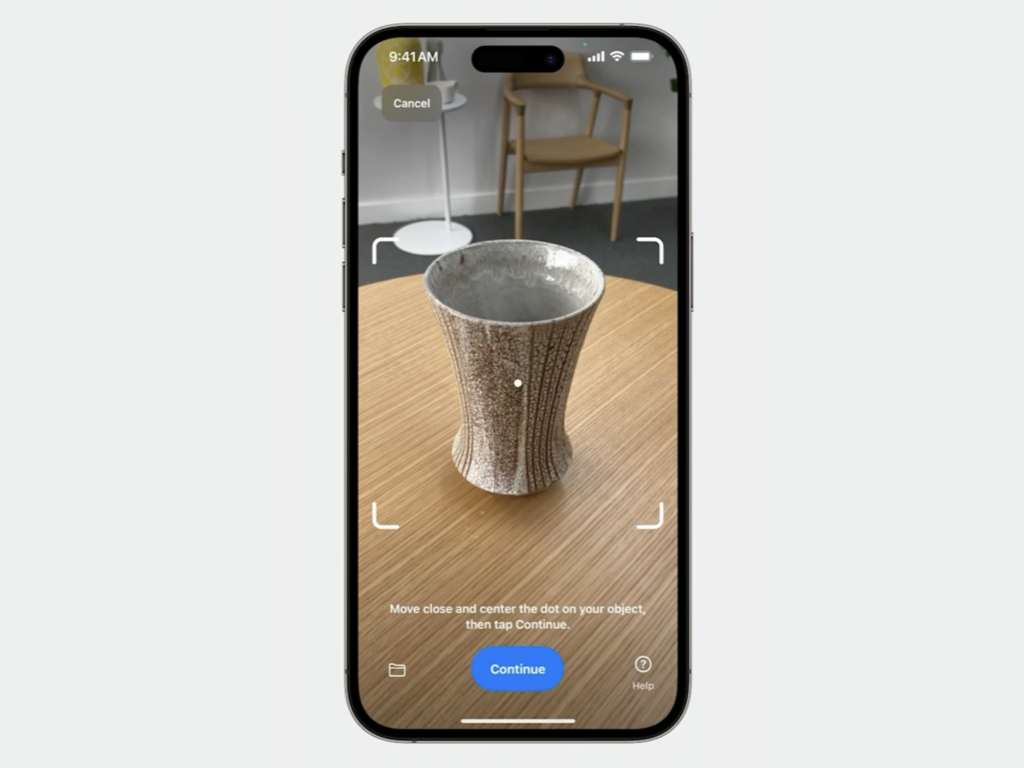
- An automatic bounding box will be generated before starting the capture. You can adjust the edges to define the scanning area.
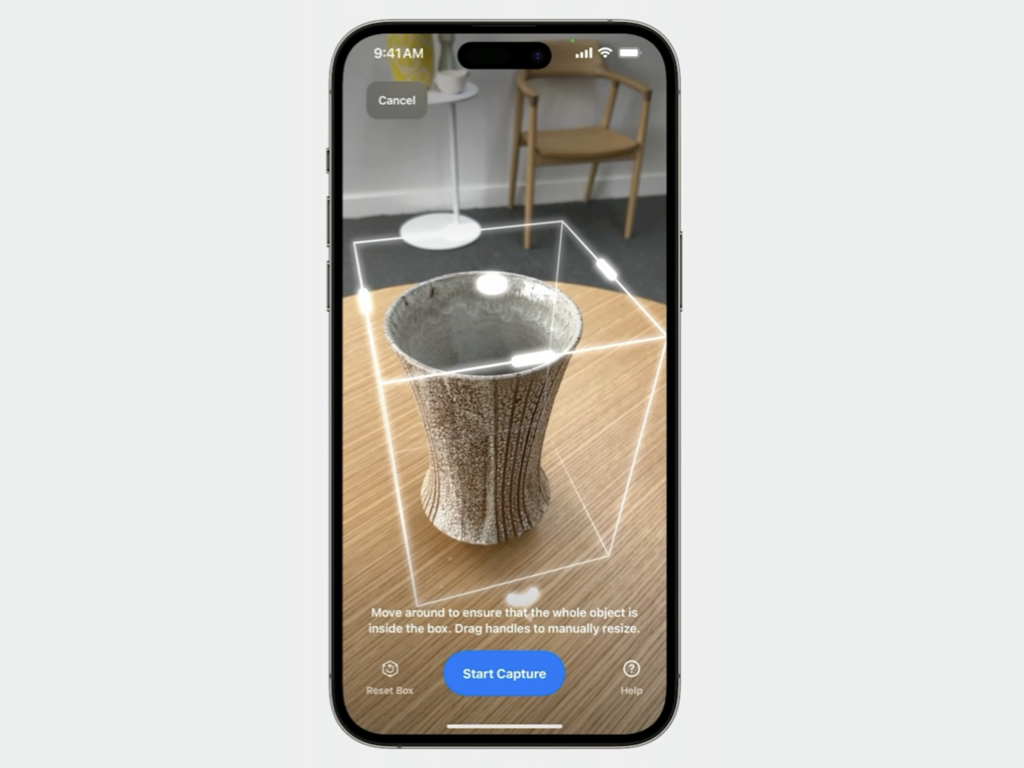
- The app will guide you through the regions that require more image scanning.
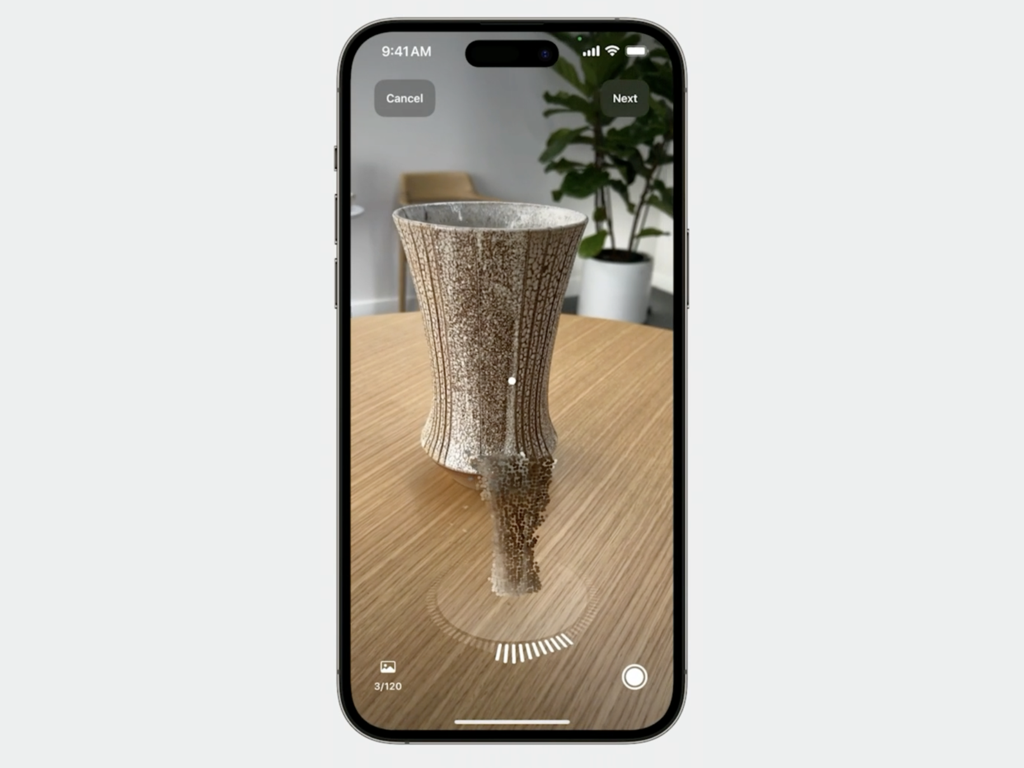
- The app provides feedback to help you capture high-quality shots.
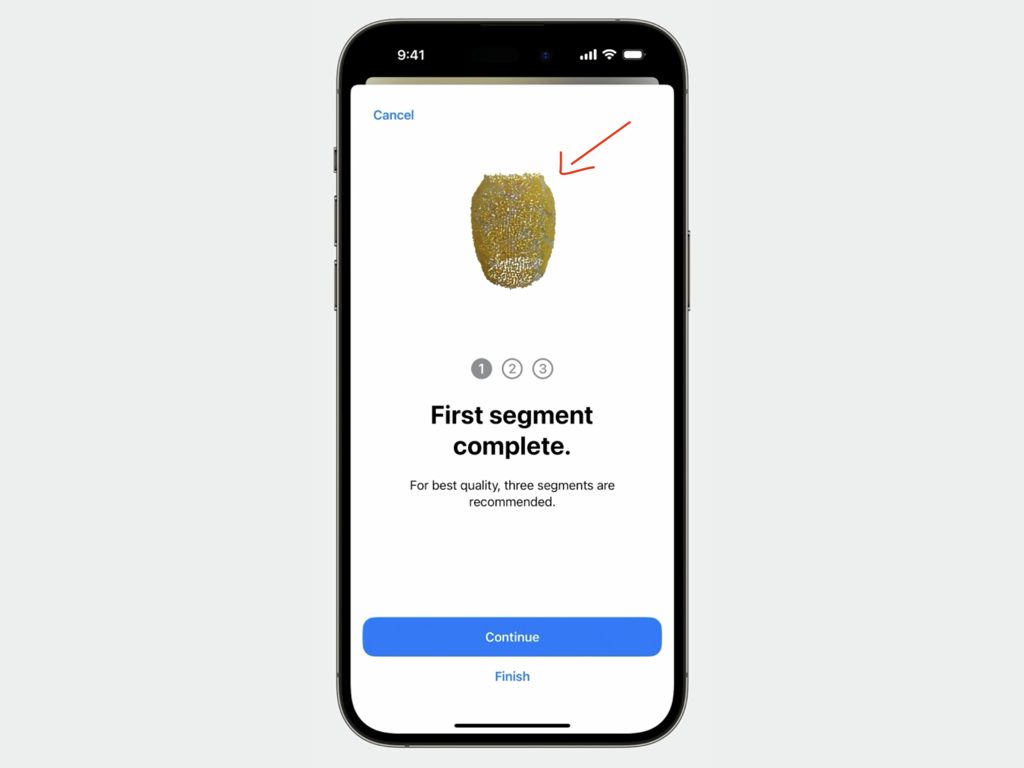
- After completing the first scanning, you can flip the object to capture the bottom (if necessary).
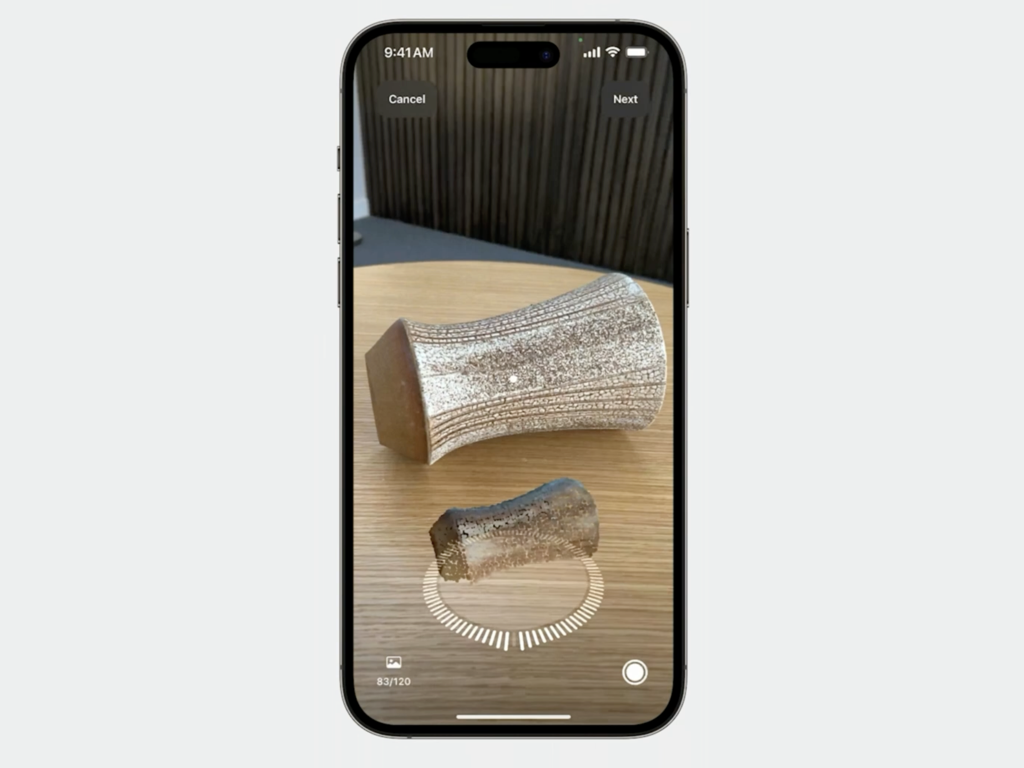
- The app requires two more scan rounds. Once all scans are completed, the app will start generating the 3D object model. This process may take a few minutes.
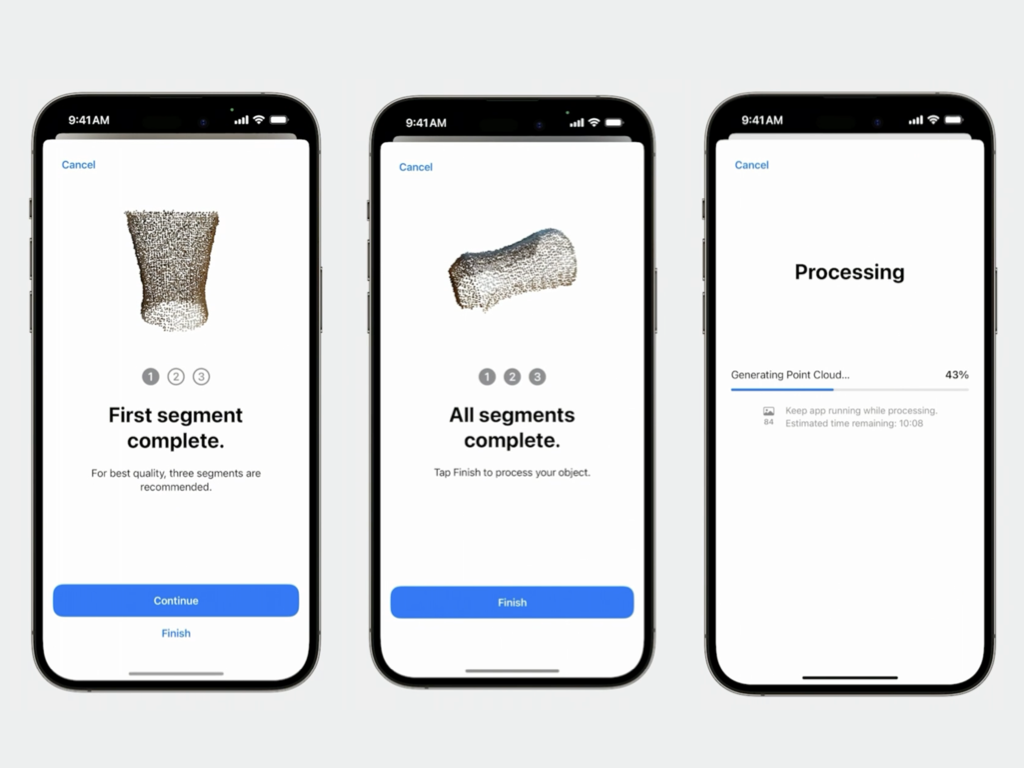
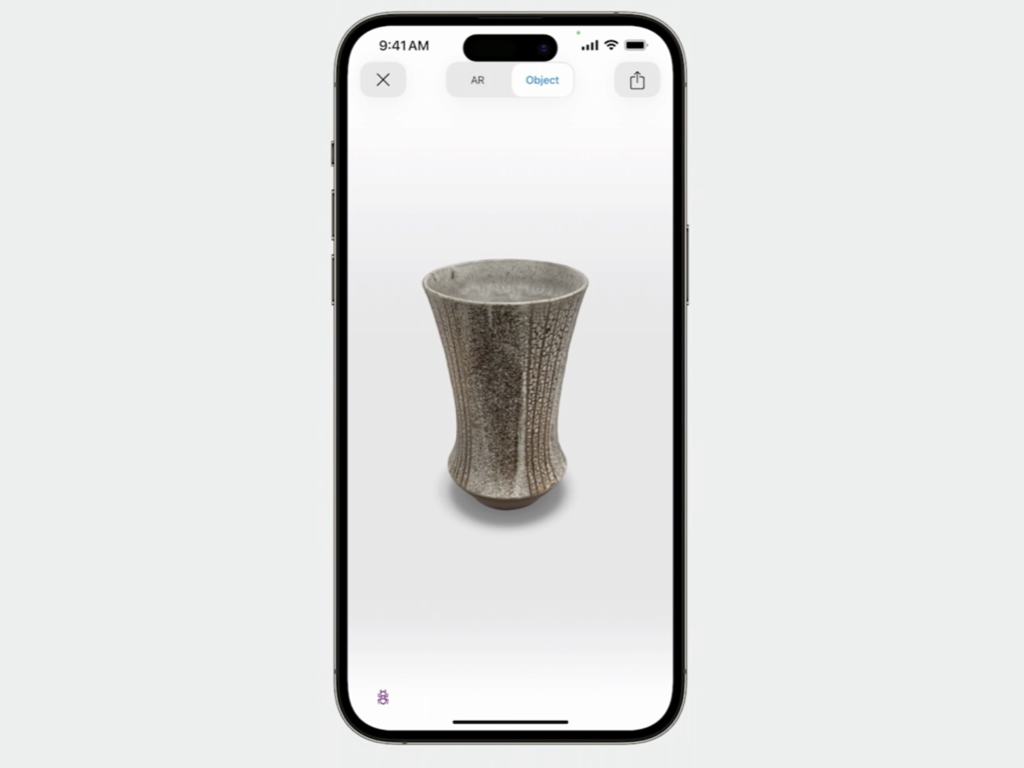
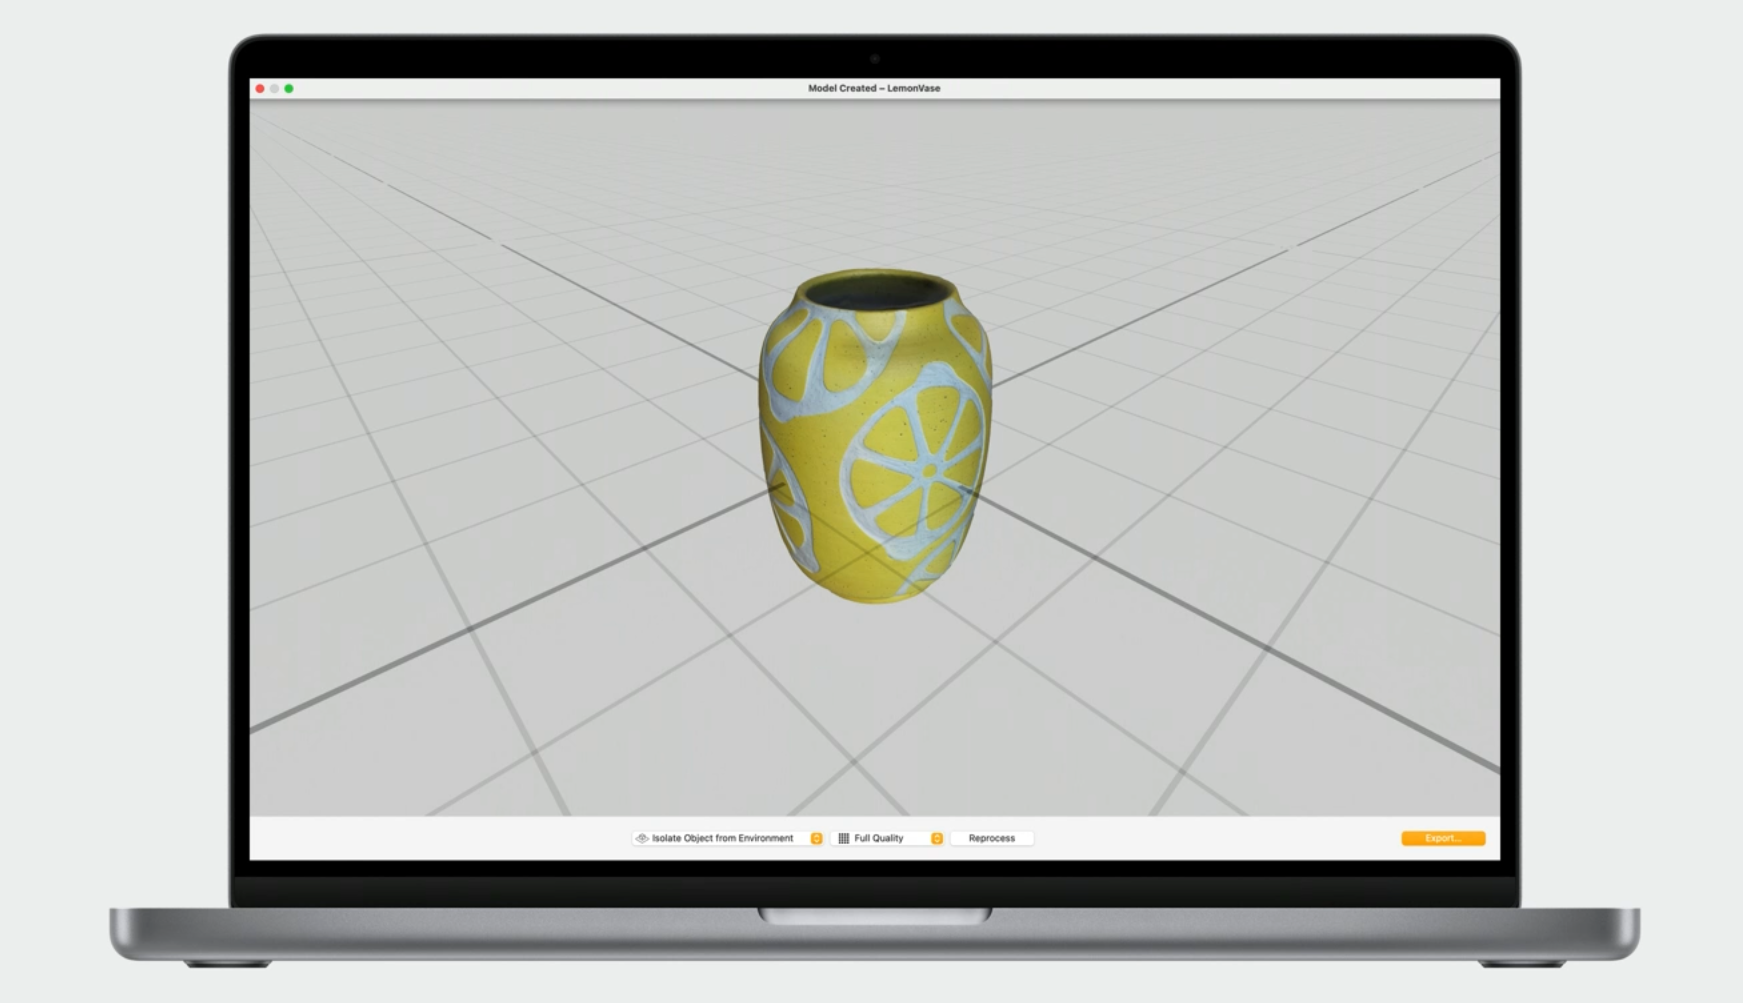
- Once the processing is complete, the app will provide a visualization of your new 3D model and you will be able to save it as a usdz file.
Support for more objects with LiDAR
The LiDAR Scanner has received improvements to scan and reconstruct low-texture objects, as demonstrated with the chair image.

Although low-texture objects are supported, scanning certain objects still presents challenges. It is best to avoid objects that are reflective, transparent, or have thin structures.
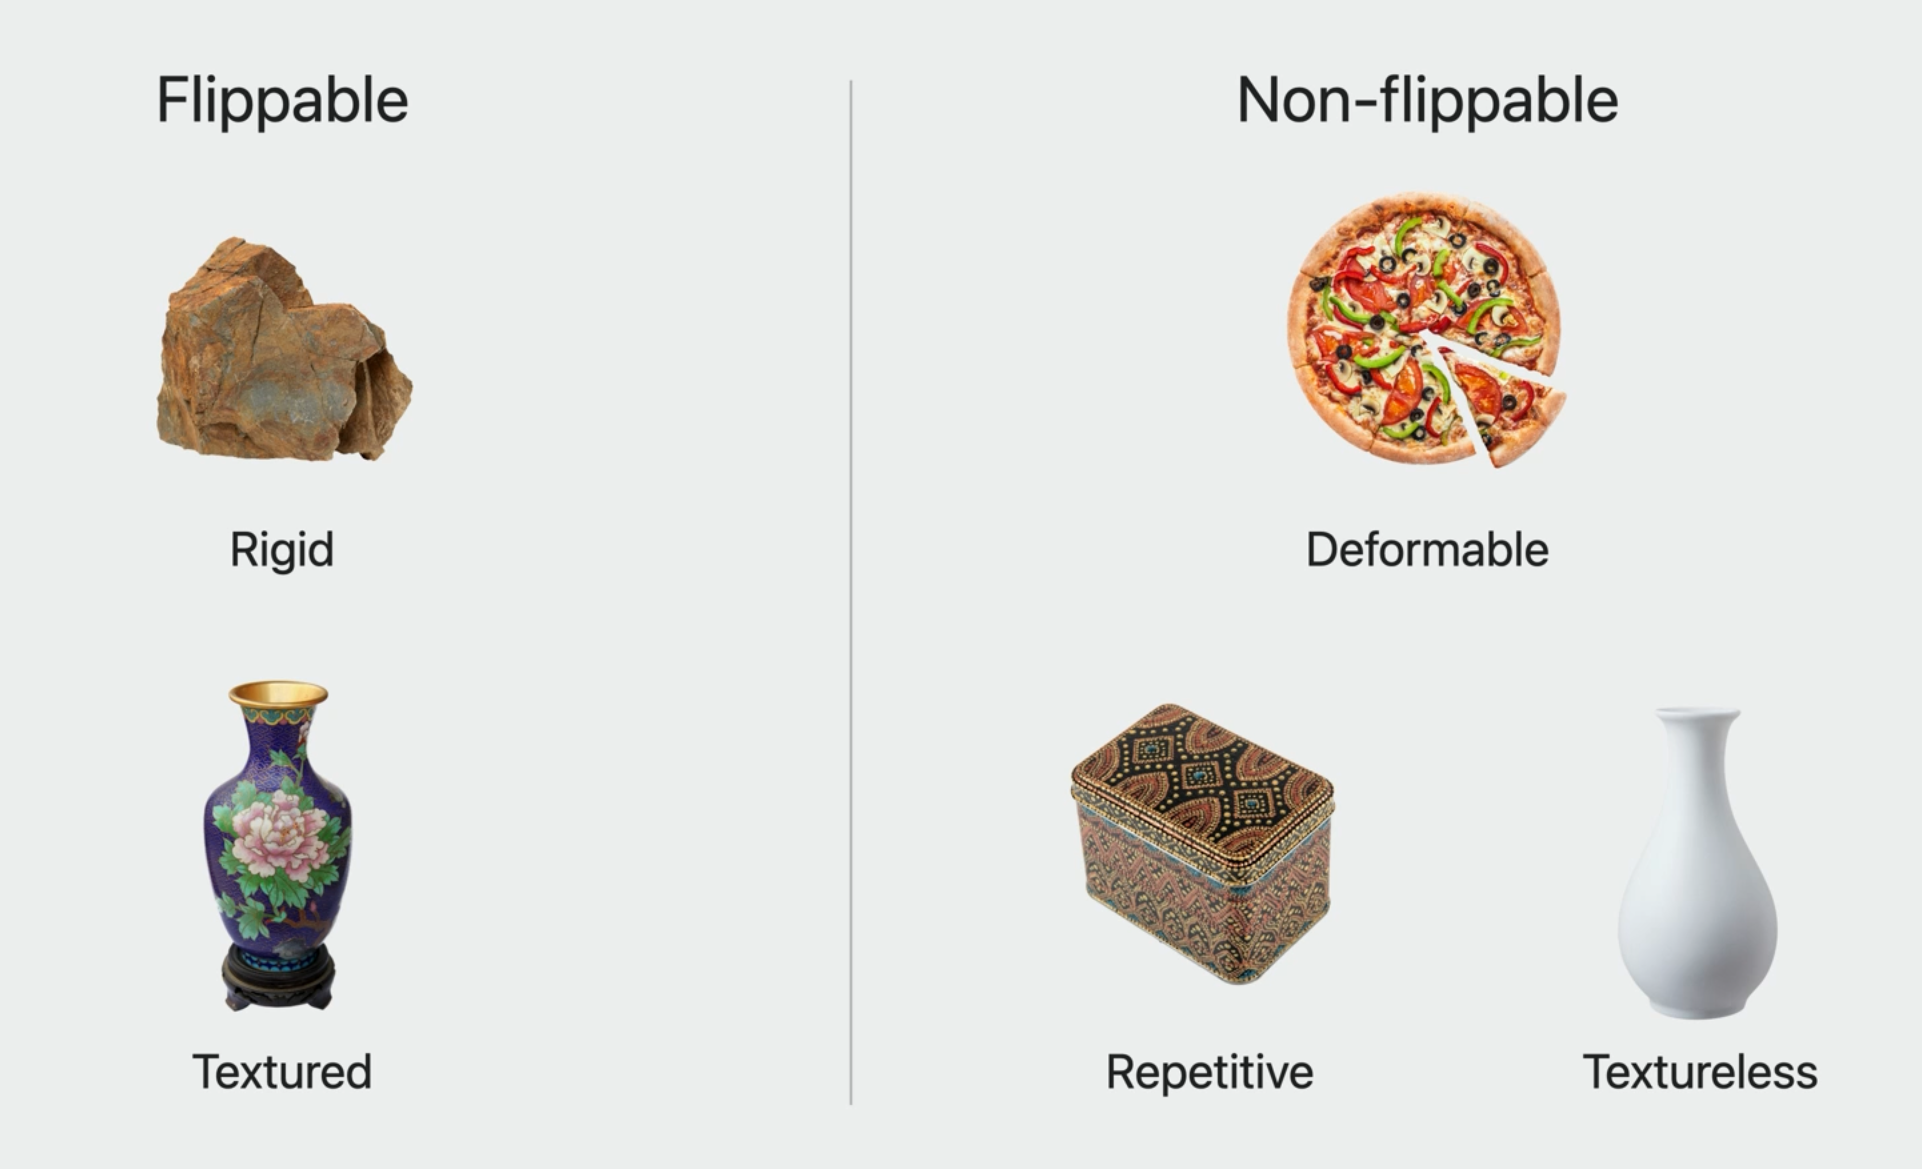
Flippable Objects
Textured and rigid objects are ideal for capturing the bottom side. However, objects with repetitive textures, deformable objects, and textureless objects are not recommended for flipping.
When flipping an object, it is advisable to use diffuse lights to minimize shadow and reflections on the object's surface.
Non-flippable Objects
For non-flippable objects, it is recommended to scan them from three different heights and place them against a textured background to enhance visibility.
Object Capture API
The Object Capture API consists of two steps:
- Image Capture
- Model Reconstruction
Image Capture API
- The Image Capture API comprises two parts: the session from
ObjectCaptureSession, which allows you to control the flow of a state machine during image capture, and the SwiftUI ViewObjectCaptureView, which displays the camera feed and adapts UI elements based on the session's state. - The session progresses through various states, including initializing, ready, detecting, capturing, finishing, completed, and failed (for errors).
Adding Capture Object API to your app
To get started, you need to first import RealityKit and SwiftUI, and then create a session object:
import RealityKit
import SwiftUI

var session = ObjectCaptureSession()
Since
ObjectCaptureSessionis a reference type, it is important to keep it alive through@StateObjectuntil the capture process is completed.
These are the different session states:

Continuing, call the start method with a directory indicating where to store the captured images:
var configuration = ObjectCaptureSession.Configuration()
configuration.checkpointDirectory = getDocumentsDir().appendingPathComponent("Snapshots/")

session.start(imagesDirectory: getDocumentsDir().appendingPathComponent("Images/"),
            configuration: configuration)
Once this call is done, it will move to ready state.
You can also provide a checkpoint directory to speed up the reconstruction process.Next, create an
ObjectCaptureViewand provide the session object. This view should be wrapped within another SwiftUI view:
import RealityKit
import SwiftUI

struct CapturePrimaryView: View {
    var body: some View {
        ZStack {
            ObjectCaptureView(session: session)
        }
    }
}
ObjectCaptureView displays the UI corresponding to the current session state.
To start detecting the object, call session.startDetecting() from the UI:
var body: some View {
    ZStack {
        ObjectCaptureView(session: session)
        if case .ready = session.state {
            CreateButton(label: "Continue") {
                session.startDetecting()
            }
        }
    }
}
In this state, the bounding box is displayed, allowing you to adjust the capture edges. - To capture a different object, call session.resetDetection() to return to the ready state:
Button {
    session.resetDetection()
} label: {
    Text("Reset")
}
Once the bounding box is adjusted, call session.startCapturing() from the UI to progress to the next state:
var body: some View {
    ZStack {
        ObjectCaptureView(session: session)
        if case .ready = session.state {
            CreateButton(label: "Continue") {
                session.startDetecting()
            }
        } else if case .detecting = session.state {
            CreateButton(label: "Start Capture") {
                session.startCapturing()
            }
        }
    }
}
The session will automatically capture images while you slowly move around the object. ObjectCaptureView provides a dial indicating areas that require scanning.
Once the scanning is complete, session.userCompletedScanPass is set to true:
var body: some View {
    if session.userCompletedScanPass {
        VStack {
        }
    } else {
        ZStack {
            ObjectCaptureView(session: session)
        }
    }
}
The session can detect if the scanned object needs to be flipped to capture parts not yet visible to the camera, such as the bottom. This can be determined using ObjectCaptureSession.Feedback and checking if session.feedback.contains(.objectNotFlippable):
if !session.feedback.contains(.objectNotFlippable) && !hasIndicatedFlipObjectAnyway {
    session.beginNewScanPass()
} else {
    session.beginNewScanPassAfterFlip()
}
If the user decides to flip the object, beginNewScanPassAfterFlip() sets the session back to the ready state to adjust the bounding box for the new orientation. Otherwise, beginNewScanPass() keeps the session in the capturing state, allowing capturing from different heights while maintaining the same bounding box.
Once the three scans are completed, the sample app provides a button to end the session by calling session.finish(). This transitions the session to the finishing state:
var body: some View {
    if session.userCompletedScanPass {
        VStack {
            CreateButton(label: "Finish") {
                session.finish()
            }
        }
    } else {
        ZStack {
            ObjectCaptureView(session: session)
        }
    }
}
Once the process is finished, the session automatically moves to the completed state, triggering on-device reconstruction.
If an error occurs during the process, the session enters into failed state, requiring the creation of a new session.
Optionally, you can use ObjectCapturePointCloudView to preview the scanned parts of the object since its initial placement or last flip:
var body: some View {
    if session.userCompletedScanPass {
        VStack {
            ObjectCapturePointCloudView(session: session)
            CreateButton(label: "Finish") {
                session.finish()
            }
        }
    } else {
        ZStack {
            ObjectCaptureView(session: session)
        }
    }
}
Model Reconstruction API
The following code from the sample app initiates the reconstruction process, applicable for both iOS and macOS:
var body: some View {
  ReconstructionProgressView()
      .task { // 1
          var configuration = PhotogrammetrySession.Configuration()
          configuration.checkpointDirectory = getDocumentsDir()
              .appendingPathComponent("Snapshots/") // 3
          let session = try PhotogrammetrySession( // 2
              input: getDocumentsDir().appendingPathComponent("Images/"),
              configuration: configuration)
          try session.process(requests: [ // 4
              .modelFile(url: getDocumentsDir().appendingPathComponent("model.usdz"))
          ])
          for try await output in session.outputs { // 5
              switch output {
                  case .processingComplete:
                      handleComplete()
                      // Handle other Output messages here.
              }
          }
      }
}
- The
taskmodifier is attached toReconstructionProgressView. - A new
PhotogrammetrySessionis created, pointing to the images. - Optionally, the same checkpoint directory used during image capture can be provided to expedite the reconstruction process.
- The
processfunction is called to request a model file. - Finally, the message stream is awaited in an asynchronous loop, and output messages are handled as they arrive.
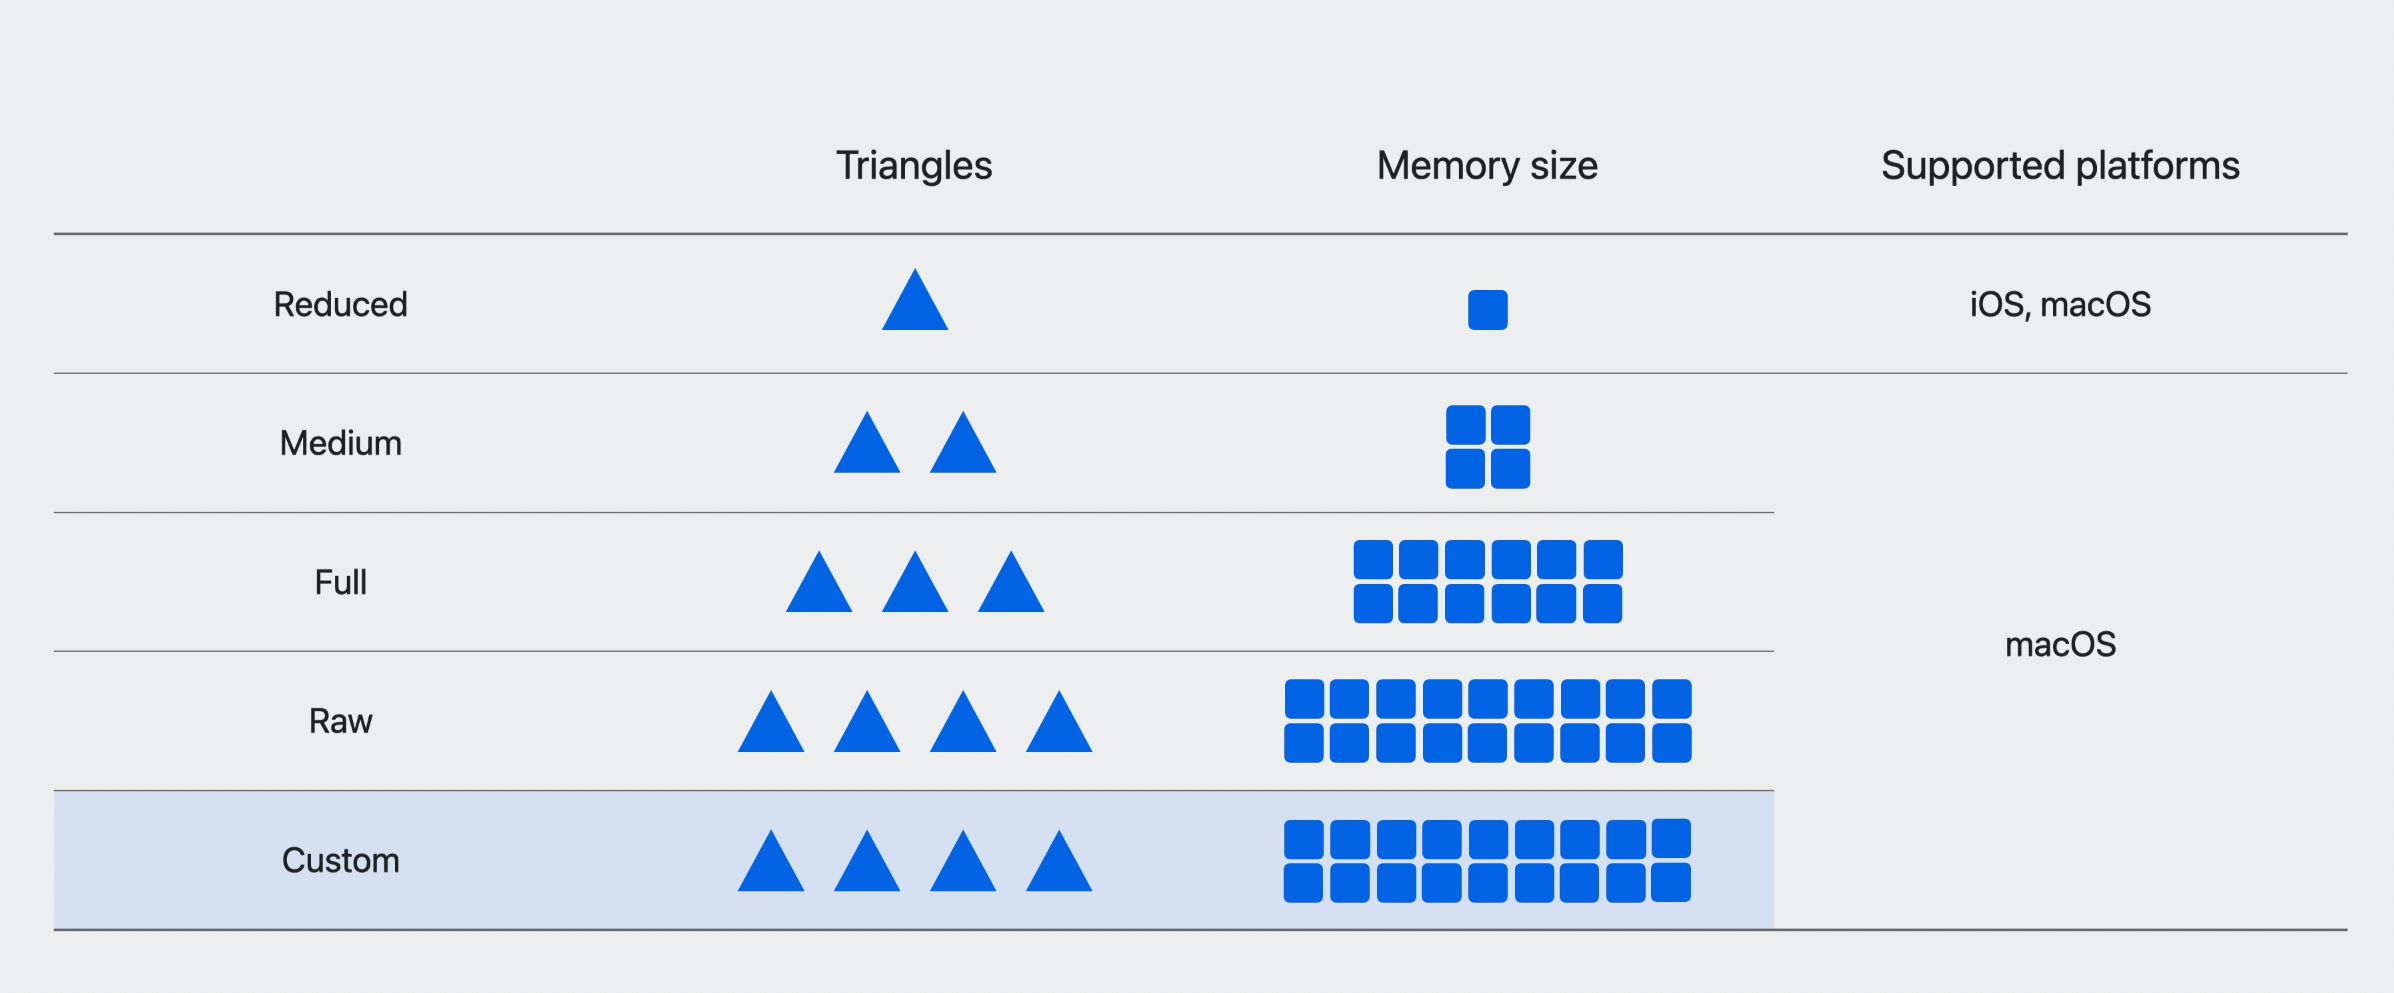
Detail level on iOS
To optimize model generation and viewing on mobile devices, iOS supports a reduced detail level. The reconstruction model includes the following texture maps: Diffuse, ambient occlusion, and normal. If you require a higher level of detail, you must transfer your images to macOS for reconstruction.
Capturing for Mac
Starting from 2023, Mac reconstruction also utilizes the saved LiDAR data in the images. By default, ObjectCaptureSession stops capturing images when the reconstruction limit for the iOS device is reached. However, for macOS, you can allow the session to capture more images than on-device reconstruction can use by setting isOverCaptureEnabled to true in the session's configurations:
var configuration = ObjectCaptureSession.Configuration()
configuration.isOverCaptureEnabled = true

session.start(imagesDirectory: getDocumentsDir().appendingPathComponent("Images/"),
            configuration: configuration)
These additional shots are not used for on-device reconstruction but are stored in the Images folder.
Model Reconstruction in Mac
No code is required. Simply import the images into Reality Composer Pro, choose a detail level, and obtain your model!
For more details, check out Meet Reality Composer Pro
Reconstruction Enhancements
- Improved performance and image quality on Mac.
- The API now provides an estimated processing time in addition to progress percentage.
- High-quality poses can now be requested for each image, including the estimated position and orientation of the camera for that image.
- To obtain the poses, add
.posesto theprocess()function call and handle them when they arrive in the message stream:
try session.process(requests: [
    .poses
    .modelFile(url: modelURL),
])
for try await output in session.outputs {
    switch output {
    case .poses(let poses):
        handlePoses(poses)
    case .processingComplete:
        handleComplete()
    }
}
- The API now provides a new custom detail level to control the amount of mesh decimation, texture map resolution, format, and which texture maps should be included.
 Twitter
 GitHub
 www.youtube.com