Write Swift macros
 John Baer
 laurent b
Description: Discover how you can use Swift macros to make your codebase more expressive and easier to read. Code along as we explore how macros can help you avoid writing repetitive code and find out how to use them in your app. We’ll share the building blocks of a macro, show you how to test it, and take you through how you can emit compilation errors from macros.
Chapters
1:15 - Overview
5:10 - Create a macro using Xcode's macro template
10:50 - Macro roles
11:40 - Write a SlopeSubset macro to define an enum subset
20:17 - Inspect the syntax tree structure in the debugger
24:35 - Add a macro to an Xcode project
27:05 - Emit error messages from a macro
30:12 - Generalize SlopeSubset to a generic EnumSubset macro
ELI5 Summary of Macros:
Imagine you're baking a cake, and you need to sift flour. You have to get out your sifter, pour in the flour, turn the handle... and you have to do this every single time you need sifted flour. Now imagine you had a magical kitchen helper who could do this for you. All you'd have to say is "sift flour" and it's done! Swift macros are like that magical kitchen helper, but for your code. Instead of you having to write out the same lines of code over and over again, you just tell your macro (your kitchen helper) what to do. This might be something like "create a struct with these properties" or "set up a standard network request". You define how the macro works one time, and then you can use it whenever you need to. It's a way to automate repetitive tasks and make your code easier to read and manage. This makes coding a lot faster and less prone to errors, especially as your projects get bigger and more complex.
Overview
Swift macros allow to generate code at compile time, making codebases more expressive and easier to read.
Example: Here there is a list of calculations that first-year students can use to practice their arithmetic skills. This is repetitive, redundant, and even error prone because nobody can guarantee that the result actually matches the calculation.
let calculations = [
(1 + 1, "1 + 1"),
(2 + 3, "2 + 3"),
(7 - 3, "7 - 3"),
(5 - 2, "5 - 2"),
(3 * 2, "3 * 2"),
(3 * 5, "3 * 5"),
]
With Swift 5.9 we can define a stringify macro to simplify this. This macro also happens to be the one that is included in Xcode's template. The stringify macro only takes the calculation as a single parameter. At compile time it expands to the tuple that we saw before, guaranteeing that the calculation and the result match.
let calculations = [
	#stringify(1 + 1),
	#stringify(2 + 3),
	#stringify(7 - 3),
	#stringify(5 - 2),
	#stringify(3 * 2),
	#stringify(3 * 5),
]
So how does this work?
@freestanding(expression)
macro stringify(_ value: Int) -> (Int, String)
The stringify macro takes an integer as the input parameter and outputs a tuple containing an the result, an integer, and the calculation-- a string. If the arguments of the macro expression don't match the macro's parameters, or don't type check by themselves, the compiler will emit an error without applying the macro expansion.
For example, passing a string literal to this macro, the compiler complains that 'String' is not convertible to expected argument type 'Int'.

This is different to, for example, C macros, which are evaluated at the pre-processor stage before type-checking. Also this macro is declared with the freestanding expression macro role. This means that we can use the macro wherever we can use an expression, and that it will be indicated by the hash character, like we see with #stringify.
Other kinds of macros are attached macros that can augment declarations.
After checking that all the arguments match the macro's parameters, the compiler performs the macro expansion.
Macro plug-in
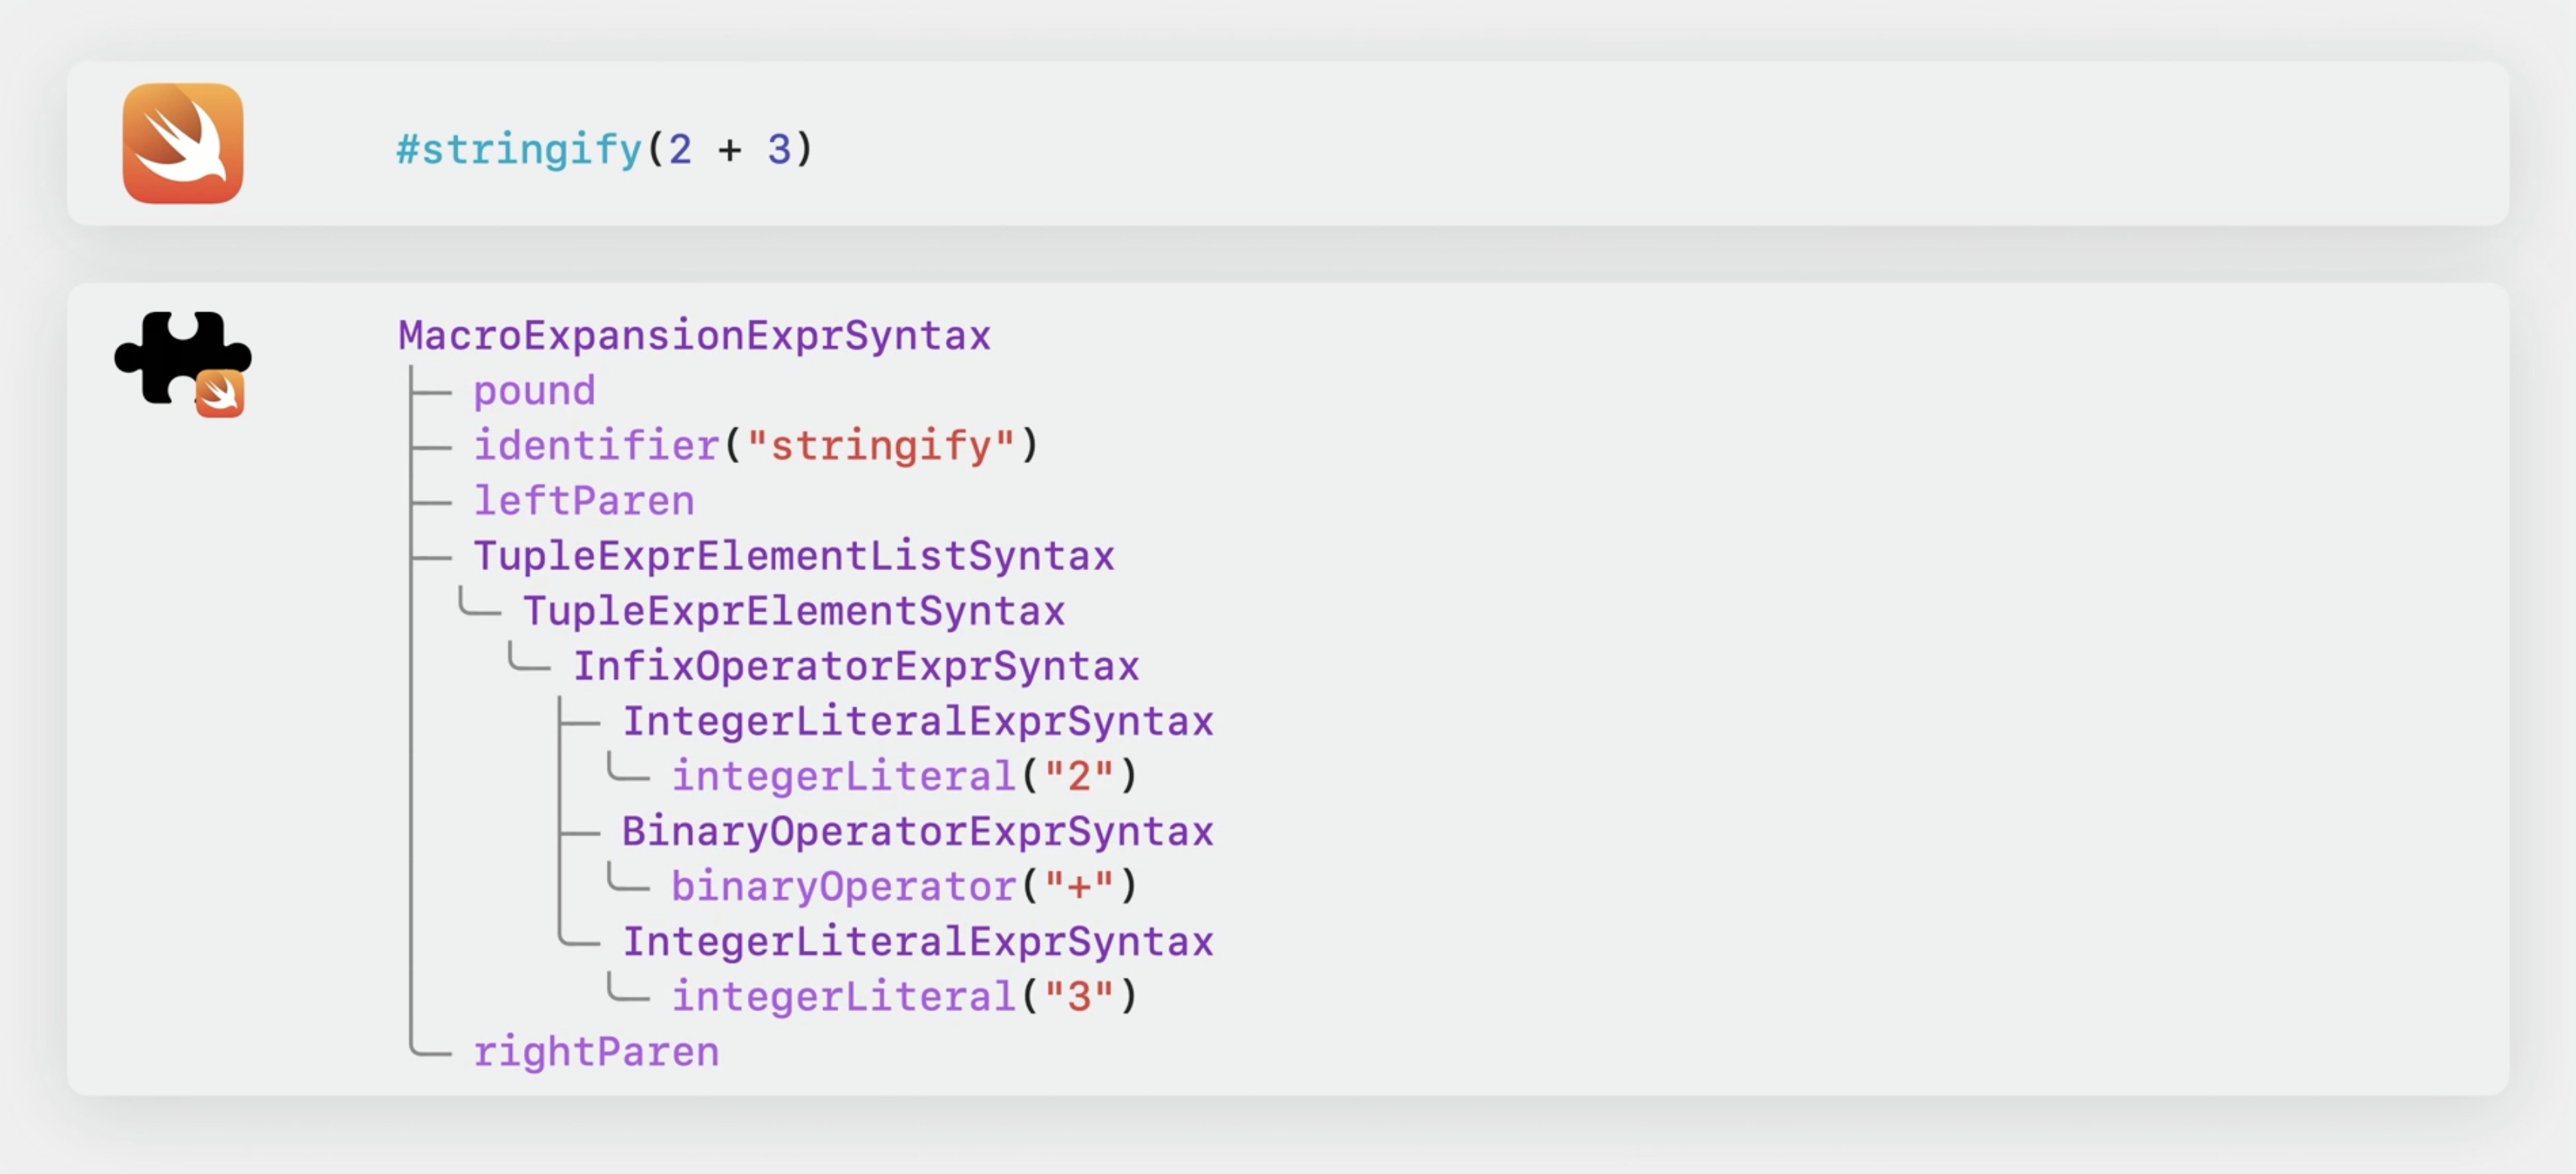
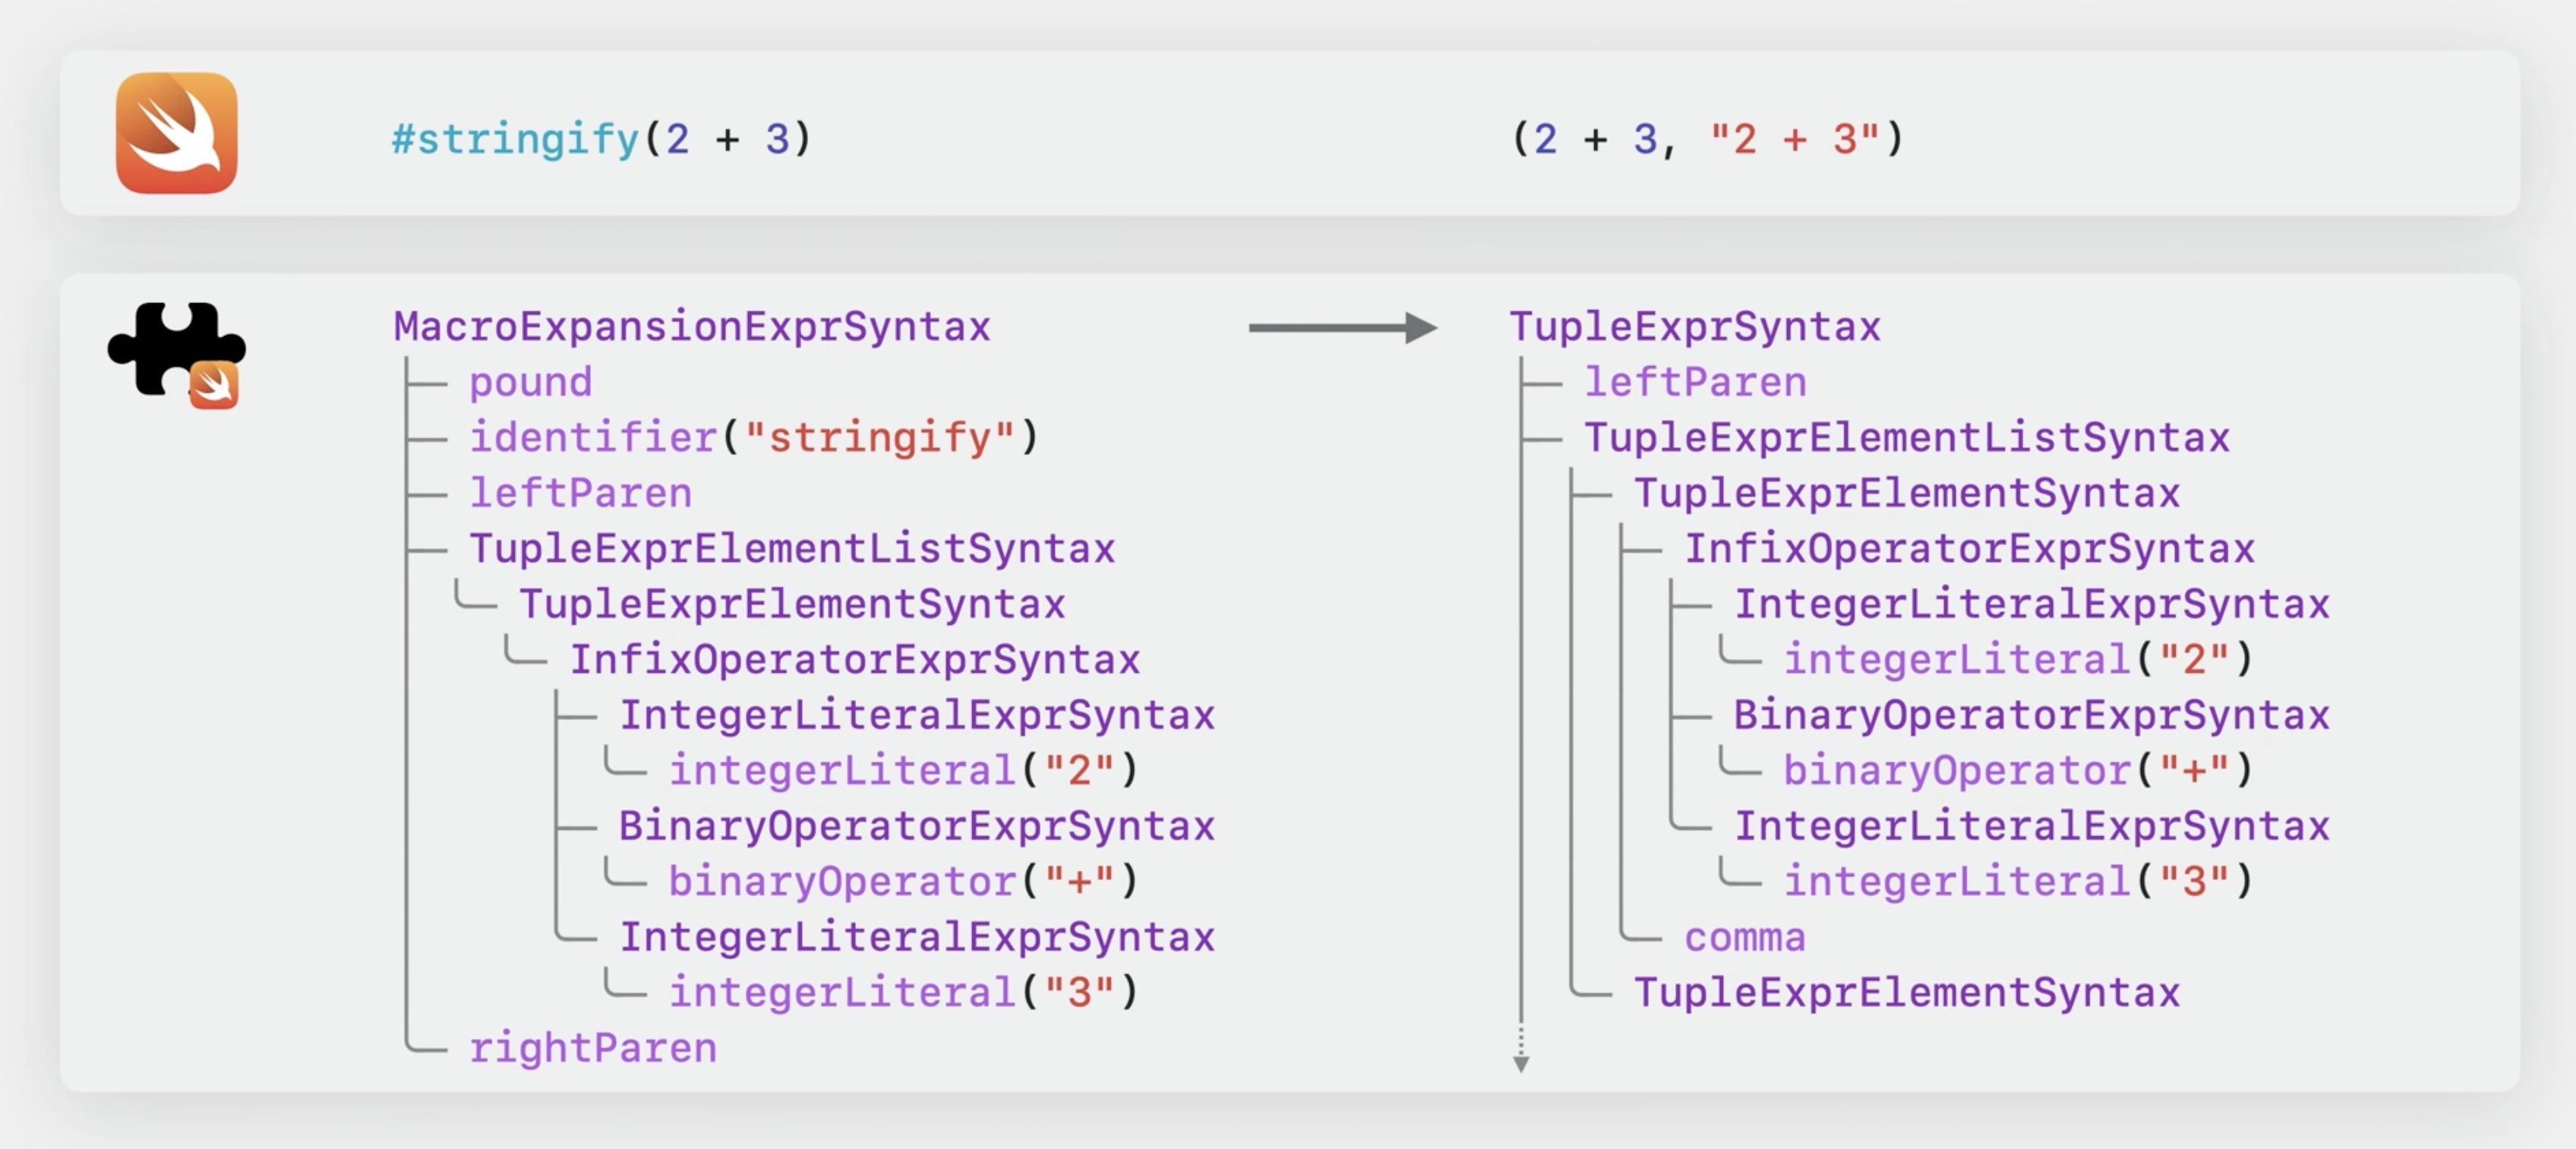
To perform the expansion, each macro defines its implementation in a compiler plug-in. The compiler will send the source code of the entire macro expression to that plug-in. The first thing that the macro plug-in does, is to parse the source code of the macro into a SwiftSyntax tree. This tree is a source-accurate, structural representation of the macro, and it will be the basis on which the macro operates. For example, our 'stringify' macro is represented in the tree as a macro expansion expression node. That expression has the macro name 'stringify'. And it takes a single argument, which is the infix operator plus applied to 2 and 3.
The macro's implementation is itself a program written in Swift and can perform any transformation to the syntax tree it wants. In this case, it generates a tuple like. It will then serialize the generated syntax tree into source code again and send it to the compiler, which will replace the macro expression by the expanded code.
Create a macro
The new macro template in Xcode defines the stringify macro. Let us walk through that template and explore the macro's definition, how the expansion works, and how the macro can be tested.
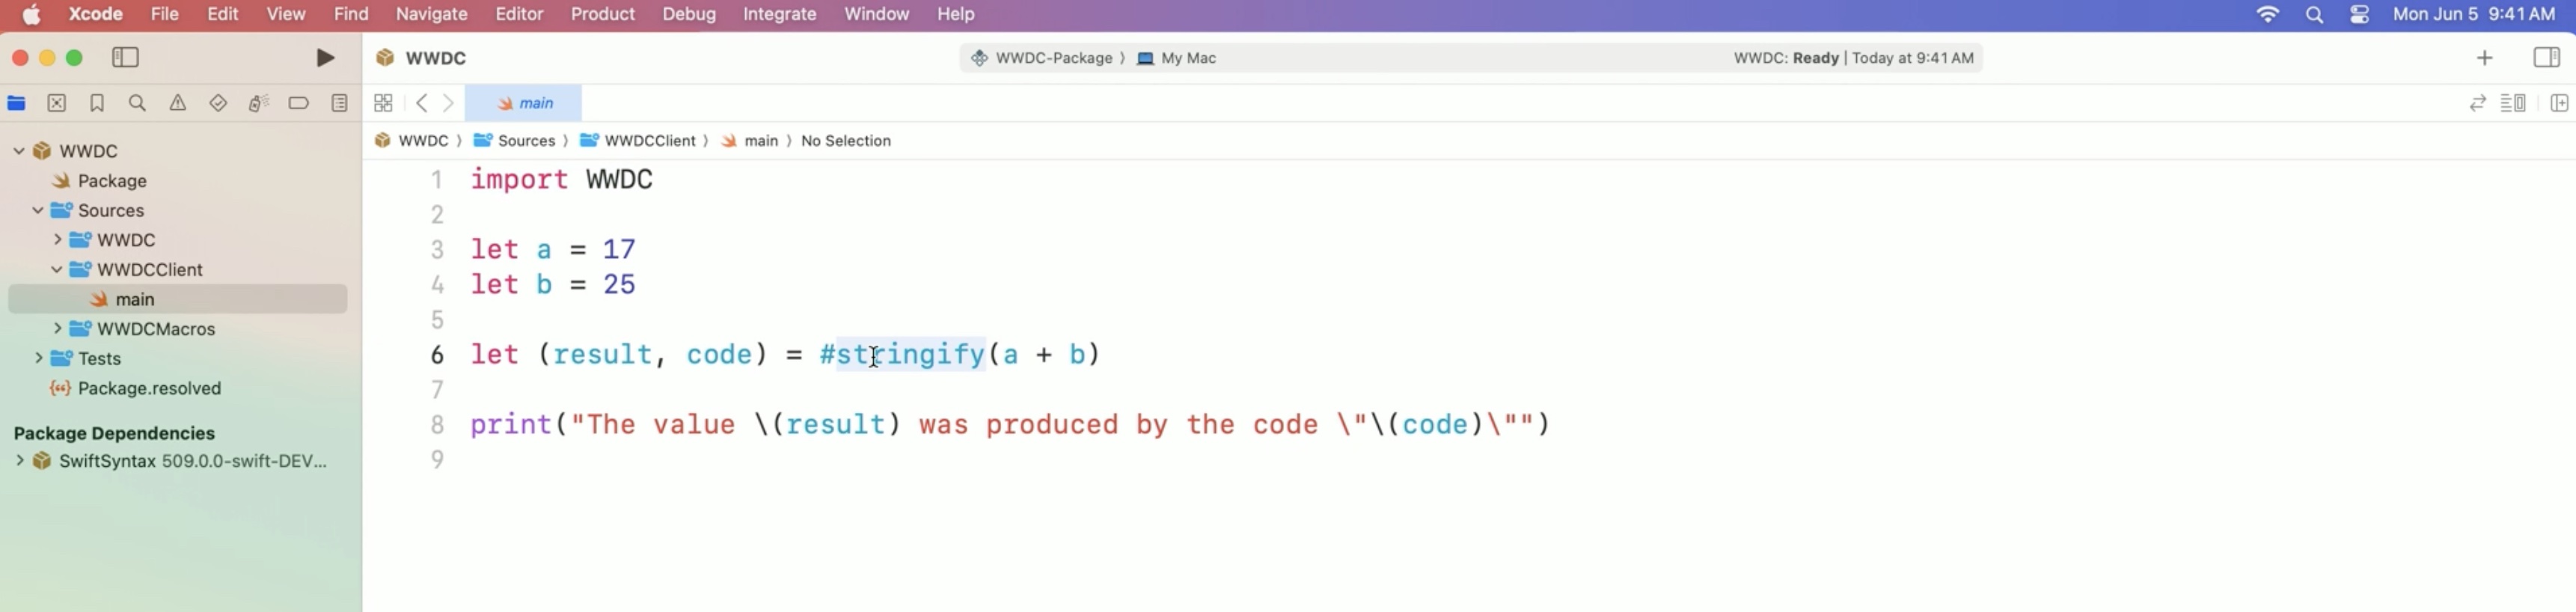
To create the template, click File, New, Package, and select the Swift Macro template. Let's call our first macro "WWDC".
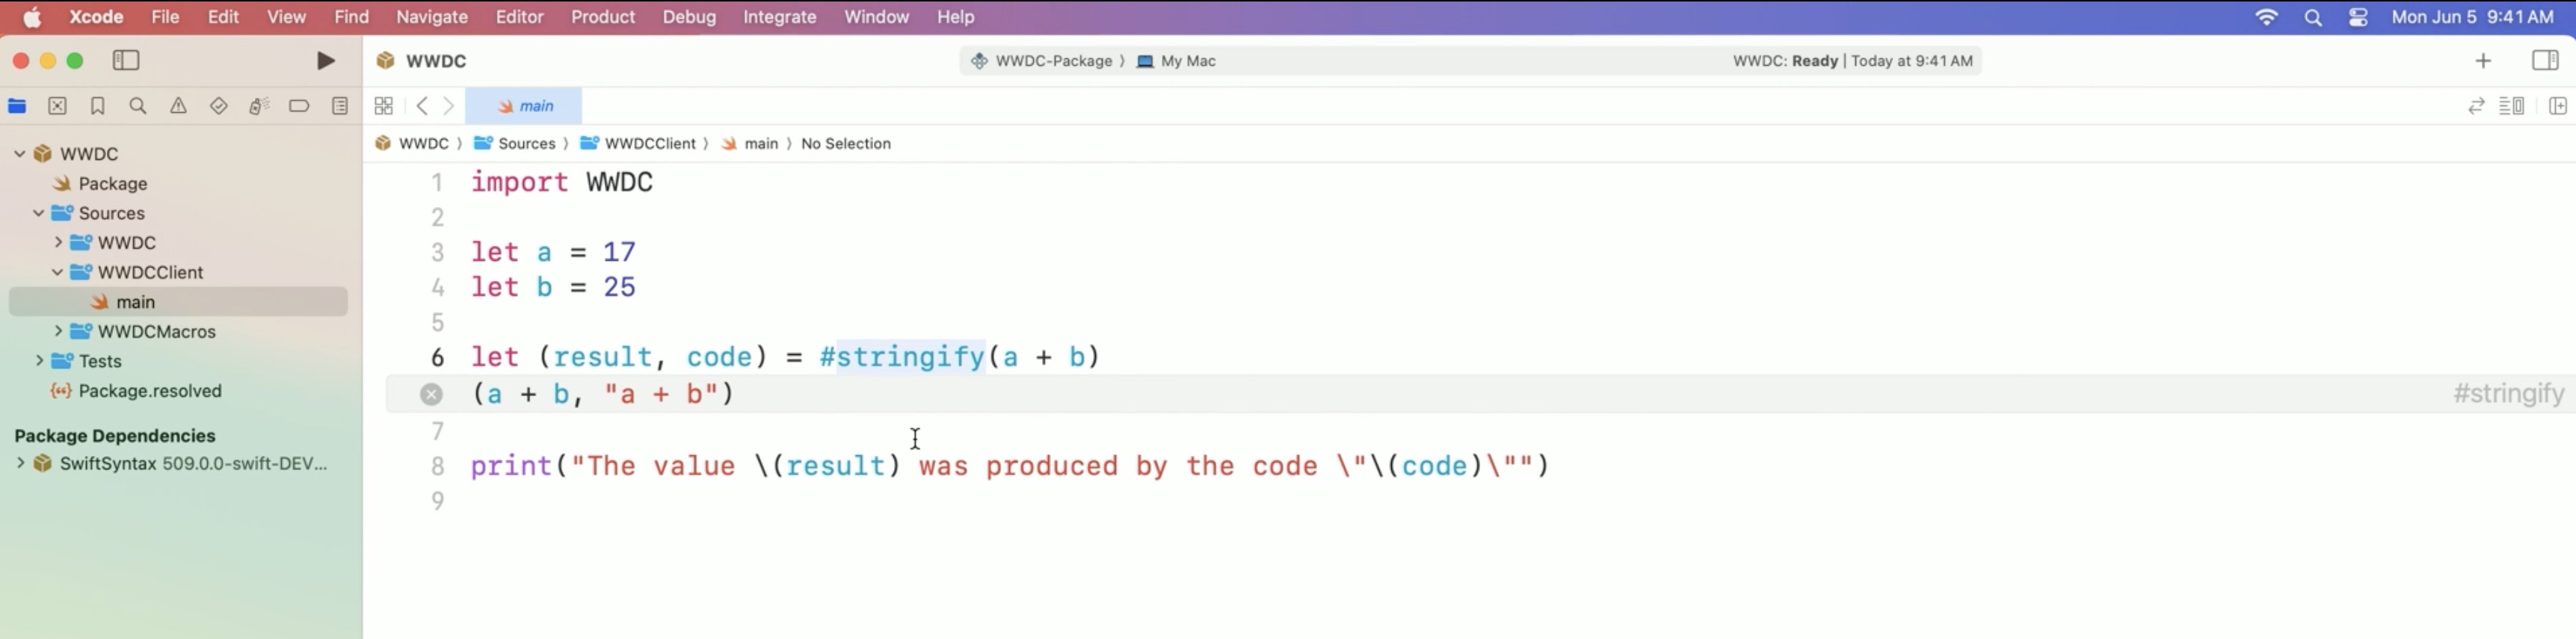
Here we have an invocation of the #stringify macro, similar to what we have seen before. It takes a parameter "a + b" and returns the result, as well as the code that produced it.
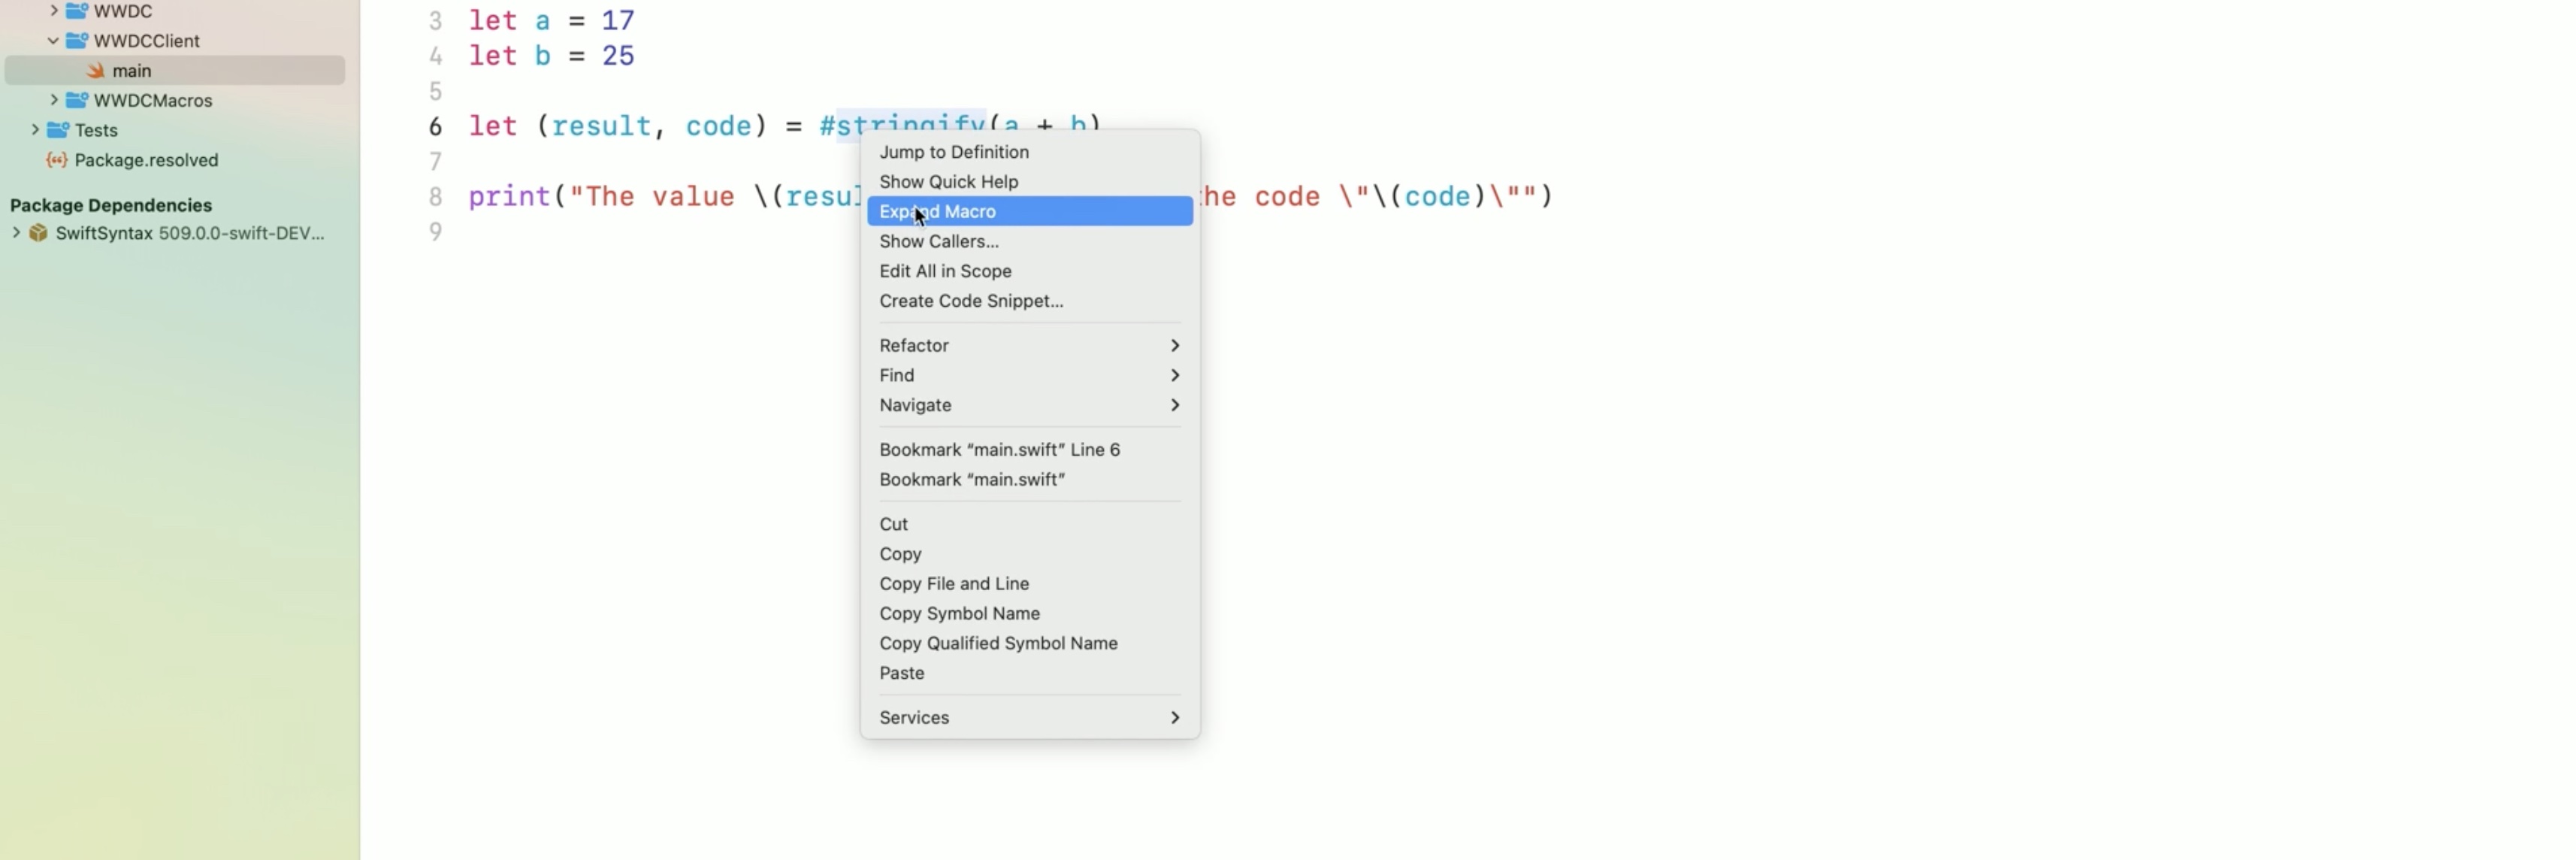
To see what the macro expands to, right-click on it and select Expand Macro.
That's exactly what we saw before.
But how is the macro defined? Let's jump to its definition. (right click again, first manu item from top).
Here we have a slightly generalized version of our previous 'stringify' macro. Instead of taking an integer, this macro is generic and can receive any type T. The macro is declared as an external macro.
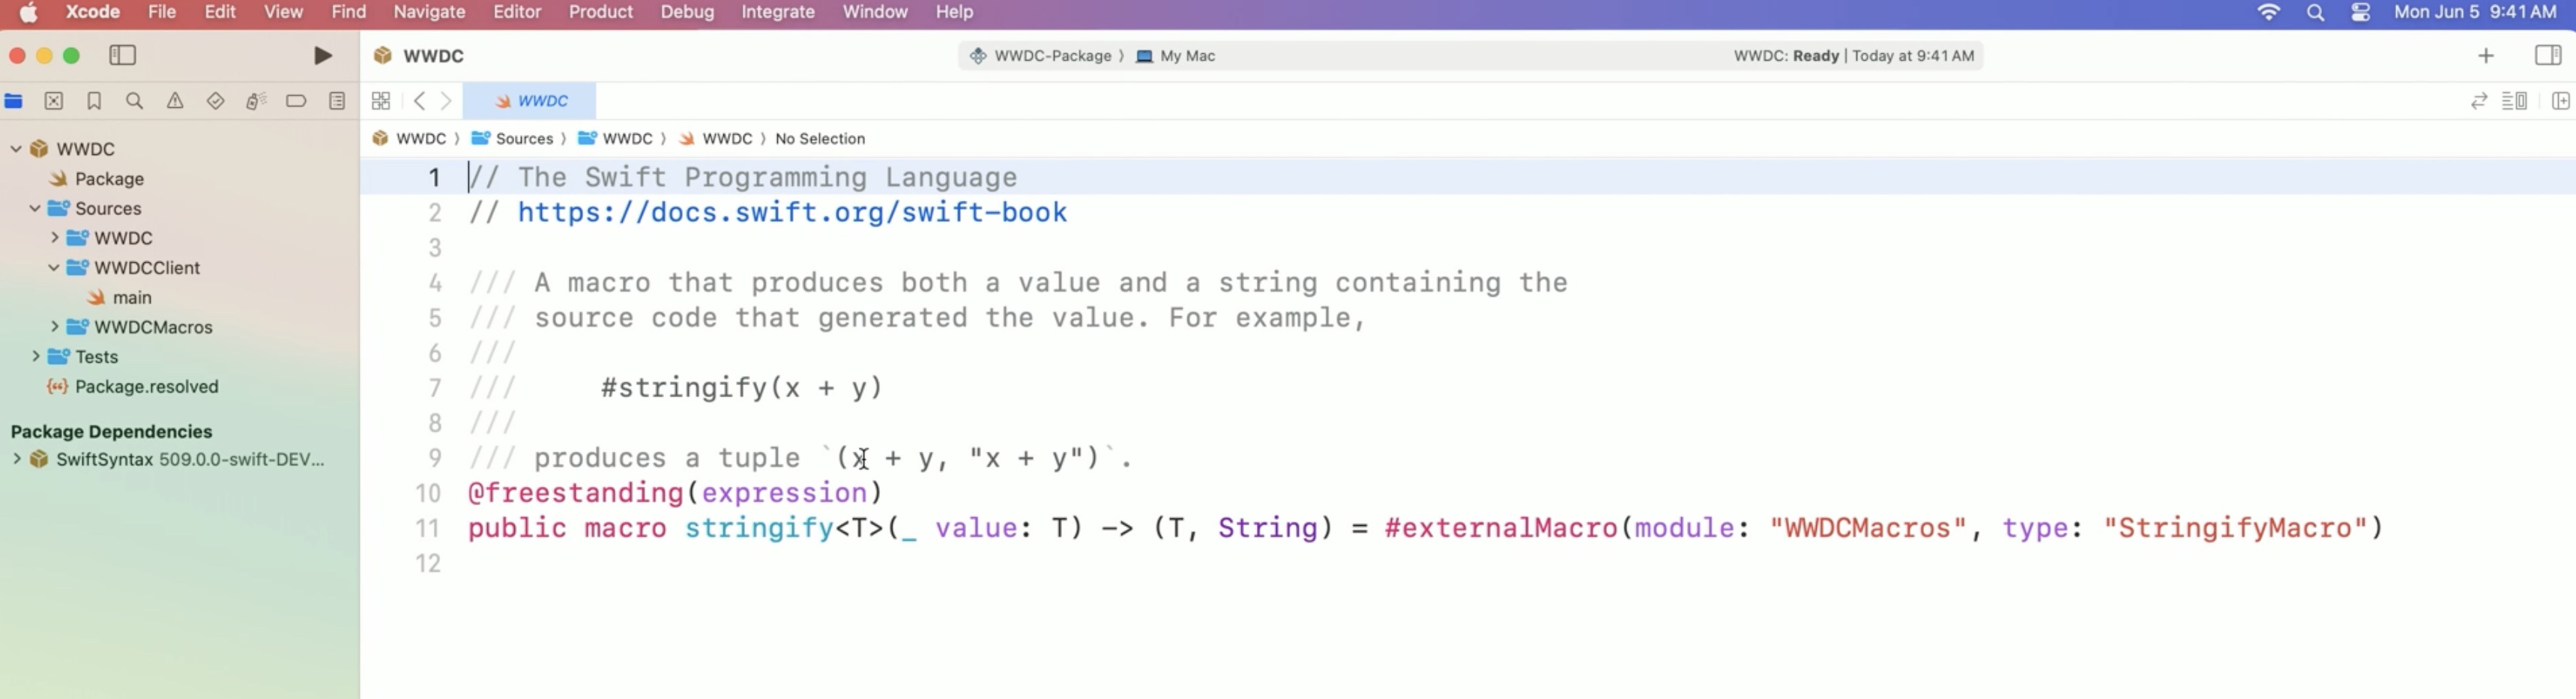
This tells the compiler that to perform the expansion, it needs to look at the StringifyMacro type in the WWDCMacros module.
How is that type defined?
command - shift - o / type "stringify" and select from search "StringifyMacro"
Because stringify is declared as a freestanding expression macro, the StringifyMacro type needs to conform to the ExpressionMacro protocol.This protocol has a single requirement: The expansion function. It takes the syntax tree of the macro expression itself, as well as a context that can be used to communicate with the compiler.
The expansion function then returns the rewritten expression syntax.
What does it do in the implementation?
At first, it retrieves the single argument to the macro expression. It knows that this argument exists because stringify is declared as taking a single parameter and all arguments need to type-check before the macro expansion can be applied.
It then uses string interpolation to create the syntax tree of a tuple. The first element is the argument itself and the second is a string literal containing the source code of the argument.
// StringifyMacro implementation
public struct StringifyMacro: ExpressionMacro {
	public static func expansion(
		of node: some FreestandingMacroExpansionSyntax,
		in context: some MacroExpansionContext
	) -> ExprSyntax {
		guard let argument = node.argumentList.first?.expression else {
			fatalError "compiler bug: the macro does not have any arguments")
		}

		return "(\(argument), \(literal: argument.description))"
	}
}
The function is not returning a string here. It is returning an expression syntax. The macro will automatically invoke the Swift parser to transform this literal into a syntax tree. And because it is using the literal interpolation style for the second argument, it will make sure that the literal's contents are properly escaped.
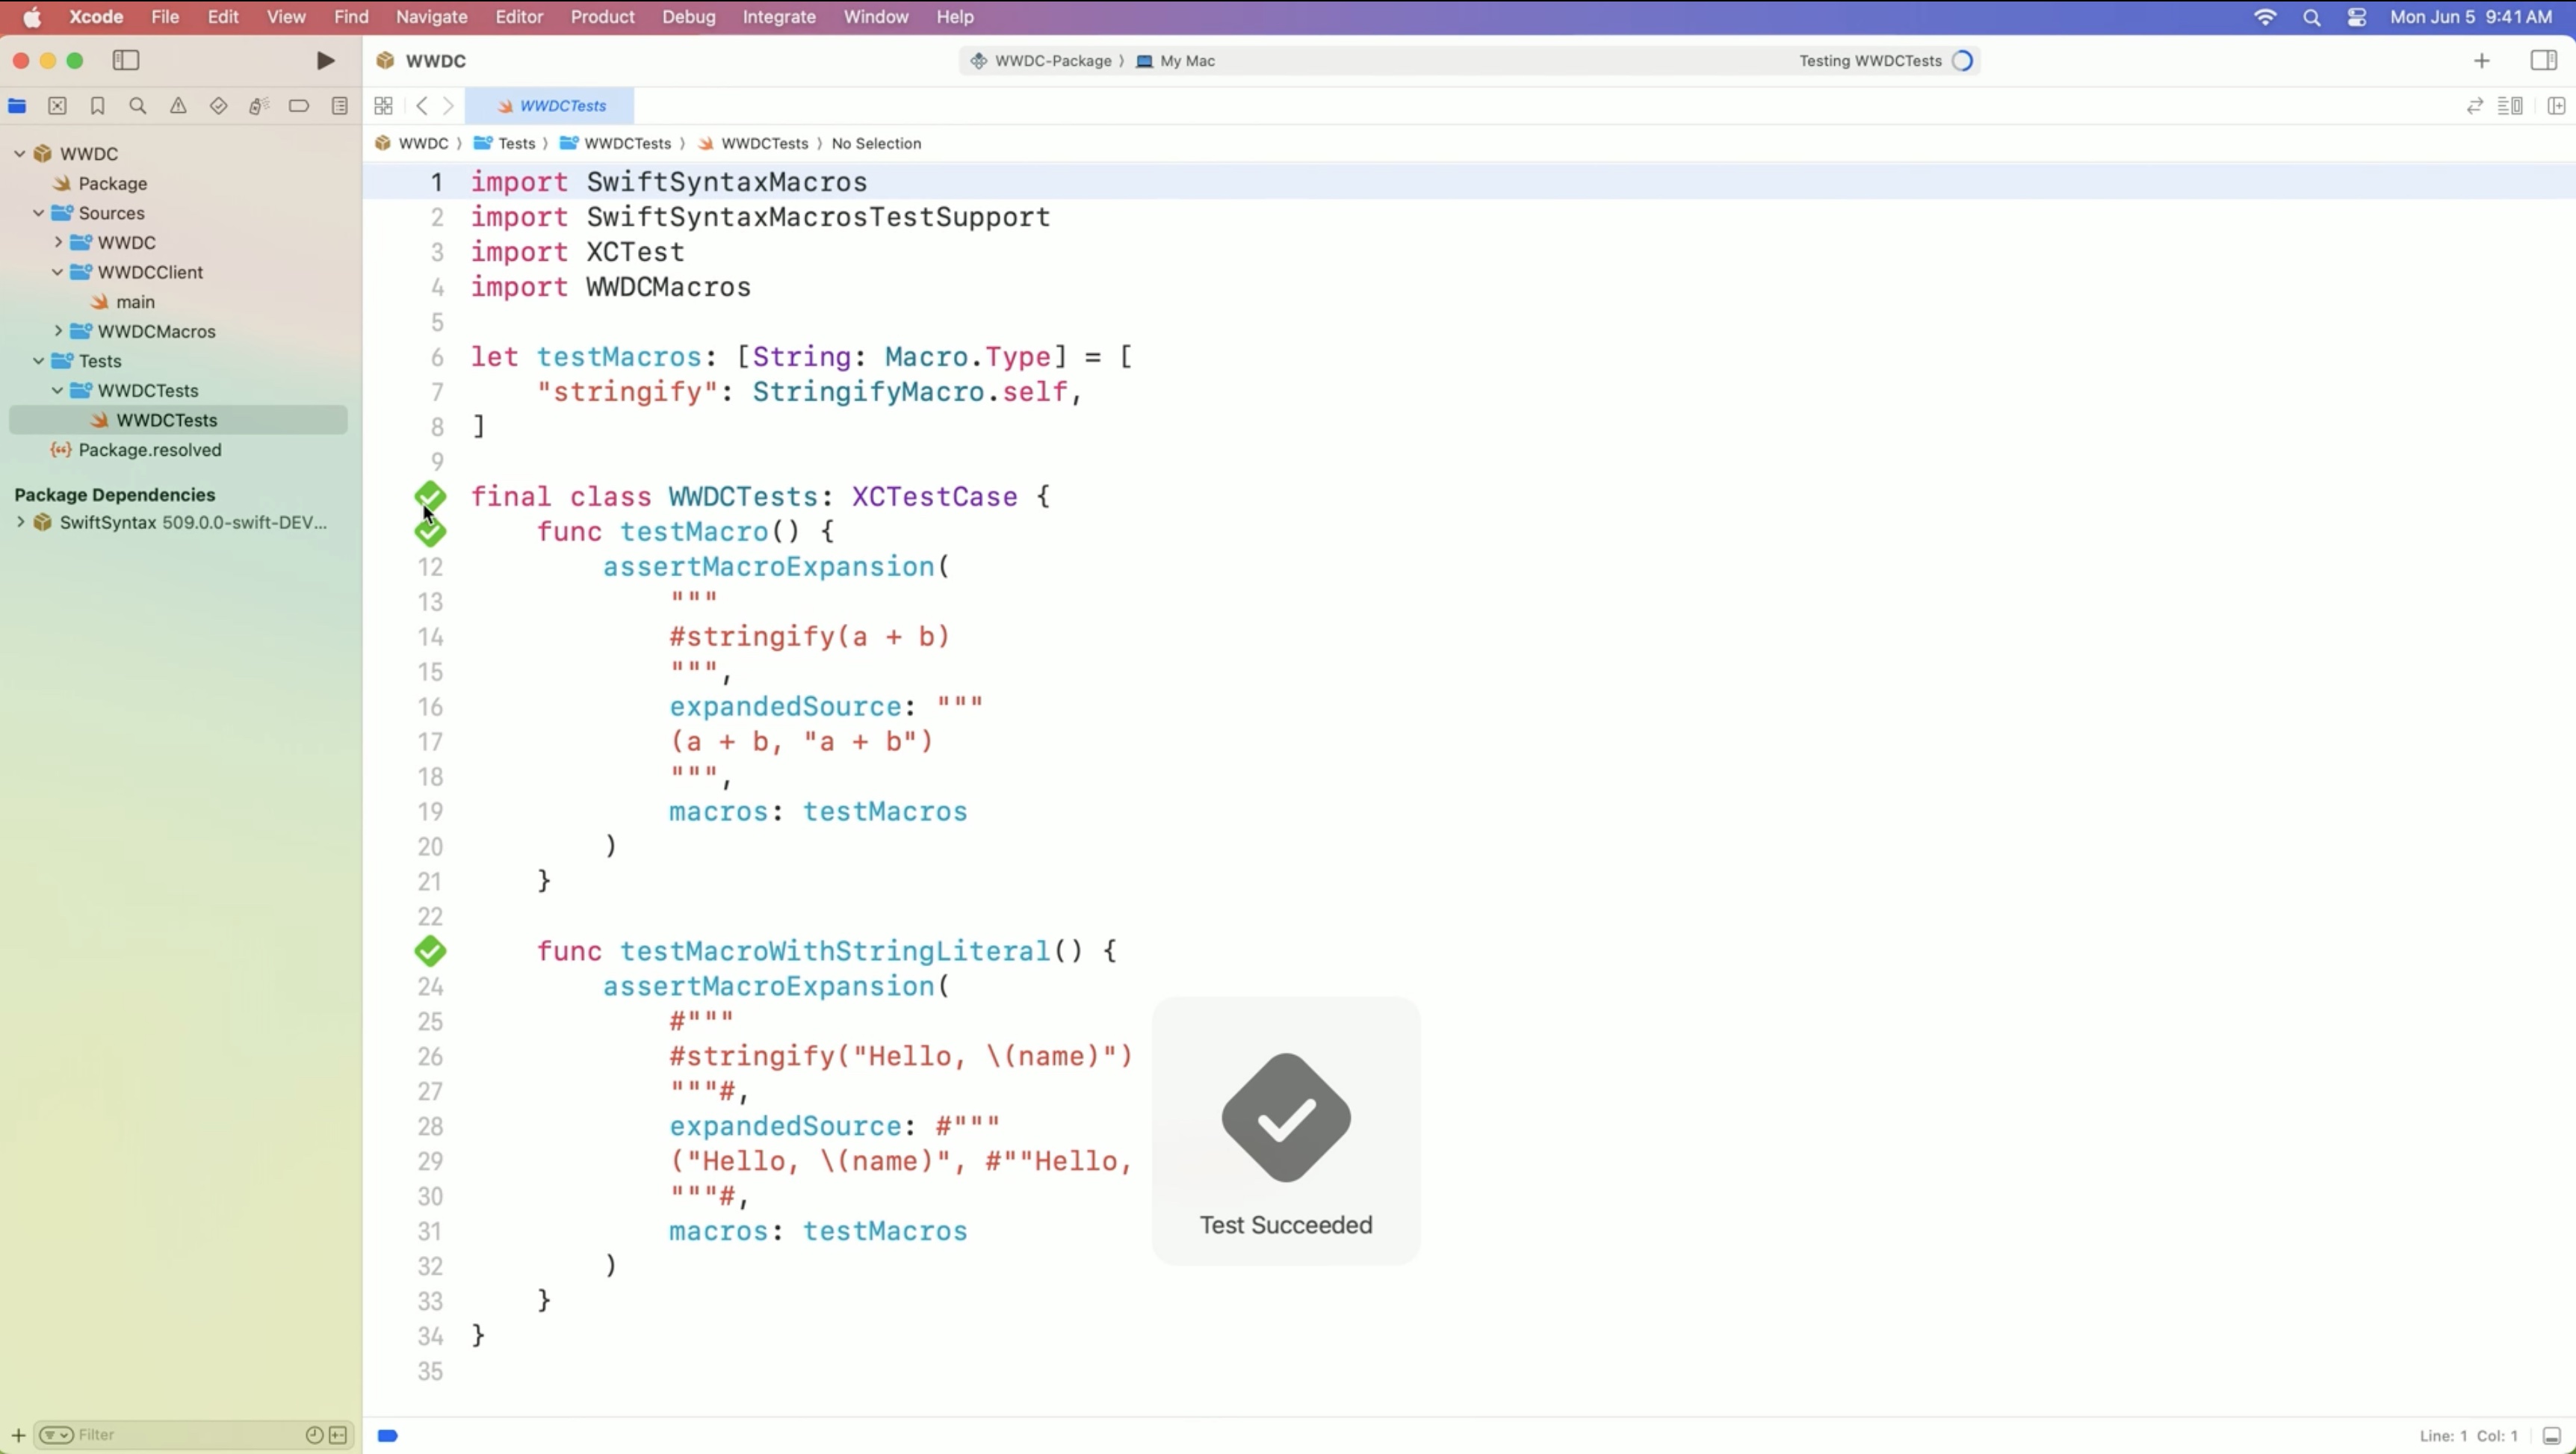
Because macros don't have side effects and the source code of syntax trees is easy to compare, a great way to test them is to write unit tests. The macro template already comes with one.
// stringify test case

final class WWDCTests: XCTestCase {
	func testMacro() {
		assertMacroExpansion(
			"""
			#stringify(a + b)
			""",
			expandedSource: """
			(a + b, "a + b")
			""",
			macros: testMacros
		)
	}
}

let testMacros: [String: Macro.Type] = [
	"stringify": StringifyMacro.self
]
This test case uses the 'assertMacroExpansion' function from the SwiftSyntax package to verify that the 'stringify' macro expands correctly.
It takes the '#stringify(a + b)' expression, that we saw before, as input. and asserts that after the macro is expanded, it produces a tuple containing 'a + b' and the string literal 'a + b'.
To tell the test case how to expand the macros, it passes the 'testMacros' parameter, which specifies that the macro ‘#stringify' should be expanded using the 'StringifyMacro' type.
Swift macro template recap
- Macro declaration defines the macro's signature
- Implementation operates on SwiftSyntax trees
- Easy to test
Macro roles
A freestanding expression macro is spelled with a hash and allows us to rewrite the entire macro expression. There's also a freestanding declaration role that expands to a declaration instead of an expression.
The other kinds of macros are attached macros. These are spelled with an @, just like attributes, and allow the macro to augment the declaration they are attached to. For example, an attached member macro adds new members of the type it is attached to.
Macro roles| Description |:------------|--:| |@freestanding(expression)| Creates a piece of code that returns a value| |@freestanding(declaration) |Creates one or more declarations| |@attached(peer)|Adds new declarations alongside the declaration it's applied to| |@attached(accessor)|Adds accessors to a property| |@attached (memberAttribute)|Adds attributes to the declarations in the tvpe/extension it's applied to| |@attached(member)|Adds new declarations inside the type/extension it's applied to| |@attached(conformance)|Adds conformances to the tvpe/extension it's applied to|
To learn more about these other roles, watch "Expand on Swift macros":
Expand on Swift macros
Example with the ski instructor app that allows to plan the tours for the students.
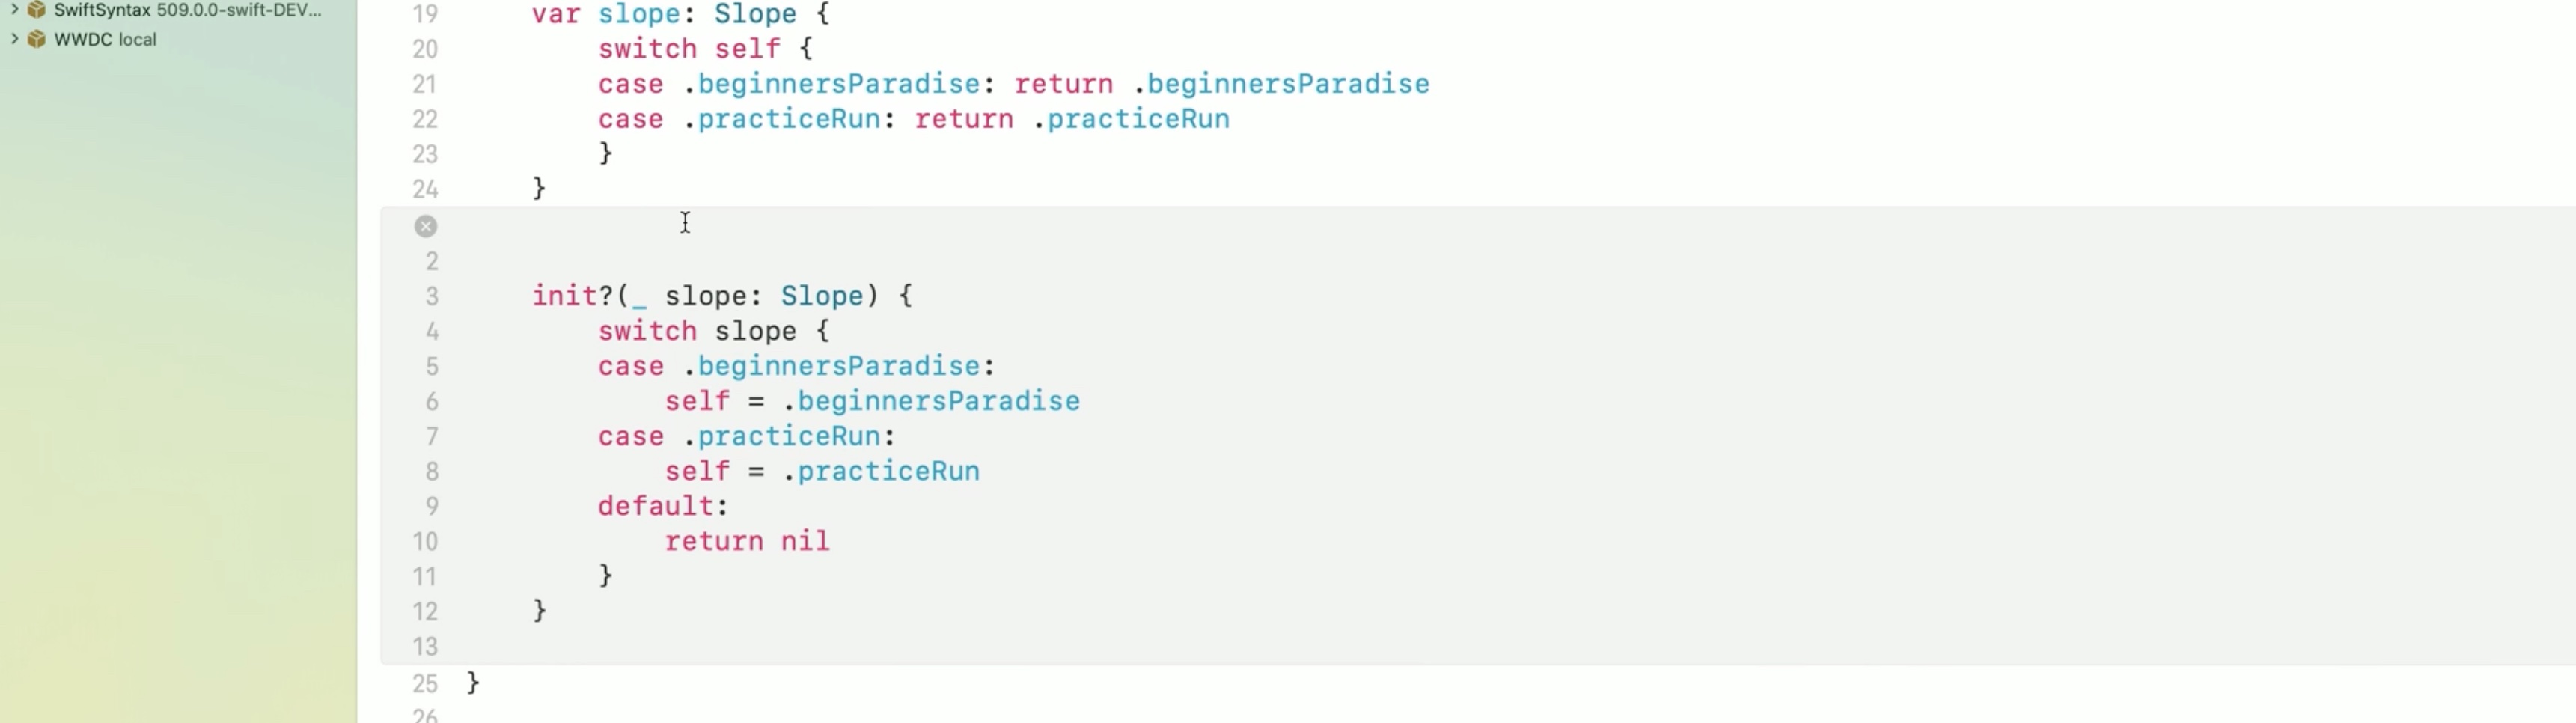
In addition to the Slope enum that contains all the slopes in the ski resort, there is also an EasySlope type that only contains slopes suitable for beginners. It has an initializer to convert a slope to an easy slope, if the slope is indeed easy, and a computed property to convert an easy slope back to a general slope.
// Slopes in my favorite ski resort.
enum Slope {
	case beginnersParadise
	case practiceRun
	case livingRoom
	case olympicRun
	case blackBeauty
 }

// Slopes suitable for beginners. Subset of 'Slopes'.
enum EasySlope {
	case beginnersParadise
	case practiceRun

	init?(_ slope: Slope) {
		switch slope {
		case .beginnersParadise: self = .beginnersParadise
		case .practiceRun: self = .practiceRun
		default: return nil
		}
	}

	var slope: Slope {
		switch self {
			case .beginnersParadise: return .beginnersParadise
			case .practiceRun: return .practiceRun
		}
	}
}
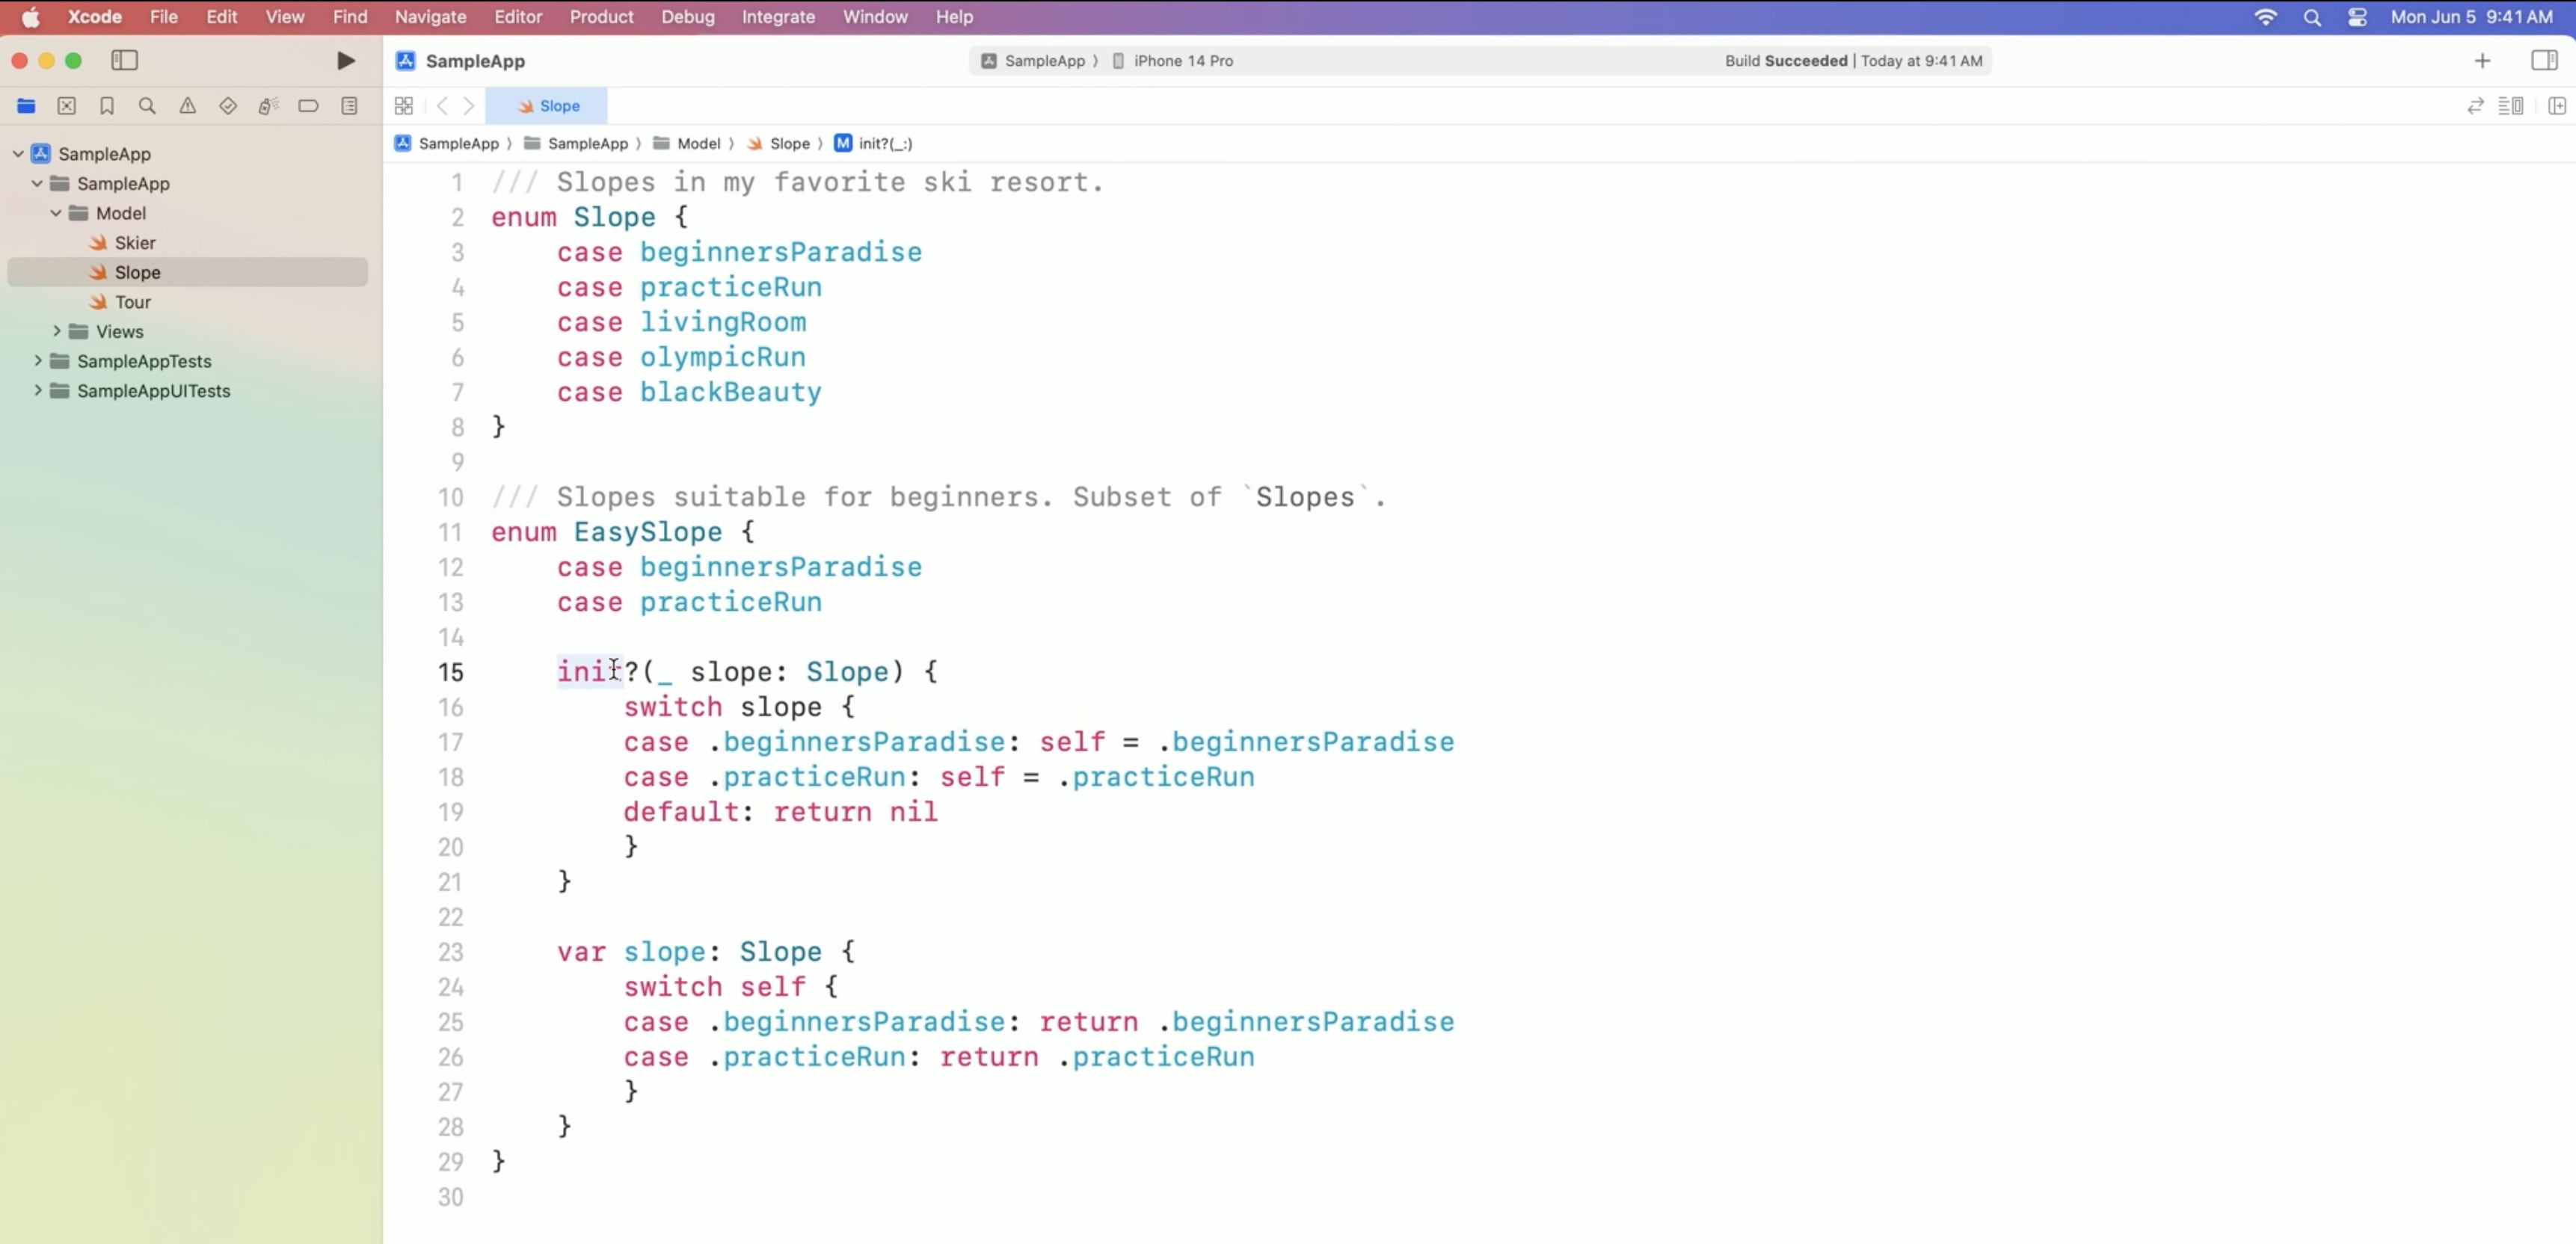
While this provides great type safety, it is really repetitive. To add an easy slope, we need to add it to Slope...EasySlope, the initializer, and the computed property. Let's see if we can improve things using a macro.
What we want to do is to automatically generate the initializer and the computed property. How can we do this?
The Plan
- declare an attached member macro.
- Create empty macro implementation
Next, create the compiler plug-in that contains the macro's implementation. We will develop it in a test-driven way.
- Create test case Thus, we will leave its implementation empty until we write a test case for it.
- Write macro implementation After we defined the macro's behavior in a test case, we will write the implementation to match that test case.
- Integrate macro into app we will integrate the new macro into the app. We will remove the initializer and have the macro generate it for us.
To develop the macro, we work with the template that we created earlier.
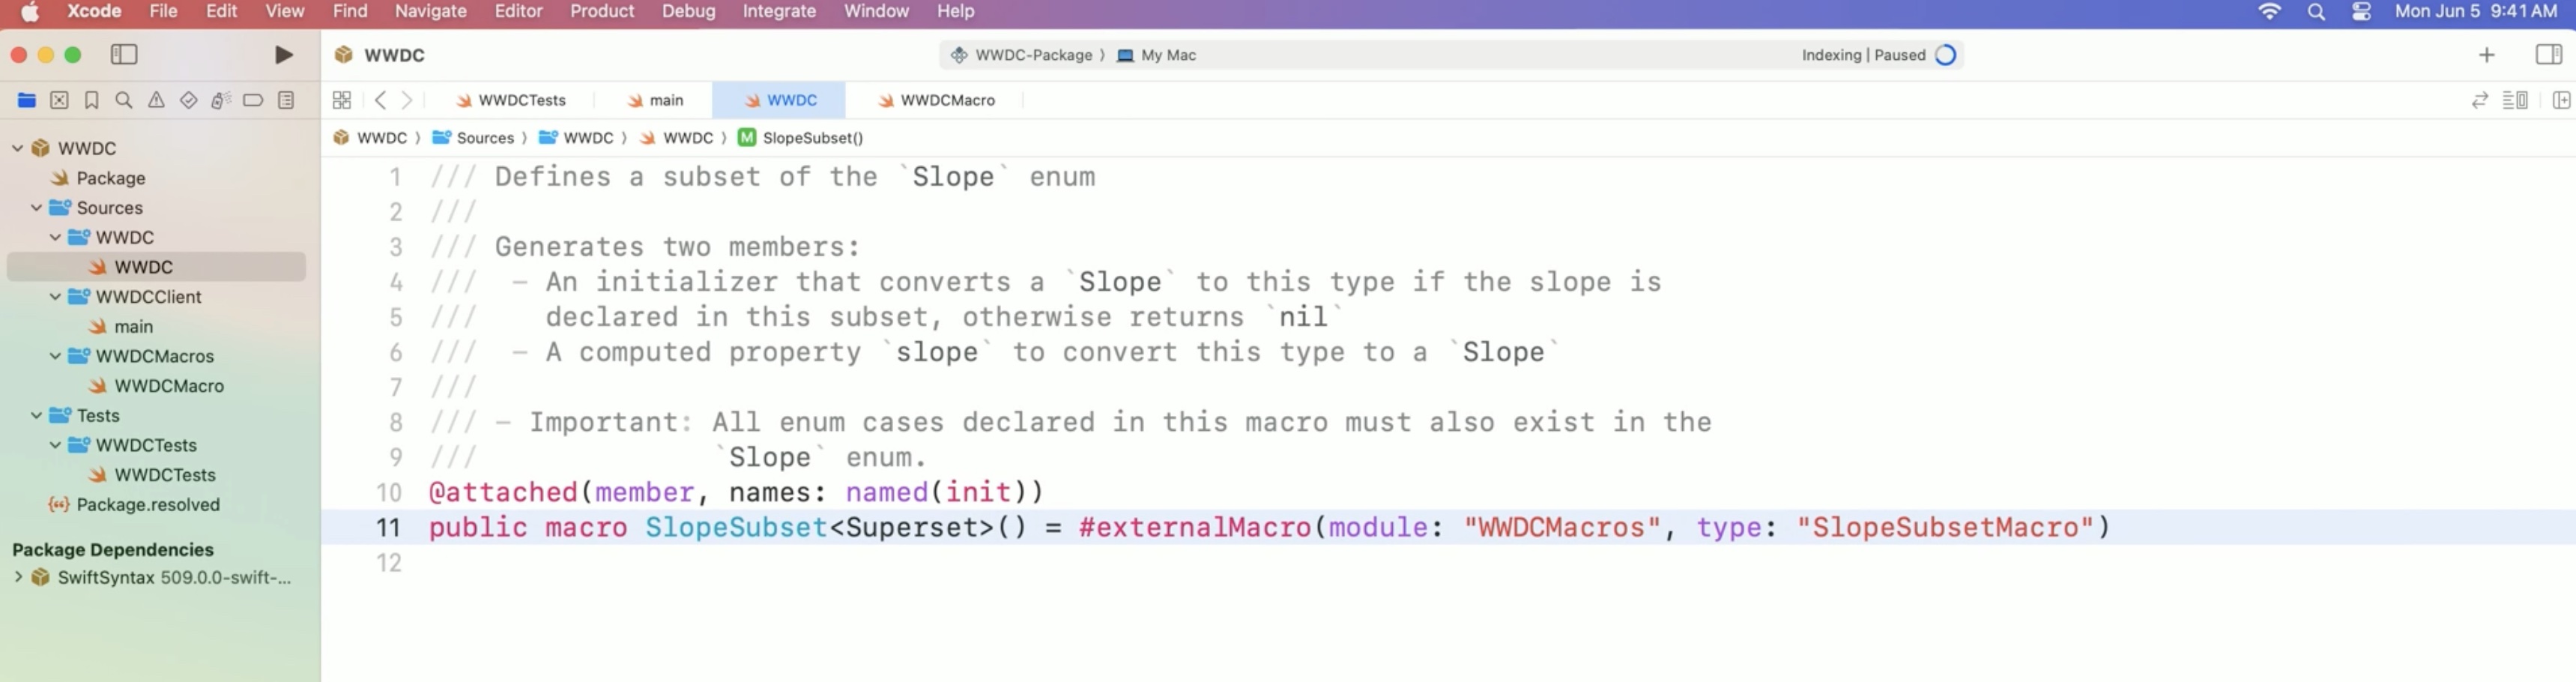
Start by declaring a new attached member macro by using the '@attached(member)' attribute and call it SlopeSubset because EasySlope is a subset of Slope.
The macro also defines the names of the members it introduces.
/// Defines a subset of the 'Slope' enum
///
/// Generates an initializer that converts a 'Slope' to this type if the slope is
/// declared in this subset, otherwise returns nil
///
/// - Important: All enum cases declared in this macro must also exist in the
/// Slope enum.
@attached (member, names: named(init))
public macro SlopeSubset() = #externalMacro(module: "WWDCMacros", type: "SlopeSubsetMacro")
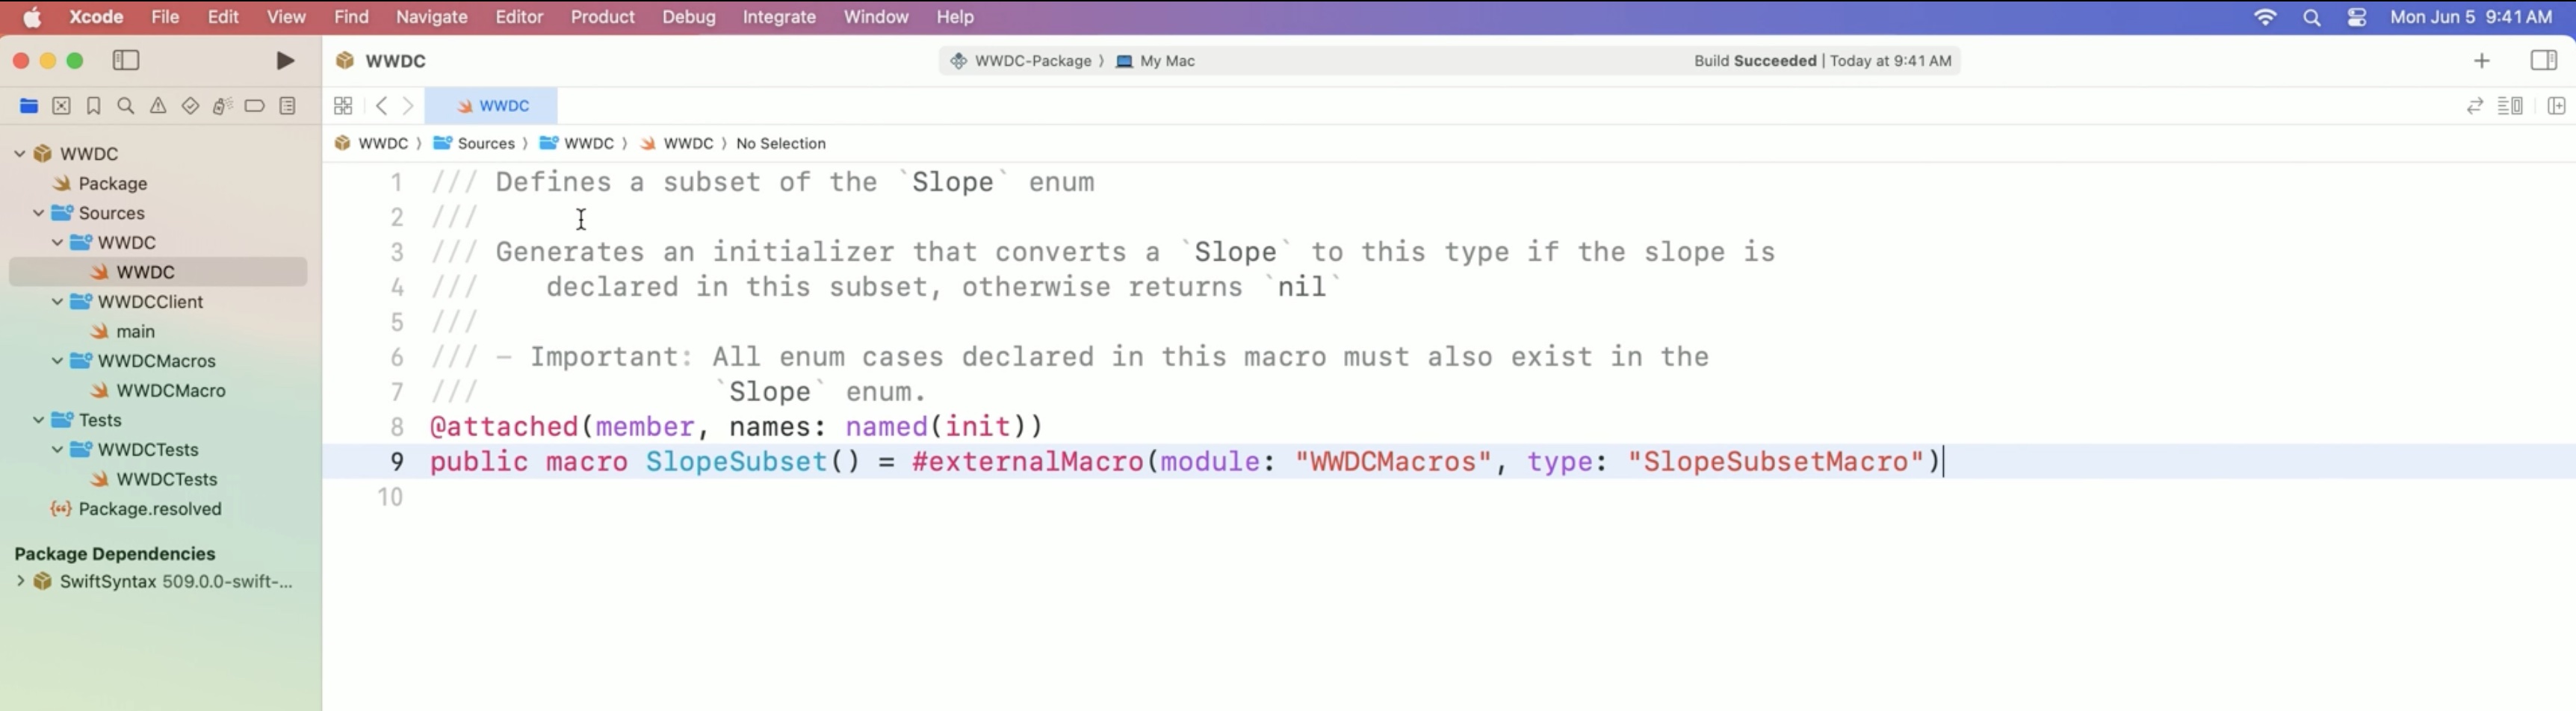
In this demo, we will see how to generate the initializer. Generating the computed property is very similar, because it's also just a switch statement that switches over all the cases. With this declaration, we have defined the macro, but we have not implemented the expansion that it actually performs. For this, our macro references the SlopeSubsetMacro type in the WWDCMacros module.
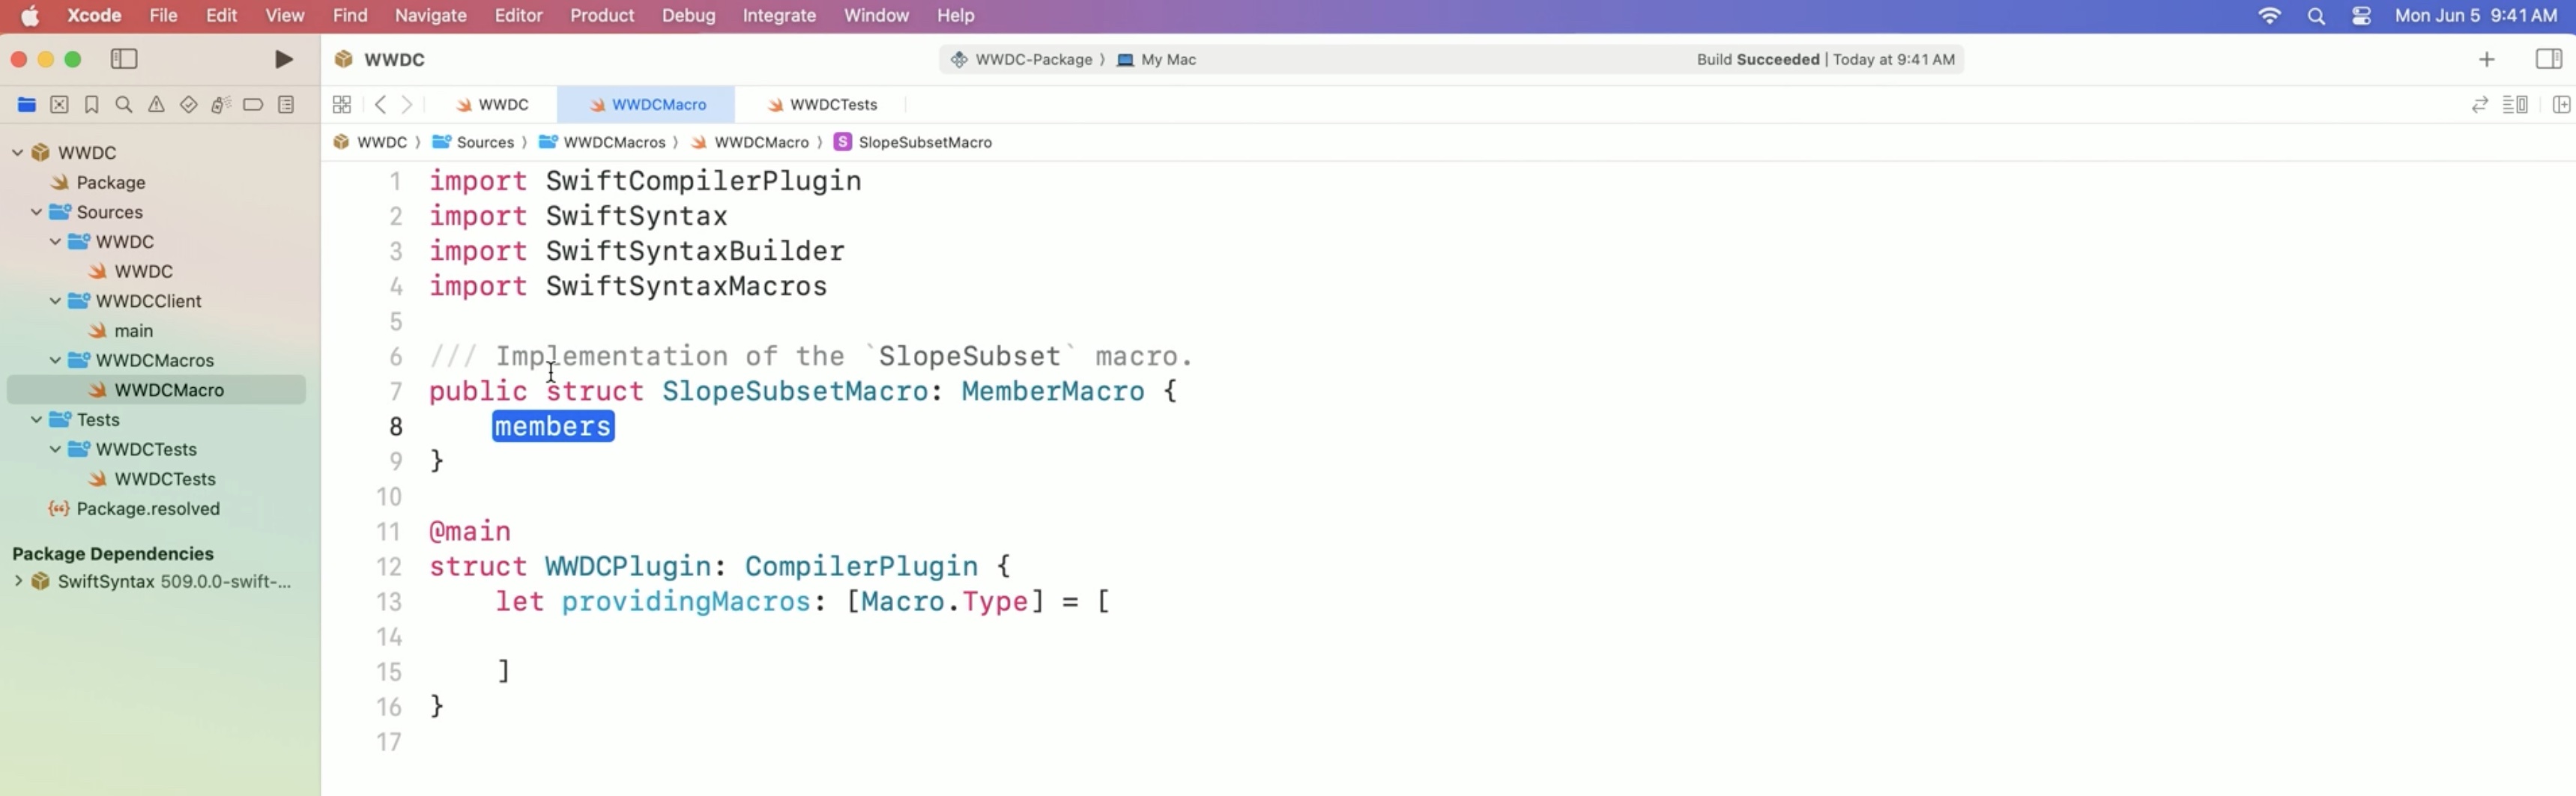
Since SlopeSubset as an attached member macro, the corresponding implementation needs to conform to the MemberMacro protocol. This protocol has a single requirement: The 'expansion' function, similar to ExpressionMacro.
import SwiftCompilerPlugin
import SwiftSyntax
import SwiftSyntaxBuilder
import SwiftSyntaxMacros

/// Implementation of the 'SlopeSubset macro.
public struct SlopeSubsetMacro: MemberMacro {
	// members
}

@main
struct WWDCPlugin: CompilerPlugin {
	let providingMacros: [Macro.Type] = [
		...

	]
}
The 'expansion' function takes the attribute with which we apply the macro to a declaration, as well as the declaration that the macro is being applied to. In our case, this will be the EasySlope enum declaration.
The macro then returns the list of all the new members it wants to add to that declaration.
import SwiftCompilerPlugin
import SwiftSyntax
import SwiftSyntaxBuilder
import SwiftSyntaxMacros
/// Implementation of the 'SlopeSubset macro.
public struct SlopeSubsetMacro: MemberMacro {
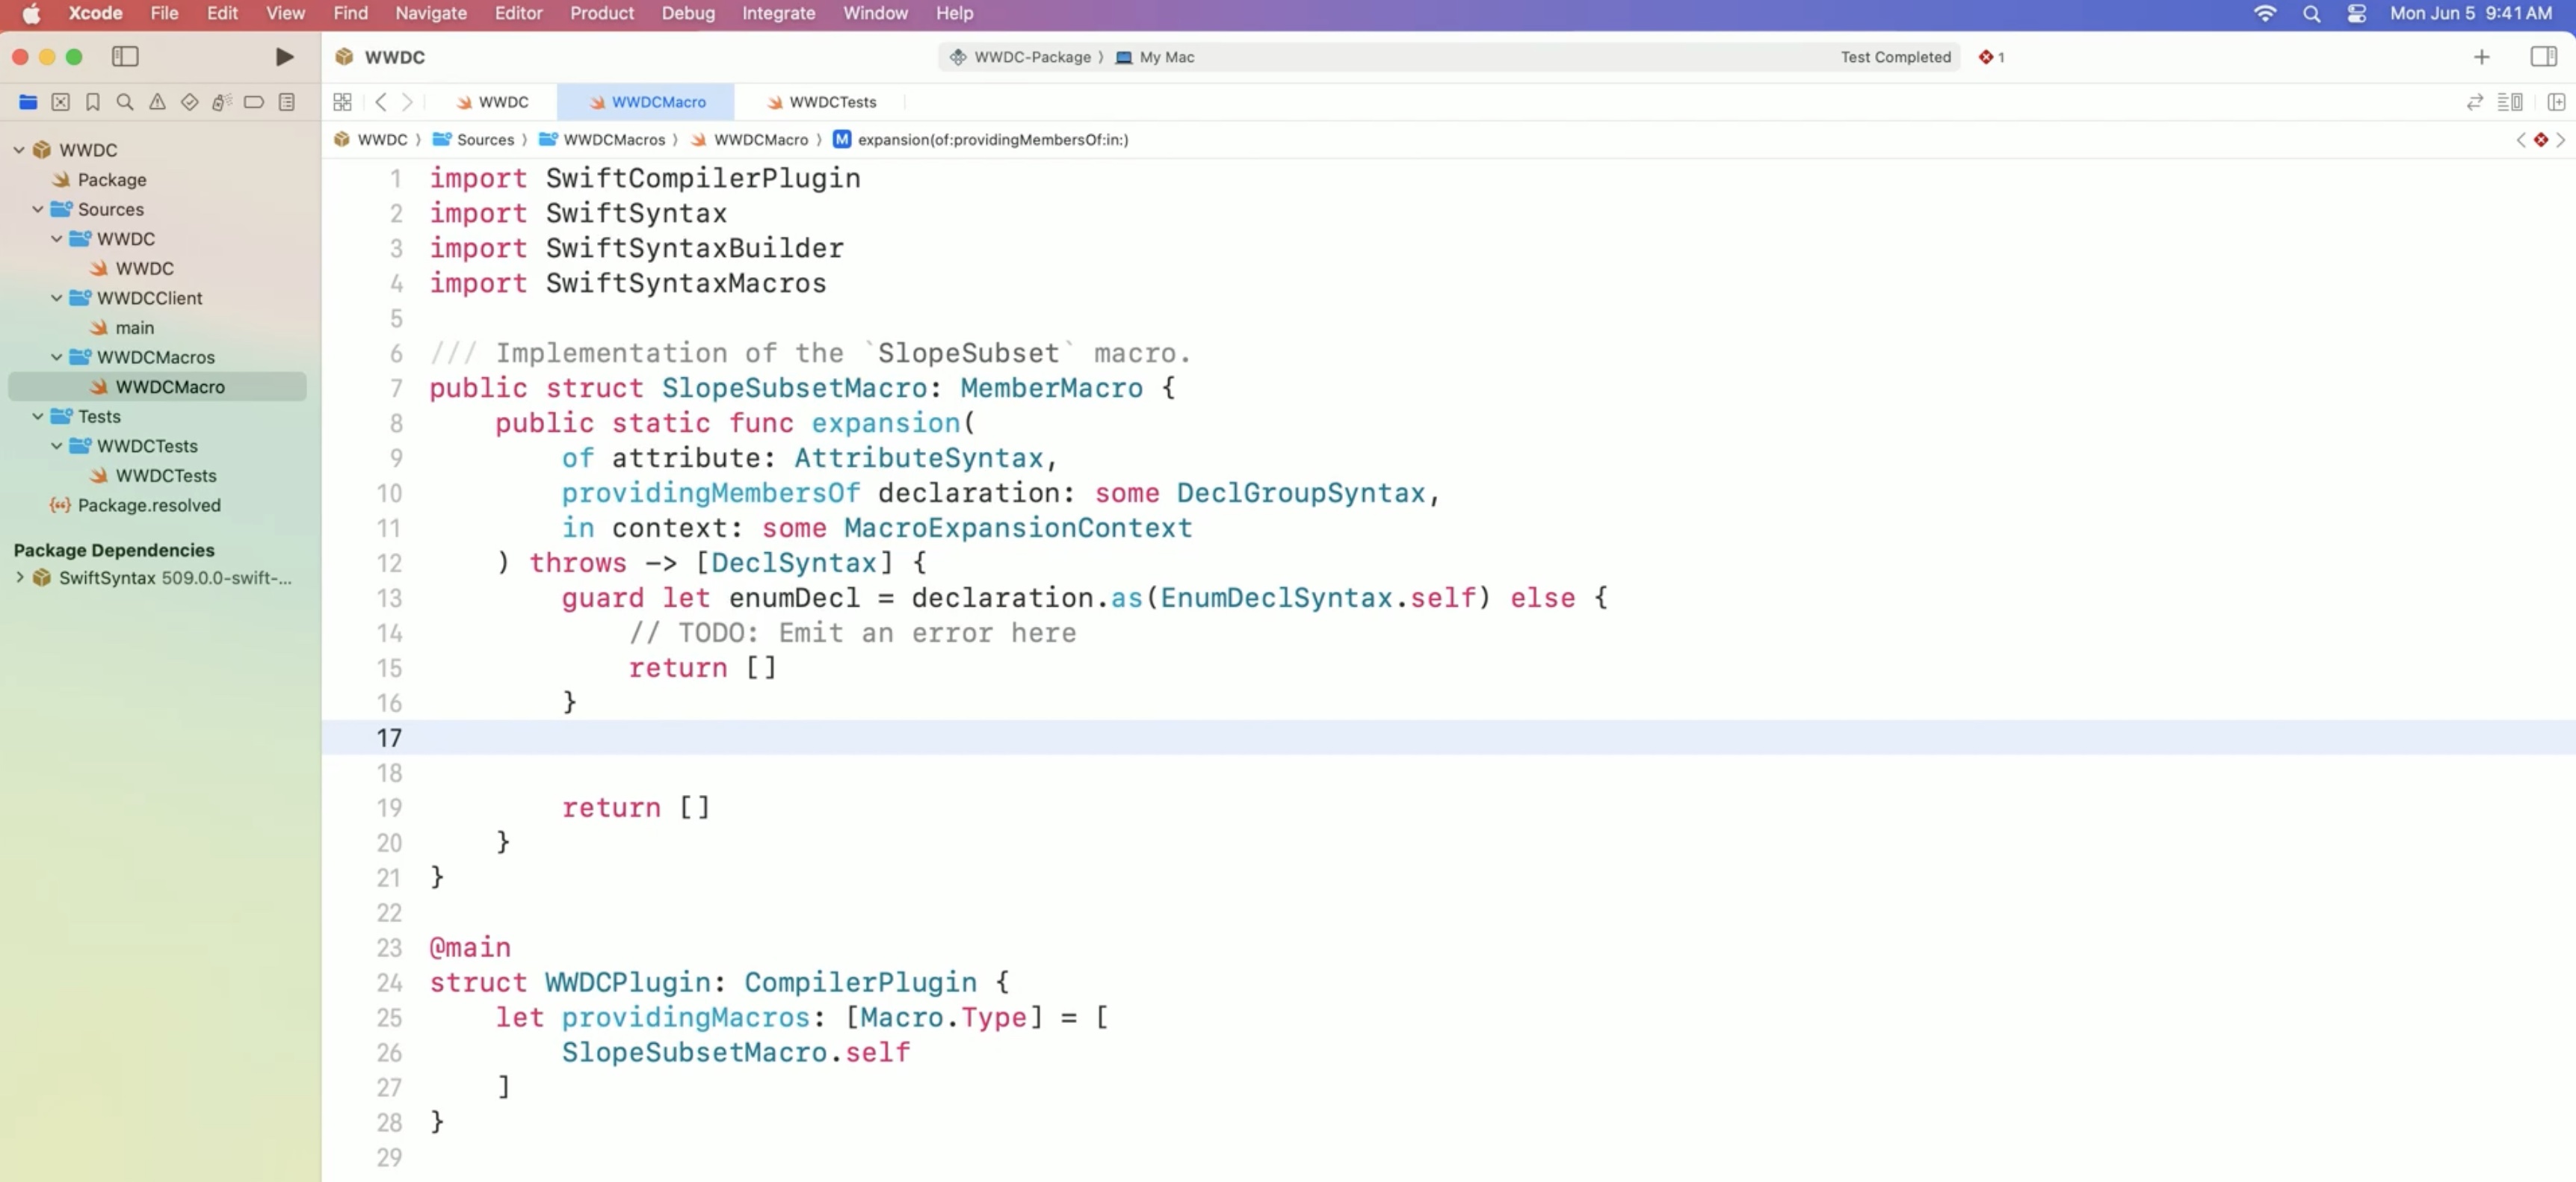
public static func expansion(
of attribute: AttributeSyntax,
providingMembers0f deciaration: some DeclGroupSyntax,
in context: some MacroExpansionContext
) throws -> [DeclSyntax] {
return [] // for now to test
}
}
@main
struct WWDCPlugin: CompilerPlugin {
let providingMacros: [Macro.Type] = [
SlopeSubsetMacro.self
]
}
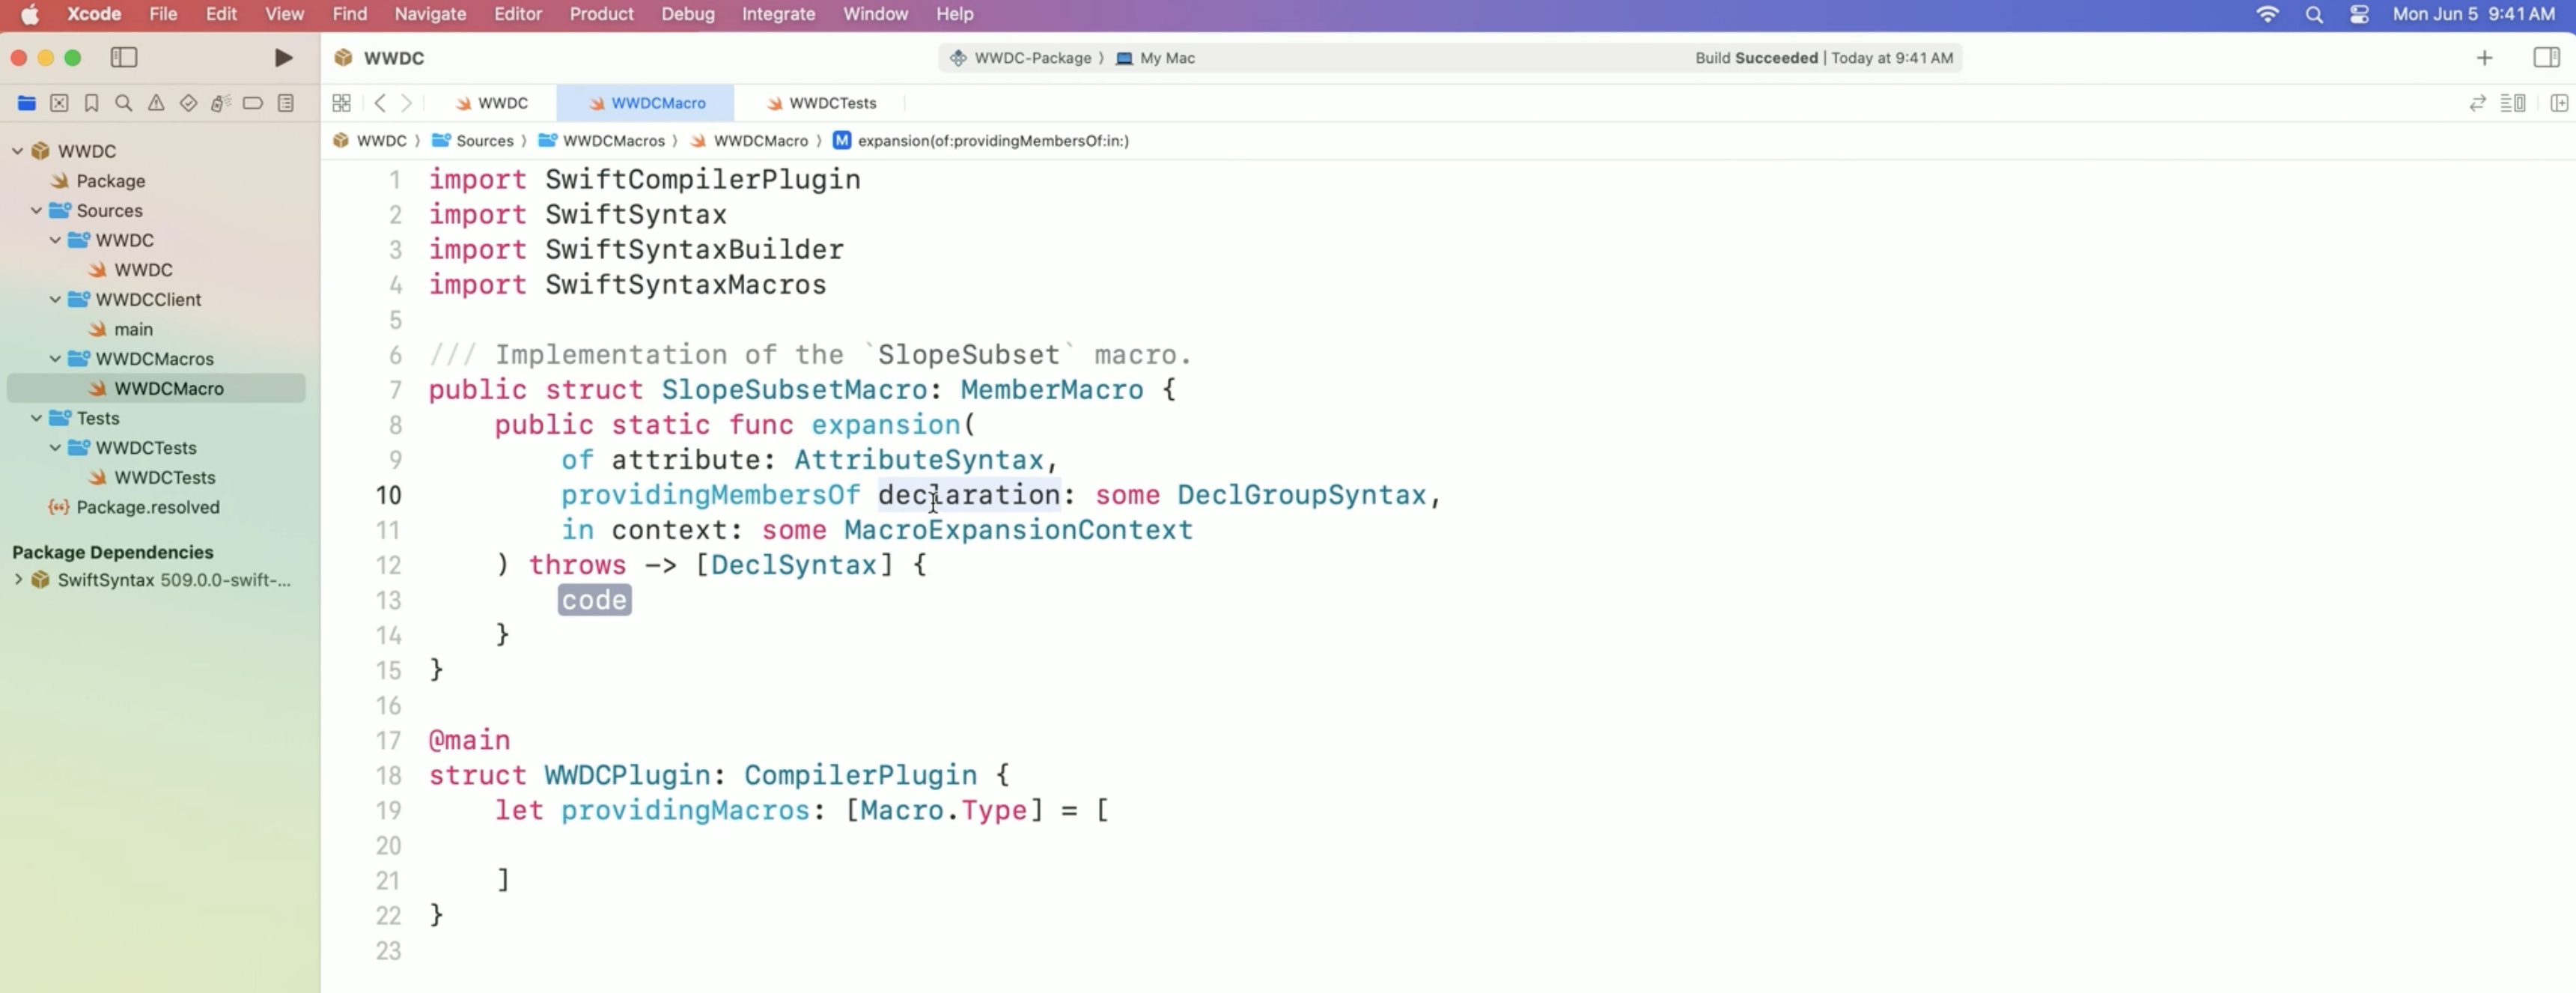
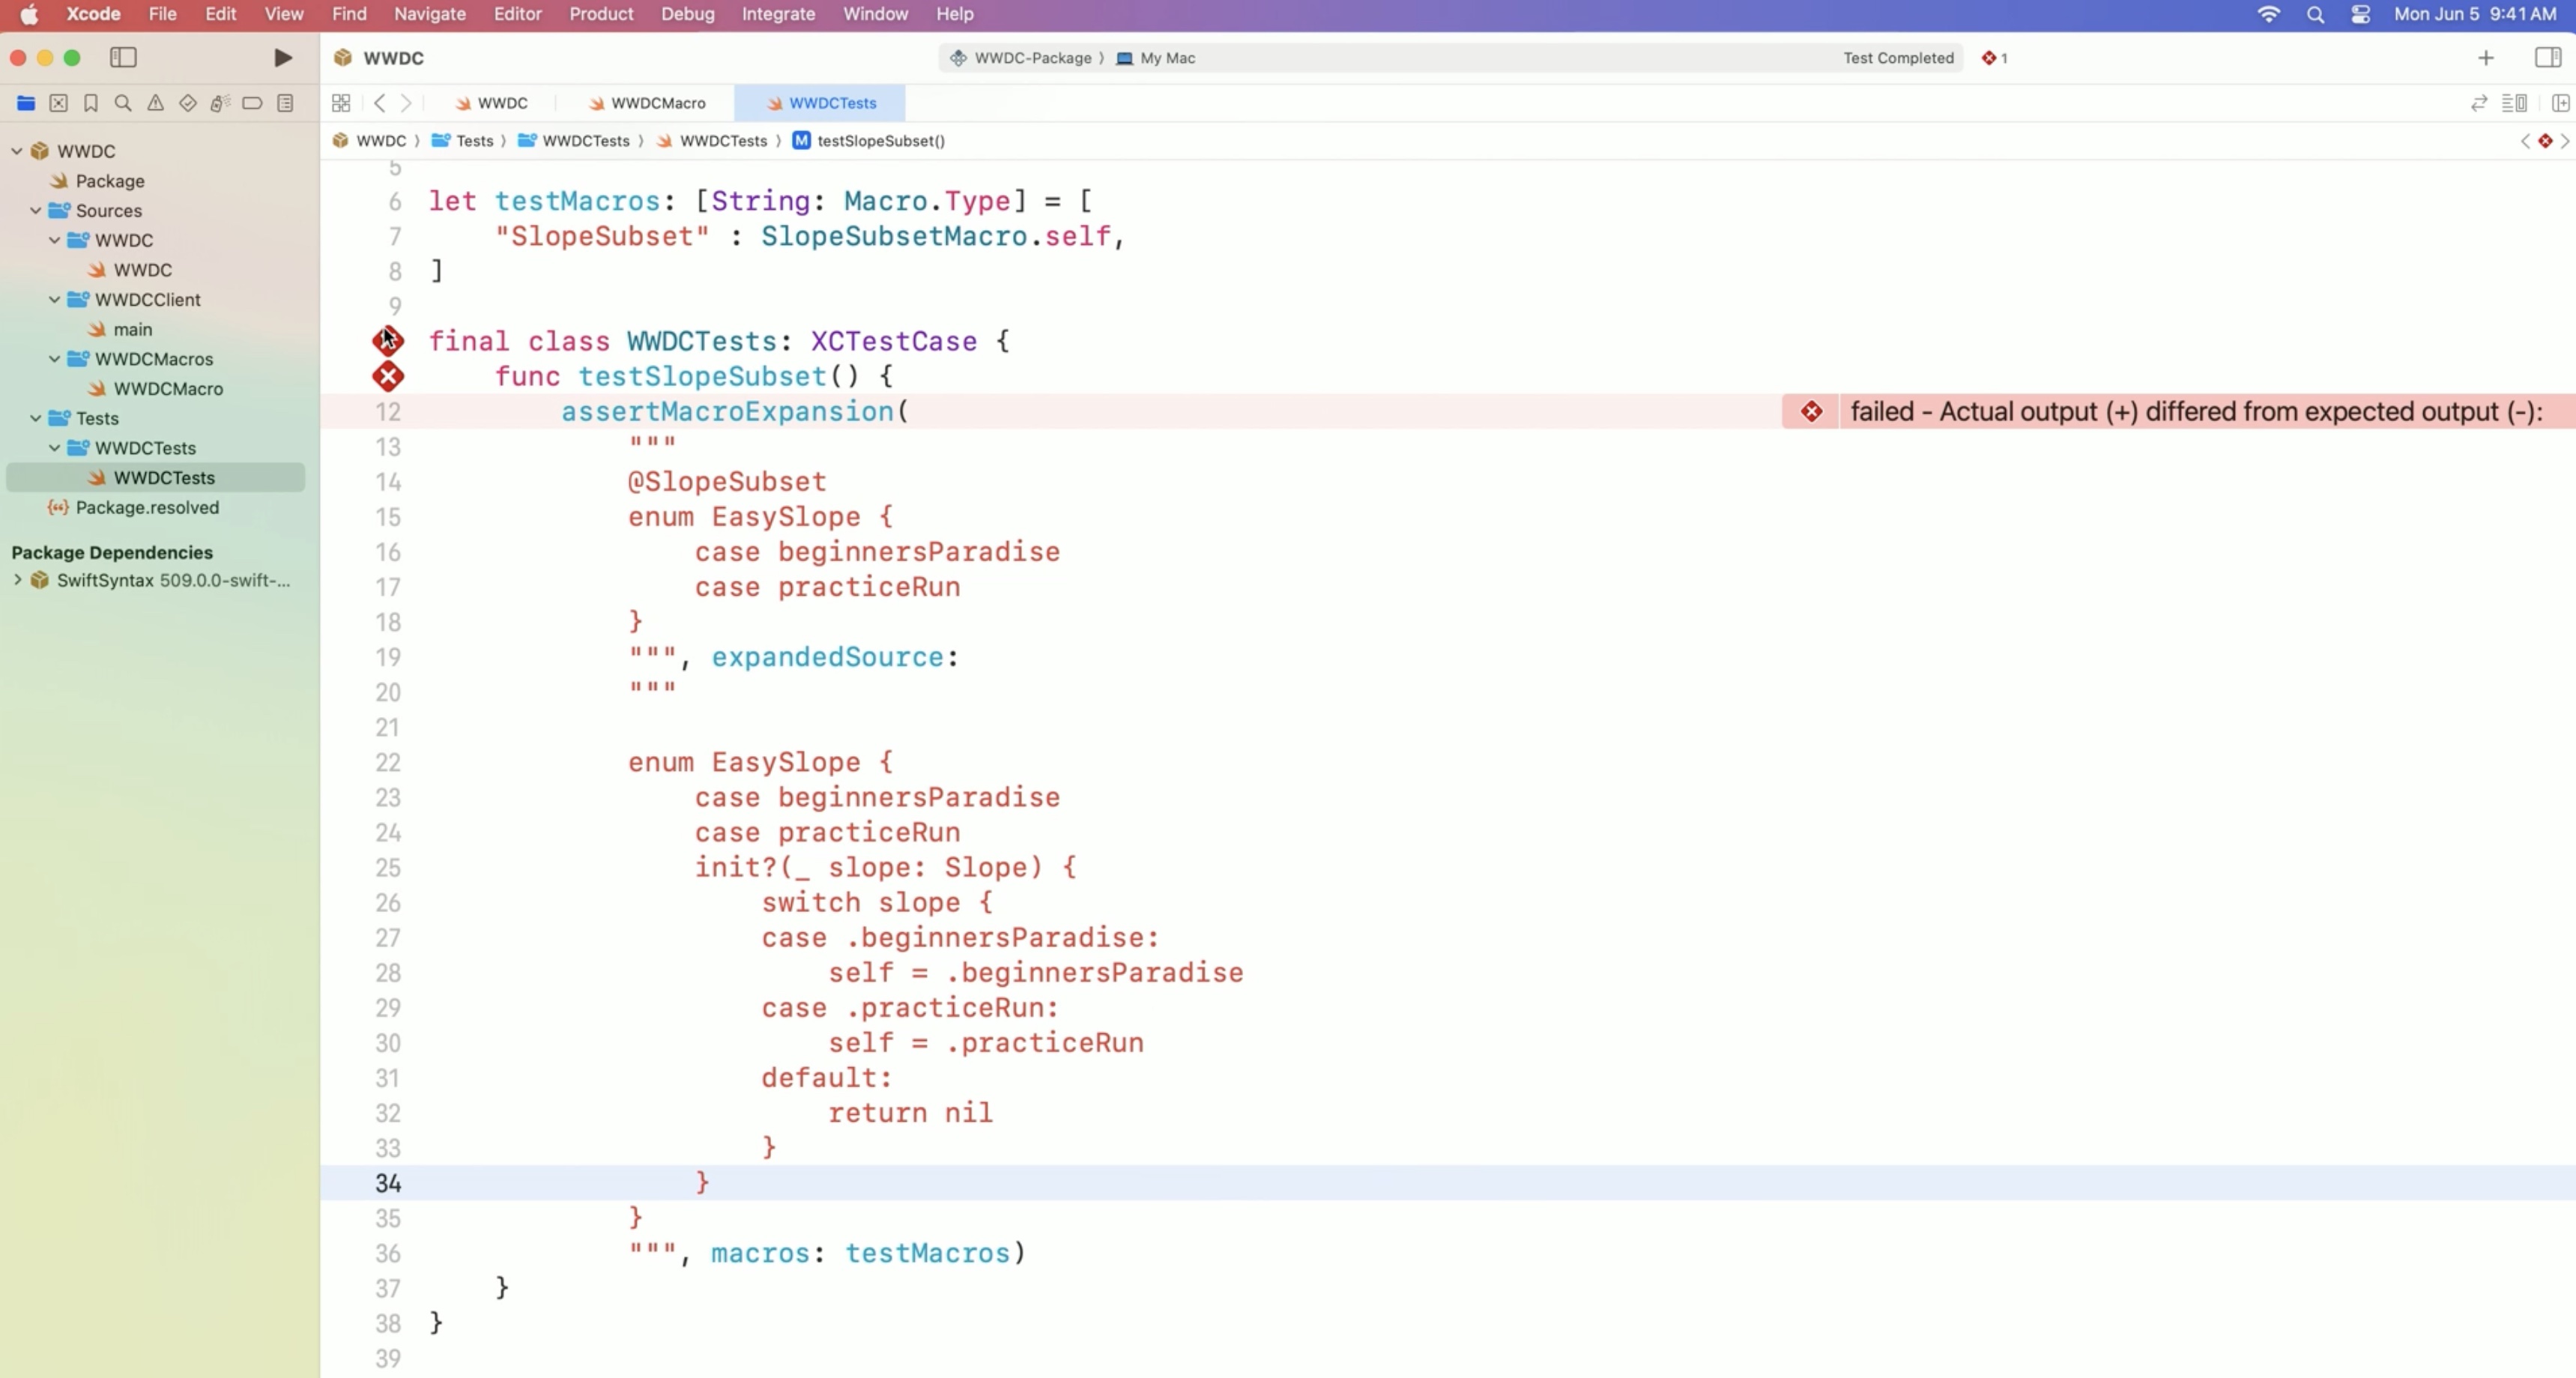
start by writing a test case for it. So for now, let us just return an empty array, indicating that no new members should be added.
Make SlopeSubset visible to the compiler. For this, add it to the 'providingMacros' property.
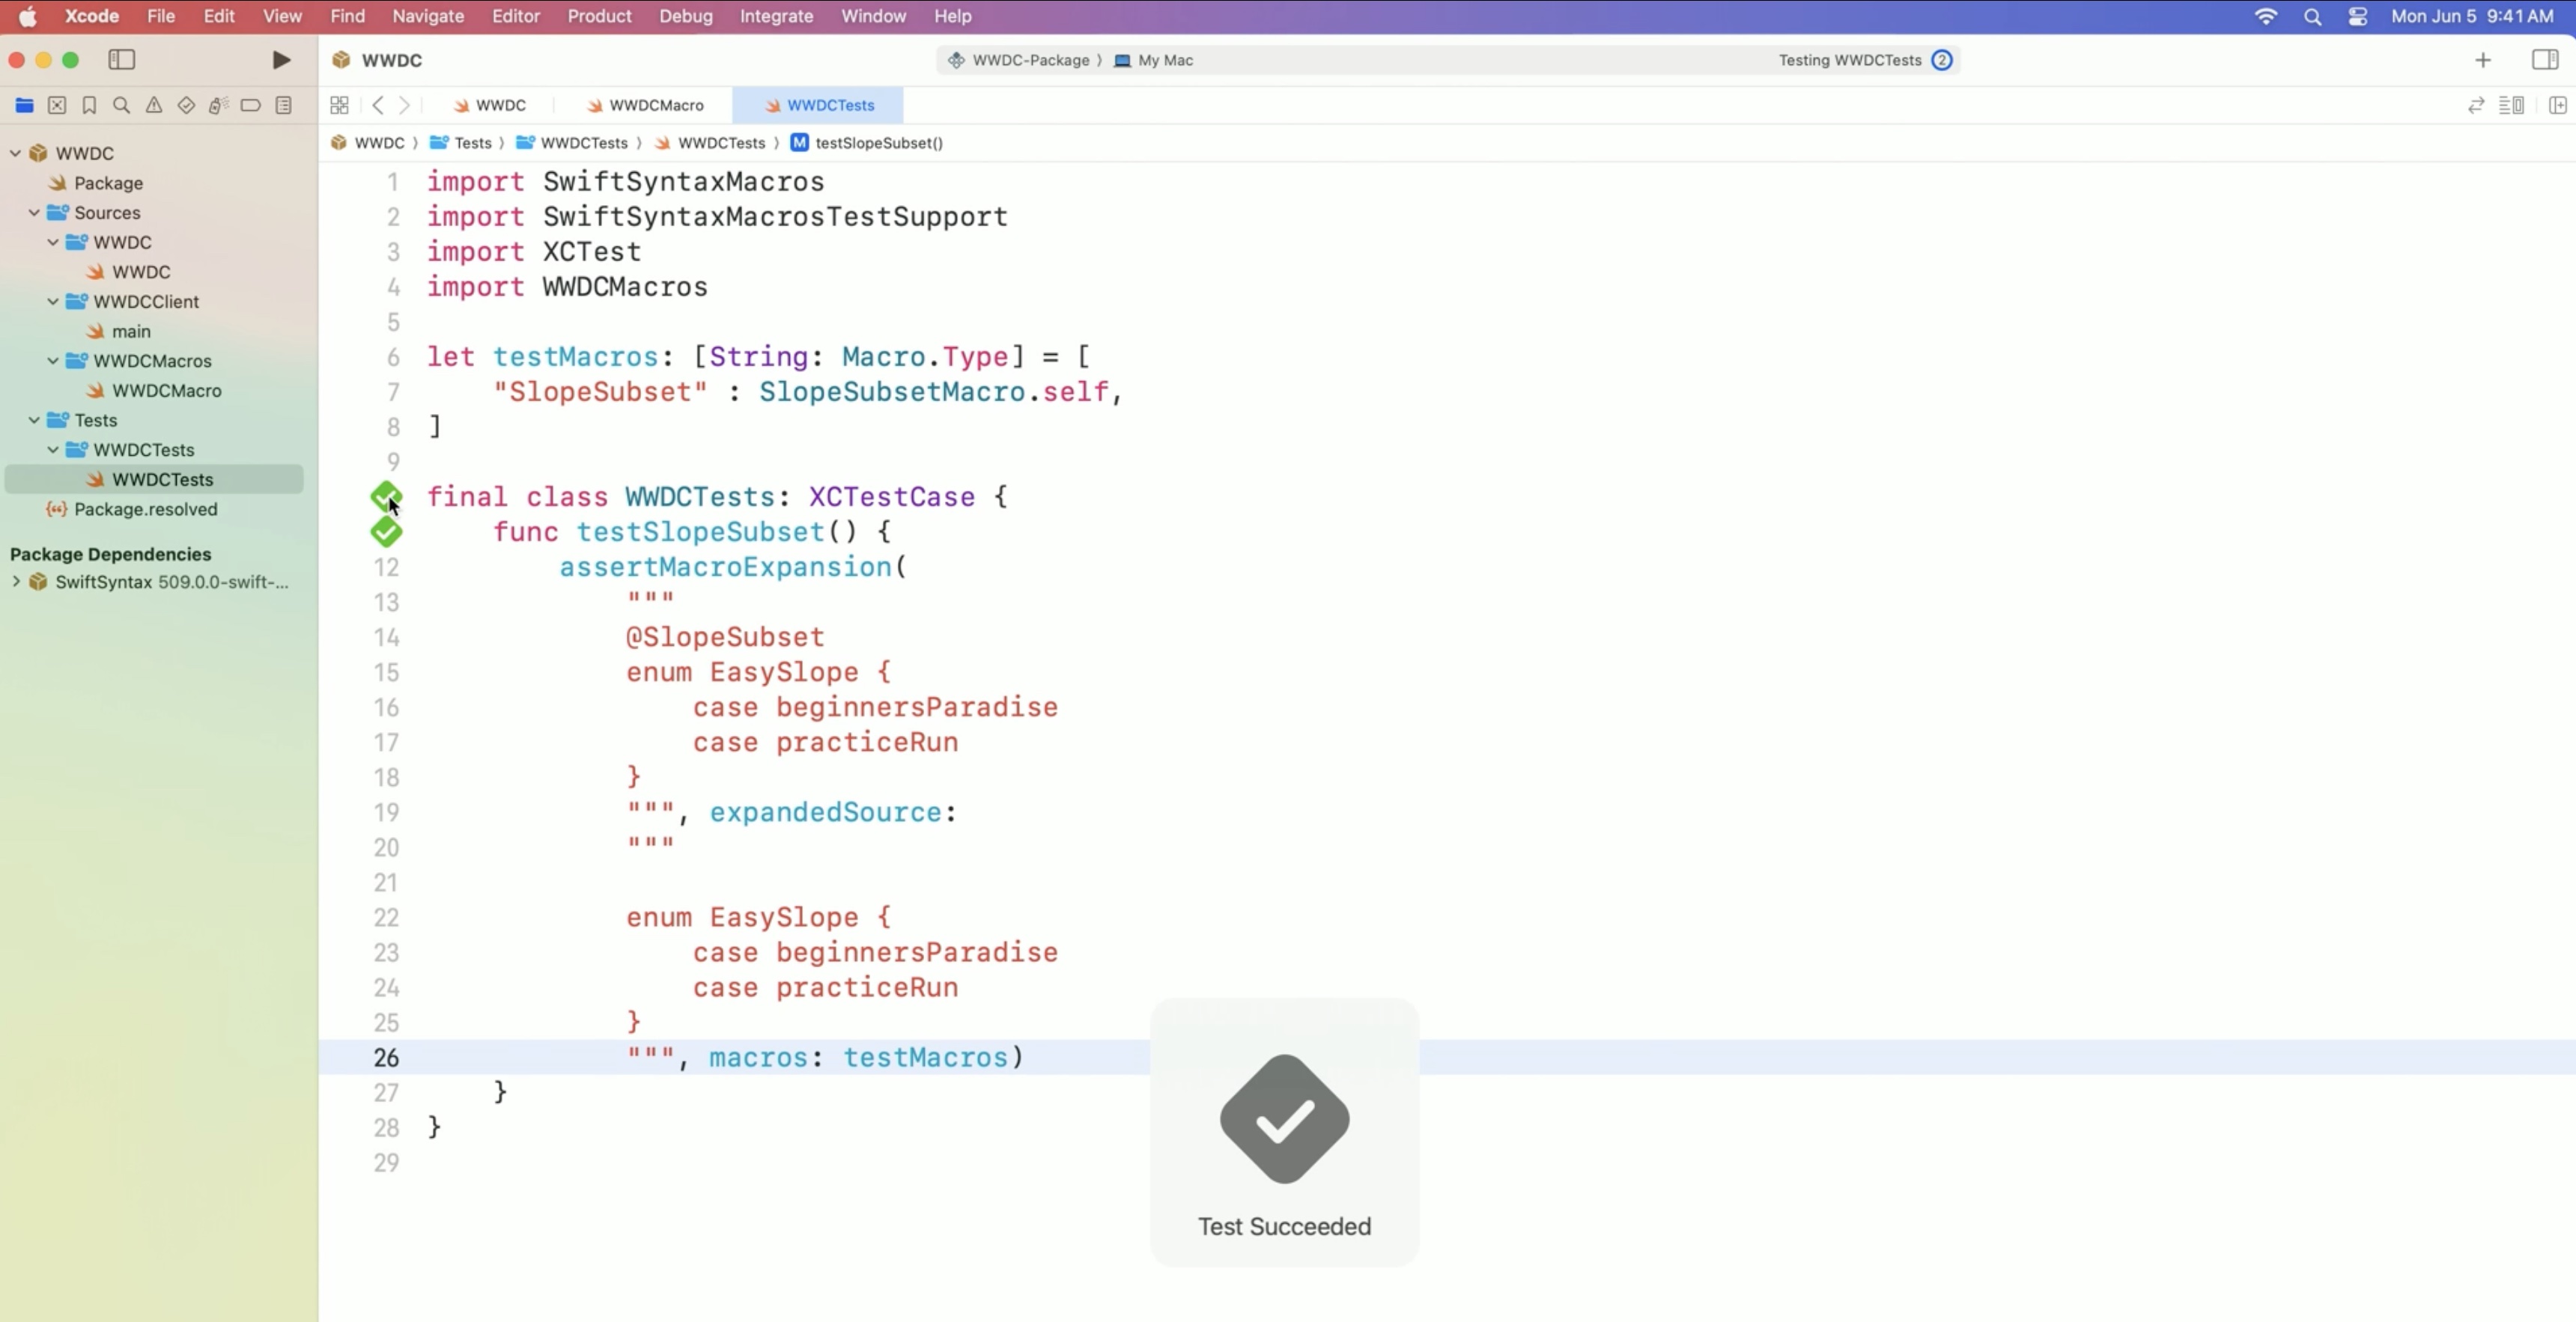
We write a test case that we can rerun whenever we make changes to the macro, to make sure we are not introducing regressions.
Use the 'assertMacroExpansion' function to verify the macro's behavior.
import SwiftSyntaxMacros
import SwiftSyntaxMacrosTestSupport
import XCTest
import WWDCMacros

let testMacros: [String: Macro.Type] = [
	"SlopeSubset" : SlopeSubsetMacro.self,
]

final class WWDCTests: XCTestCase {
	func testSlopeSubset () {
		assertMacroExpansion (
			"""
			@SlopeSubset
			enum EasySlope {
			case beginnersParadise
			case practiceRun
			}
			""",expandedSource:
			"""

			enum EasySlope {
				case beginnersParadise
				case practiceRun
			}
			""", macros: testMacros)
	}
}
What we want to test is what the macro generates when applied to the EasySlope type, so we use that as our test case's input.
And since the macro's not doing anything yet, we just expect it to remove the attribute and not add any new members, so the expected expanded code is the same as the input, just without '@SlopeSubset'.
Let the test case know that it should expand the macro SlopeSubset using the SlopeSubsetMacro implementation. For that, we need to map the macro name to its implementing type in the 'testMacros' dictionary and pass that dictionary to the assertion function.
Running the tests
But is the macro actually generating the initializer and not just removing the attribute? We copy the code previously wrote by hand into the test case because that's what we want the plug-in to generate.
And running the test again… ...it fails because the macro doesn't actually generate the initializer yet.
"""
enum EasySlope {
	case beginnersParadise
	case practiceRun
	init?(_ slope: Slope) {
		switch slope {
		case .beginnersParadise:
			self = .beginnersParadise
		case .practiceRun:
			self = .practiceRun
		default:
			return nil
		}
	}
}
"""
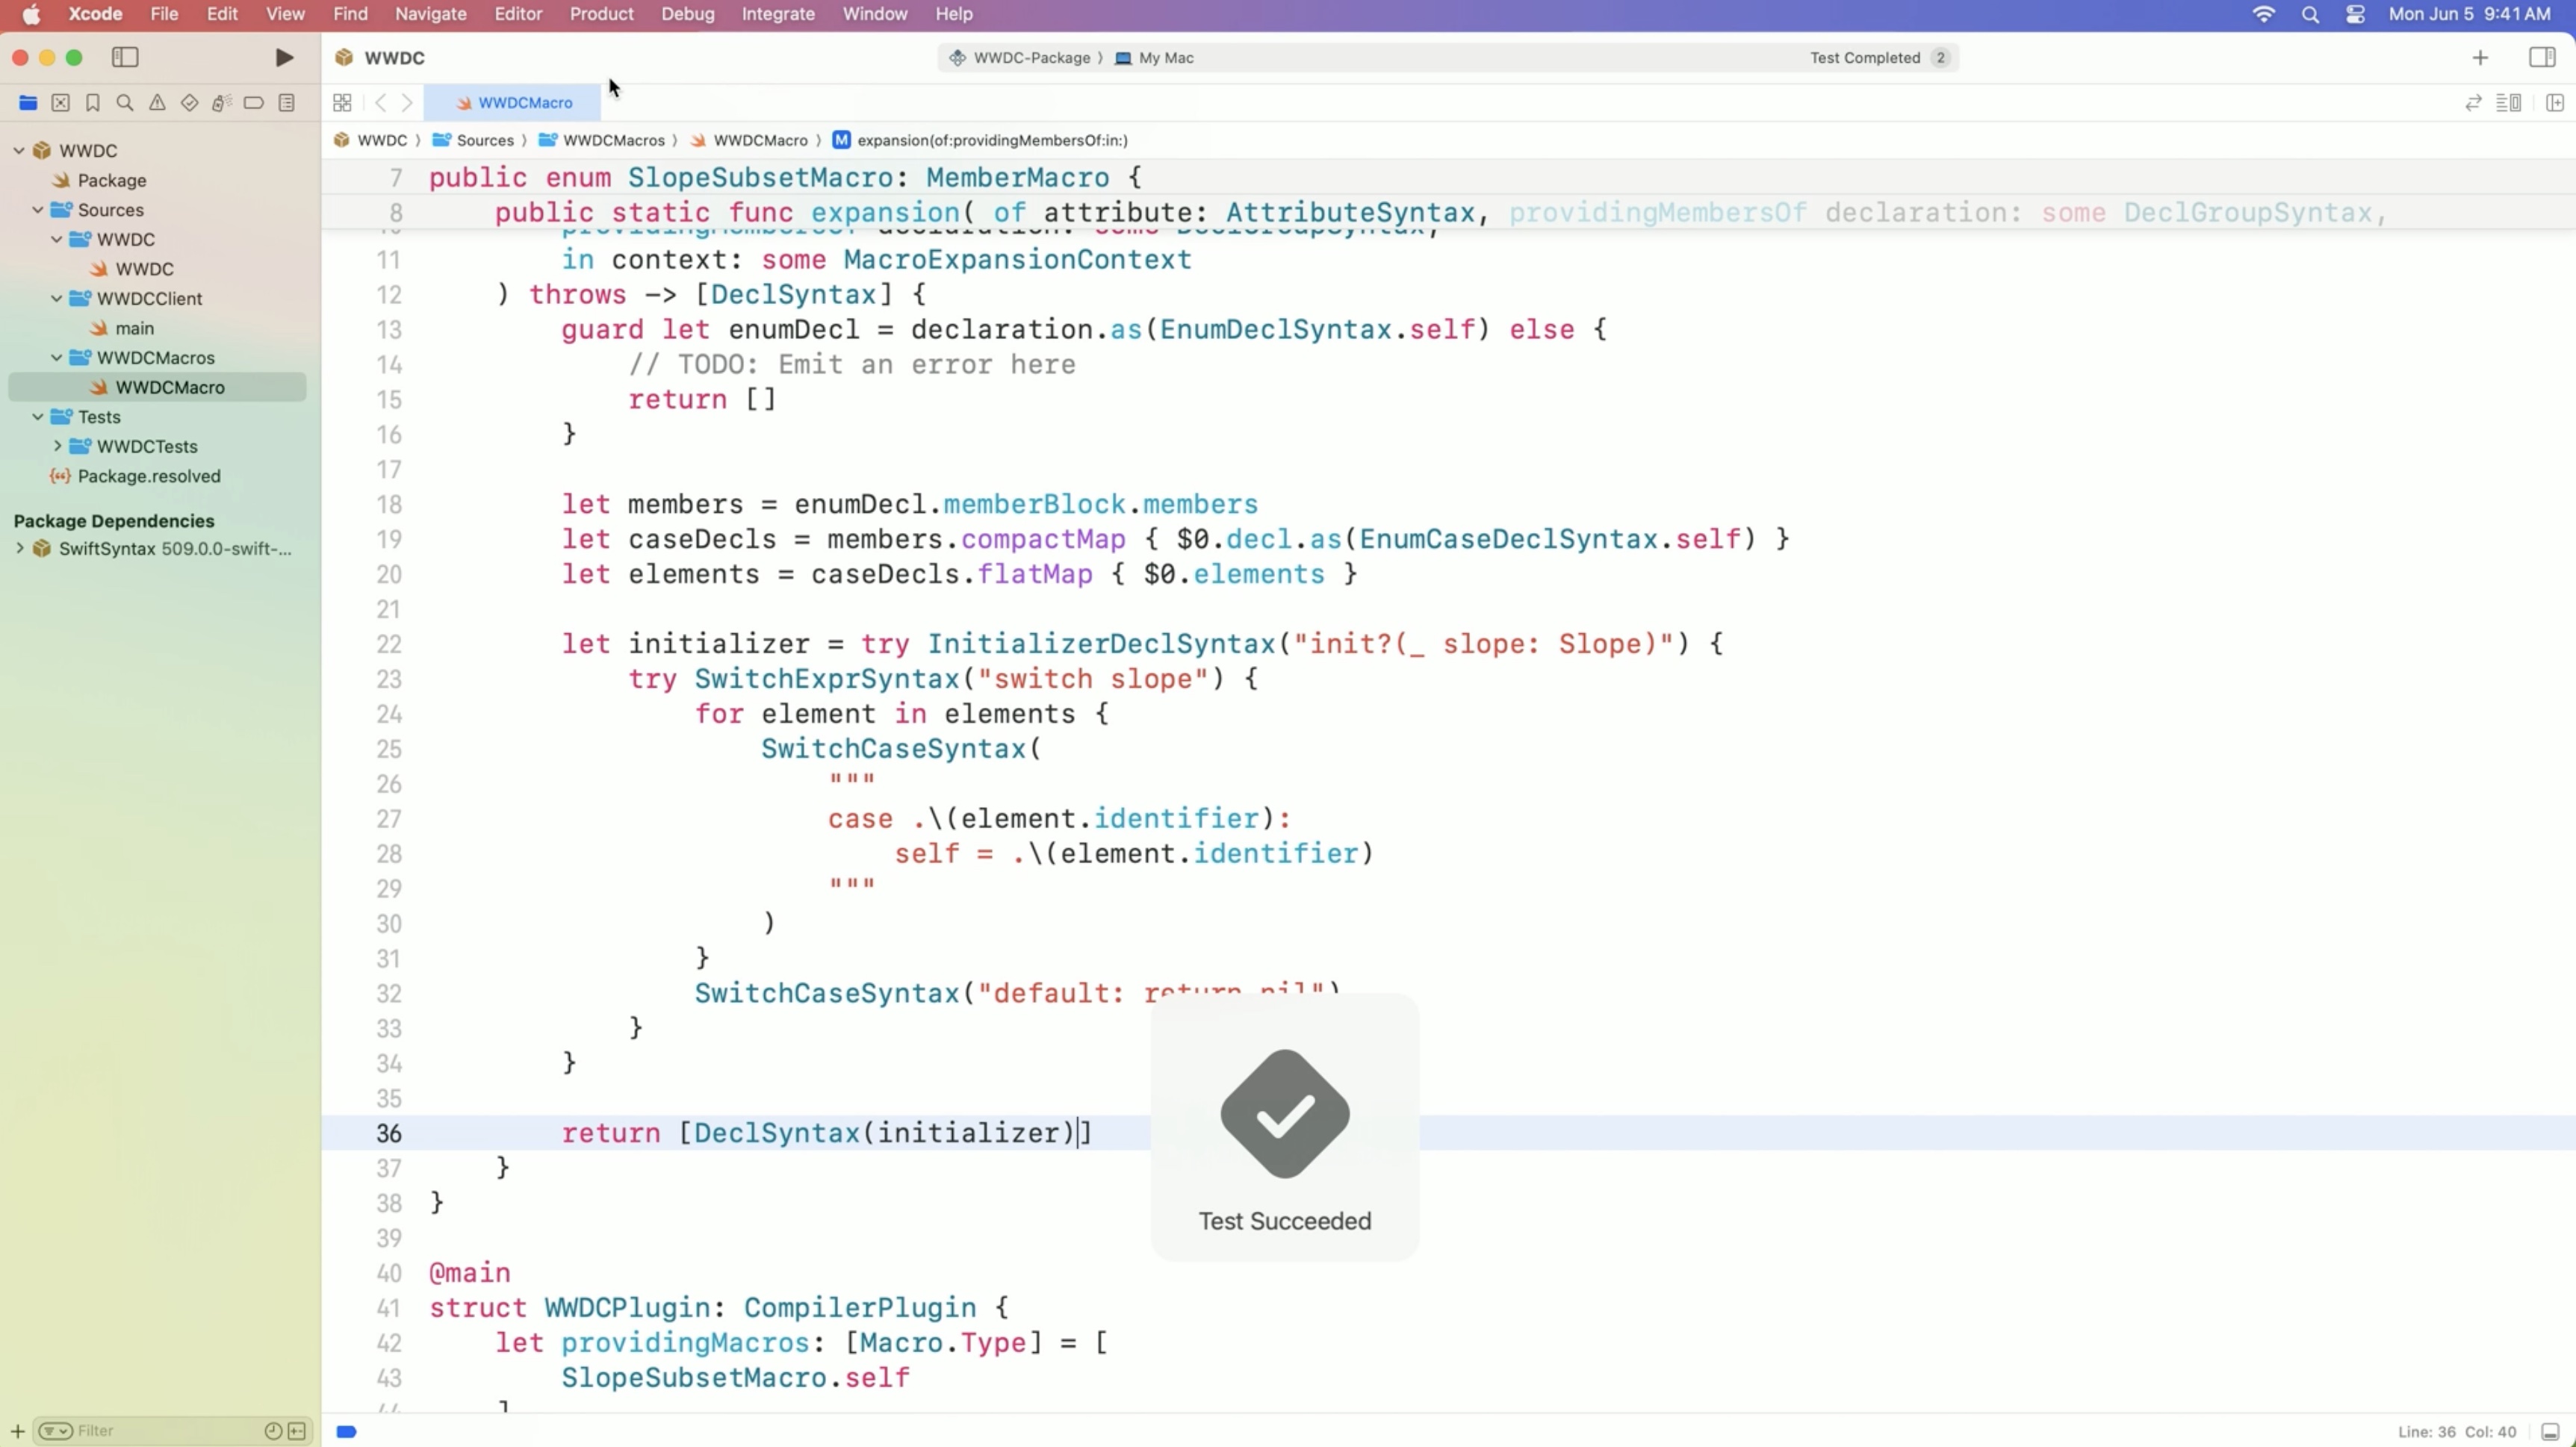
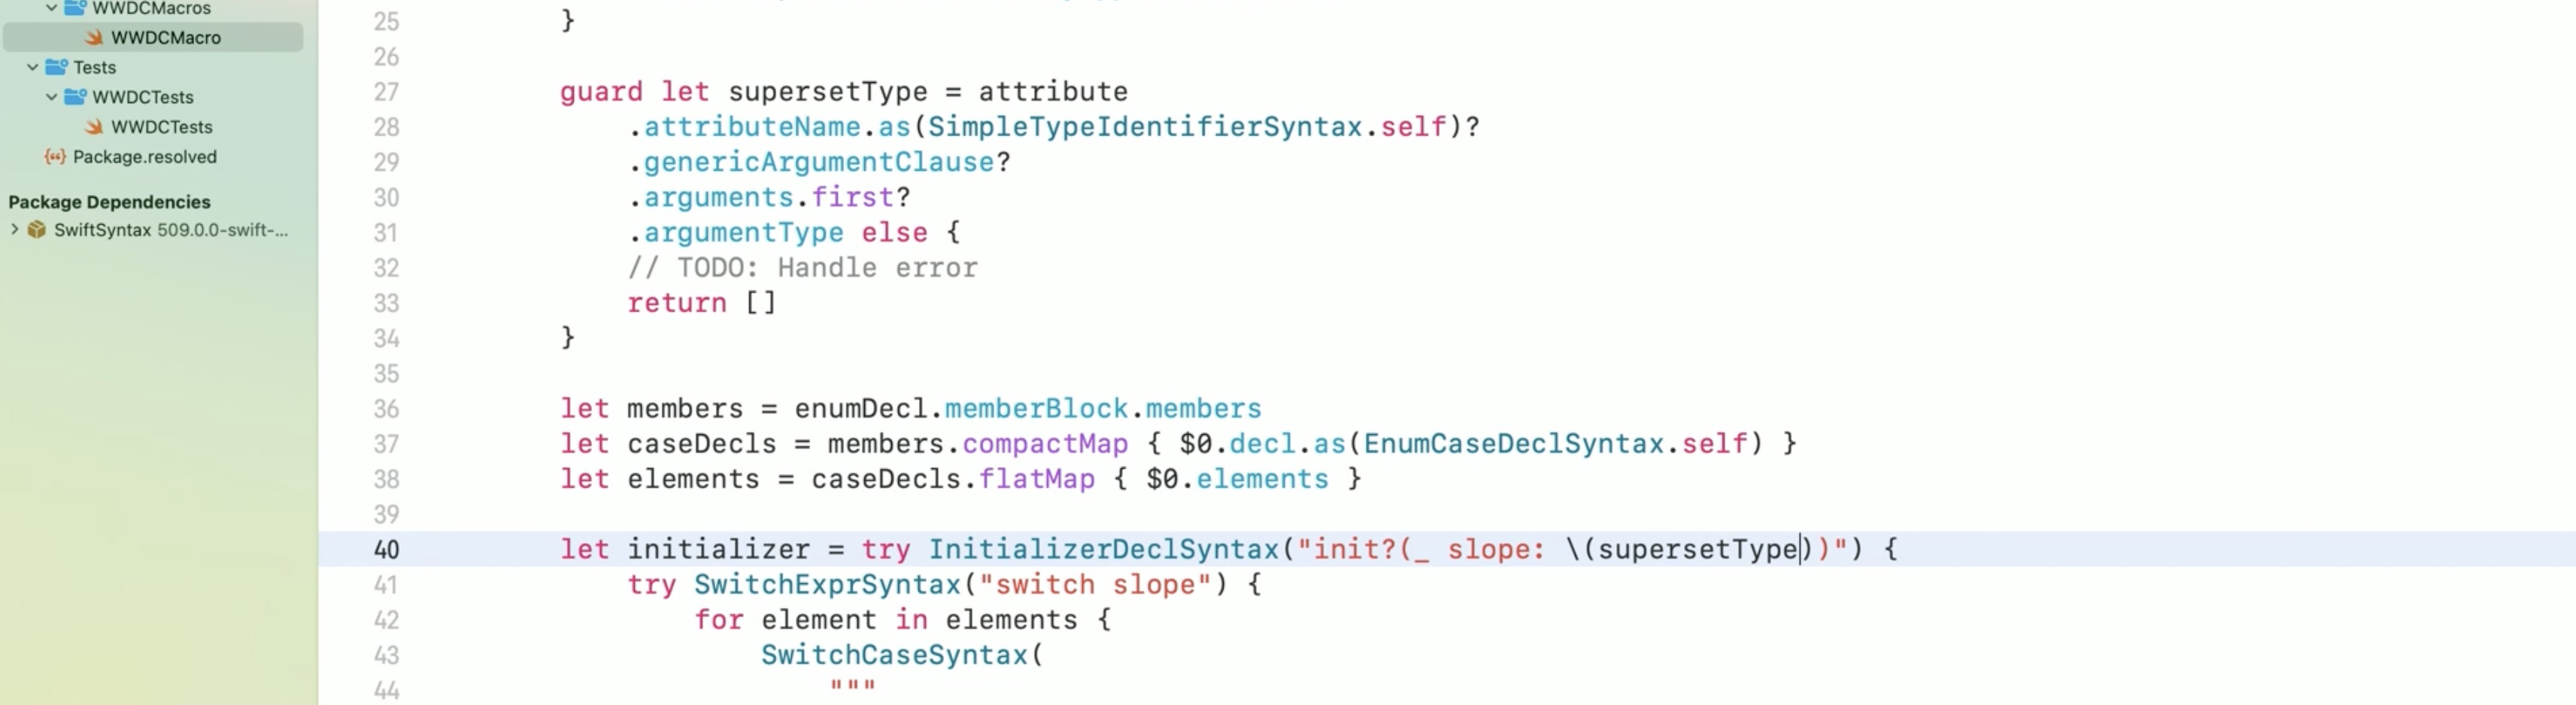
The initializer switches over all the enum elements declared in the EasySlopes enum. So the first thing that we need to do is to retrieve these enum elements from the declaration. Since enum elements can only be declared inside enum declarations, we start by casting 'declaration' to an enum declaration.
If the macro is attached to a type that is not an enum, we should get an error. Add a TODO so that we don’t forget to do it later, and return an empty array for now.
Next, we need to get all the elements that the enum declares. To figure out how to do that, we inspect the syntactic structure of our enum in the SwiftSyntax tree.
Since the macro's implementation is just an ordinary Swift program, we can debug it in Xcode. For example, we can set a breakpoint inside the expansion function and run the test cases to hit that breakpoint.
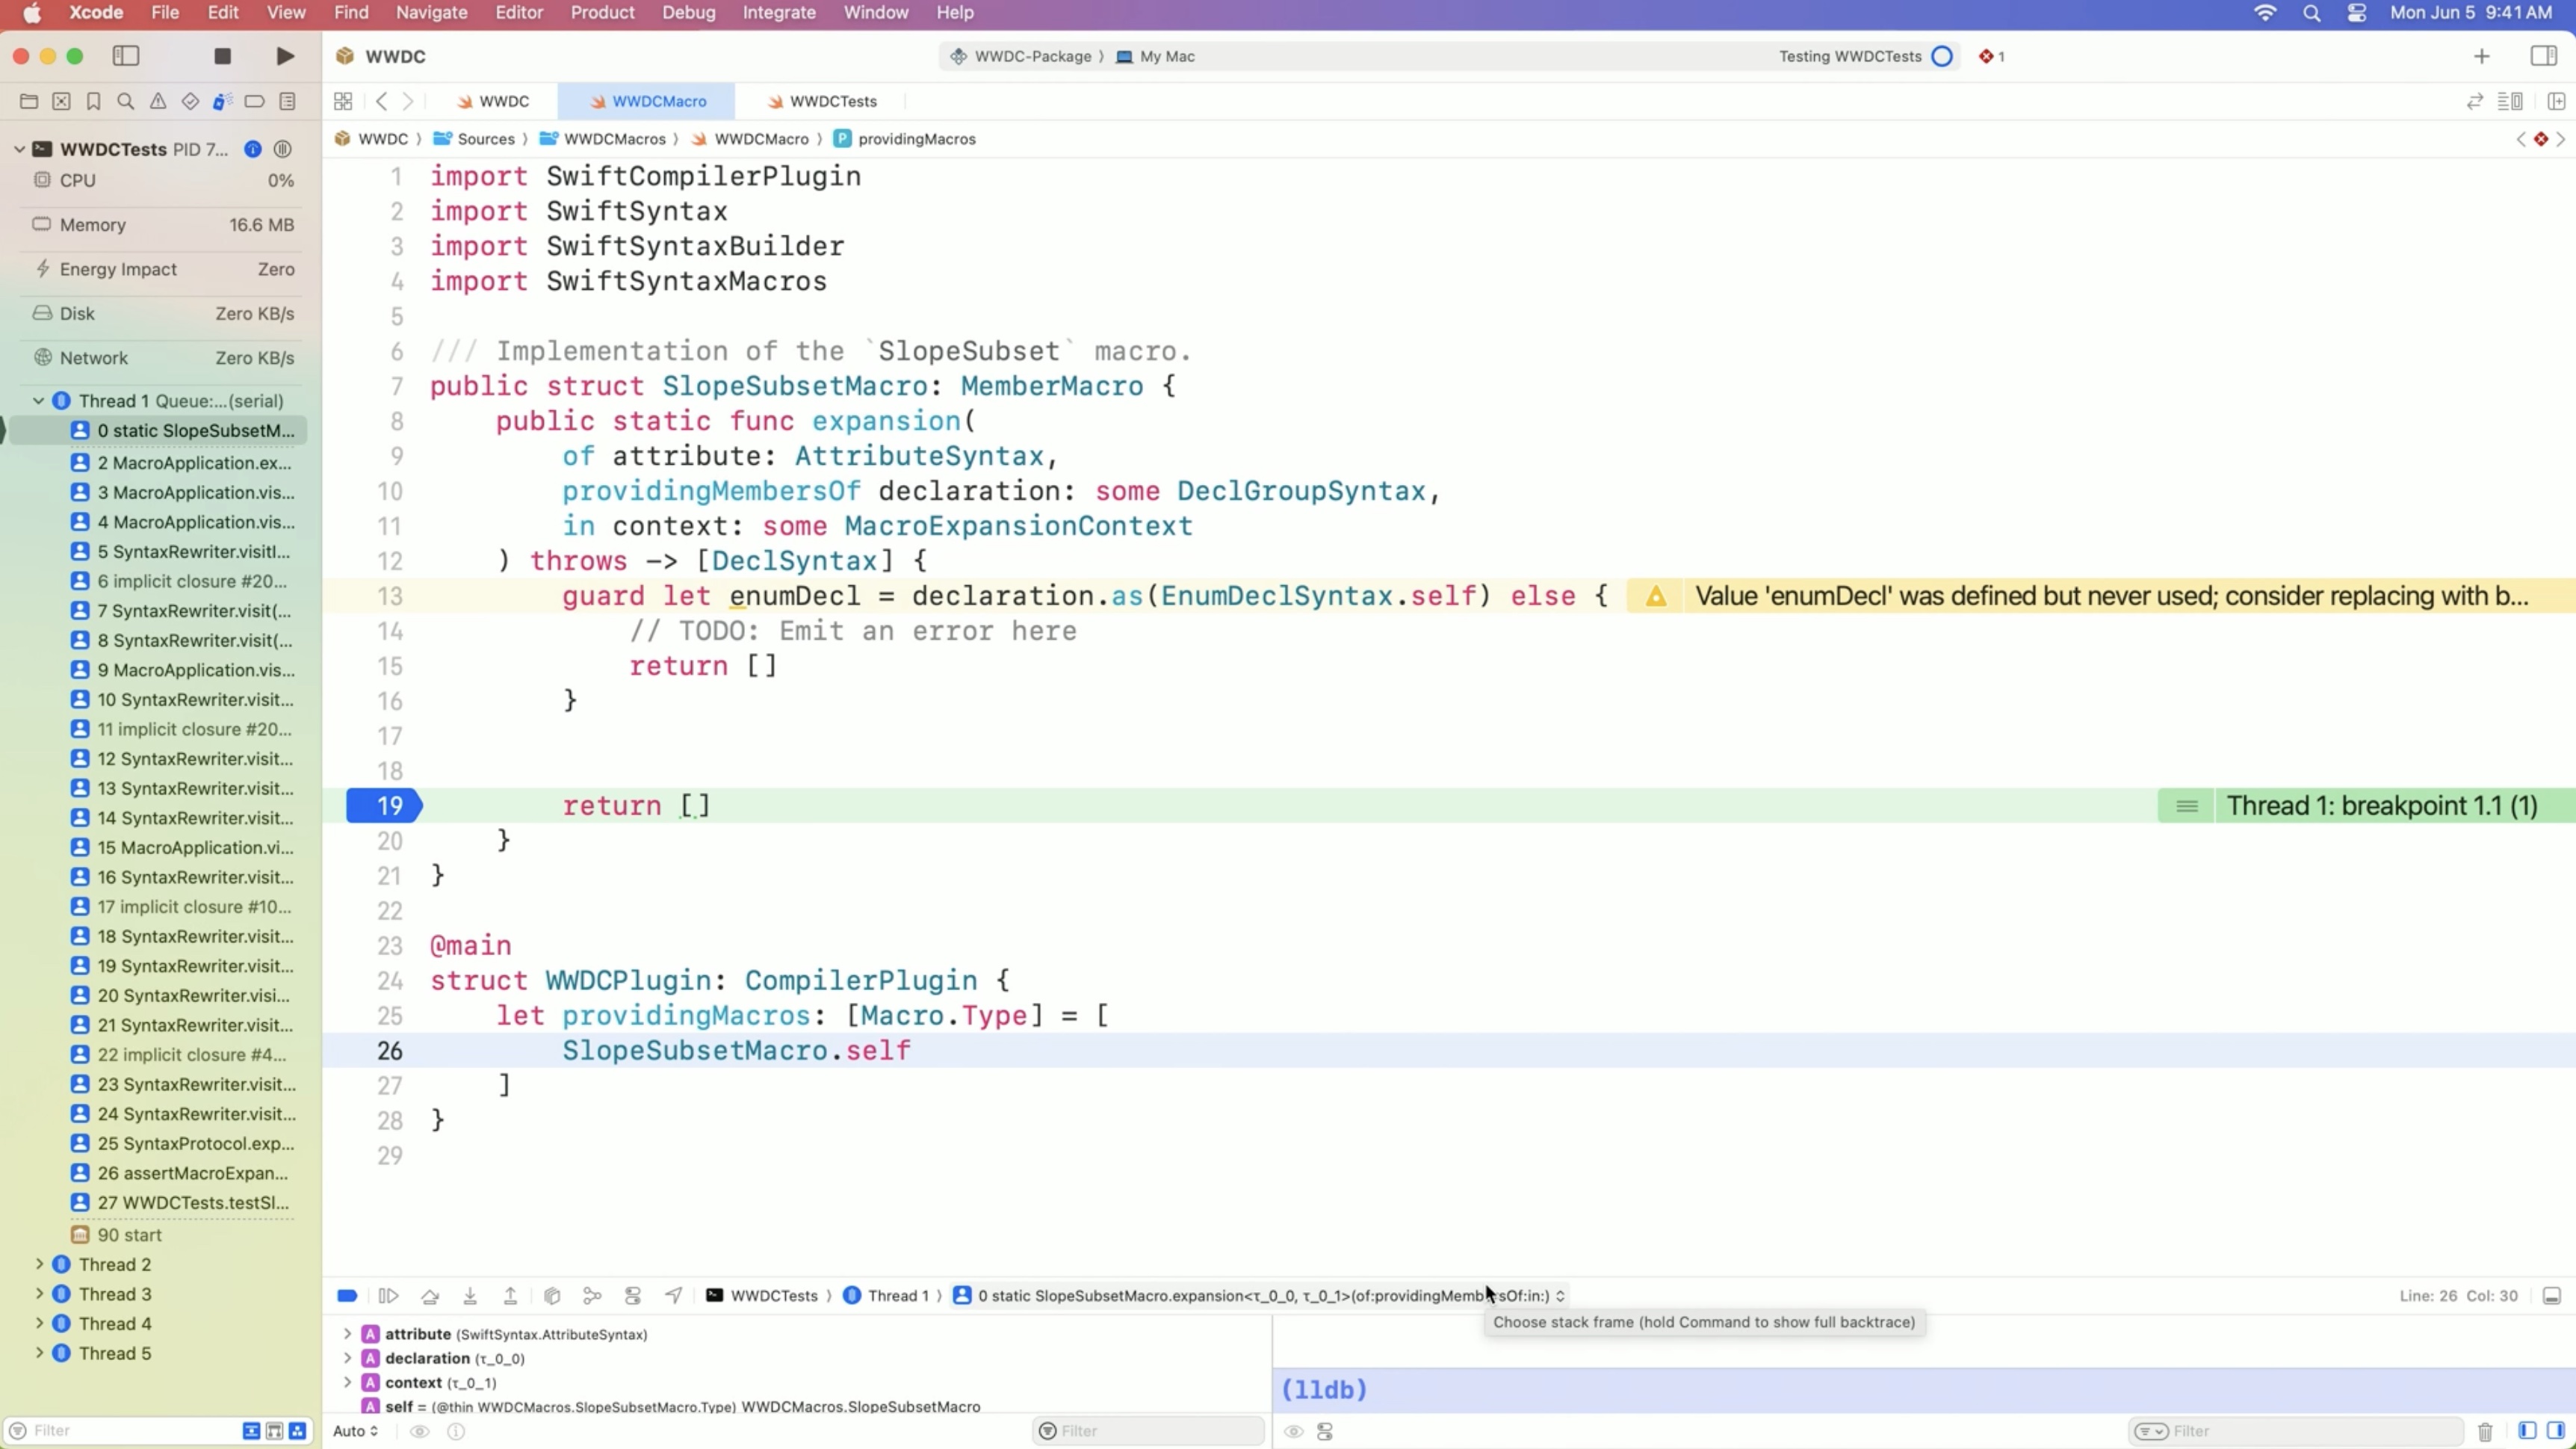
We now have the debugger paused inside the macro’s implementation and 'enumDecl' is the EasySlopes enum. We can print it in the debugger by typing 'po enumDecl'.
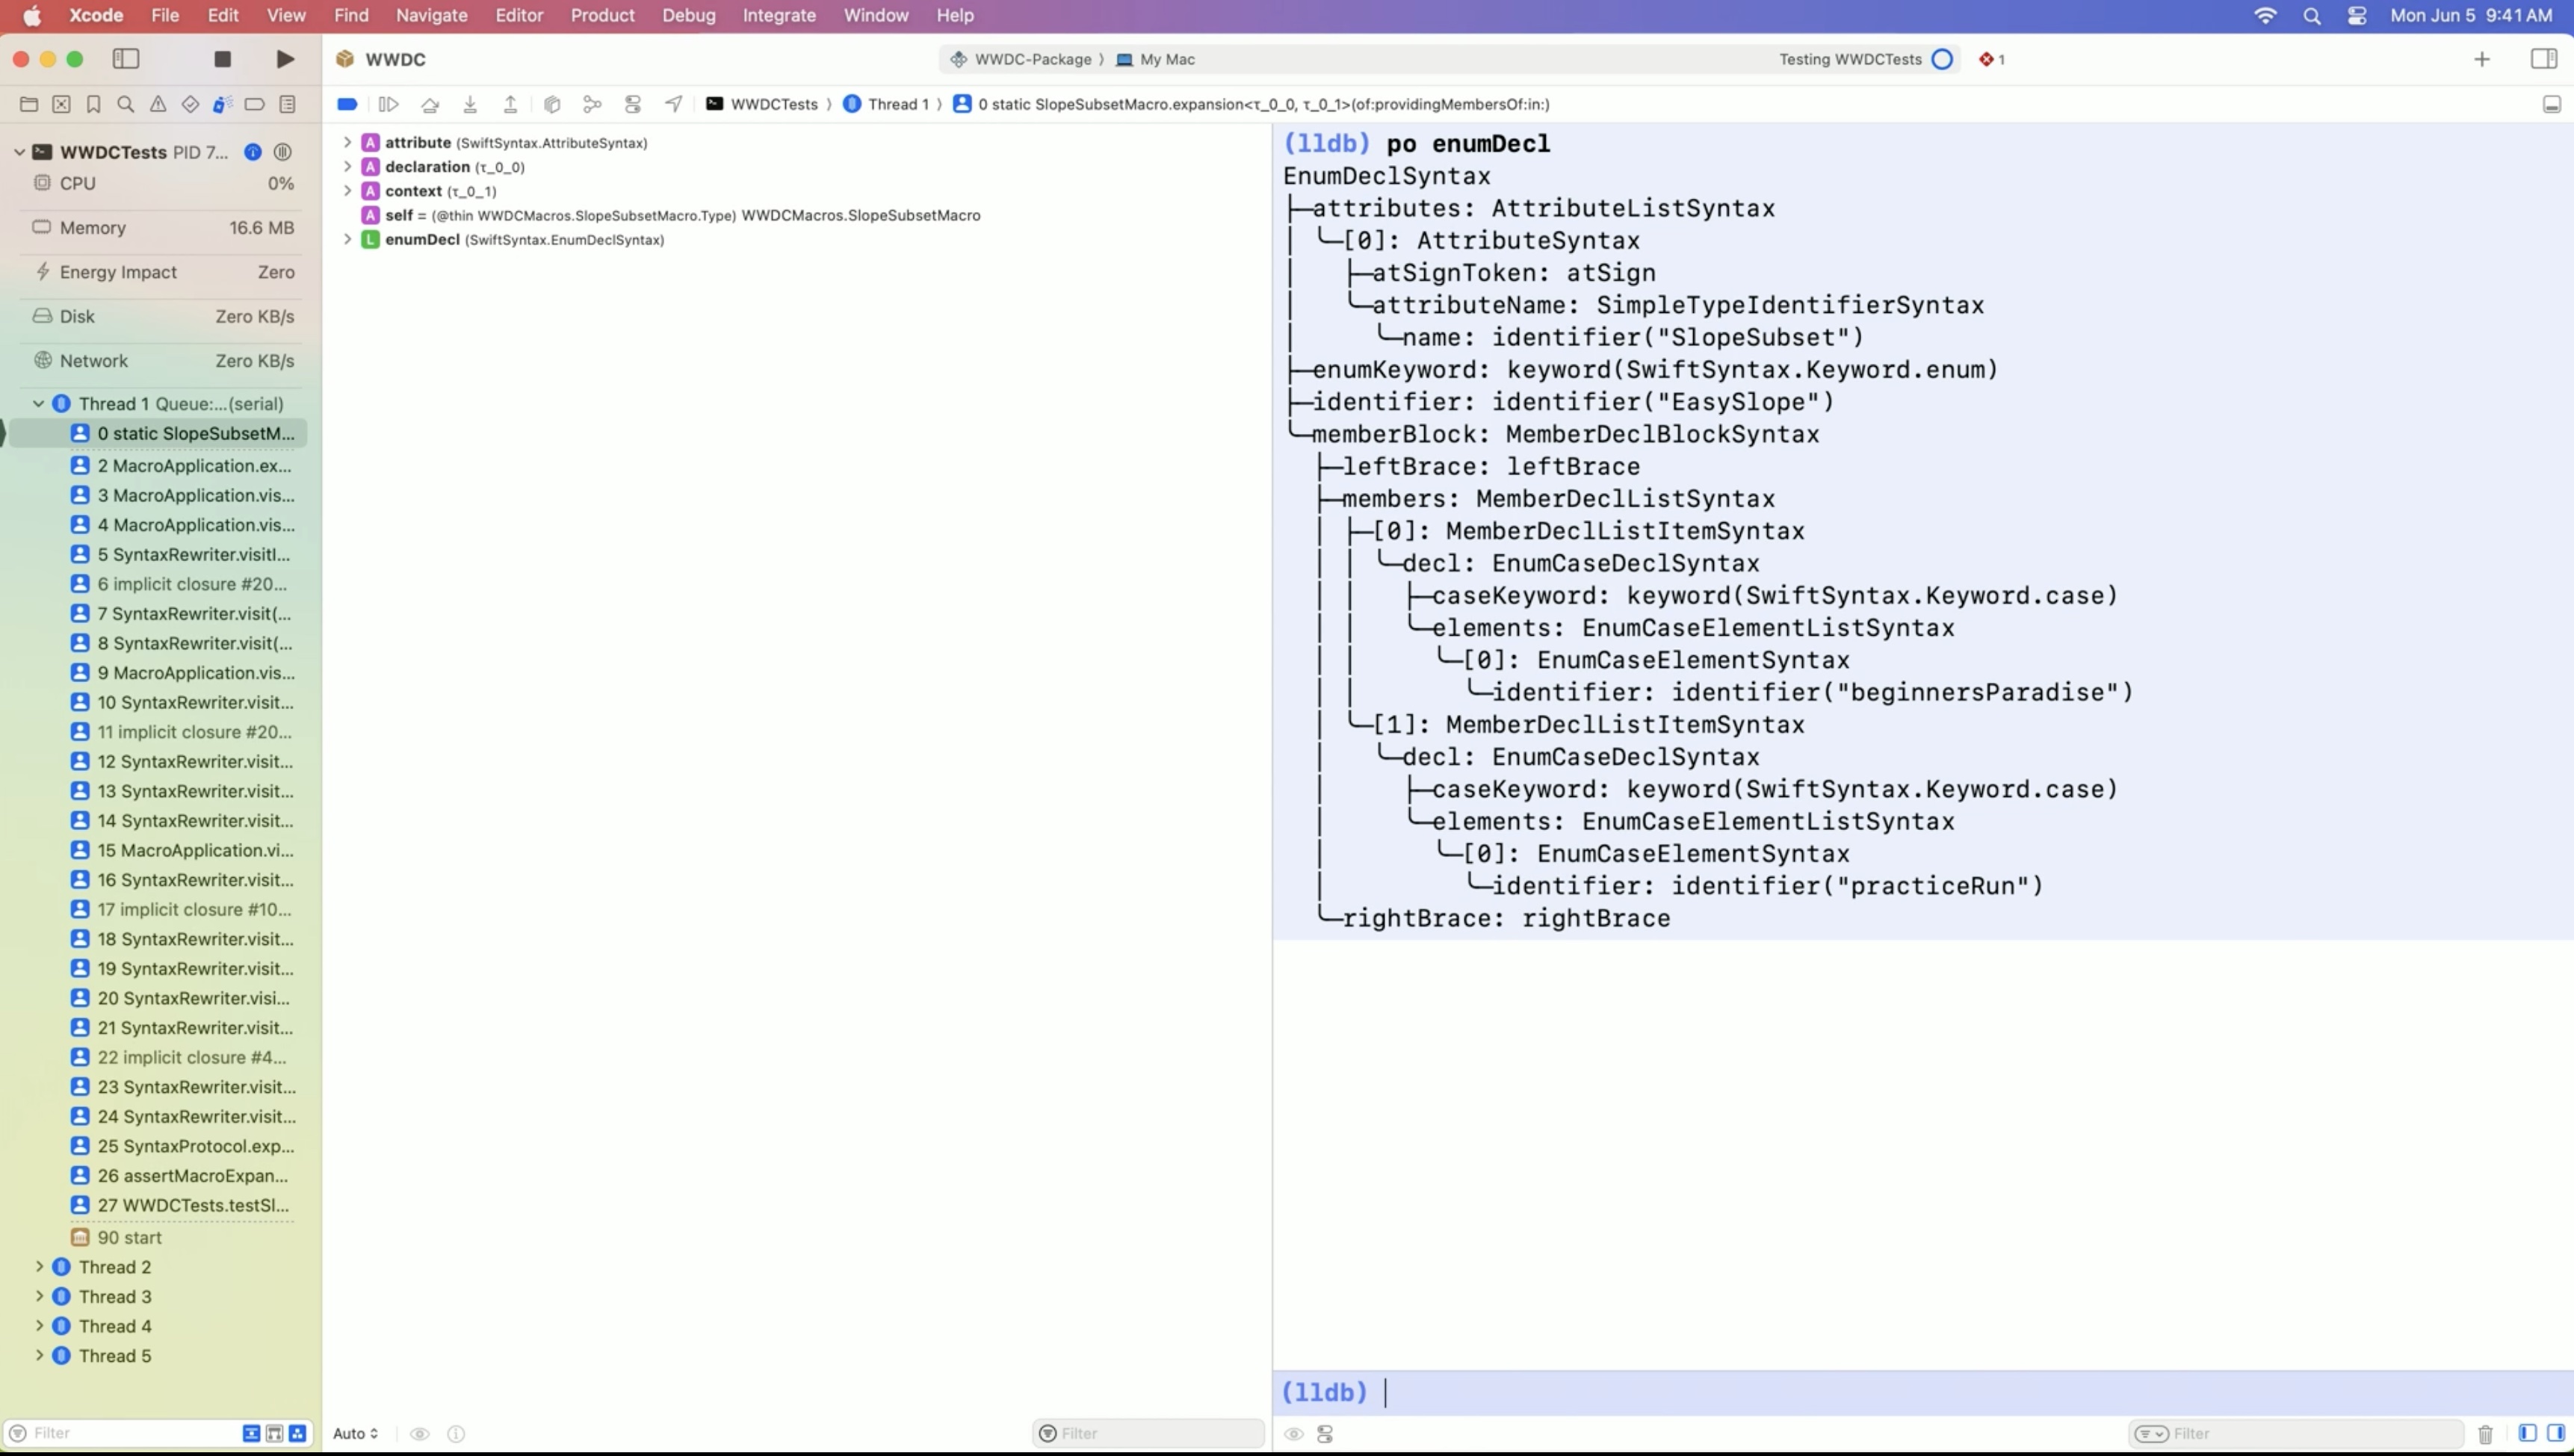
The innermost nodes of the syntax tree represent the enum elements, the 'beginnersParadise', and 'practiceRun' slopes. To retrieve them, we need to follow the structure that is outlined to us in the syntax tree.
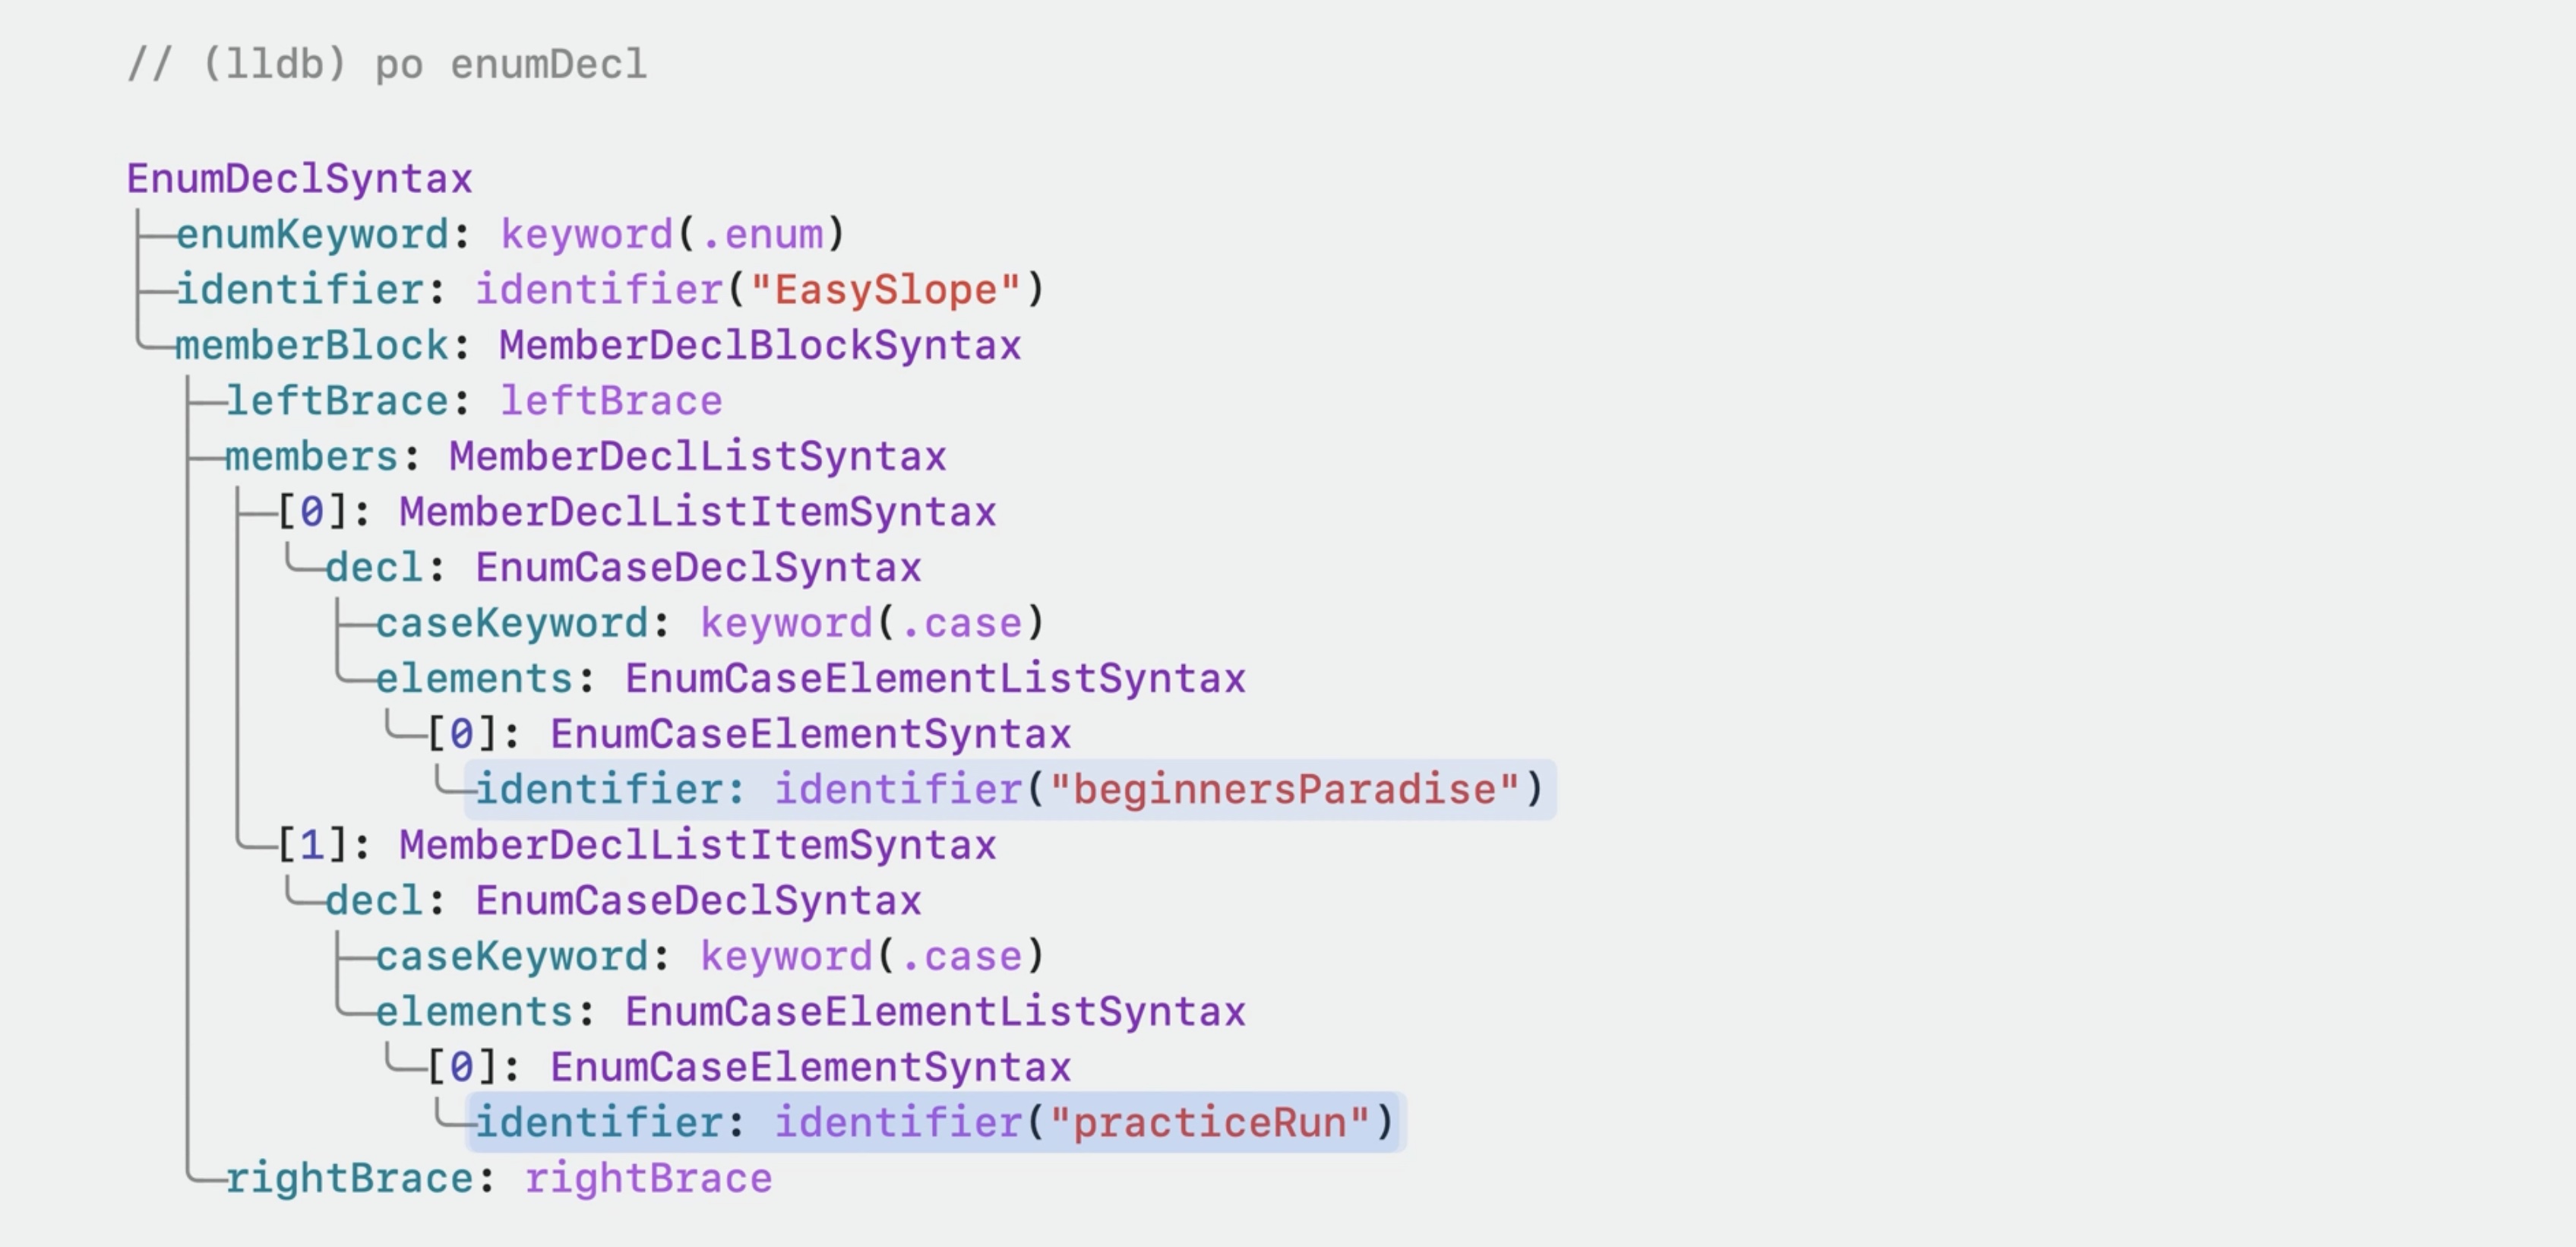
The enum declaration has a child called 'memberBlock'. This member block contains both the braces and the actual members. So to access the members, we start with 'enumDecl.memberBlock.members'.
These members contain the actual declaration, as well as an optional semicolon. We are interested in the declarations, in particular those declarations that actually declare enum cases. Using compact map to get a list of all the member declarations that are enum cases. Each case declaration can declare multiple elements. To retrieve all of them, we can use 'flatMap'.
// Retrieving enum elements
let members = enumDecl.memberBlock.members
let caseDecls = members.compactMap { $0.decl.as(EnumCaseDec1Syntax.self) }
let elements = caseDecls.flatMap { $0.elements }
And now we can start constructing the initializer.
// Initializer to generate

init?(_ slope: Slope) {
	switch slope {
		case beginnersParadise:
			self = .beginnersParadise
		case .practiceRun:
			self = .practiceRun
		default:
			return nil
	}
}
The initializer declaration has a single item: A switch expression.
This switch expression contains a case for each element in the enum, as well as a default case that returns nil. We need to create syntax nodes for all of these.
Two great ways of finding the syntax nodes to create, are either by printing the syntax tree like we did before, or by reading SwiftSyntax's documentation.
We start by constructing an InitializerDeclSyntax.
This type can be constructed by building the body using a result builder and specifying the header-- that is the 'init' keyword and all the parameters. This will allow us to use a for loop inside the result builder to iterate over all the elements, exactly what we need.
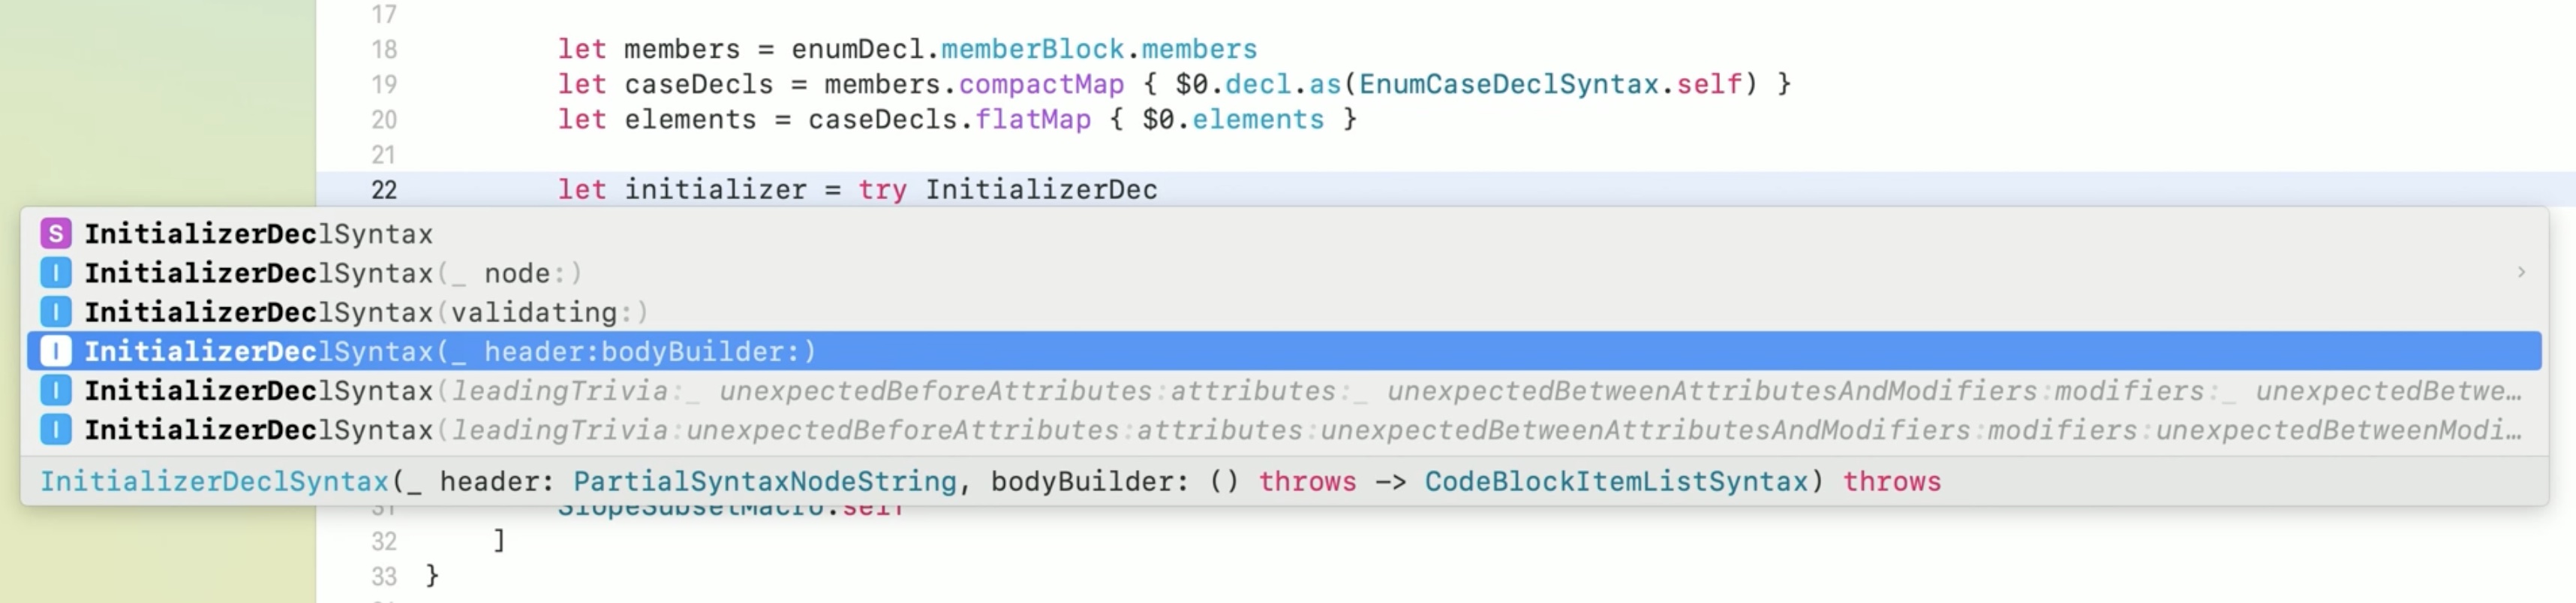
Copy the init header from our test case.
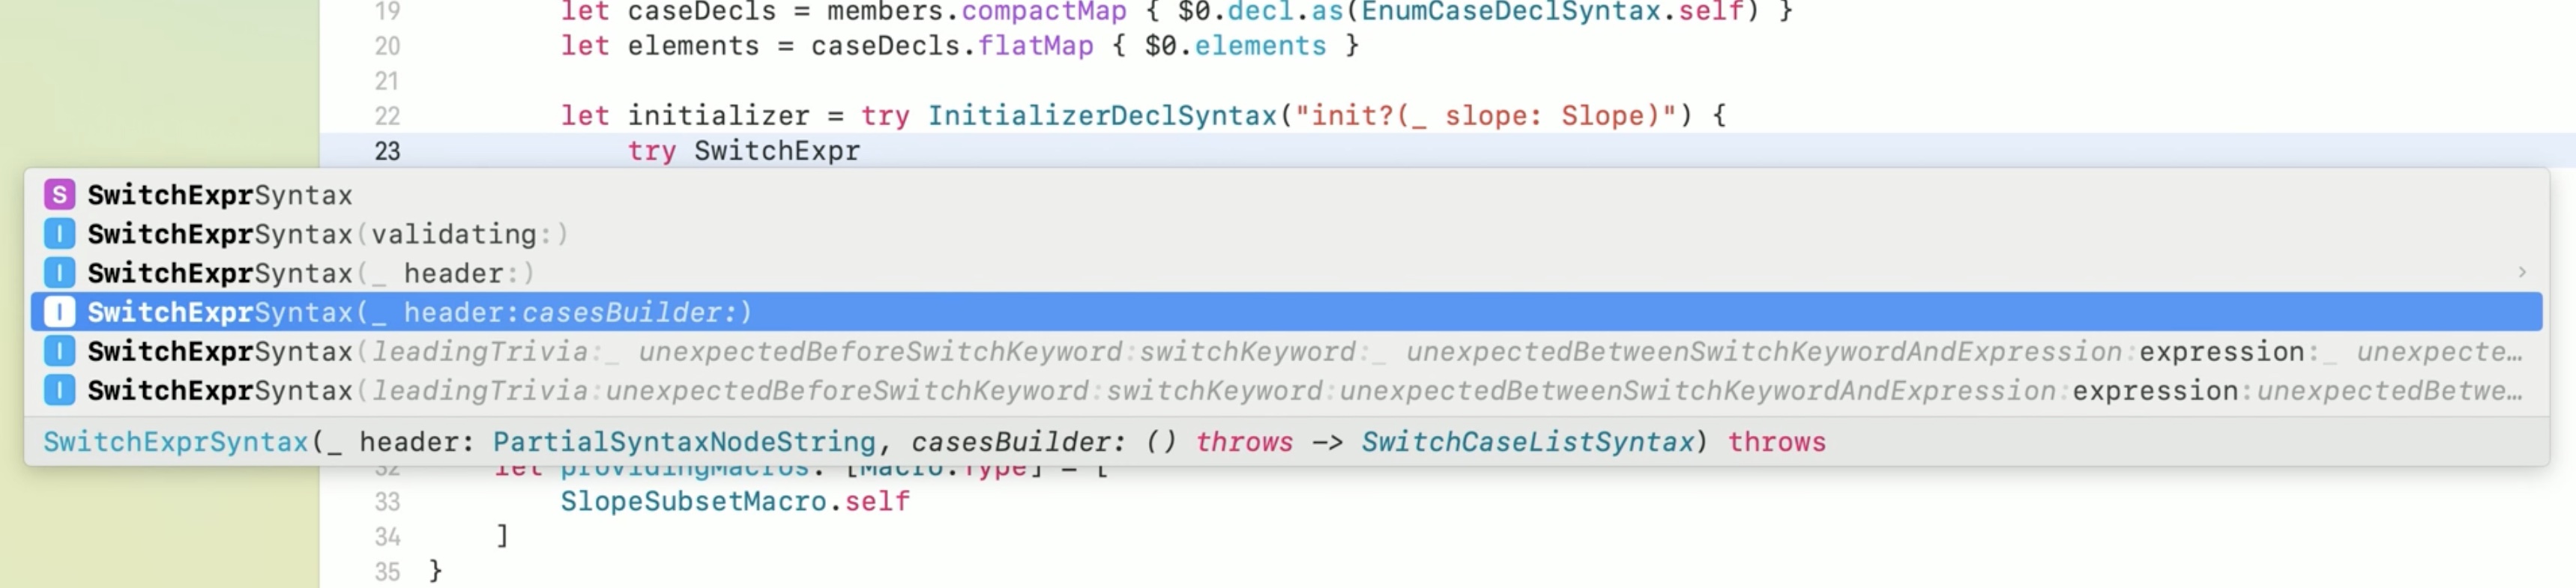
Inside the body, we need a switch expression. This type also has an initializer that takes a header and a result builder.
Now we iterate over all elements. For each element, we want to create a new case item, which we can construct using string interpolation just like we saw for ‘#stringify'. We also need to add a default case that returns nil.
And finally, return the initializer.
// ...

let initializer = try InitializerDeciSyntax("init?(_ slope: Slope)") {
	try SwitchExprSyntax("switch slope") {
		for element in elements {
			SwitchCaseSyntax(
				"""
				case .\(element.identifier):
					self = .\(element.identifier)
				"""
			)
		}
		SwitchCaseSyntax("default: return nil")
	}
}
return [DecISyntax(initializer)]

// ...
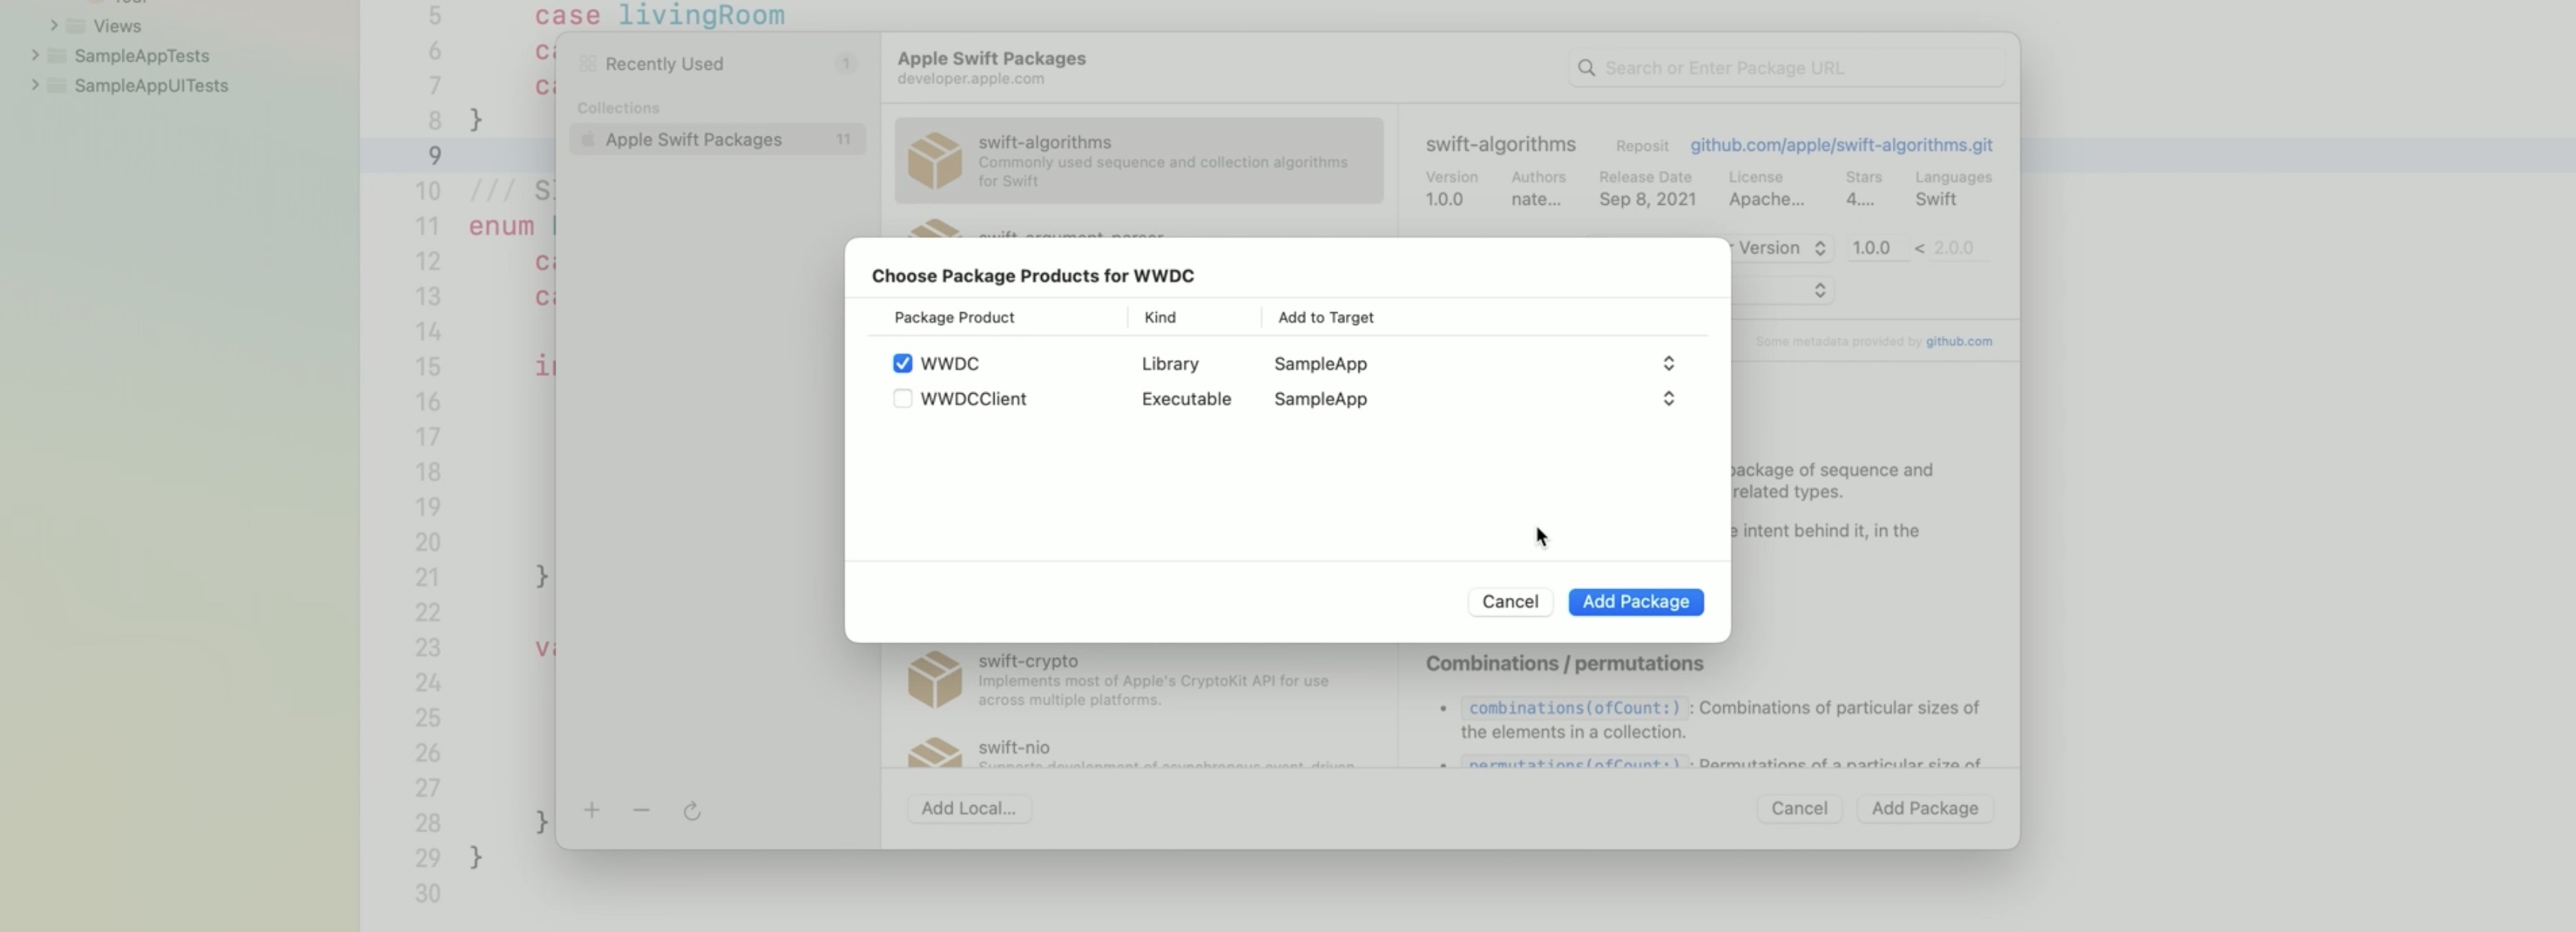
To add the macro package to the Xcode project, we right-click on it and select "Add Package Dependencies" and select the local package that we just created.
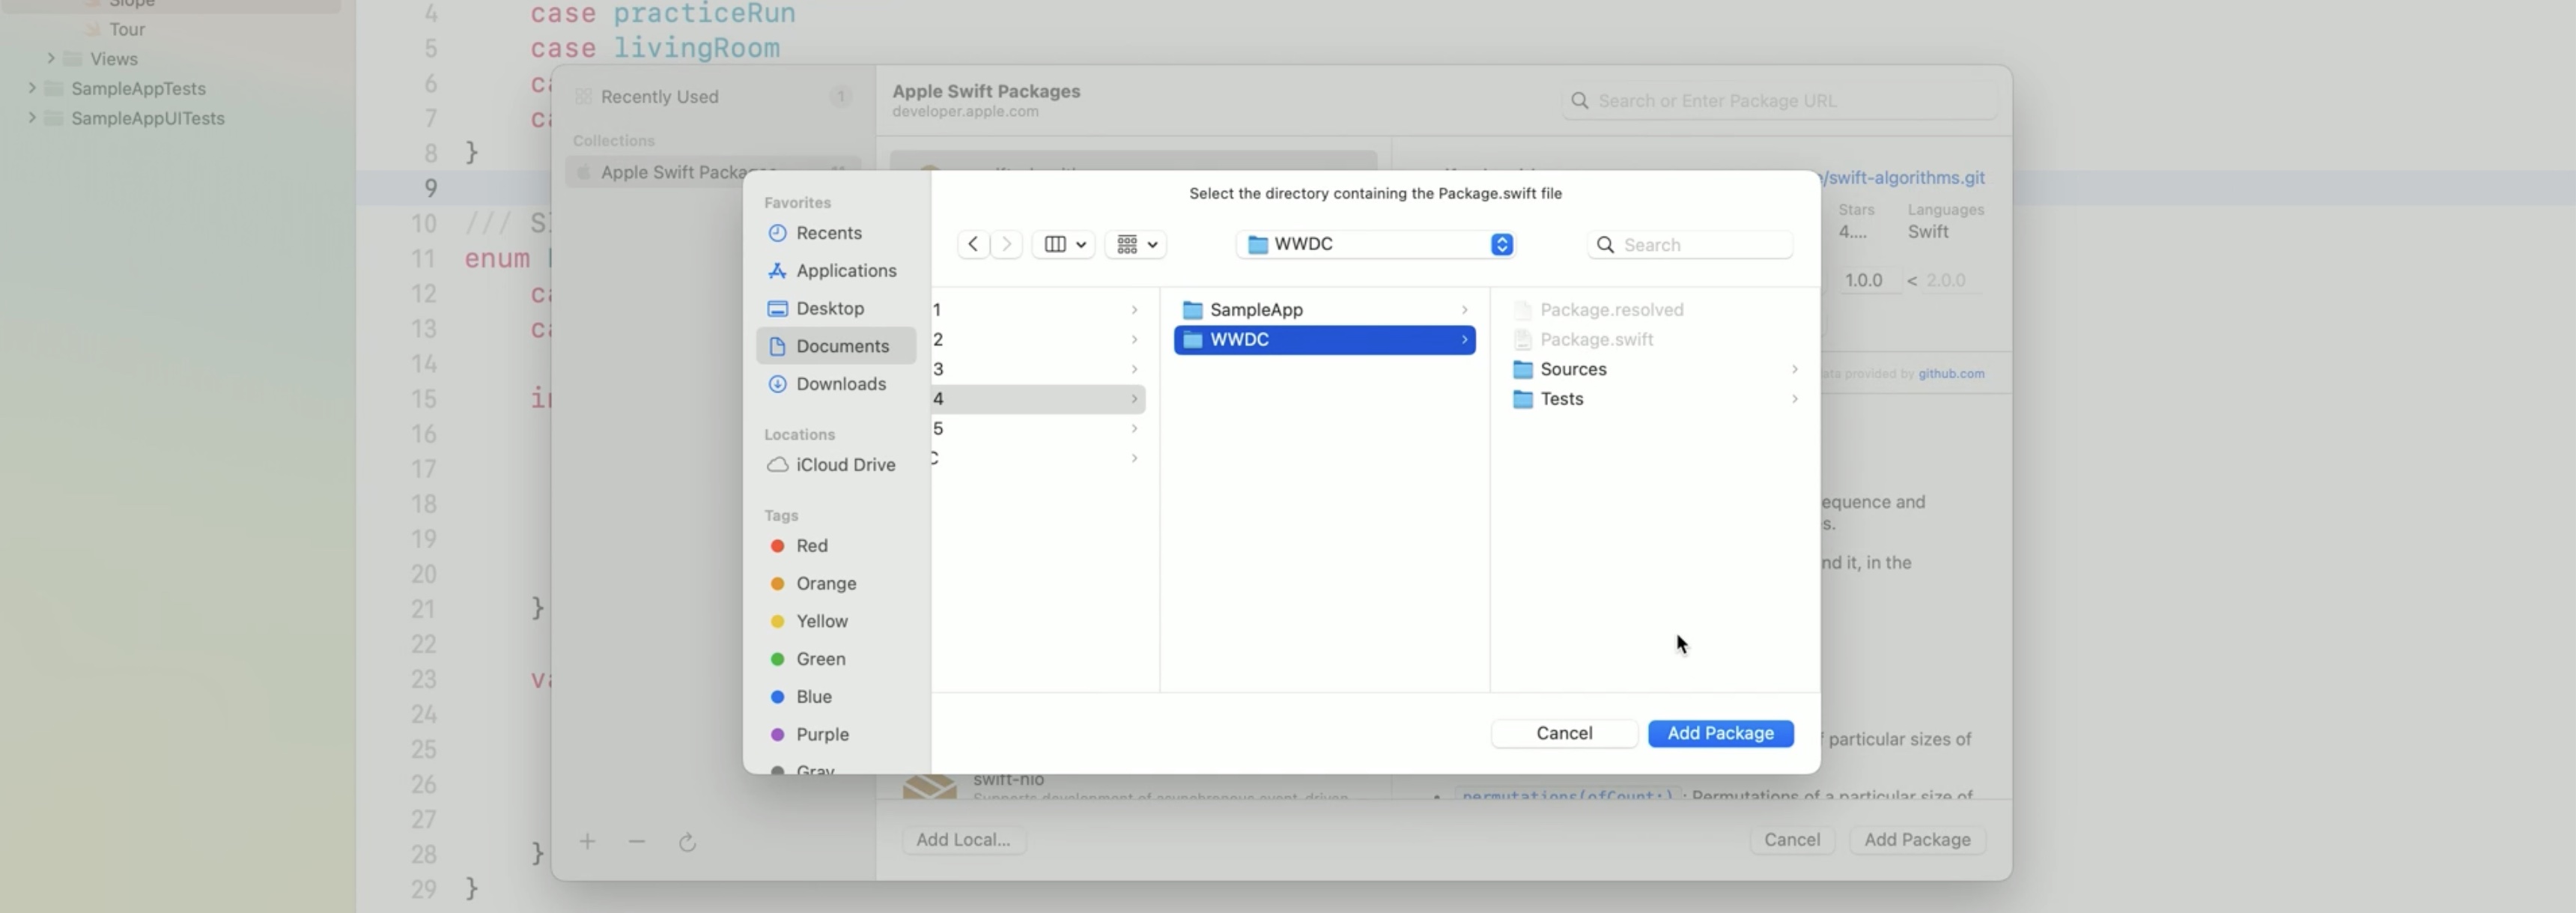
To be able to use the macro, we add the WWDC target as a dependency of the app.
Now import the WWDC module from the package and apply the SlopeSubset macro to the EasySlope type.
If we build... ...the compiler complains that the hand-written initializer is an invalid redeclaration. And that's because the macro now generates it for us. So we can just delete it. So if we want to see what the macro actually generated, we can right-click on SlopeSubset and click Expand Macro.
And if I forgot what the macro does, we can also Option-click on it to read its documentation.

Write macro recap
- Start with the Swift macro package template.
- Use the debugger to explore the syntax node structure: stop the macro's execution and print the syntax node inside the debugger. See which properties we need to access to get all the enum elements.
- Develop macro based on test cases
- Add package to an Xcode project
Diagnostics
But what happens if our macro is used in situations that it doesn't support and generates code that does not compile. We can emit error messages that inform our adopters about what's going wrong.
let's go and fix the TODO we left in our codebase. When SlopeSubset is applied to a type that is not an enum, the macro should emit an error, saying that it is only applicable to enums.
let's start by adding a test case.
func testSlopeSubsetOnStruct() throws {
	assertMacroExpansion(
		"""
		@SlopeSubset
		struct Skier {
		}
		""",
		expandedSource: """

		struct Skier {
		}
		""",
		diagnostics: [
			DiagnosticSpec(message: "@SlopeSubset can only be applied to an enum", line: 1, column: 1)
		],
		macros: testMacros
	)
}
This time, we are applying the SlopeSubset macro to a struct.
Since there are no enum elements in the struct, we don't expect the macro to generate an initializer. Instead, it should emit a diagnostic, that is an error, informing us that SlopeSubset can only be applied to an enum. If we run this test... ...it fails because we are not outputting the error message yet. Let's go to the compiler plug-in to do so now.
Macro errors can be represented by any type that conforms to the Swift Error protocol. I use an enum with a single case to describe the error message if SlopeSubset is applied to a type that's not an enum.
enum SlopeSubsetError: CustomStringConvertible, Error {
	case onlyApplicableToEnum

	var description: String {
		switch self {
		case .onlyApplicableToEnum: return "@SlopeSubset can only be applied to an enum"
		}
	}
}
If we throw the error from the expansion function, it will be shown at the attribute that calls the macro expansion.

If we want to show the error message at a different location than the attribute, generate warnings, or even show Fix-Its in Xcode, there's an 'addDiagnostic' method on the context parameter that allows to generate rich diagnostics.
Now, how does it look like in Xcode if we apply SlopeSubset to a struct?
Xcode shows the custom error message inline with all other compilation errors. That makes it easy for adopters of our macro to see what they are doing wrong.

Now that we have good error handling, go and generalize it.
To specify the superset of the enum, that we have so far hard-coded as Slope, we add a generic parameter to the macro declaration.
And since the macro is now no longer specific to slopes, let's rename it to EnumSubset by right clicking on SlopeSubset and selecting Refactor, Rename.
(Rename all occurences inside string literals and comments by Command-clicking them.)
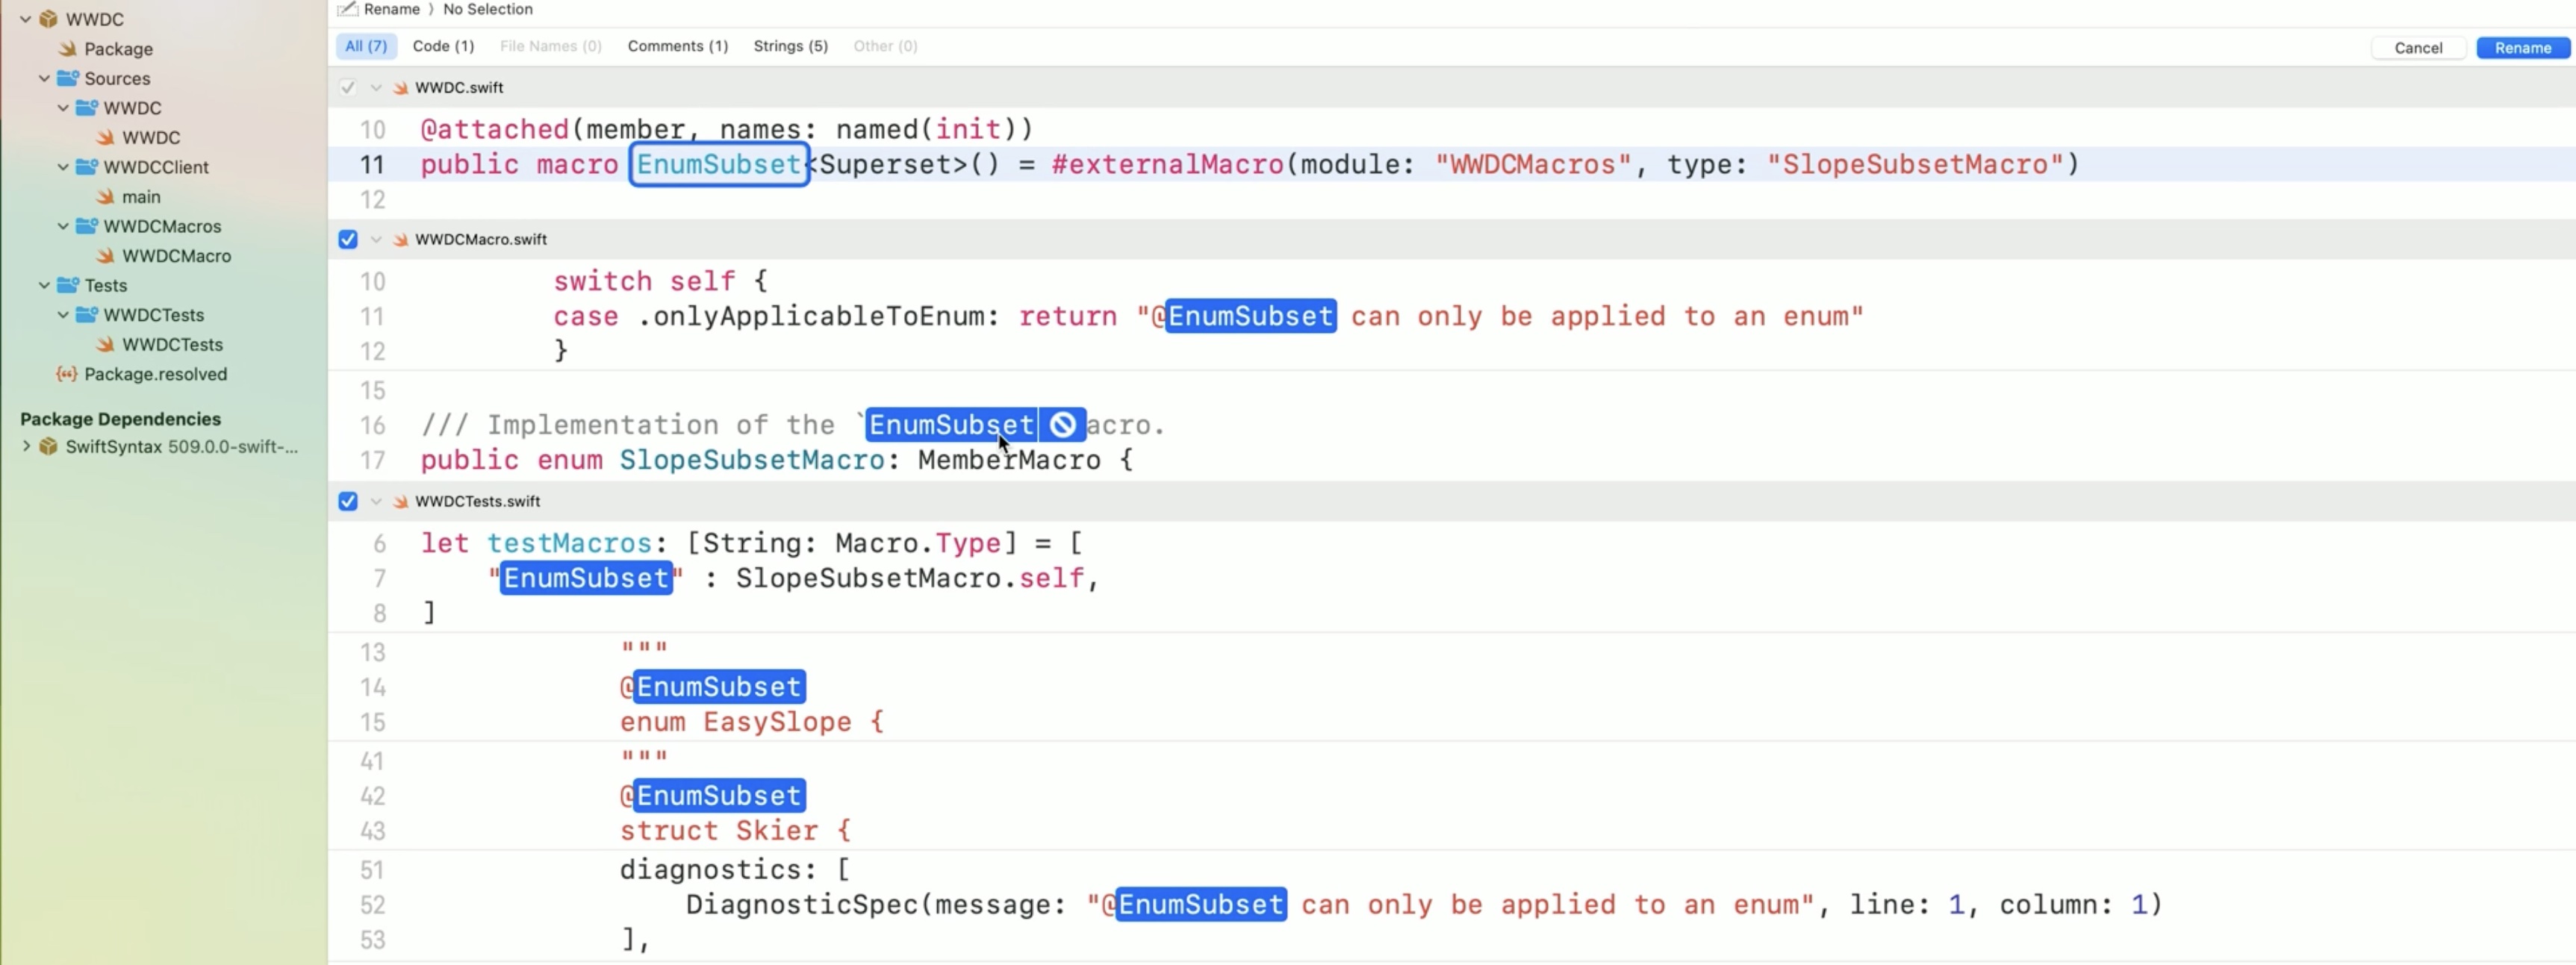
We adjust our macro implementation to use the generic parameter, instead of the hard-coded Slopes type. If we print the attribute inside the debugger and inspect its layout, just like we did for 'enumDecl', we can see that we can retrieve the generic parameter by accessing the 'argumentType' of the first argument in the 'genericArgumentClause' of the attribute's name. So now that we've retrieved the generic parameter, we can replace the so-far hardcoded Slope type by the variable 'supersetType'.
Need a couple more changes, like renaming the initializer's parameter, changing the macro implementation's type name, and updating the documentation. For now, we make sure that our tests are still passing.
Since we made EnumSubset generic, we need to explicitly specify that EasySlope is a subset of Slope by passing slope as a generic parameter to the EnumSubset macro.

Wrap up
The key benefits of using Swift macros are: - Code Consistency: Since macros generate code, it ensures that similar code snippets throughout the program are consistent. This is especially important when working in large teams where ensuring code consistency can be a challenge. - Time Saving: Macros can automate repetitive tasks in your codebase. This can save a lot of time, especially on larger projects. - Improved Readability and Maintainability: By abstracting away repetitive or complex code into a macro, the resulting code becomes easier to read and maintain. - Reduced Errors: When repetitive code is generated by macros, it reduces the chance of introducing errors that can occur when manually writing similar code snippets.
In summary, while Swift macros might seem complex at first, especially for a new developer, they are a powerful tool to have in our programming toolkit.
They can make our code cleaner, more efficient, and less prone to errors.
Resources
Have a question? Ask with tag wwdc2023-10166
Search the forums for tag wwdc2023-10166
## Related Videos Discover Observation in SwiftUI
Expand on Swift macros
What’s new in Swift
What’s new in Xcode 15
 GitHub
 Twitter
 iosdev.space