Meet Core Location Monitor
Written by
 Travis Ma
Travis Ma
Description: Discover how Core Location Monitor can help you better understand location and beacon events in your app. Learn how to use Core Location Conditions to describe and track the state of events in your app, and find out how you can better respond to transitions in your apps through Swift semantics and improved reliability.
let self.monitor = await CLMonitor("iHeartMonitor")

//Add a condition for monitoring
await self.monitor.add(aCondition, identifier: "Work")

//Receive and respond to events
Task {
  for try await event in self.monitor.events {
    takeAction(on: event)
  }
}
Monitor Overview
- When creating a
CLMonitor, only one instance with a given name can be opened at a timelet self.monitor = await CLMonitor("iHeartMonitor")will either return existing instance or generate a new one
Supported Conditions
- Add a condition to a CLMonitor instance for monitoring and associate it with an identifier using the
addmethod- Example: "Work" uniquely identifies the record of a condition that is satisfied when the user is at work. The record object and its contents will be accessible by this identifier and the condition will be monitored until it is removed.
- You can remove the monitoring condition and corresponding record by calling
removewith the same identifier - Two types of conditions supported on iOS:
- CircularGeographicCondition
- Defined by a center and a radius. Only events reported inside of the circle condition are considered "satisfied"
    // Circular geographic condition
    let center = CLLocationCoordinate2D(latitude: 37.33467, longitude: -122.00898)
    let appleParkCondition = CLMonitor.CircularGeographicCondition(
      center: center,
      radius: 100.0
    )
- BeaconIdentityCondition
- Condition satisfied if someone approaches a site of interest Definedby a UUID, major number and minor number Can use wildcards or ommitting numbers to filter beacons Example conditions for:
- If you want to determine is someone is near any of your sites, all sites can simply use the same UUID
- If you want to know if someone is near a specific site, all sites can use the same UUID, but you can give each site a different major number for identification
- Condition satisfied if someone approaches a site of interest Definedby a UUID, major number and minor number Can use wildcards or ommitting numbers to filter beacons Example conditions for:
        let condition1 = CLMonitor.BeaconIdentityCondition(
        uuid: myDevCentersUUID,
        major: texasDevCenter
        )
        let condition1 = CLMonitor.BeaconIdentityCondition(
        uuid: myDevCentersUUID,
        major: arizonaDevCenter
        )
- If you want to know if someone is near a specific area of a site
`swift let condition1 = CLMonitor.BeaconIdentityCondition( uuid: myDevCentersUUID, major: texasDevCenter, minor: cafeteria ) let condition1 = CLMonitor.BeaconIdentityCondition( uuid: myDevCentersUUID, major: texasDevCenter, minor: parkingLot )`
- Optionally, you can add a condition with a default state (
.satisfied,.unsatisfied) if you know where most common usage will occur. CLMonitor will override the state if it's incorrect during usage.
await self.monitor.add(
  appleParkCondition,
  identifier: "appleParkCondition",
  assuming: .unsatisfied
)
For more information on how Beacons work, please refer to Ranging for Beacons
Inspecting Records
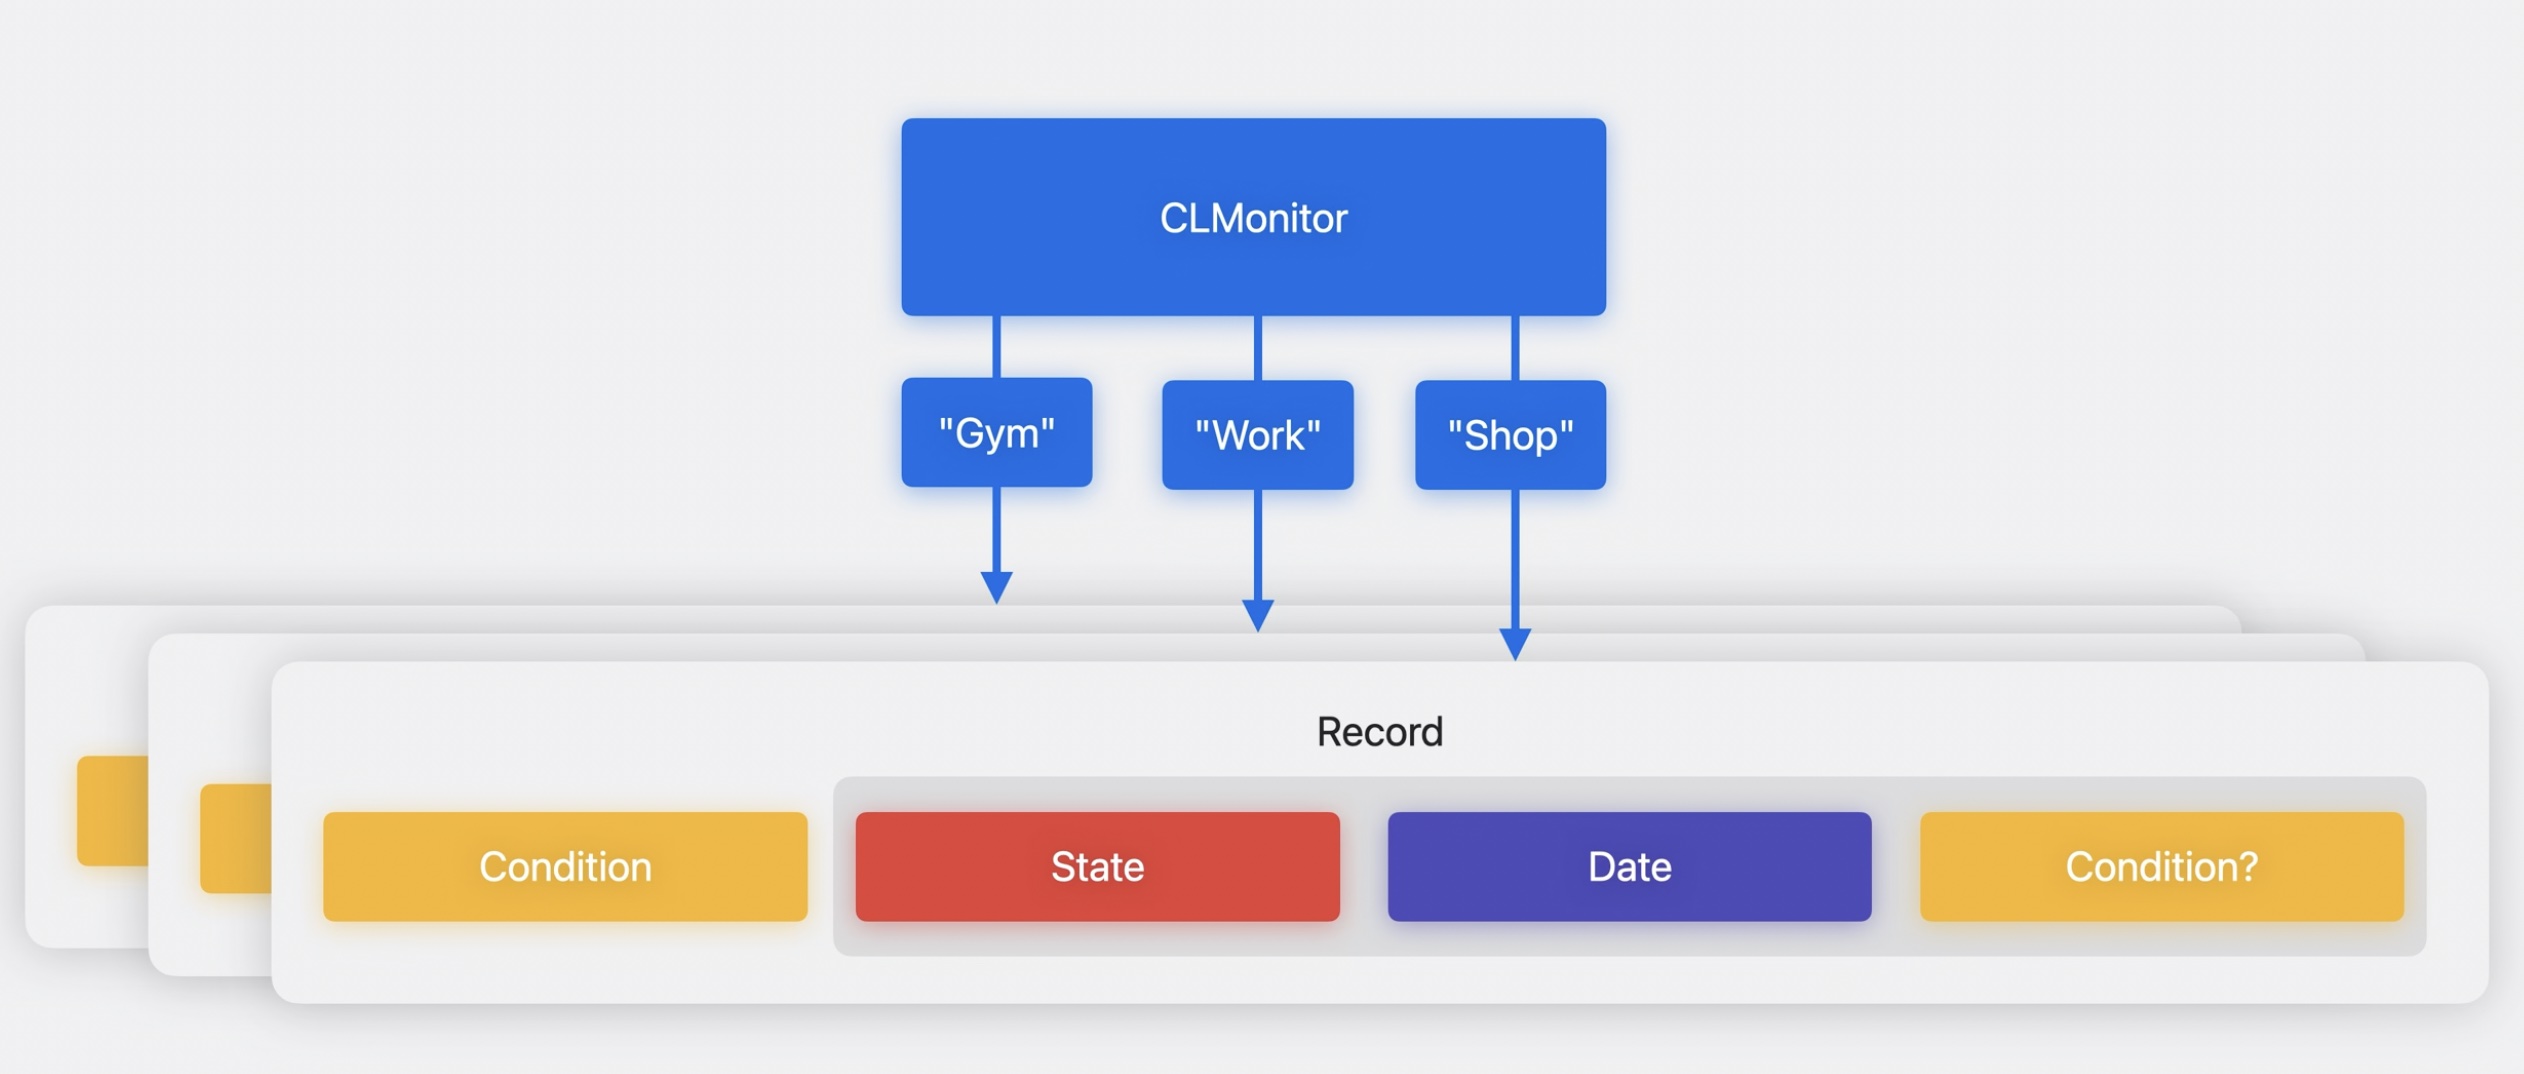
- After fetching the record for a condition you'll receive the
lastEventand thestate - Why is a
Condition?also returned inside of the event record for a Condition?- This is called a "refinement" for BeaconIdentityCondition. If a condition with major and minor wildcarded becomes satisfied, that event will be delivered with the refinement populated. That refinement condition will carry the UUID but also the major and minor information of the observed beacon.
// Inspecting a record and its contents
// Get record
let monitoredRecord = await self.monitor.record(for: "appleParkCondition")
// Monitored condition
let condition = monitoredRecord?.condition
// Get last event
let lastEvent = monitoredRecord?.lastEvent
// Get last state
let lastState = lastEvent?.state
To check all monitored conditions:
// Get all monitored identifiers
for anIdentifier in await self.monitor.identifiers {
  // Get record
  if let monitoredRecord = await self.monitor.record(for: anIdentifier) {
    ...
  }
}
Handling Events
When Core Location observes a state for a monitored condition which differs from the state reported in the lastEvent, then Core Location will deliver a new event through the events async sequence property on your monitor which resumes the awaiting loop.
// Receiving events
Task{
  for try await event in self.monitor.events {
    switch (event.state){
    case satisfied:
      print ("\(event.identifier) is satisfied" )
    case unsatisfied:
      print ("\(event.identifier) is unsatisfied")
    case unknown:
      print("\(event.identifier) is unknown")
    }
  }
}
Best Practices
- Keep CLMonitor instances unique, don't try to create duplicates with the same name
- Task and await your events
- Core Location will launch your app in the background (if it was terminated) as long as it is authorized to receive user location. That means your app needs to reinit monitor and await events whenever it is launched.
- Using duplicate CLMonitors in widgets and plug-ins will launch your app and cause issues in states and conditions
- Try not to maintain condition states in your own data store, instead act on them as they arrive from CLMonitor to avoid them getting out of sync
 GitHub
 www.travisma.me