Discover Metal for immersive apps
 laurent b
Description: Find out how you can use Metal to render fully immersive experiences for visionOS. We'll show you how to set up a rendering session on the platform and create a basic render loop, and share how you can make your experience interactive by incorporating spatial input.
Chapters
0:06 - Intro
1:50 - App Architecture
5:58 - Render configuration
11:29 - Render Loop
13:00 - Render a frame
17:28 - User input
20:22 - Wrap-Up
Intro
- App architecture. To write our own engine, the CompositorServices API gives access to Metal rendering on xrOS. We can combine it with ARKit, which adds world tracking and hand tracking, to create a fully immersive experience.
- Render configuration. CompositorServices is the key to configure our engine to work on xrOS.
- Render loop, how to setup the render loop
- And how to render one frame.
- User input, how to use ARKit to make our experience interactive.
How to create immersive experiences with Metal on xrOS.
RecRoom is a great example of an application that provides a fully immersive experience using CompositorServices to create a rendering session, Metal APIs to render frames, and ARKit to get world and hand tracking.

They were able to bring support to all these technologies thanks to the Unity editor.
App architecture
Start with the architecture of an xrOS app.
we'll get the most out of today's session if we have previous experience with Metal APIs and Metal rendering techniques. If we haven't used Metal before, check out the code samples and documentation over in developer.apple.com/Metal.

When we create immersive experiences on xrOS with Metal, we'll start with SwiftUI to create the application and the rendering session.
After creating the rendering session, we can switch to a language we might be more familiar with, like C or C++, to define the inner parts of the engine.
we start by creating a type that conforms to the SwiftUI app protocol. To conform to this protocol, we will define the list of scenes in our app.
On xrOS, there are three main scenes types.
The window type provides an experience similar to 2D platforms like macOS. The volume type renders content within its bounds and it coexists in the Shared Space with other applications. And ImmersiveSpace allows us to render content anywhere.

Whenever we render fully immersive experiences with Metal, we will choose the ImmersiveSpace type.
ImmersiveSpace
ImmersiveSpace is a new SwiftUI Scene type available on xrOS.
- Conforms to SwiftUI Scene
- Container for immersive experiences
- It serves as the container for fully immersive experiences.
To learn how to use ImmersiveSpace, check out the session "Go beyond the window with SwiftUI."
Go beyond the window with SwiftUI - WWDC23
## Rendering on an ImmersiveSpace When we create an ImmersiveSpace scene, our application provides the content by using a type that conforms to the ImmersiveSpaceContent protocol. Often, when creating content for an ImmersiveSpace Scene, applications will use RealityKit.
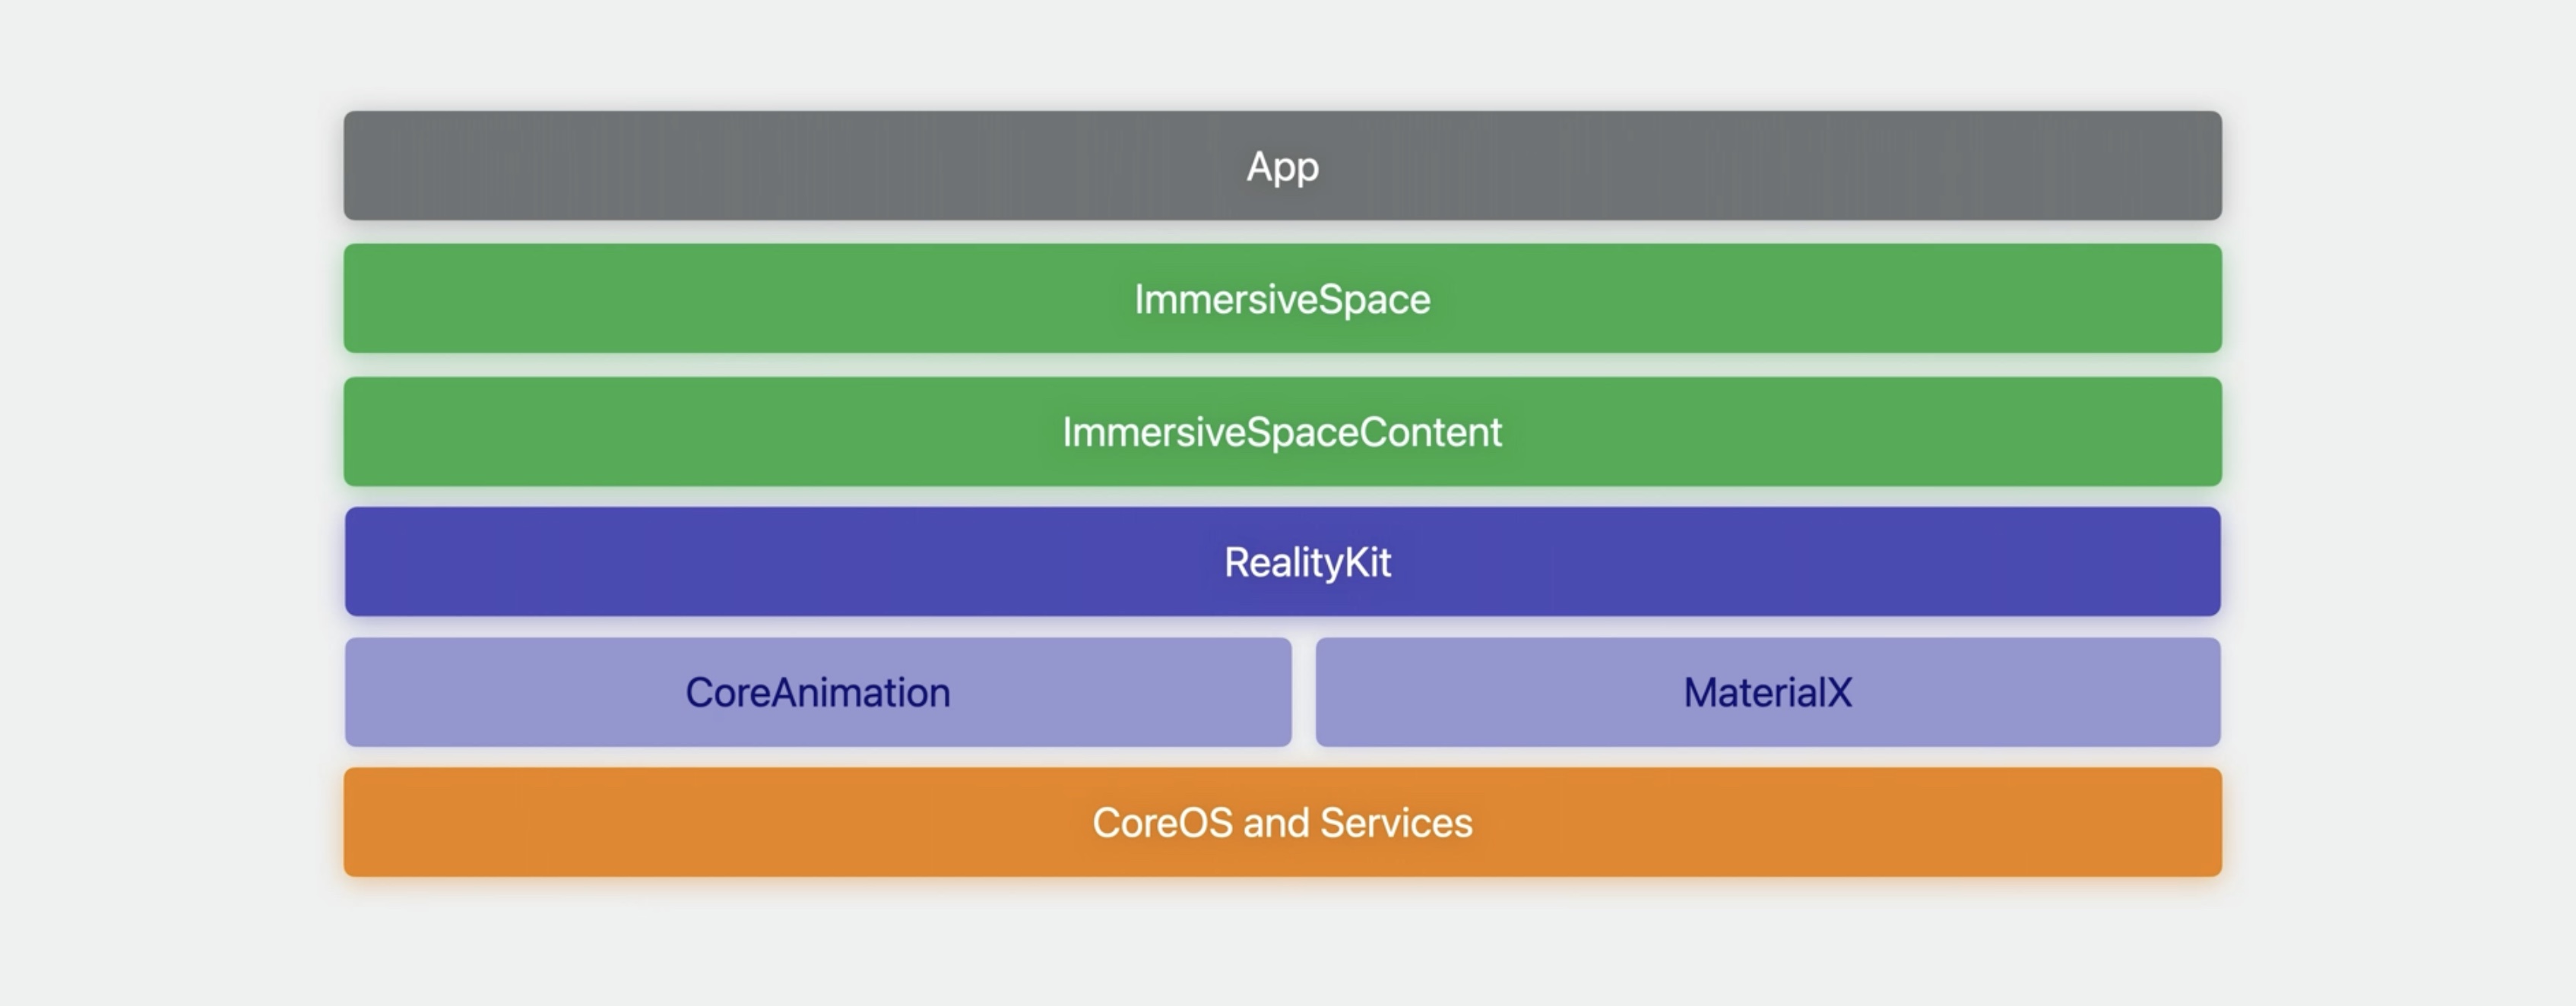
It uses CoreAnimation and MaterialX under the hood. But we canuse the power of Metal to render the content of our application.
CompositorServices API
- Metal rendering interface
- Render directly to the compositor server
- Low IPC overhead to minimize latency
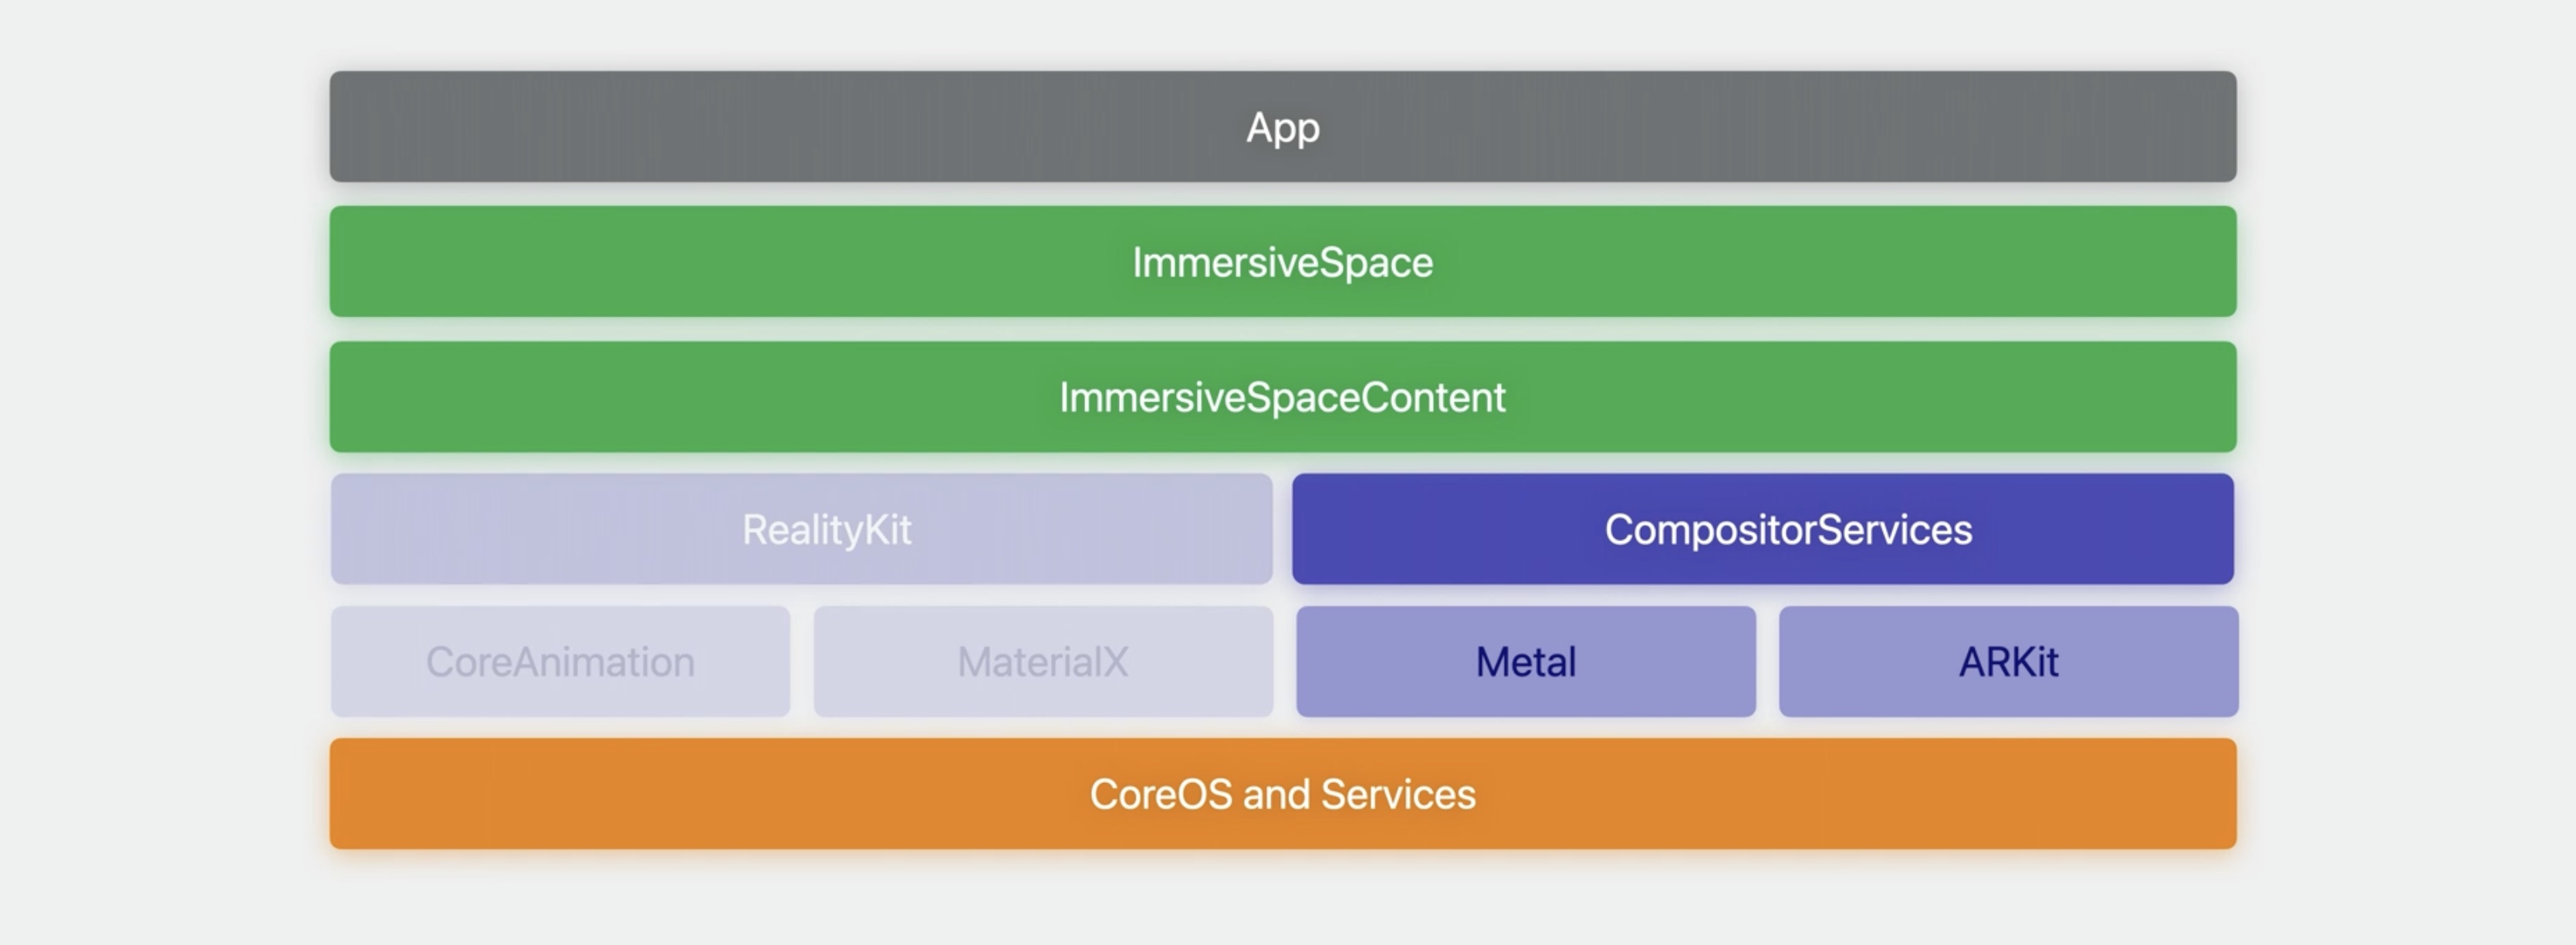
The new CompositorServices API, introduced in xrOS, provides a Metal rendering interface to be able to render the contents of an ImmersiveSpace.
With CompositorServices, applications can render directly into the compositor server. It has a low IPC overhead to minimize latency, and it is built from the ground up to support both C and Swift APIs.
When using CompositorServices, the ImmersiveSpaceContent is called CompositorLayer.
To create a CompositorLayer we will need to provide two parameters. The first one is the CompositorLayerConfiguration protocol, which defines the behavior and capabilities of the rendering session. The second is the LayerRenderer.
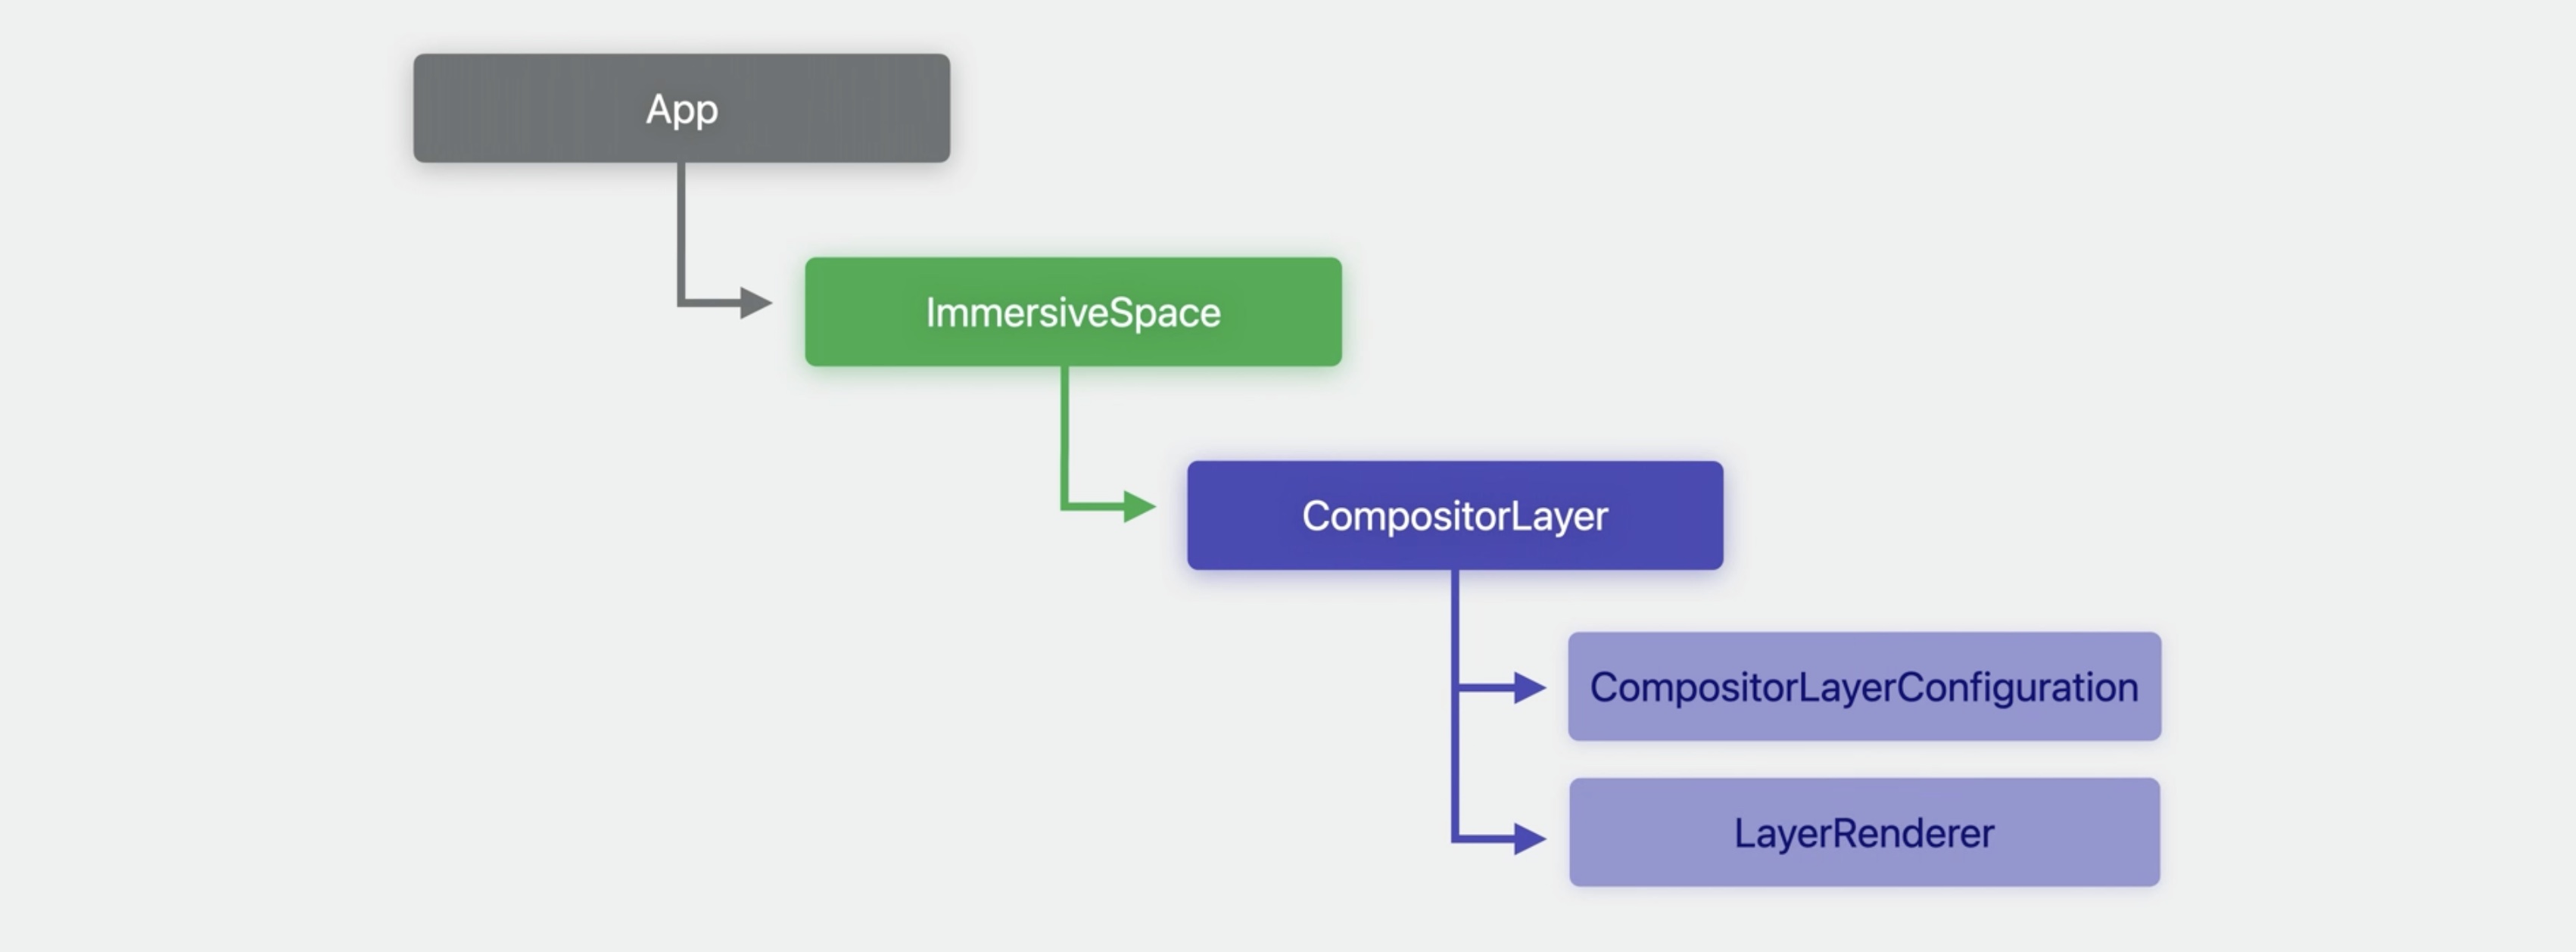
This is the interface to the layer rendering session. our application will use this object to schedule and render new frames.
When writing an immersive experience with Metal, we start by defining the app type. As the scene type, use ImmersiveSpace.
For the content type, use a CompositorLayer.
Once the CompositorLayer is ready to render content, the system will call the application with the instance of the rendering session.Here is a good place to create the instance of our custom engine.Now that we have the engine instance, we can create the render thread and run the render loop by calling start.
@main
struct MyApp: App {
	var body: some Scene {
		ImmersiveSpace {
			CompositorLayer { layerRenderer in
				let engine = my_engine_create(layerRenderer)
				let renderThread = Thread {
					my_engine_render_loop(engine)
				}
				renderThread.name = "Render Thread"
				renderThread.start ()
			}
		}
	}
}
Customize default app scene
- Bounded window by default
- Space with Compositor Content as the initial Scene
One thing to take into account when defining the scene list in our application, is that by default SwiftUI creates a window scene, even if the first scene in our app is an ImmersiveSpace.
To change that default behavior, we can modify the info plist of our app.we can add the key UIApplicationPreferred DefaultSceneSessionRole to our application scene manifest to change the default scene type of our application.
If we are using a space with a Compositor SpaceContent, we will use CPSceneSessionRole ImmersiveSpaceApplication.

Render configuration
After setting up the application, and before getting in the render loop, we'll tell CompositorServices how to configure the LayerRenderer.
Configure CompositorLayer
To provide a configuration to the CompositorLayer, we will create a new type that conforms to the CompositorLayerConfiguration protocol. This protocol allows we to modify the setup and some of the behavior of the rendering session.
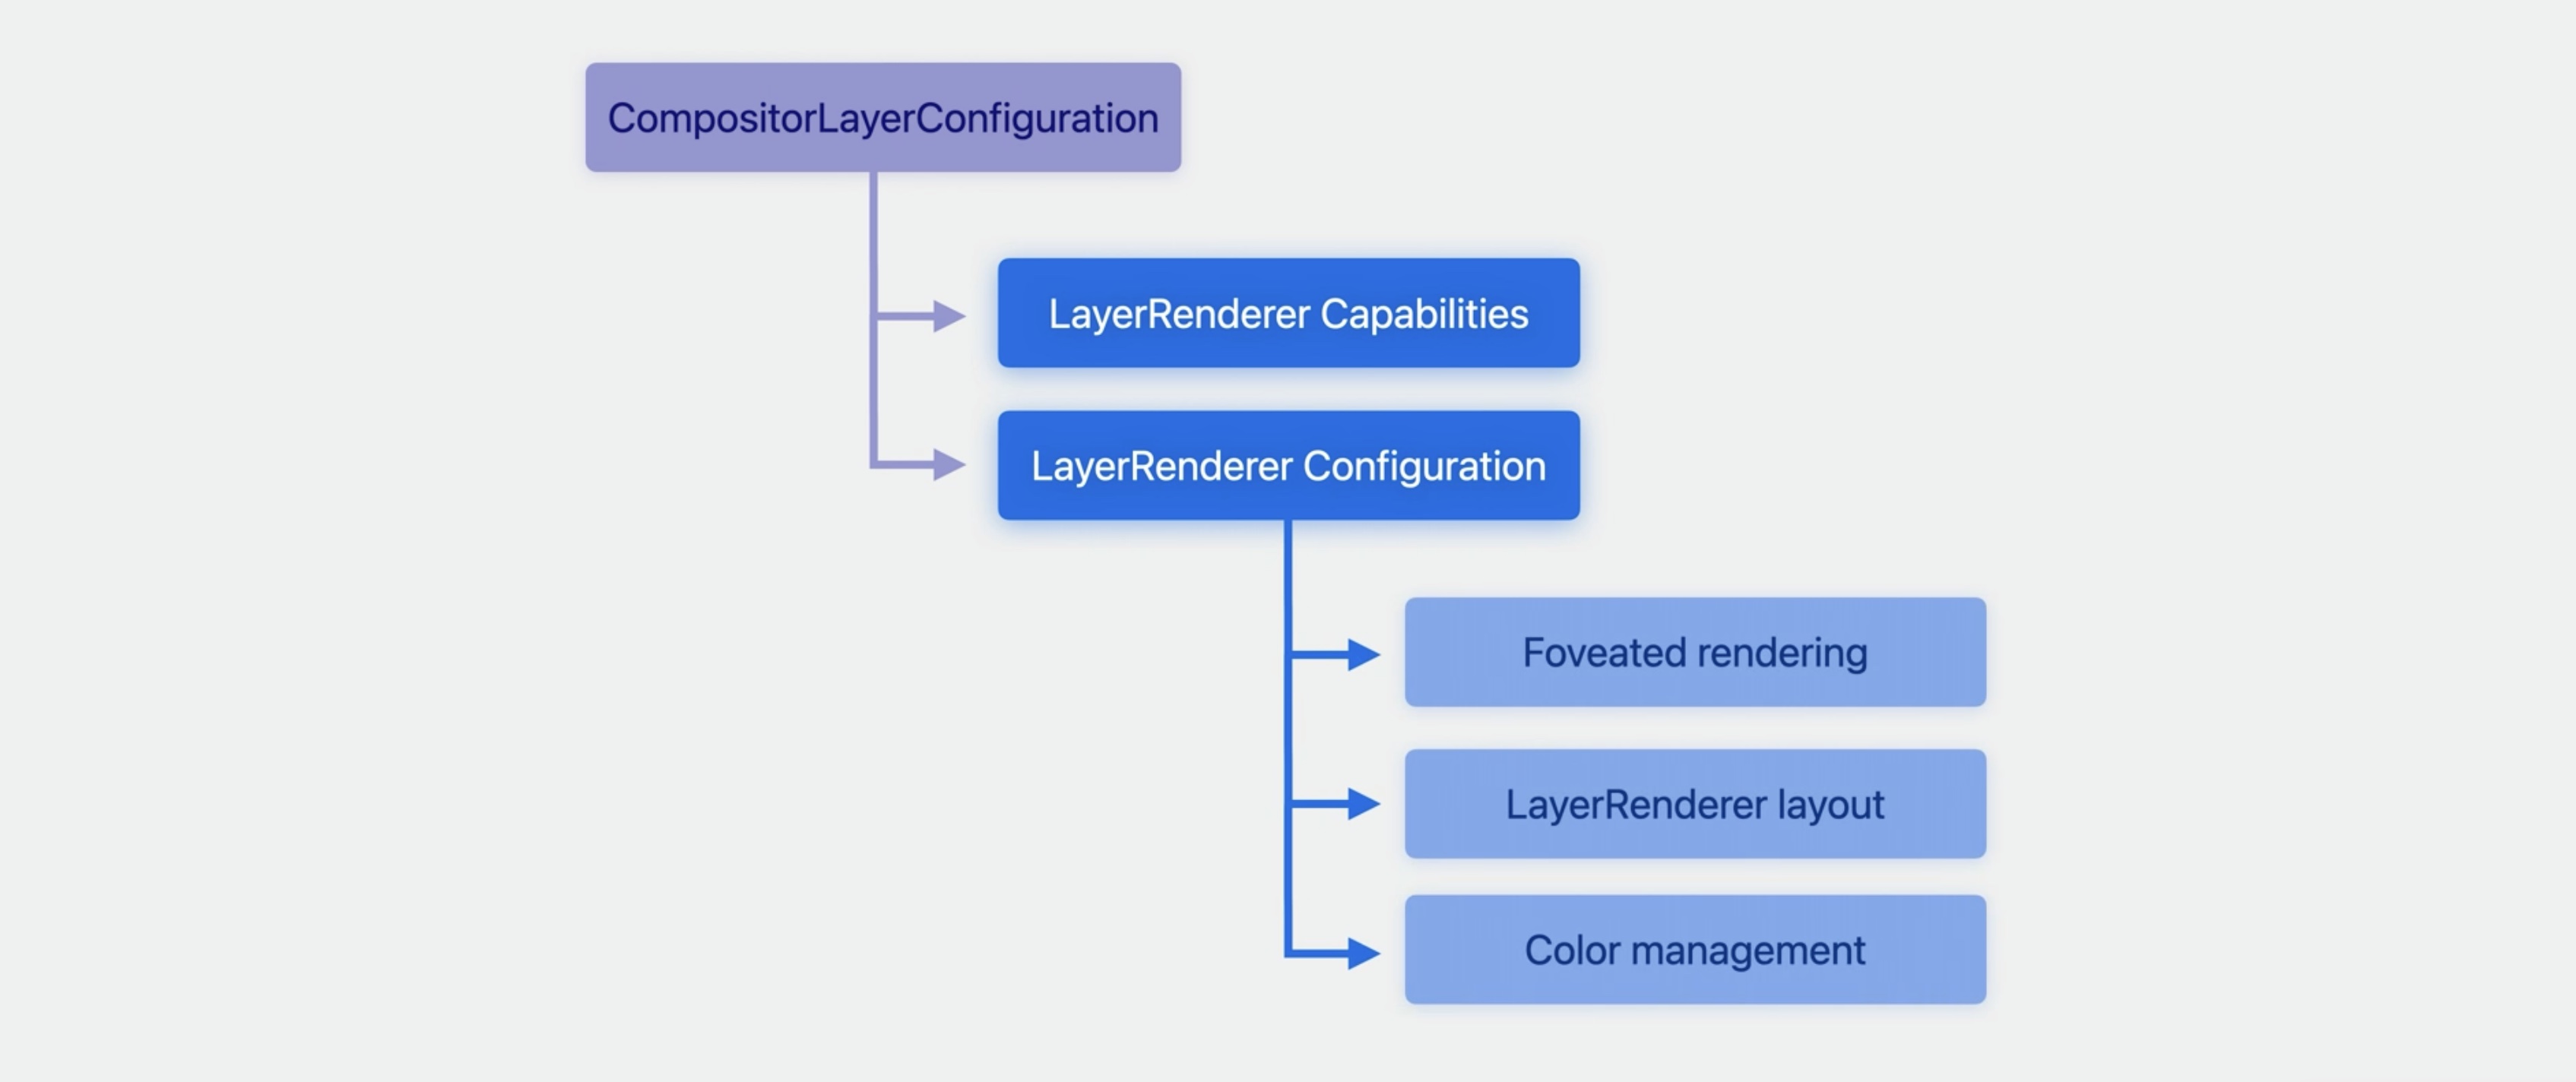
The CompositorLayerConfiguration provides we two parameters. The first one is the layer capabilities. It enables we to query what features are available on the device. Use the capabilities to create a valid configuration.
And the second parameter is the LayerRenderer Configuration.This type defines the configuration of our rendering session. With the configuration, we can define how our engine maps its content into the layer, enable foveated rendering, and define the color management of our pipeline.
Render with foveation
The main goal of foveated rendering is to allow we to render content at a higher pixel-per-degree density without using a bigger texture size.In a regular display pipeline, the pixels are distributed linearly in a texture.
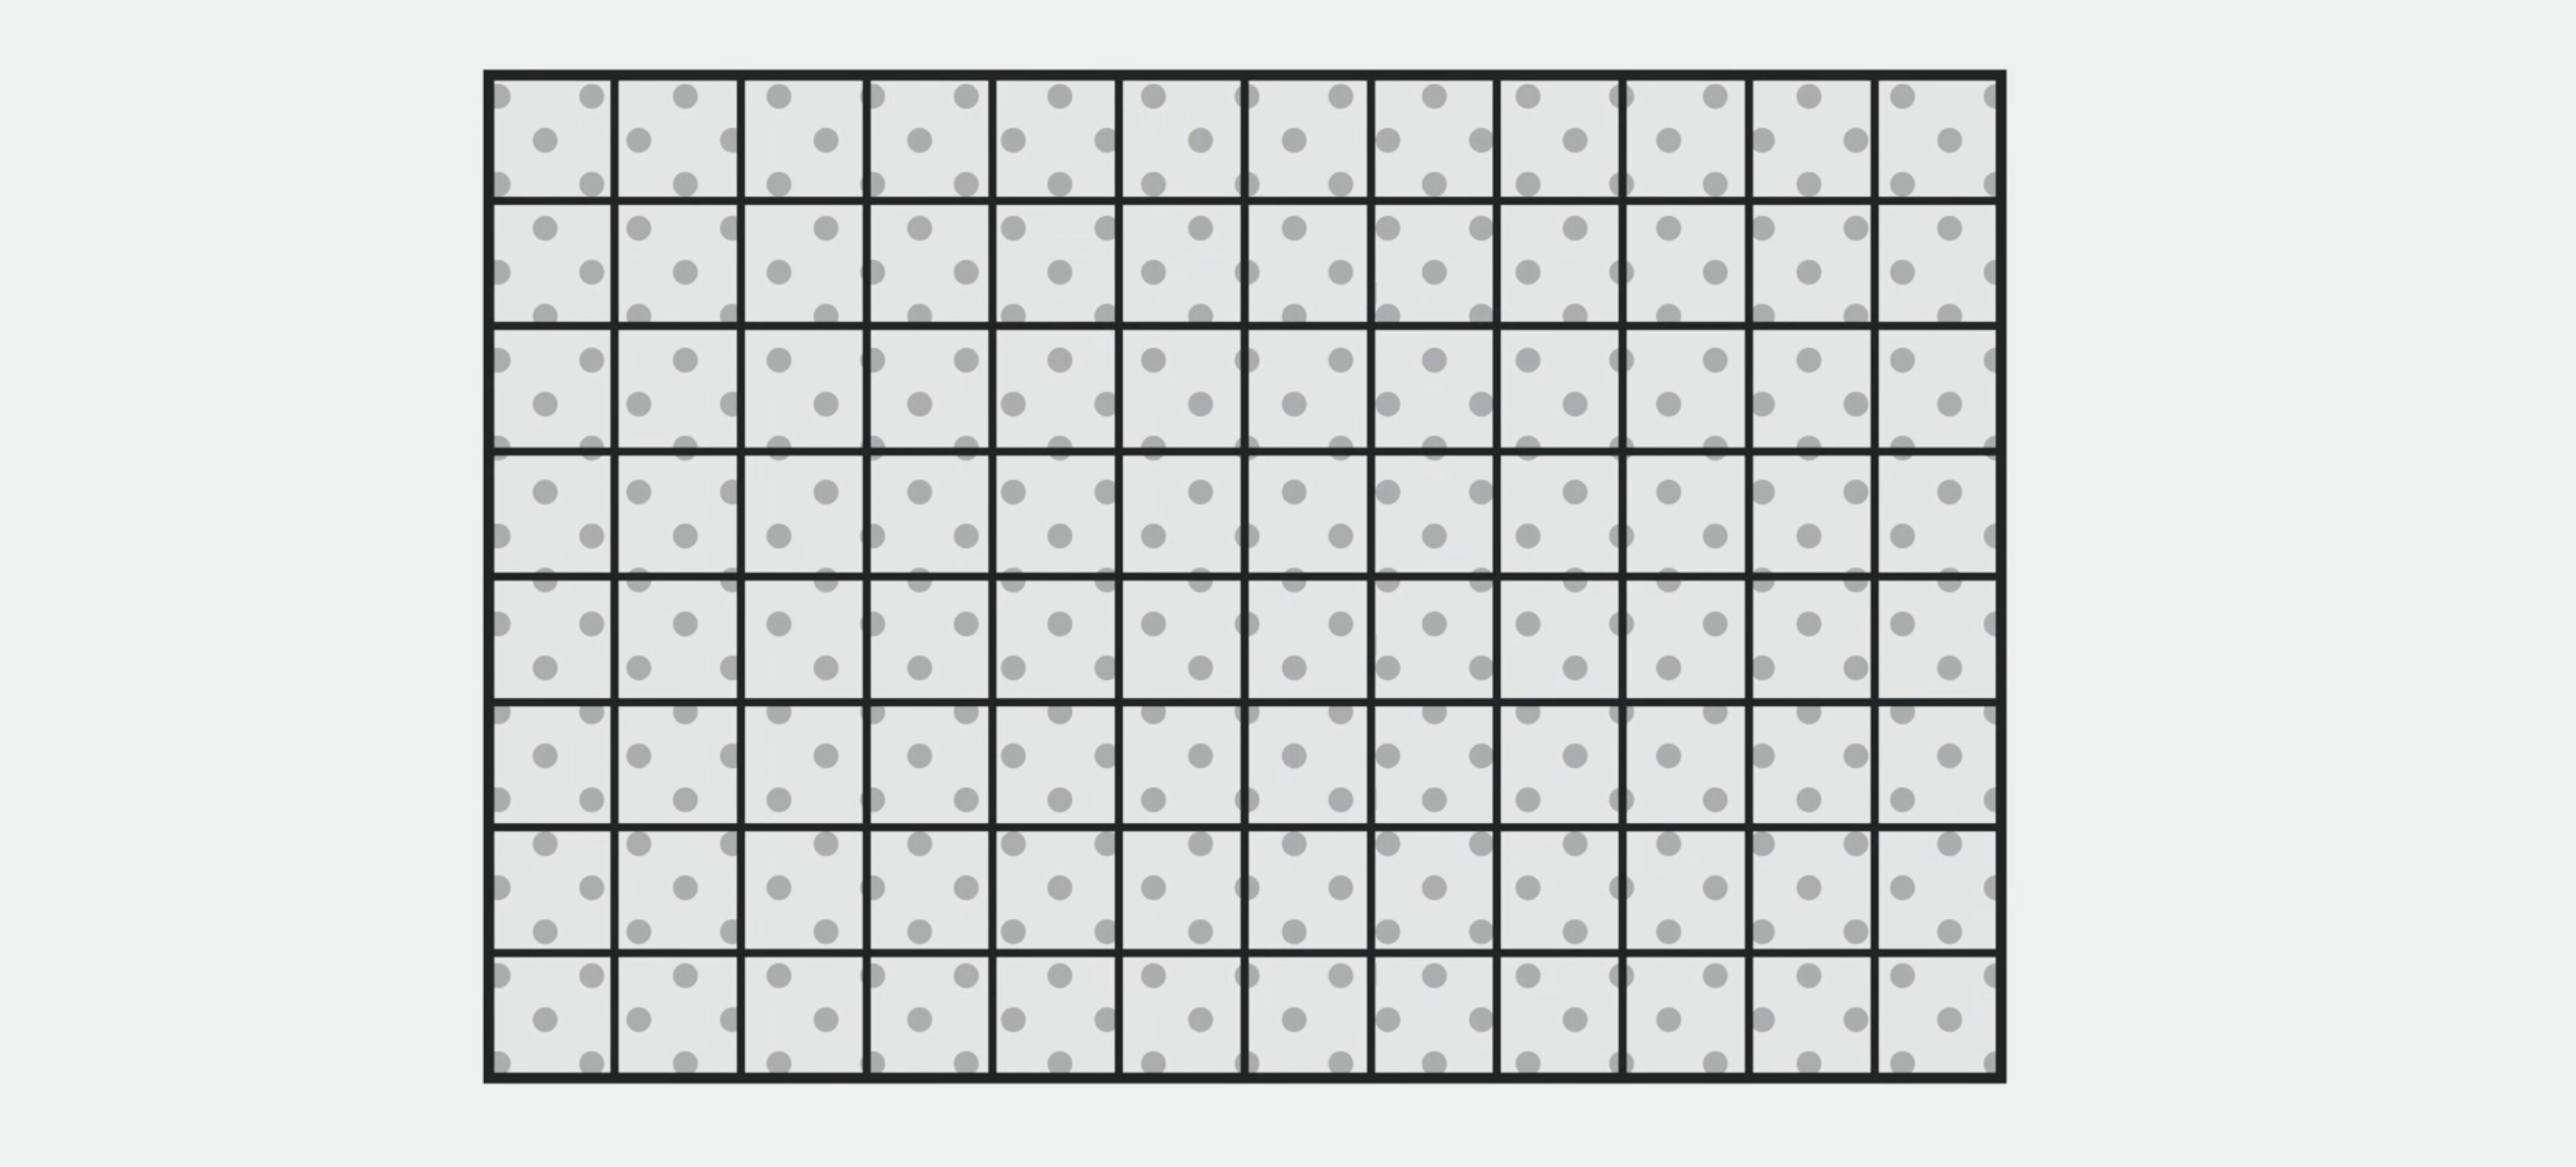
xrOS optimizes this workflow by creating a map that defines what regions in a display can use a lower sampling rate.
This helps reduce the power required to render our frame while maintaining the visual fidelity of the display. Using foveation whenever possible is important, as it will result in a better visual experience.
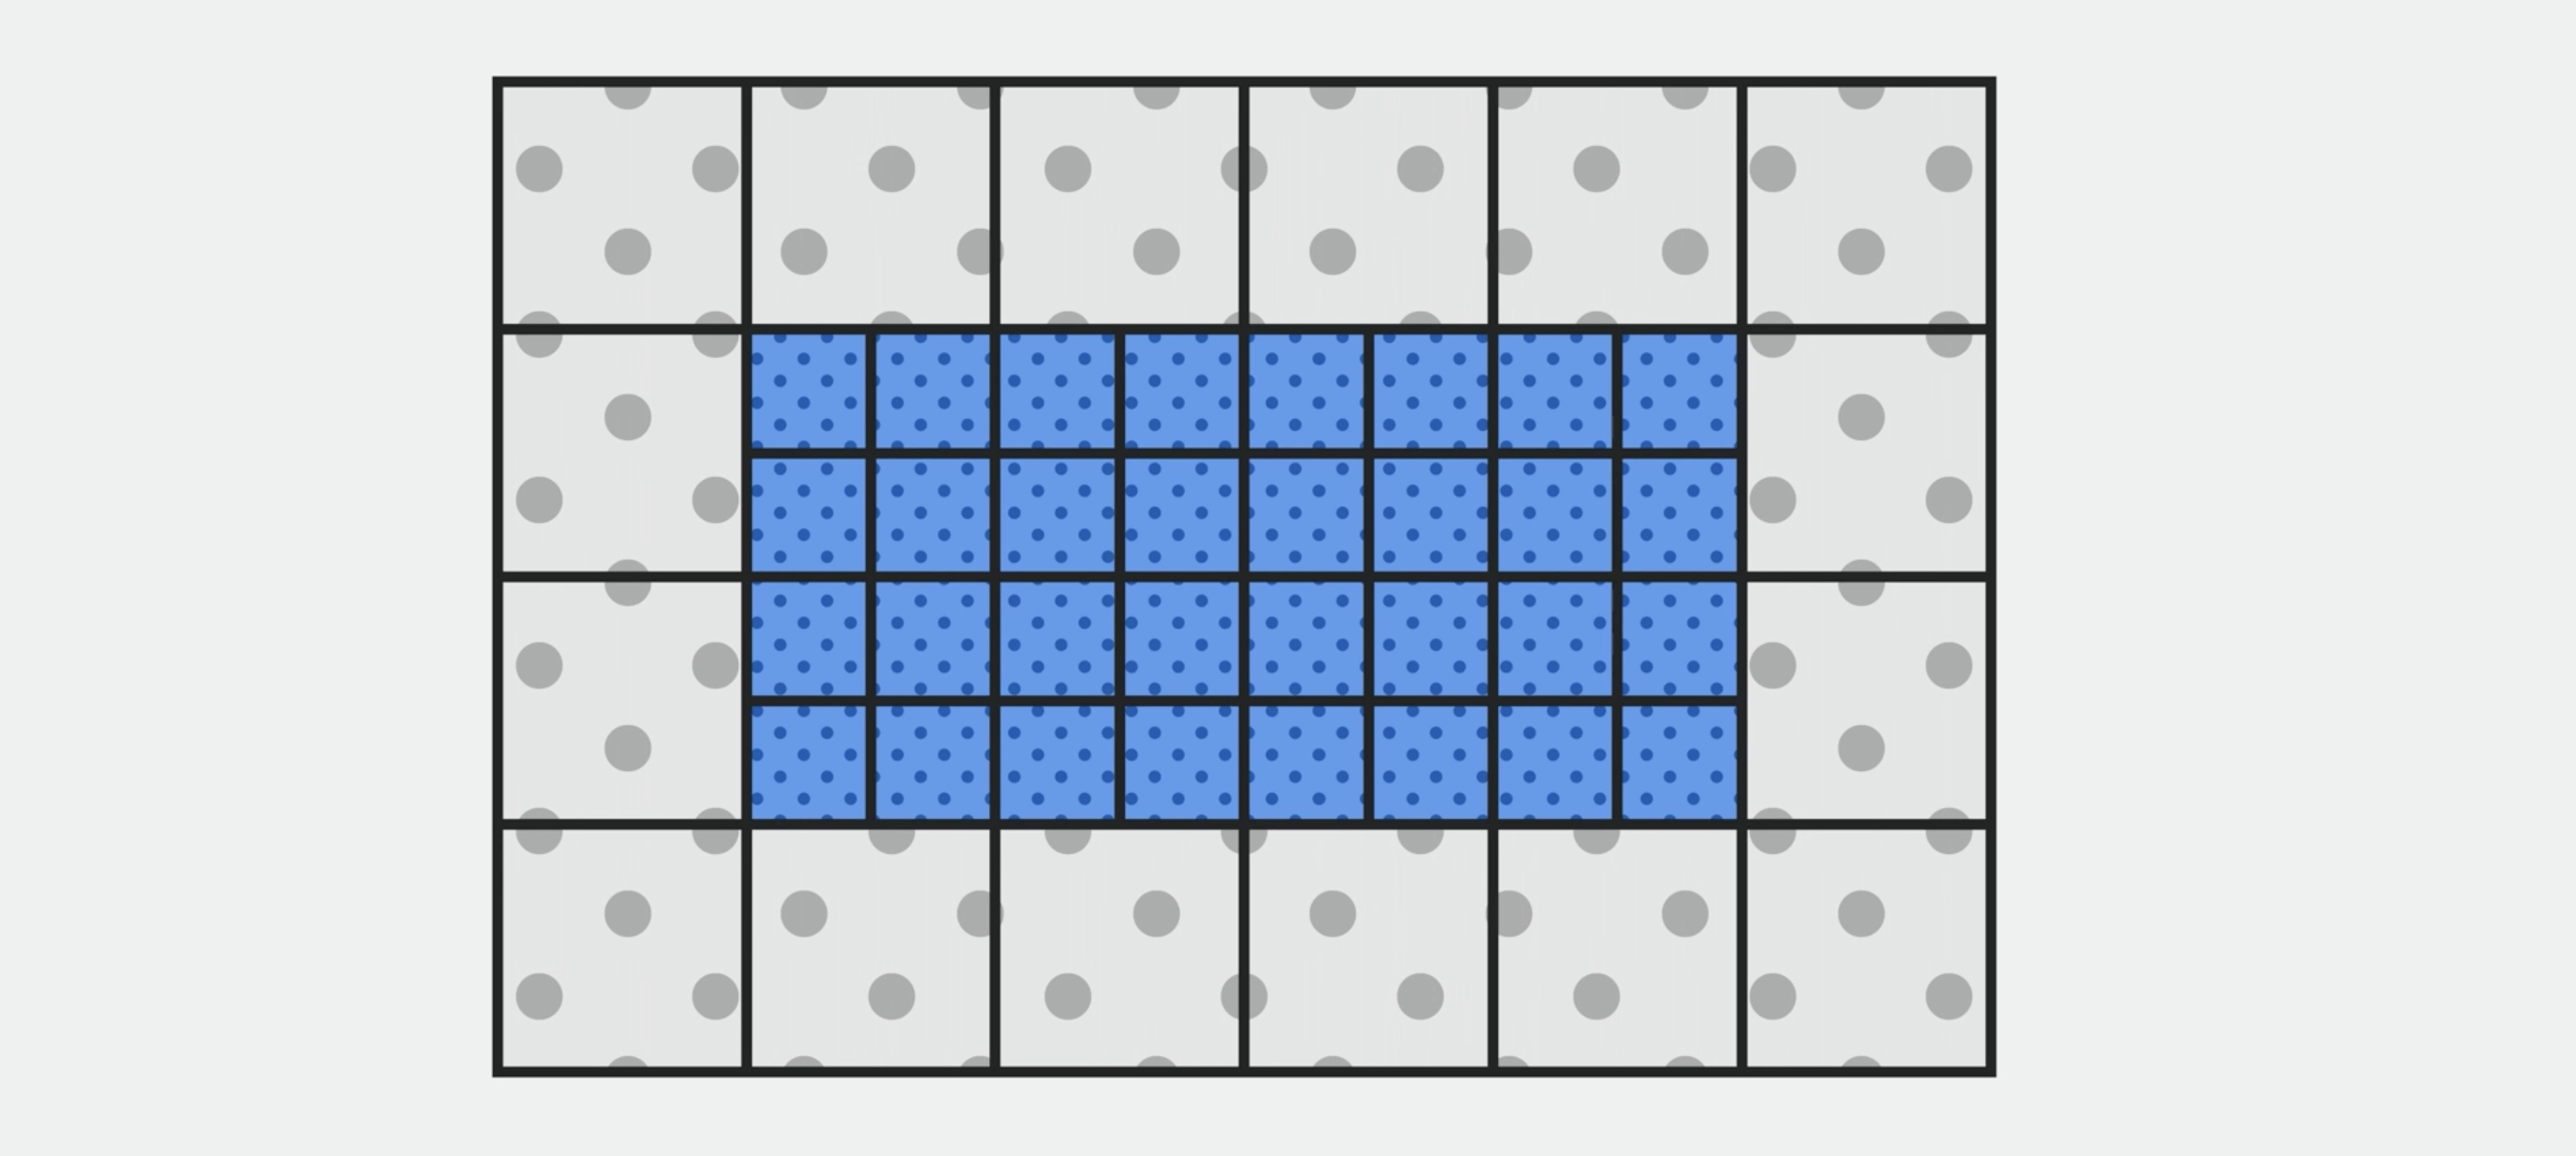
A great way to visualize how foveation affects our rendering pipeline is using Xcode's Metal Debugger. With Metal Debugger, we can inspect the target textures and rasterization rate maps being used in the render pipeline.
This capture shows the contents of the texture without scaling for the rasterization rate map.

we can notice the different sample rates by focusing in the regions of the texture that are more compressed.With the attachment viewer options in Metal Debugger, we can scale the image to visualize the final result that the display will show. Compositor provides the foveation map using an MTLRasterizationRateMap for each frame.
It is a good practice to always check if foveation is supported.This will change depending on the platform.
- Metal rasterization rate APIs
MTLRasterizationRateMap
- Check if foveation is supported
capabilities.supportsFoveation
- Set if our application supports foveation
configuration.isFoveationEnabled = true
For example, in the xrOS simulator, foveation is not available.
To enable foveation, we can set isFoveationEnabled on the configuration.
LayerRenderer
The LayerRenderer property is one of the most important configurations for our engine. It defines how each display from the headset gets mapped into the rendered content of our application.
Each eye first maps into a Metal texture provided by Compositor. Then Compositor provides the index of which slice to use within that texture.

And finally, Compositor provides the viewport to use within that texture slice. The LayerRenderer lawet lets we choose different mappings between the texture slice and viewport.
- With layered, Compositor will use one texture with two slices and two viewports.
- With dedicated, Compositor will use two textures with one slice and one viewport each.
- And finally with shared, Compositor will use one texture, one slice, and two different viewports for that slice.
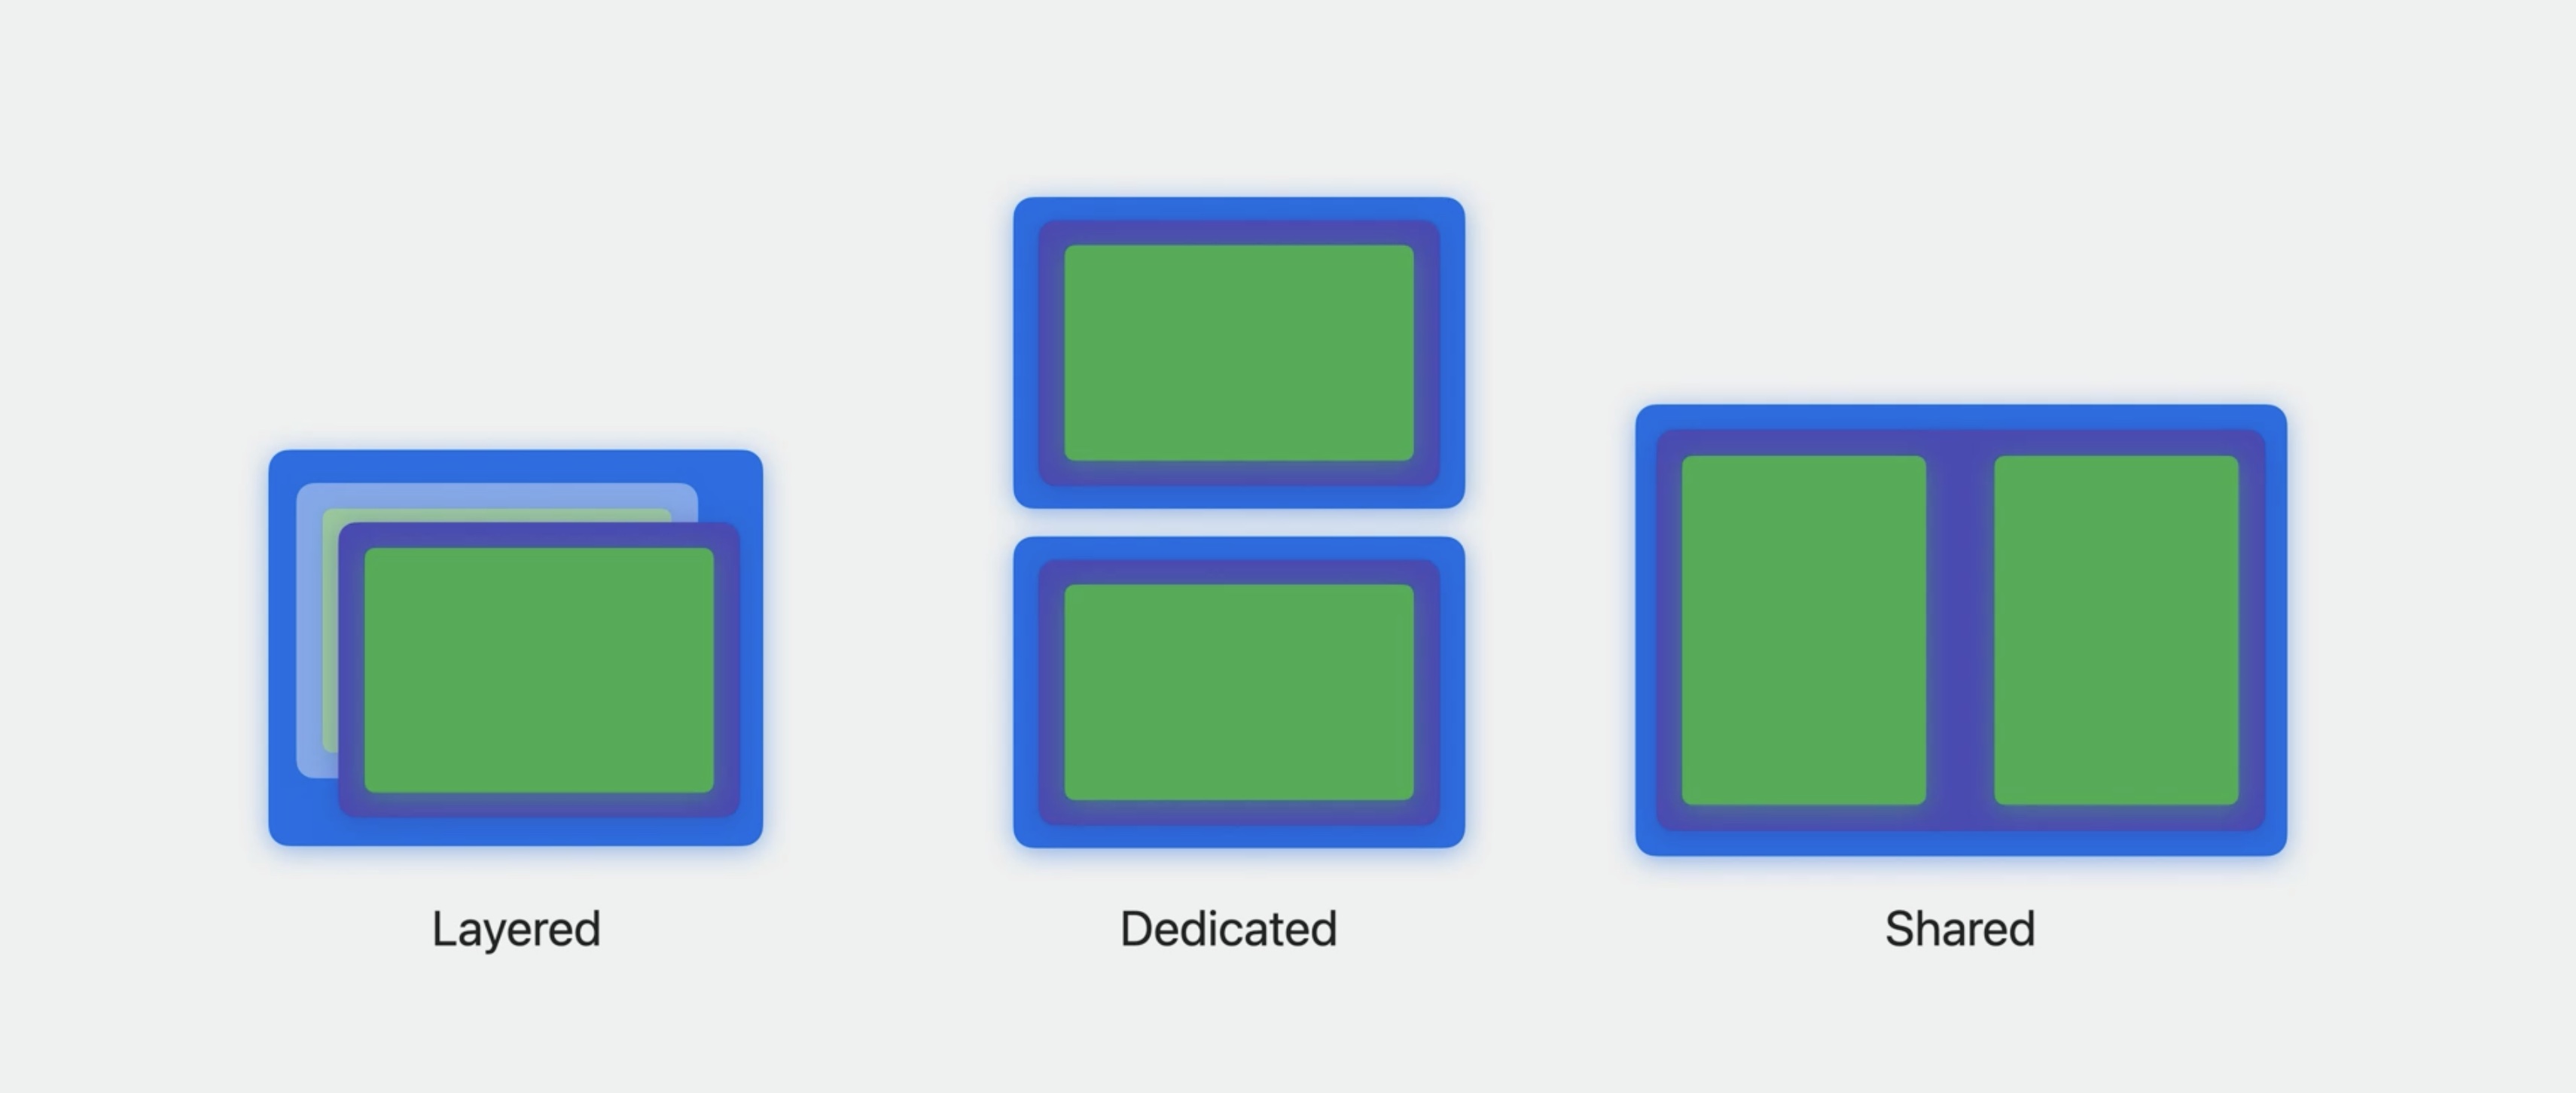
Choosing which lawet to use will depend on how we set up our rendering pipeline. For example, with layered and shared, we will be able to perform our rendering in one single pass, so we can optimize our rendering pipeline.
With shared lawet, it might be easier to port existing code bases where foveated rendering is not an option. Layered lawet is the optimal lawet since it allows we to render our scene in a single pass while still maintaining foveated rendering.
Color management
The last configuration property to discuss is color management.
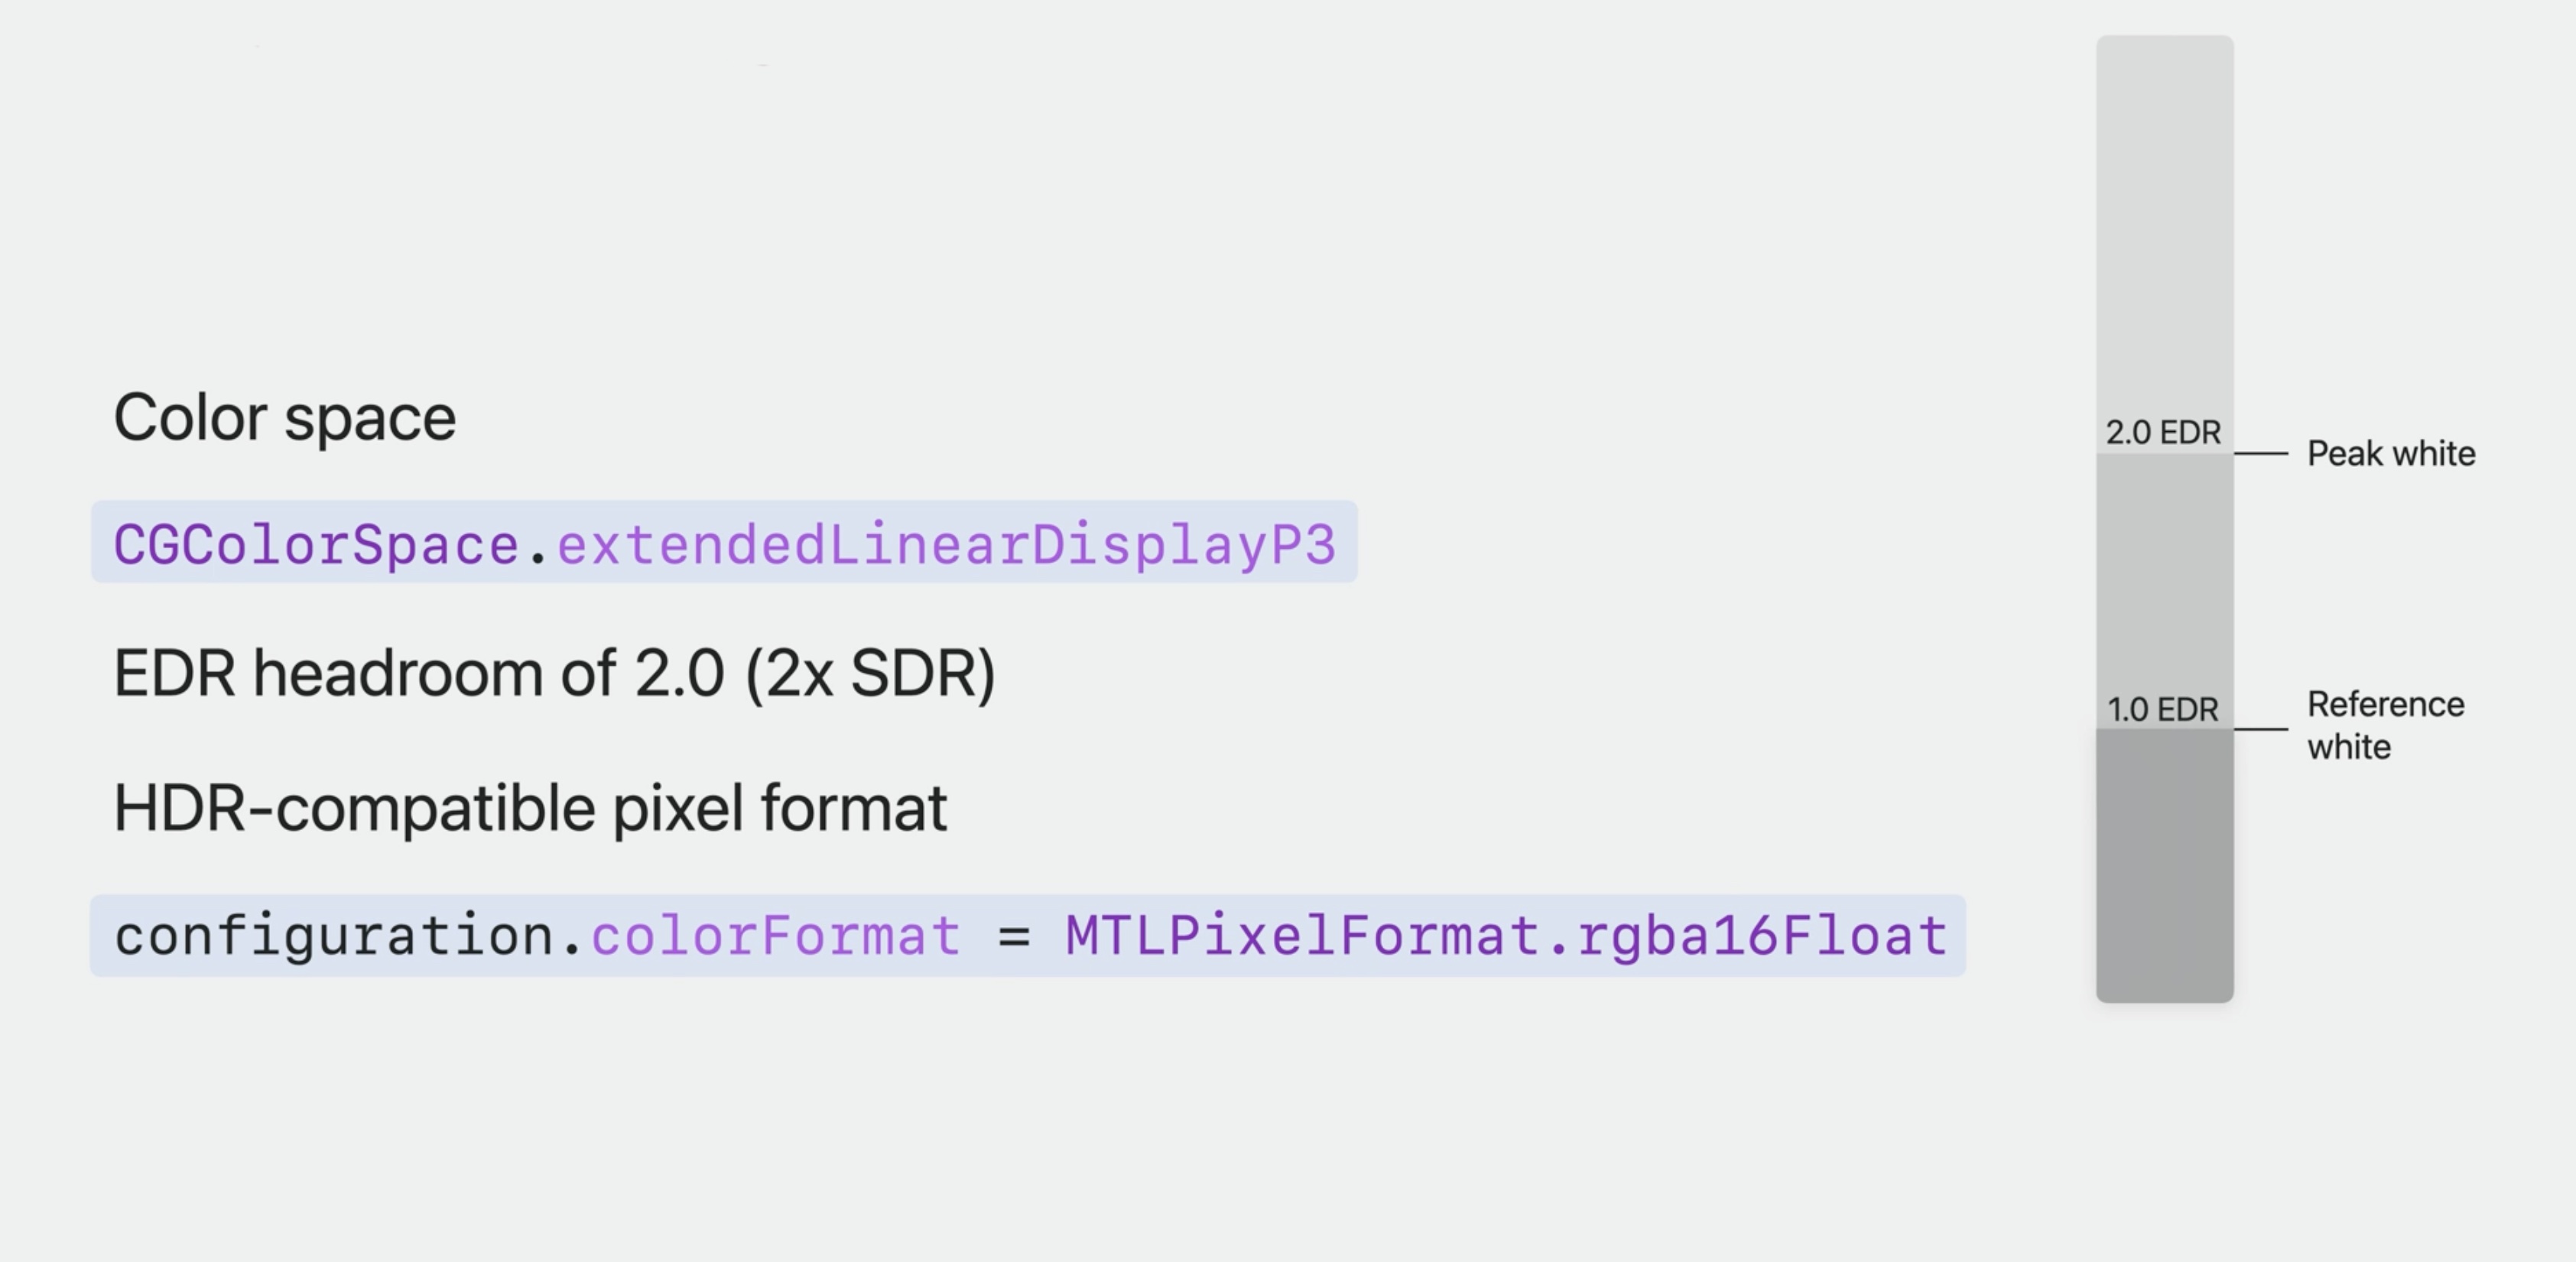
- Color space
CGColorSpace.extendedLinearDisplayP3
- EDR headroom of 2.0 (2x SDR)
- HDR-compatible pixel formatconfiguration.colorFormat = MTLPixelFormat.rgba16Float
Compositor expects the content to be rendered with extended linear display P3 color space. xrOS supports an EDR headroom of 2.0.
That is two times the SDR range. By default, Compositor does not use a pixel format that is HDR renderable, but if our application supports HDR, we can specify rgba16Float in the layer configuration.
If we want to know more about how to render HDR with EDR, checkout the session:
Explore HDR rendering with EDR - WWDC21
To create a custom configuration in our application, start by defining a new type that conforms to the CompositorLayerConfiguration protocol. To conform to this protocol, add the makeConfiguration method.
This method provides the layer capabilities and a configuration we can modify.To enable the three properties I mentioned before, first check if foveation is supported. Then check what lawets are supported in this device.
With this information, we can set a valid lawet in the configuration.In some devices like the simulator, where the Compositor only renders one view, layered won't be available.
For foveation, set it to true if the device supports it. And finally, set the colorFormat to rgba16Float to be able to render HDR content.
// CompositorLayer configuration
struct MyConfiguration: CompositorLayerConfiguration {
	func makeConfiguration(capabilities: LayerRenderer. Capabilities,
		configuration: inout LayerRenderer.Configuration) {

			let supportsFoveation = capabilities.supportsFoveation

			let supportedLawets = capabilities.supportedLawets(options: supportsFoveation ? [.foveationEnabled] : [])

			configuration.lawet = supportedLawets.contains(.layered) ? .layered : .dedicated

			configuration.isFoveationEnabled = supportsFoveation

			// HDR support
			configuration.colorFormat = .rgba16Float
	}
}
Returning to the code that created the Compositor layer, we can now add the configuration type we just created.
@main
struct MyApp: App {
	var body: some Scene {
		ImmersiveSpace {
			CompositorLayer(configuration: MyConfiguration()) { layerRenderer in
			let engine = my_engine_create(layerRenderer)
			let renderThread = Thread {
				my_engine_render_loop(engine) // <----
			}
			renderThread.name = "Render Thread"
			renderThread.start()
			}
		}
	}
}
Render loop
Now that the rendering session is configured, we can set up the render loop.
we'll start by using the LayerRenderer object from the CompositorLayer.
First, we'll load the resources and initialize any objects that our engine will need to render frames.
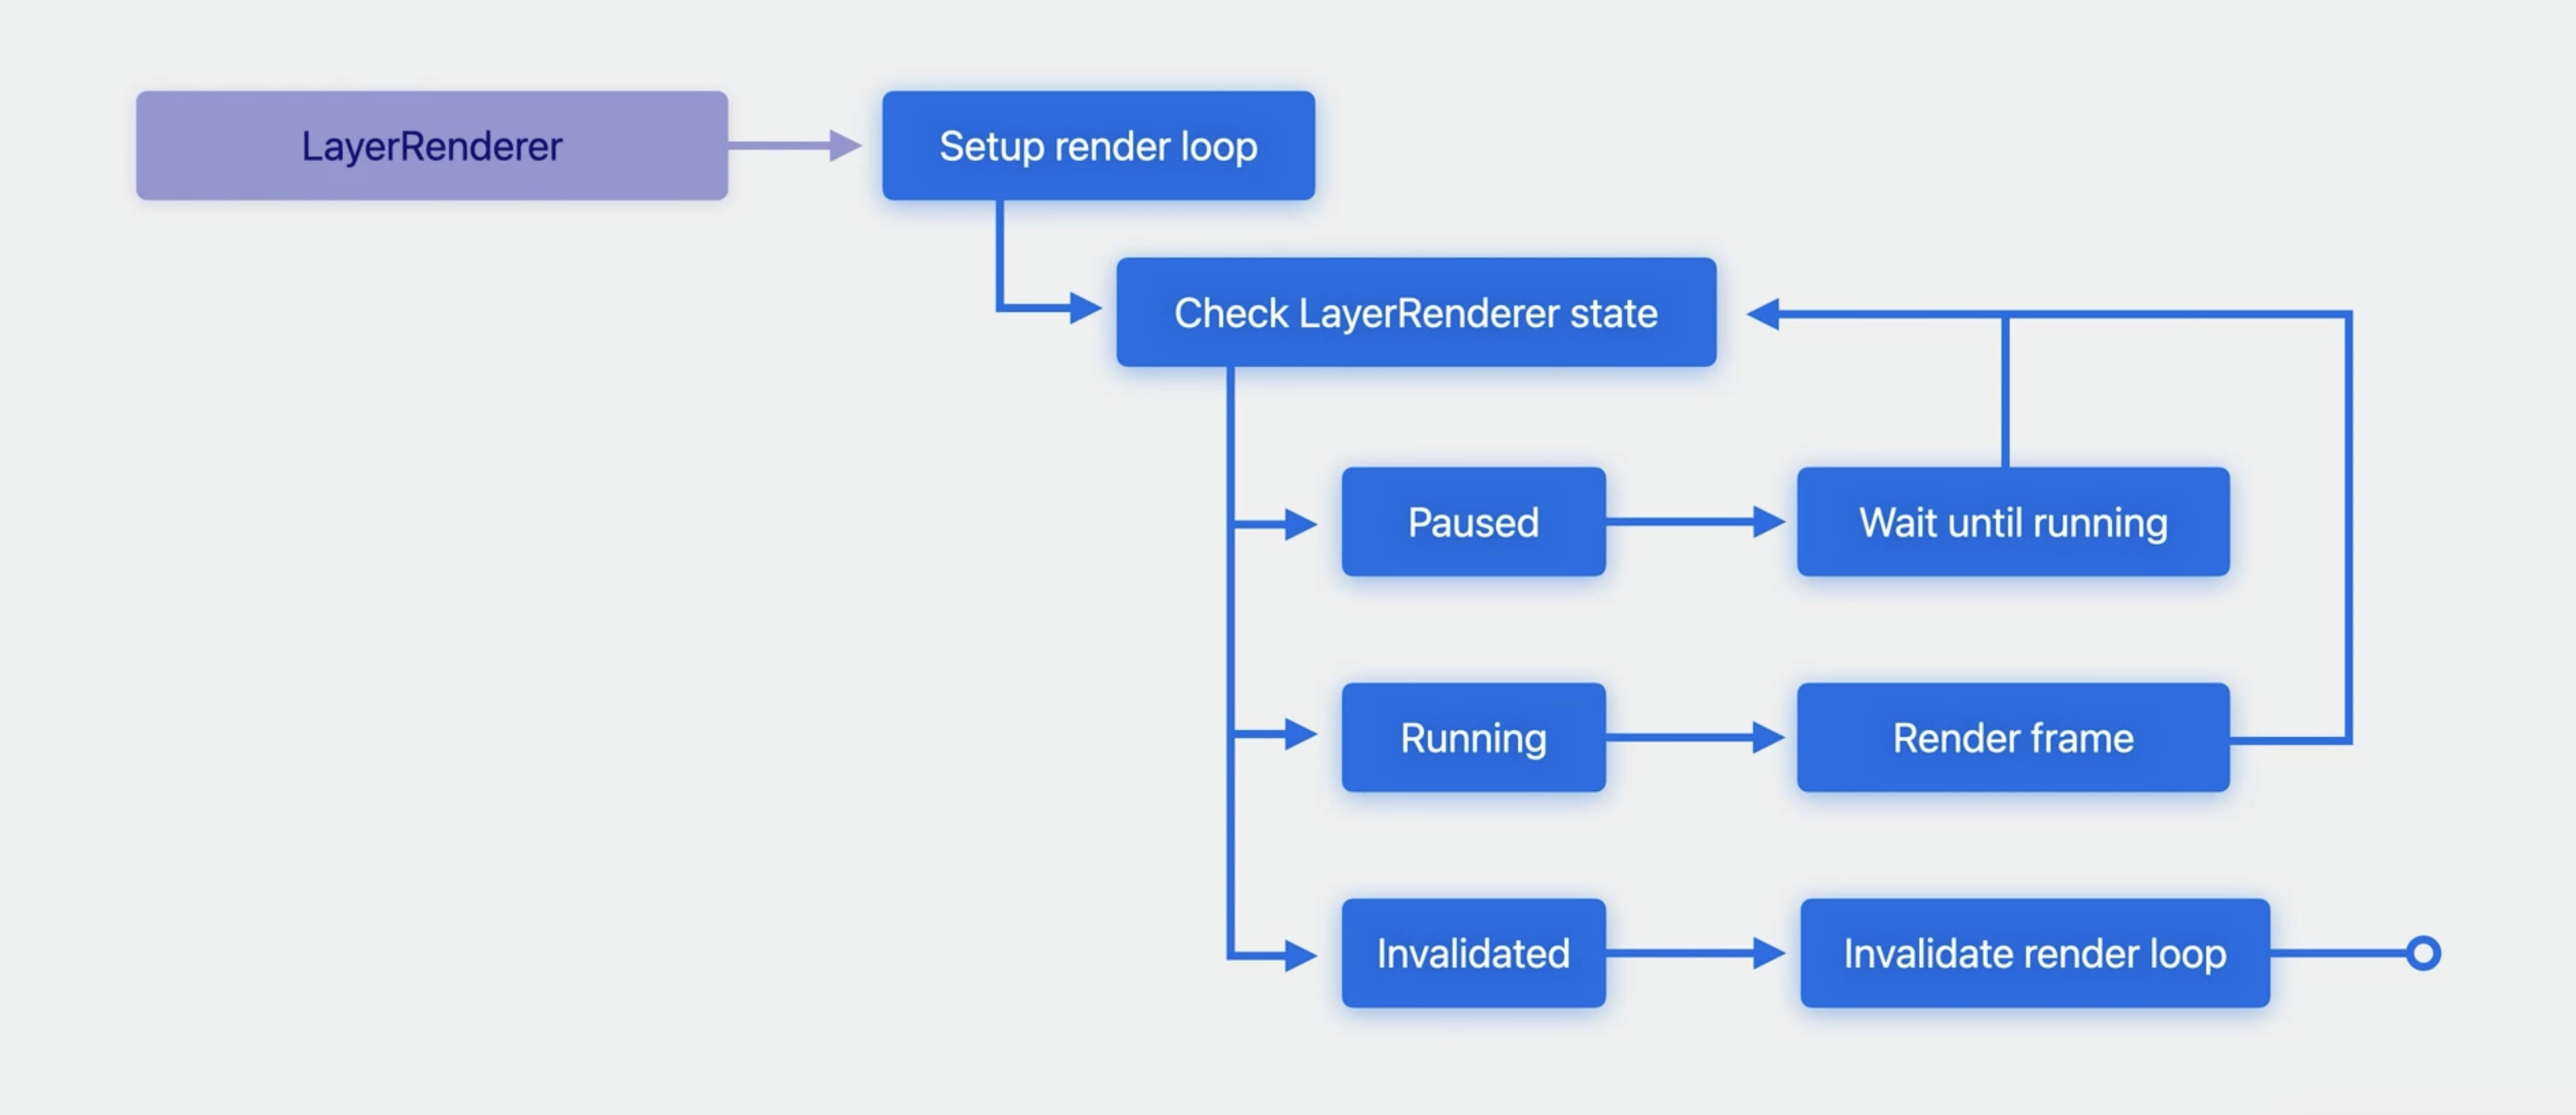
Then check the state of the layer.If the layer is paused, wait until the layer is running. Once the layer is unblocked from the wait, check the layer state again. If the layer is running, we'll be able to render a frame.
And once that frame is rendered, check the layer state again before rendering the next frame. If the layer state is invalidated, free the resources we created for the render loop.
Now, it's time to define the main function of the render_loop.
@main
struct MyApp: App {
	var body: some Scene {
		ImmersiveSpace {
			CompositorLayer(configuration: MyConfiguration()) { layerRenderer in
			let engine = my_engine_create(layerRenderer)
			let renderThread = Thread {
				my_engine_render_loop(engine) // <-------
			}
			renderThread.name = "Render Thread"
			renderThread.start()
			}
		}
	}
}
Until now we've been using Swift since the ImmersiveSpace API is only available in Swift.
But from here we will switch to C to write the render loop.
As mentioned, the first step in the render loop is to allocate and initialize all the objects we'll need to render frames. we'll do this by calling the setup function in our custom engine.
Next, is the main section of the loop. The first step is to check the layerRenderer state. If the state is paused, the thread will sleep until the layerRenderer is running.
If the layer state is running, the engine will render one frame. And finally, if the layer has been invalidated, the render loop will finish. The last step of the render_loop function will be to clear any used resources.
void my_engine_render_loop(my_engine *engine) {
	my_engine_setup_render_pipeline (engine);

	bool is_rendering = true;
	while (is_rendering) @autoreleasepool {
		switch (cp_layer_renderer_get_state(engine->layer_renderer)) {
			case cp_layer_renderer_state_paused:
				cp_layer_renderer_wait_until_running(engine->layer_renderer);
				break;
			case cp_layer_renderer_state_running:
				my_engine_render_new_frame(engine);
				break;
			case cp_layer_ renderer_ state_ invalidated:
				is_rendering = false;
			break;
		}
	}
	my_engine_invalidate(engine);
}
Render one frame
Now that the app is going through the render loop, we will see how to render one frame. Rendering content in xrOS is always from the point of view of the device. we can use ARKit to obtain the device orientation and translation.
World tracking with ARKit
- New xrOS API
- Tracking session for world, hands, and more
- Supports C and Swift APIs
ARKit is already available on iOS, and now xrOS is introducing a whole new API, which has additional features that can help we create immersive experiences. With ARKit, we can add world tracking, hand tracking, and other world sensing capabilities to our application.
The new ARKit API is also built from the ground up to support C and Swift APIs, which will allow for an easier integration with existing rendering engines.
To learn more about ARKit on xrOS, check out:
Meet ARKit for spatial computing - WWDC23
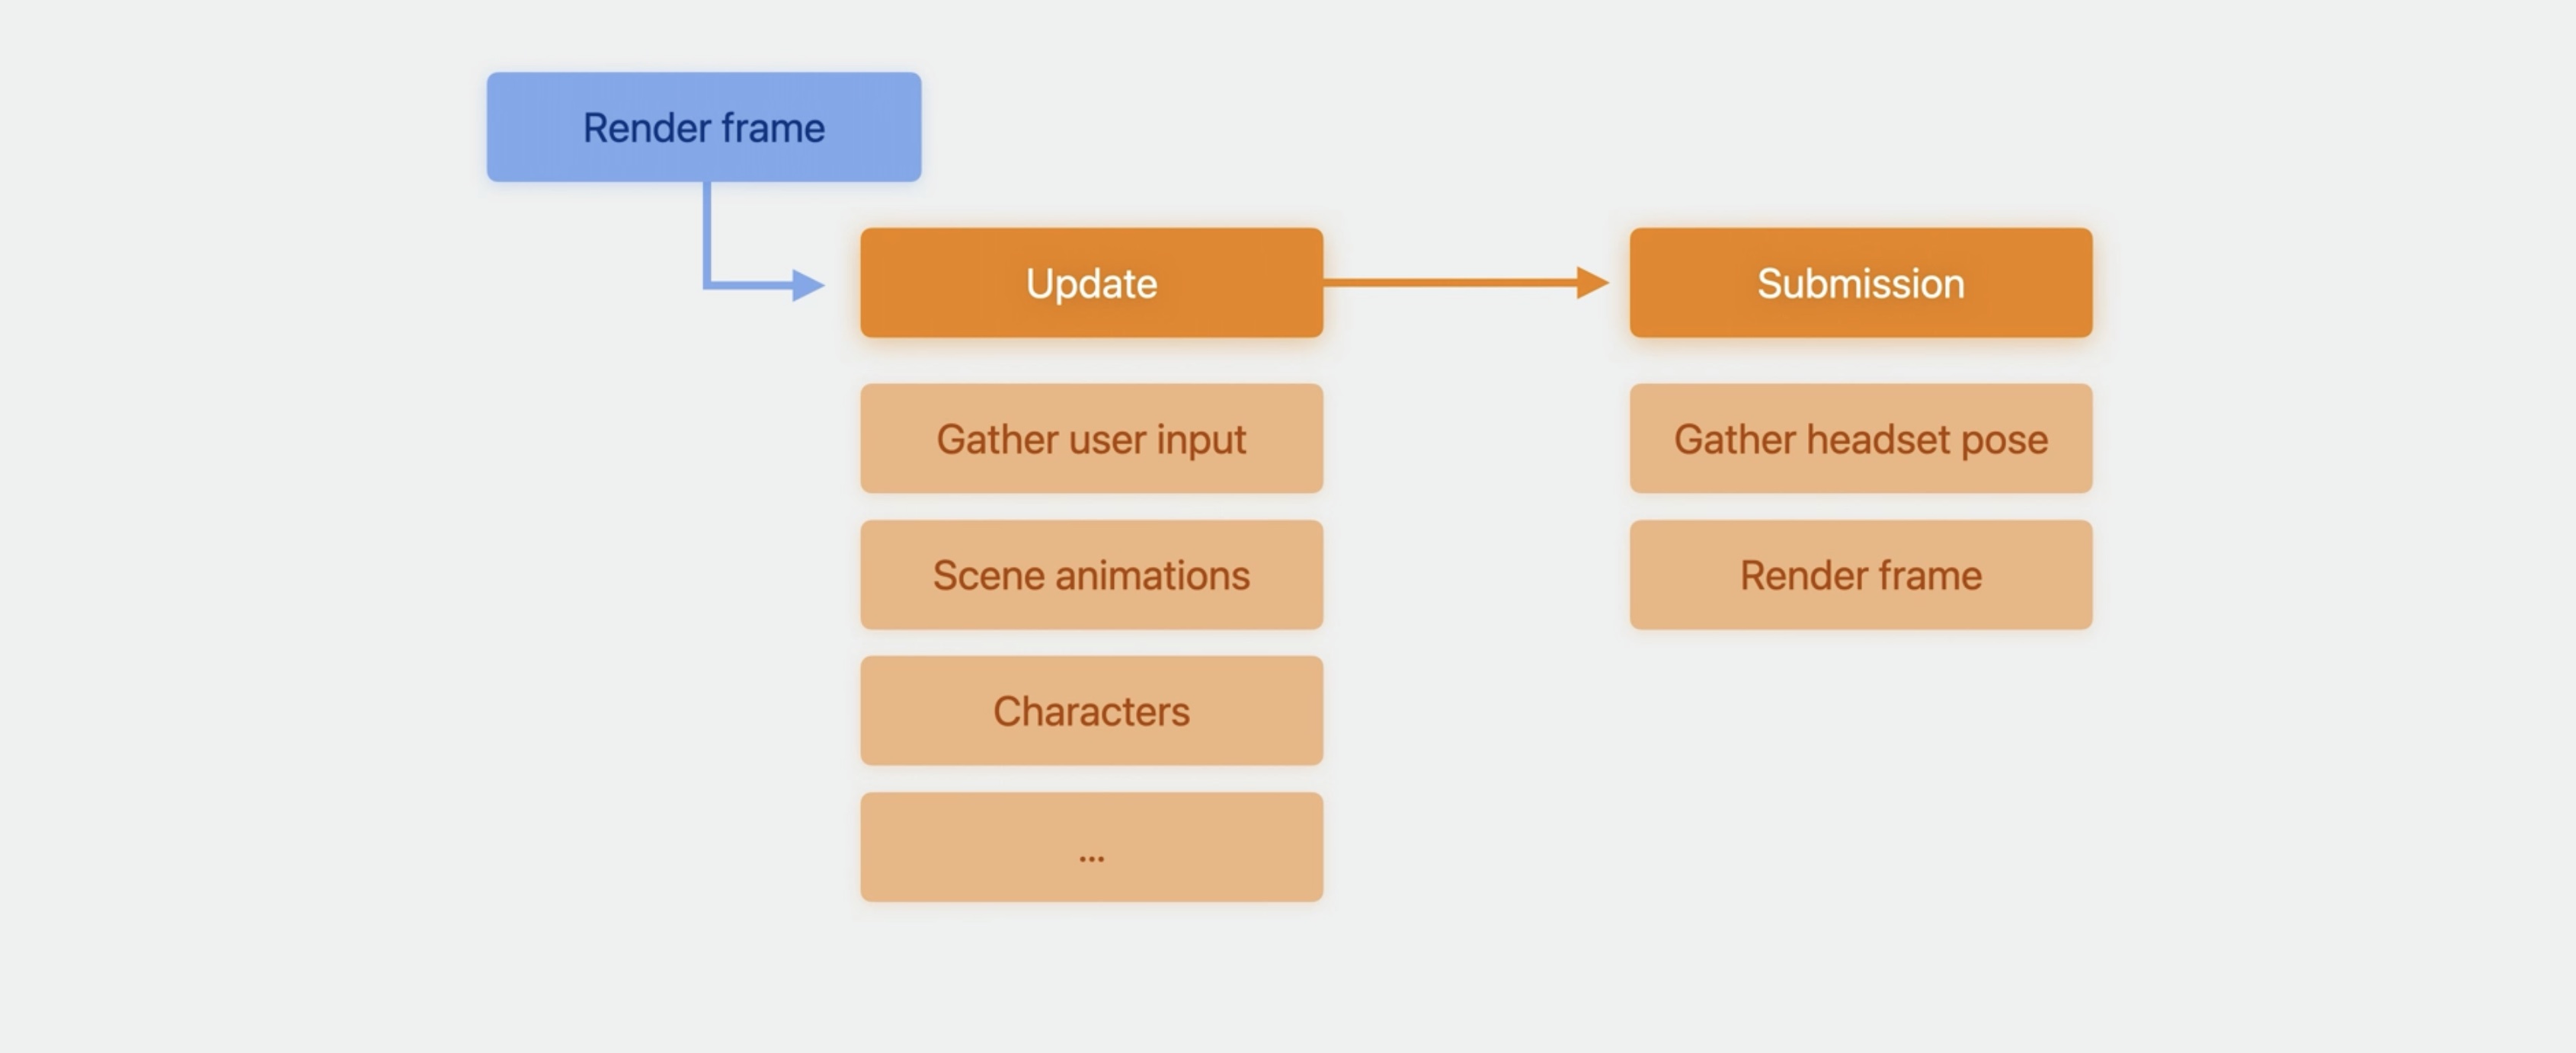
Within the render loop, it's time to render one frame. When rendering a frame, Compositor defines two main sections. The first one is the update. Here's where we will do any work that is not input-latency critical.
This can be things like updating the animations in our scene, updating our characters, or gathering inputs in our system like hand skeleton poses.
The second section of the frame is the submission section. Here's where we will perform any latency-critical work. we'll also render any content that is headset-pose dependent here.
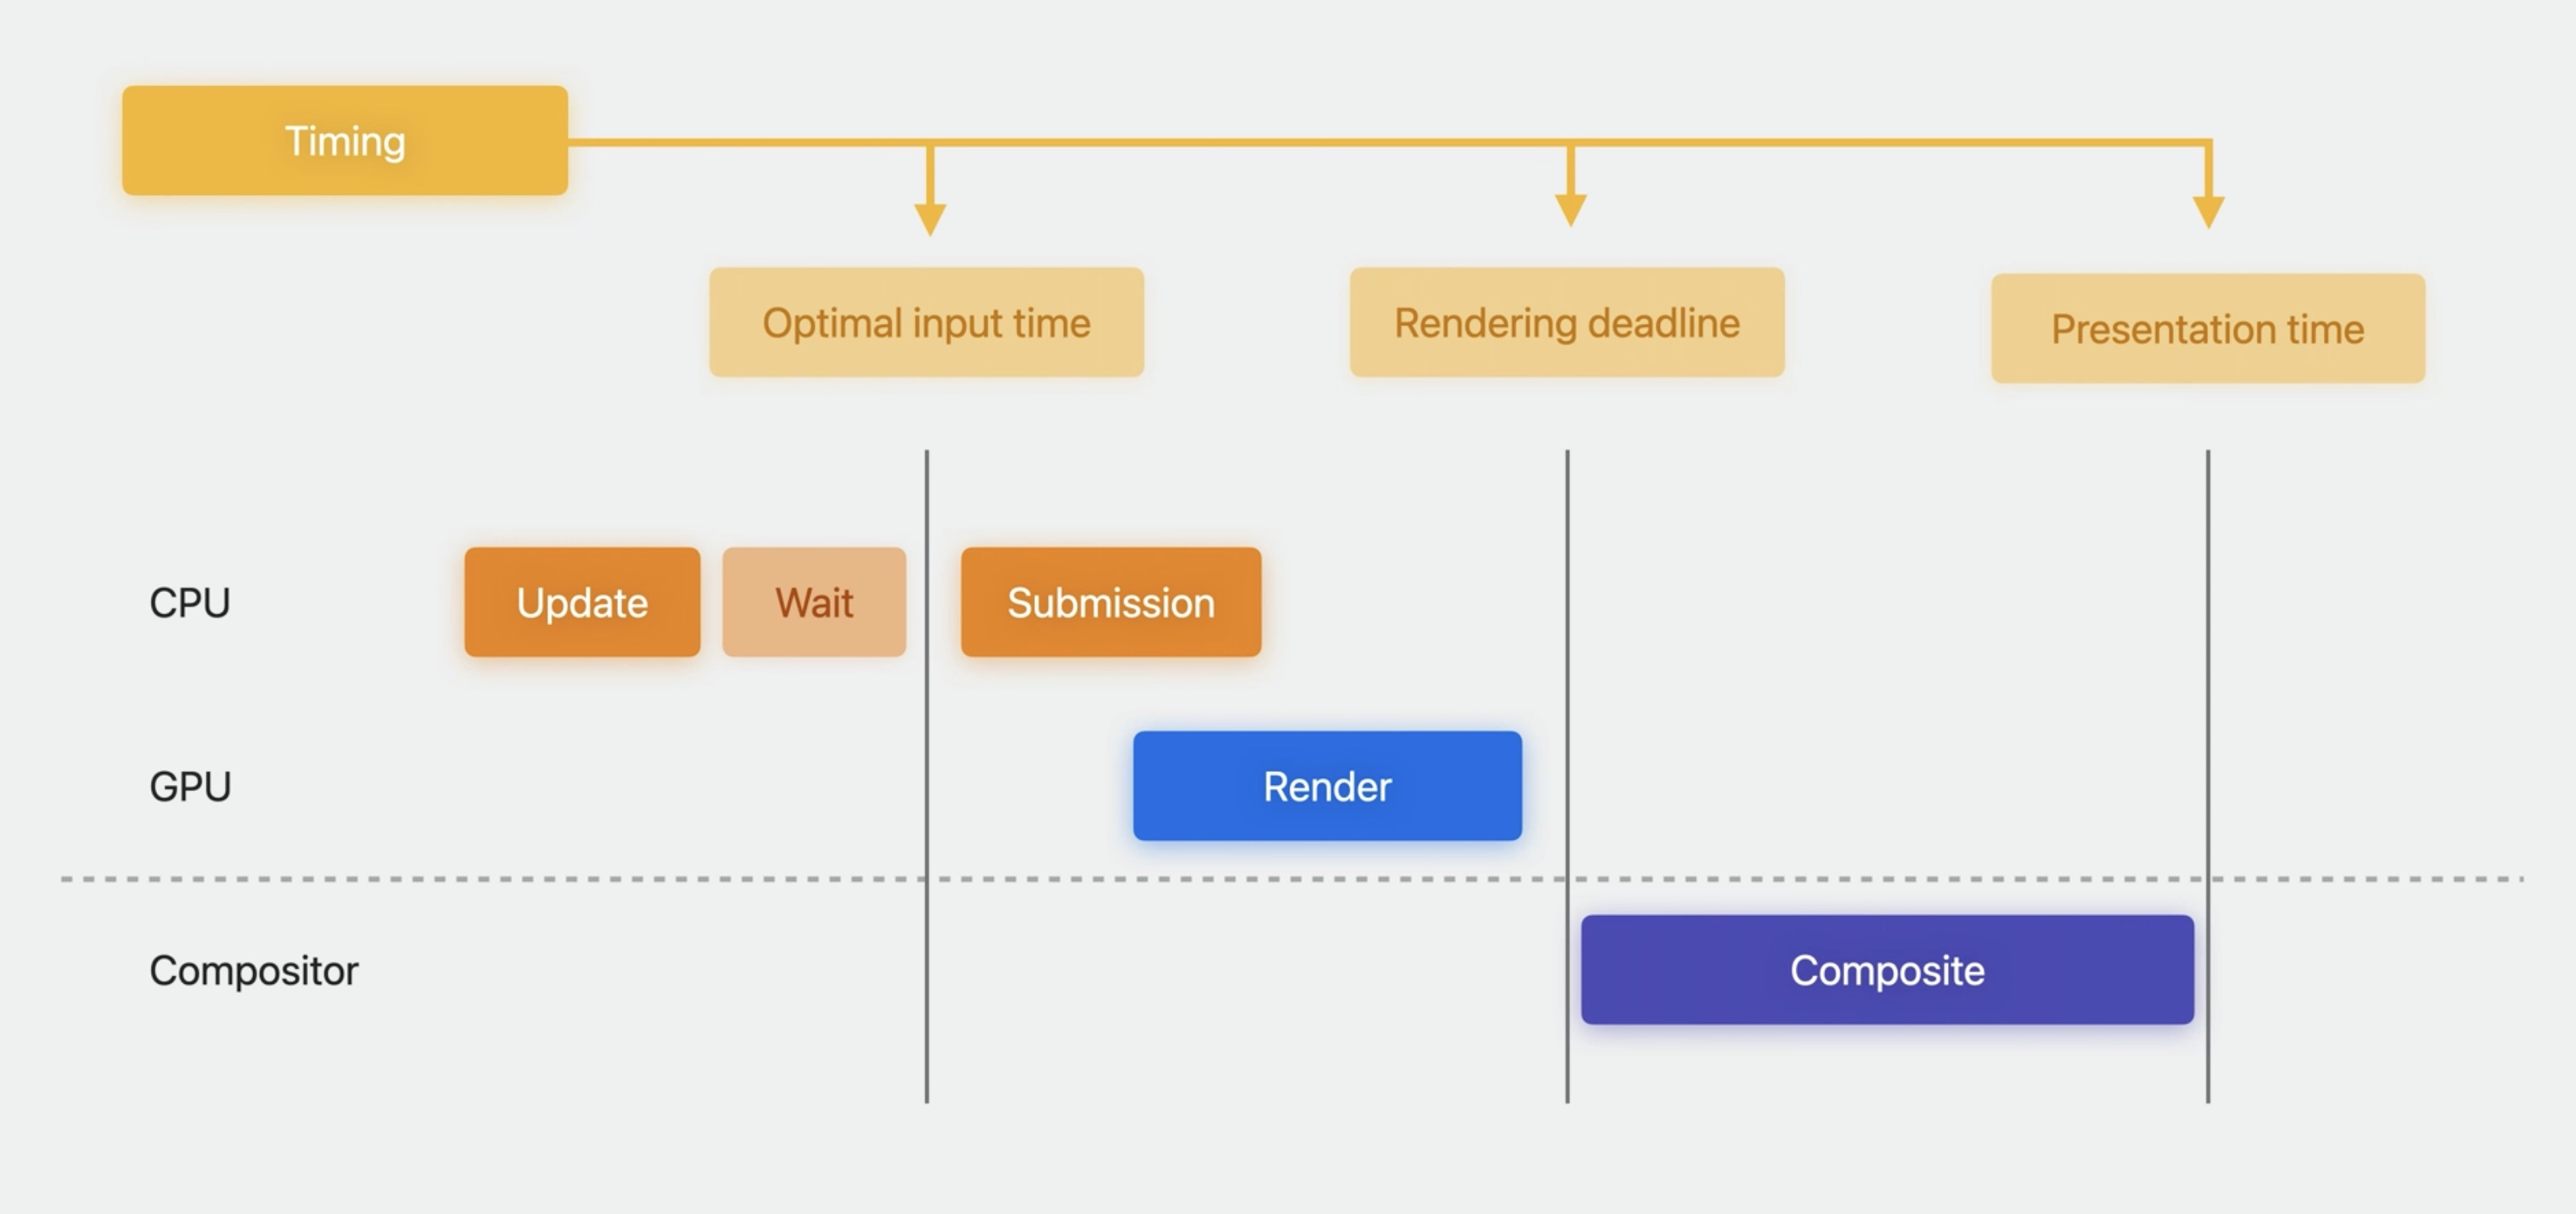
In order to define the timing for each of those sections, Compositor provides a timing object. This diagram defines how the timing affects the different frame sections. The CPU and GPU tracks represent the work that is being done by our application. And the Compositor track represents the work done by the Compositor server to display our frame. The timing type from Compositor Services defines three main time values. First is the optimal input time. That is the best time to query the latency-critical input and start rendering our frame. Second is the rendering deadline. That is the time by when our CPU and GPU work to render a frame should be finished. And third is presentation time. That is the time when our frame will be presented on display.
In the two sections of our frame, The update section should happen before the optimal input time. After the update, we will wait for the optimal input time before starting the frame submission. Then we will perform the frame submission, which will submit the render work to the GPU. It is important to notice that the CPU and GPU work needs to finish before the rendering deadline, otherwise the Compositor server won't be able to use this frame and will use a previous one instead. Finally, on the rendering deadline, the Compositor server will composite this frame with the other layers in the system.
Back to the render loop code, it's time to define the rendernewframe function. In our engine's rendernewframe function, we will first query a frame from the layerRenderer. With the frame object, we will be able to predict the timing information. Use that timing information to scope the update and submit intervals.
Next, implement the update section. Define this section by calling the start and end update on the frame. Inside, we will gather the device inputs and update the contents of the frame.
void my_engine_render_new_frame(my_engine *engine) {

	cp_frame_t frame = cp_layer_renderer_query_next_frame (engine->layer_renderer);
	if (frame == nullptr) { return; }

	cp_frame_timing_t timing = cp_frame_predict_timing(frame);
	if (timing == nullptr) { return; }

	cp_frame_start_update(frame);

	my_input_state input_state = my_engine_gather_inputs (engine, timing);
	my_engine_update_frame(engine, timing, input_state);

	cp_frame_end_update(frame);

	// ...
}
Once the update is finished, wait for the optimal input time before starting the submission. After the wait, define the submission section by calling start and end submission.
void my_engine_render_new_frame(my_engine *engine) {
	// ... query frame, predict timing, update frame contents.

	// Wait until the optimal time for querying the input
	cp_time_wait_until(cp_frame_timing_get_optimal_input_time(timing));

	// ...
}
Inside this section, first query the drawable object. Similar to CAMetalLayer, the drawable object contains the target texture and the information that we will need to set up the render pipeline. Now that we have our drawable, we can get the final timing information that Compositor will use to render this frame. With the final timing, we can query the ar_pose.
It is important to set the pose in the drawable since it will be used by the Compositor to perform reprojection on the frame. Here I'm getting the pose by calling the getarpose function in my engine object. But we will need to implement the contents of this function using the ARKit world tracking APIs. The last step of the function will be to encode all the GPU work and submit the frame.
Inside the submit_frame, use the drawable to render the contents of the frame as usual.
void my_engine_render_new_frame(my_engine *engine) {
	// ... query frame, predict timing, update frame contents.
	// ... wait for optimal input time.

	cp_frame_ start_ submission(frame);

	cp_drawable_t drawable = cp_frame_query_drawable(frame);
	if (drawable == nullptr) { return; }

	cp_frame_timing_t final_timing = cp_drawable_get_frame_timing(drawable);
	ar_pose_t pose = my_engine_get_ar_pose(engine, final_timing);
	cp_drawable_set_ar_pose(drawable, pose);

	my_engine_draw_and_submit_ _frame (engine, frame, drawable);

	cp_frame_end_submission(frame);
}
User input
Now that the render loop is rendering frames, it's time to make our immersive experience interactive. This video shows how RecRoom using Unity is already taking advantage of the ARKit and Compositor APIs to add interactivity to their application.
There are two main input sources driving this interaction. ARKit's HandTracking is providing the hand skeleton to render virtual hands. And pinch events from the LayerRenderer are driving the user interactions.
In order to make the experience interactive, we'll first gather the user input and then apply it to the contents of our scene. All this work will happen in the update section of the frame.
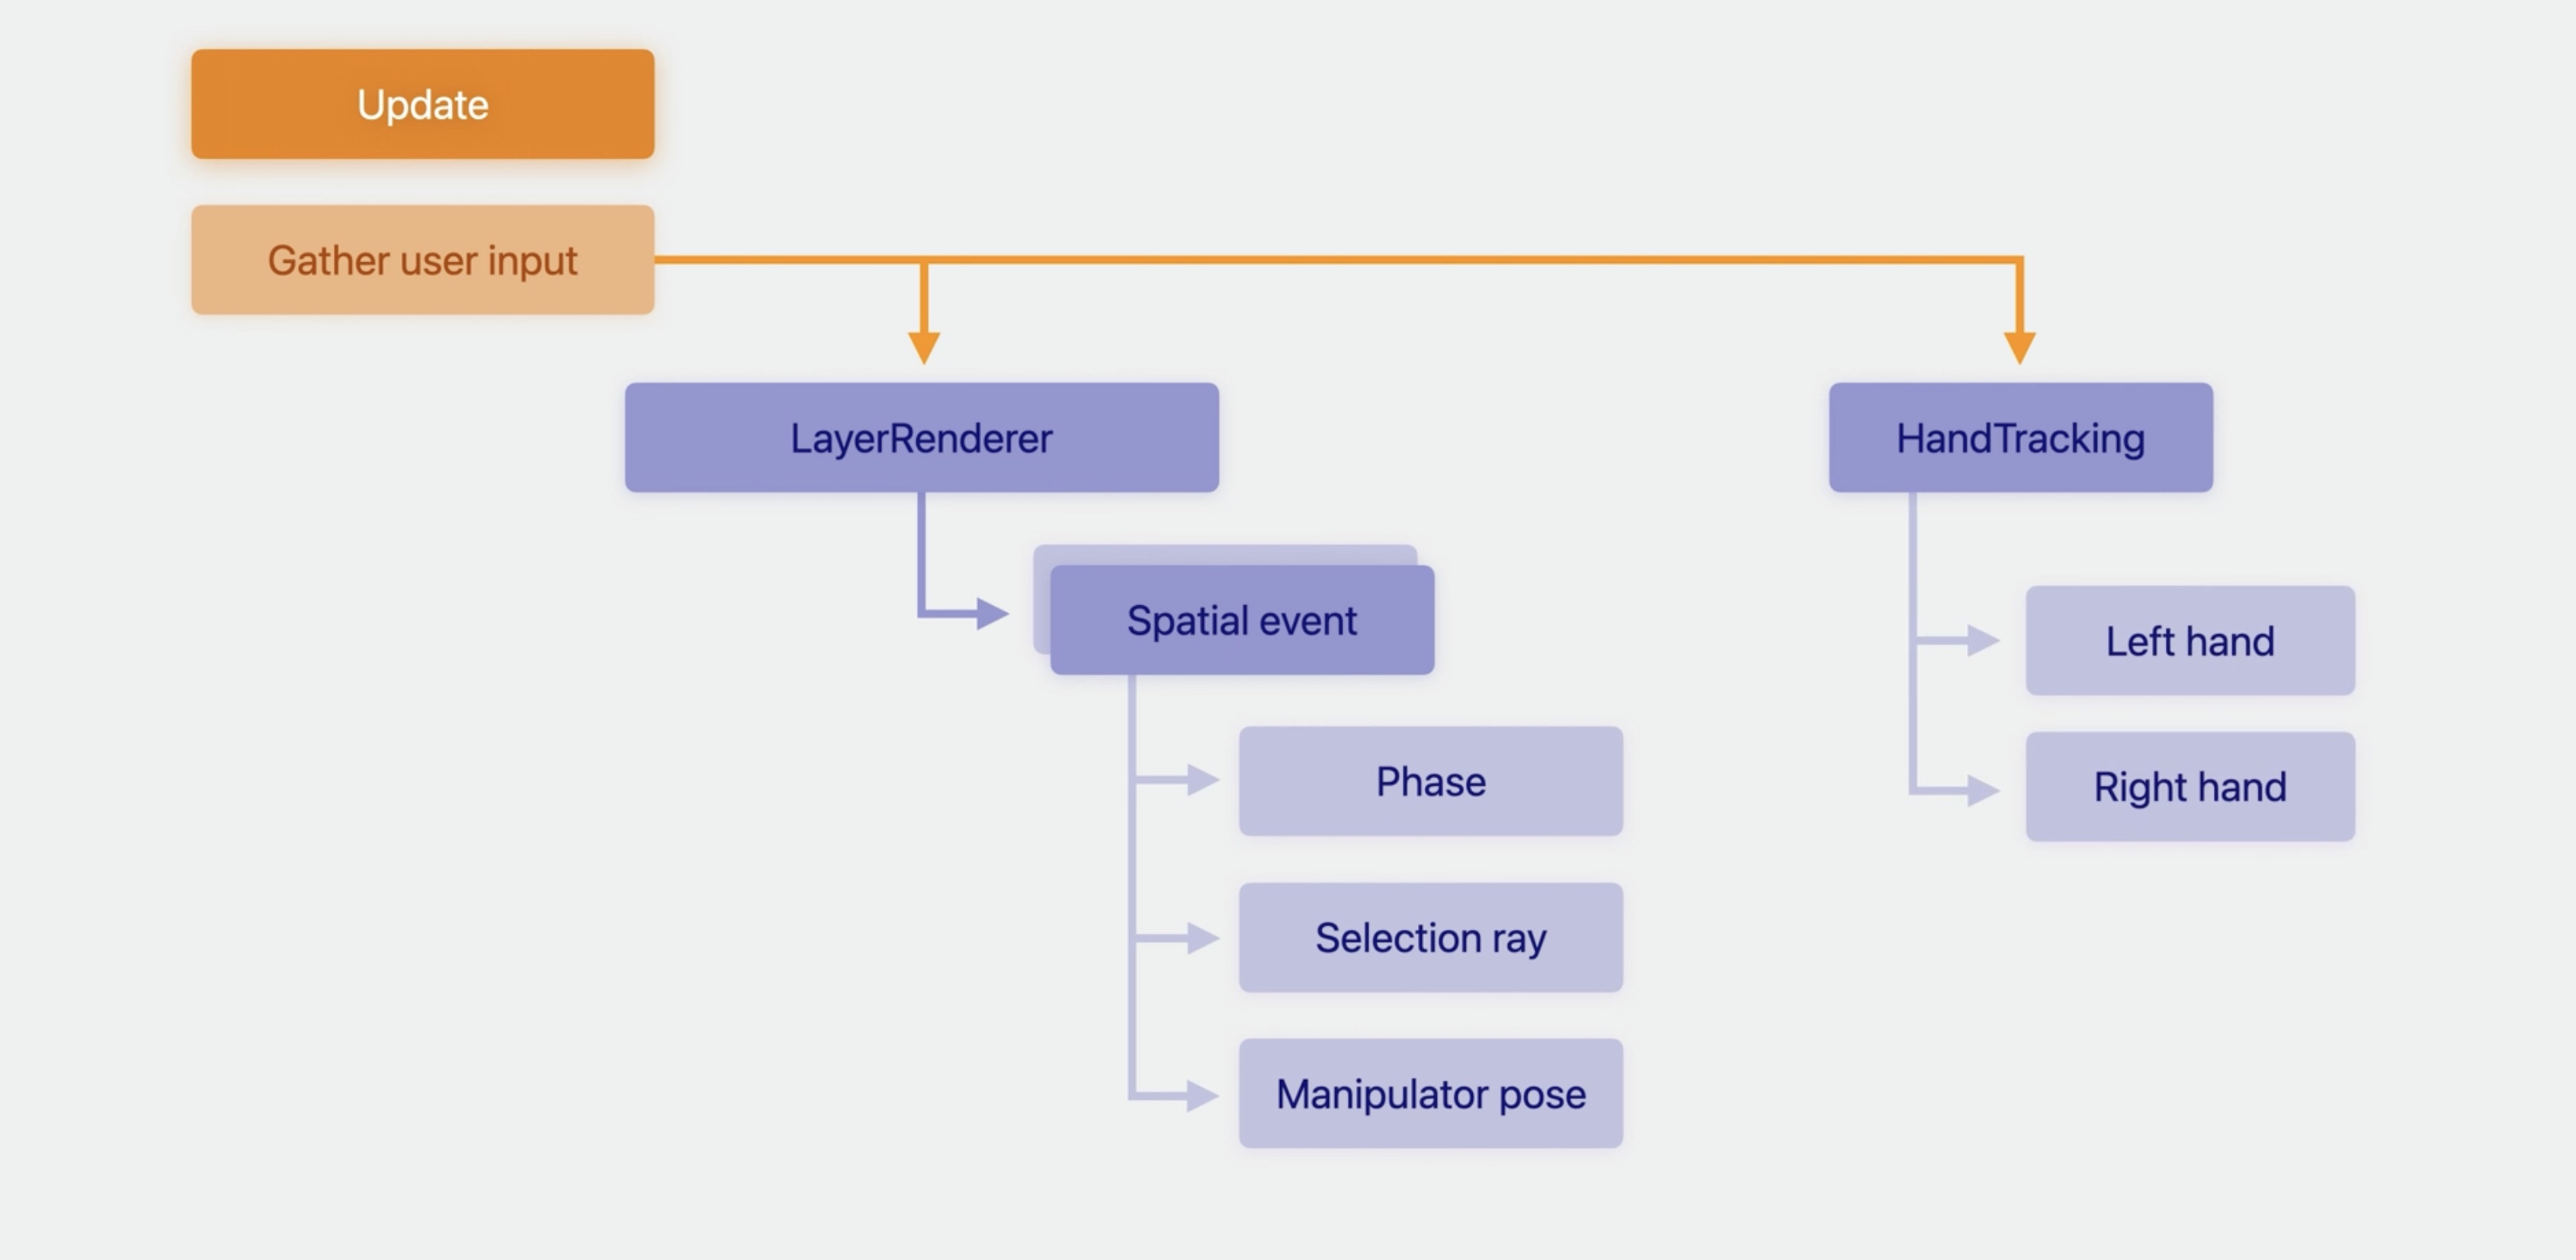
There are two main input sources, the LayerRenderer and the ARKit HandTracking provider. With the LayerRenderer, we will get updates every time the application receives a pinch event. These updates are exposed in the form of spatial events. These events contains three main properties. The phase will tell we if the event is active, if it finished, or if it got canceled. The selection ray will allow we to determine the content of the scene that had the attention when the event began. And the last event property is the manipulator pose. This is the pose of the pinch and gets updated every frame for the duration of the event. From the HandTracking API, we will be able to get skeleton for both the left and right hands.
Now, it's time to add input support in the code.
Before gathering the input, we will decide if our application is rendering virtual hands or if it uses passthrough hands. Add the upperLimbVisibility scene modifier to the ImmersiveSpace to make the passthrough hands visible or hidden.
@main
struct MyApp: App {
	var body: some Scene {
		ImmersiveSpace {
			CompositorLayer (configuration: MyConfiguration ()) { layerRenderer in
				let engine = my_engine_create (layerRenderer)
				let renderThread = Thread {
					my_engine_render_loop(engine)
				}
				renderThread.name = "Render Thread"
				renderThread.start()
			}
		}
		.upperLimbVisibility(.hidden)
	}
}
To access the spatial events, go back to where we defined the CompositorLayer render handler. Here, register a block in the layerRenderer to get updates every time there is a new spatial event.
@main
struct MyApp: App {
	var body: some Scene {
		ImmersiveSpace {
			CompositorLayer (configuration: MyConfiguration ()) { layerRenderer in
				let engine = my_engine_create (layerRenderer)
				let renderThread = Thread {
					my_engine_render_loop(engine)
				}
				renderThread.name = "Render Thread"
				renderThread.start()

				// add this
				layerRenderer.onSpatialEvent = { eventCollection in
					var events = eventCollection.map { my_spatial_event ($0) }
					my_engine_push_spatial_events(engine, &events, events.count)
				}

			}
		}
		.upperLimbVisibility(.hidden)
	}
}
If we are writing our engine code in C, we'll map the SwiftUI spatial event to a C type. Inside the C code, we can now receive the C event collection. One thing to keep in mind when handling the spatial event updates is that the updates get delivered in the main thread. This means that we will use some synchronization mechanism when reading and writing the events in our engine.
void my_engine_push_spatial_events(my_engine *engine,
								my_spatial_event *spatial_event_collection, size_t event_count) {
	os_unfair_lock_lock(&engine-›input_event_lock);

	// Copy events into an internal queue

	os_unfair_lock_unlock(&engine->input_event_lock);
}
Now that the events are stored in the engine, it's time to implement the gather input function. The first step is to create an object to store the current input state for this frame.
This input state will store the events that we received from the LayerRenderer. Make sure that we are accessing our internal storage in a safe way.
As for the hand skeleton, we can use the hand tracking provider API from ARKit to get the latest hand anchors.
my_input_state my_engine_gather_inputs (my_engine *engine,cp_frame_timing_t timing) {

	my_input_state input_state = my_input_state_create();

	os_unfair_lock_lock(&engine->input_event_lock);
	input_state.current_pinch_collection = my_engine_pop_spatial_events(engine);
	os_unfair_lock_unlock(&engine->input_event_lock);

	ar_hand_tracking_provider_get_latest_anchors(engine->hand_tracking_provider, input_state.left_hand, input_state.right_hand);

	return input_state;
}
And now that our application has input support, we have all the tools at our disposal to create fully immersive experiences on xrOS.
Wrap up
To recap, with SwiftUI, we will define the application.
With CompositorServices and Metal, we will set up the render loop and display 3D content.
And finally, with ARKit, we will be able to make our experience interactive.
Resources
Drawing fully immersive content using Metal
Have a question? Ask with tag wwdc2023-10089
Metal
Search the forums for tag wwdc2023-10089
## Related Videos
Build great games for spatial computing - WWDC23
Go beyond the window with SwiftUI - WWDC23
Meet ARKit for spatial computing - WWDC23
Explore HDR rendering with EDR - WWDC21
 Twitter
 GitHub
 iosdev.space