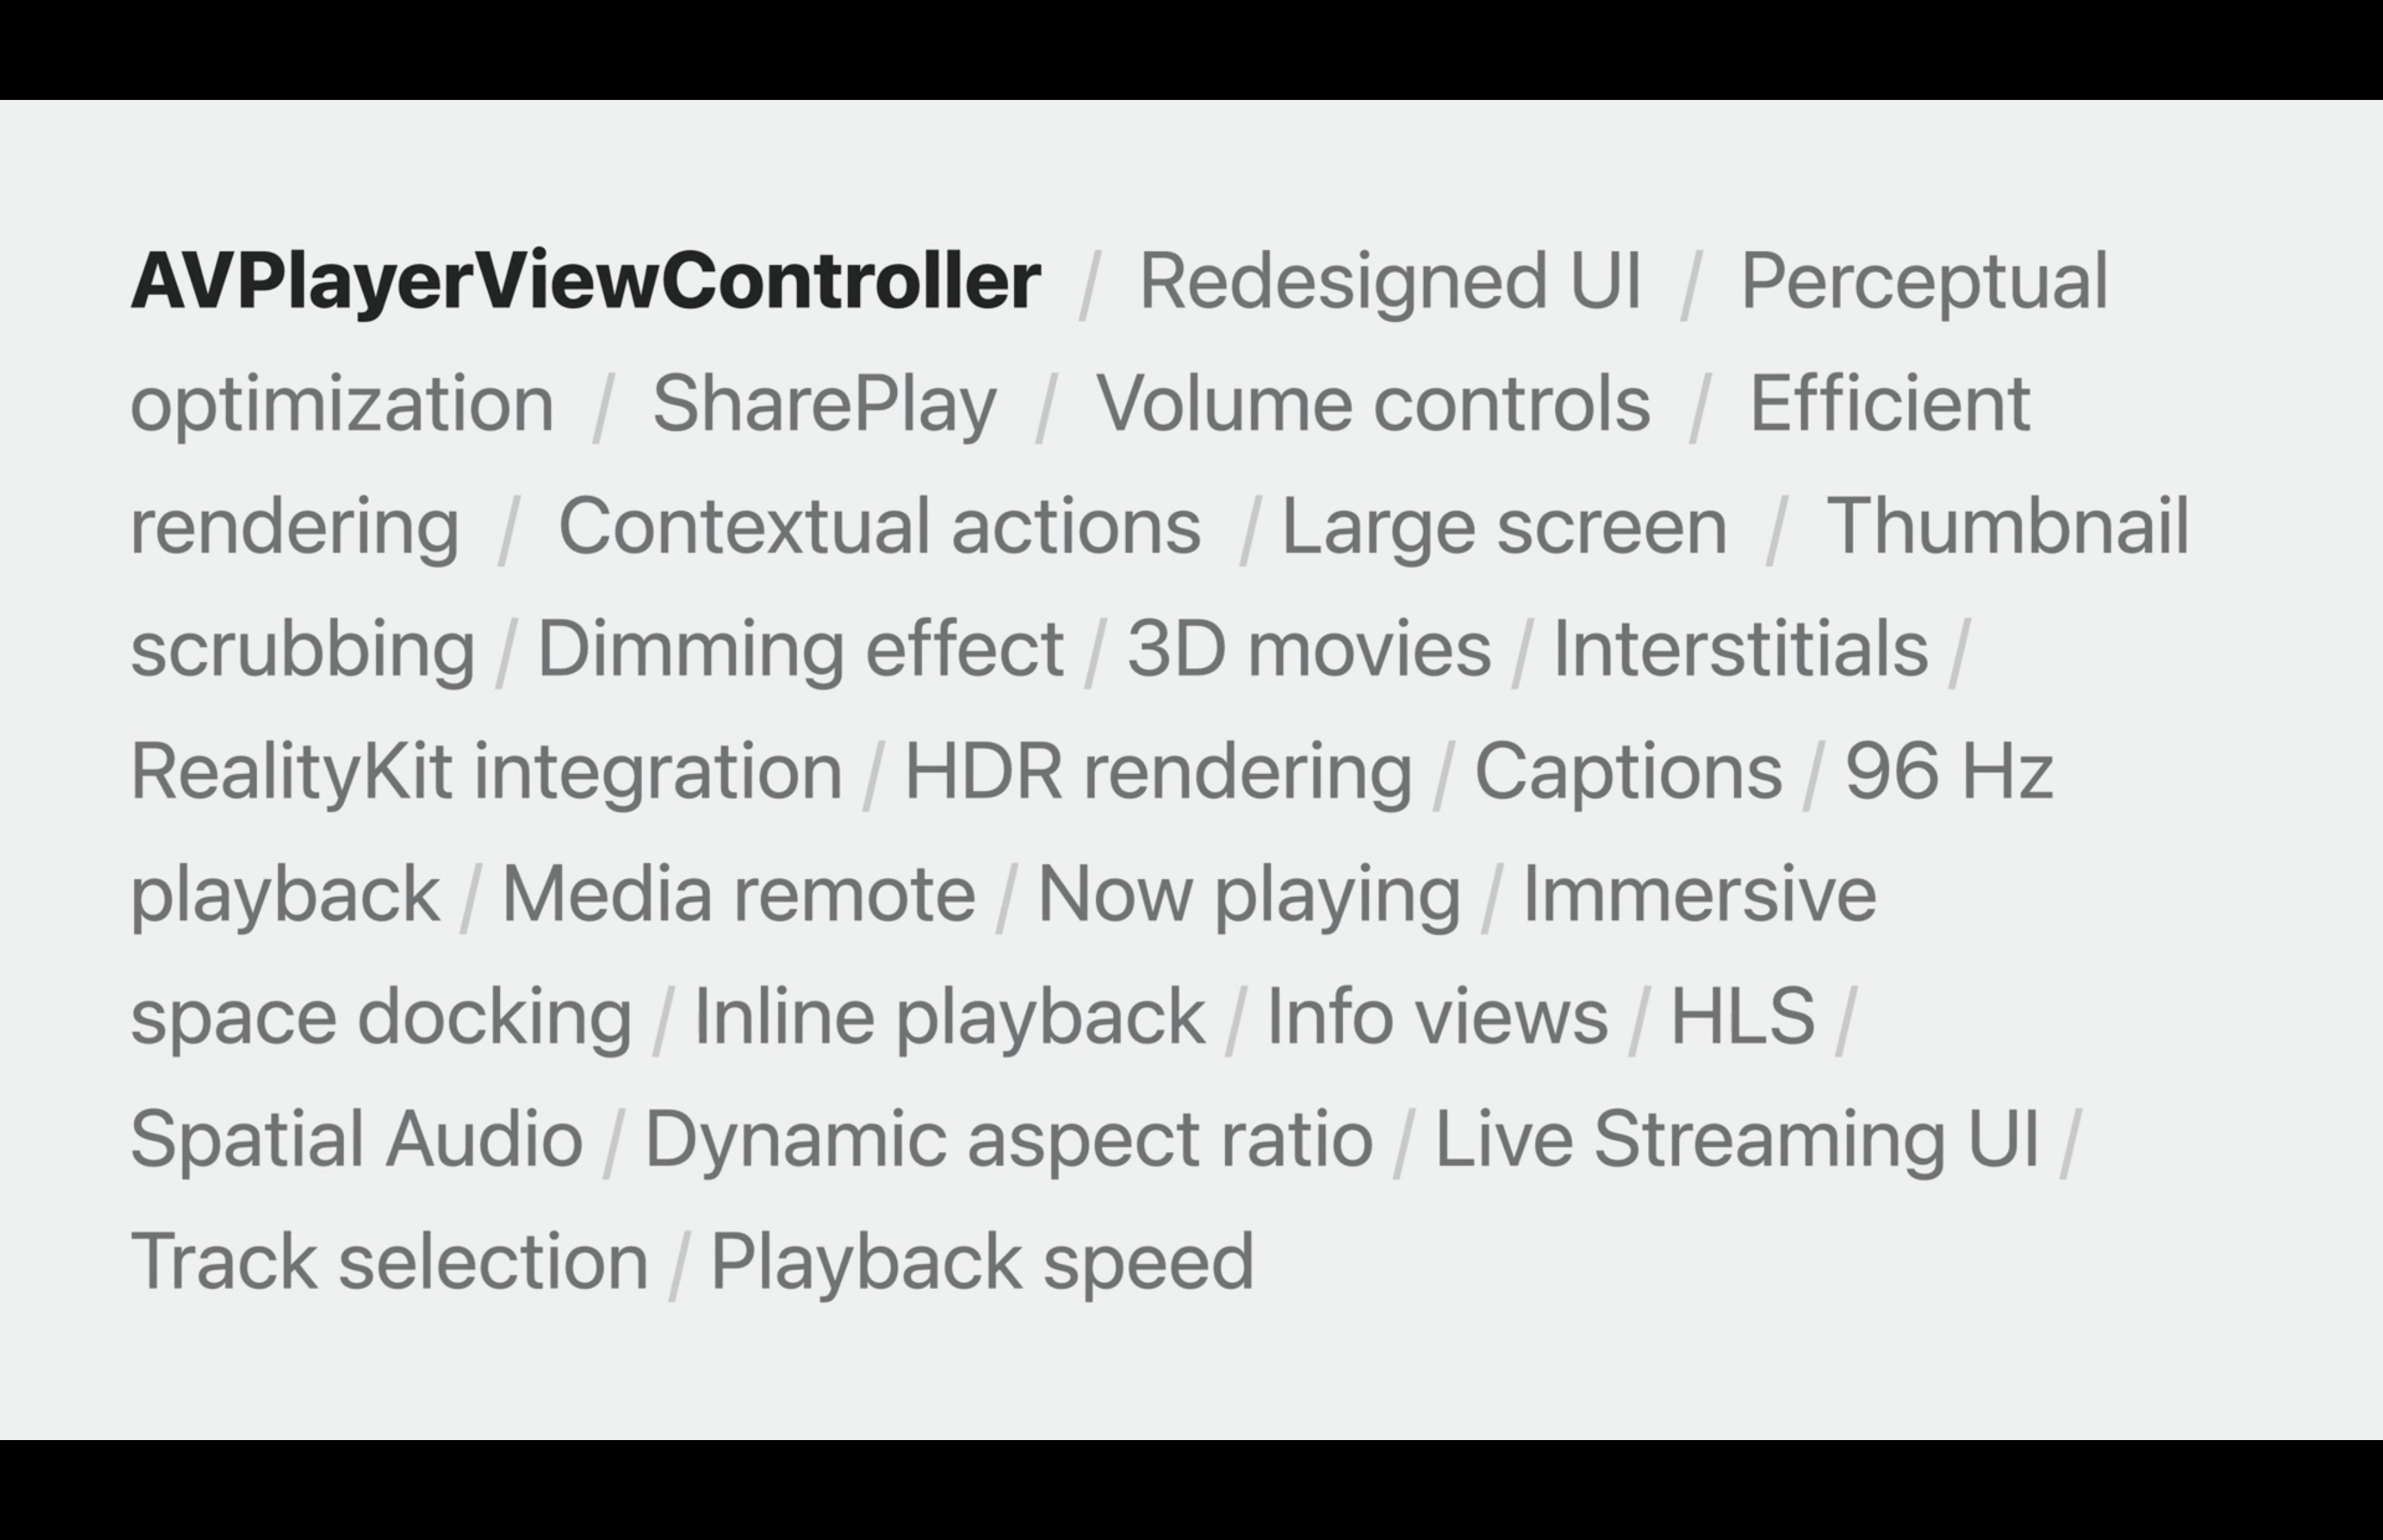
Create a great spatial playback experience
 laurent b
Description: Get ready to support video in your visionOS app! Take a tour of the frameworks and APIs that power video playback and learn how you can update your app to play 3D content. We'll also share tips for customizing playback to create a more immersive watching experience.
how to create a great spatial experiences for video playback.
A great experience is optimized for the platform, takes advantage of its powerful media capabilities, and integrates with the whole system.
First, we'll explore the media experience with a minimal app. Next, I'll go over some more advanced UI features. Then, I'll go over some other methods of displaying video. Finally, I'll compare the options. If you have used the media APIs on iOS or tvOS, then this may feel familiar. This platform builds on those same APIs and extends them for its unique capabilities.
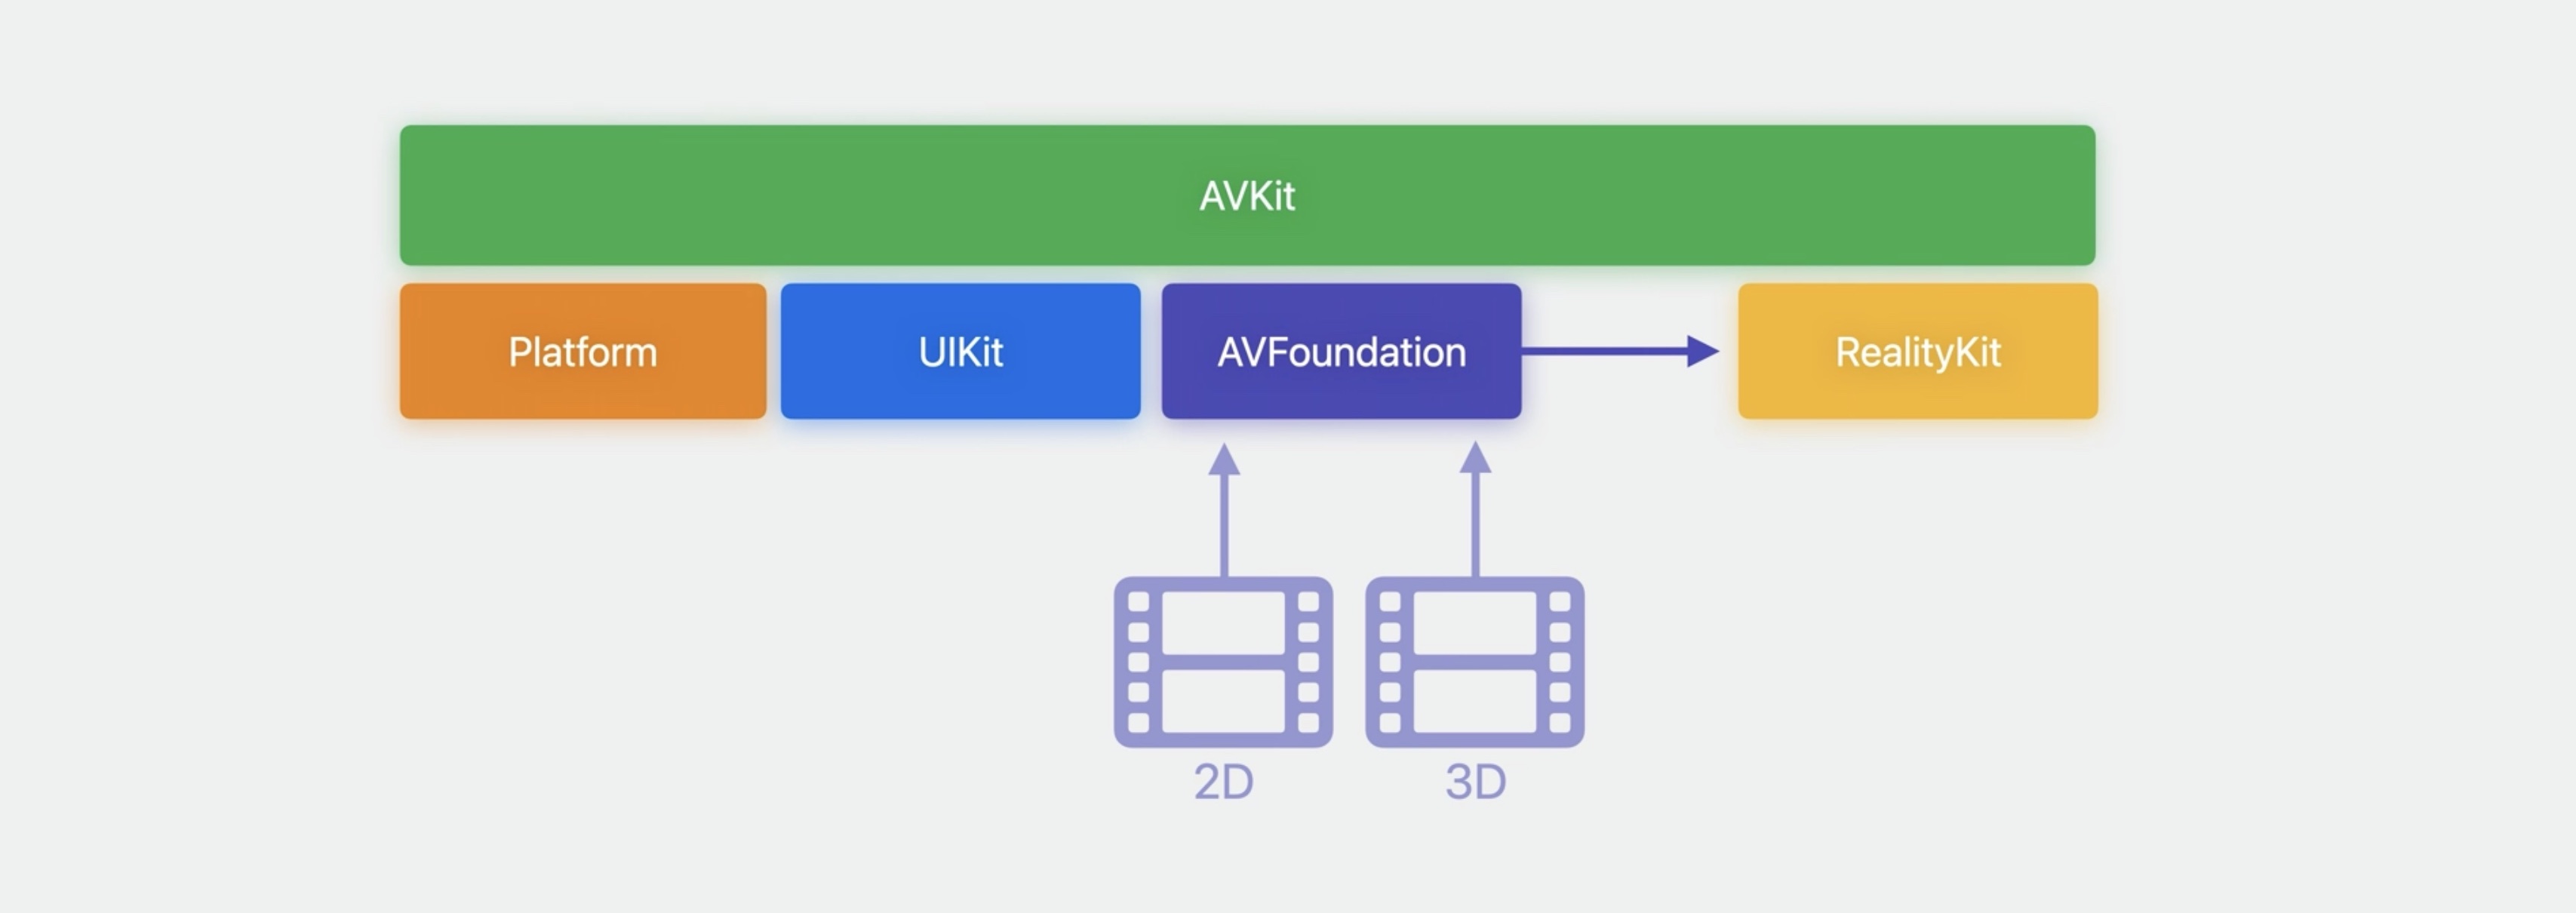
AVFoundation handles all the work of playing movies: streaming, parsing, decoding, synchronizing. And AVKit builds on AVFoundation and UI Frameworks, to create a playback experience that's customized and integrated for each platform.
On this platform, AVFoundation has been enhanced to support new media formats that take advantage of its unique capabilities, such as 3D video.
Refer to this session for more details about these formats.
Deliver video content for spatial experiences - WWDC23
AVFoundation has also been enhanced to render performantly and with high quality using RealityKit, so that video can be composited seamlessly into the world around you, and so that audio also responds to the world around you. And AVKit's AVPlayerViewController has been extended to make use of the power of RealityKit and the unique capabilities of the platform to create a highly refined experience.
This includes all the playback controls you expect, but also has many unique capabilities. What's required to take advantage of this in your app?
Requirements
- First, the Xcode target must build with this platform's SDK. Compatible iOS apps built with the iOS SDK will get an iOS compatible experience.
- Use
AVPlayerViewControllerjust like you do on iOS or tvOS. - And finally, present the view controller so it fills the window. Let's demonstrate this with some code.
First, we'll import AVFoundation and AVKit. Next, create an AVPlayerViewController and connect an AVPlayer to it. Then, create a new player item with the content URL and set it on the player.
import AVFoundation
import AVKit

    let controller = AVPlayerViewController ()
    controller.player = AVPlayer ()
    controller.player?.replaceCurrentItem(with: AVPlayerItemurl: contentURL))
Adding the item after setting the player on the view controller can improve performance because the player will understand how it will be displayed before it starts loading the media. Then, to use it in SwiftUI, wrap that code in a UIViewControllerRepresentable. We'll call this one PlayerView.
import SwiftUI
import AVFoundation
import AVKit

struct PlayerView: UIViewControllerepresentable {

    func makeUIViewController(context: Context) -> AVPlayerViewController {
        let controller = AVPlayerViewController()
        controller.player = AVPlayer()
        controller.player?.replaceCurrentItem(with: AVPlayerItem(url: itemURL))
    return controller
}

func updateUIViewController(_ : AVPlayerViewController, context: Context) {
}
Then, we'll create our app, which we'll call MoviePlayingApp.
import SwiftUI
@main
struct MoviePlayingApp: App {
    var body: some SwiftUI.Scene {
        WindowGroup {
            PlayerView()
        }
    }
}
Add the view controller, which we just defined, so it fills the window. Just like that, you've got a movie playing app. If you're thinking this code looks very similar to what you would write on other Apple platforms, that's because it is.AVPlayerViewController and AVPlayer are doing a lot of the heavy lifting so you don't have to. Let me show you the media experience a simple app like this has. Before the app is launched, just the room is visible. When the app launches, a large screen appears right in front and the room darkens, creating a nice ambiance.
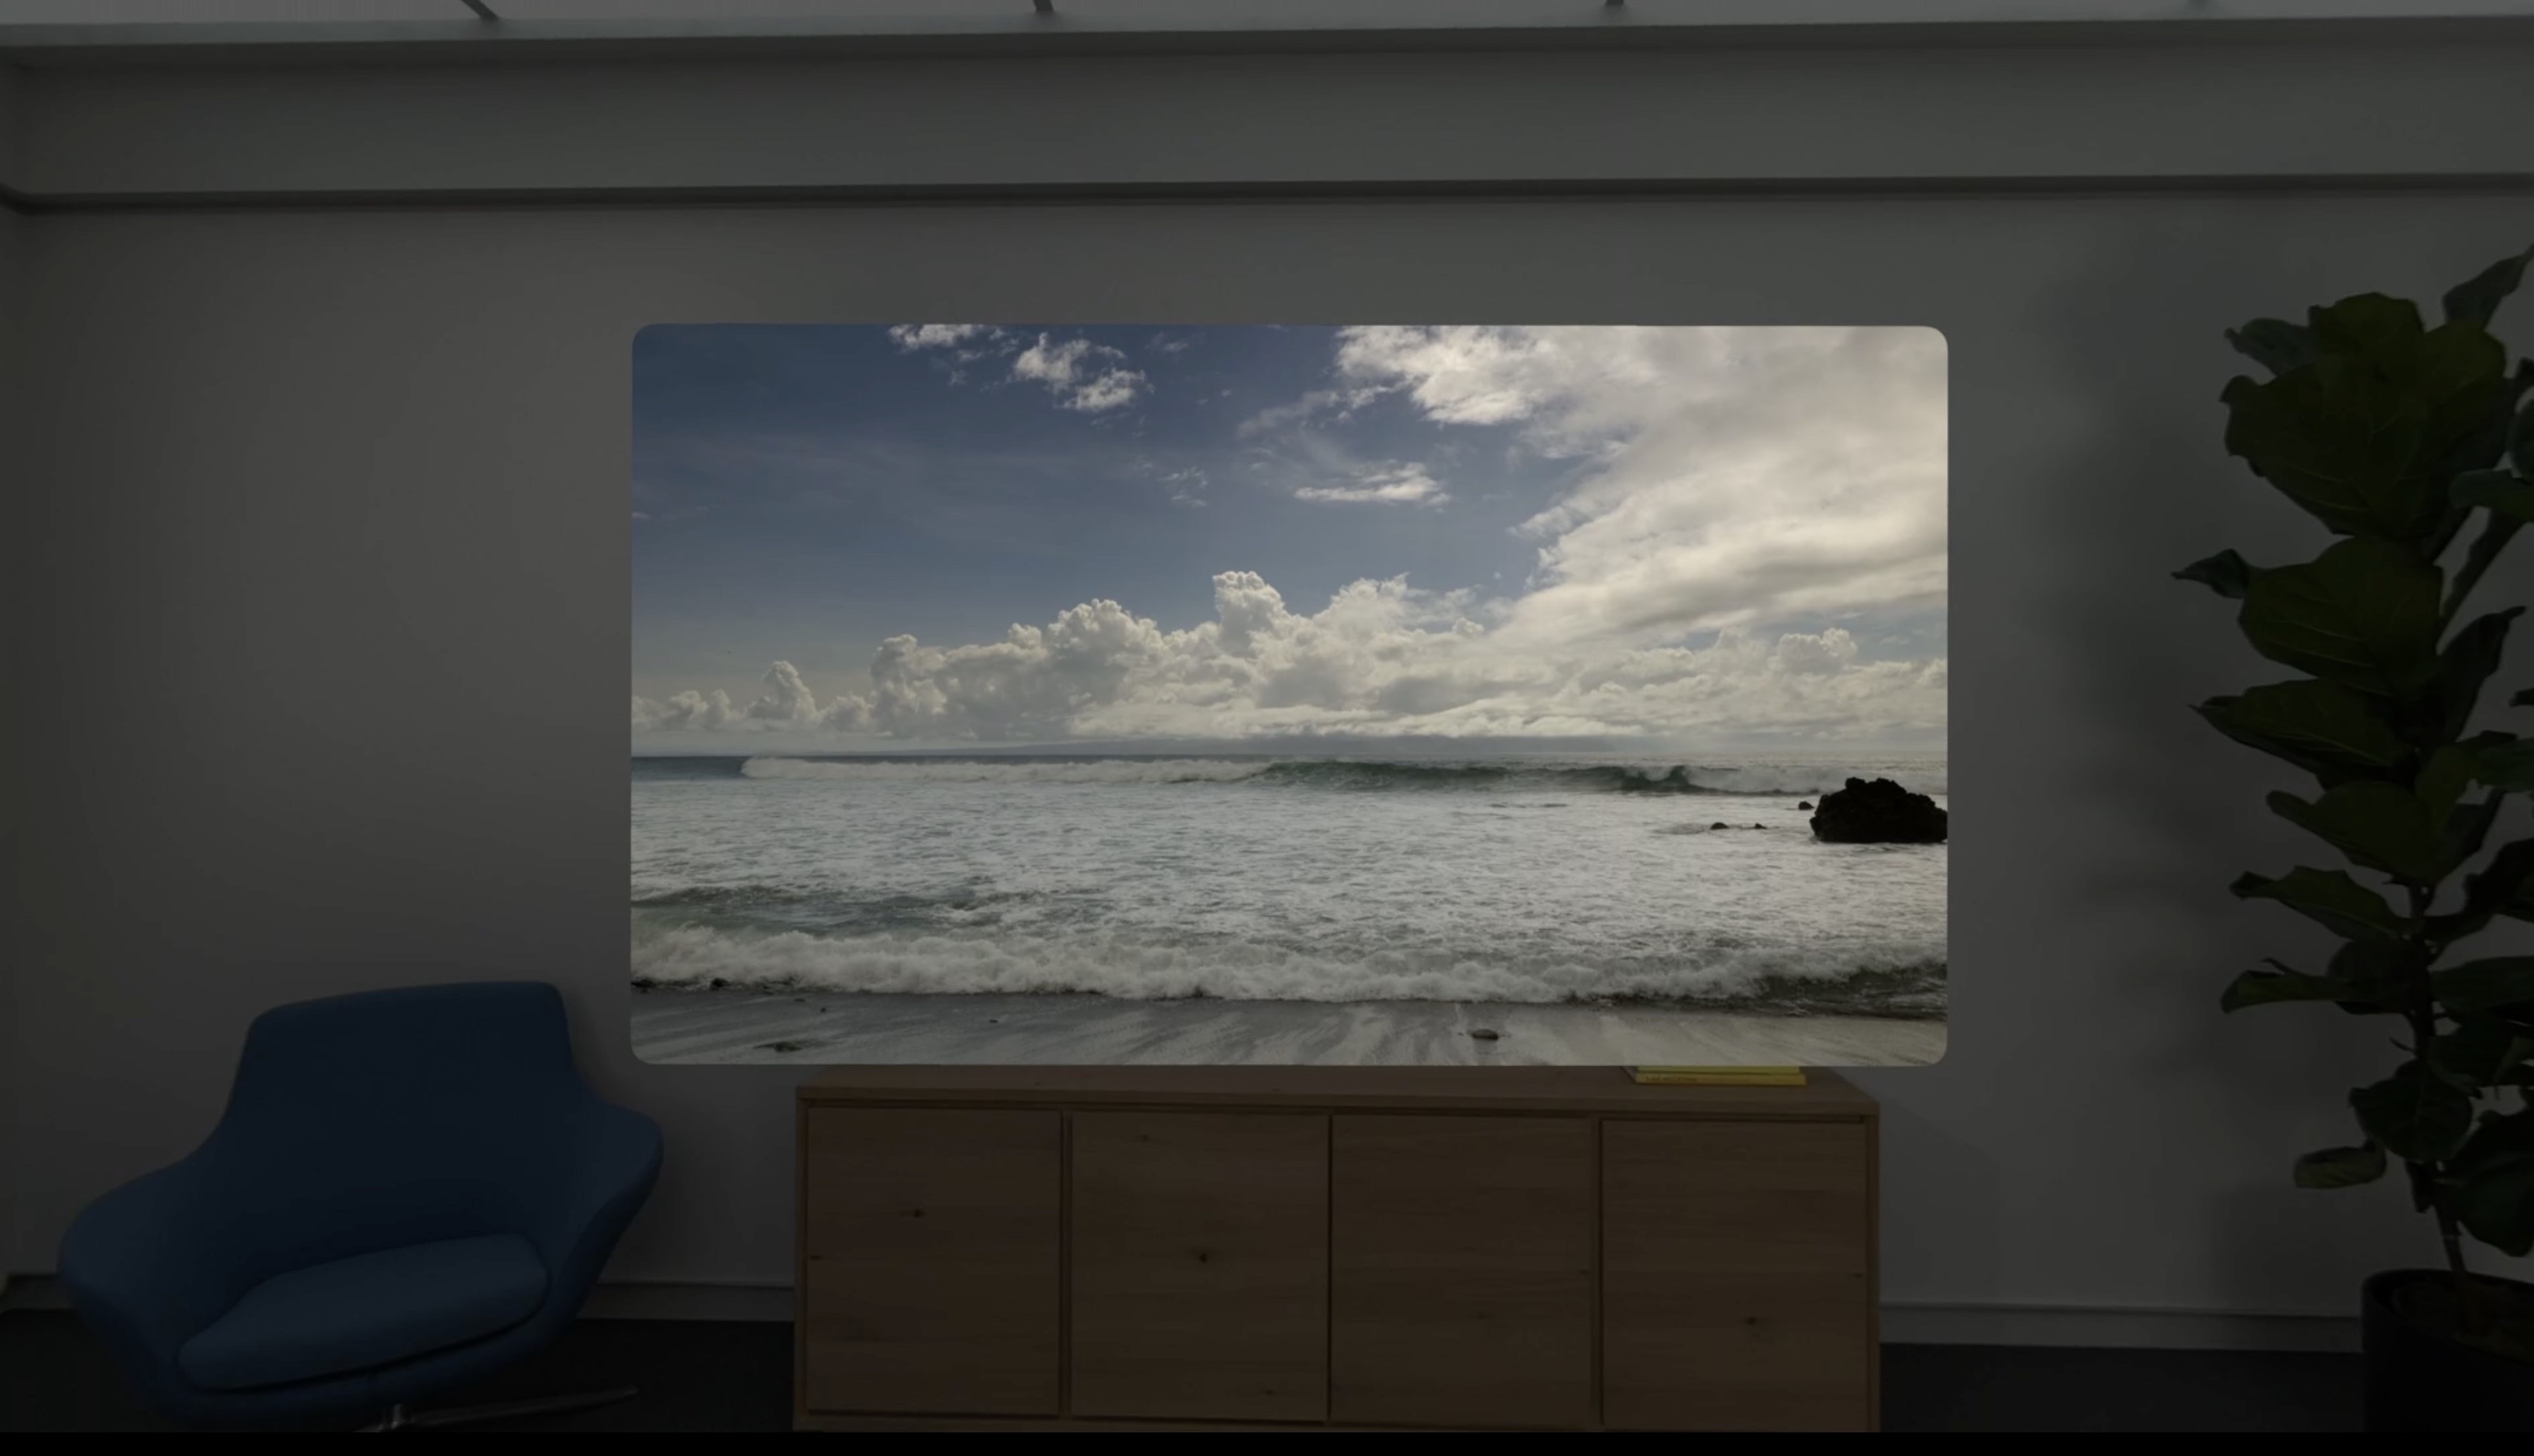
When moving, the screen stays in place, and the audio stays anchored to the screen. To show playback controls, look at the screen and tap. The controls float just in front of the video. While playing, do nothing and they will disappear on their own. Or make them disappear by looking at the screen and tapping again. Grab the window bar below the screen to reposition it.
Grab the corner of the screen to resize. Notice that as the screen resizes, it animates smoothly and matches the aspect ratio of the video. Adjust the volume by turning the Digital Crown. Or use the Digital Crown to open an environment, like this. I love watching movies this way. You've got to experience this for yourself.
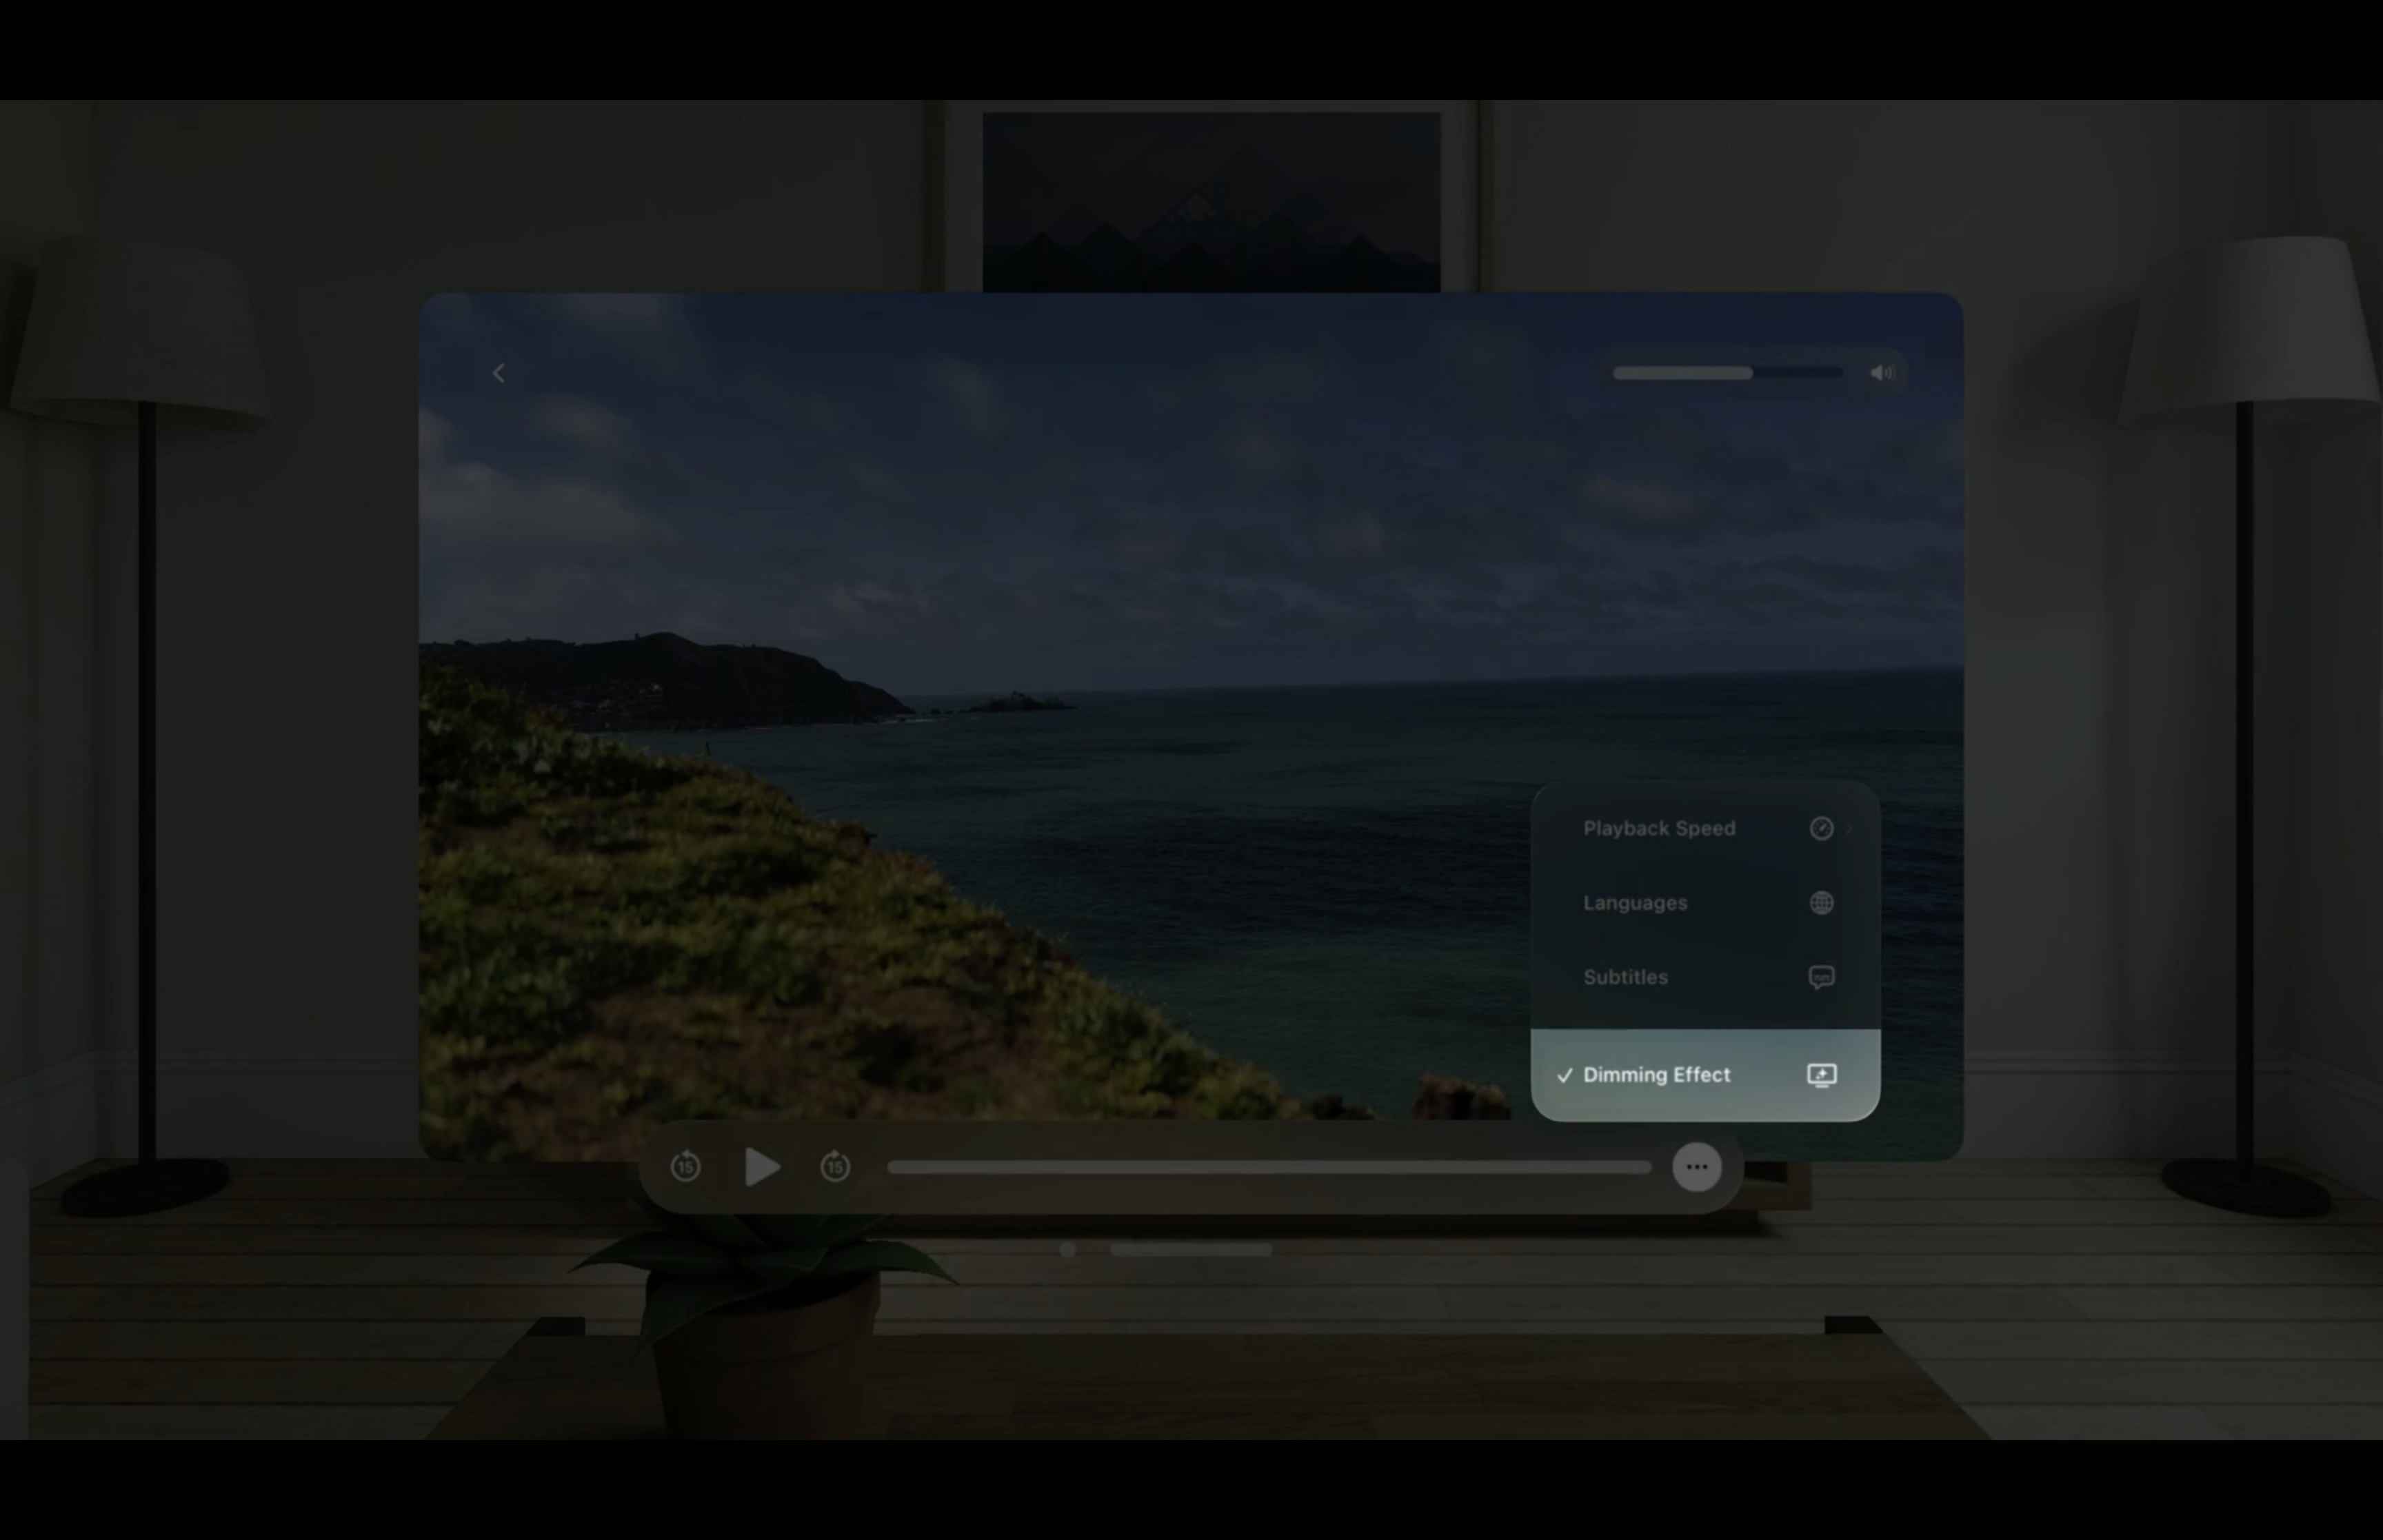
Now, let's examine the playback controls more closely to see the features they provide. Here is our player interface. At the top right is the volume control to make quick adjustments or to mute. As I mentioned, volume can also be adjusted with the Digital Crown. At the bottom left are the familiar play/pause and back/forward buttons. In the bottom middle is the scrubber to jump to a different time in the movie. And in the bottom right is this button with more options. Here are options to adjust the playback speed. When movies contain multiple audio tracks or caption tracks, use these options to choose the language for the audio track, or to enable captions in the preferred language.
This last option is Dimming Effect. I love watching movies in the dark to really focus on them, but sometimes a video isn't my only focus. Here, I can turn off Dimming Effect to better see what's around me.
Advanced features.
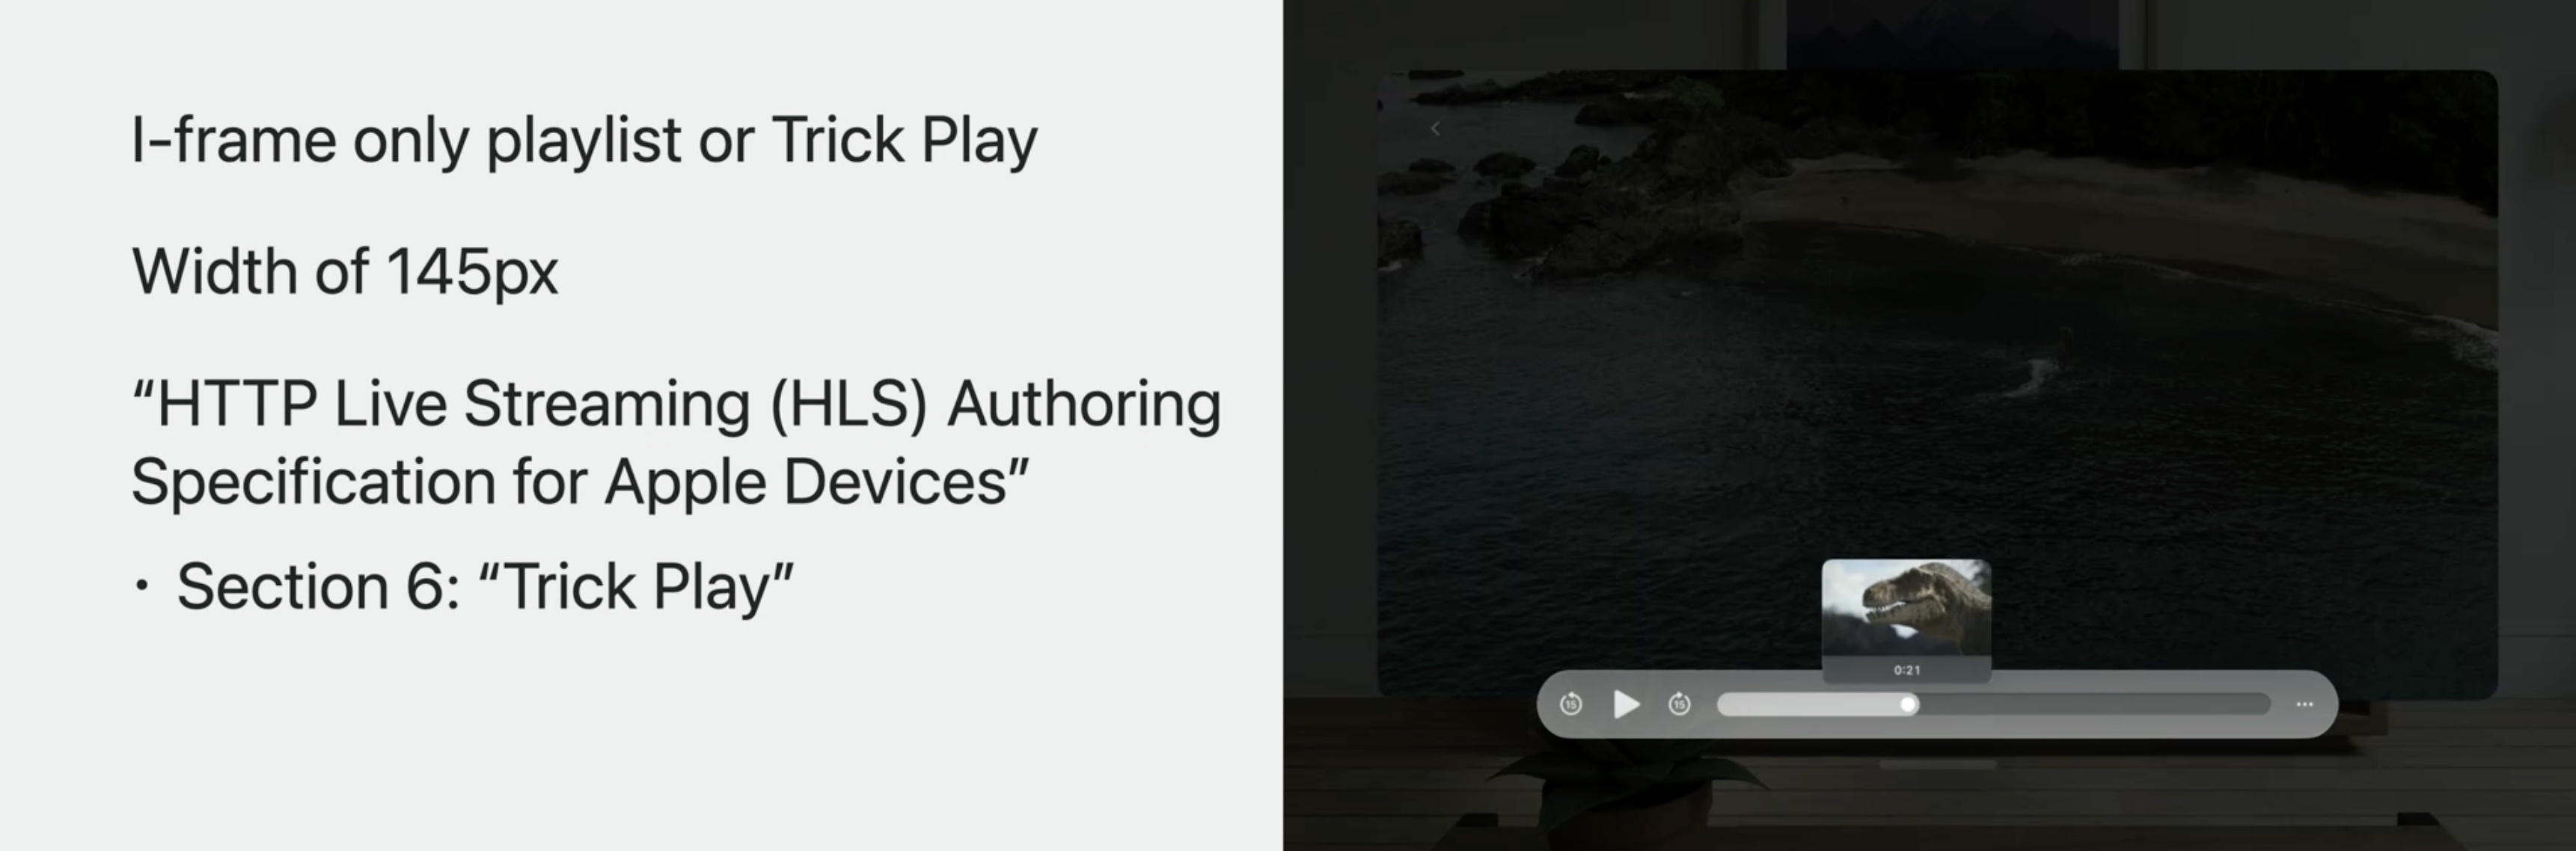
Thumbnail scrubbing and Trick Play
Thumbnail scrubbing shows a small image of the video while scrubbing, allowing seamless navigation of the content. The controls will automatically display a thumbnail when scrubbing for HLS streams that have an I-frame only playlist, also known as a Trick Play track. Small Trick Play tracks with a width of 145 pixels are preferred.
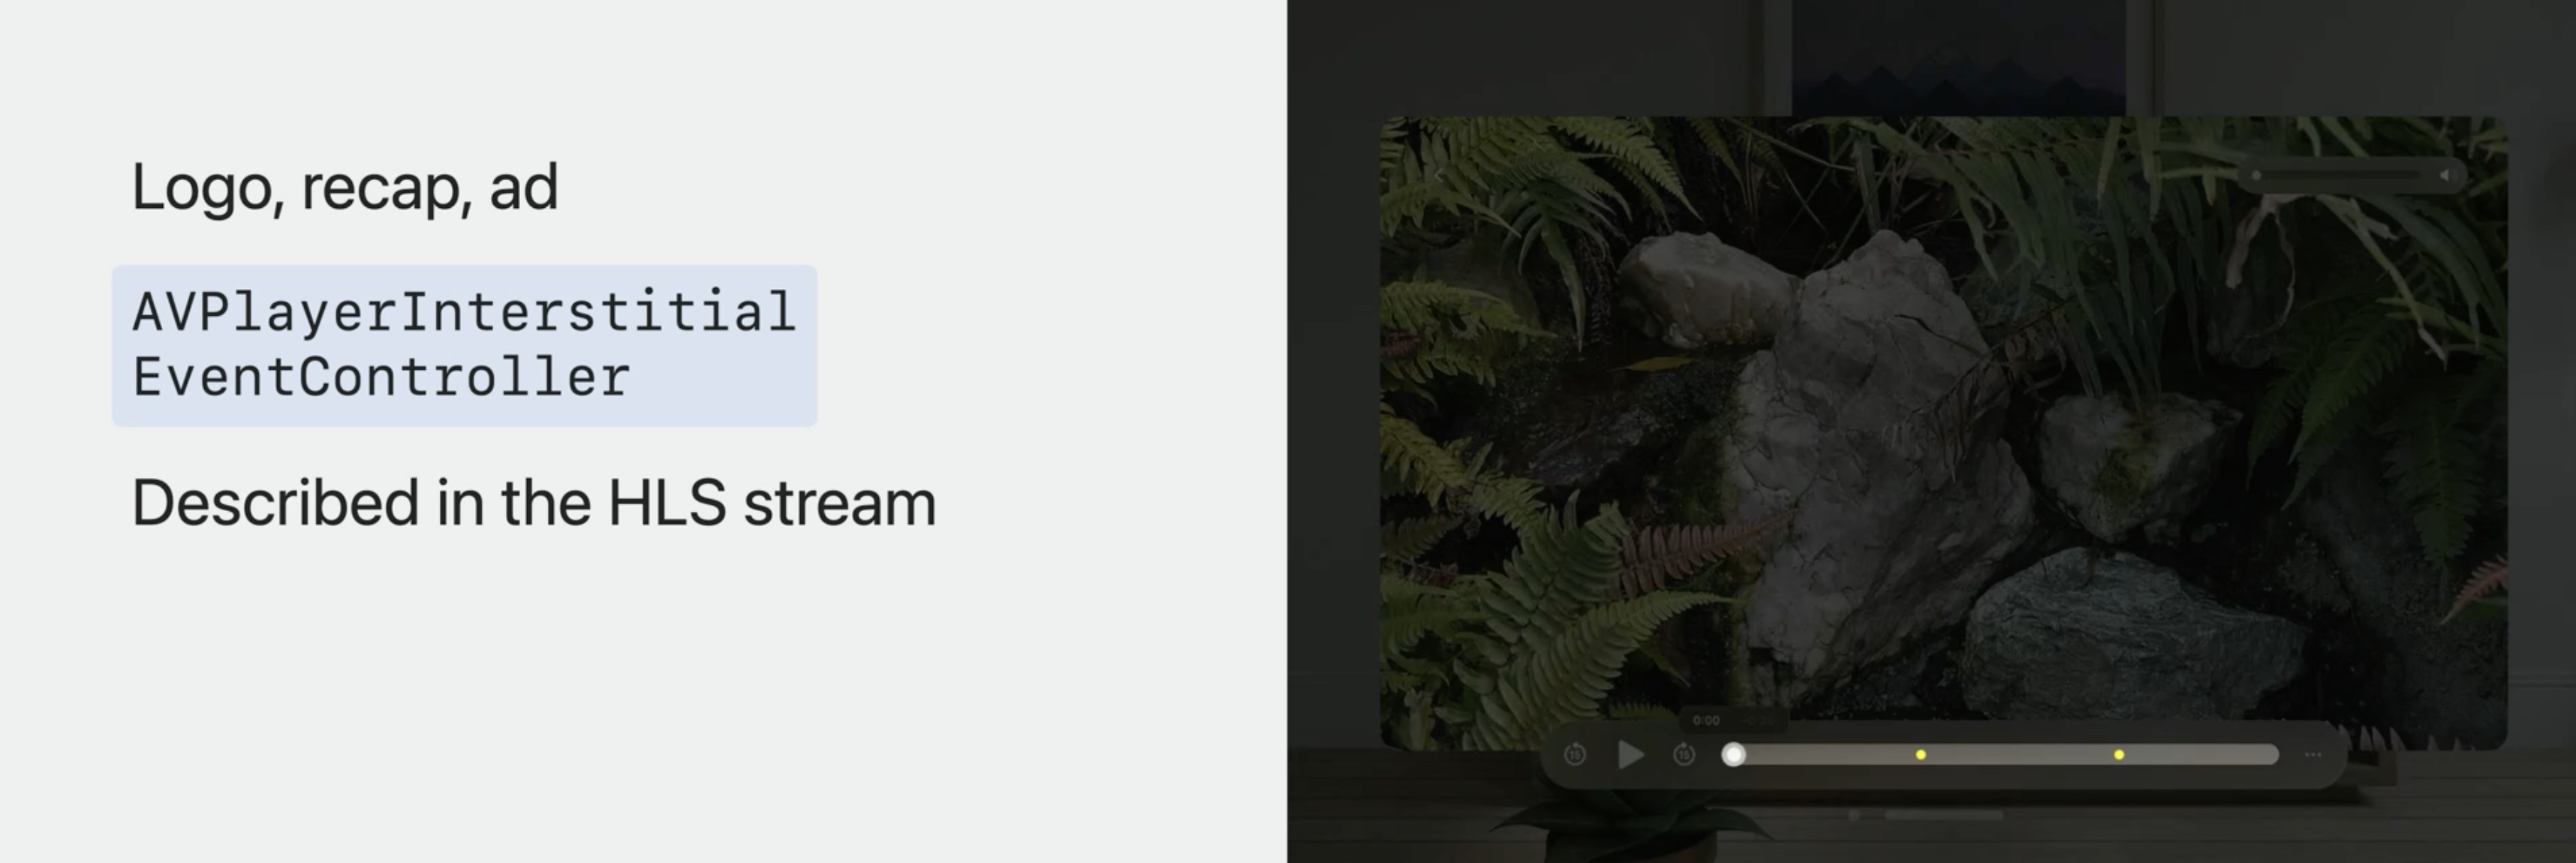
Interstitials support
Sometimes media needs to be inserted into the timeline for a logo, a recap, or an ad. Interstitials support enables this ability. When interstitials are present, the controls will automatically reflect them with an indicator in the timeline. These interstitials can be configured programmatically with an AVPlayerInterstital EventController, or they can be described within the HLS stream.
Refer to this session for more details.
What's new in HLS interstitials - WWDC22
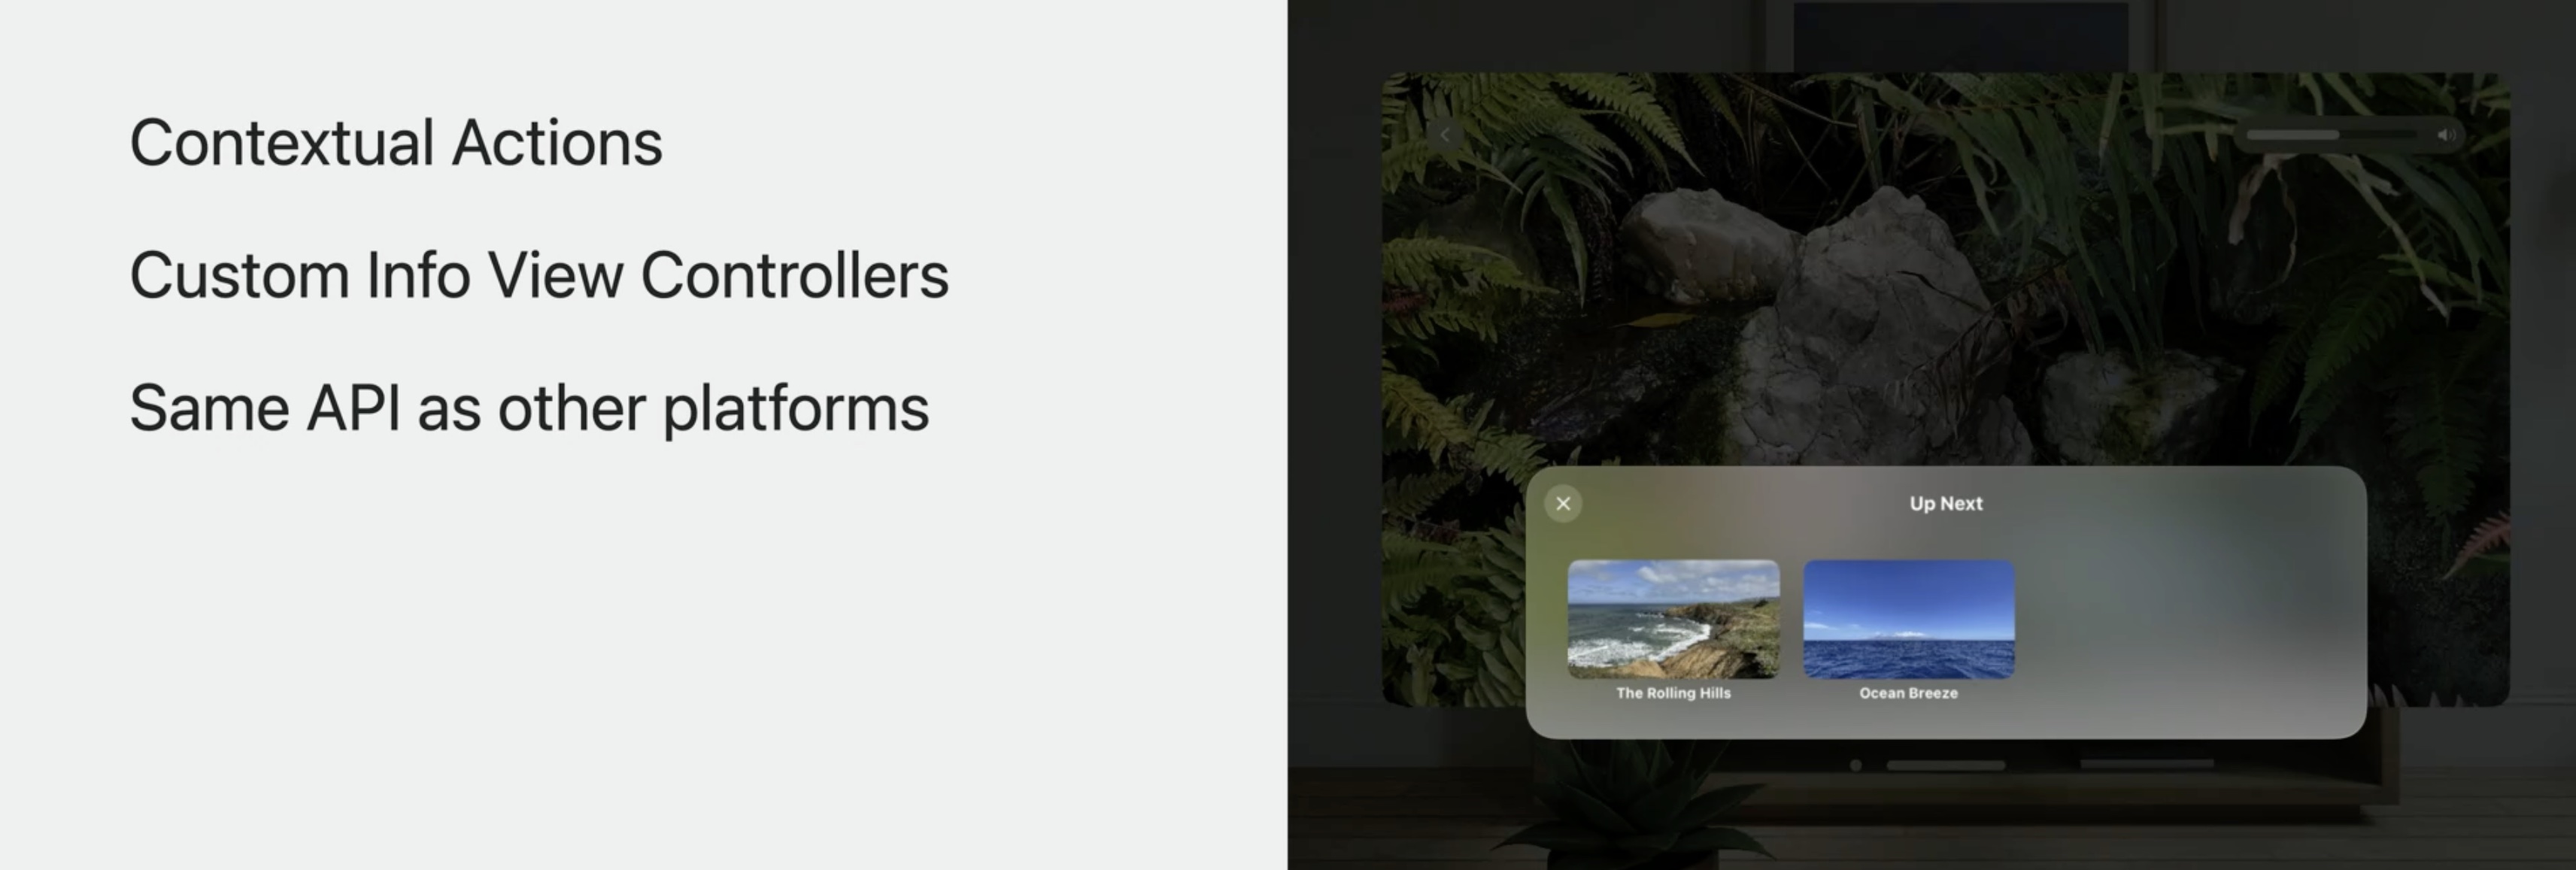
Additional UI
There are some additional UI options commonly used by video playing apps. Contextual actions allow you to add buttons like Skip intro or Play next episode. They can have a title and an optional image. Custom info view controllers can be used to show metadata about the content or to suggest related content. These APIs work the same as on other Apple platforms.
Refer to this session for more details.
What's new in AVKit - WWDC21
Immersive Spaces
Your app can also transport you to another place with a feature called Immersive Spaces. When your app creates an Immersive Space, you get to decide what that space looks like. And even better, your video screen will automatically move into that space and anchor itself at a predictable size and position to guarantee an excellent viewing angle every time. And the controls detach and move closer to make them easier to interact with.
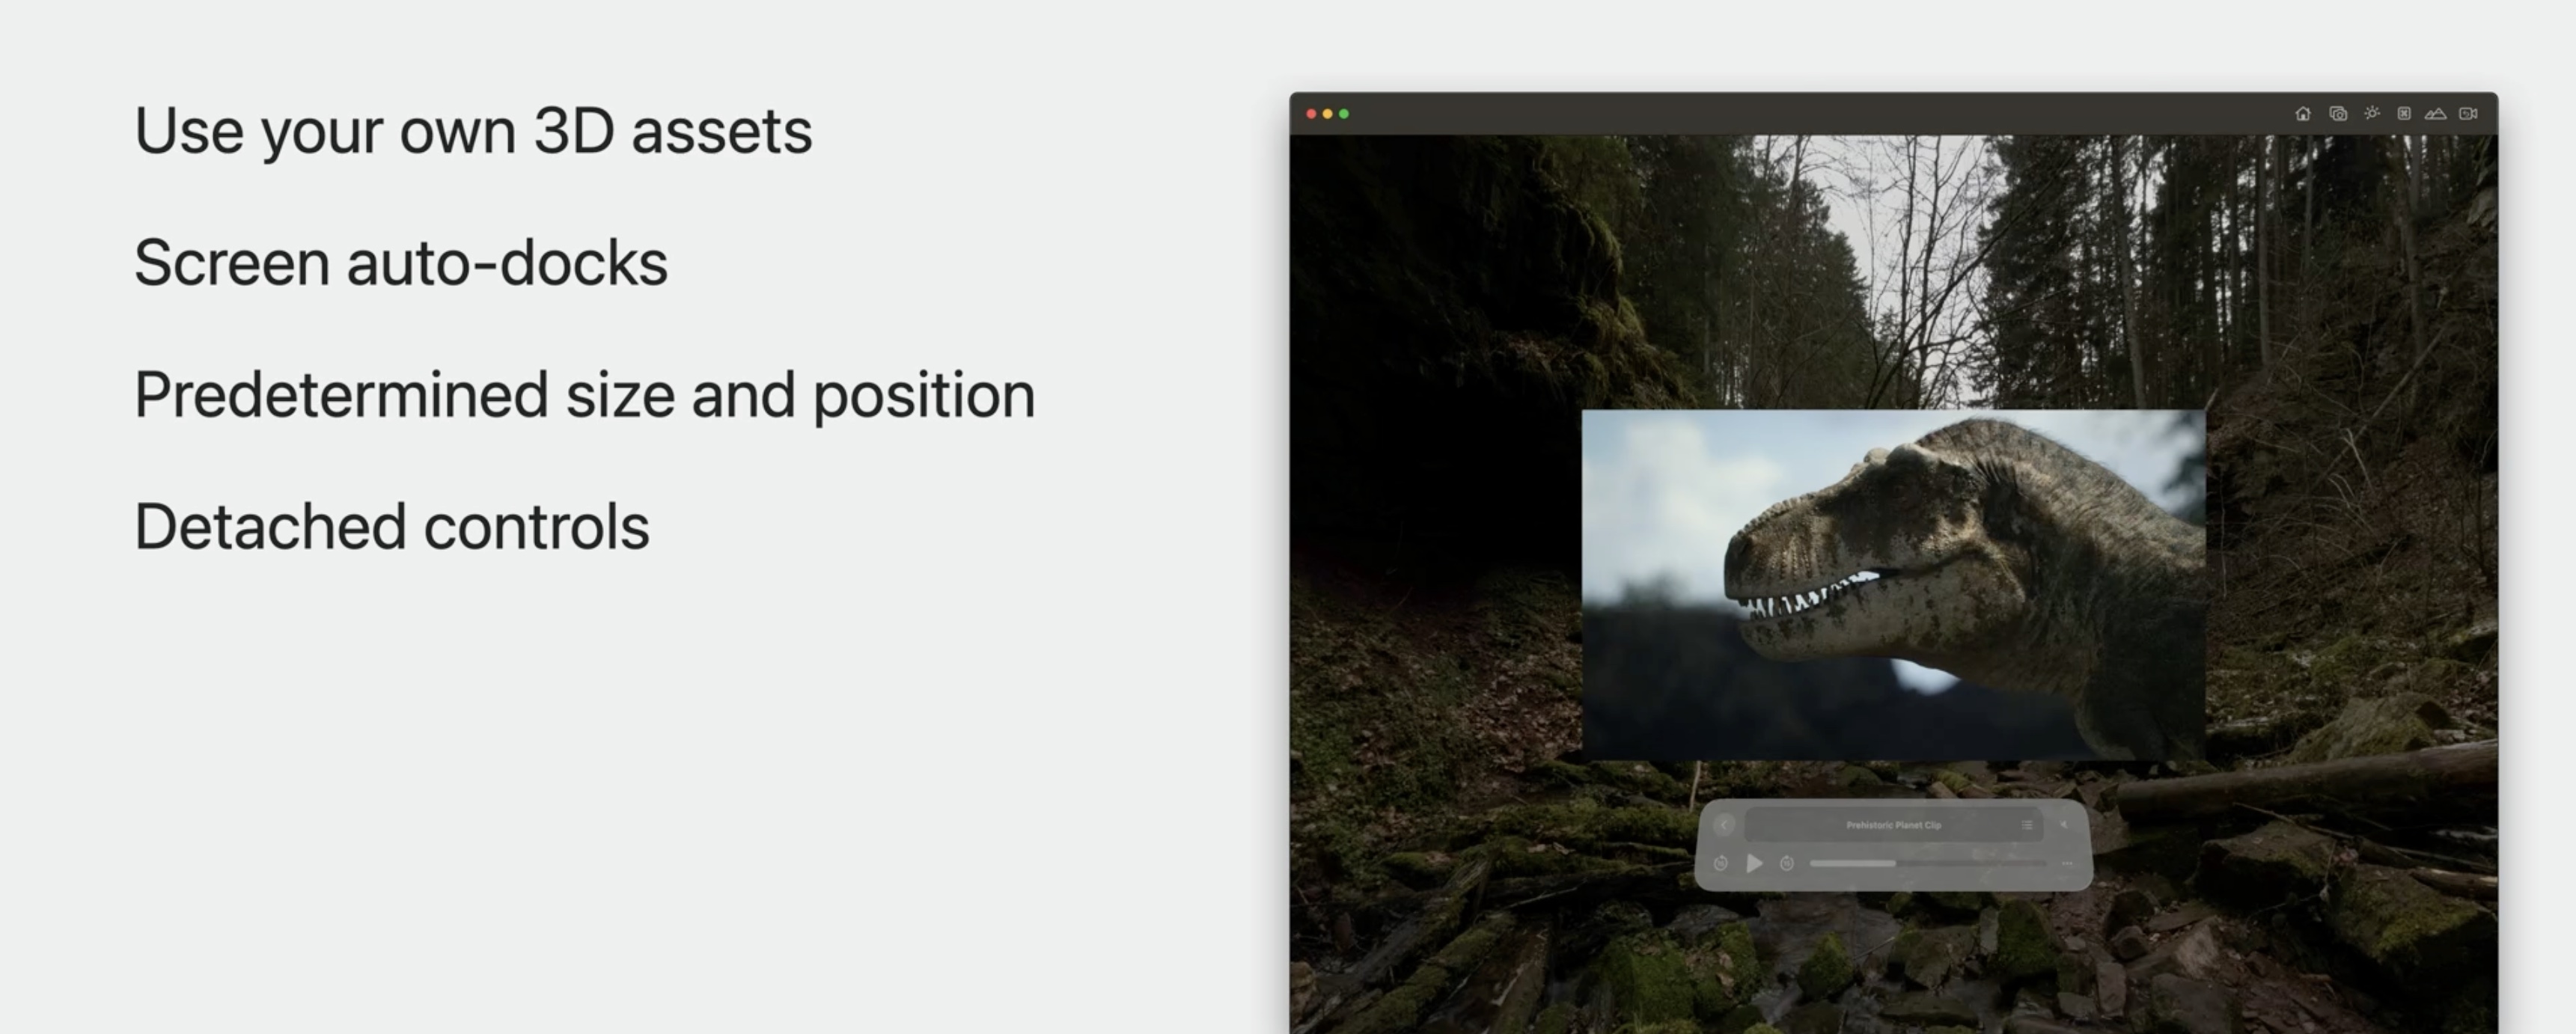
Let's check out some code. Here is our MoviePlayingApp from earlier. First, we'll add an Immersive Space. The 3D content will be described by RealityKit entities. Then we'll use onAppear on our PlayerView to open the space. Make sure your Immersive Space is designed to accommodate the movie player when it's docked.
import SwiftUI

@main
struct MoviePlayingApp: App {
    var body: some SwiftUI.Scene {
        WindowGroup {
            PlayerView()
            .onAppear() {
                Task {
                    await openImmersiveSpace(id: "PlayerImmersiveSpace")
                }
            }
        }
        ImmersiveSpace(id: "PlayerImmersiveSpace") {
            RealityView { content in
                let entity = // Create entities.
                content.add(entity)
            }
        }
    }
}
For more information about how to build and present spaces, refer to this session.
Go beyond the window with SwiftUI - WWDC23
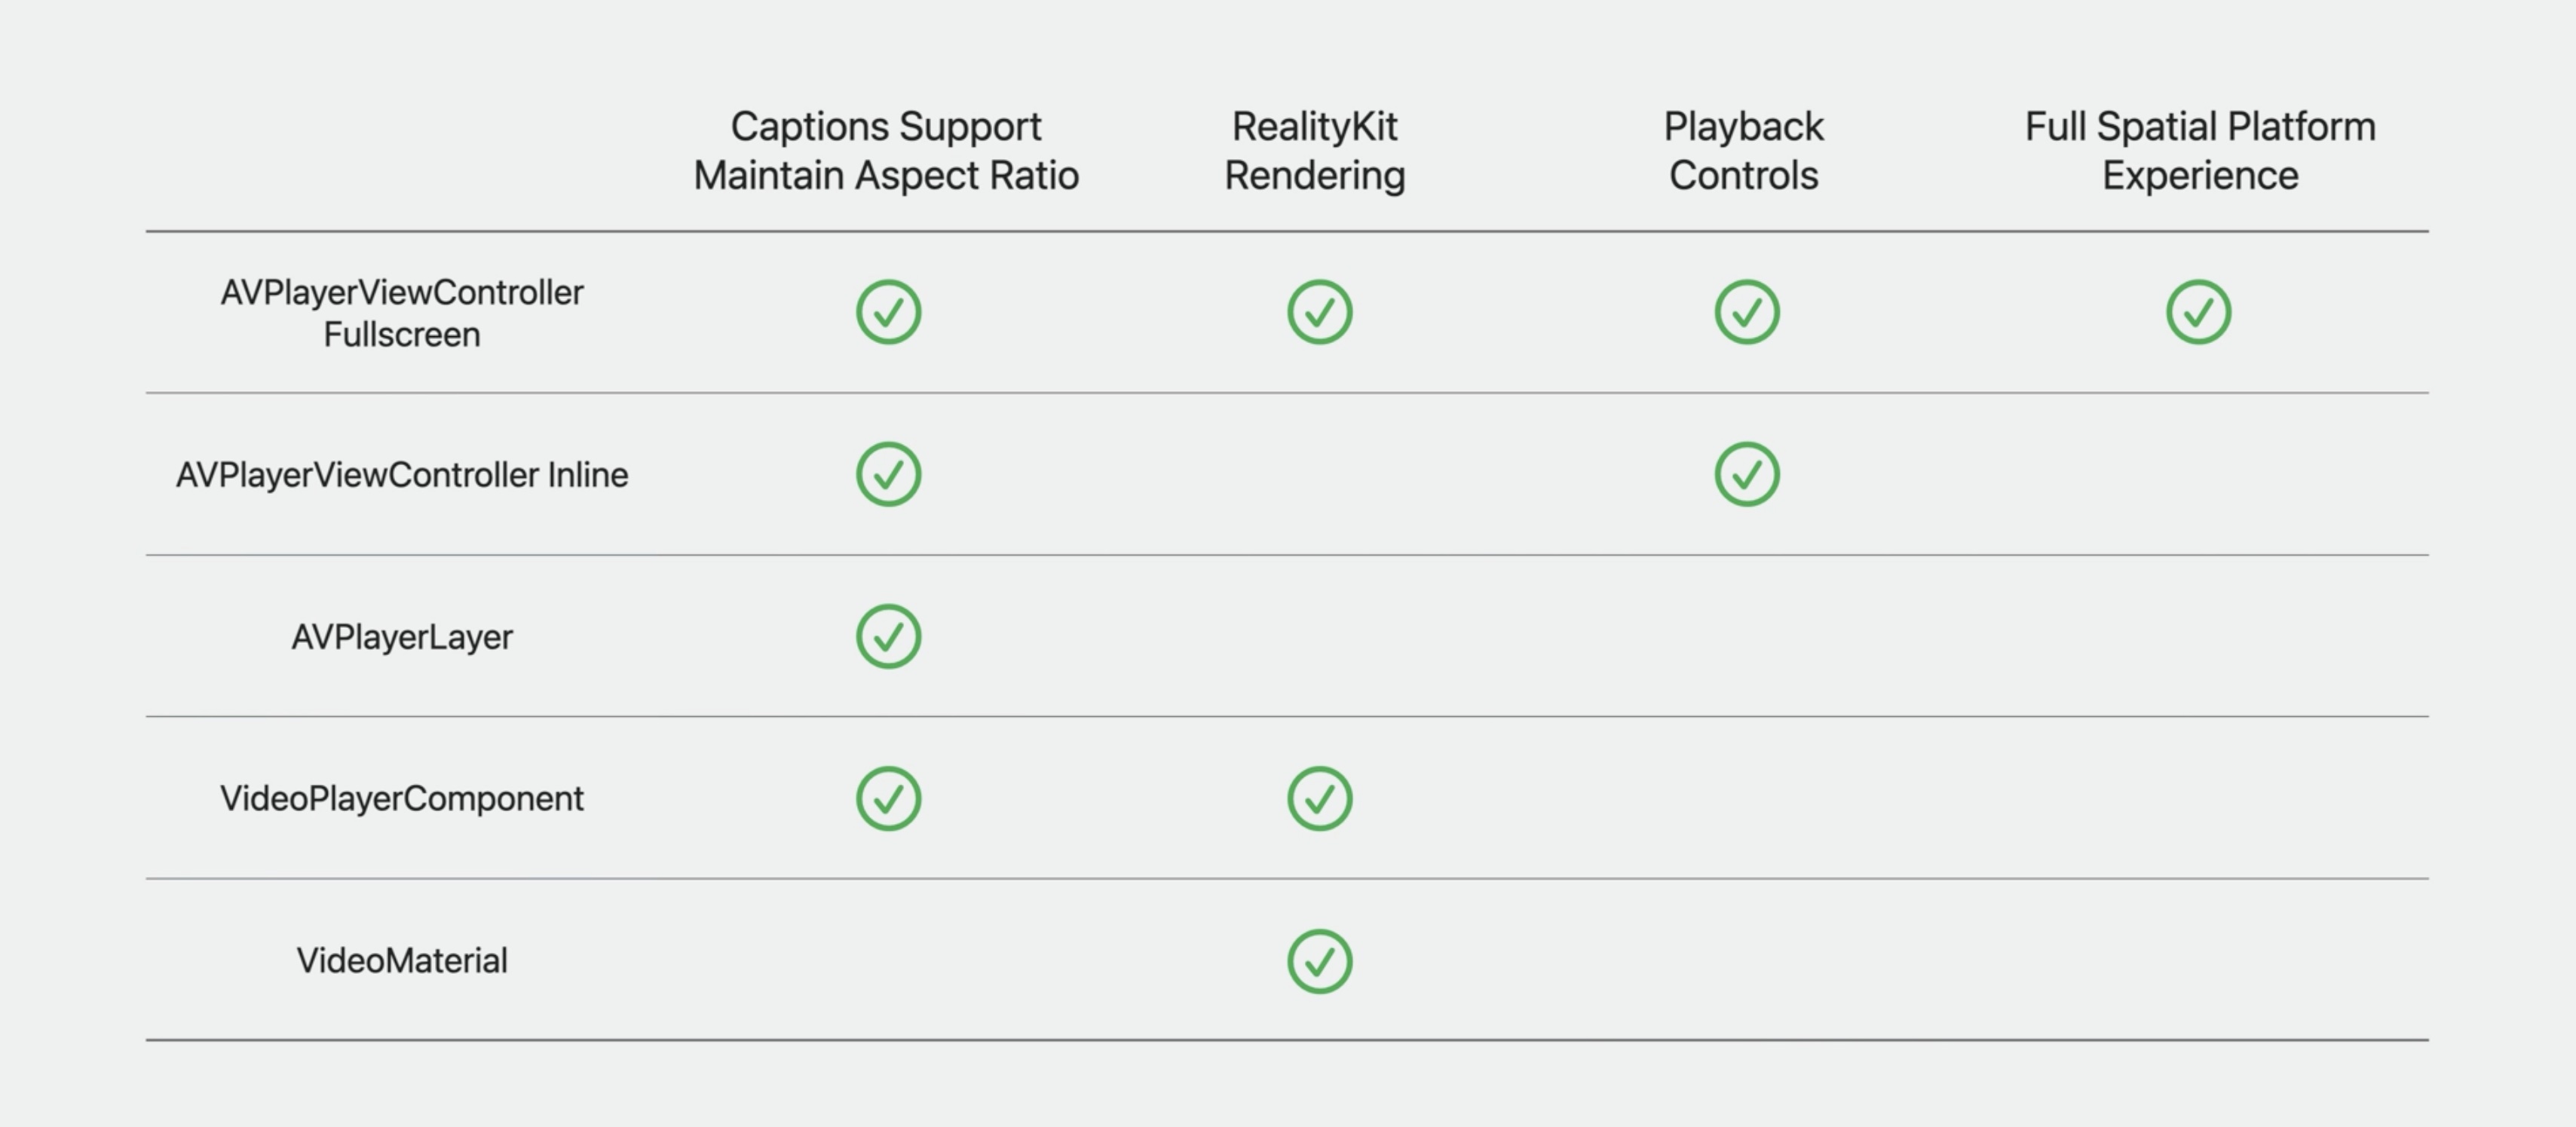
We recommend you use AVPlayerViewController. You can hide the controls and supply an overlay for your custom UI. This is preferred over using a lower-level API because, as we've demonstrated, AVPlayerViewController provides a lot of system integration features beyond just playback controls.
showsPlaybackControls = false
Otheer Use Cases
Sometimes you want a movie to play inline in a window. It could be part of a document or to play a preview. AVPlayerViewController inline is great for this situation too. How do you get the inline view? It will automatically use this mode whenever it's displayed without filling the window. Its inline controls are also redesigned for the OS. Note, because video is composited within the window using AVPlayerLayer, it won't be able to display 3D video.
RealityKit entity video
Sometimes your app may want to play video as an entity of a 3D scene. It could be a splash screen or a video transition. In these cases, you don't want playback controls and you also don't want system integration like docking. For those cases, use RealityKit's VideoPlayerComponent. VideoPlayerComponent connects a RealityKit Entity to an AVPlayer. You can position it in your RealityKit scene just like any other entity. It creates an aspect ratio correct mesh for the video, and it supports displaying captions.
Whenever possible, prefer it over AVPlayerLayer.
Because it takes advantage of RealityKit's optimizations for video, it gets better performance than AVPlayerLayer, and it supports new 3D video formats.
Refer to this session for more details.
Enhance your Spatial Computing App with RealityKit - WWDC23
Video Effects
Sometimes you may want to use video in a 3D scene where the video is used as an effect. In this case, you may want to create your own geometry and have more control over how the video is displayed. VideoMaterial is a lower-level API that will display video on arbitrary geometry. This means it can't ensure the original aspect ratio and it doesn't have the ability to display captions.

Check out this related talk for more details.
What's new in RealityKit - WWDC20
We've talked about some additional UI features and some other use cases. The DestinationVideo sample app demonstrates some of these features. It has a video browser for choosing videos and plays them in an Immersive Space. Here it is. Choose a video to show the info page and an Immersive Space opens. Notice the use of an inline player with custom UI controls for the preview. Then, play the movie. The player UI appears and immediately docks into the Immersive Space at a fixed size and location for optimal viewing. Another nice detail is that when the screen is docked in an Immersive Space like this, the playback controls detach and come a little closer to make them more convenient to interact with. Tap the list button. The app has supplied custom info view controllers to display more info about the content and related content while watching the video. Near the end of the video, a contextual action button labeled Play Next appears in the bottom-right corner.
We've covered the spatial experience for video playback. It has a large screen floating in space in front of you with beautiful visuals and great spatial audio. It includes playback controls for everything you need to do, and we've talked about some other playback use cases.
There are several ways to display video in your app. Let's compare them. These are the APIs to show video. Each has different capabilities.
Spatial media capabilities represent an opportunity for people to experience video in a whole new way.
To recap:
To get started, check out DestinationVideo Sample Project. Sample Project: DestinationVideo
It demonstrates many of the features discussed here.
Check out also
Deliver video content for spatial experiences - WWDC23
What's new in HLS interstitials - WWDC22
What's new in AVKit - WWDC21
Enhance your Spatial Computing App with RealityKit - WWDC23
What's new in RealityKit - WWDC20
Sample Project: DestinationVideo
 Twitter
 GitHub
 iosdev.space