What's new in MapKit
 laurent b
Description: Come along with us as MapKit enters a new dimension. We'll show you how you can upgrade your app to use the latest map and support the highly-detailed 3D City Experience. Learn how you can visualize data using overlays while ensuring they integrate smoothly into the 3D map. We’ll also cover how to create interactive and immersive experiences with Selectable Map Features and Look Around APIs.
Originally launched with U.S. support, the all-new map and Look Around coverage has been expanding since and now includes Canada, many European countries, Japan, and more.
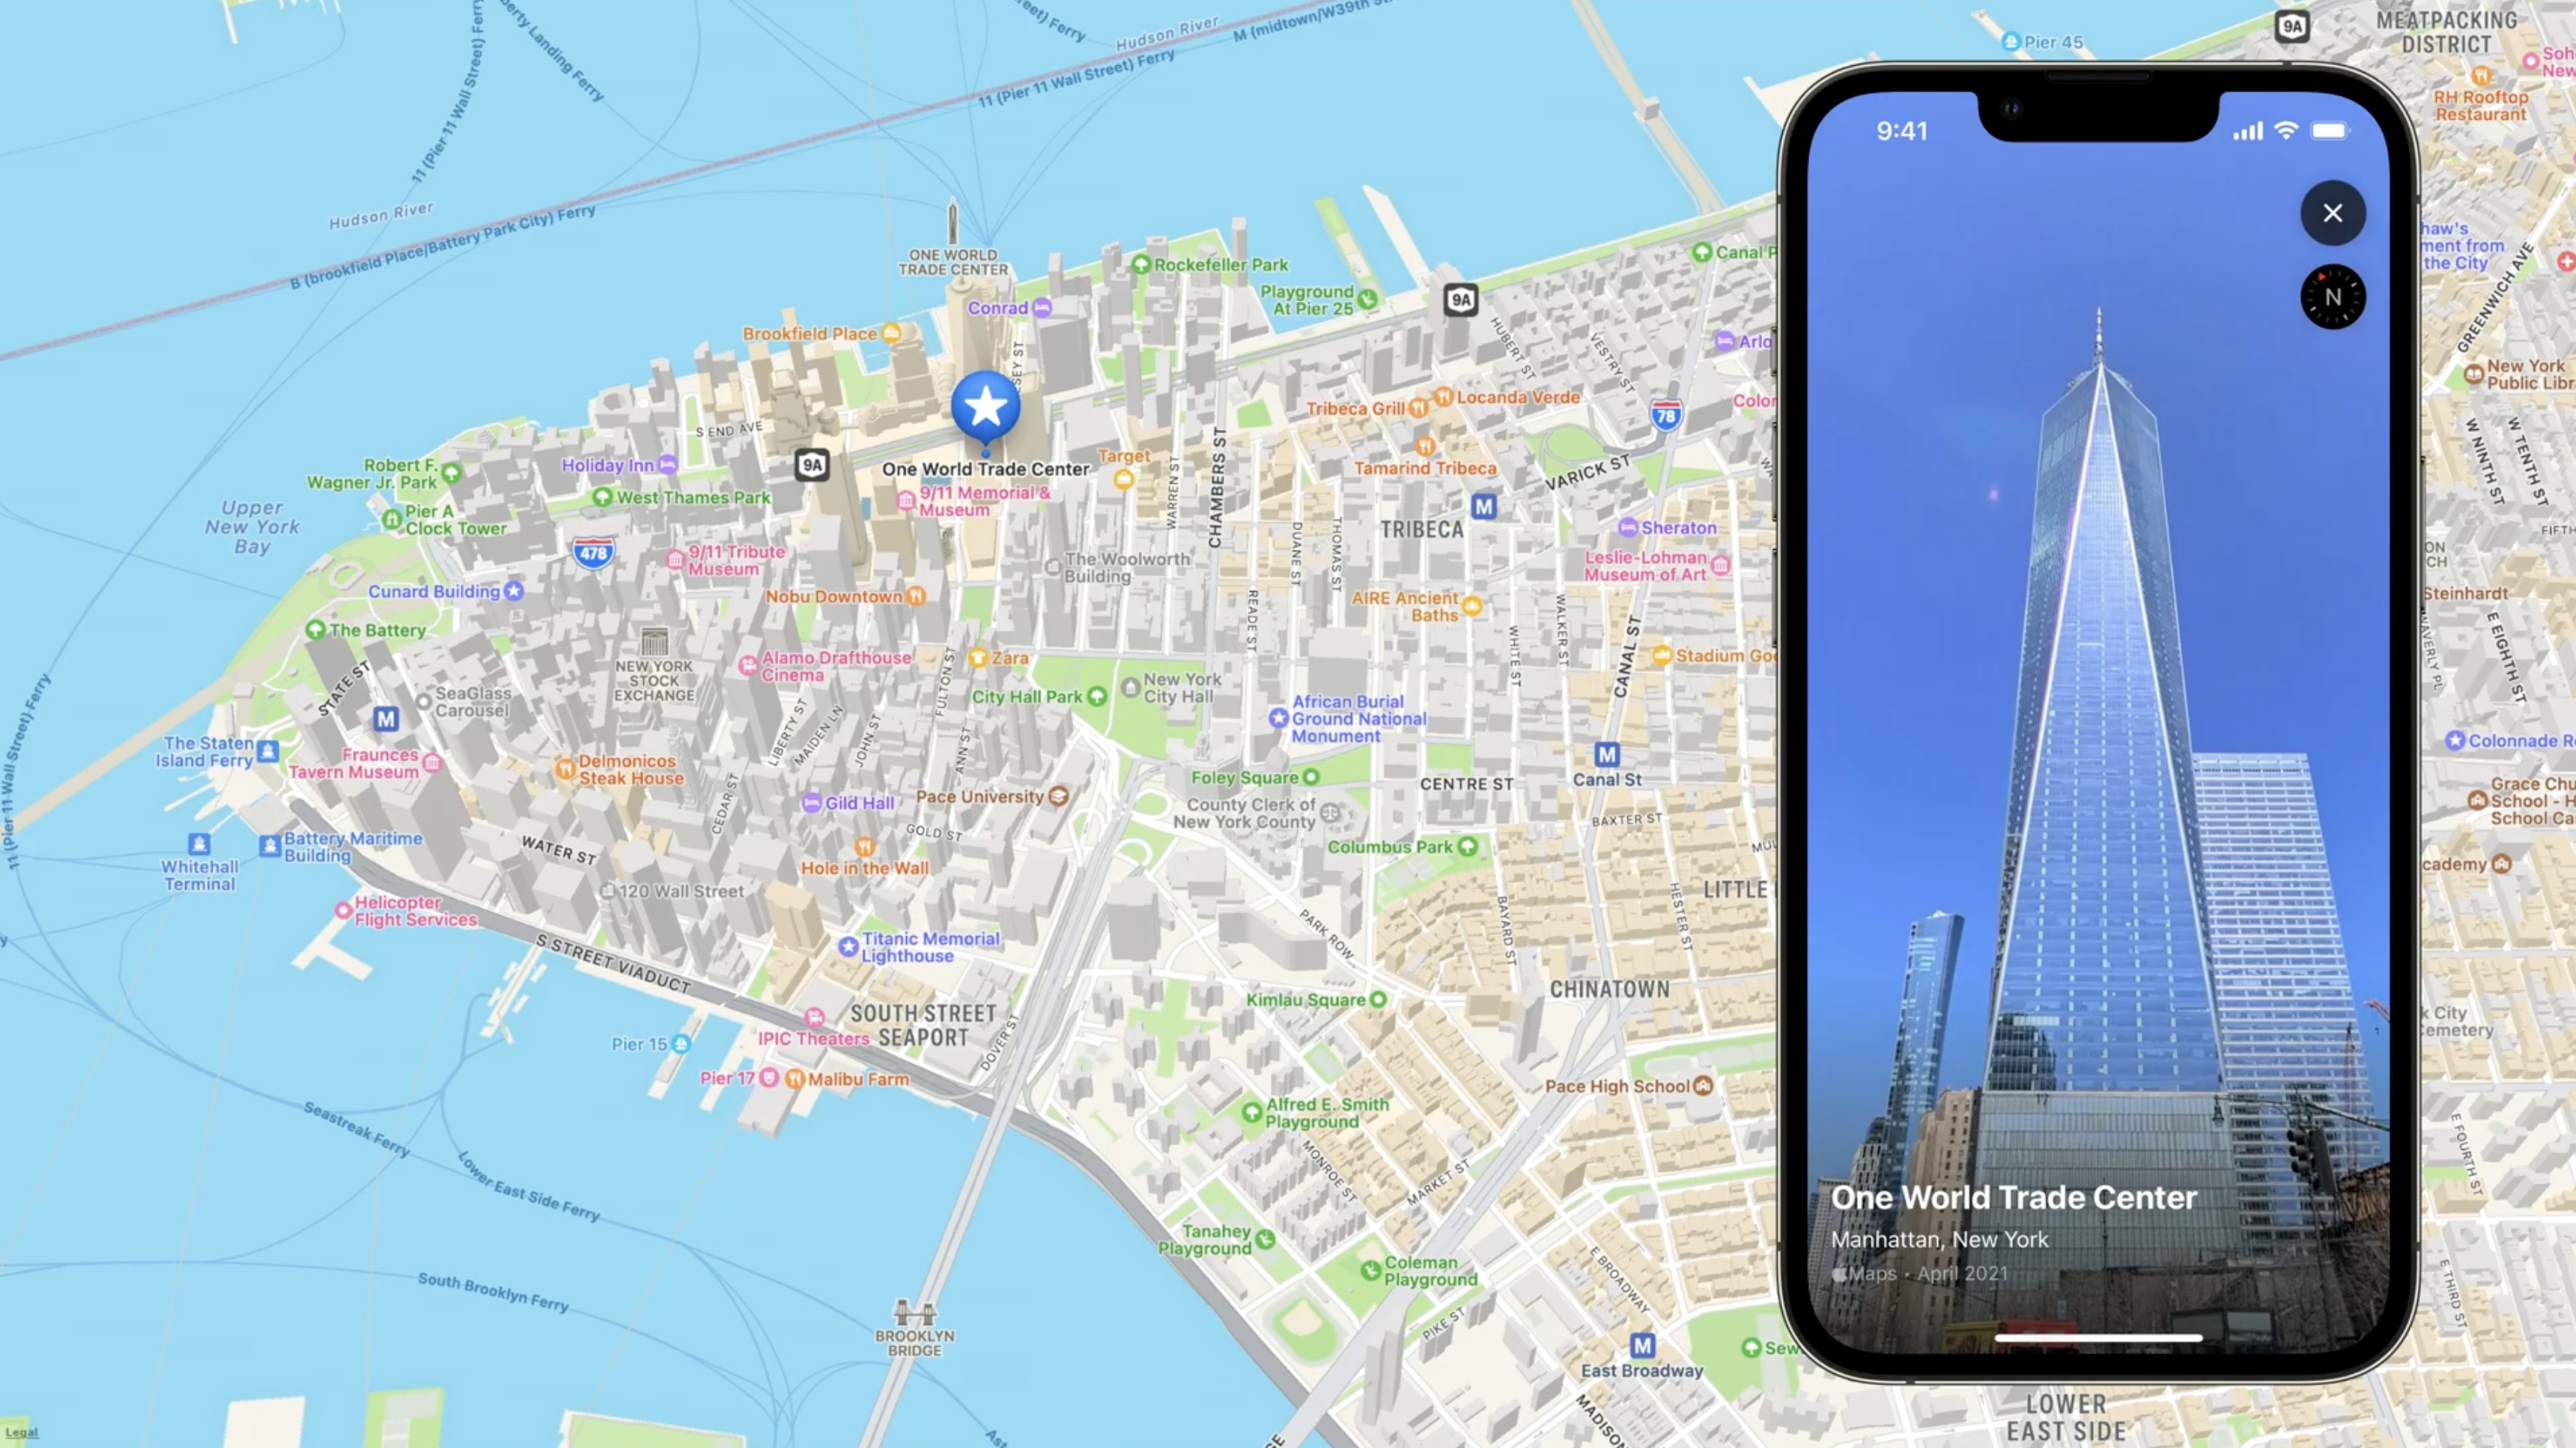
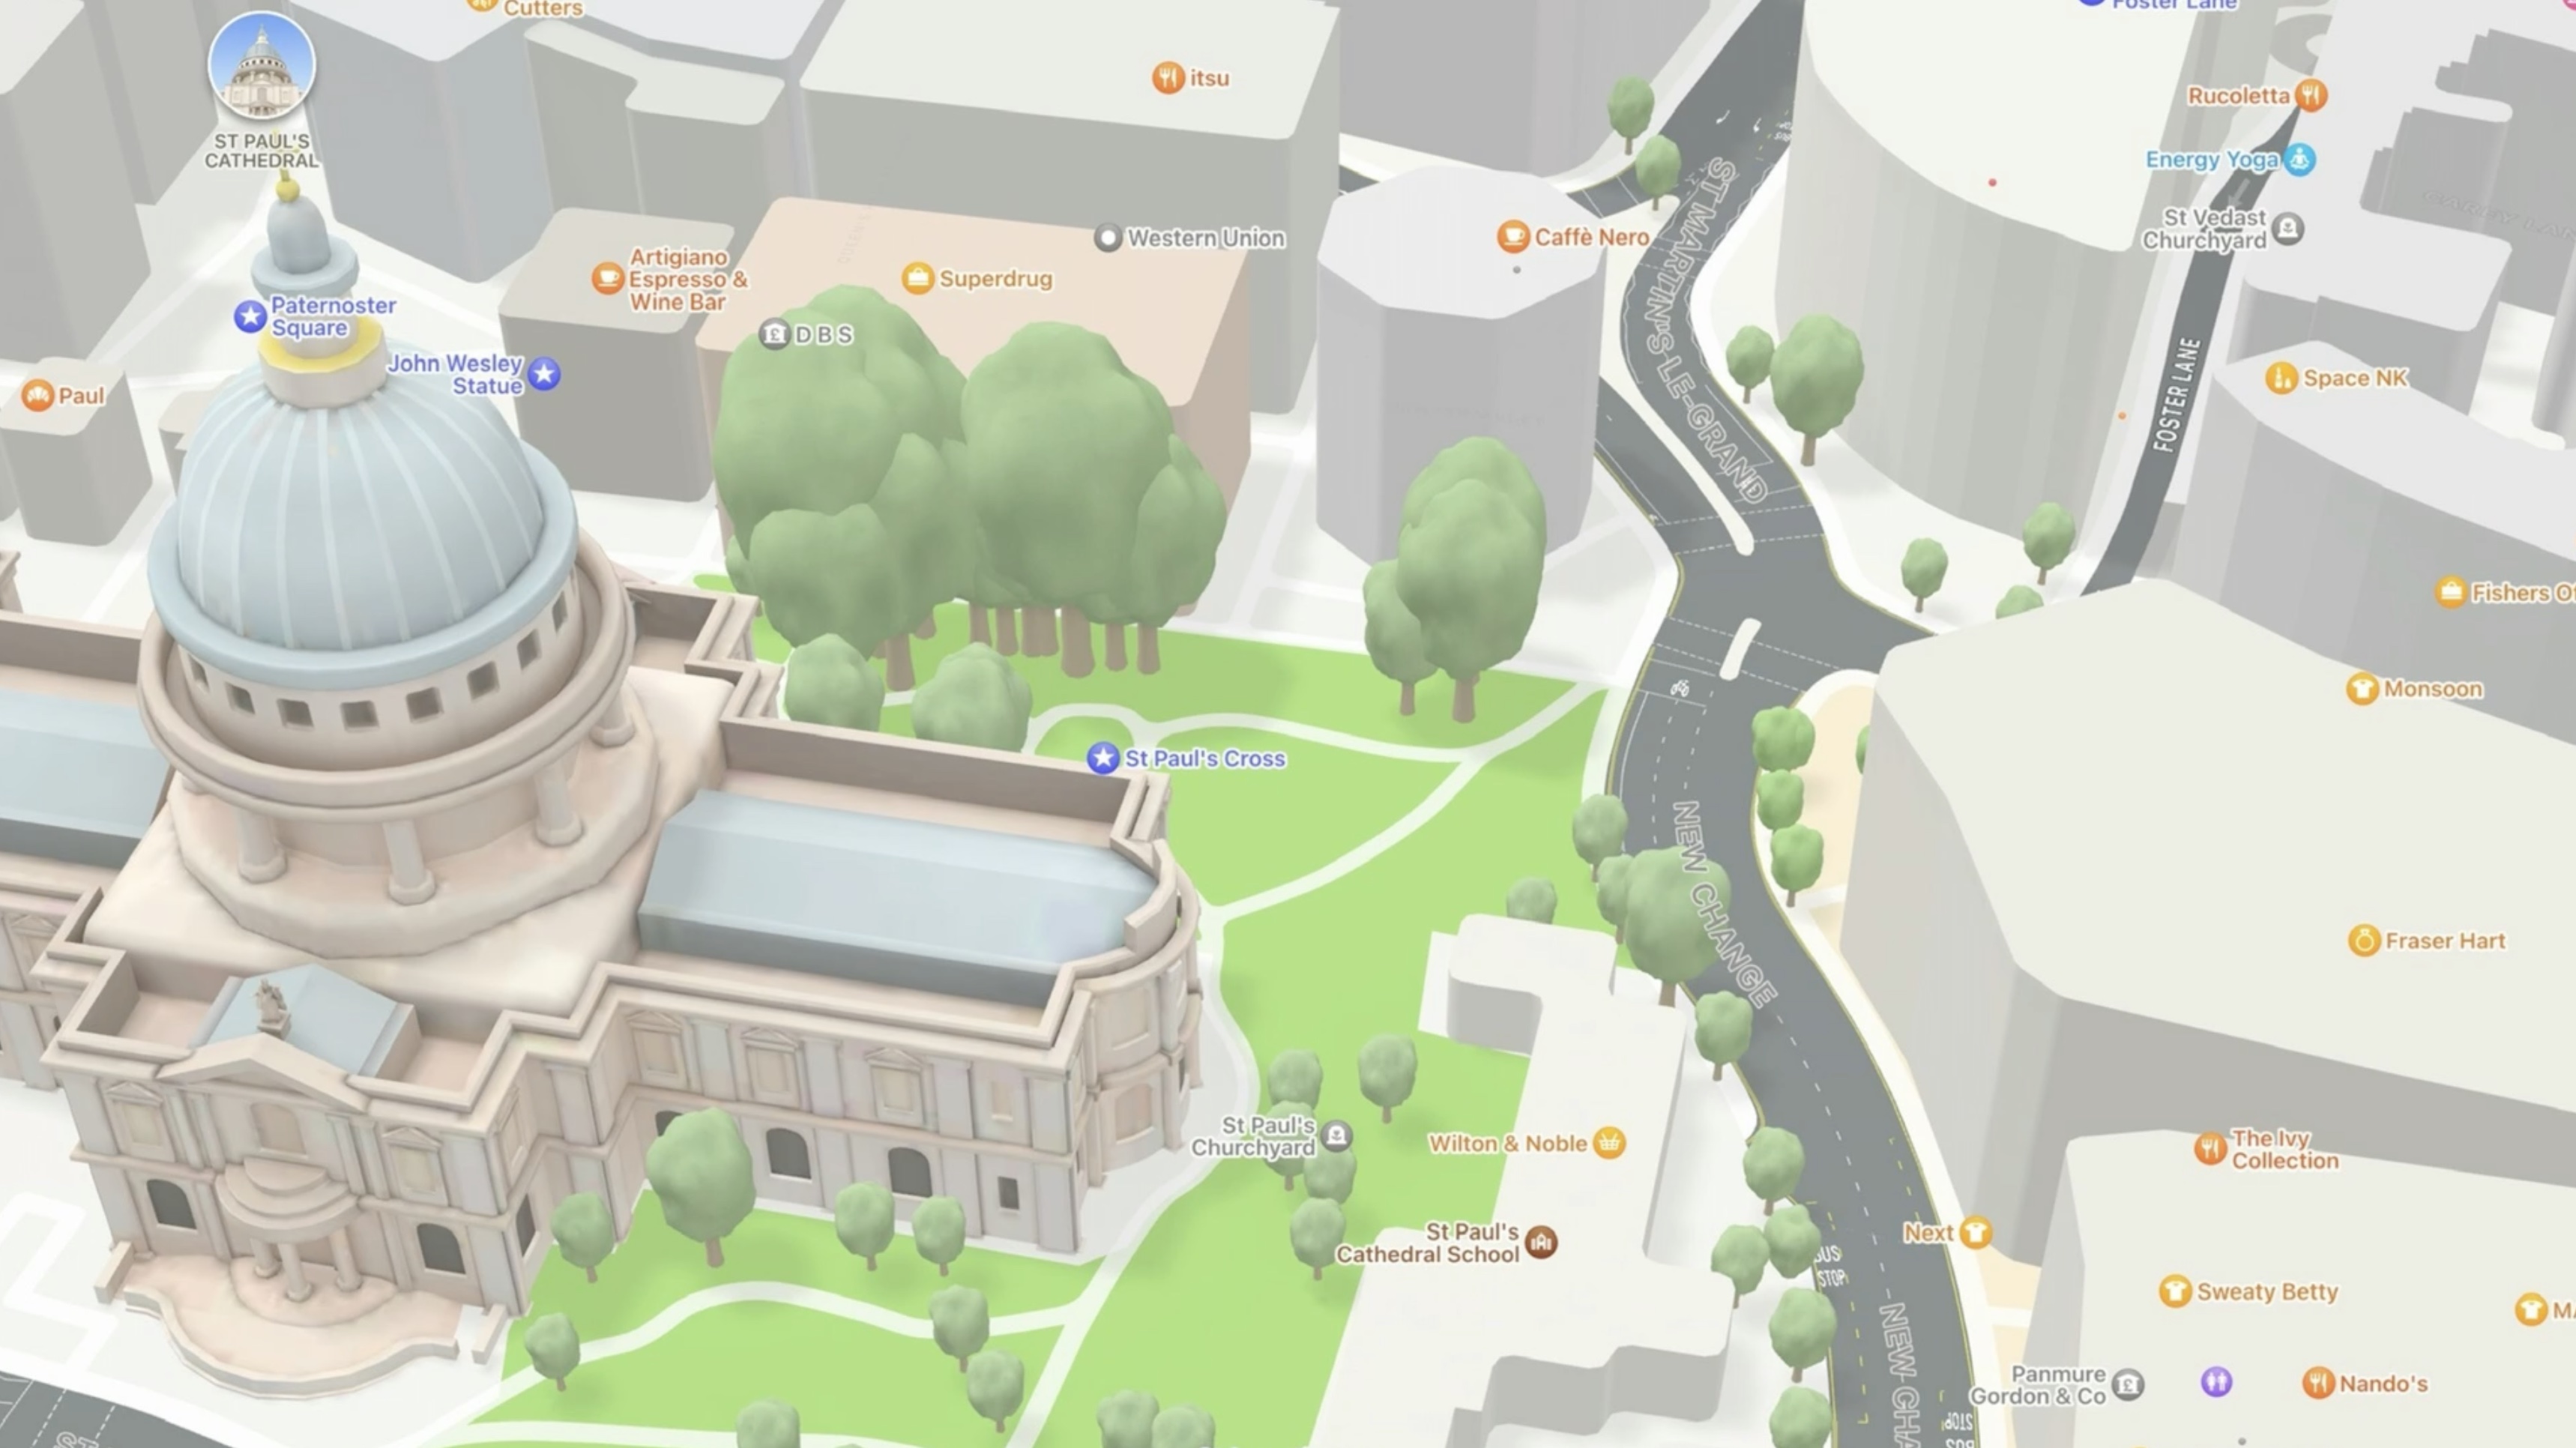
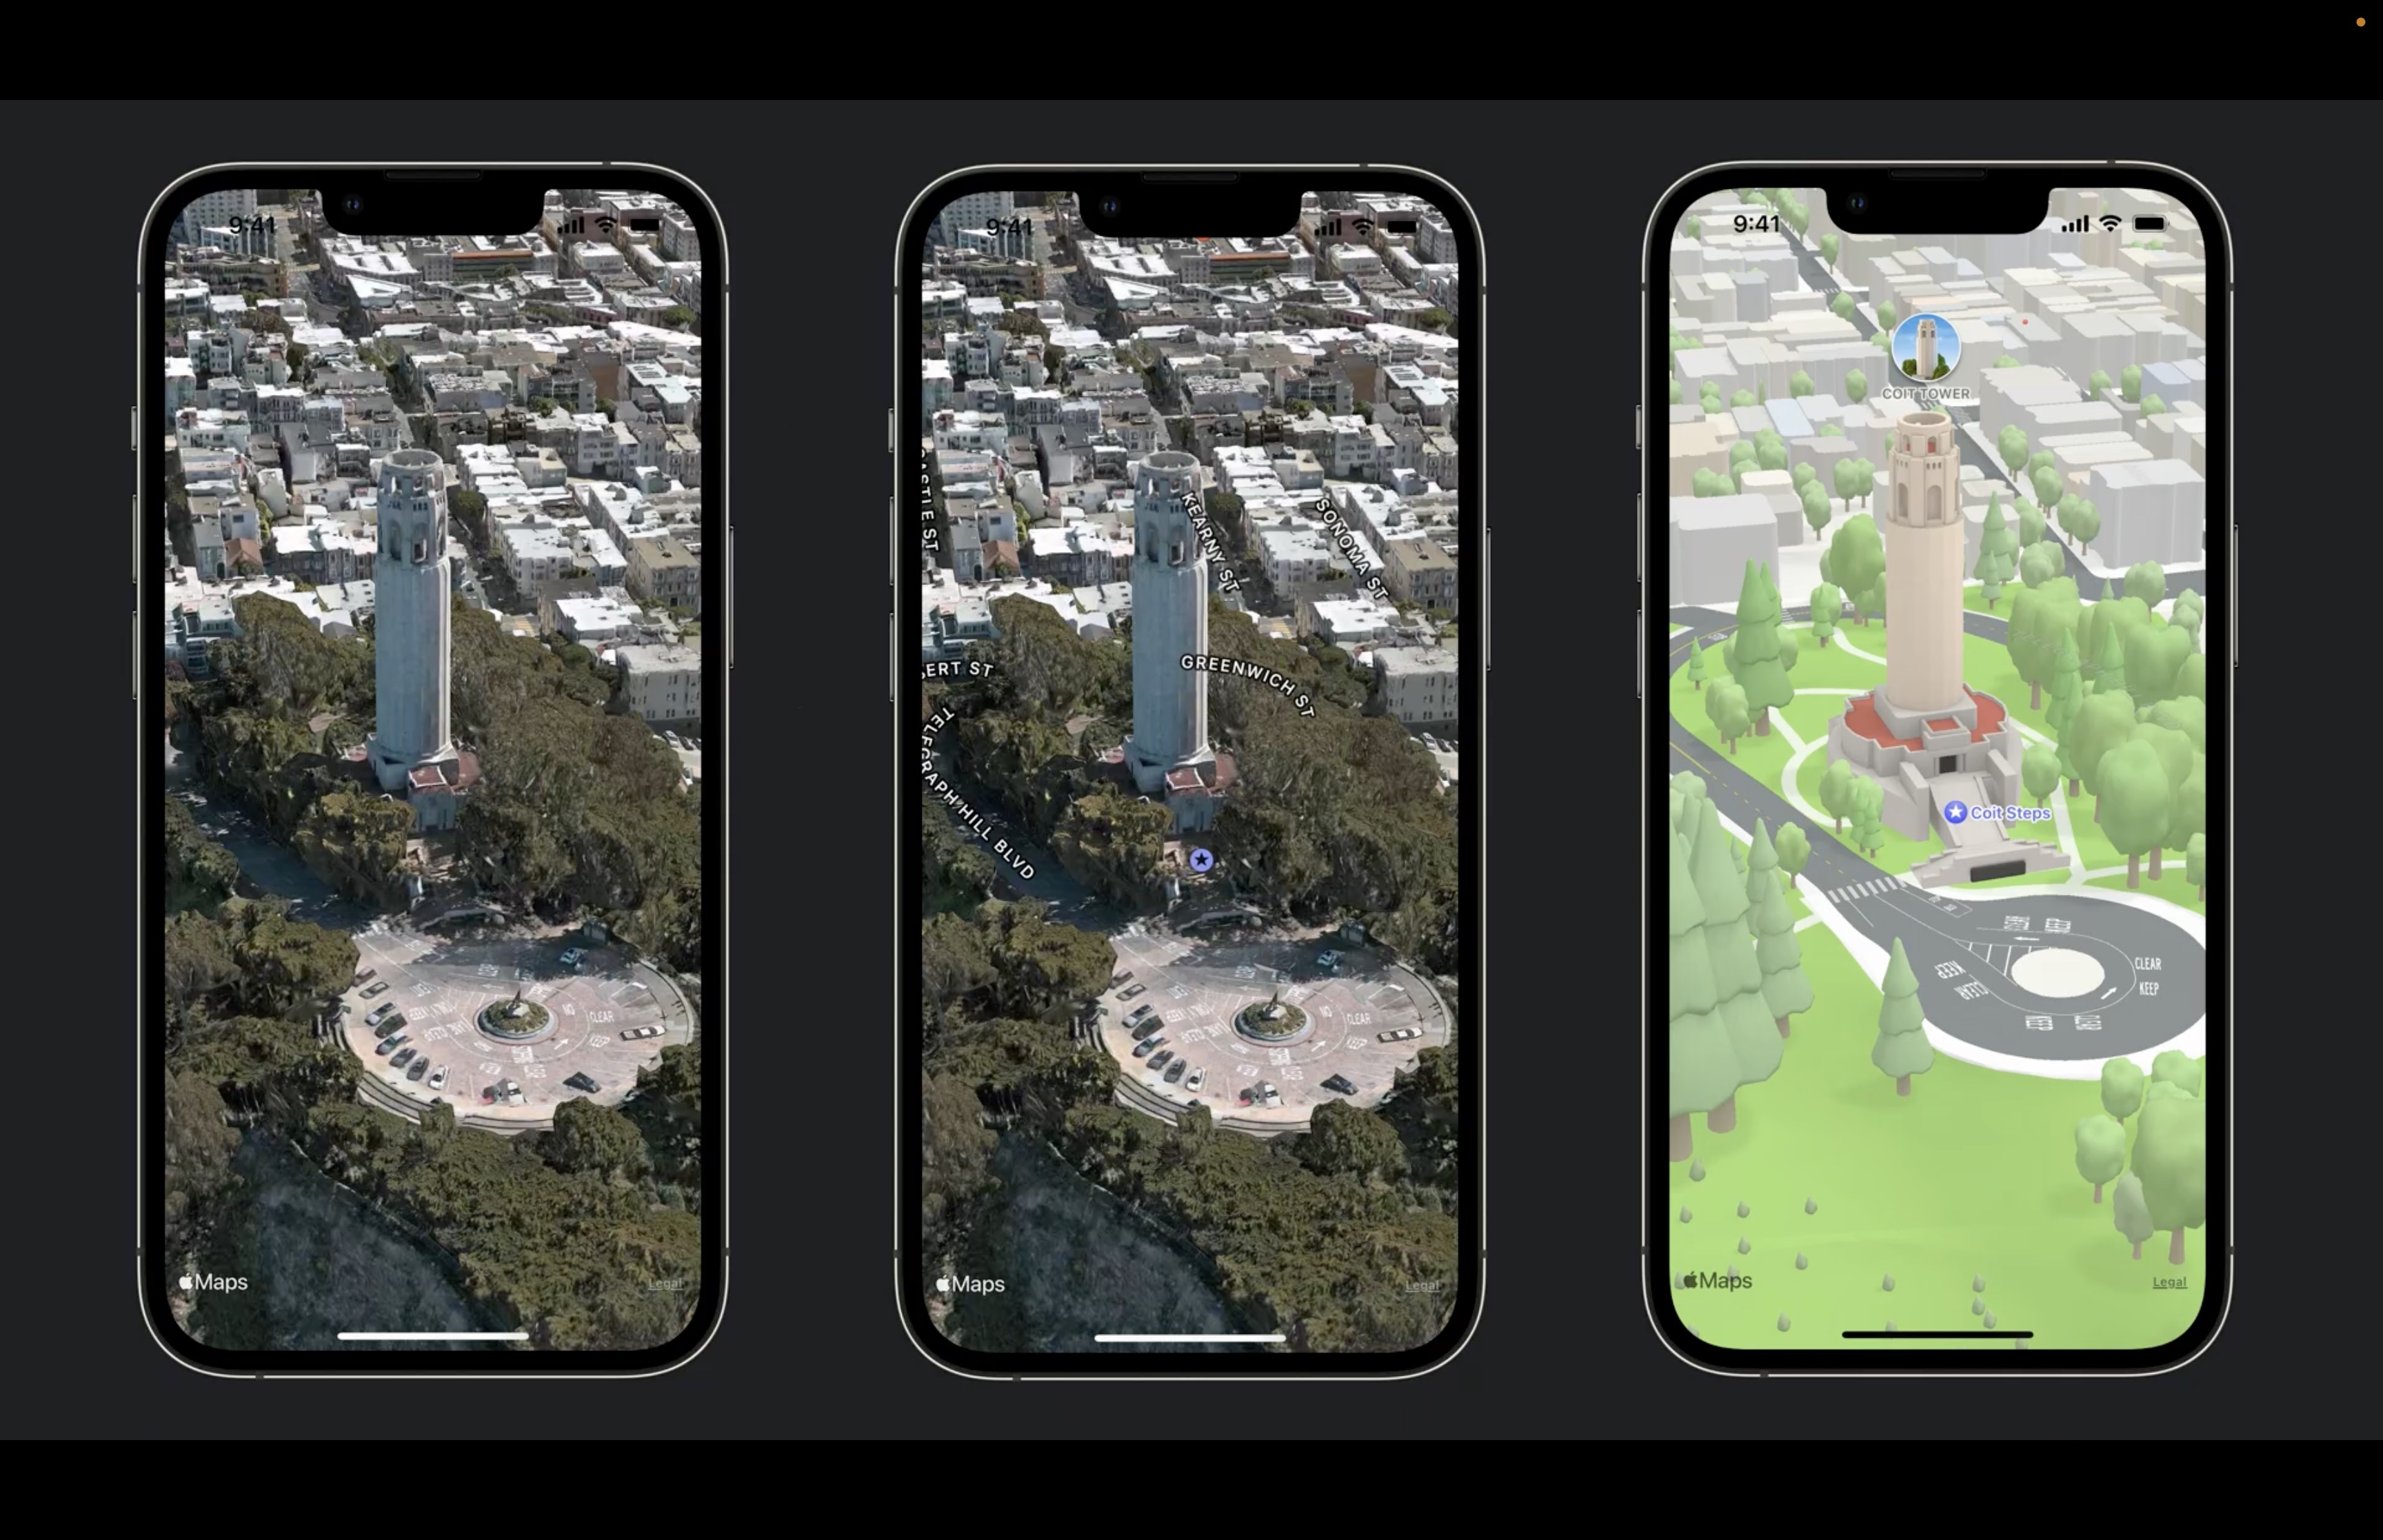
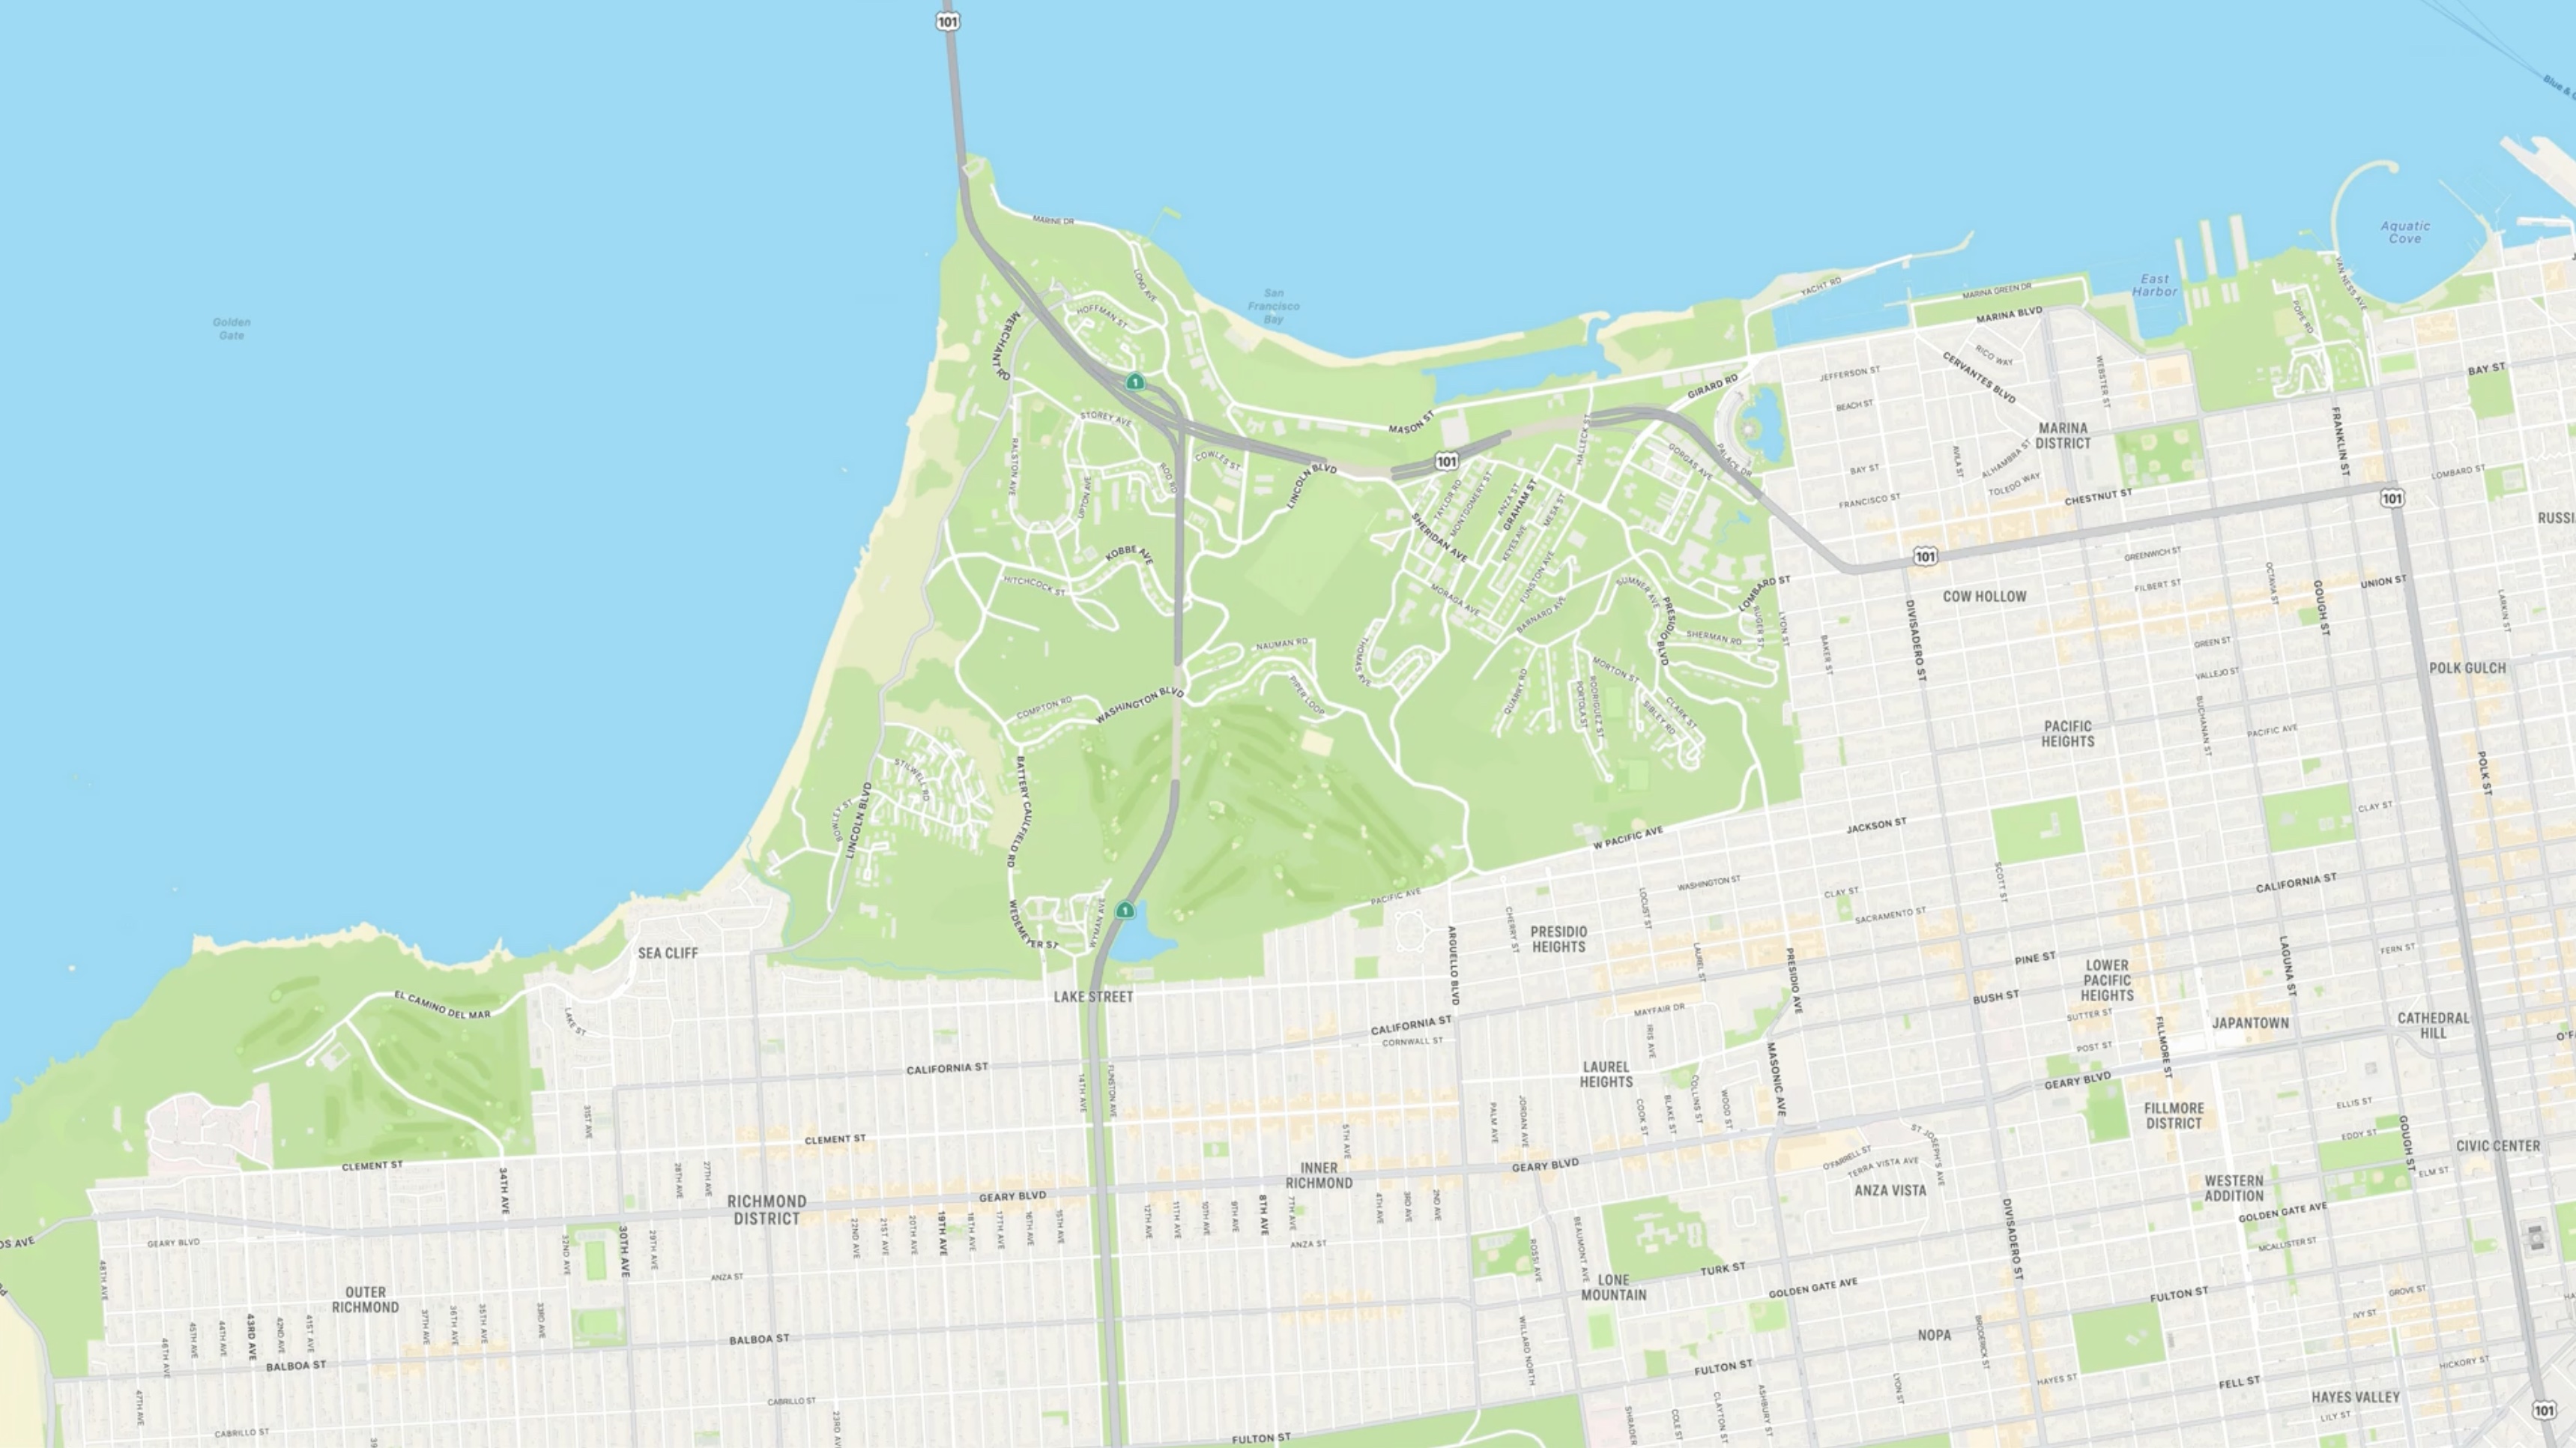
Last year, Apple Maps introduced the 3D City Experiences, featuring turn lanes, crosswalks, bike lanes, and handcrafted 3D landmarks like the Ferry Building.

The additional detail of the map allows to provide context and precision and a high level of realism.
New MapKit features.
- The Map Configuration API.
- Improvements to the overlay APIs
- New blend modes support
- brand-new Selectable Map Features API.
- Integrating the immersive Look Around experience
Map Configuration API.
To adopt the all-new map is easy and we just need to recompile our app with the new SDK; it will be automatically opted in to the all-new Apple map, including the 3D City Experience, where available.
In iOS 15, the way to configure the map is through various properties on MKMapView. In iOS 16, however, those properties are being softly deprecated.
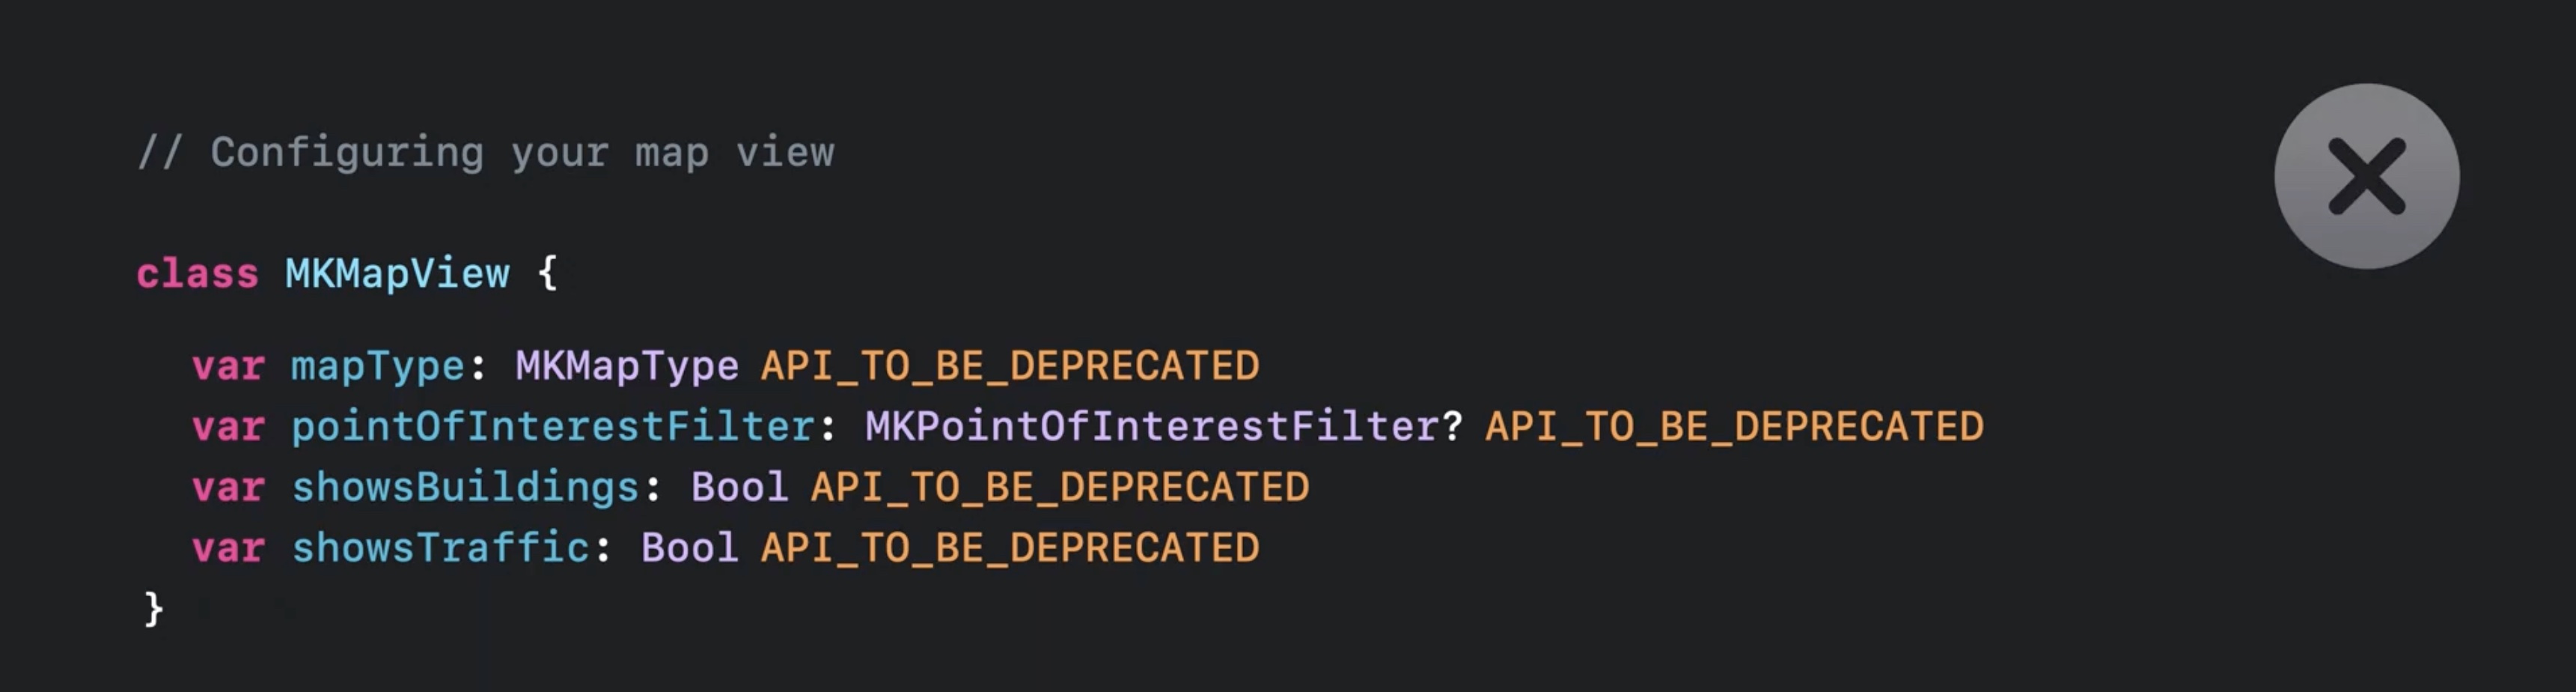
and a new Map Configuration API is being introduced as a replacement.
// Configuring your map view
class MKMapView {
    ...
    var preferredConfiguration: MKMapConfiguration
}
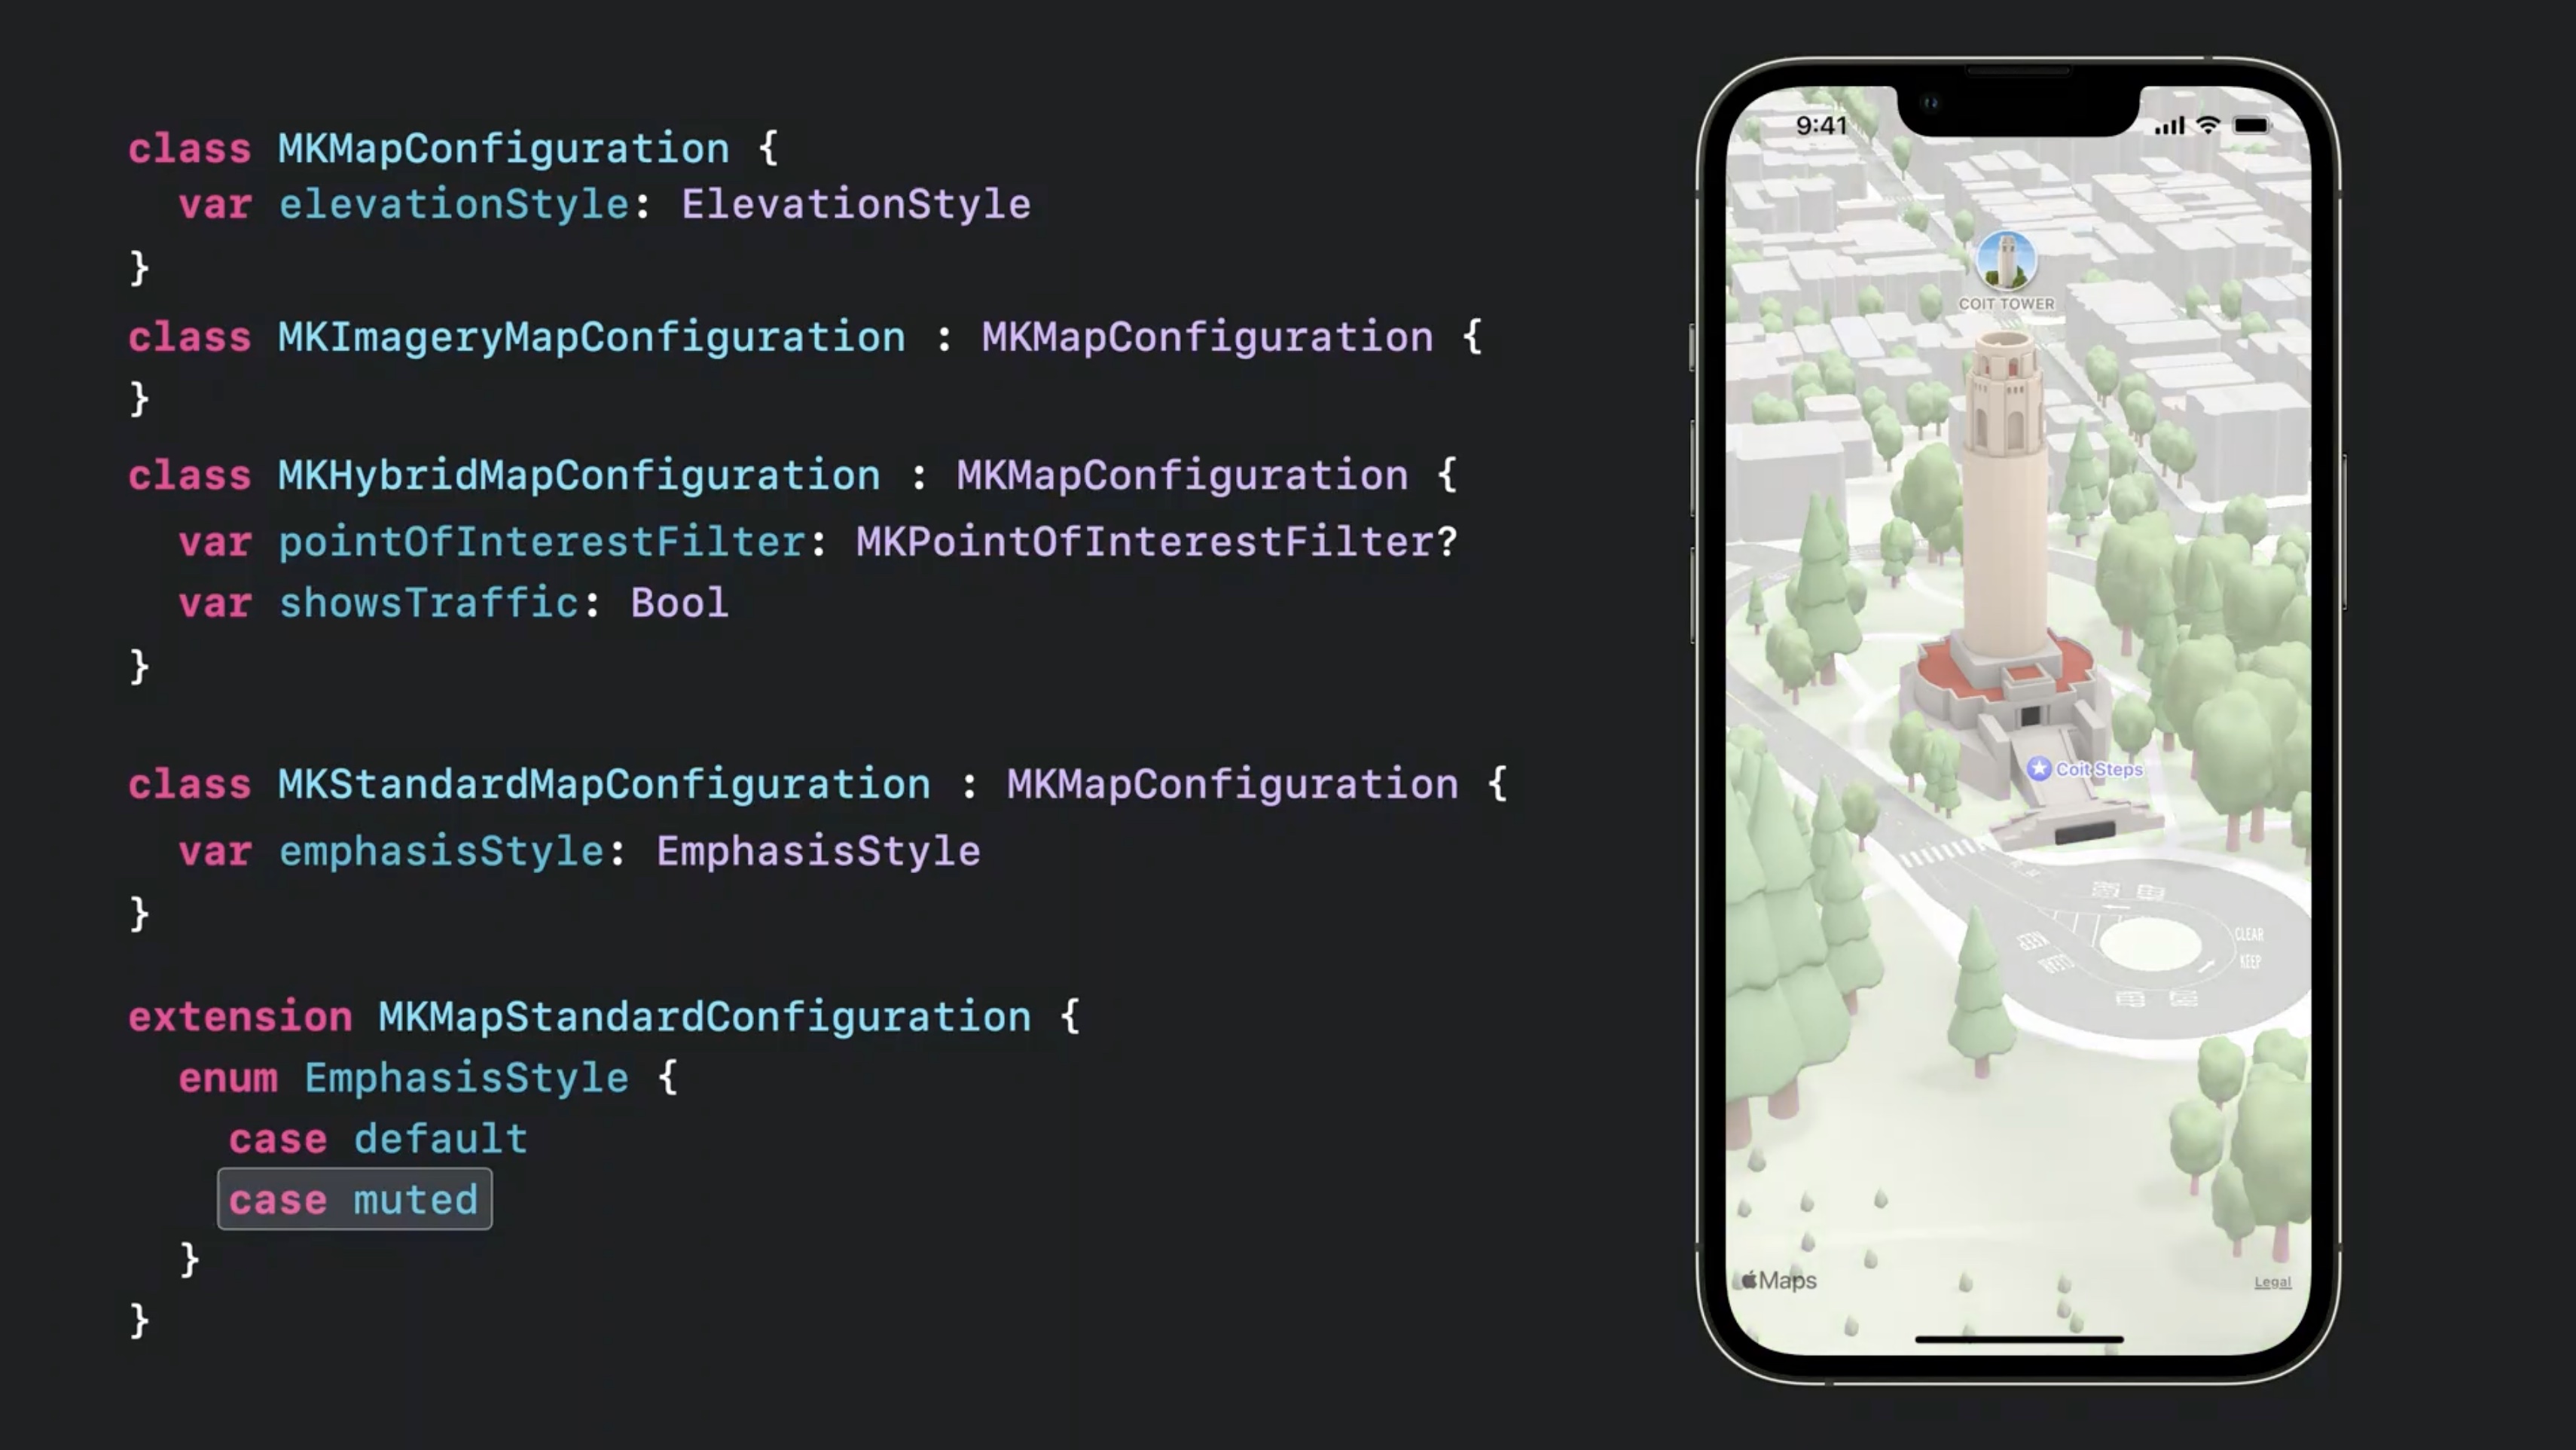
MKMapConfiguration is the central class of the new Map Configuration API. MKMapConfiguration is an abstract base class with three concrete subclasses.
class MKMapConfiguration {
}

class MKImageryMapConfiguration : MKMapConfiguration {
}

class MKHybridMapConfiguration : MKMapConfiguration {
}

class MKStandardMapConfiguration : MKMapConfiguration {
}
- The imagery map configuration is used to present satellite-style imagery.
- The hybrid map configuration is used to present an imagery-based map with added map features such as road labels and points of interest.
- The standard map configuration is used to present a fully graphics-based map.
The elevation style property.
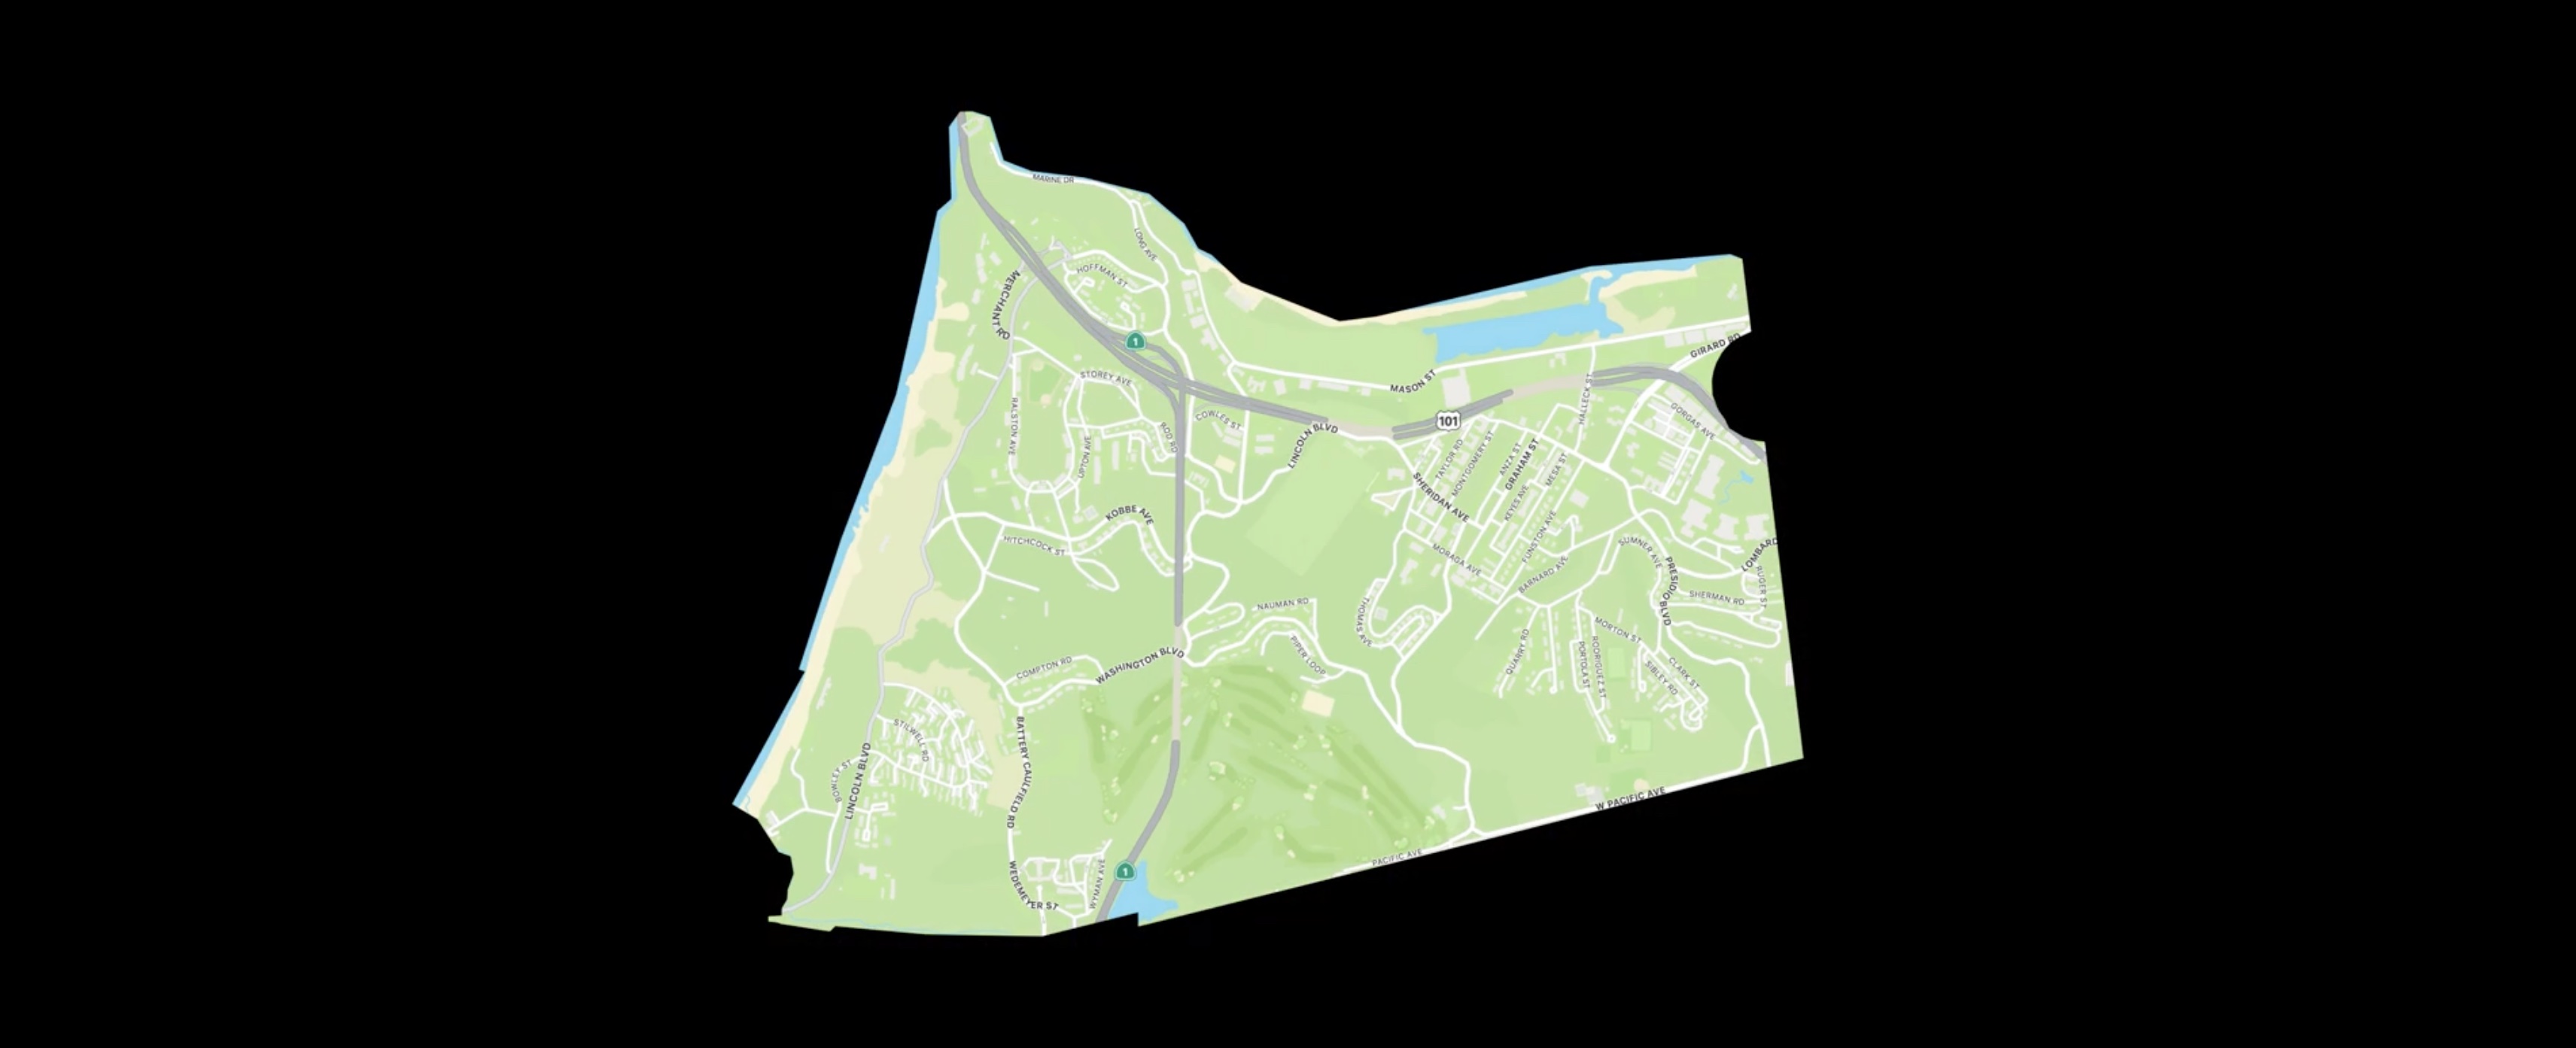
The base map configuration class supports an elevationStyle property, which can be either flat or realistic. A flat elevation style means that the ground appears flat. Roads, including bridges and overpasses, also appear flat.
Flat is the default elevation style. A realistic elevation style means that the ground terrain reproduces the real-world elevation such as hills and mountains. Roads are depicted with realistic elevation details.
class MKMapConfiguration {
    var elevationStyle: ElevationStyle
}

extension MKMapConfiguration {
    enum ElevationStyle {
        case flat
        case realistic
    }
}
The map configuration subclasses.
The imagery map configuration only shows satellite imagery with no additional map features, so it doesn't have any other properties.
class MKImageryMapConfiguration : MKMapConfiguration {

}
The hybrid map configuration has additional properties to control filtering of point of interest categories and whether to show traffic or not.
class MKHybridMapConfiguration : MKMapConfiguration {
    var point0fInterestFilter: MKPointOfInterestFilter?
    var showsTraffic: Bool
}
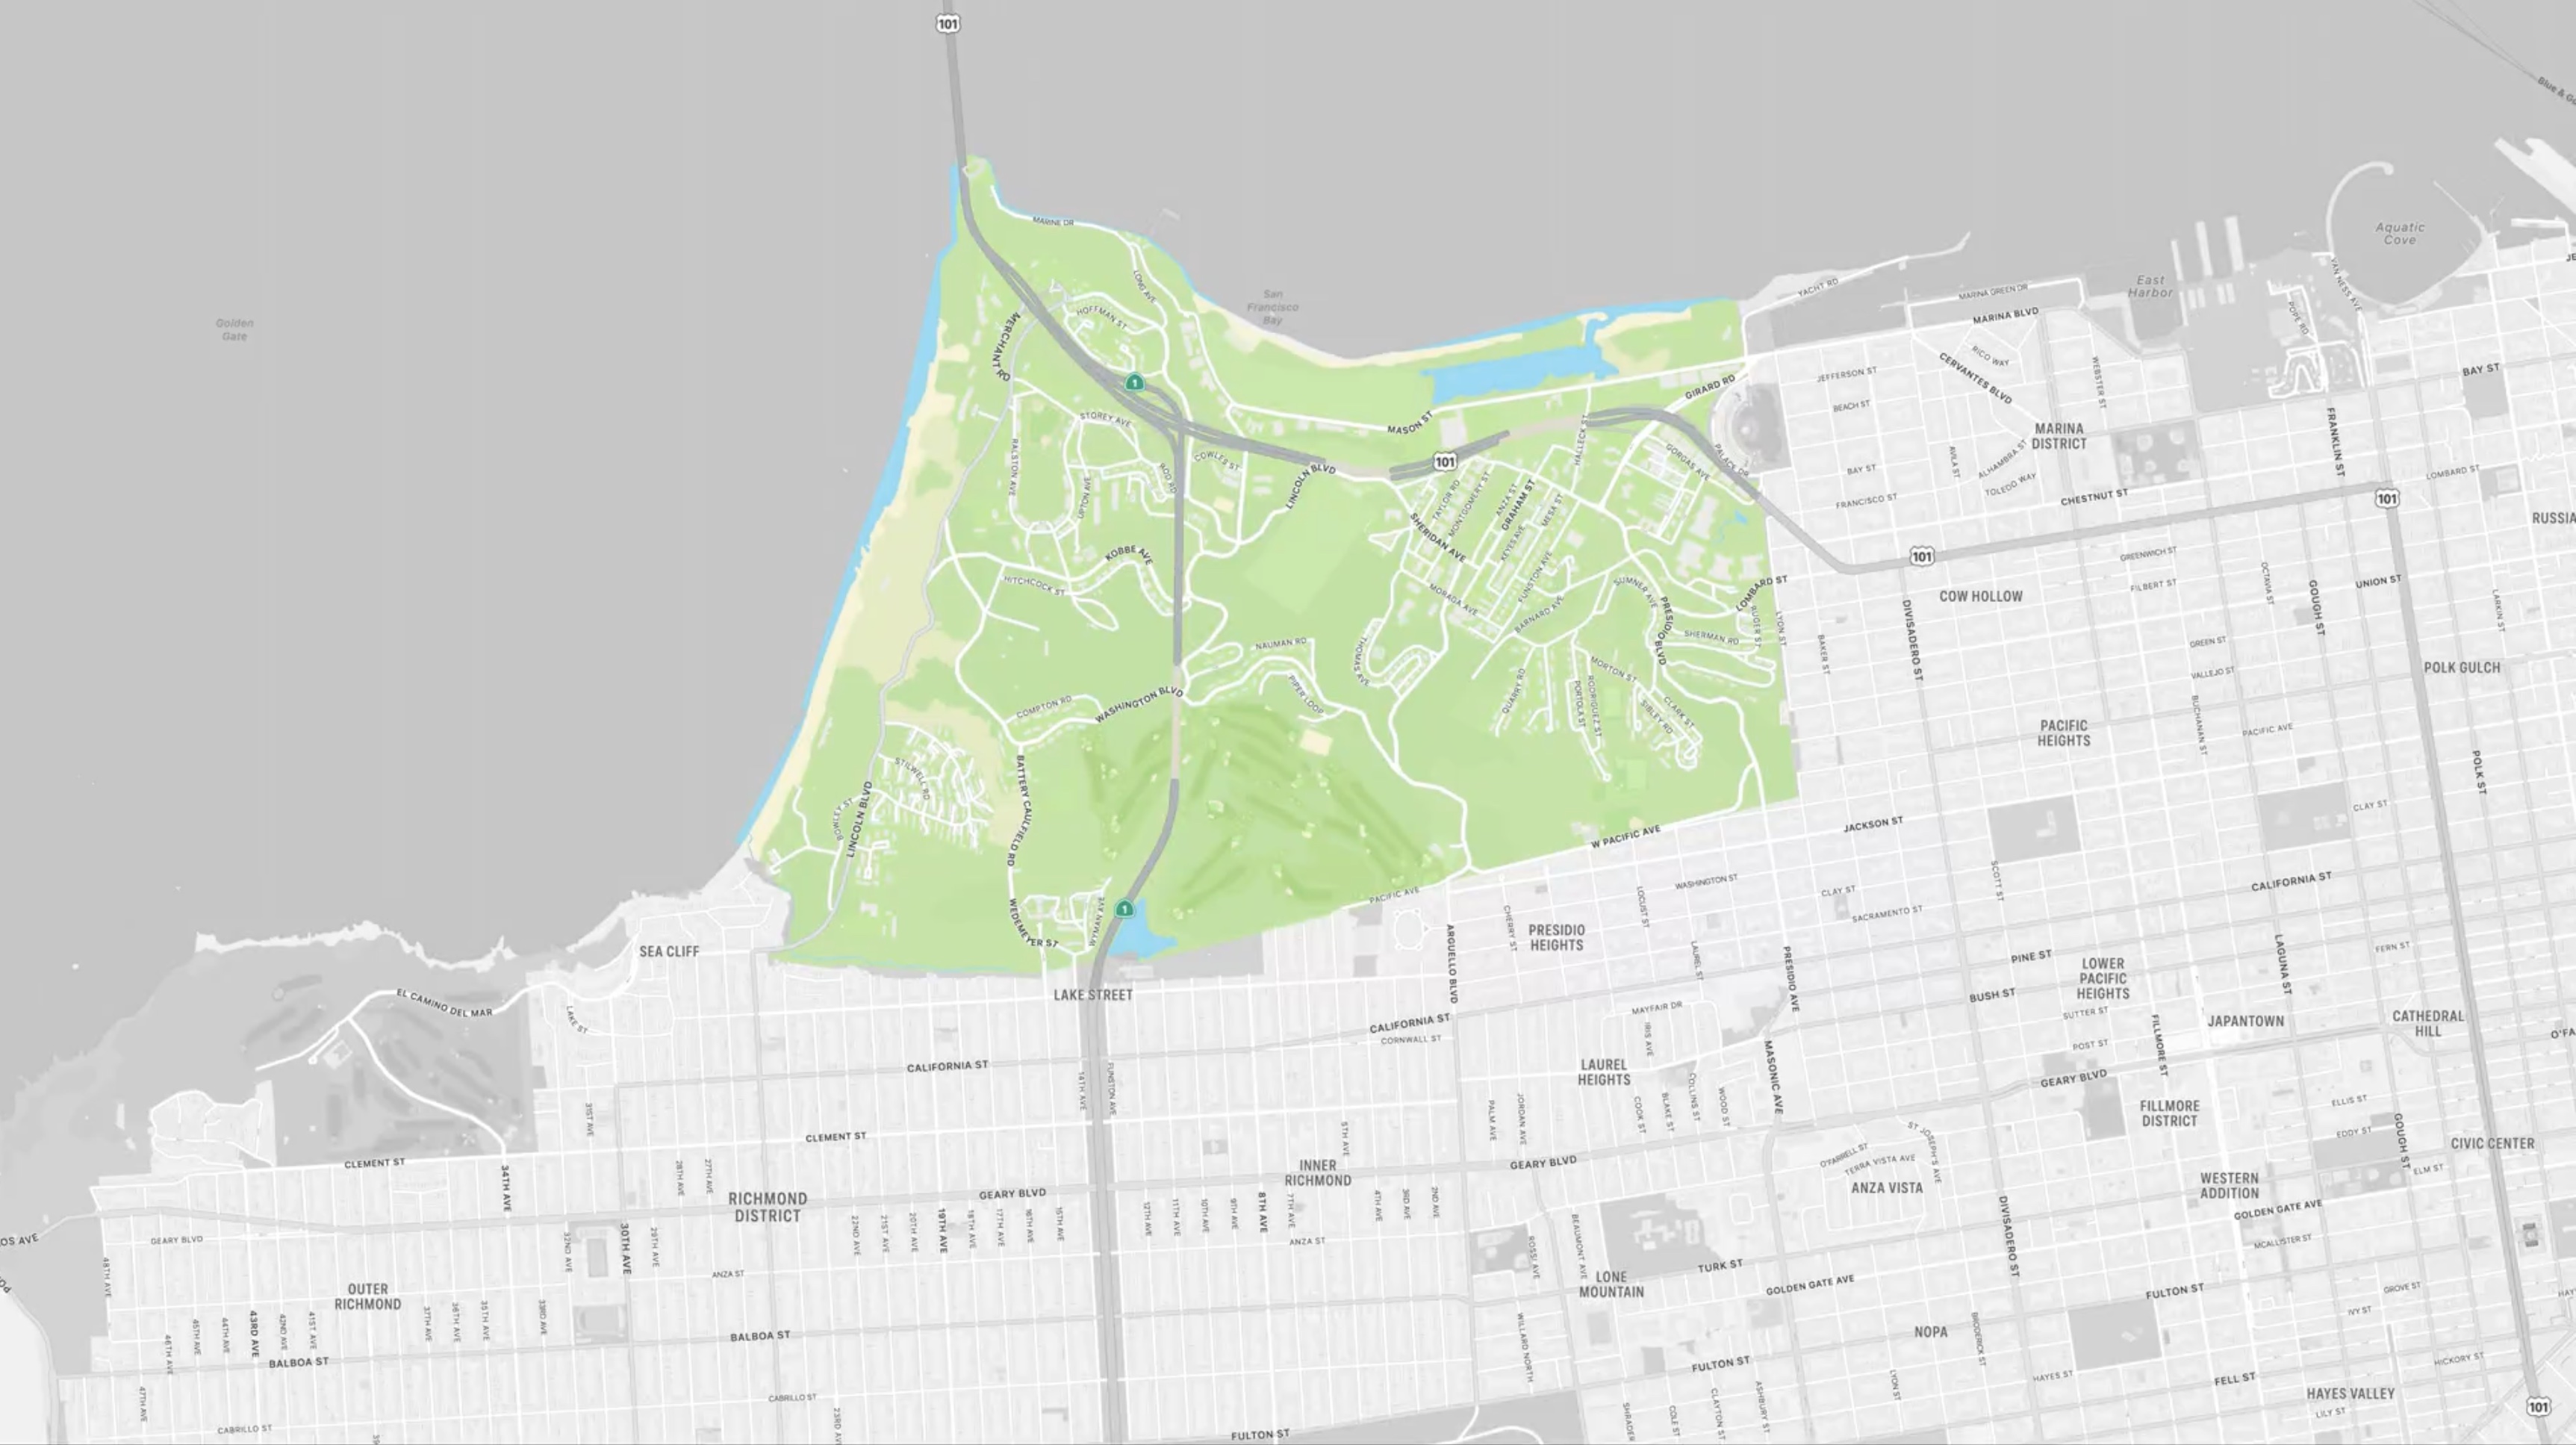
The standard map configuration supports an emphasisStyle property which can be either default or muted.
class MKStandardMapConfiguration : MKMapConfiguration { var emphasisStyle: EmphasisStyle }
As the name implies, this is the default emphasis style unless otherwise stated. The muted emphasis style softens the contrasts of the map details.
The standard map configuration also has additional properties to control filtering of point of interest categories and whether to show traffic or not.
class MKStandardMapConfiguration : MKMapConfiguration {
    var emphasisStyle: EmphasisStyle
    var pointOfInterestFilter: MKPoint0fInterestFilter?
    var showsTraffic: Bool
}
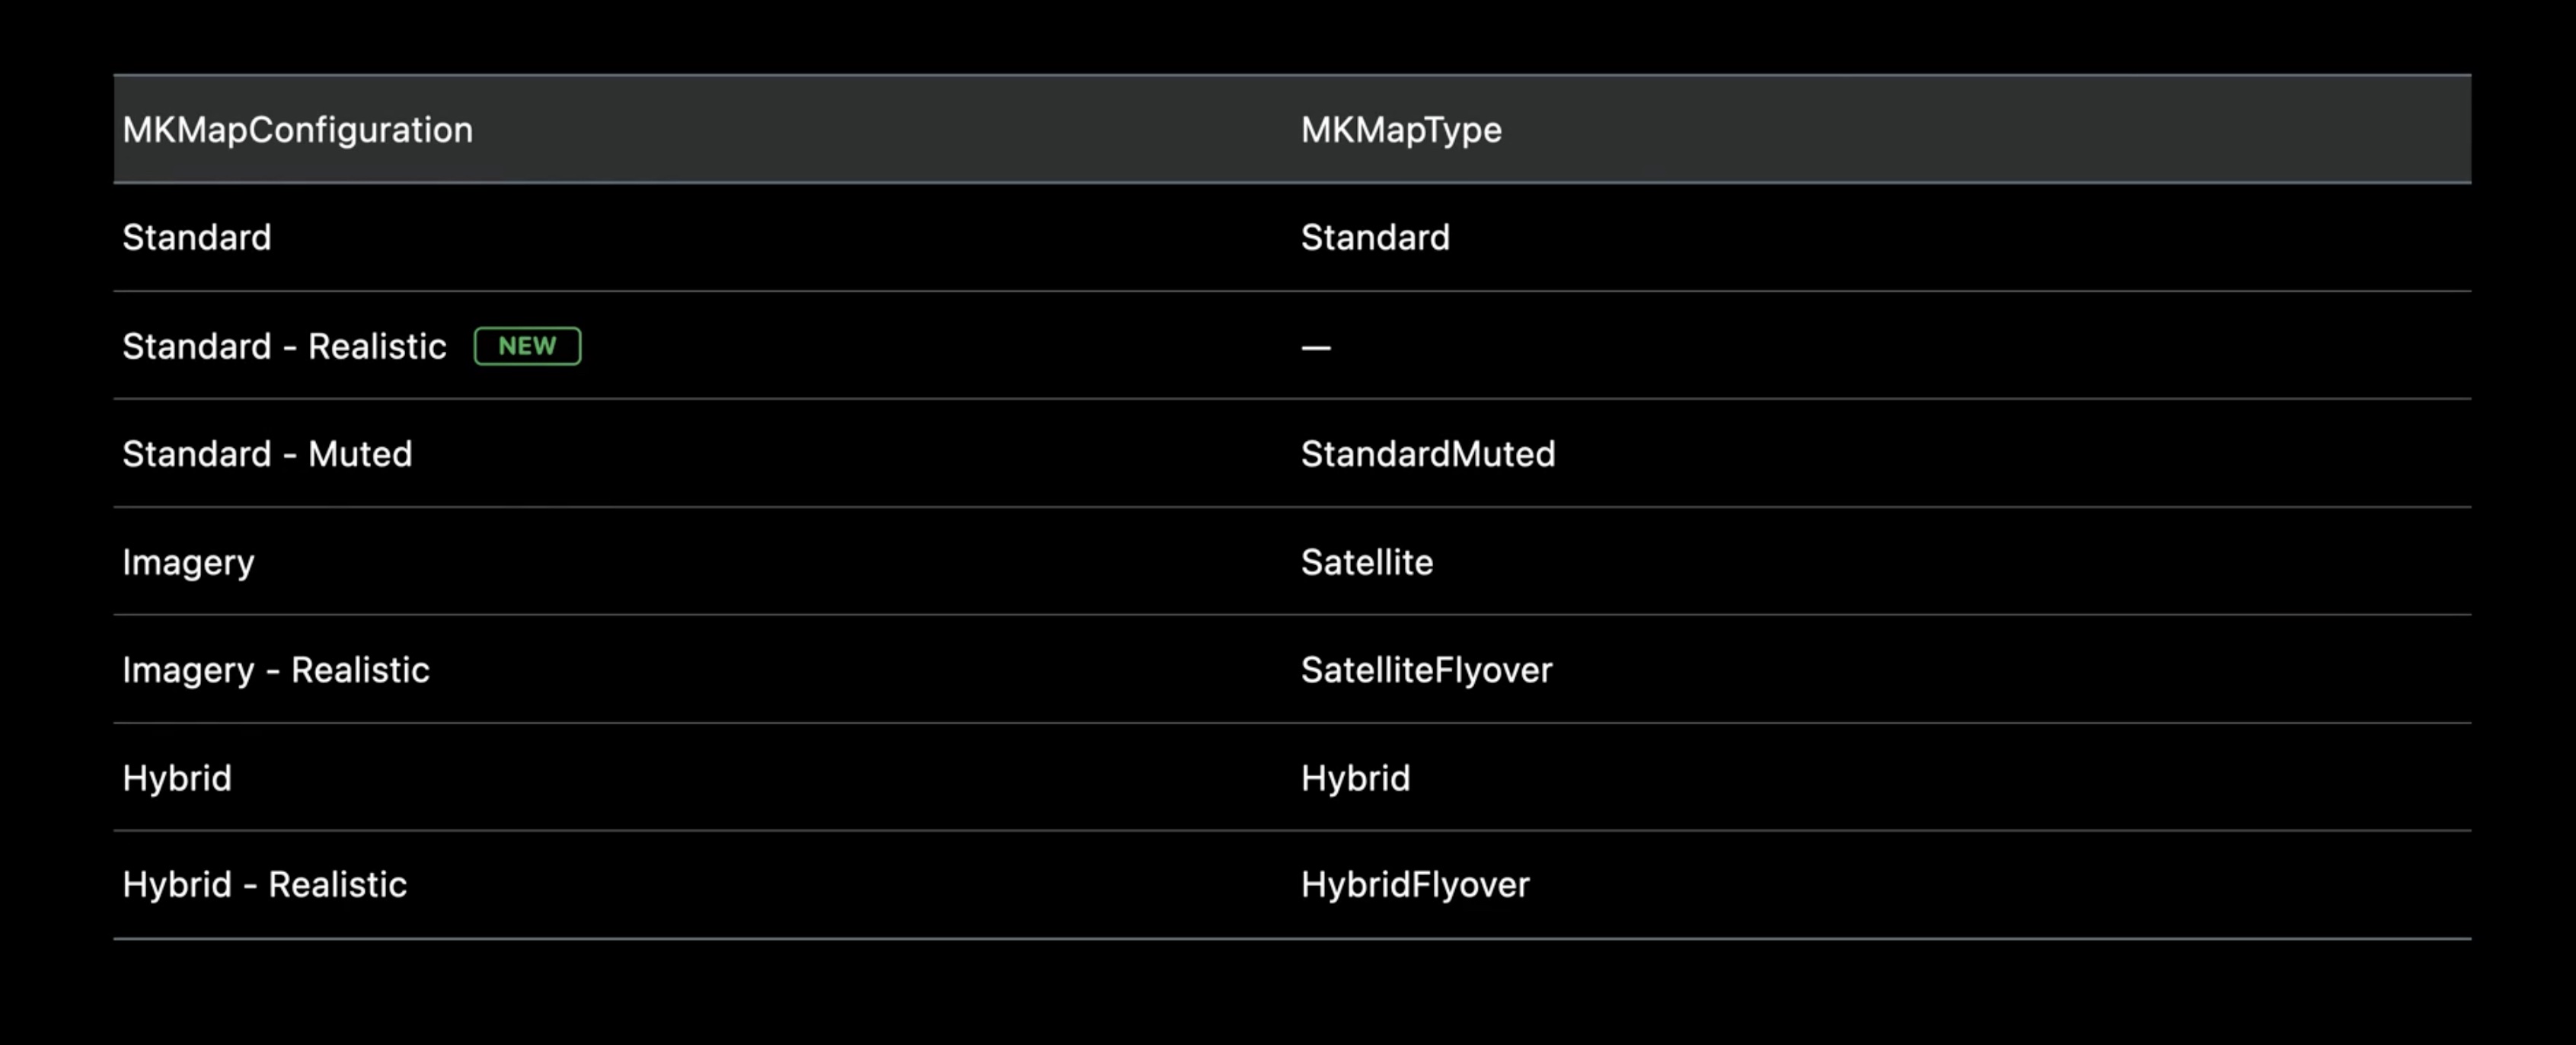
Map type mapping
Here's a table that shows the correspondence between the new map configuration classes and the MKMapType property.
The all-new map with the 3D City Experience requires compatible hardware. On iOS, the new map support requires A12-based iPhones and iPads or later. On macOS, the new map support requires any M1-based computer or later.
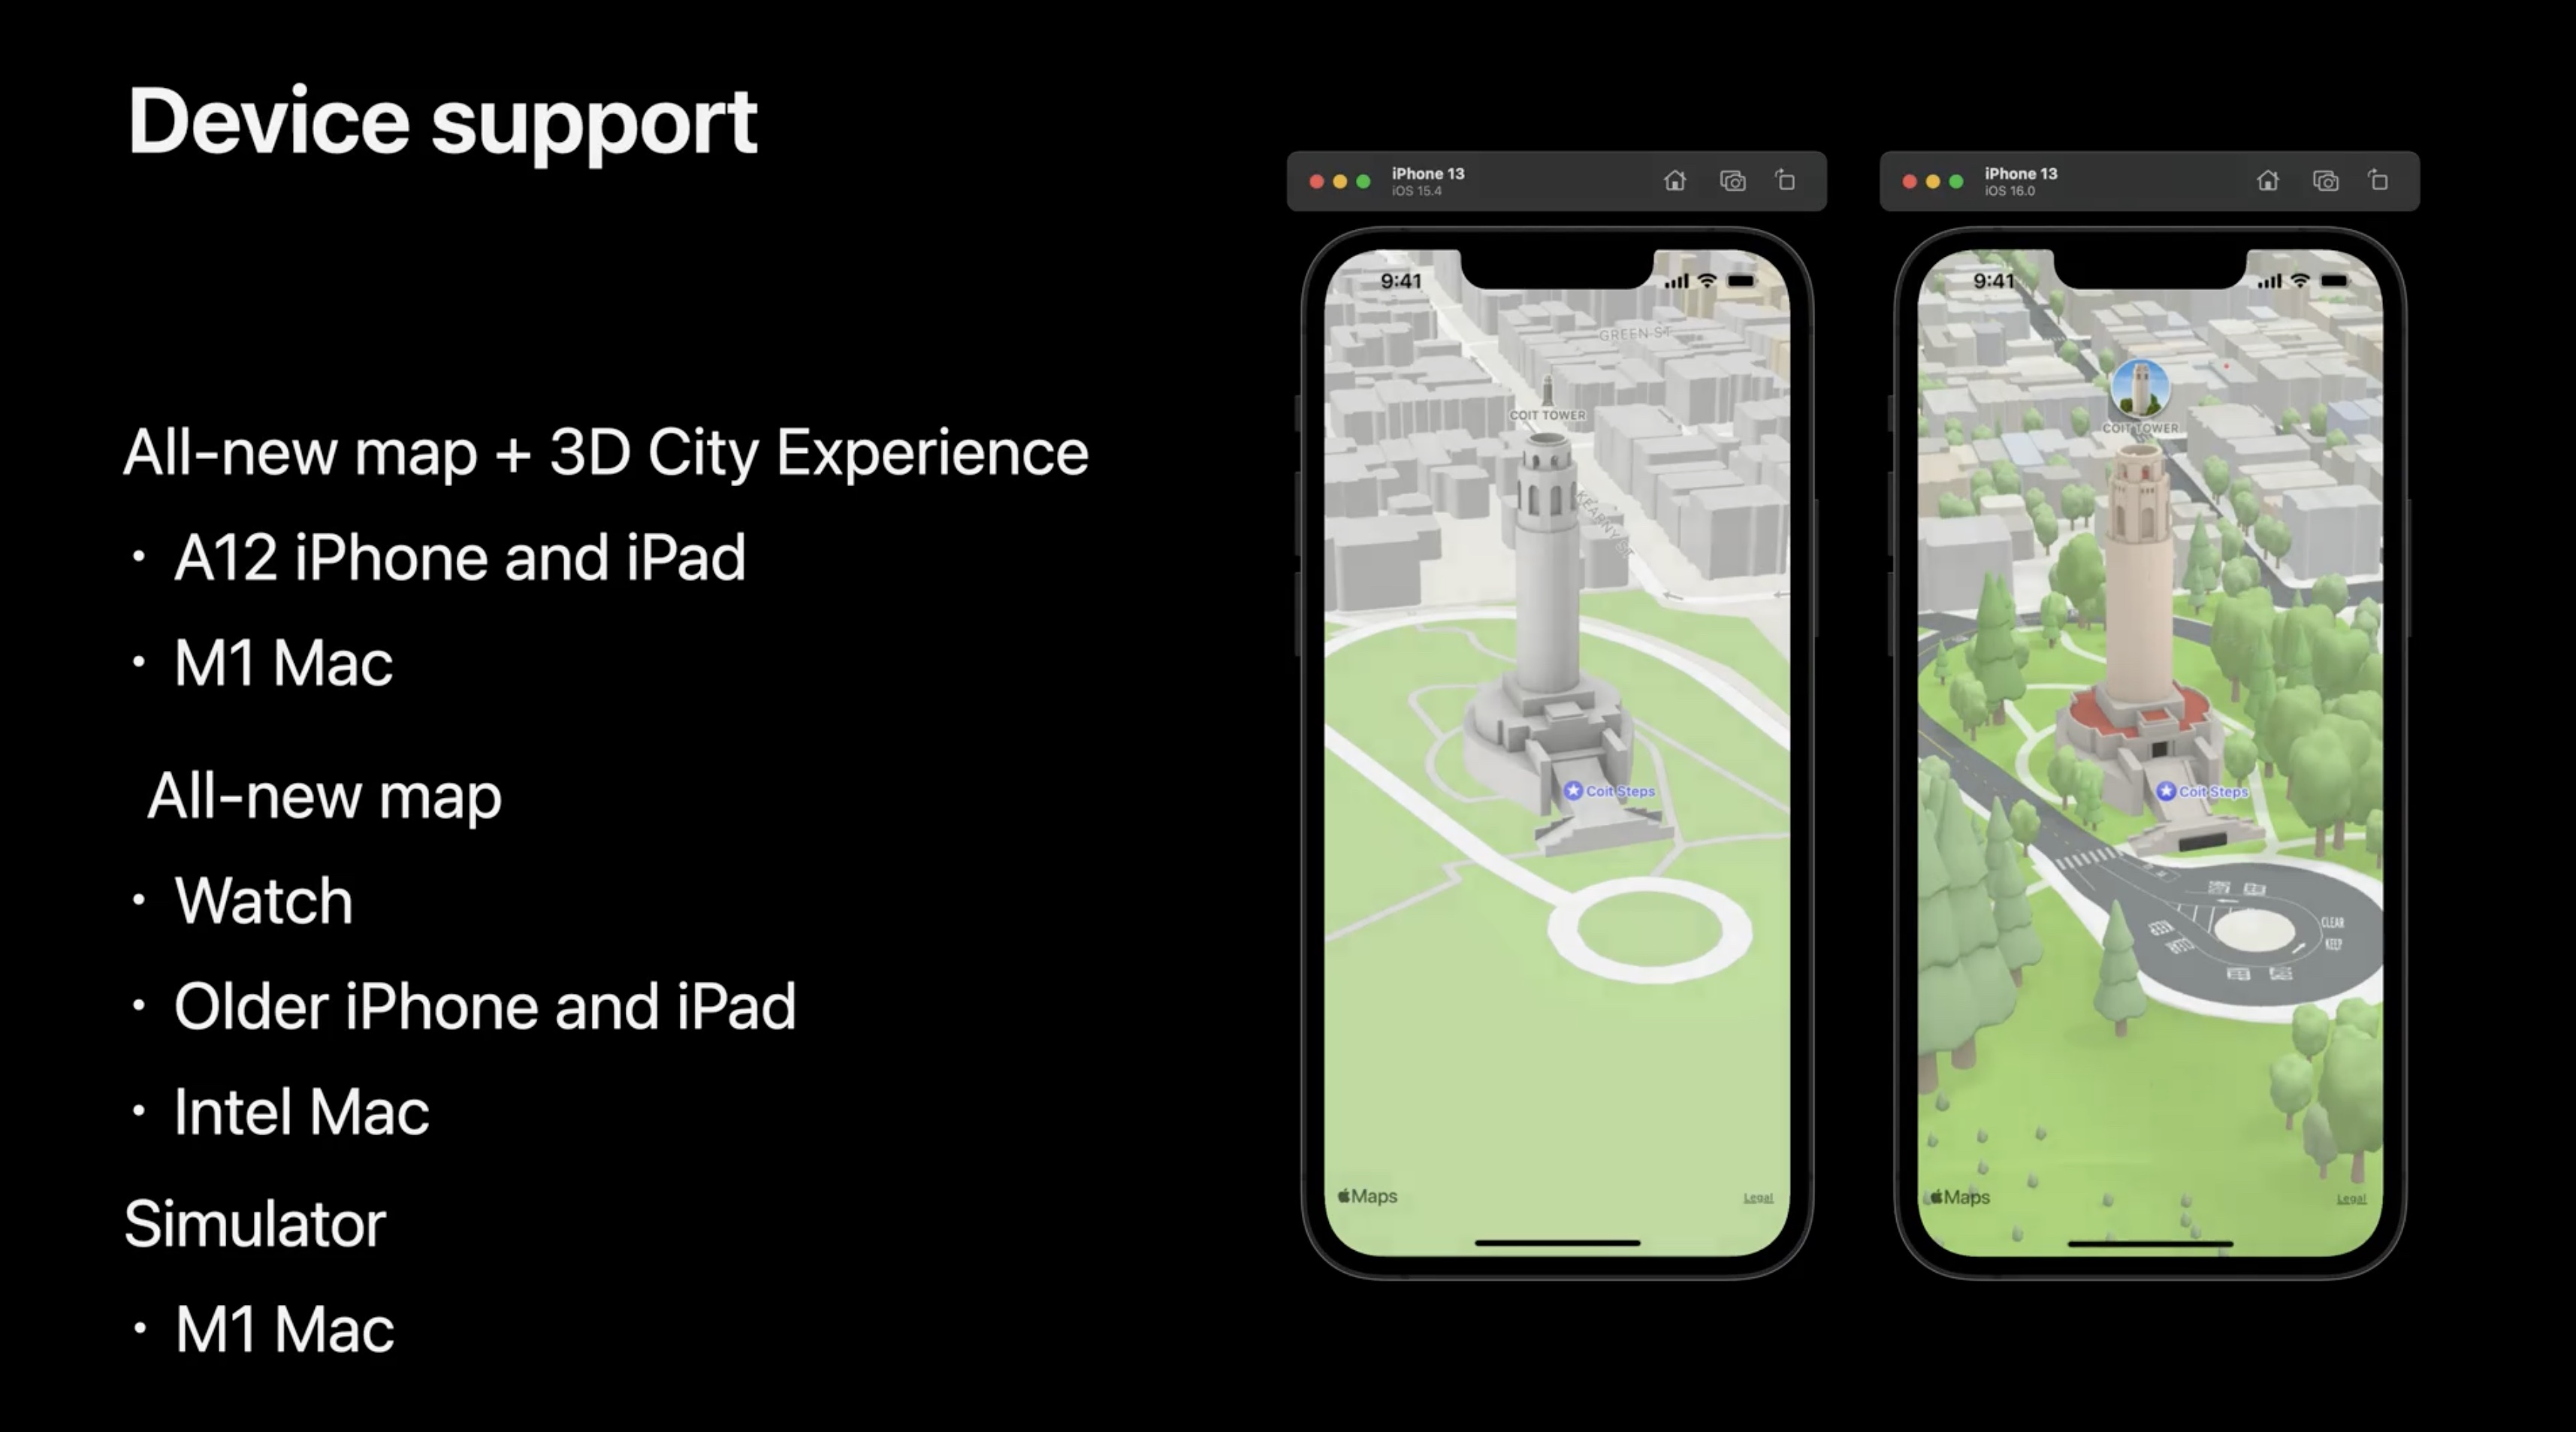
In areas where the 3D City Experience is not available, the map will automatically fall back to present the all-new map with a flat elevation. On all other devices, the all-new map will be presented with a flat elevation.
On M1 Macs, Xcode allows you to simulate both experiences simply by changing the OS version.
3D City Experience
- San Francisco Bay Area
- Los Angeles
- New York
- London
- Washington, DC
- San Diego
- Philadelphia
- Toronto
- Montreal
- Vancouver
Overlays
MapKit has supported overlays with several styling options for years. In iOS 16, there are some additions.
Overlays can be rendered at two different levels: above roads and above labels. You can specify the rendering level at insertion time using one of MapKit's many overlay insertion functions.
// Overlay levels
class MKMapView {
    func addOverlay(_: MKOverlay, level: MKOverlayLevel)
    // ...
}

public enum MKOverlayLevel {
    case aboveLabels
    case aboveRoads
}
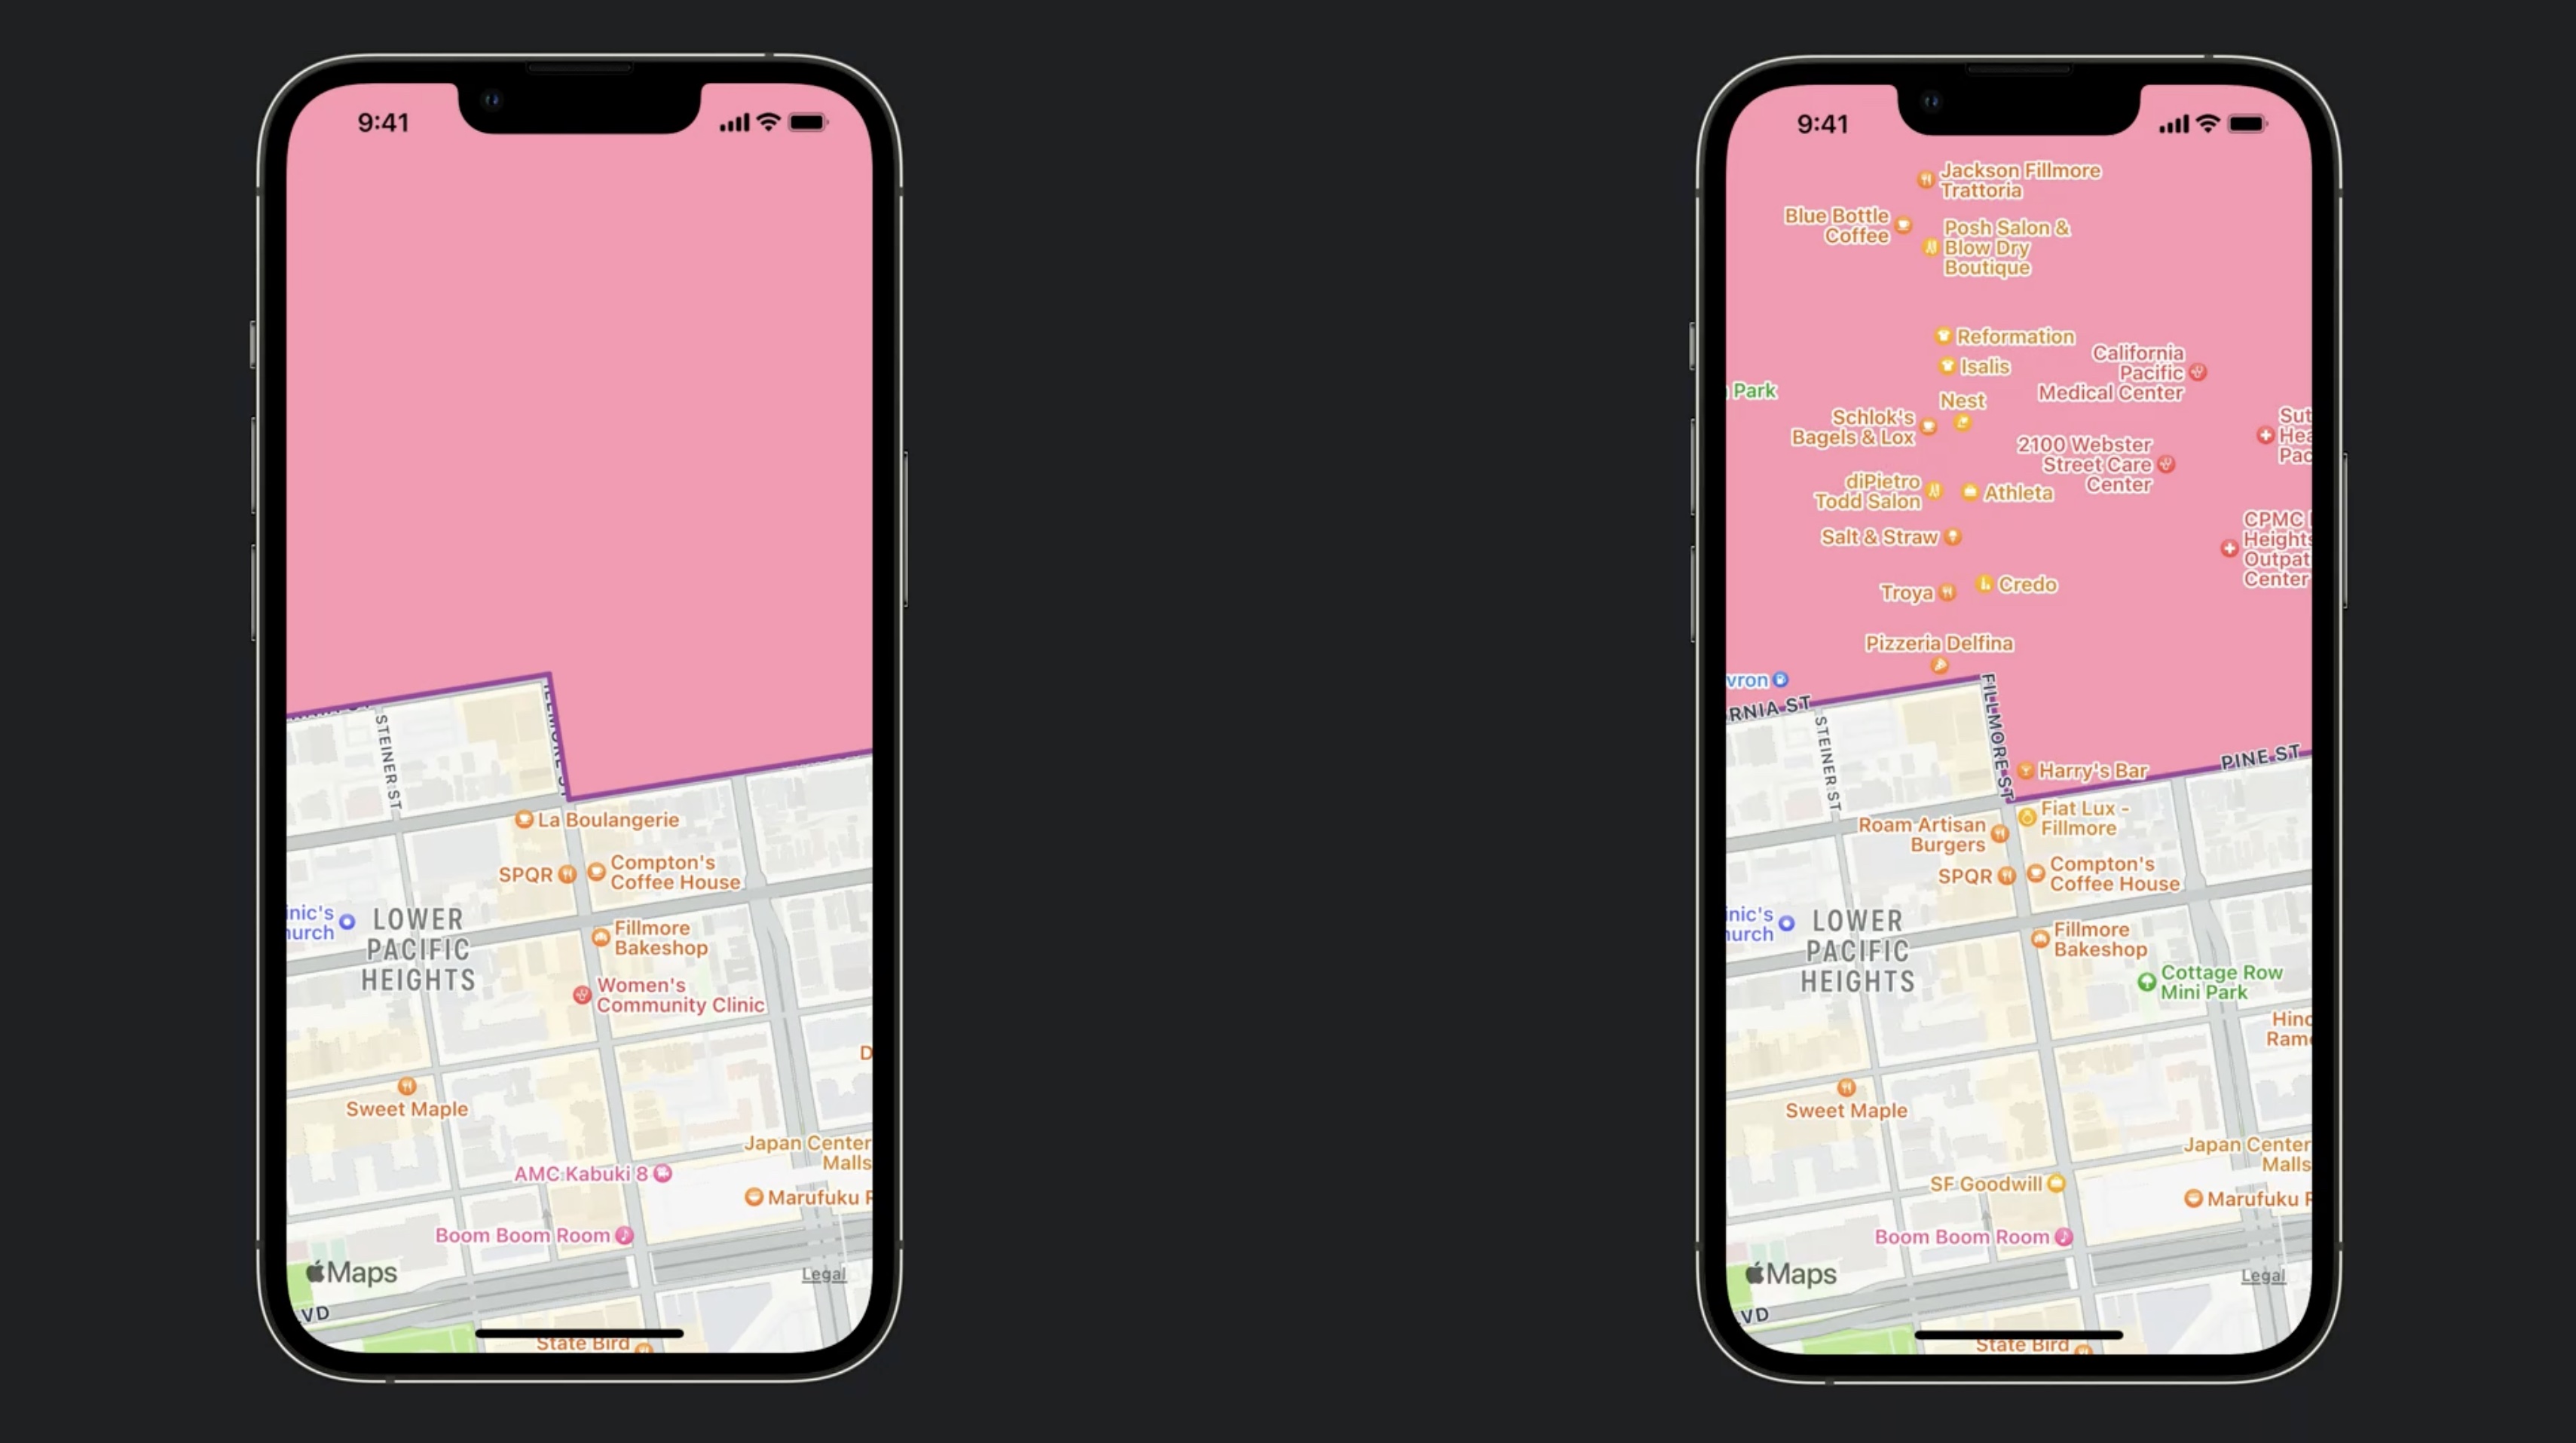
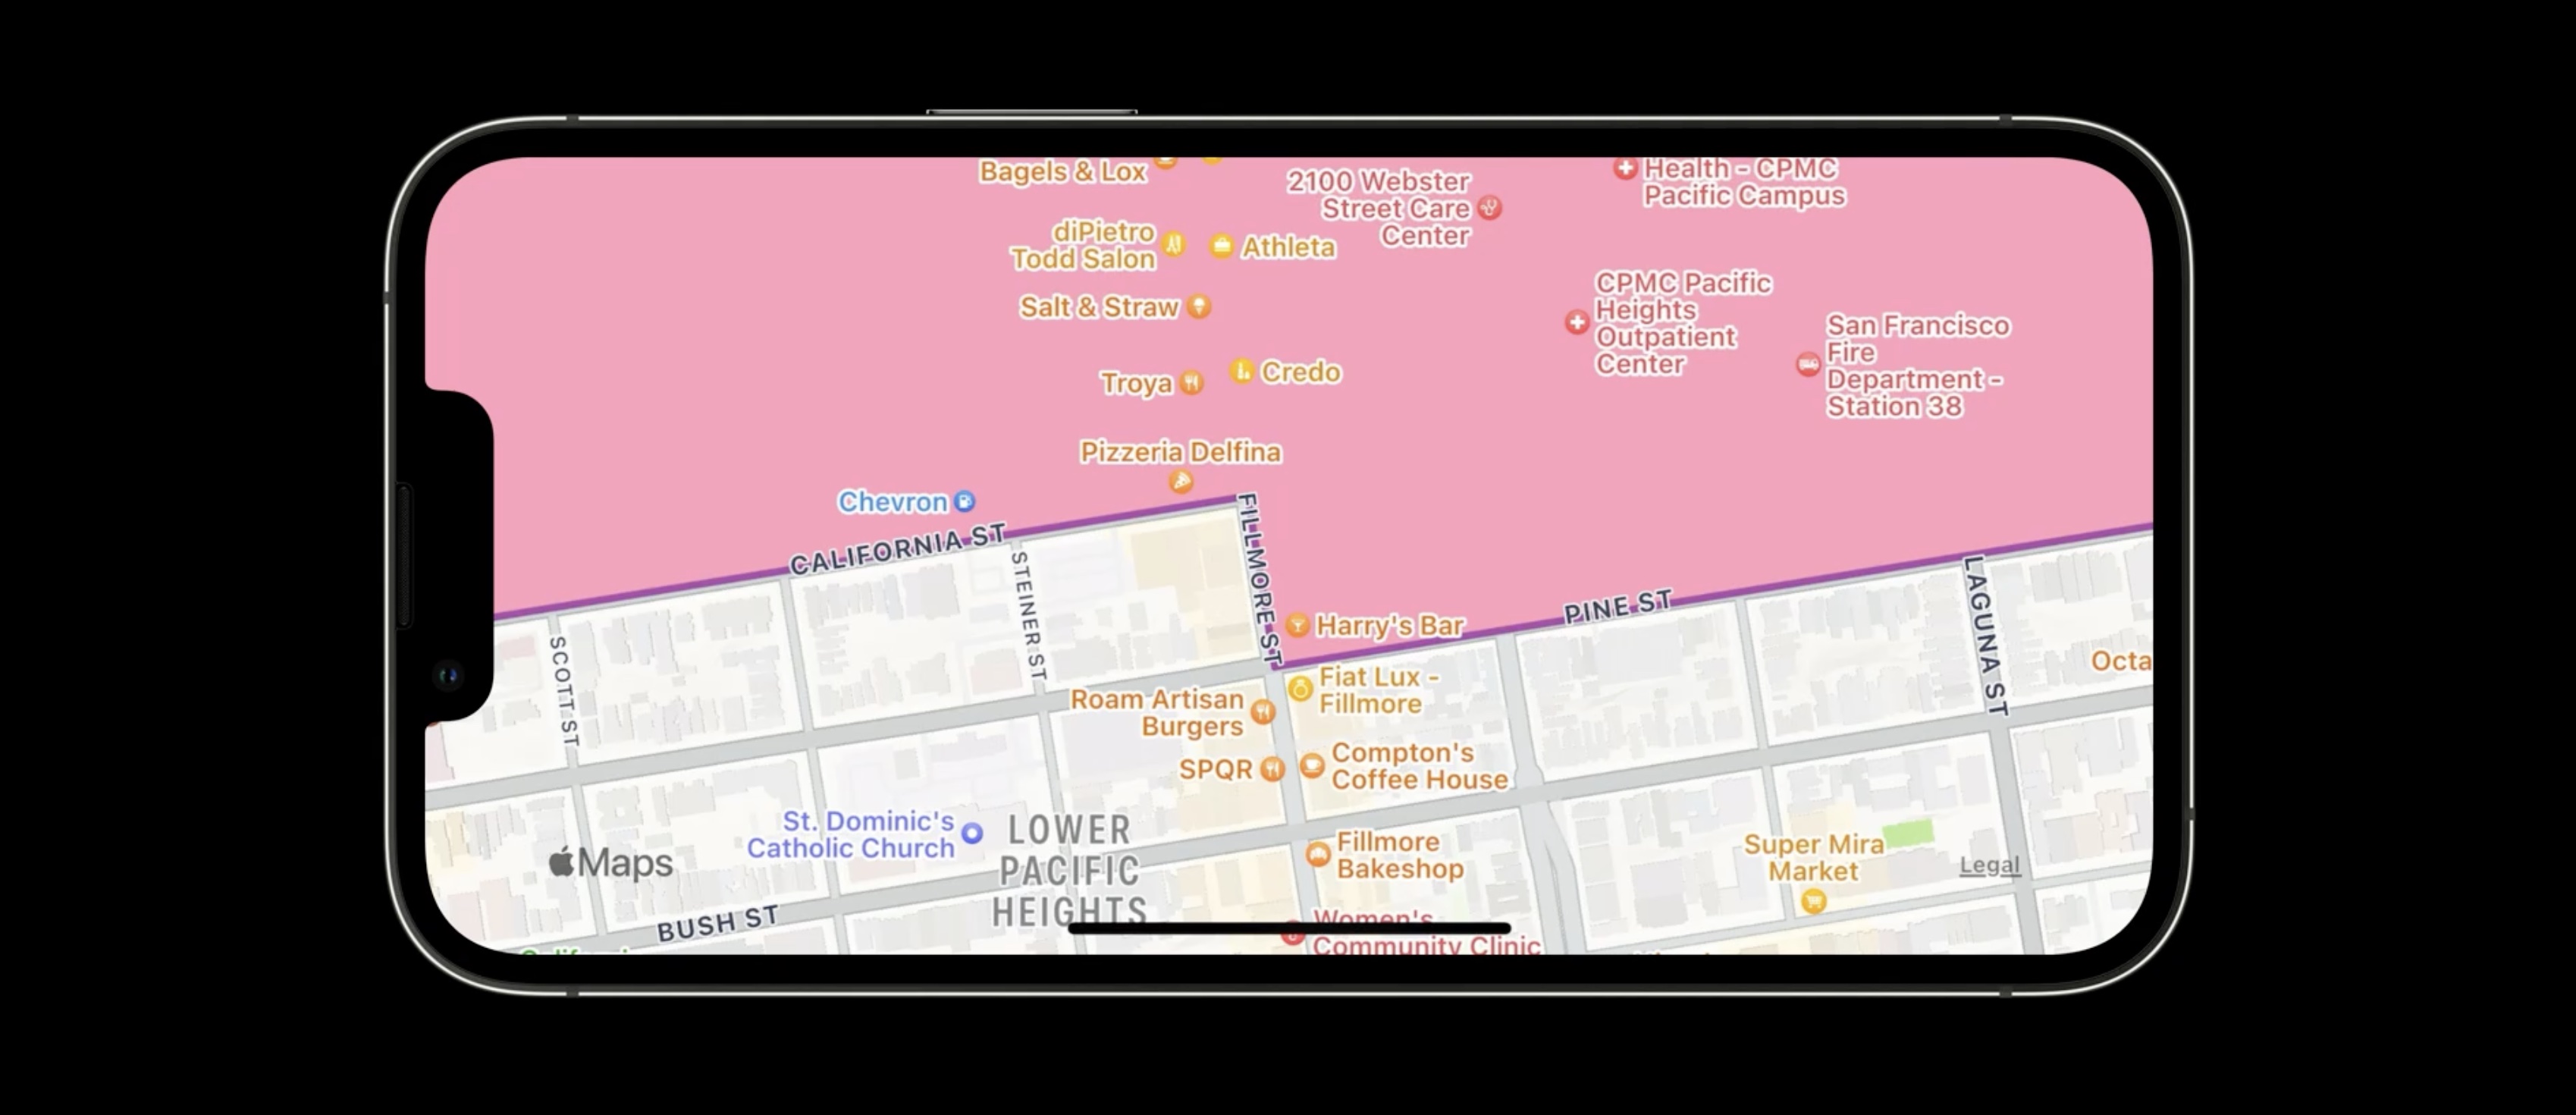
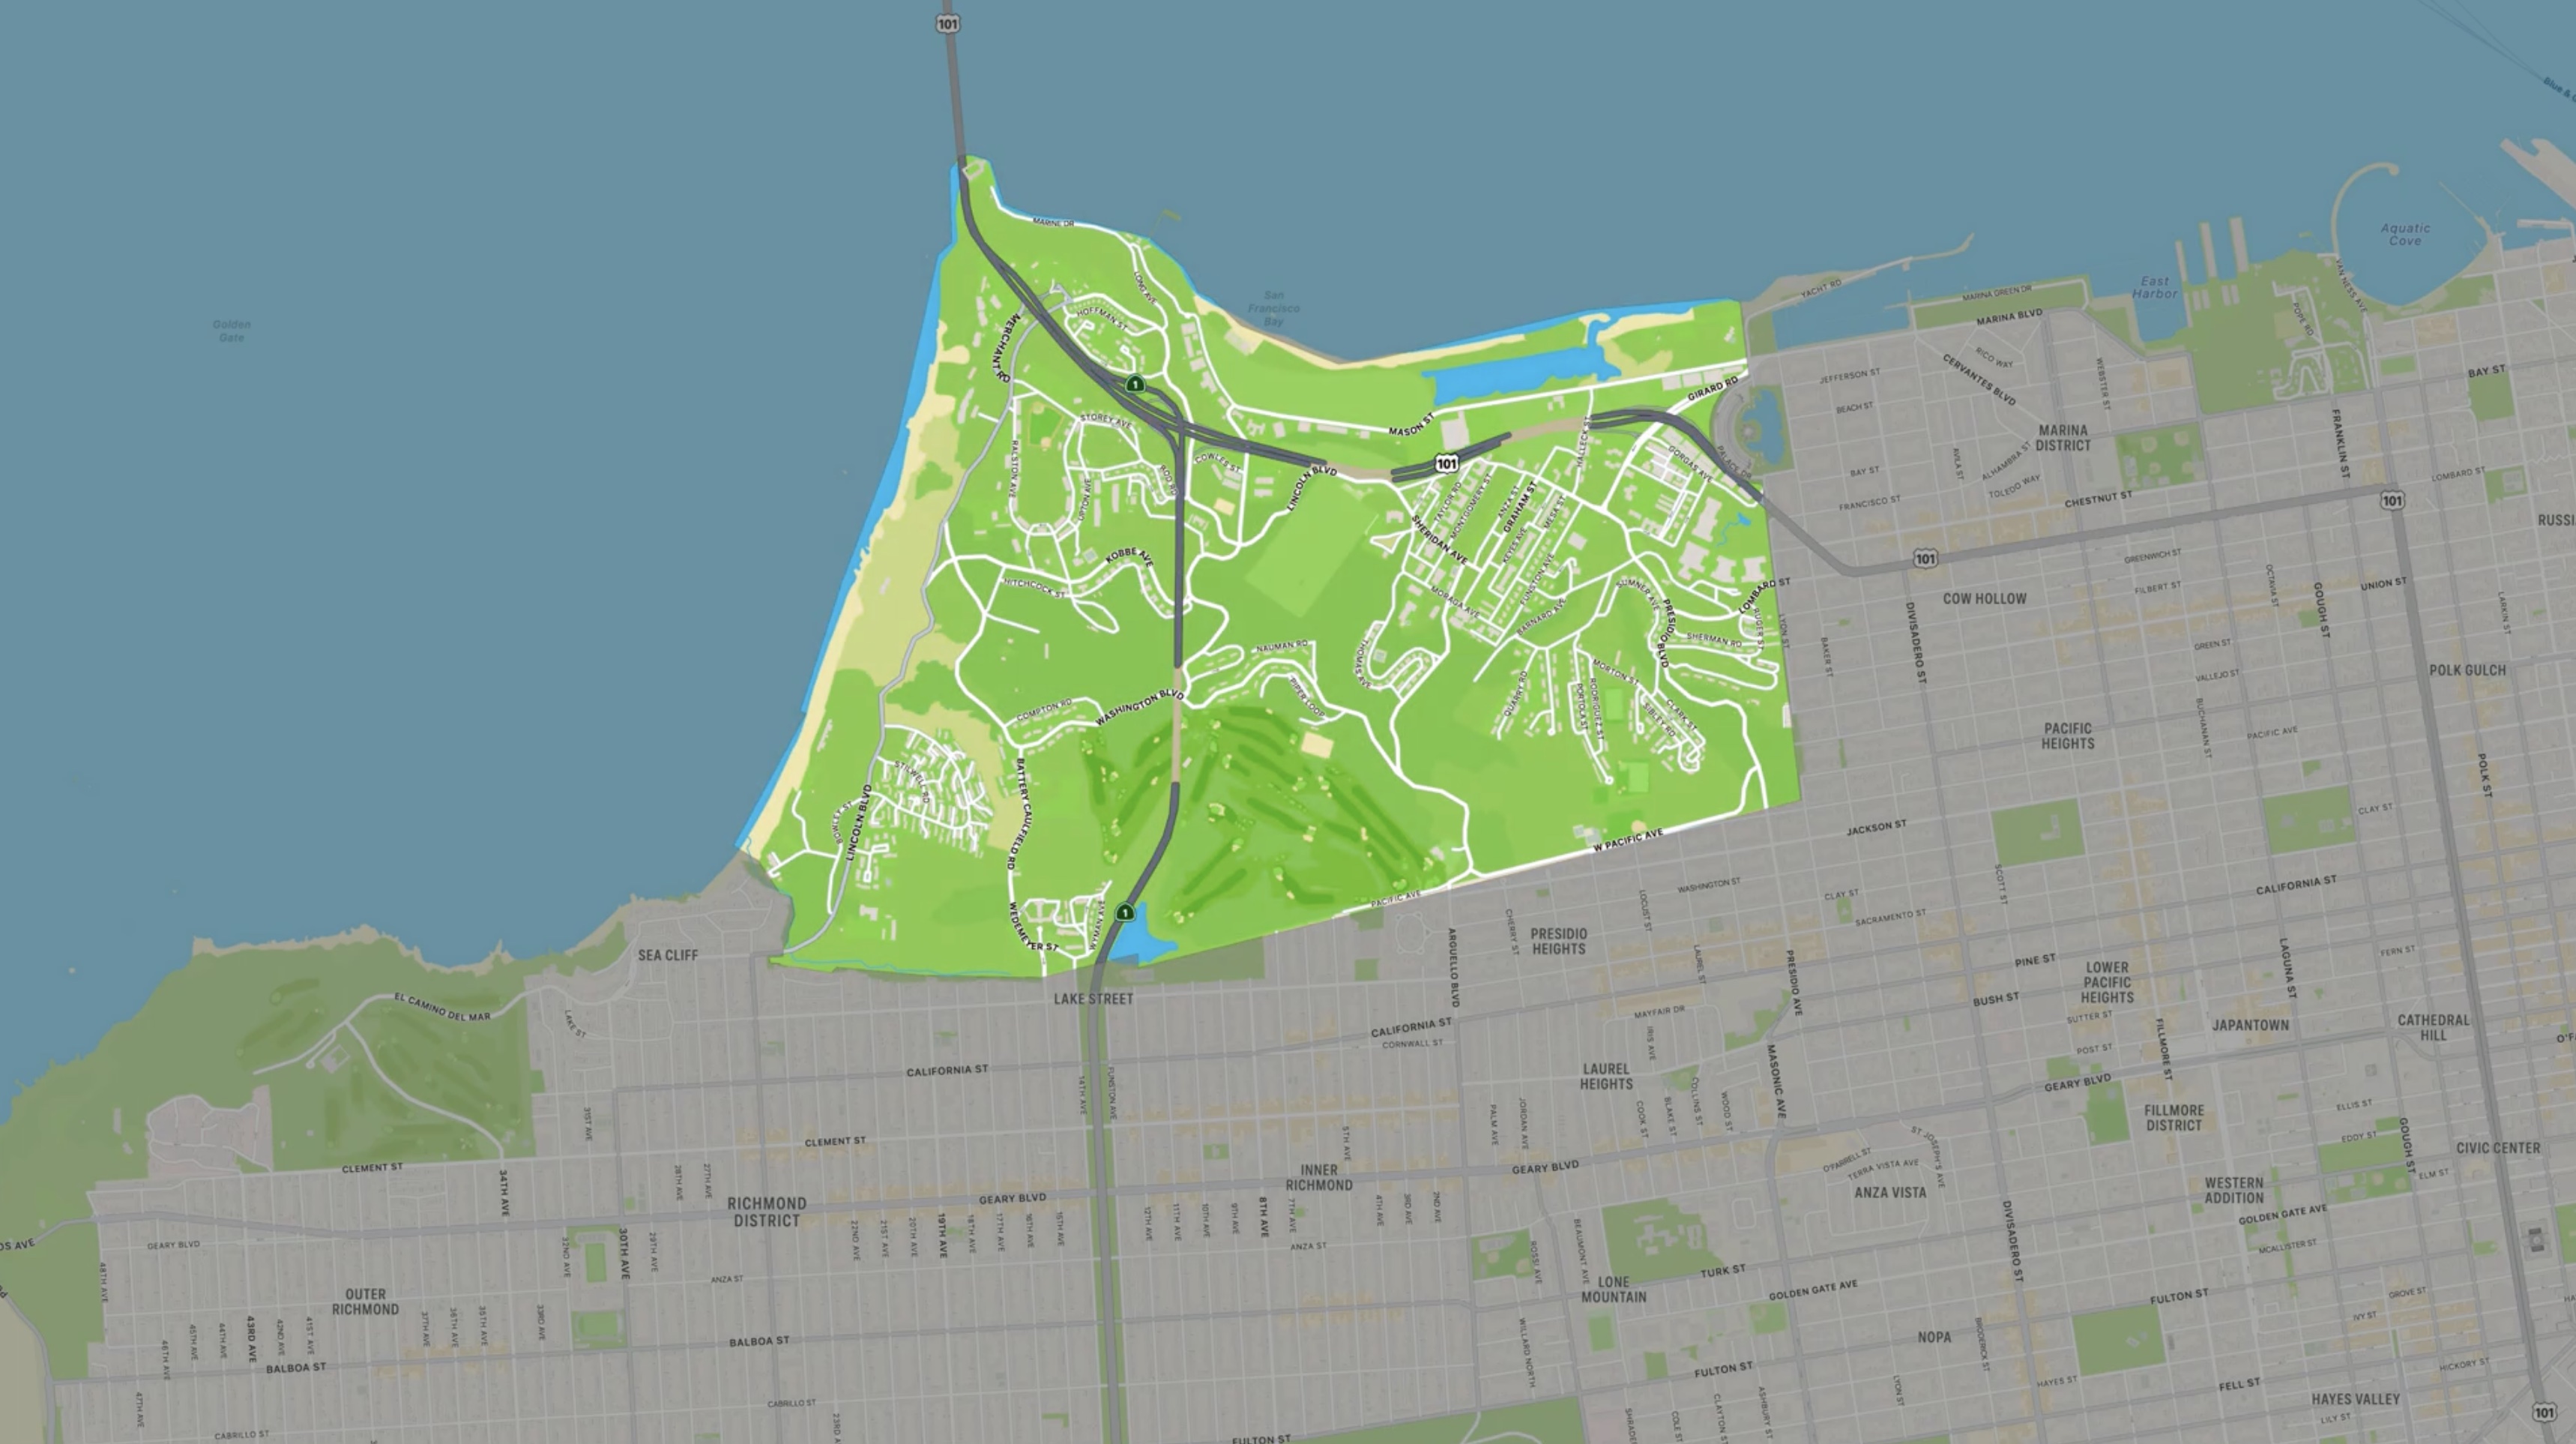
Above labels renders the overlay above everything, including labels. Since labels provide important context information, only use above labels in those rare cases where we don't want the data to interact with the map at all. Consider using the muted map emphasis or the blend modes.
Above roads means the overlay will be shown on top of the terrain, including roads, land cover, or bodies of water. It will, however, be shown below labels and, to some degree, trees and buildings. See the screenshot on the right below.
Above roads will be the new default mode in iOS 16.
Transparent buildings
There is a new feature in iOS 16 called transparent buildings.
Regardless of whether the overlay level is above roads or above labels, it will always be rendered on top of buildings when viewed top-down with no pitch.
Ground objects such as trees and buildings are now automatically rendered with transparency when appearing above overlays, so as not to fully obscure them. The alpha value varies with the map's pitch angle. Reverting to showing the map top-down with a 0º pitch angle, colliding ground objects effectively disappear from view, leaving the overlays fully visible.
Transparent buildings also work for semi-transparent overlays. The alpha value of the overlay will be added to combine with the alpha value of the transparent buildings.

There's one more change to overlays. When adding an overlay to a map with realistic terrain,
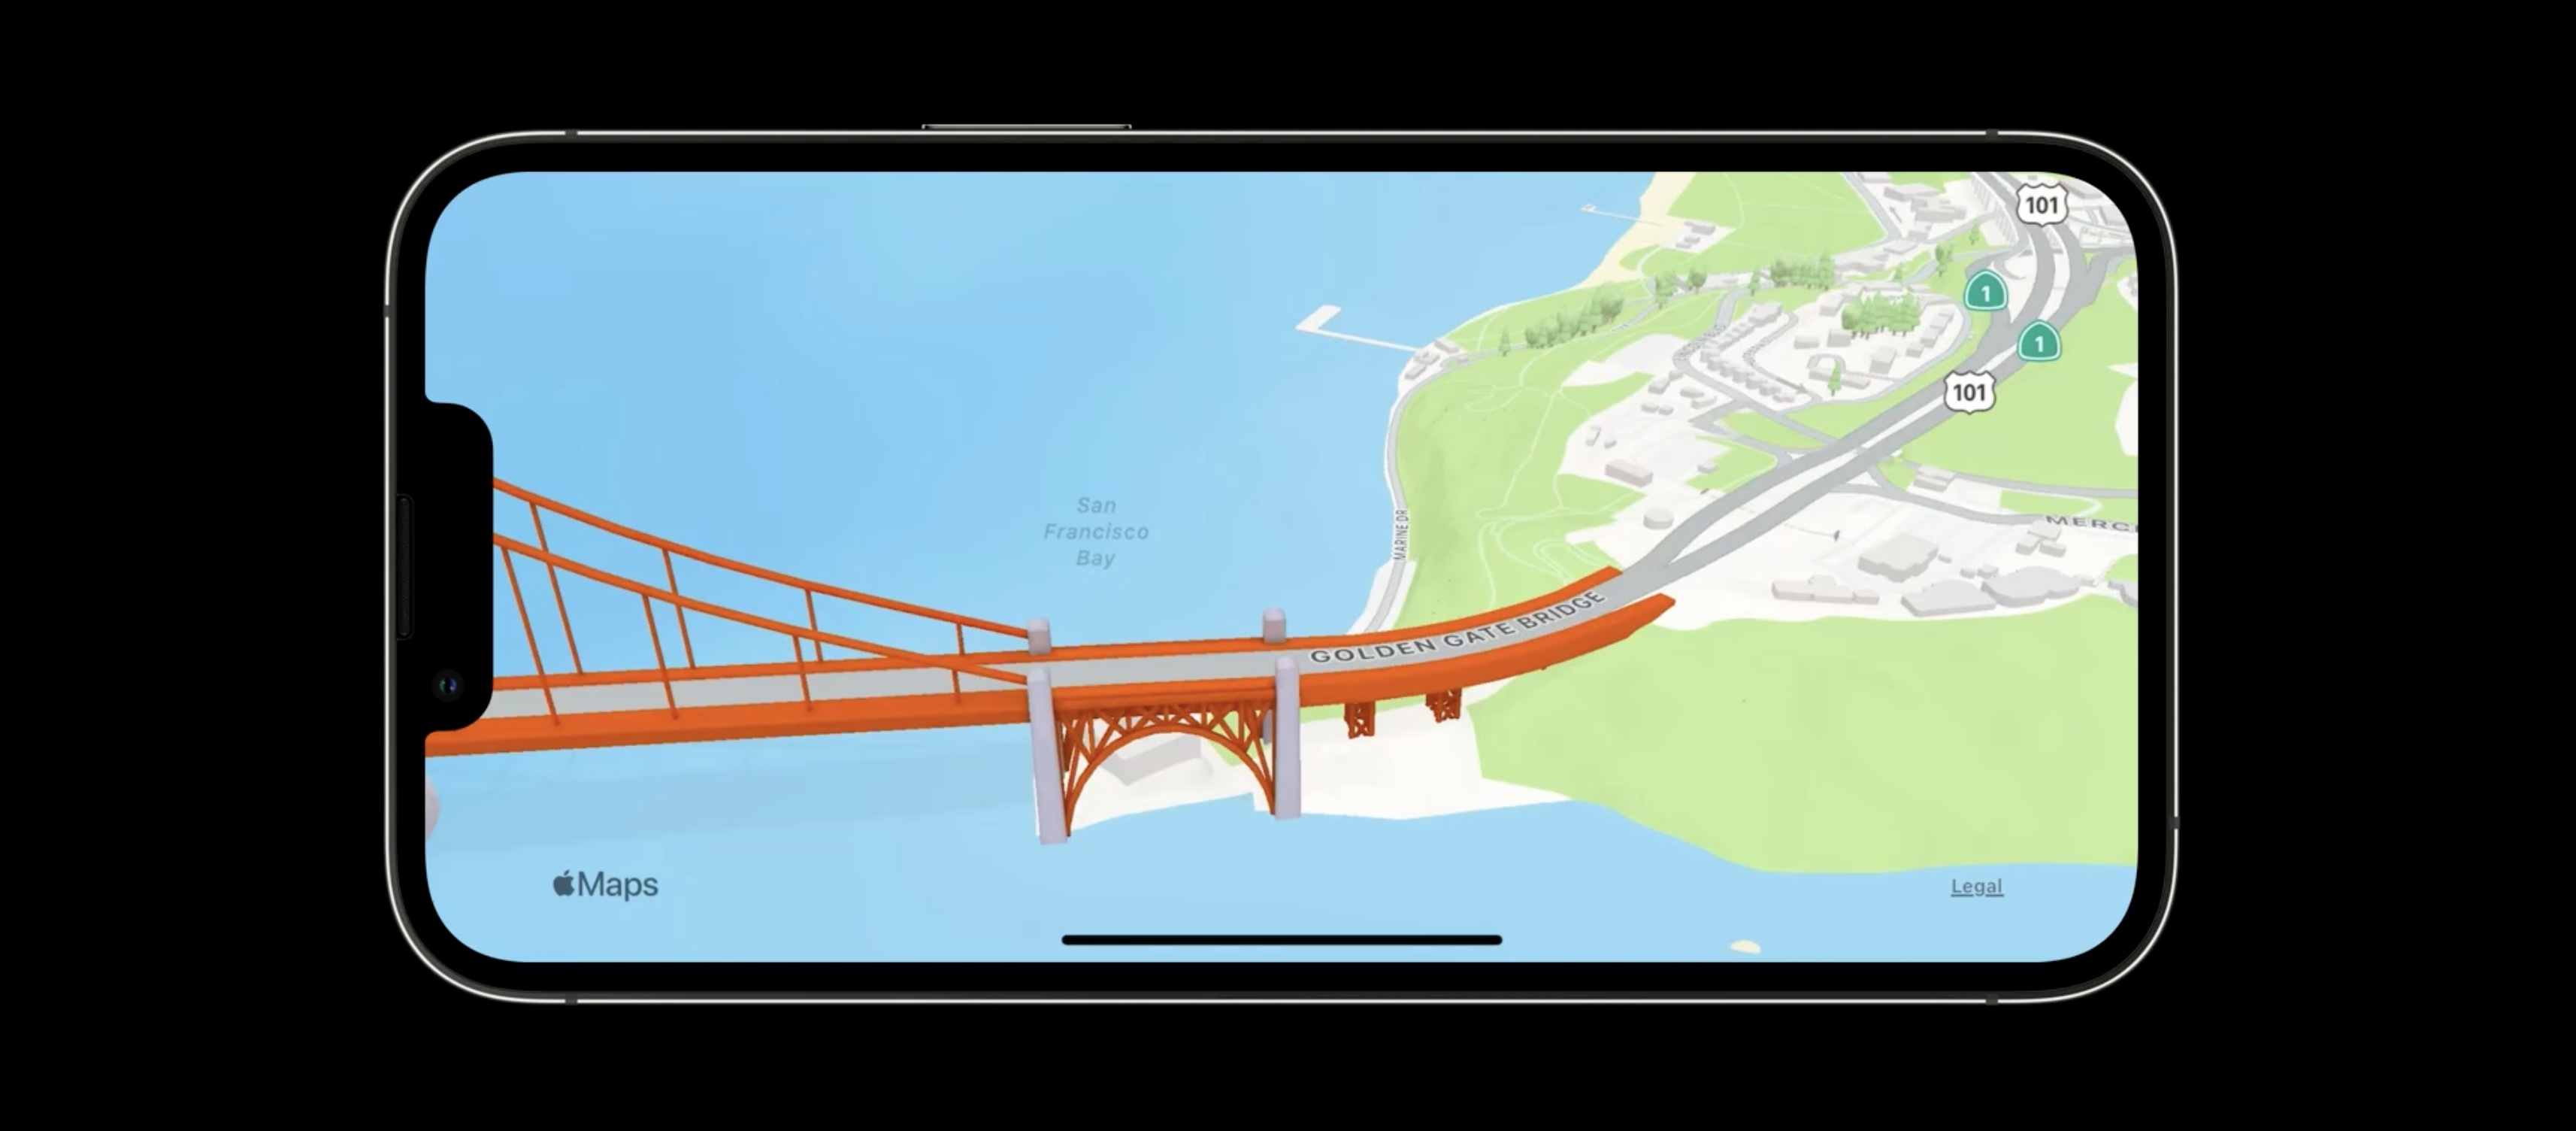
MapKit will automatically transition the map to a flat representation.
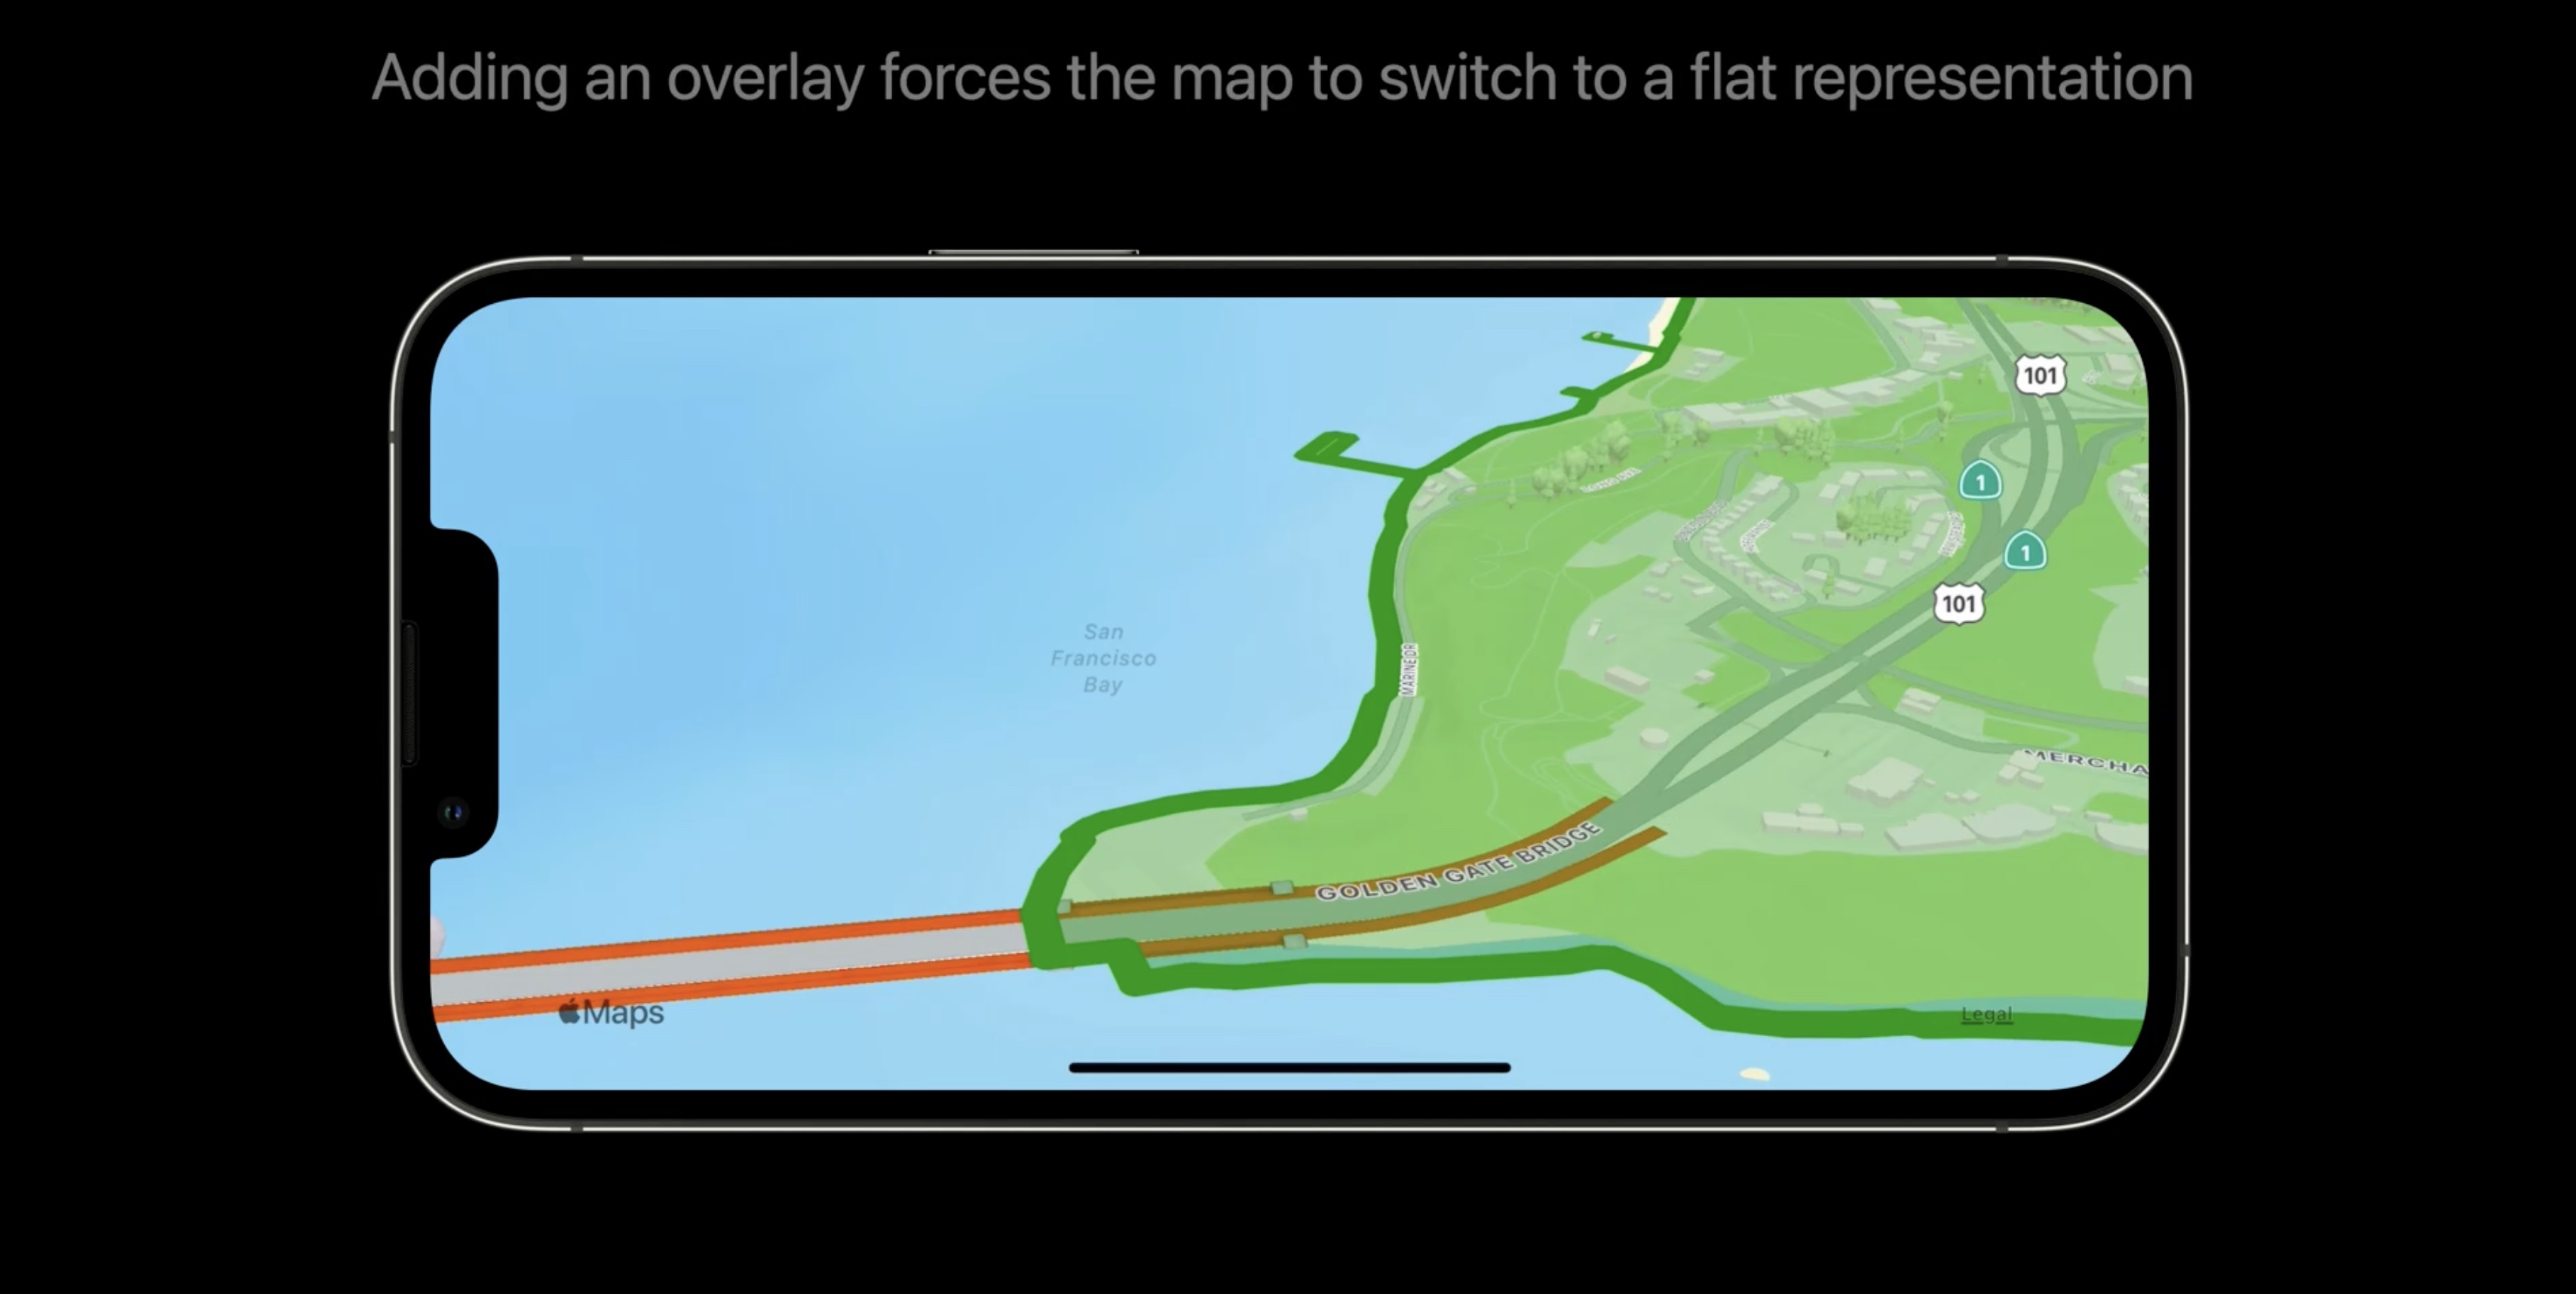
The map will automatically go back to realistic when removing the last overlay. One notable exception to this rule are overlays sourced through MapKit's directions API. Those overlays automatically follow the terrain.
Adding Polygon Overlays
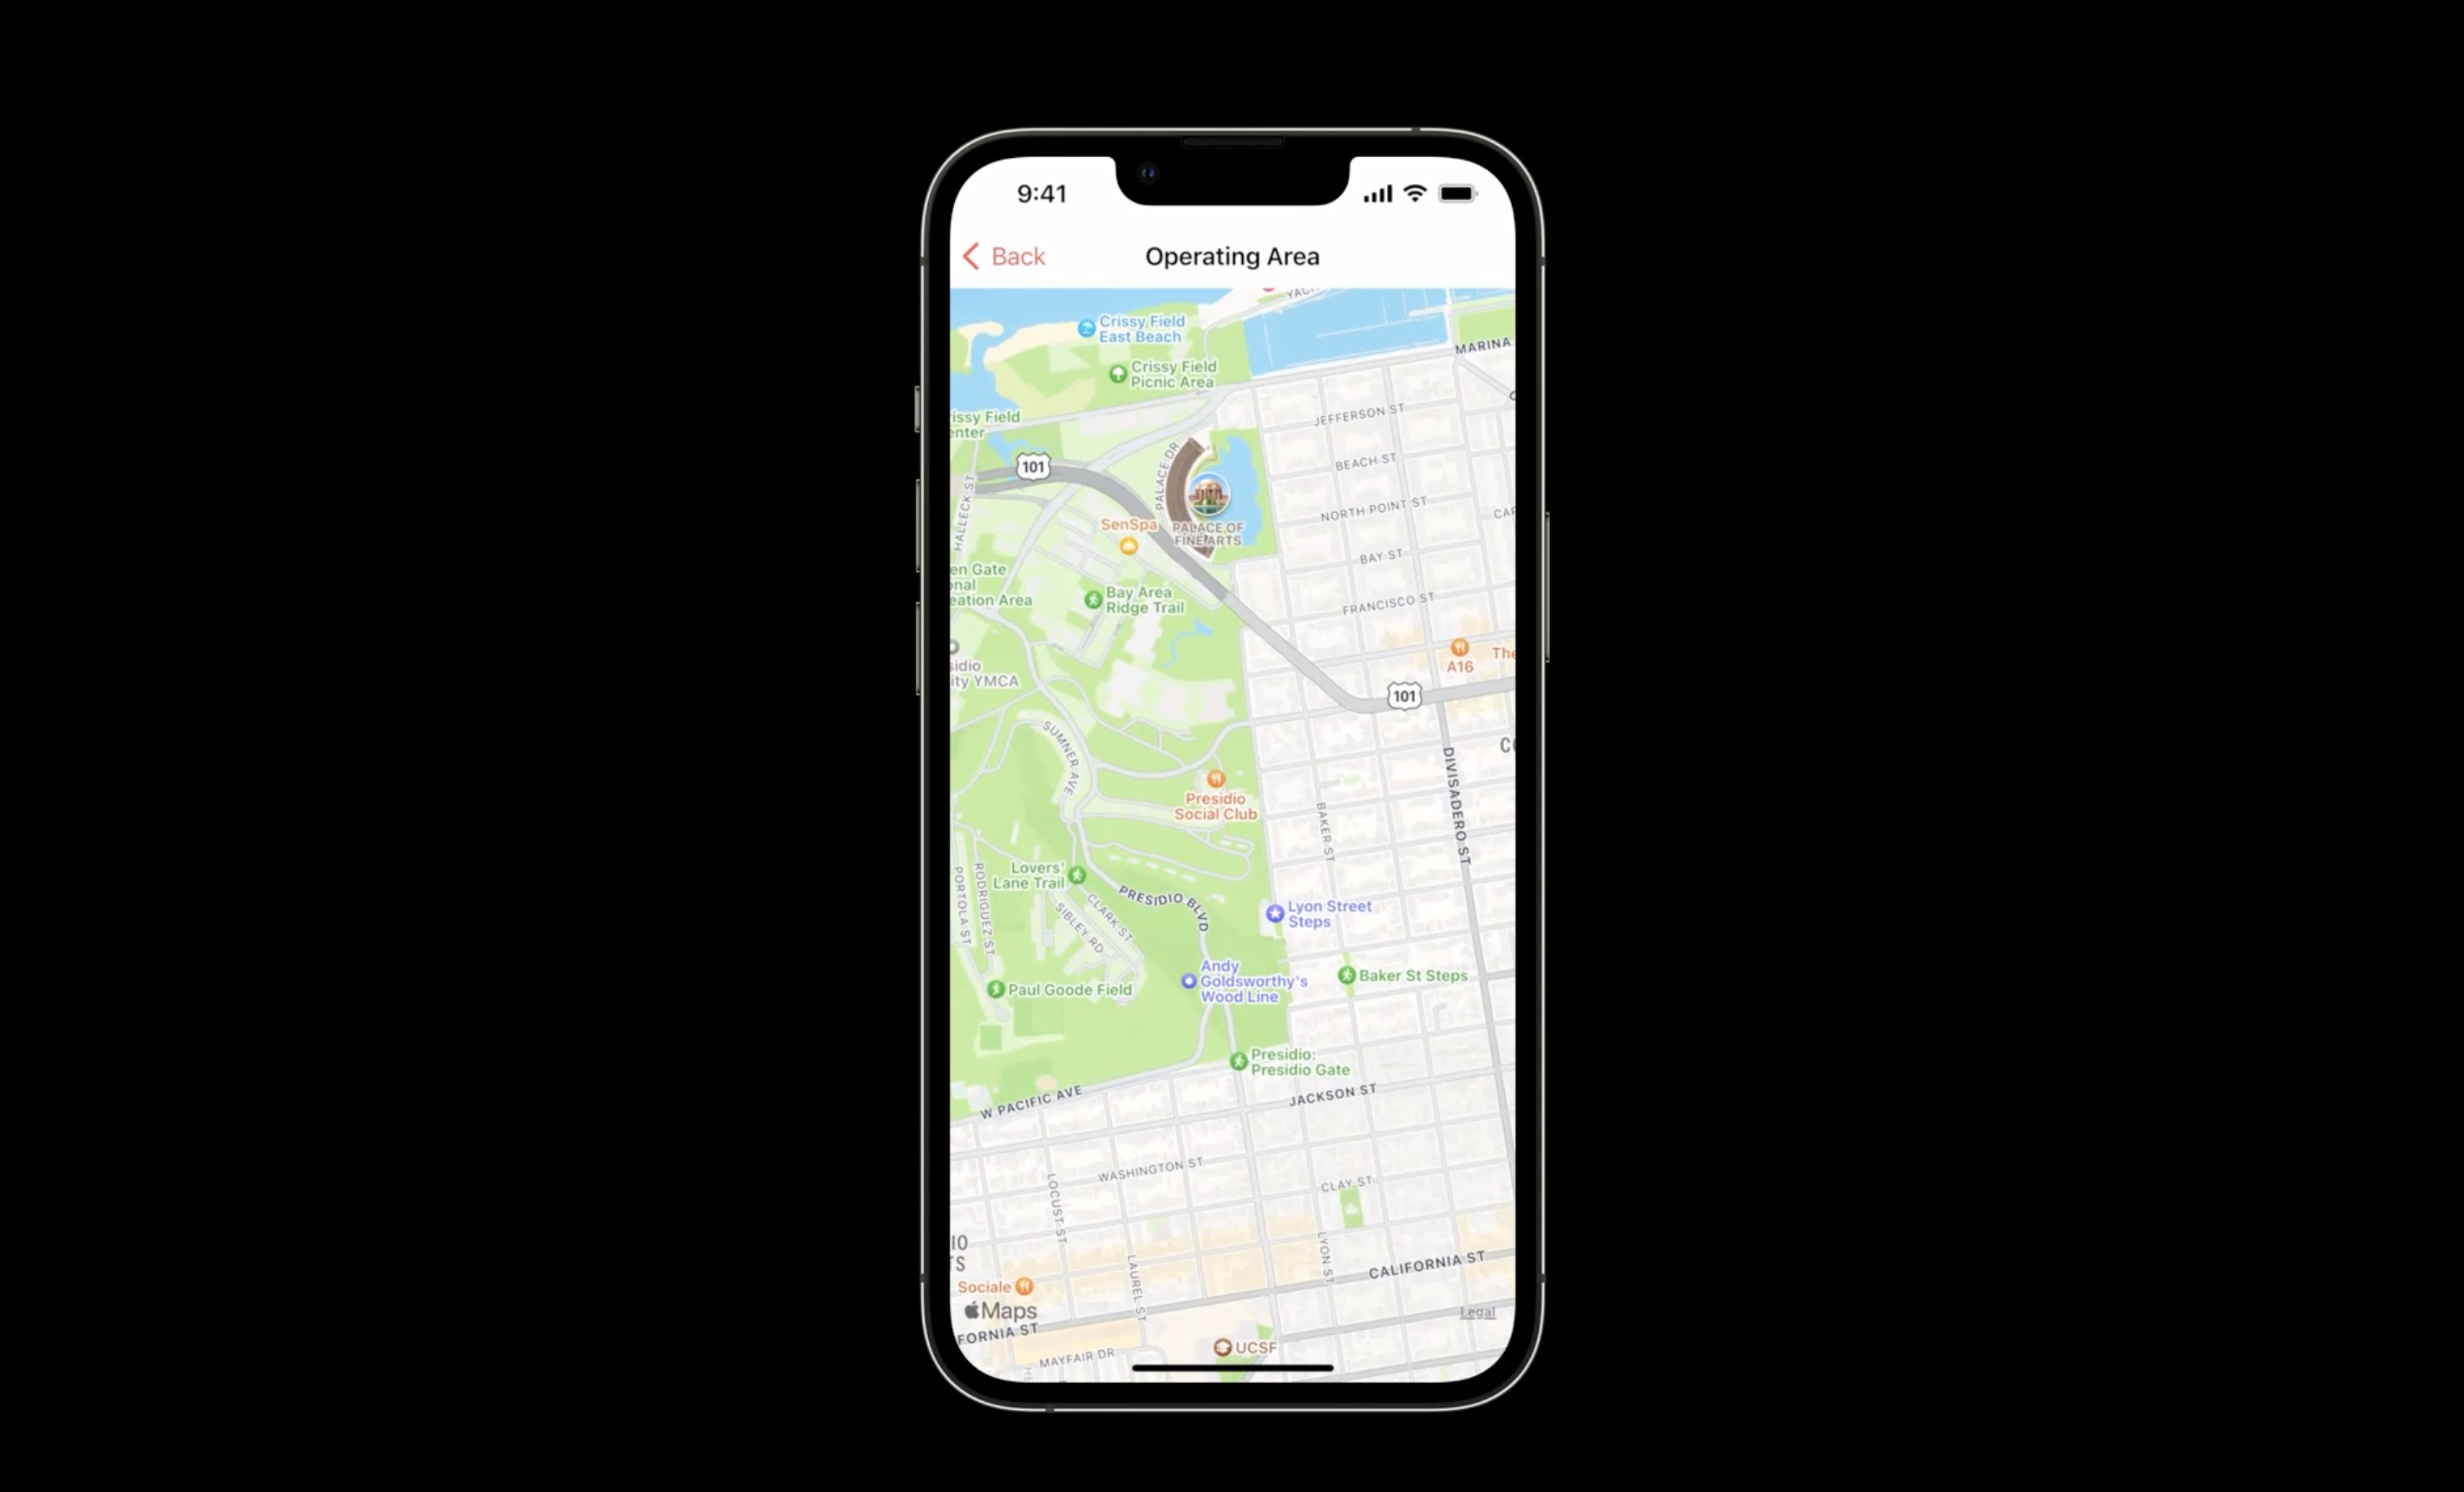
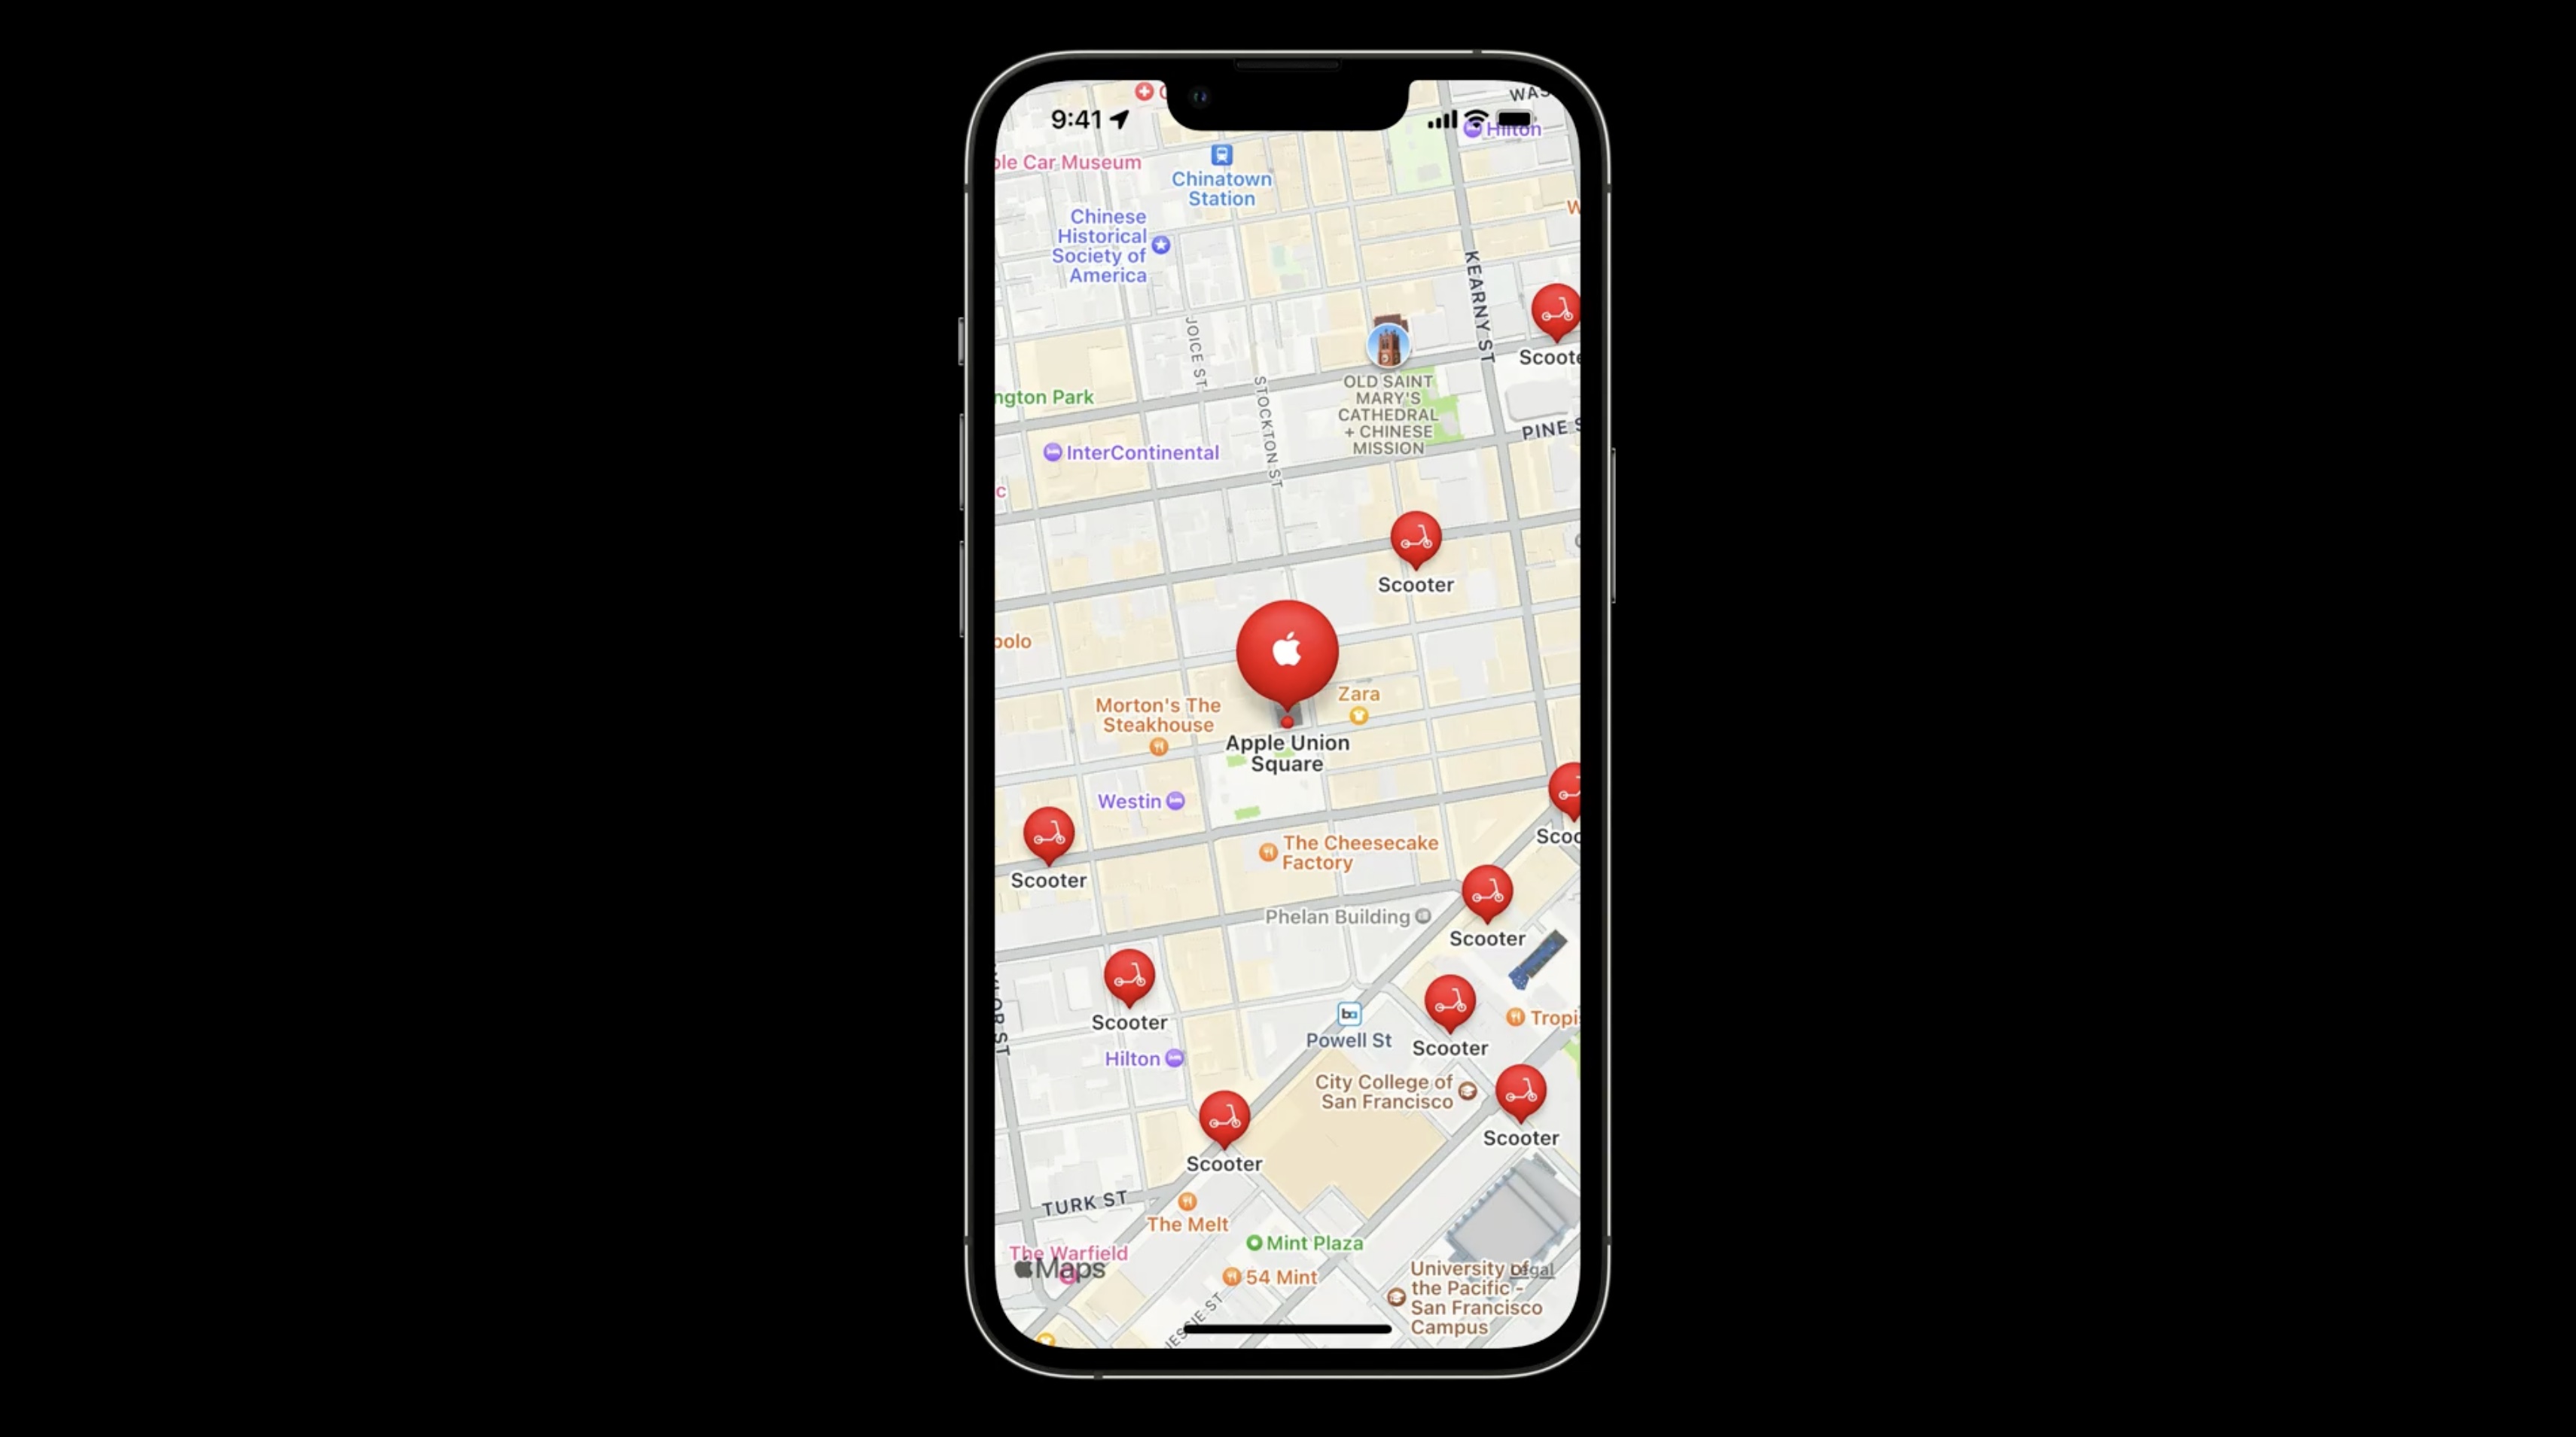
Using the sample app, which helps users rent scooters to tour San Francisco.
The app offers a number of features, as shown by the rows in this table view. "Operating Area" allows the user to see where they can take our scooters. "Ride" takes the user on a tour across the Golden Gate Bridge. "Explore" gives the user an interactive map of downtown San Francisco, which they can use to explore attractions near the waterfront. "Highlights" offers a closer look at must-see places. We will implement or upgrade these features throughout this session.
We are going to use the Operating Area feature.
let's add a polygon overlay to visualize the operating area. When the view is loaded, we'll first set the region and the camera boundary.
import MapKit

// This class displays elevated route line overlay loaded from MapKit server on a map view.

class PolygonOverlayViewController: UIViewController, MKMapViewDelegate {

    @IBOutlet var mapView: MKMapView!

    private let dataSource: OverlayDataSource

    required init? (coder: NSCoder) {
        dataSource = OverlavDataSource()
        super.init (coder: coder)
    }

    override func viewDidLoad() {
        super.viewDidLoad ()
        mapView.region = .overlay

        mapView.cameraBoundary = MKMapView.CameraBoundary(coordinateRegion: .overlayCameraBoundary)

        mapView.addOverlays(dataSource.overlays, level: .aboveRoads)
    }

    // MARK: - MKMapViewDelegate
    func mapView(_ mapView: MKMapView, rendererFor overlay: MKOverlay) -> MKOverlayRenderer {
        let renderer: MKOverlayPathRenderer

        if let multiPolygon = overlay as? MKMultiPolygon {
            renderer = MKMultiPolygonRenderer(multiPolygon: multiPolygon)
            renderer.fillColor = UIColor(red: 1, green: 0.59, blue: 0.7, alpha: 1.0)
            renderer.strokeColor = UIColor(red: 0.63, green: 0.27, blue: 0.63, alpha: 1.0)
            renderer.linewidth = 3.0
        else {
            renderer = MKOverlayPathRenderer(overlay: overlay)
        return renderer
        }
    }
    //...
}
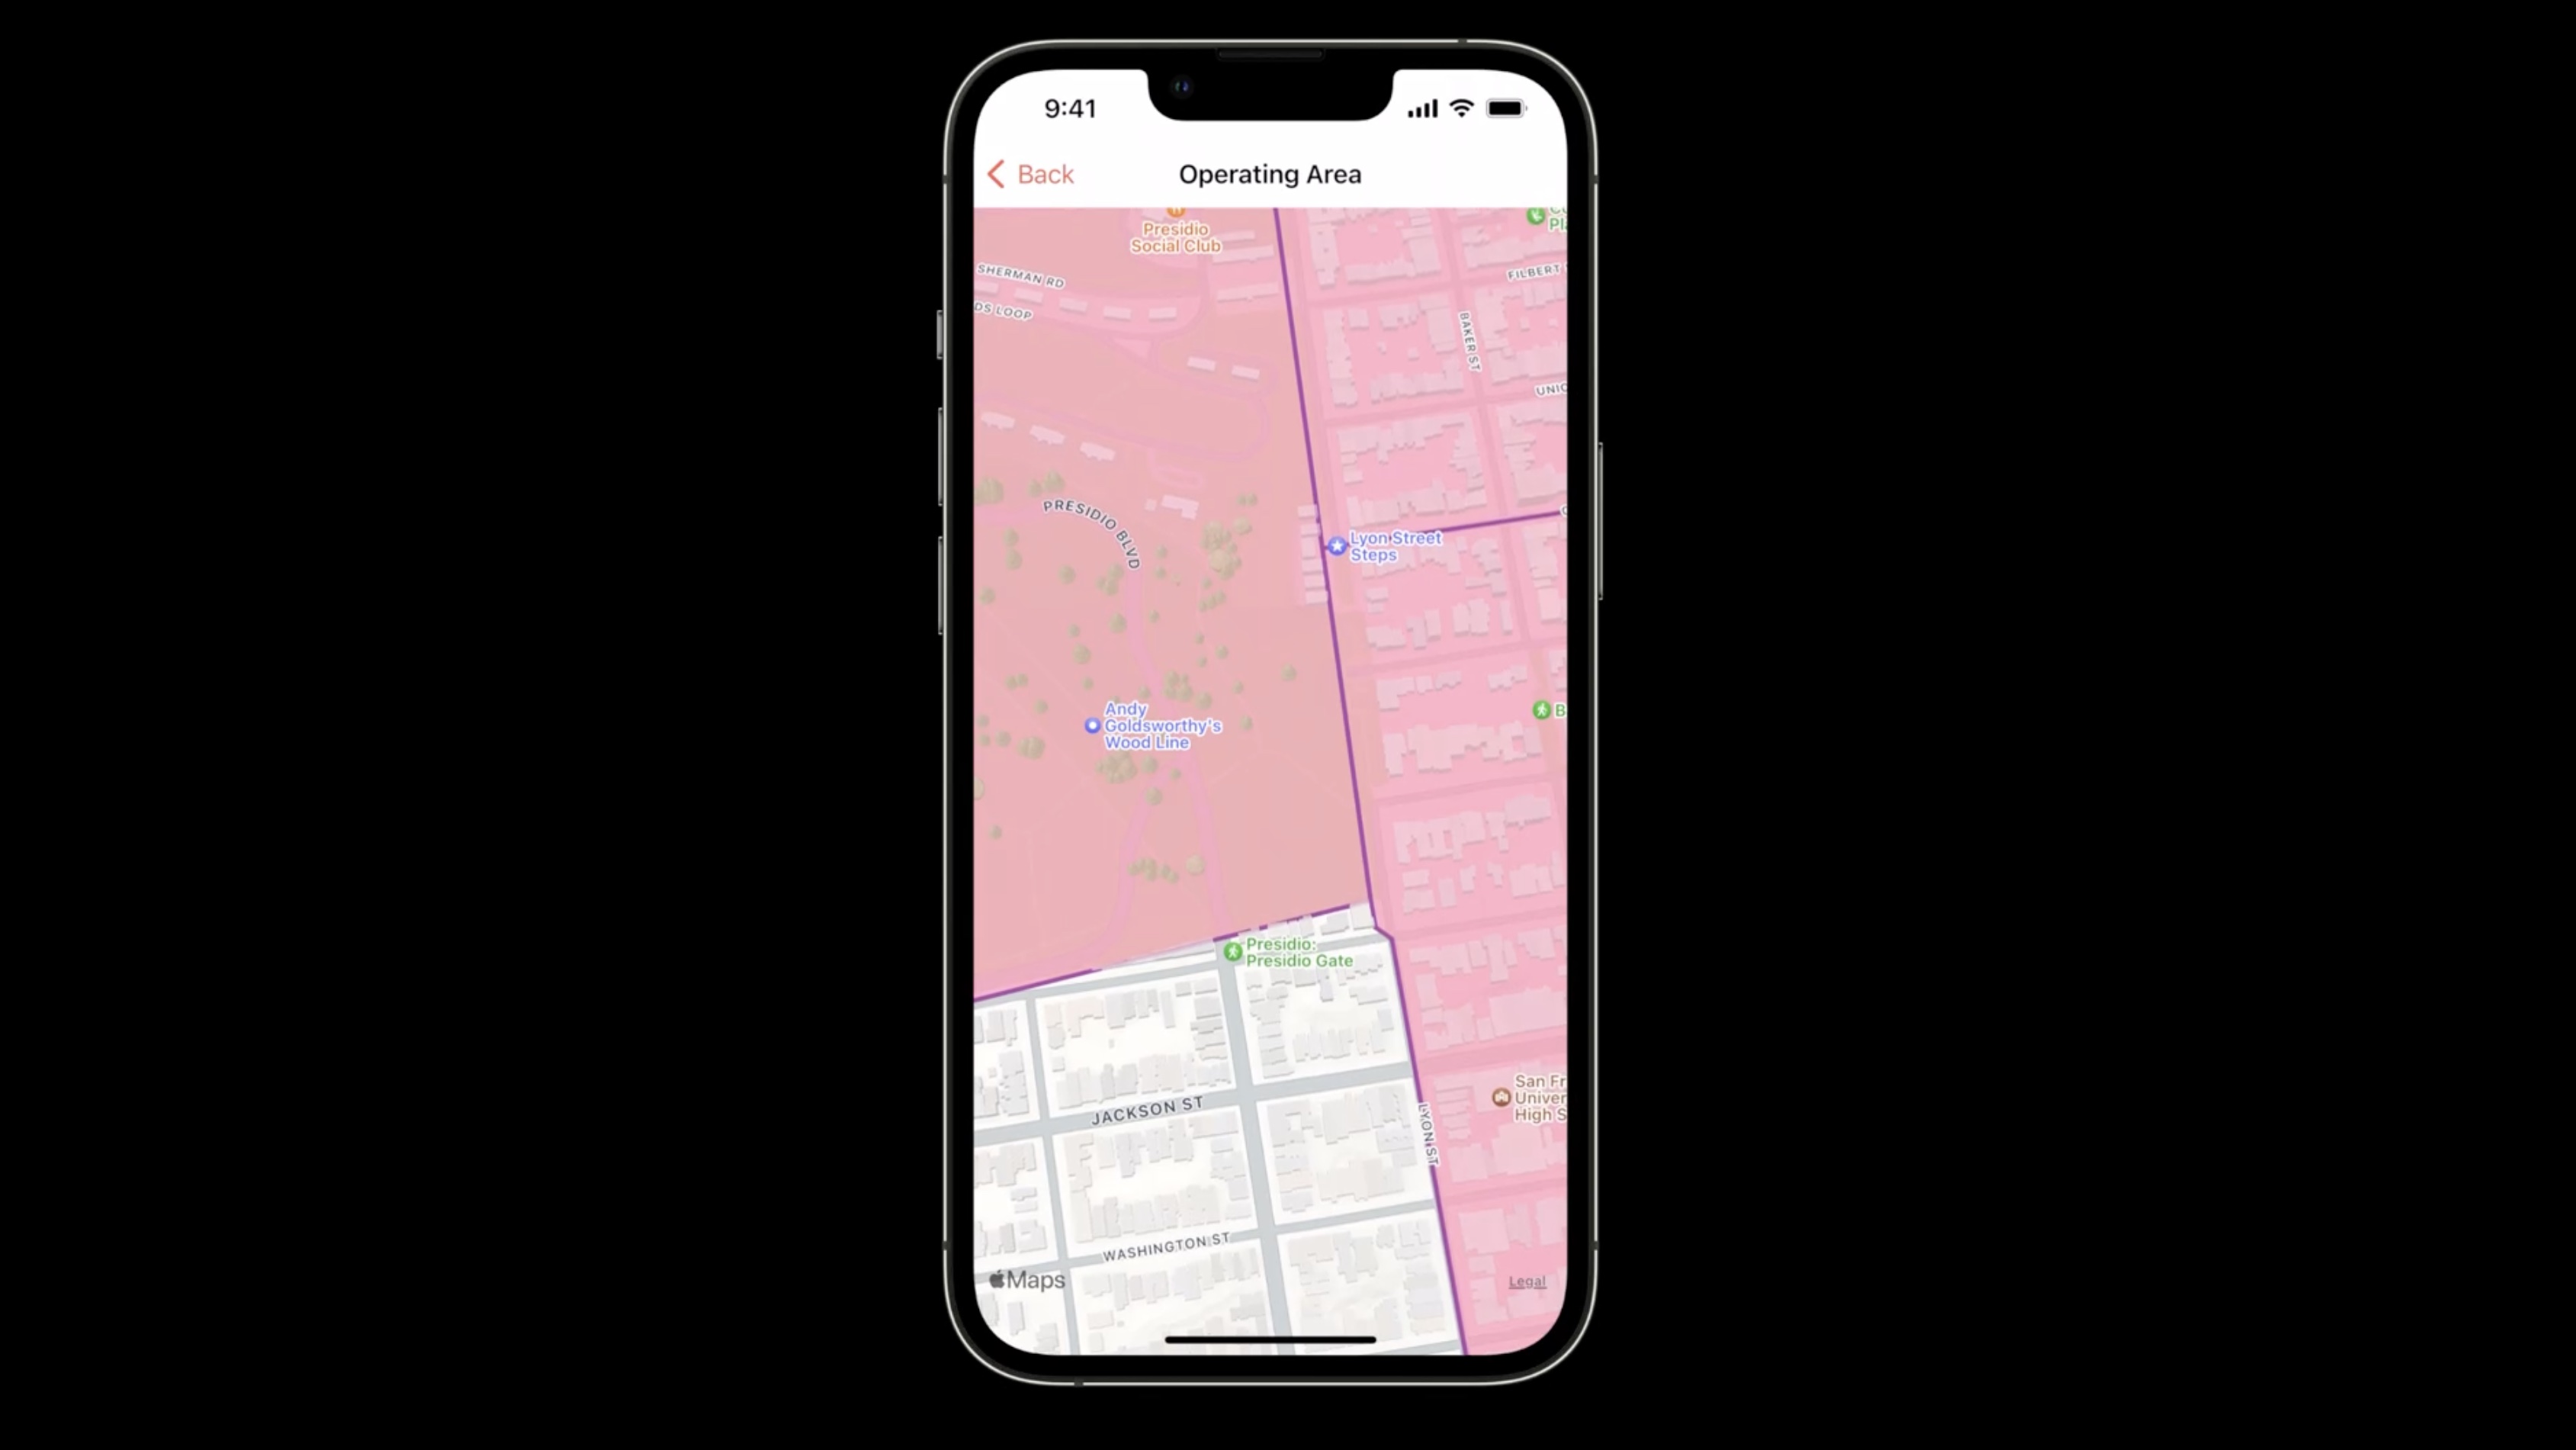
The polygon overlay is opaque when viewed straight down. As we zoom in and pitch, the buildings begin to show, with the transparency increasing as we pitch further. This effect is only available when using the overlay level AboveRoads.
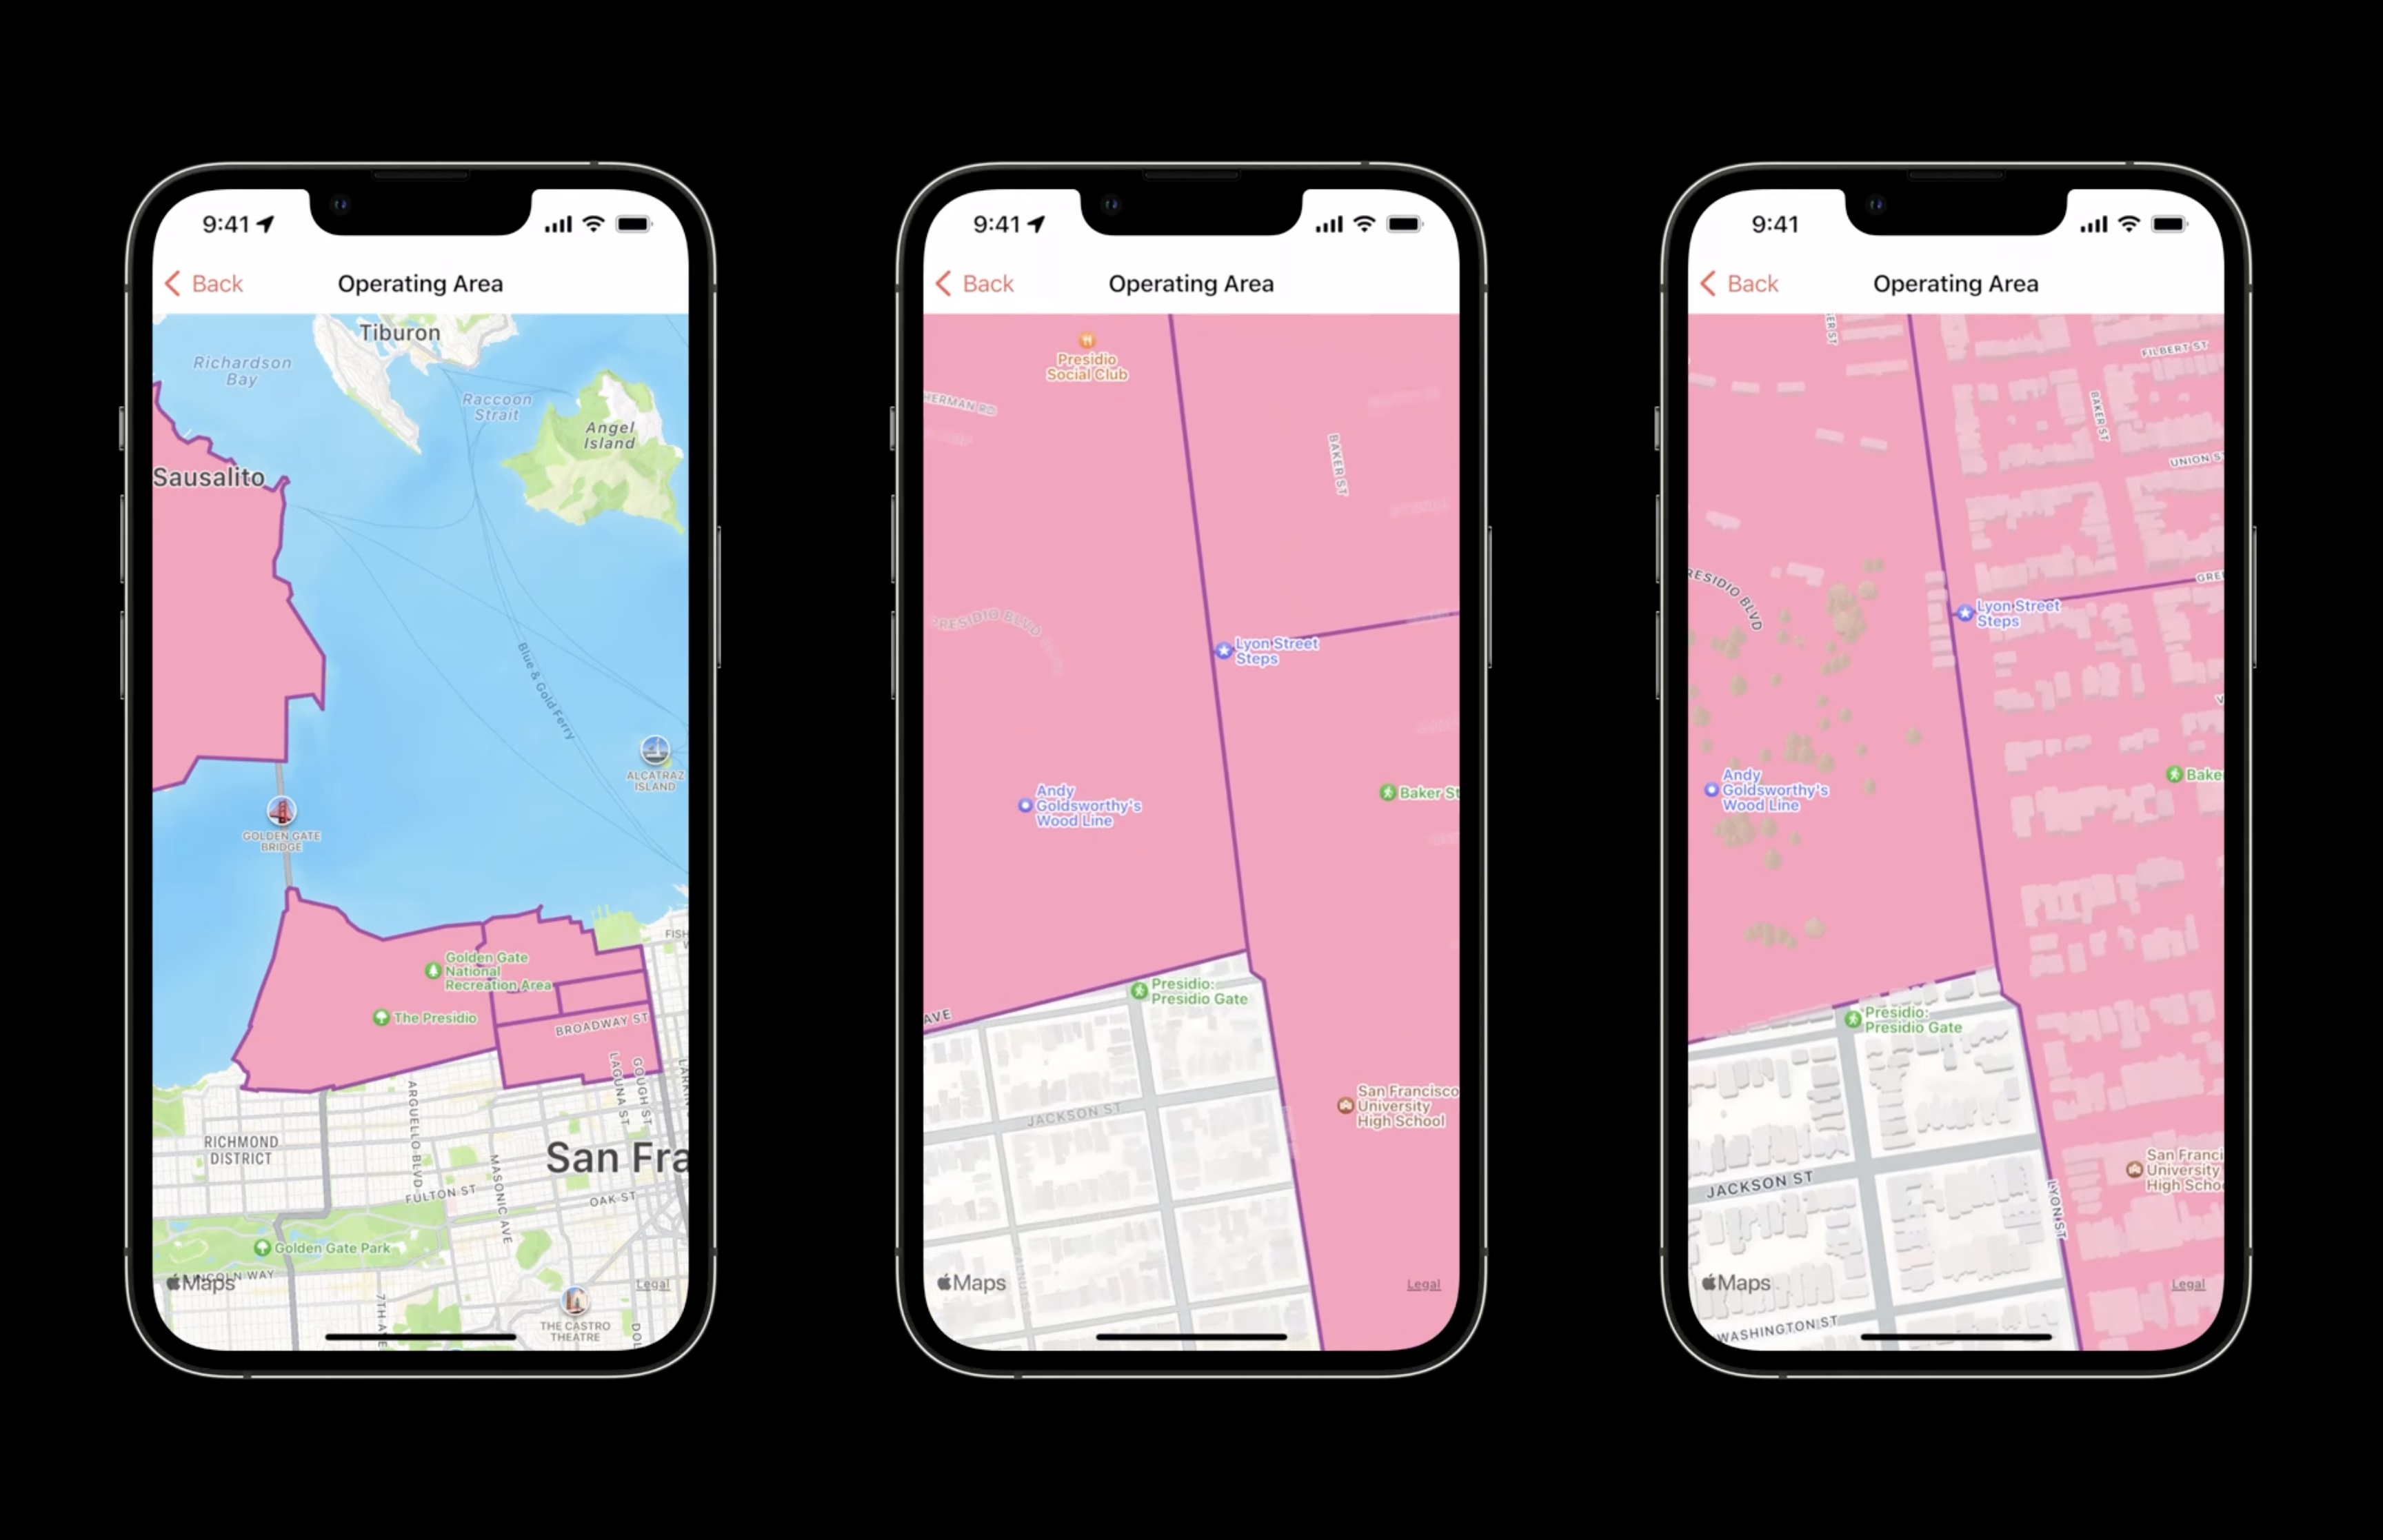
To want to leverage transparent buildings and trees, choose the correct overlay level.
Let's go back to the code and make the overlay semi-transparent with alpha to 0.8.
Now we have a transparent overlay and we can see roads and buildings even when not pitched.
Integrate realistic terrain and show adding an elevated route line
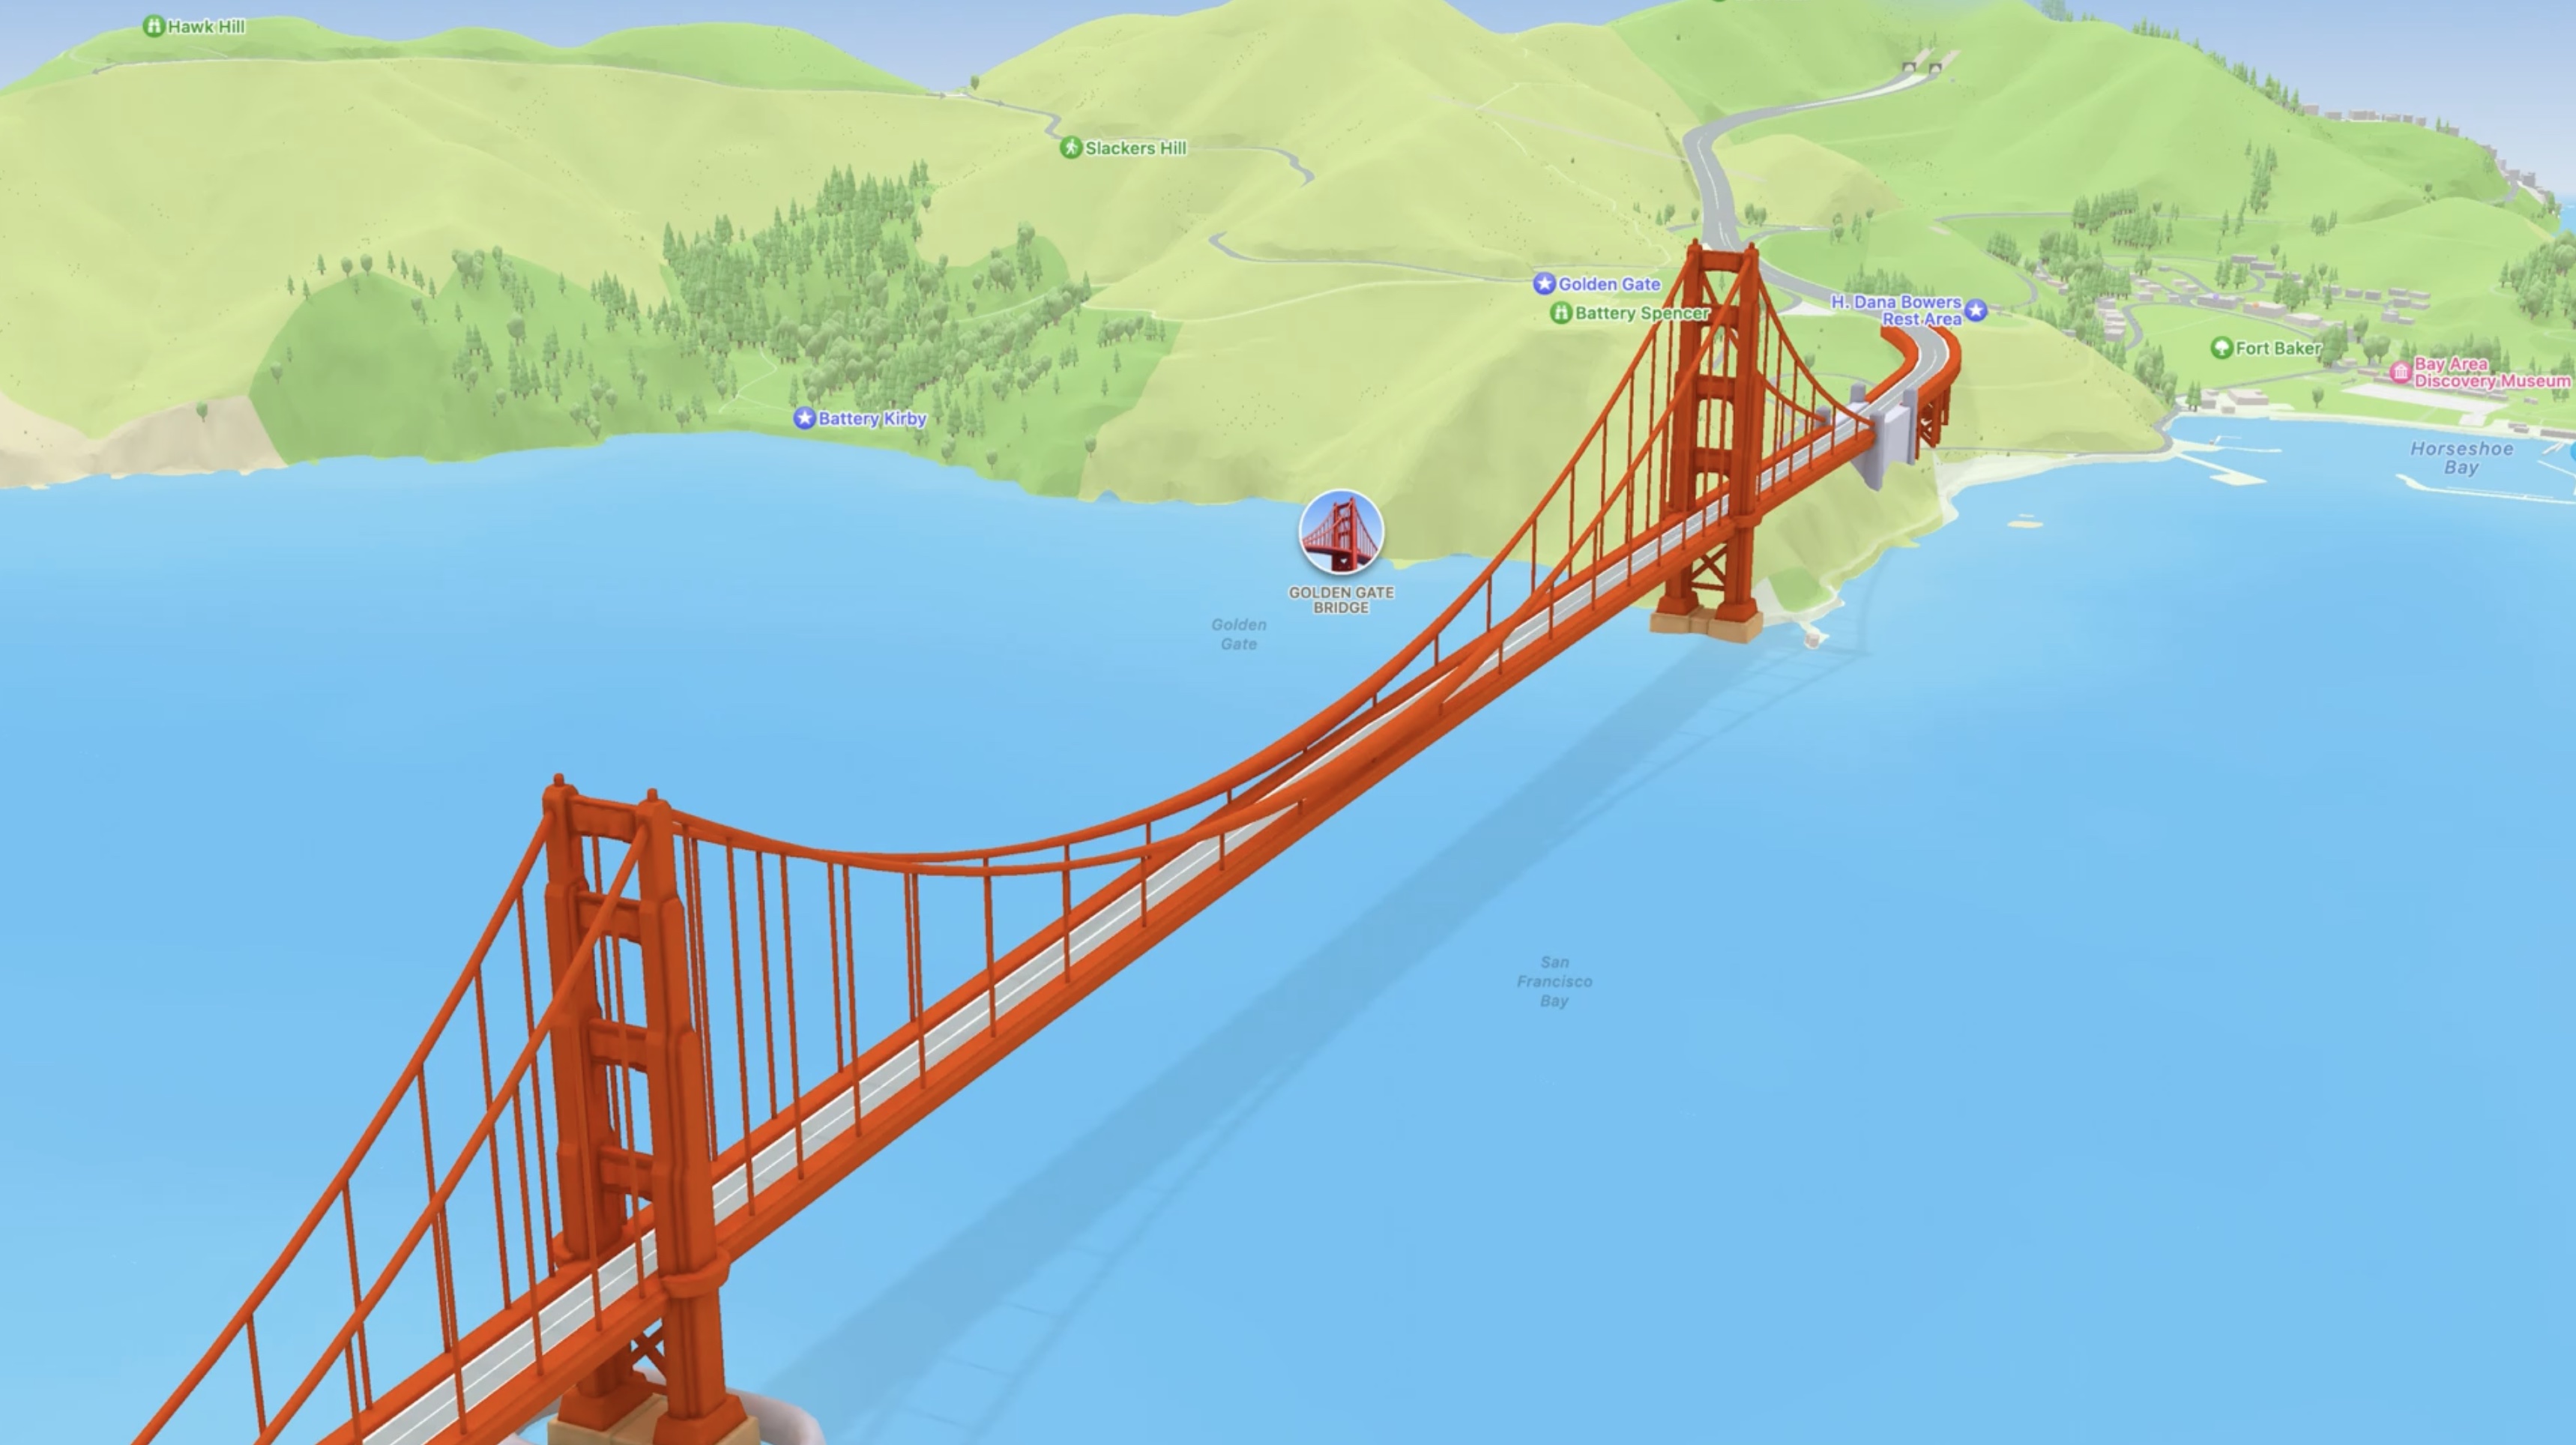
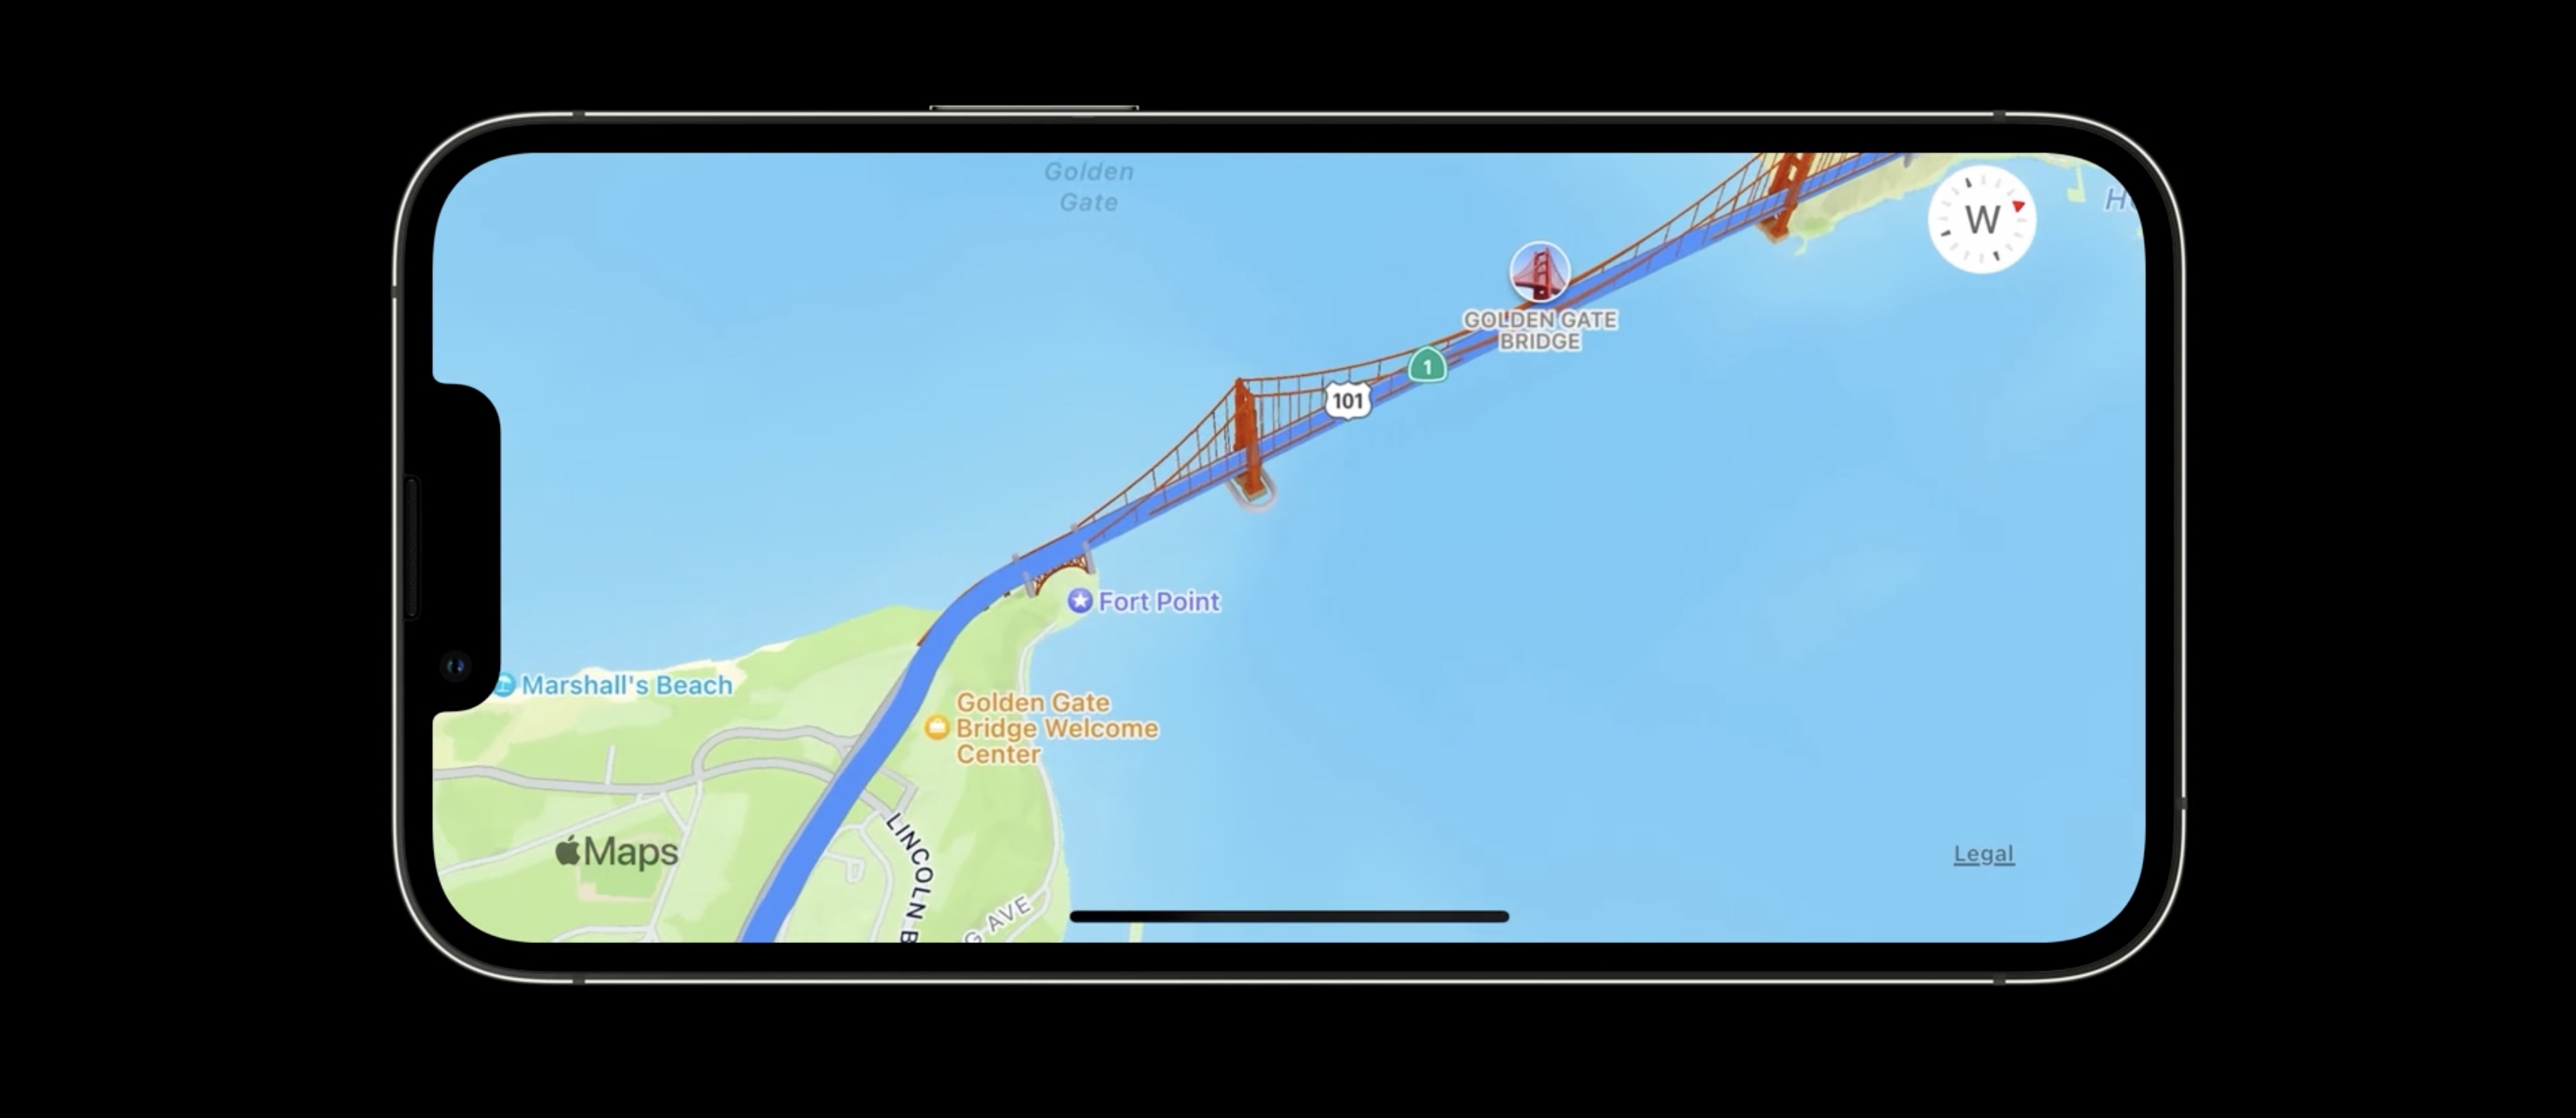
We will integrate realistic terrain and add an elevated route line. This will complete our "Ride" feature of the app, a tour across the Golden Gate Bridge.
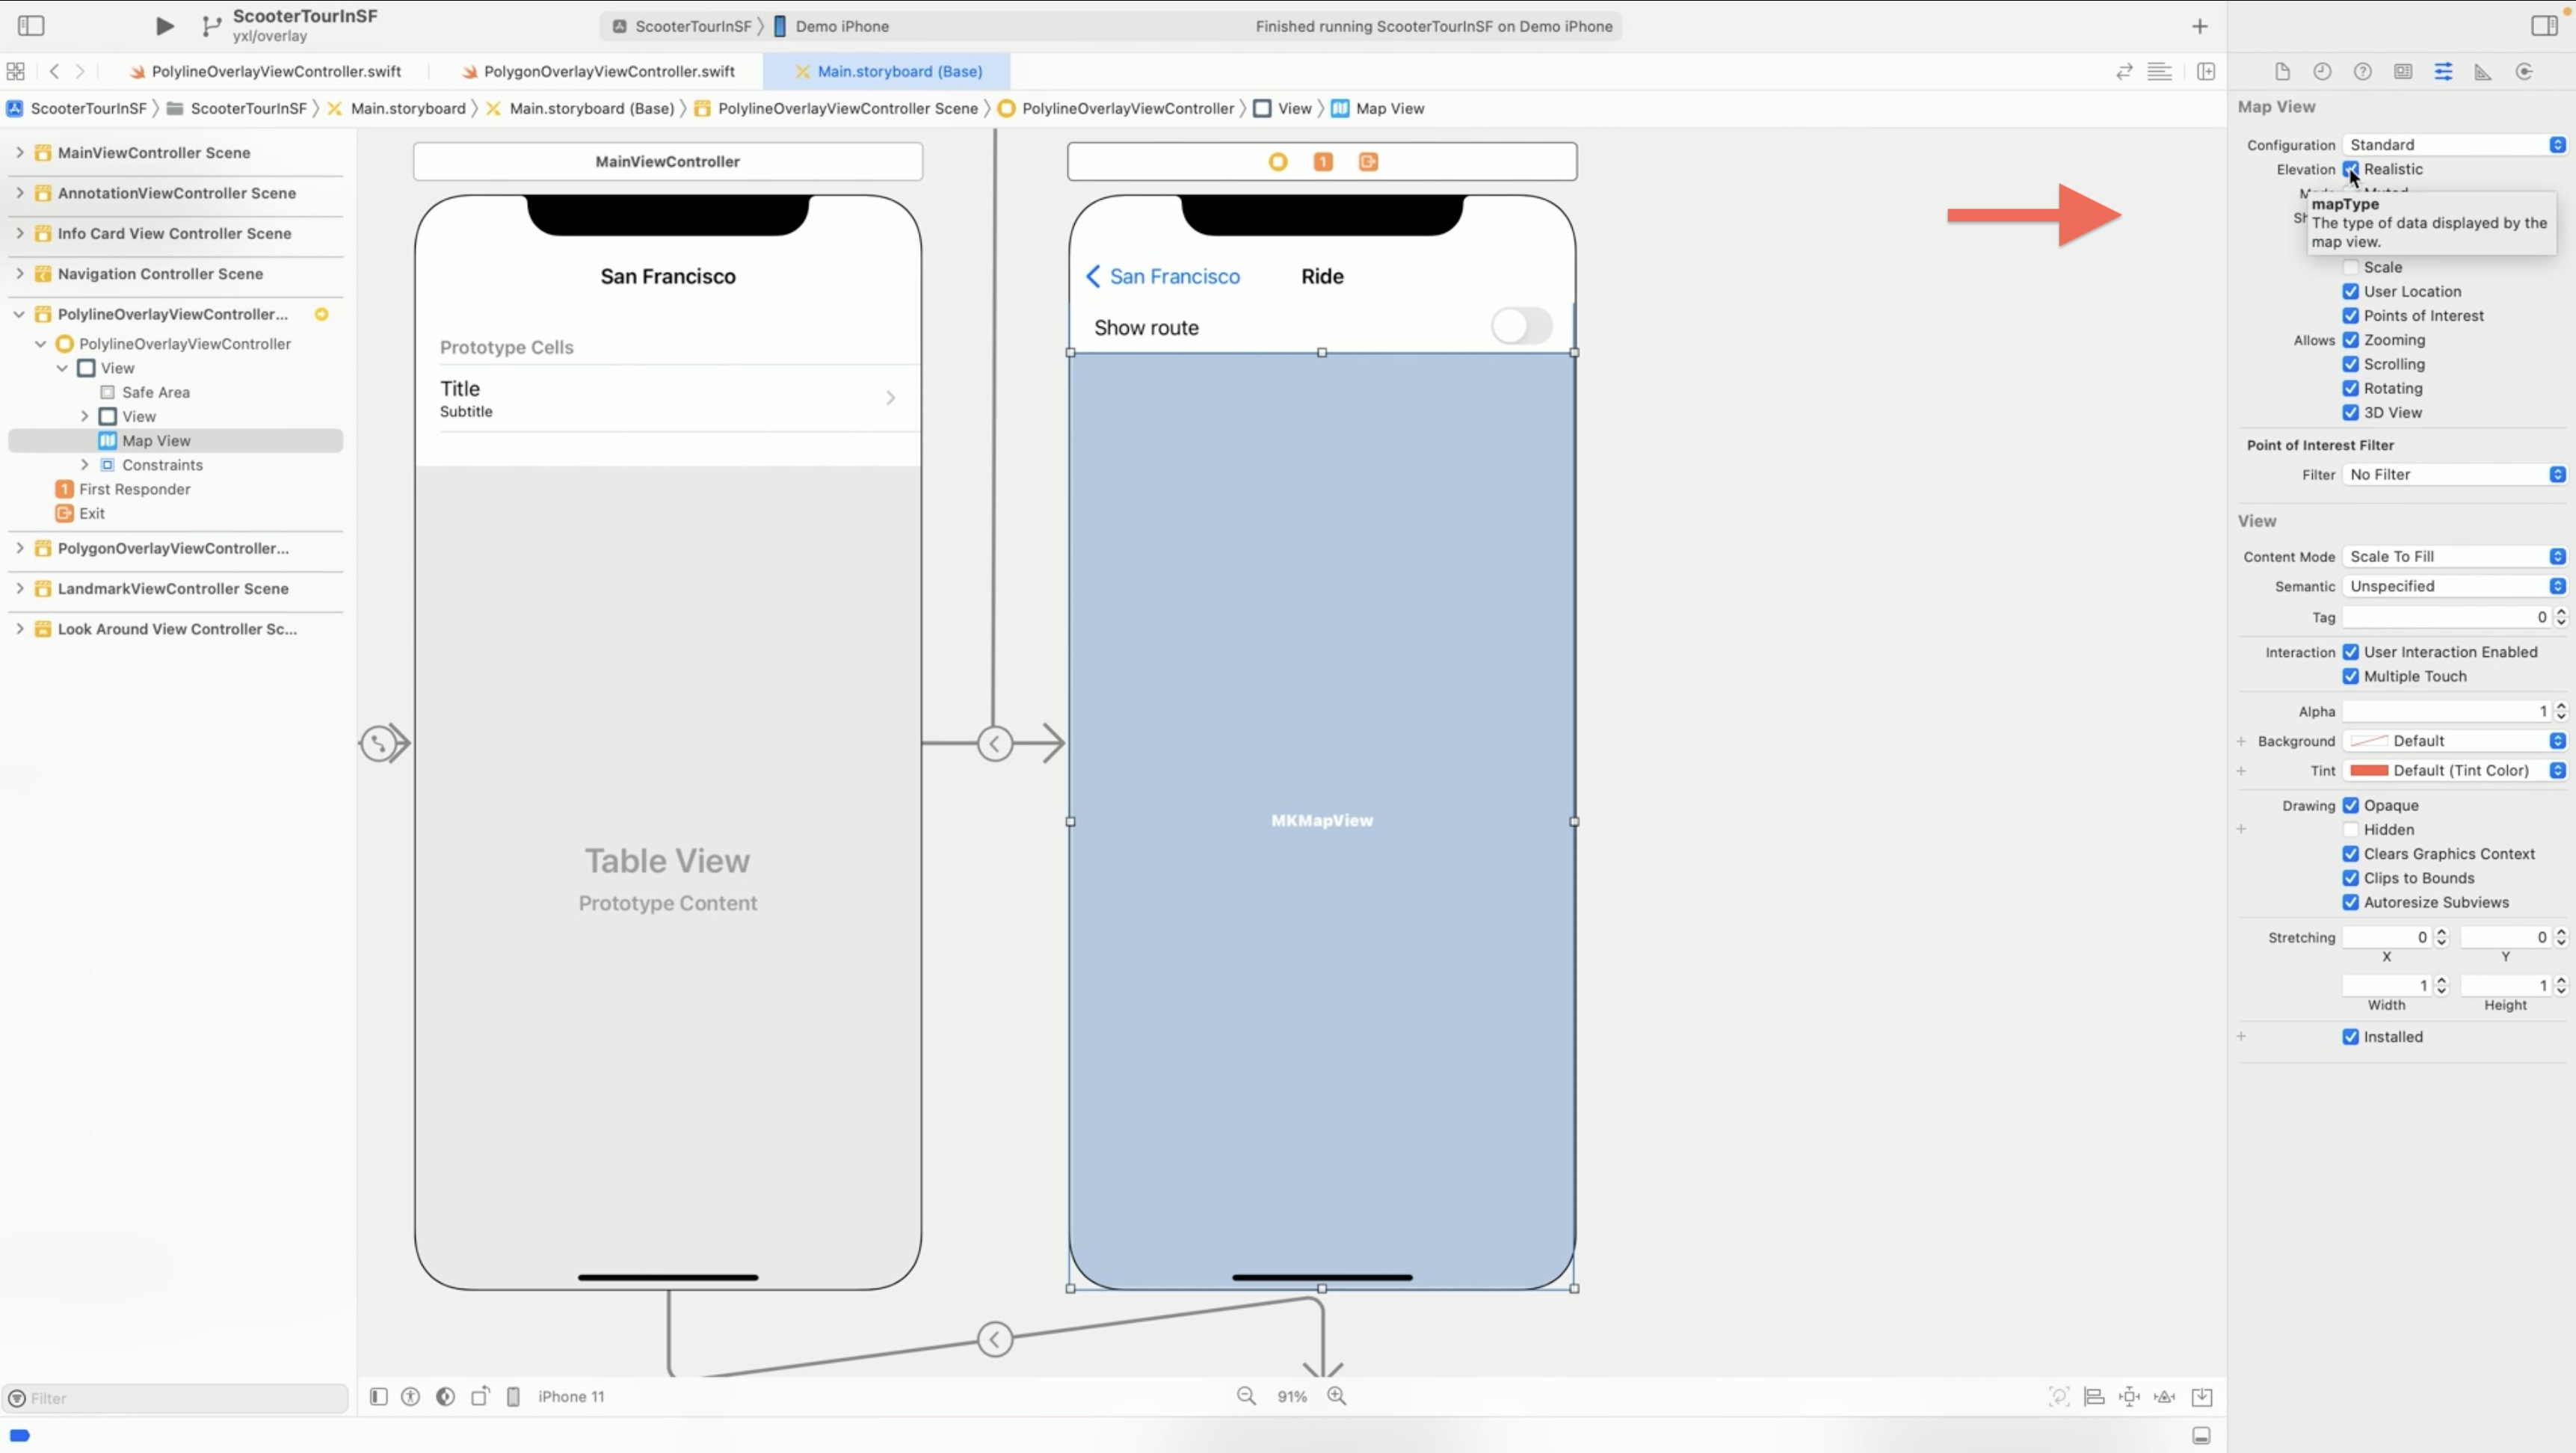
Start by configuring the map view. We can change the elevation style in code, or we can just open the Interface Builder inspector on the right-hand side.
Here are the available map view configuration settings. Let's select "elevation: realistic".
Next, let's work on the route.
For this feature, we want to show a route when the user toggles the Show Route switch. We will also animate the camera to focus on the route.
Since we want to show a route across the Golden Gate Bridge, we'll use the Presidio Park entry as the start point and the Battery Spencer as the end point.
imроrt UIKit
import MapKit


//This class displays elevated route line overlay loaded from MapKit server on a map view.

class Polyline0verlayViewController: UIViewController, MKMapViewDelegate {
    @IBOutlet private var mapView: MKMapView!

    let presidioEntry = CLLocationCoordinate2D(latitude: 37.79190, longitude: -122.44776)
    let batterySpencer = CLLocationCoordinate2D(latitude: 37.82798, longitude: -122.48201)

    //...
When the map view is loaded, we'll create annotations to mark the start and destination points.
override func viewDidLoad() {
    super.viewDidLoad()
    configureCamera()
    // Create annotations
    addAnnotationsAtStartAndEnd()
Set coordinates and title, append it to the annotation array, then add them to the map view.
func addAnnotationsAtStartAndEnd() {
    // Create annotations for start location and destination.
    var annotations = [MKAnnotation]()

    let startAnnotation = MKPointAnnotation()
    startAnnotation.coordinate = presidioEntry
    startAnnotation.title = "Presidio Gate"
    annotations.append(startAnnotation)

    let endAnnotation = MKPointAnnotation( )
    endAnnotation.coordinate = batterySpencer
    endAnnotation.title = "Battery Spencer"
    annotations.append(endAnnotation)

    // Add annotations to map view.
    mapView.addAnnotations (annotations)
    }
While normal overlays will flatten the map, the polyline returned by MapKit's Directions API will preserve the realistic terrain.
In this action function, once the switch is turned on, it will create place marks with the coordinates defined above. Then create a direction request, with source and destination. Finally, we request the directions.
If the fetch operation succeeds, we add the route polyline as an overlay.
@IBAction func routeSwitchToggled(_ sender: UISwitch) {
    if sender.isOn {

        // Create MKPlaceMark for start position and destination
        let origin = MKPlacemark(coordinate: presidioEntry)
        let destination = MKPlacemark(coordinate: batterySpencer)

        // Create MDirections request with locations defined above.
        let request = MKDirections.Request()
        request. source = MKMapItem(placemark: origin)
        request.destination = MKMapItem(placemark: destination)

        Task {

            // Make direction request.
            let direction = MDirections(request: request)
            do {
                guard let response = try await direction.calculate() else { return }

                // Add route polyline
                for route in response.routes {
                    self.mapView.addOverlay(route.polyline, level: .aboveRoads)
                }

                // Animate map camera for a closer look at elevated route polyline
                animateCamera()

            } catch {
            // ...
            }
        }
    }
}
The annotations are automatically upgraded to the new gradient look.. Once we toggle show route, the camera will pitch. Then, you can get a better view of them.
The route line follows the elevated terrain. It also follows the road across the bridge. Also, the route subtly shows through the bridge pillars.
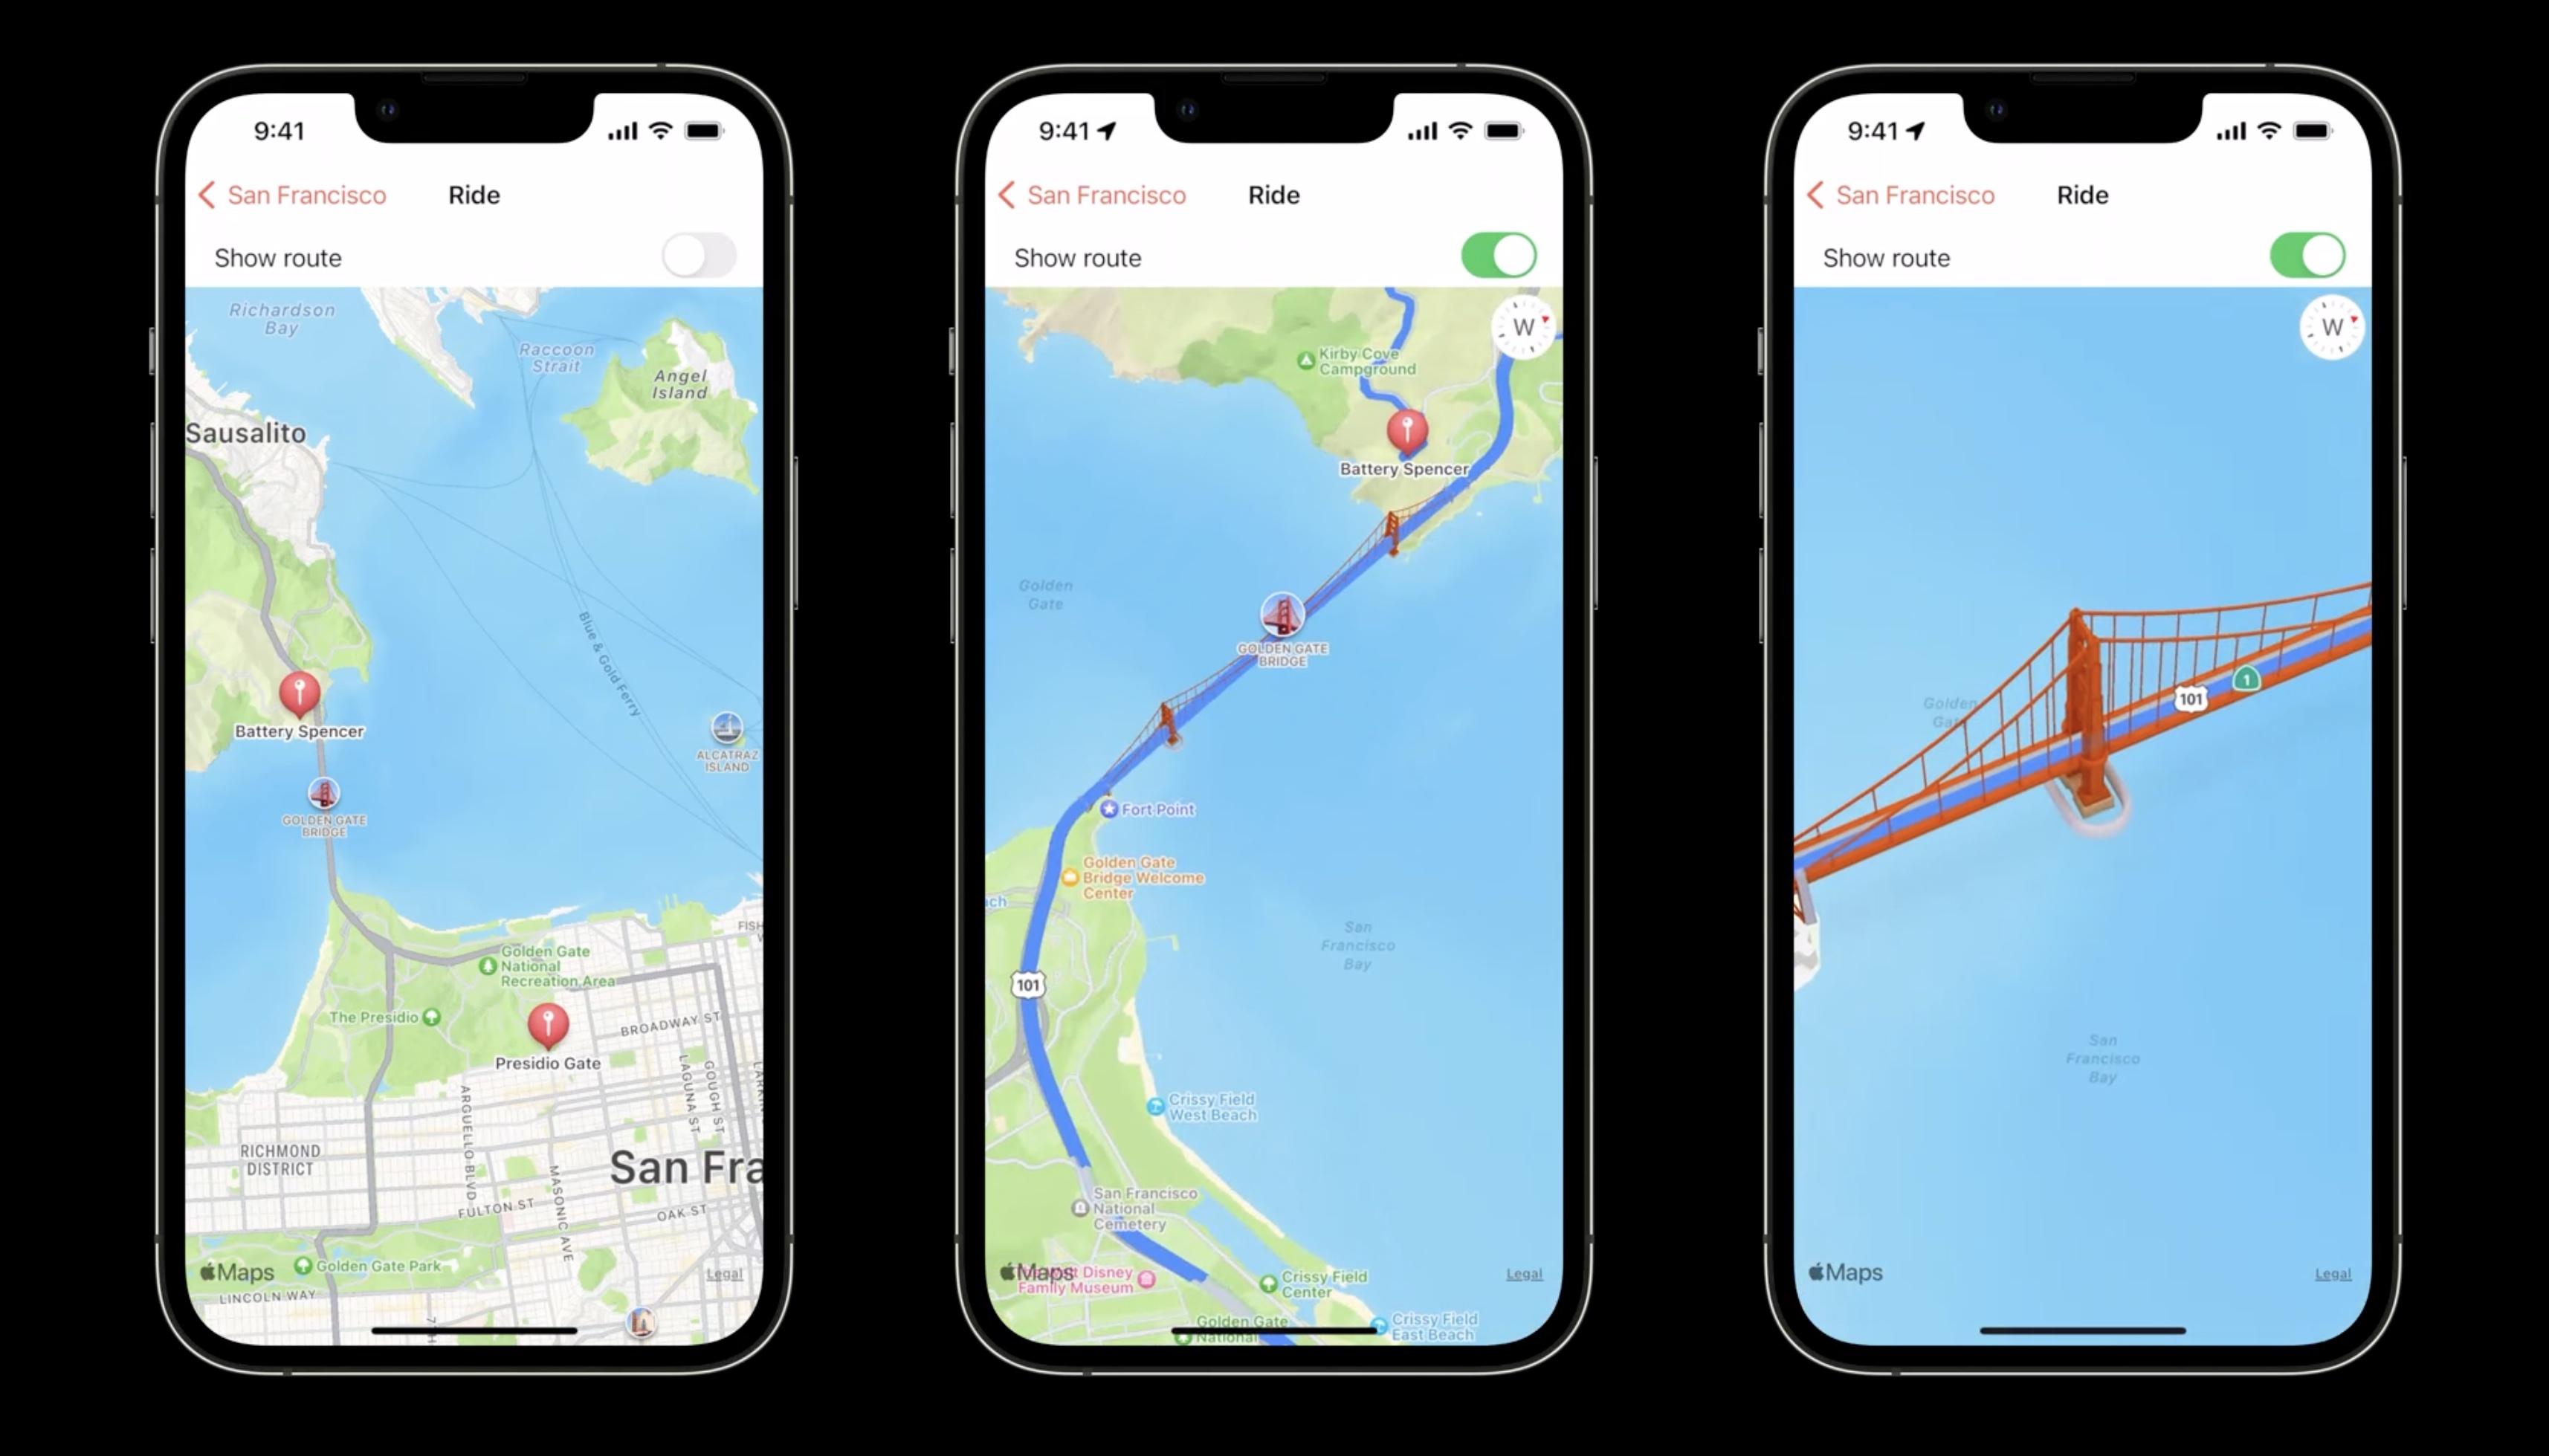
Finally, we can see the route show through the trees that stand in front of it.
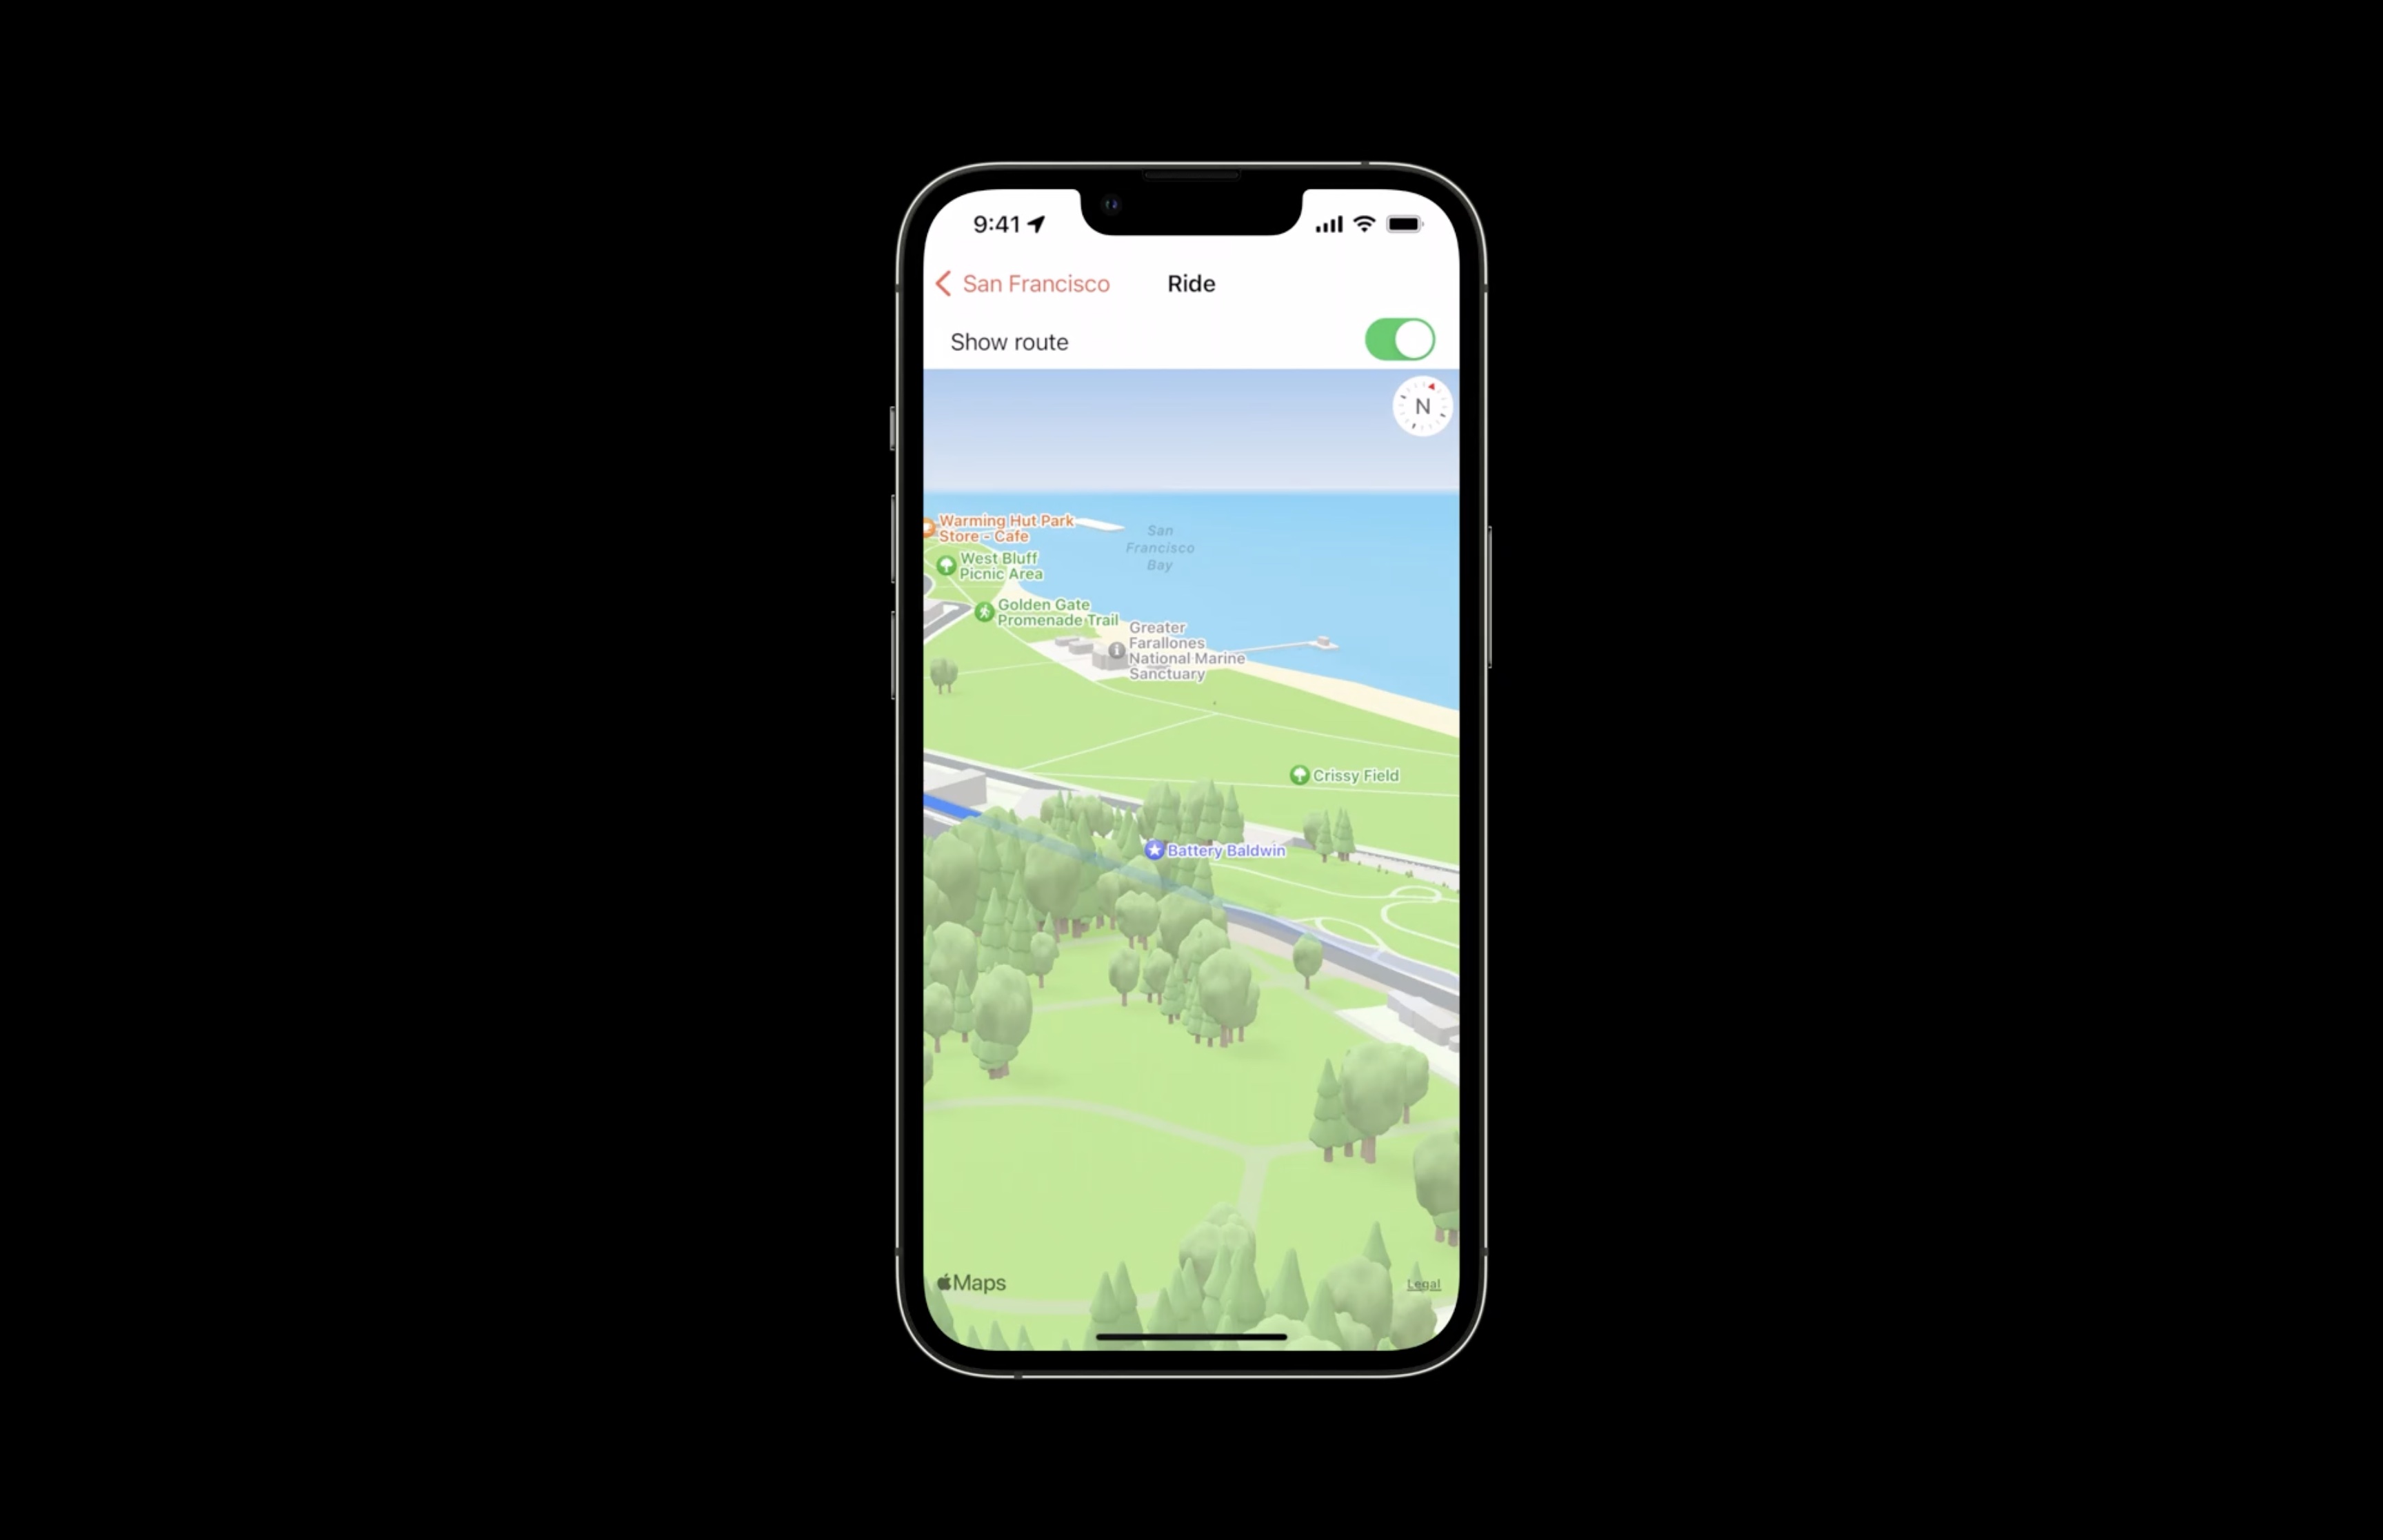
Here a part of the route goes through a tunnel, so we get transparency for it. ElevationRealisticStyle and the elevated route line feature are supported on A12-based iOS devices. The same app on an older iOS device, will automatically get a 2D route on a 2D map...
Blend modes
This new API gives you more control over the look and feel of overlays. During a blend operation, two graphical layers are combined following a set of equations specified by the blend mode.
In this scenario, we want to highlight the area of the Presidio National Park in San Francisco in the center of this map. First, we create an overlay covering the entire map area, with a cutout in the shape of the Presidio.
We are not using any blend modes yet. This is just a plain overlay, in the shape of a big square doughnut. Next, we assign a hue blend mode to the overlay, with a gray fill. This desaturates the map outside of the Presidio.
Next, we are going to duplicate that overlay and assign it a hard light blend mode, with a dark gray fill.
This has the effect of darkening the area around the Presidio. This already looks nice, but lets add another overlay. This time, we'll add an overlay in the shape of the Presidio and assign a saturation blend mode, with a yellow fill. But the colors are way too bright. We'll apply a color burn blend mode with a gray fill.
We added a property to MKOverlayRenderer, called blendMode. All we need to do is set the desired CoreGraphics blend mode on the overlay renderer.
class MKOverlayRenderer {

    var blendMode: CGBlendMode
}

class MKMapView {
    func insertOverlay(_ overlay: MKOverlay, at index: Int, level: MKOverlayLevel)
    func insertOverlay(_ overlay: MKOverlay, above sibling: MKOverlay)
    func insertOverlay(_ overlay: MKOverlay, below sibling: MKOverlay)
    //...
}
Blend modes are order dependent. The overlay at the bottom of the stack is blended with the map, the second-to-last overlay is then blended with the result of the previous blend operation, and so on.
In MapKit, the order of overlays is determined at insertion time. we can use either absolute or relative positioning using one of MKMapView's many overlay insertion functions.
Blend modes:
- Multiply
- Screen
- Overlay
- Darken
- Lighten
- ColorDodge
- ColorBurn
- LinearBurn
- SoftLight
- HardLight
- Difference
- Exclusion
- Hue
- Saturation
- Color
- Luminosity
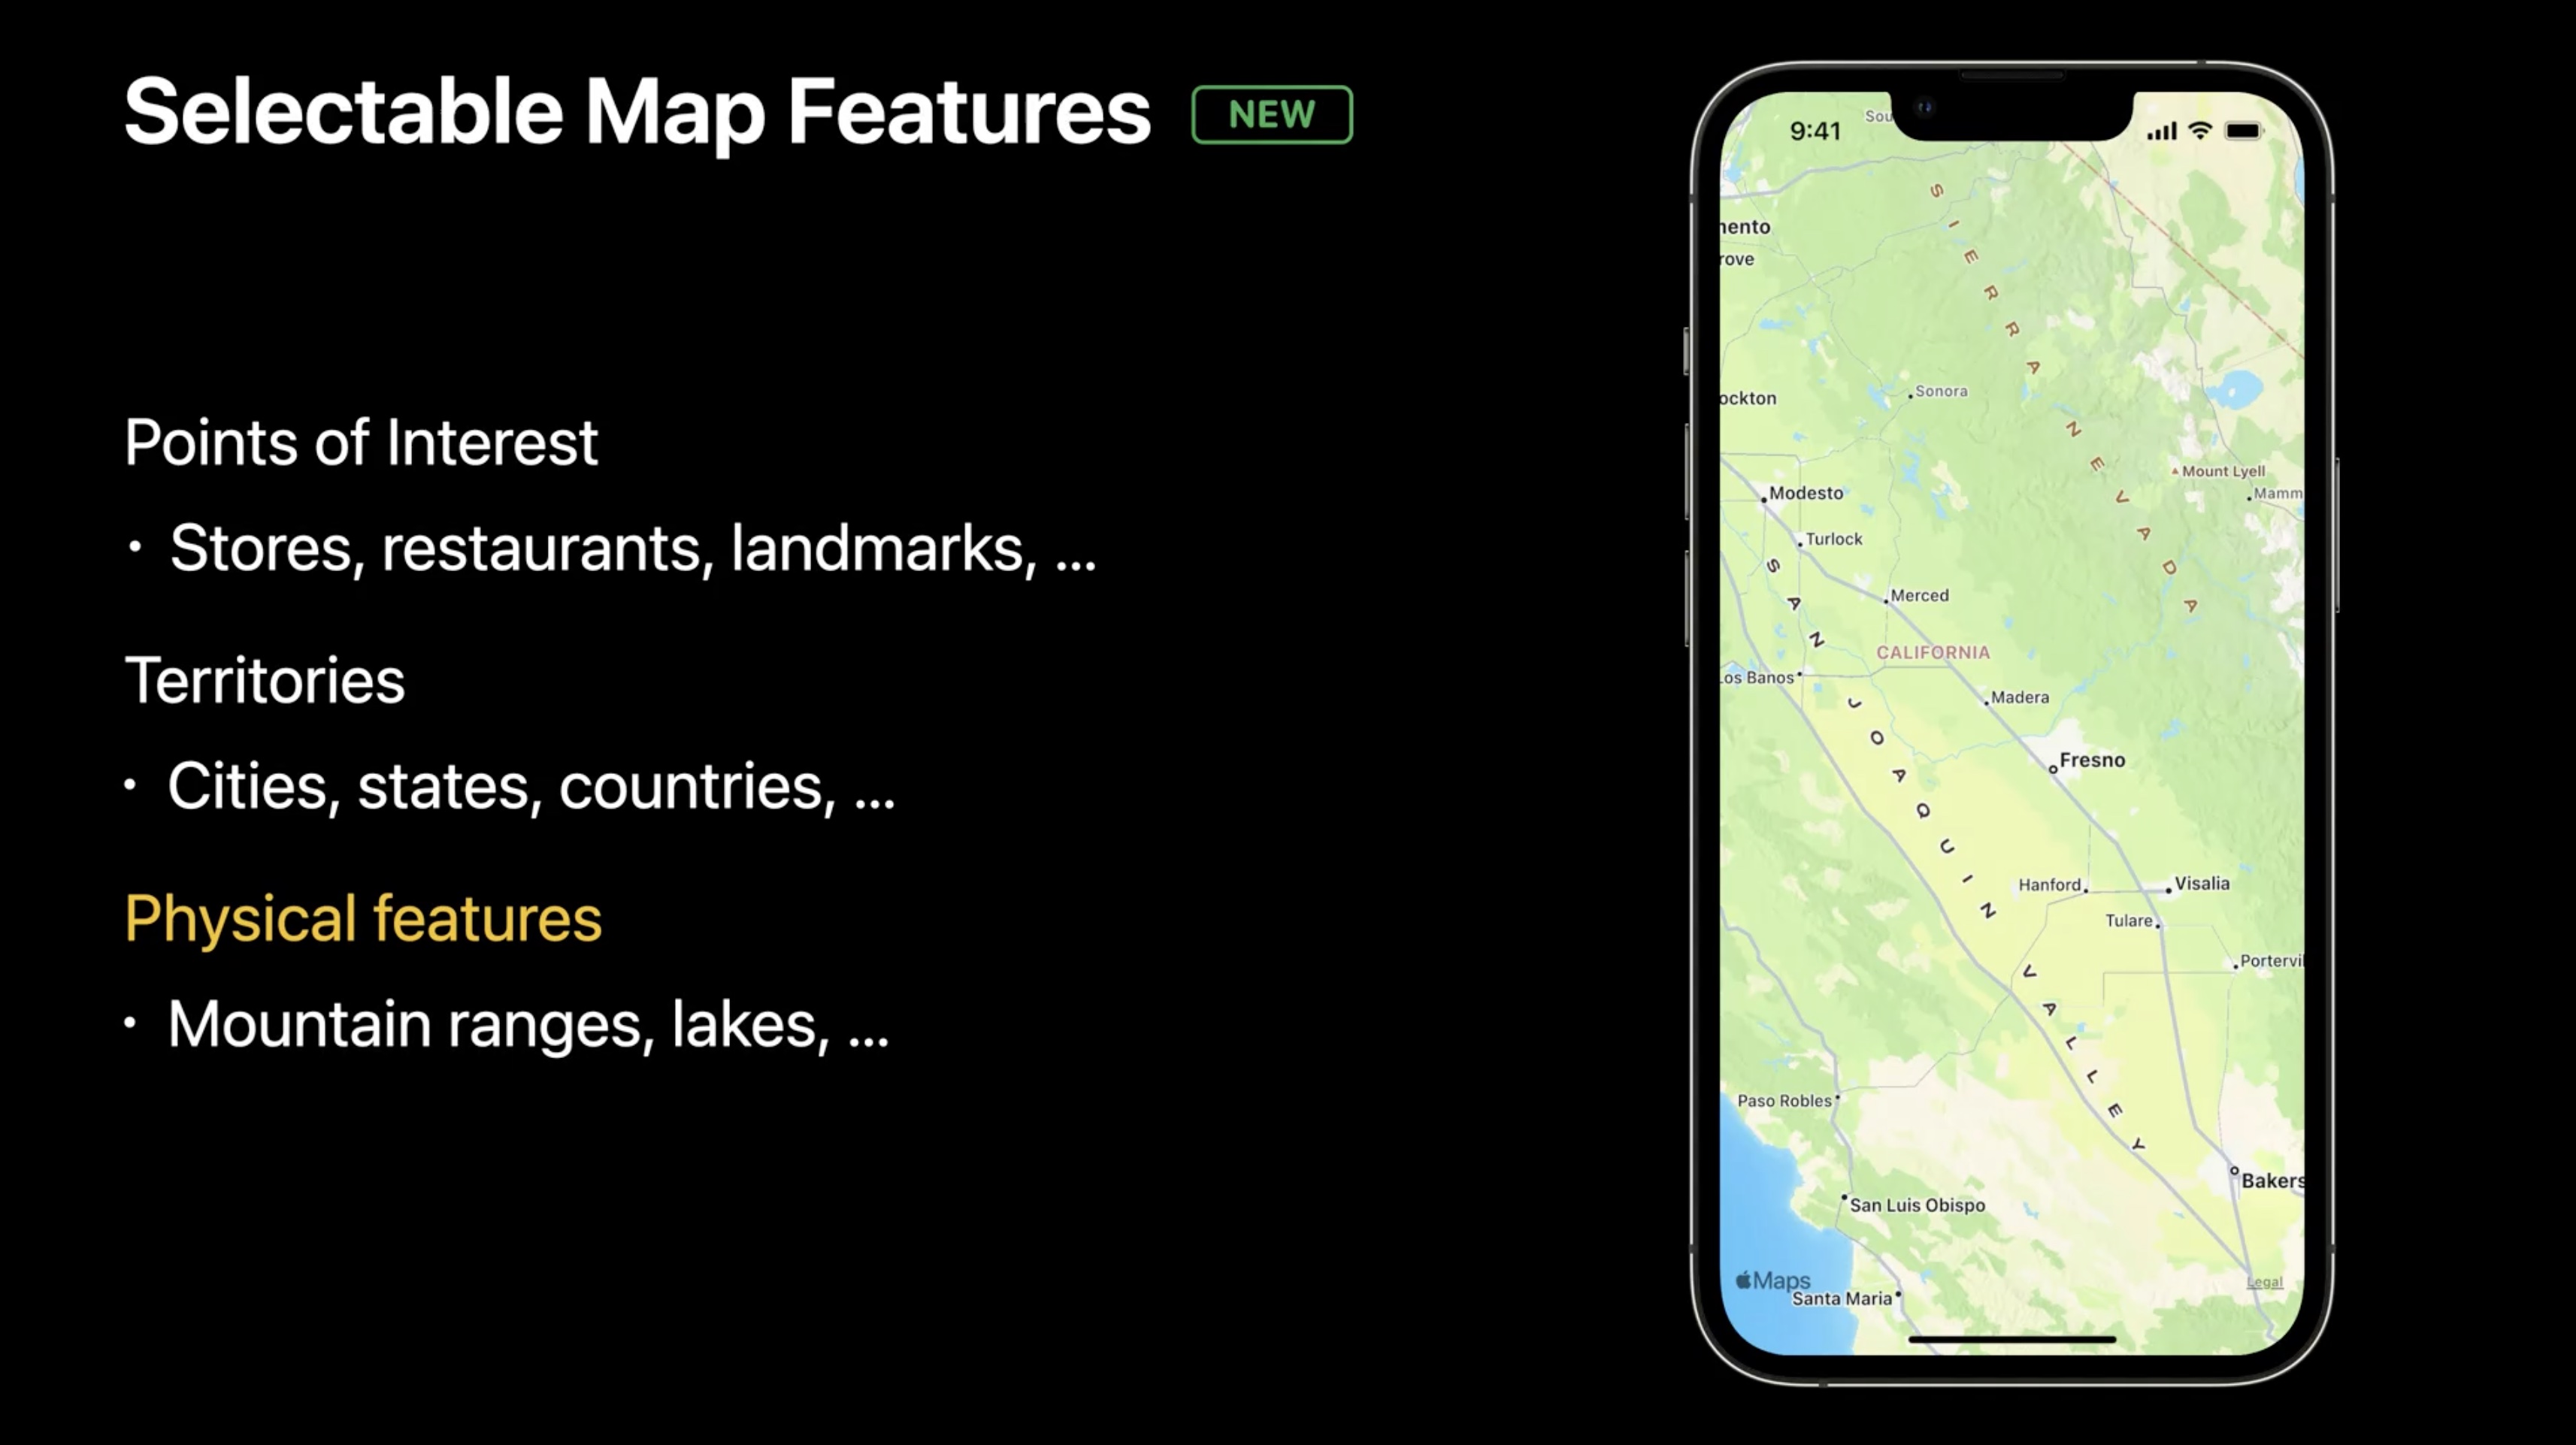
Selectable Map Features
Using MapKit we leverage annotations to show the location of cities, points of interest, or physical objects. Unless using POI filtering, we are placing those annotations on a map which already contains a number of similar annotations provided by Apple. Up until now, users could only interact with the annotations we provided.
In iOS 16, using the new Selectable Map Features API, we'll have the option to let our users select features on the map.
Selectable map features include points of interest, such as stores, restaurants, and landmarks; territories, such as cities and states; and physical features, such as mountain ranges and lakes.
To adopt Selectable Map Features in your app:
First, configure which feature types should be selectable. There are three main feature types, and it might not make sense for all of them to be interactive. For points-of-interest features, we can also use existing filter API to further restrict which points-of-interest categories can appear and therefore be selectable.
Second, implement the MKMapView delegate callbacks to handle selection events. We might want to control how selected features appear, or might want to show some additional UI in response to the selection events.
Third, to request and display additional place information in the application's user interface. To give users more context about the place they selected, we'll need to request additional information.
We'll start with configuring which map features should be selectable using the new selectableMapFeatures property.
class MKMapView {
    var selectableMapFeatures: MKMapFeatureOptions
}

struct MKMapFeature0ptions: OptionSet {
    static var points0fInterest
    static var territories
    static var physicalFeatures
}
We can choose any combination of points of interest, territories, and physical features. Once we have configured the selectable map features and the user taps one of those features, we'll start receiving some new delegate callbacks allowing to customize the selection behavior.
protocol MKMapViewDelegate {
    optional func mapView(_: MKMapView, didSelect annotation: MKAnnotation)
    optional func mapView(_: MKMapView, didDeselect annotation: MKAnnotation)

    // existing
    optional func mapView(_: MKMapView, viewFor annotation: MKAnnotation) -> MKAnnotationView?
}
The first callback is the new didSelect annotation. This callback is a great opportunity to request additional data about the map item using the new request API.
The second callback is the existing viewFor annotation. This is where we can customize the view which will be shown for the selected state.
While this is existing API, there is a new type of annotation class called MapFeatureAnnotation.
class MKMapFeatureAnnotation: MKAnnotation {
    var featureType: FeatureType
    var point0fInterestCategory: MKPoint0fInterestCategory?
    var iconStyle: MKIconStyle?
}
This class will be passed to "view for annotation" when the user selects a map feature. MapFeatureAnnotation has a number of properties. We can inspect the FeatureType property to determine whether the map feature is a point of interest, a territory, or a physical feature. If the map feature is a point of interest, the pointOfInterestCategory property will let us know what its category is, and the iconStyle property will let us obtain additional information about the icon, such as its background color and the icon image itself.
class MKIconStyle {
    var backgroundColor: UIColor
    var image: UIImage
}
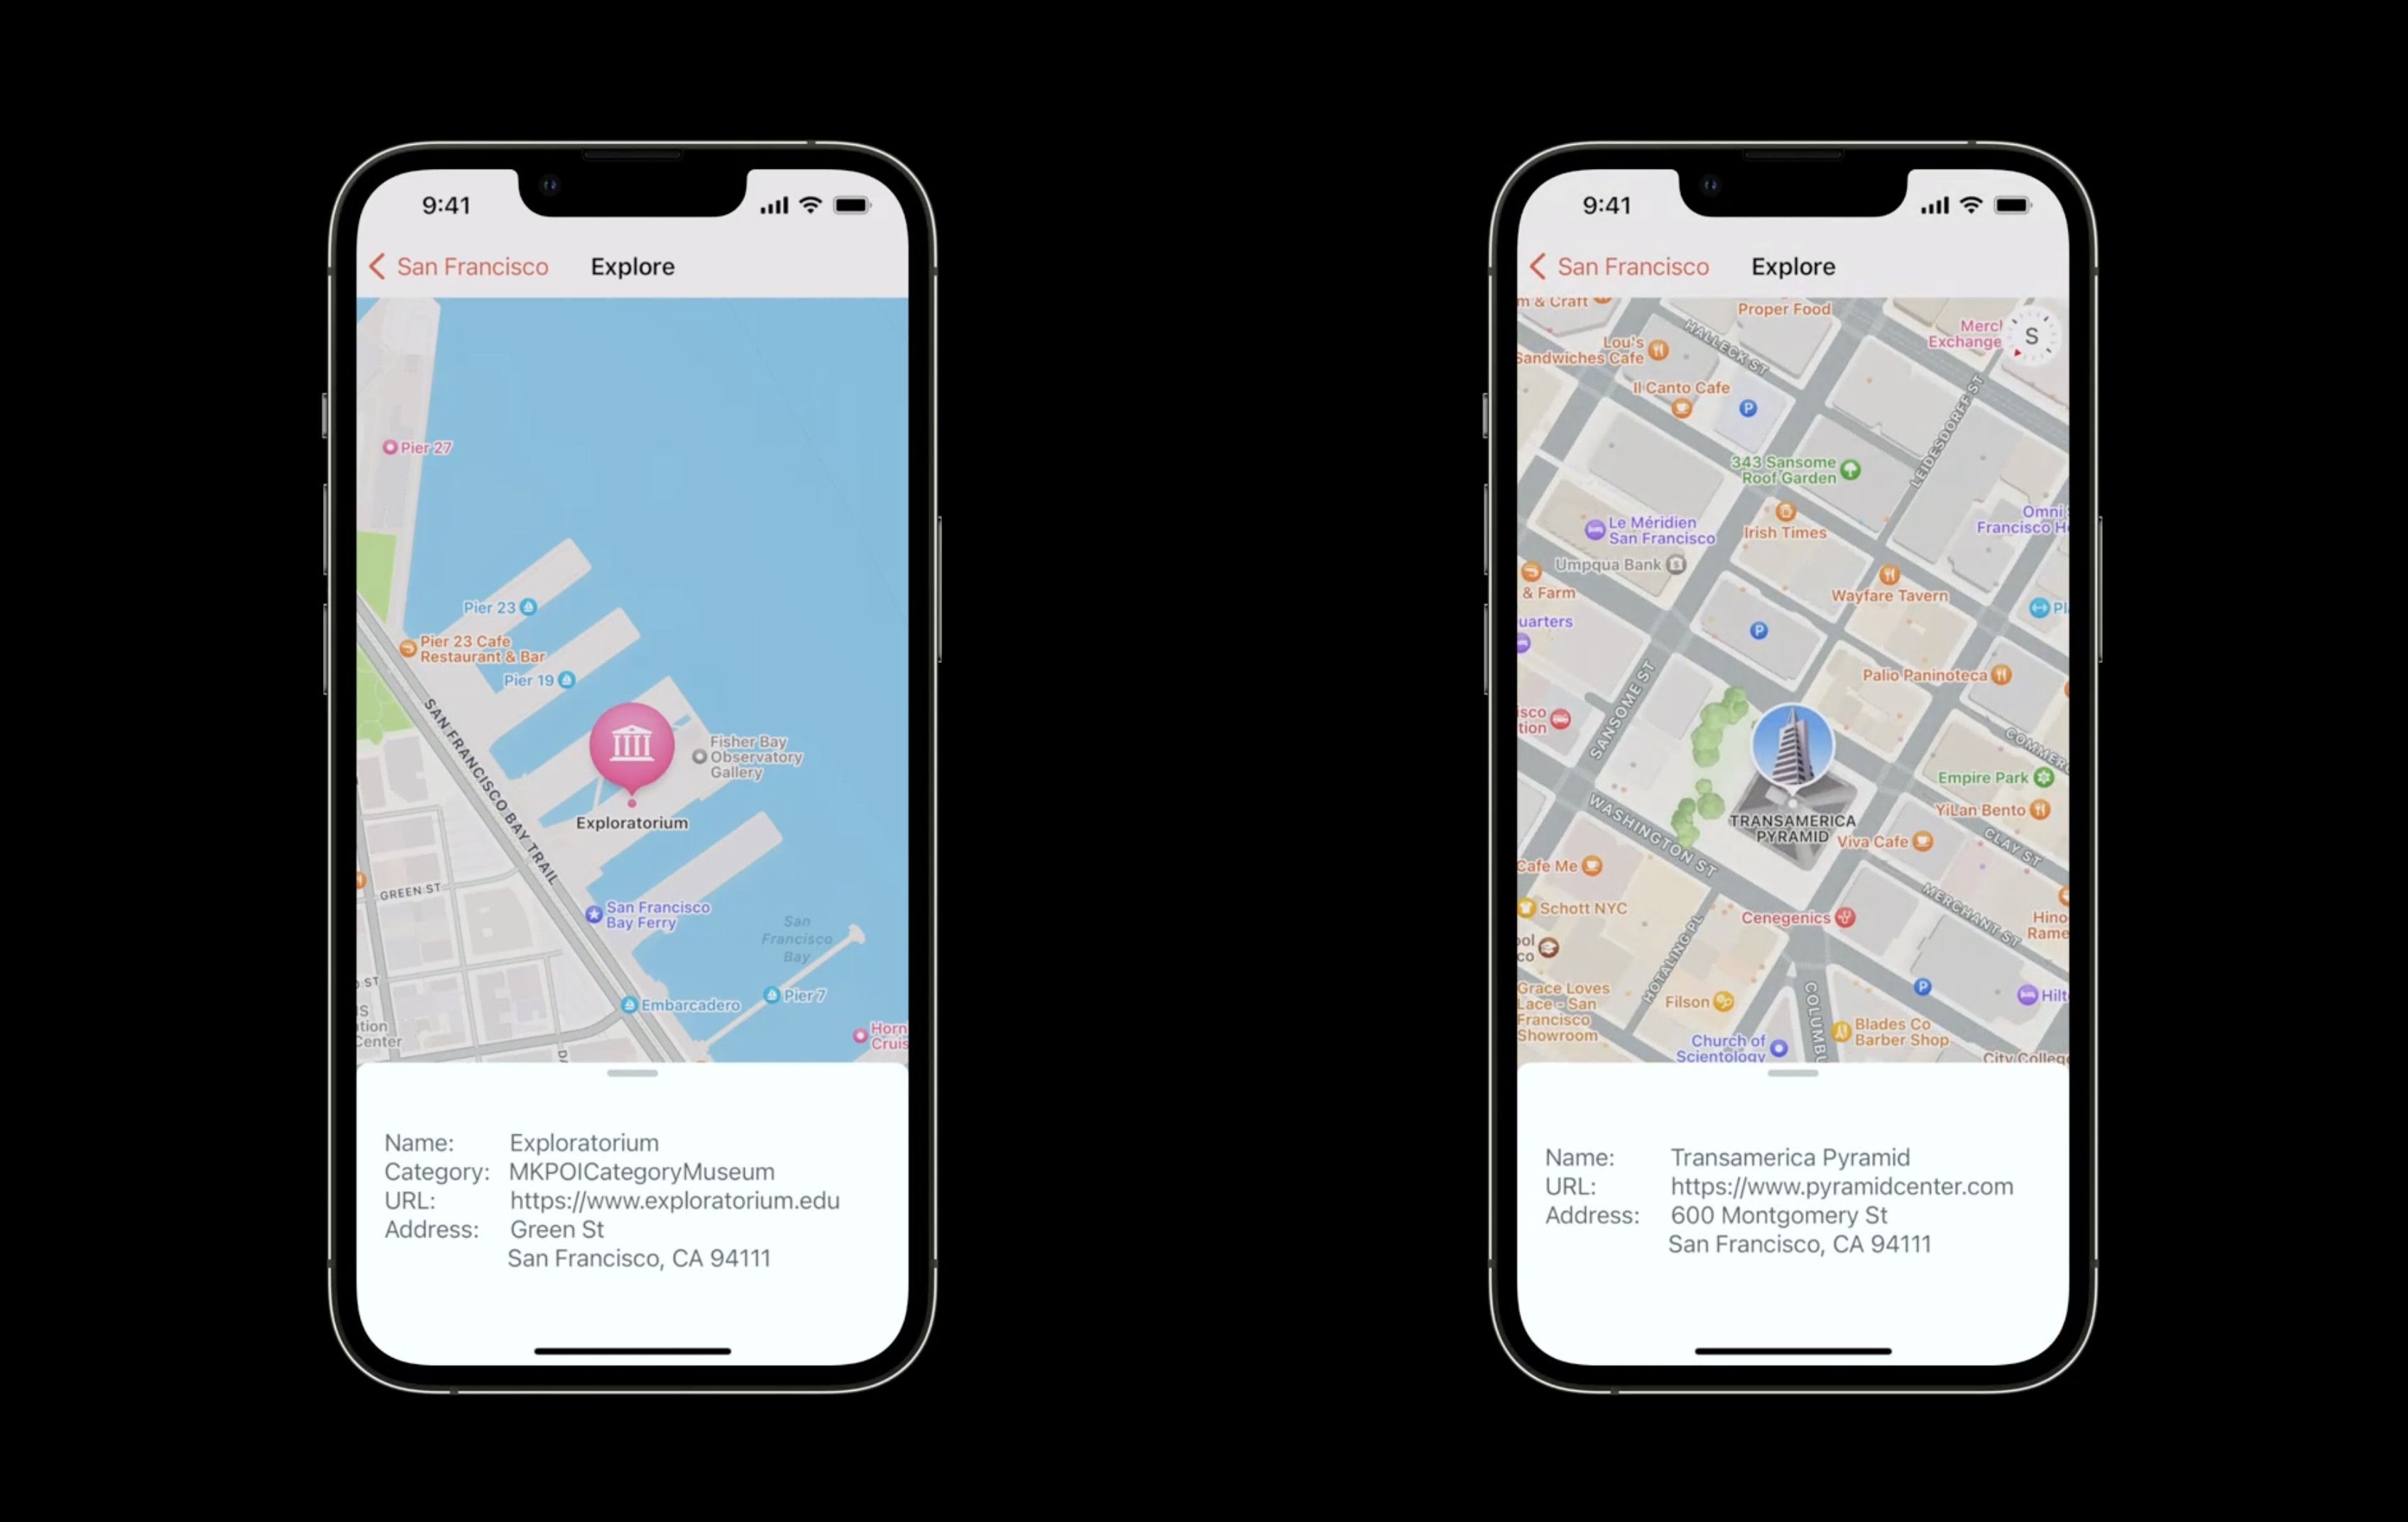
How to customize the annotation view using the viewFor annotation callback. To achieve the same selection style as the Maps app, return nil.
func mapView(_: MKMapView, viewFor annotation: MKAnnotation) -> MKAnnotationView? {
    return nil
}
To customize the selection style, we can return an annotationView, the same way we would for our own annotations.
func mapView(_: MKMapView, viewFor annotation: MKAnnotation) -> MKAnnotationView? {

    if let feature = annotation as MKMapFeatureAnnotation? {
        var annotationView: MKMarkerAnnotationView =
        // dequeue or create
        annotationView.image = feature.iconStyle?.image
        annotationView.color = // application tint color
        return annotationView
    }
    // else
    return nil
}
The markerAnnotationView is a great option. It will give us the same balloon-style shape as the Maps app, a gradient treatment, and it allows to choose our own color or icon. To go fully custom, we can provide any annotation view subclass that we create.
func mapView(_: MKMapView, viewFor annotation: MKAnnotation) -> MKAnnotationView?
{
    return MyUnicornAnnotationView()
}
We can use the feature annotation to retrieve visual information about the selected feature. By passing the feature annotation on to our new MKMapItemRequest API, we can also retrieve a map item for the selected feature.
class MKMapItemRequest : NSObject {

    init(featureAnnotation: MKMapFeatureAnnotation) {}

    func getMapItem(completionHandler: @escaping (MKMapItem?, Error?) -> Void) {}
    var mapItem: MKMapItem { get async throws }
}
This map item contains additional metadata about the place, such as an address, a name, a phone number, and a URL.
The map item also provides a function to punch out to the Maps app if the users want to see additional metadata which isn't available through MapKit.
// Existing API

open class MKMapItem : NSObject {
    open var placemark: MKPlacemark { get }
    open var name: String?
    open var phoneNumber: String?
    open var url: URL?

    // ...

    func openInMaps (launchOptions: [String : Any]? = nil,
        from scene: UIScene?) async -> Bool {}
The explore feature of the sample app
The users should be able to explore some interesting places near the waterfront. If they tap on POIs, annotations should show up. We will perform a camera animation to the tapped location, and show an info card from the bottom.
First, let's filter points of interest on the map and remove the categories which are irrelevant to the tour. Aside from applying the filter in code, we can also apply it in Interface Builder inspector. Let's select the map view, and go to inspector on the right-hand side and do an exclusion filter.
lets select the categories that we don't want, for example: airport, car rental, hospital, and laundry.

It's very simple to enable Selectable Map Features. All we need to do is to specify an option set of desired selectable features.
In the scope of this sample app, we'll just use points of interest, but we also can support selectable physical features and territories.
override func viewDidLoad() {
    super.viewDidLoad()

    mapView.region = .annotation

    mapView.cameraBoundary = MKMapView.CameraBoundary(coordinateRegion: .annotationCameraBoundary)

    // Enable selectable map
    mapView.selectableMapFeatures = [.pointsOfInterest]
We can use the existing delegate method mapView viewForAnnotation to create a view for the feature annotation. Here, we'll just return nil... To use the default gradient annotation offered by MapKit.
func mapView(_ mapView: MKMapView, viewFor annotation: MKAnnotation) -> MKAnnotationView? {
    return nil
}
If an annotation is on Selected state, we will be informed through the new delegate method mapView didSelectAnnotation.
We use this function to perform a camera animation and zoom in on the selected feature. First, we cast the annotation to featureAnnotation, then create a map item request with it. This is a new API to fetch additional place informations with feature annotations. We issue the request. Once the fetch operation succeeds, we will animate to the map item. When the camera animation has completed, we will get details from the feature item and show them on an info card.
func mapView(_ mapView: MKMapView, didSelect annotation: MKAnnotation) {
    guard let featureAnnotation = annotation as? MKMapFeatureAnnotation else { return }
    let featureRequest = MKMapItemRequest(mapFeatureAnnotation: featureAnnotation)

    Task {

        // Issue request.
        do {
            guard let featureItem = try await featureRequest.mapItem else { return }

            UIView.animate(withDuration: 4) {

                // Update map camera
                self.animateCamera(featureItem)

            } completion: { _ in
                // Concatenate info string from map item - name, category, url and address
                self.showInfoCardView(featureItem)
            }
        } catch {

        }
    }
}
The gradient annotations show up. The camera animates to the tab location. Then the info card shows up.
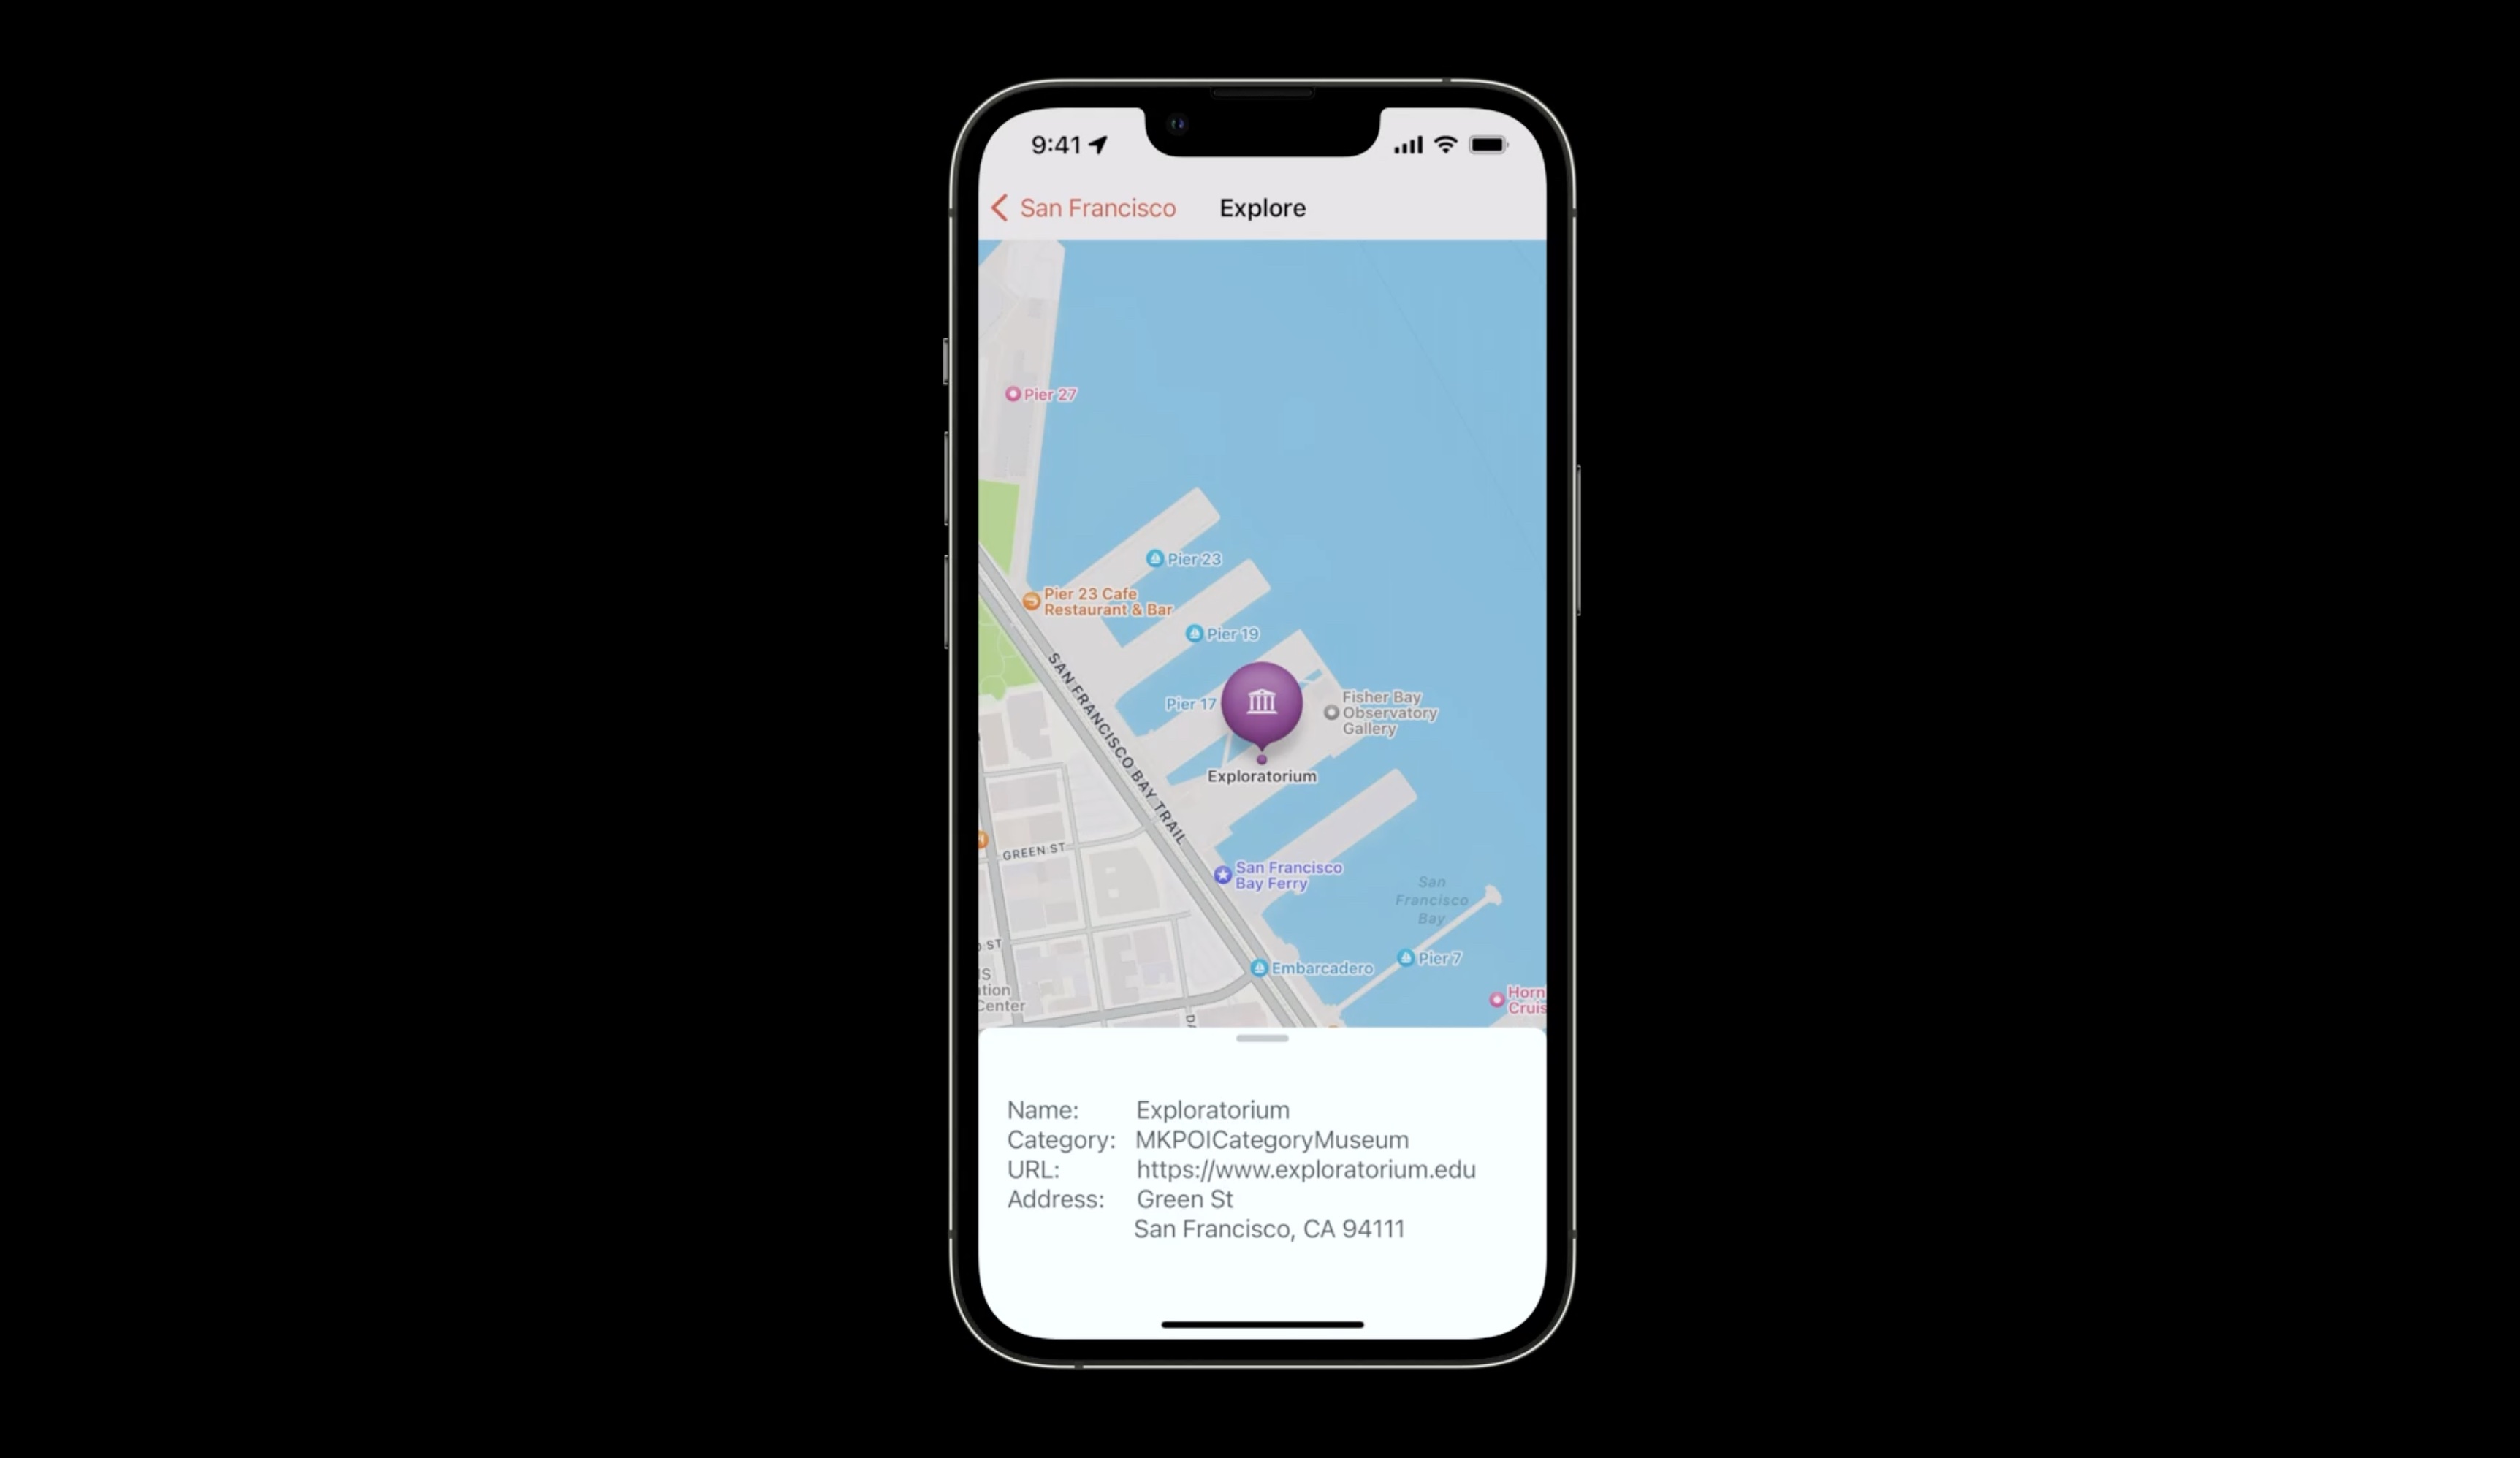
Now let's customize our annotation for the selection state.
Instead of nil, let's create a MarkerAnnotationView. We'll cast the annotation to featureAnnotation first, so we can use specific data from it to customize the view. Let's tint the annotation with a purple-ish color so it's in line with our corporate identity. We can also customize the annotation glyph. SelectedGlyphImage is for annotations on Selected state. GlyphImage is smaller. It is the glyph for annotations on Unselected state. Assigning them the same glyph is recommended for a smooth transition from the Unselected to Selected state.
Let's use the icon style image we got from the featureAnnotation.MKIconStyle is a new class in iOS16. It has the iconography and color info of the selected POI.
func mapView(_: MKMapView, viewFor annotation: MKAnnotation) -> MKAnnotationView? {

    if let featureAnnotation = annotation as? MKMapFeatureAnnotation {

        let customView = MKMarkerAnnotationView(annotation: featureAnnotation, reuseIdentifier: nil)

        customView.markerTintColor = UIColor(red: 0.63, green: 0.27, blue: 0.63, alpha: 1.0)

        customView.selectedGlyphImage = featureAnnotation.iconStyle?.image
        customView.glyphImage = featureAnnotation.iconStyle?.image

        return customView
    }

    let annotationView = MKMarkerAnnotationView(annotation: annotation, reuseIdentifier: nil)
    return annotationView
}
Now we have an annotation that matches our corporate colors, but still uses Apple iconography.
Look Around!
The Maps app introduced Look Around in iOS 13
Look Around is available in many places around the world, including these cities, and entire countries.
Cities:
Atlanta, GA / Boston, MA / Chicago, IL / Denver, CO / Detroit, MI / Dublin, Ireland / Edinburgh, Scotland / Fukuoka, Japan / Hiroshima, Japan / Houston, TX / Kanazawa, Japan / Las Vegas, NV / London, United Kingdom / Los Angeles, CA / Miami, FL / Nagoya, Japan / New York, NY / Oahu, HI / Osaka, Japan / Philadelphia, PA / Phoenix, AZ / Portland, OR / Sagamihara, Japan / San Diego, CA / San Francisco Bay Area / Santa Cruz, CA / Seattle, WA / Sendai, Japan / Takamatsu, Japan / Tokyo, Japan / Washington, DC / Yokohama, Japan
Countries and territories:
Andorra / Australia / Canada / Gibraltar / Italy / Portugal / San Marino / Spain
With iOS 16, Look Around is coming to MapKit, and adopting it only requires three steps.
- Check for data availability. Check whether data is available for the desired location. Even if Look Around is available in the target region, not every location can be seen from a street, and therefore, Look Around imagery might not always be available.
- Pass data to the Look Around UI. Once we've determined whether Look Around data is available, we'll need to pass that data on to either the Look Around View Controller or the Look Around Snapshotter.
- Conditionally show Look Around UI. And finally, if Look Around data is available, we'll want to update your app UI to show the Look Around preview.
We create a LookAroundSceneRequest, which is a new class introduced in iOS 16. we can initialize a new instance with either a coordinate or a map item.
we'll retrieve its scene property. This is an optional async property. If data is available, we will get back a scene instance. If data is not available, we will get back a nil instead. And if there was a problem with the request, an error will be thrown.
class MKLookAroundSceneRequest {
    init (coordinate: CLLocationCoordinate2D)
    init (mapItem: MKMapItem)
    var scene: MKLookAroundScene? { get async throws }
}
The Look Around Scene is an opaque object with no properties. It acts as a token that ensures the availability of Look Around imagery for a requested location.
class MKLookAroundScene {

}
To show an interactive preview of the Look Around scene, we pass the scene on to a new Look Around View Controller instance as an init parameter or assign it to the read write scene property of an existing instance.
class MKLookAroundViewController : UIViewController {
    init (scene: MKLookAroundScene)
    var scene: MKLookAroundScene?
}
Alternatively, we can also pass the scene on to a new Look Around View Snapshotter instance as an init parameter and subsequently retrieve its snapshot async property.
class MKLookAroundSnapshotter {
    init (scene: MKLookAroundScene, options: MKLookAroundSnapshotter.Options)
    var snapshot: MKLookAroundSnapshotter.Snapshot { get async throws }
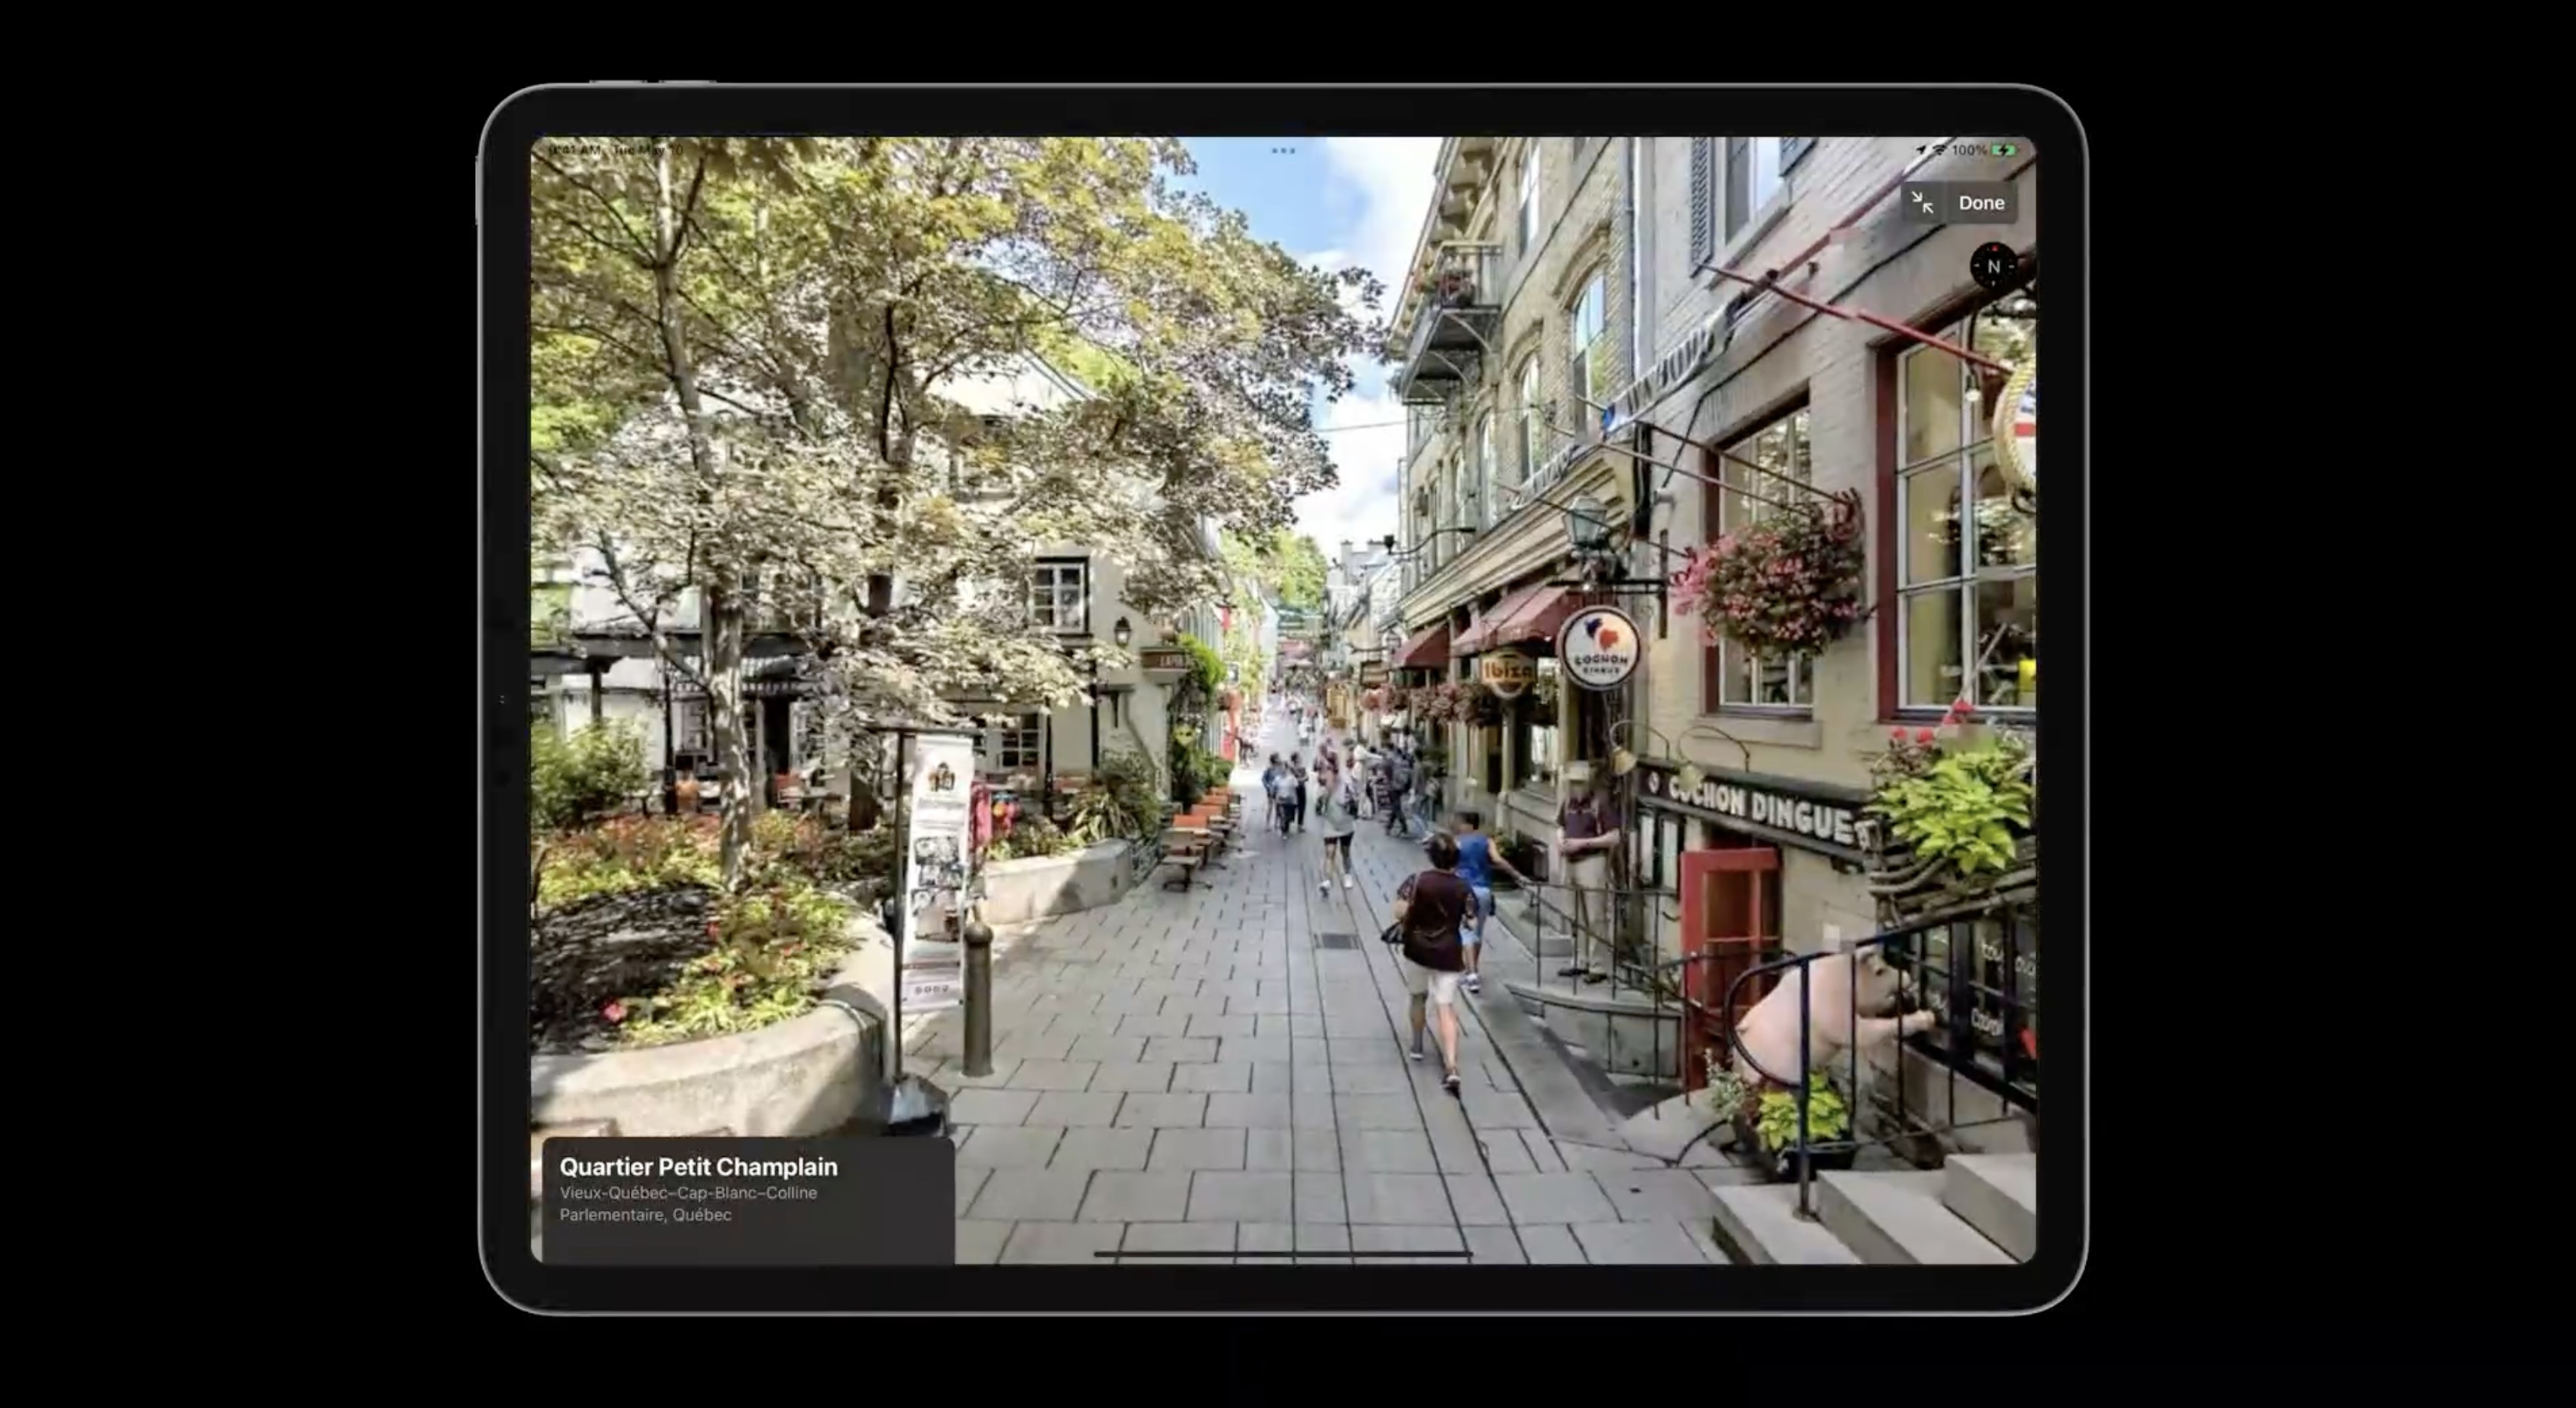
The Look Around view controller is designed to embed a smaller static preview of a Look Around image, which the user can tap on to enter a full-screen Look Around interactive session.
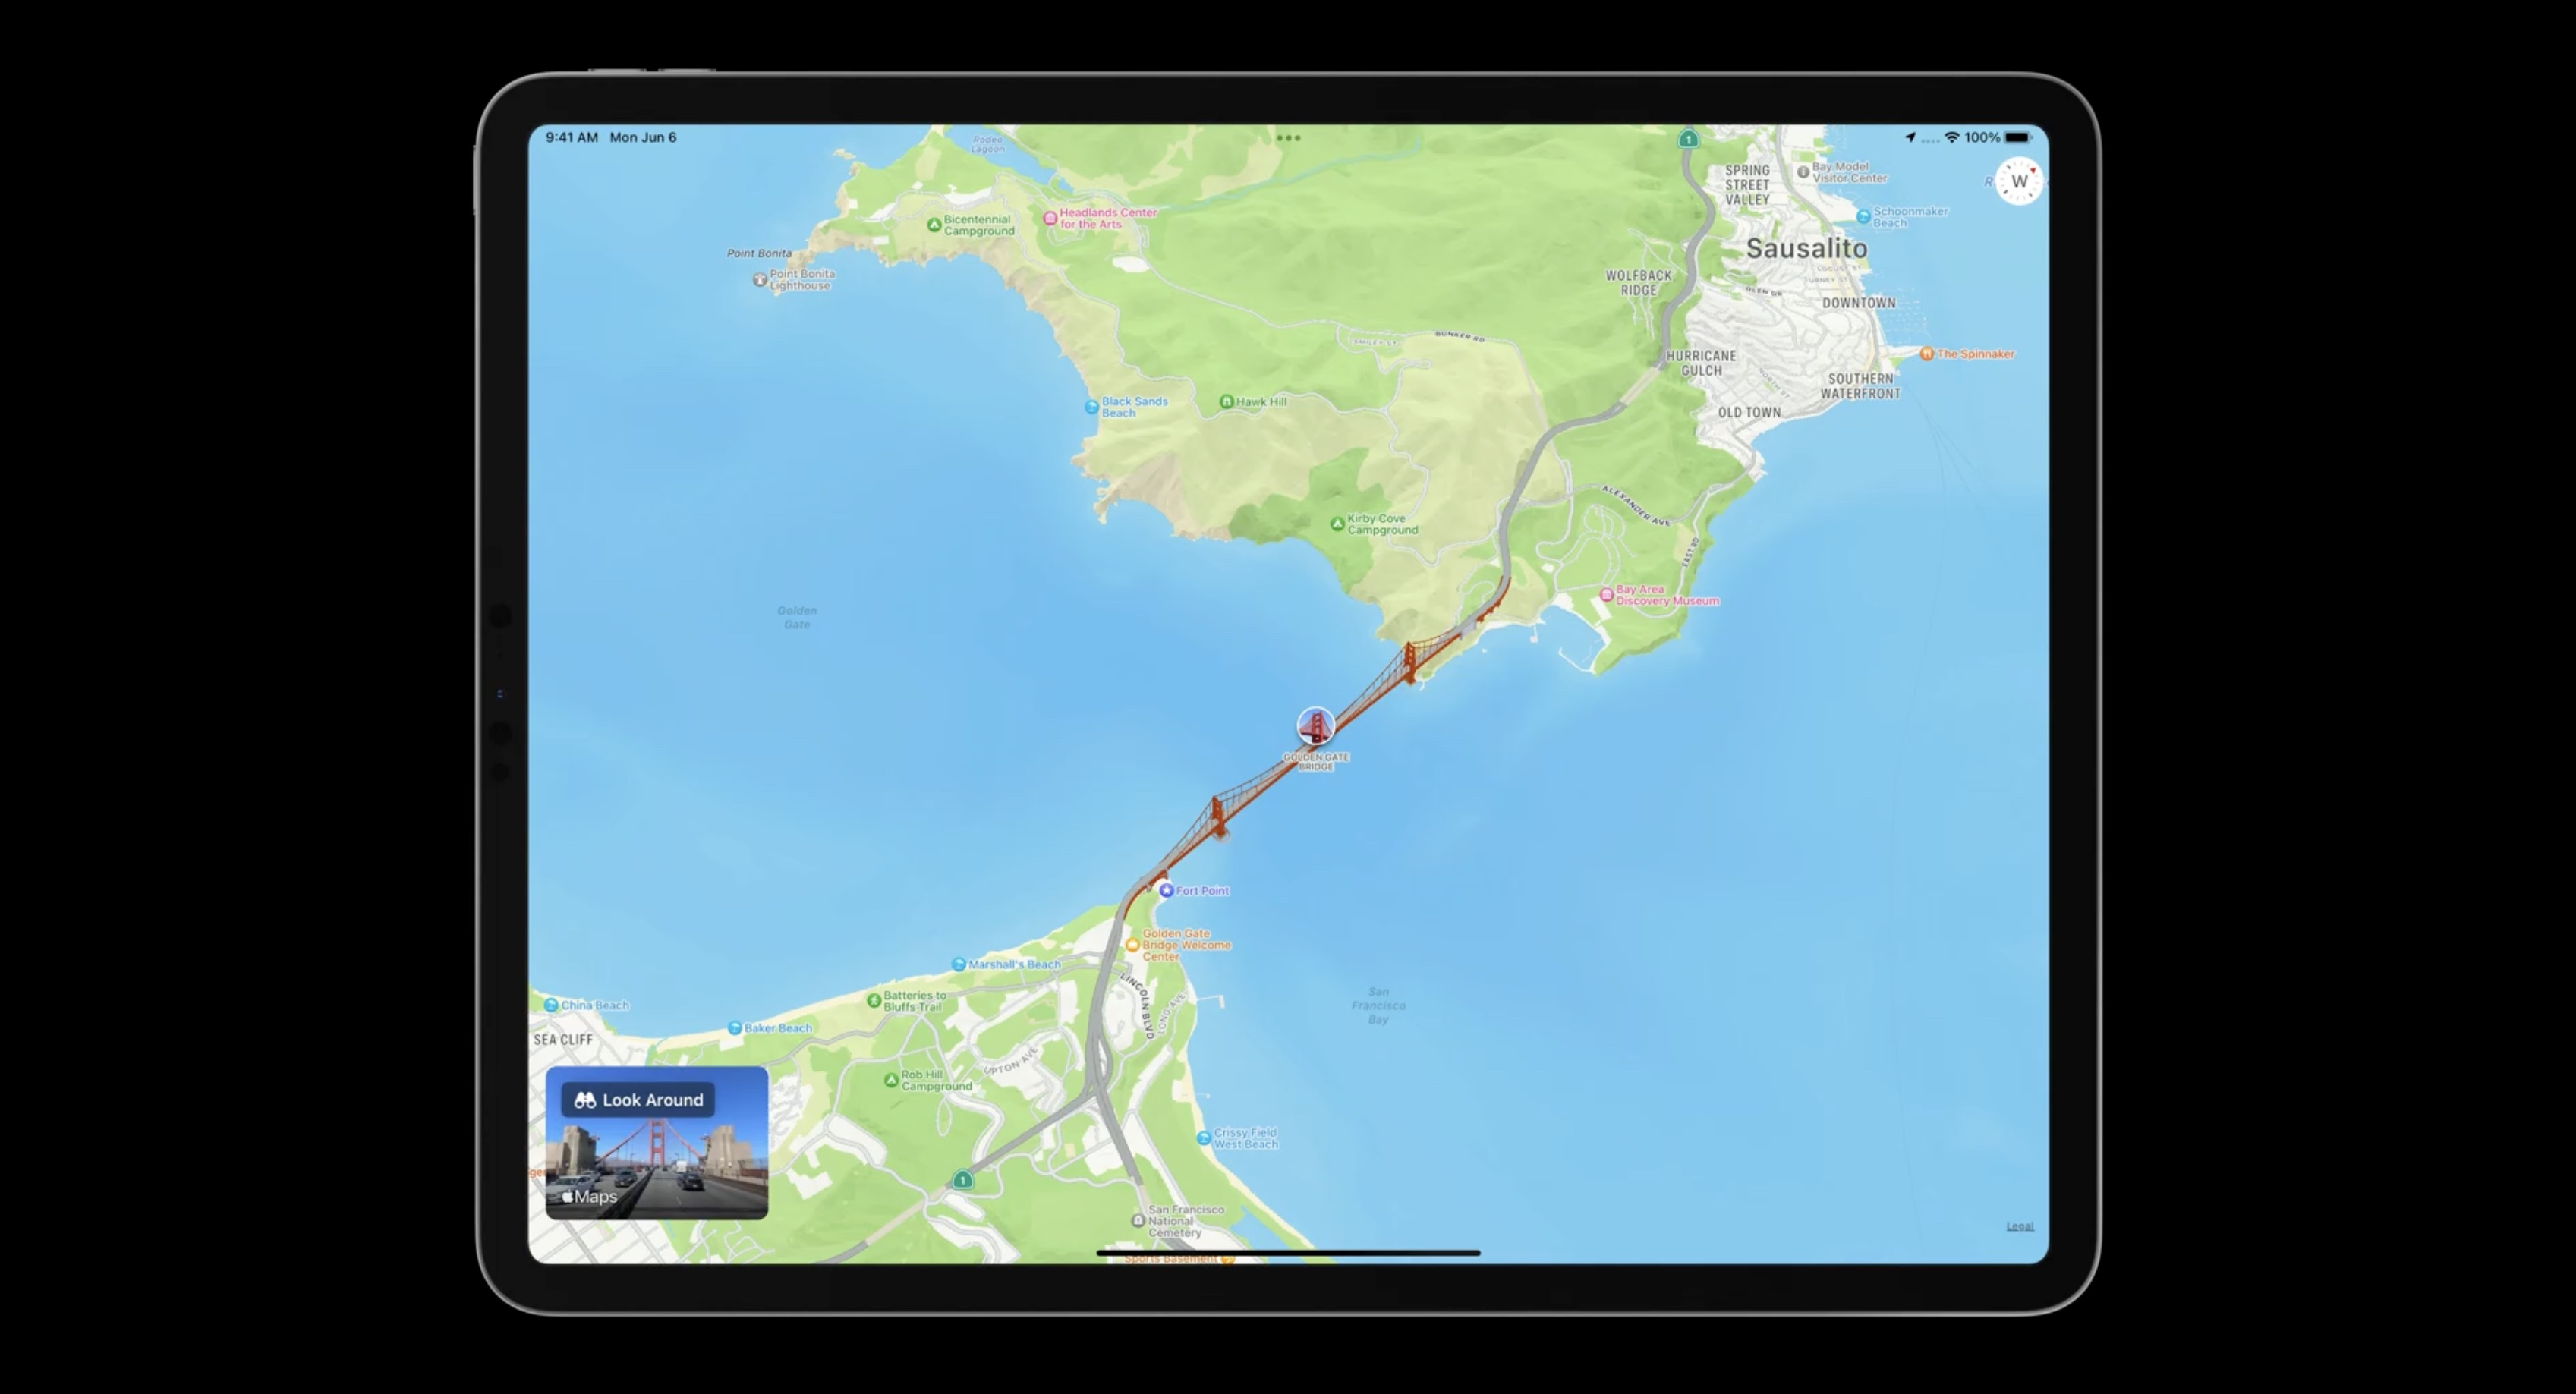
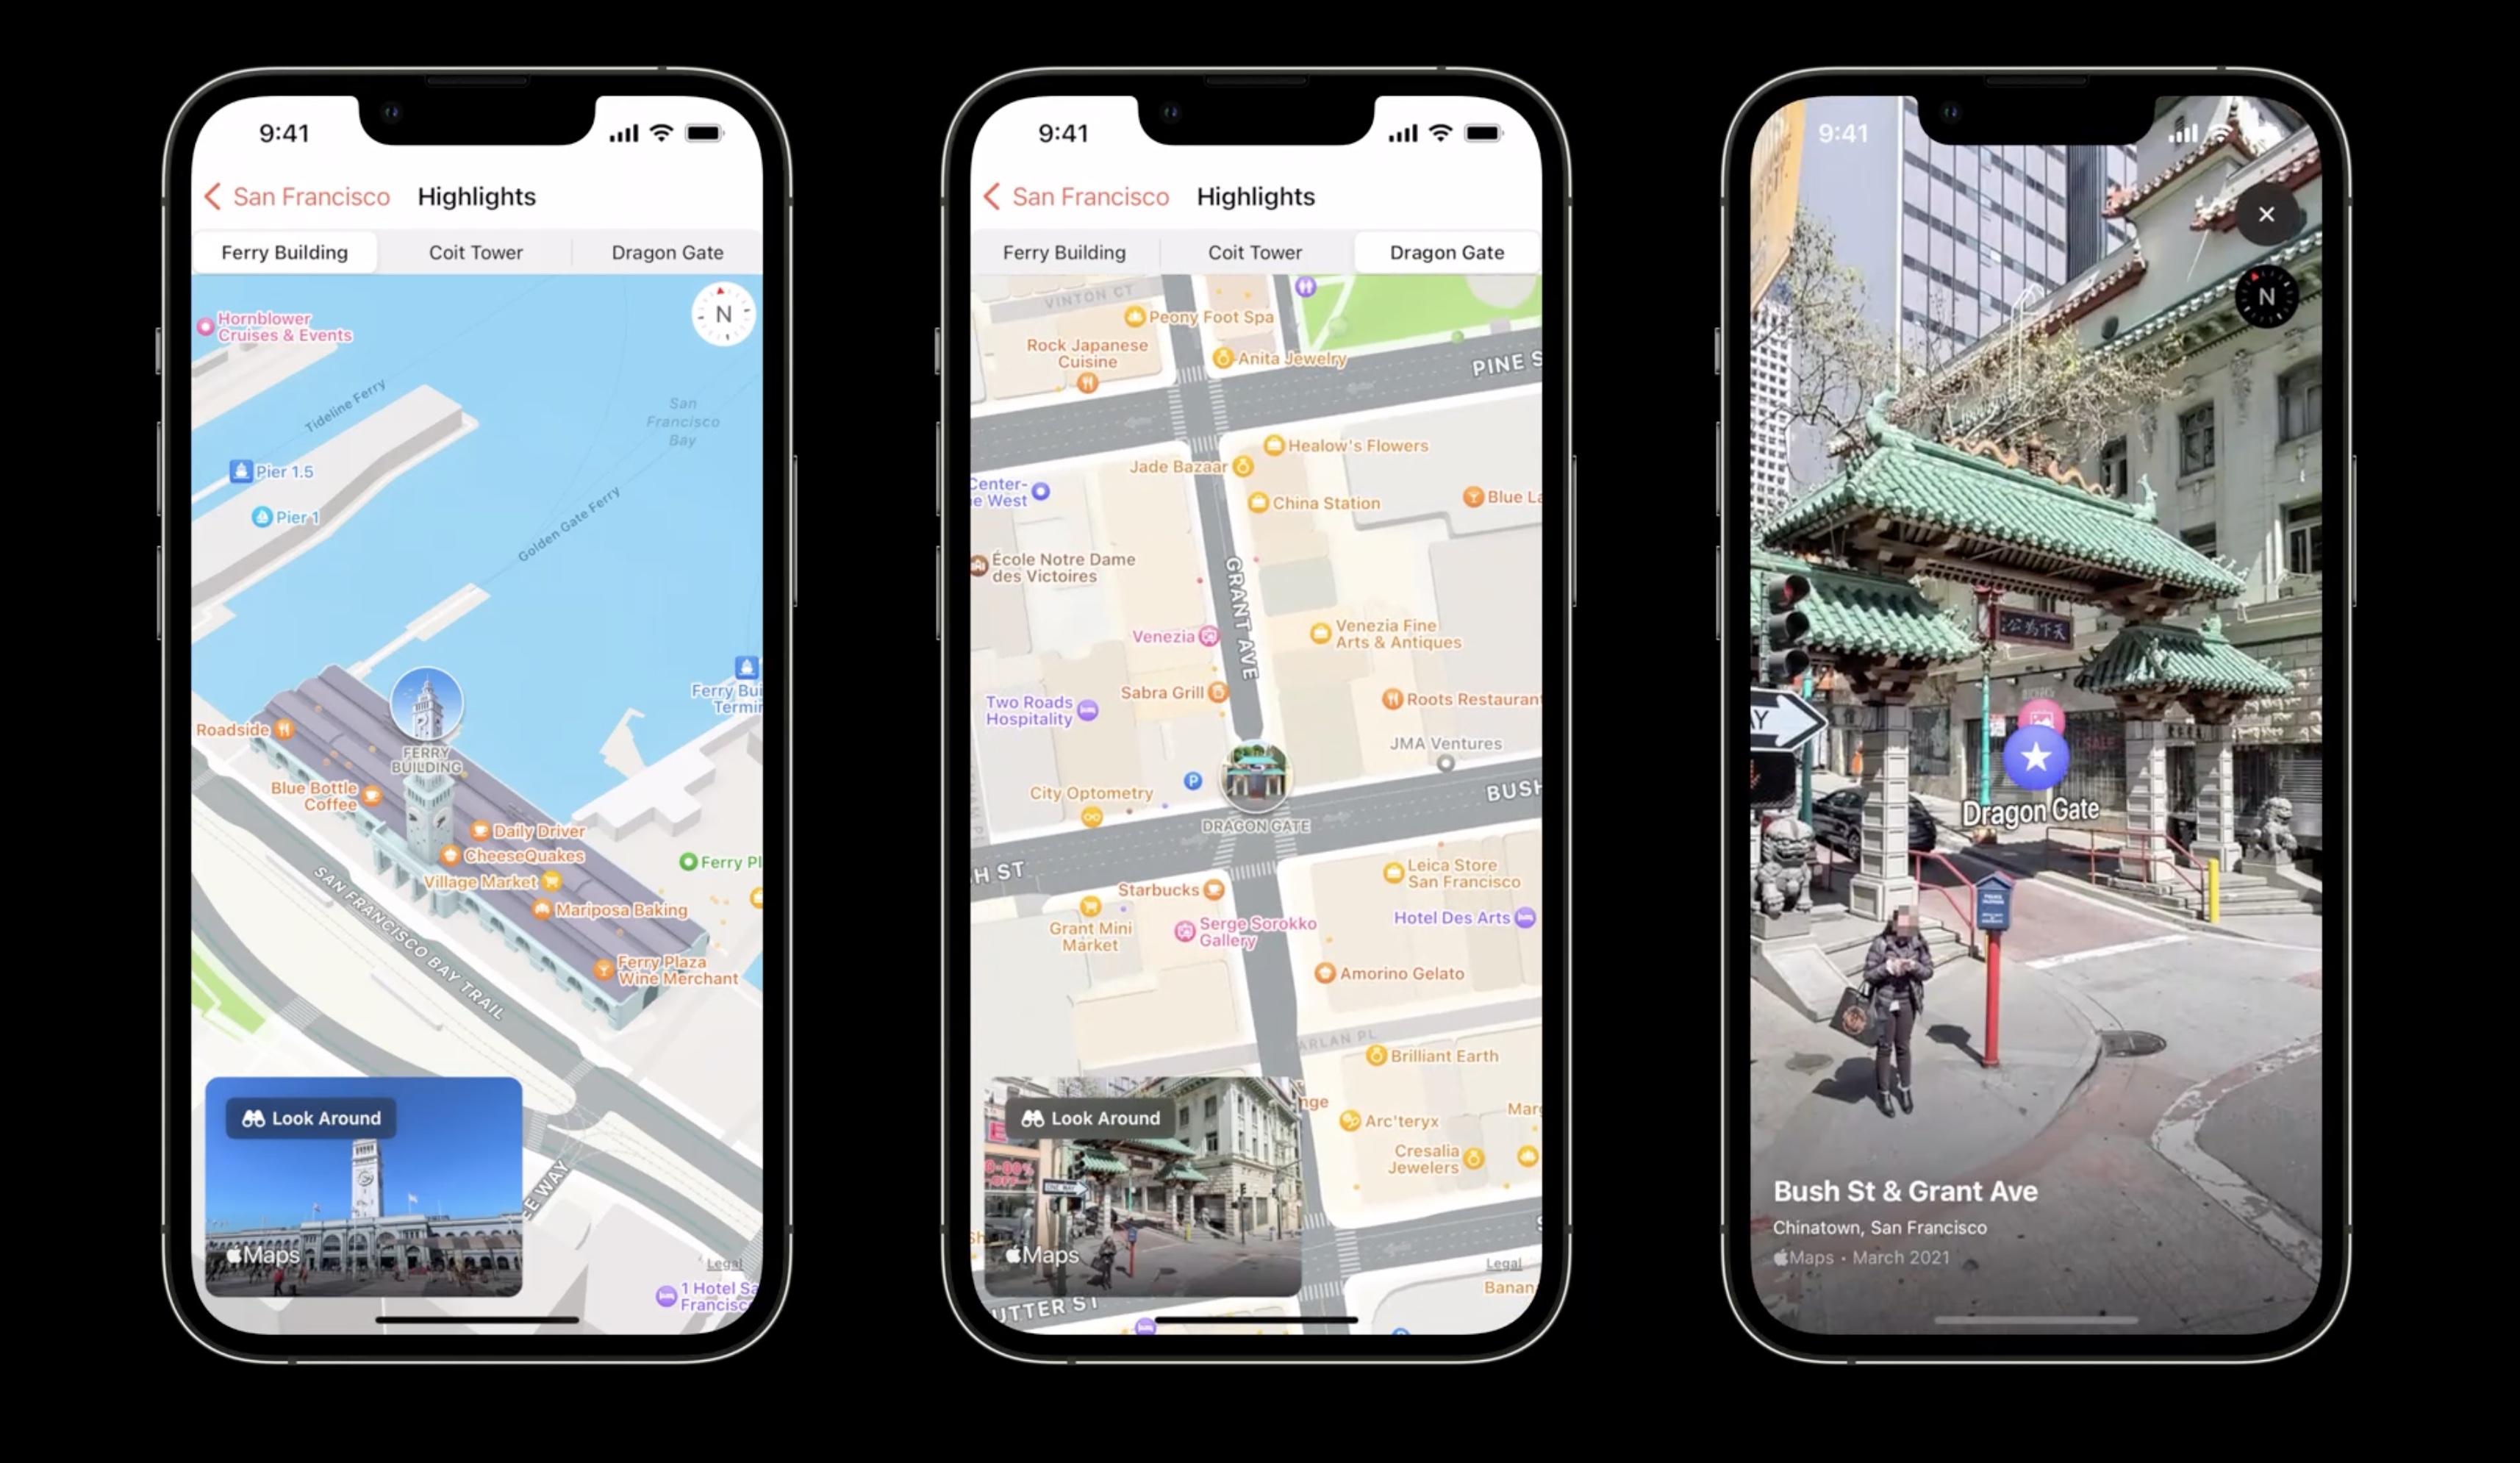
Highlights feature of the sample app
The last sample app feature, Highlights. Users can get a realistic view of must-see places.
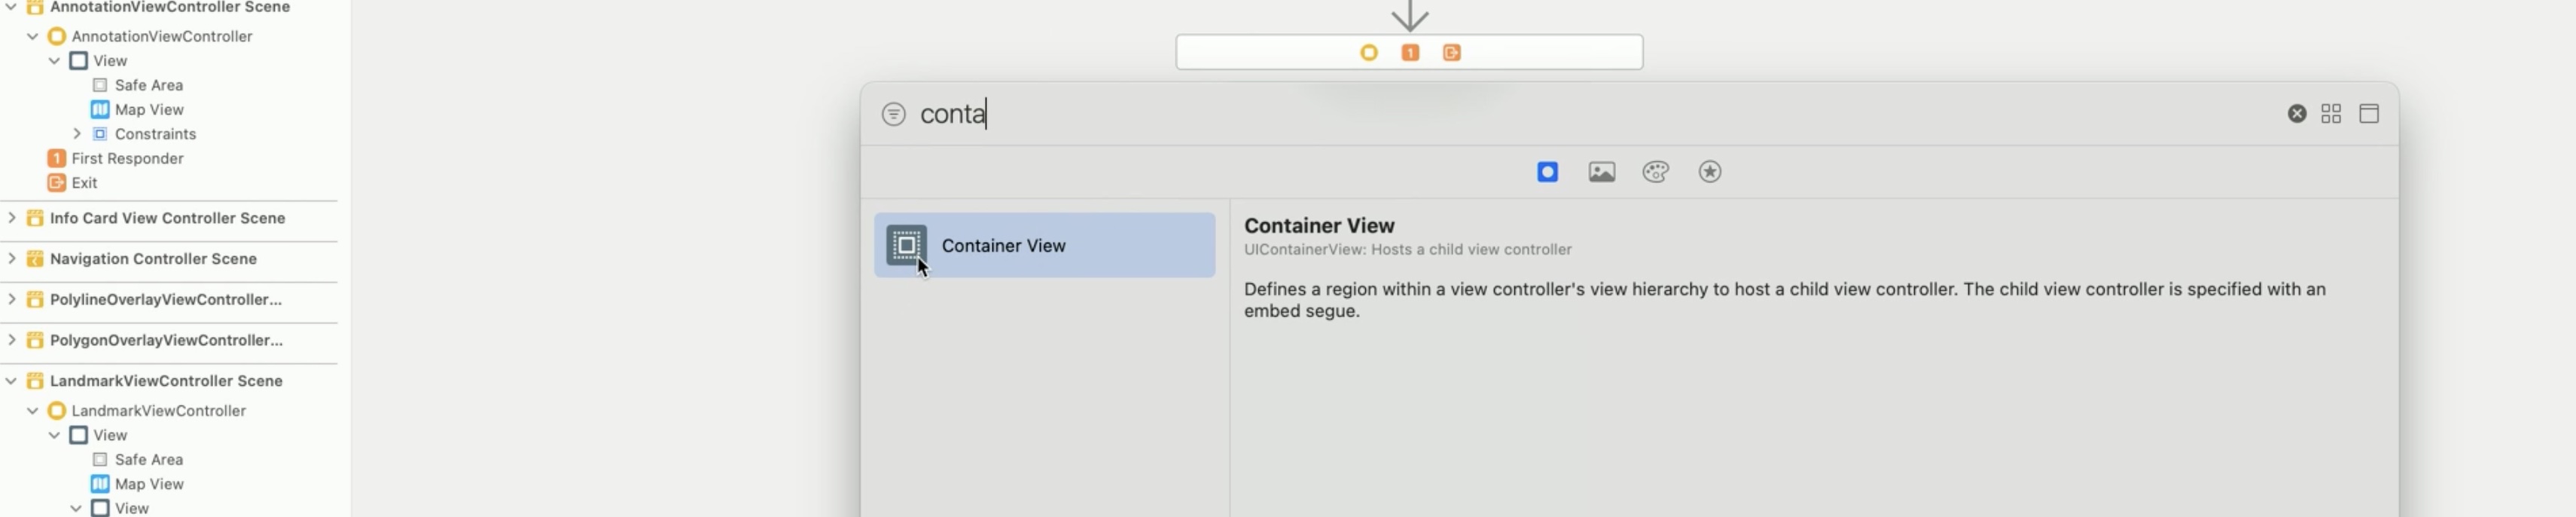
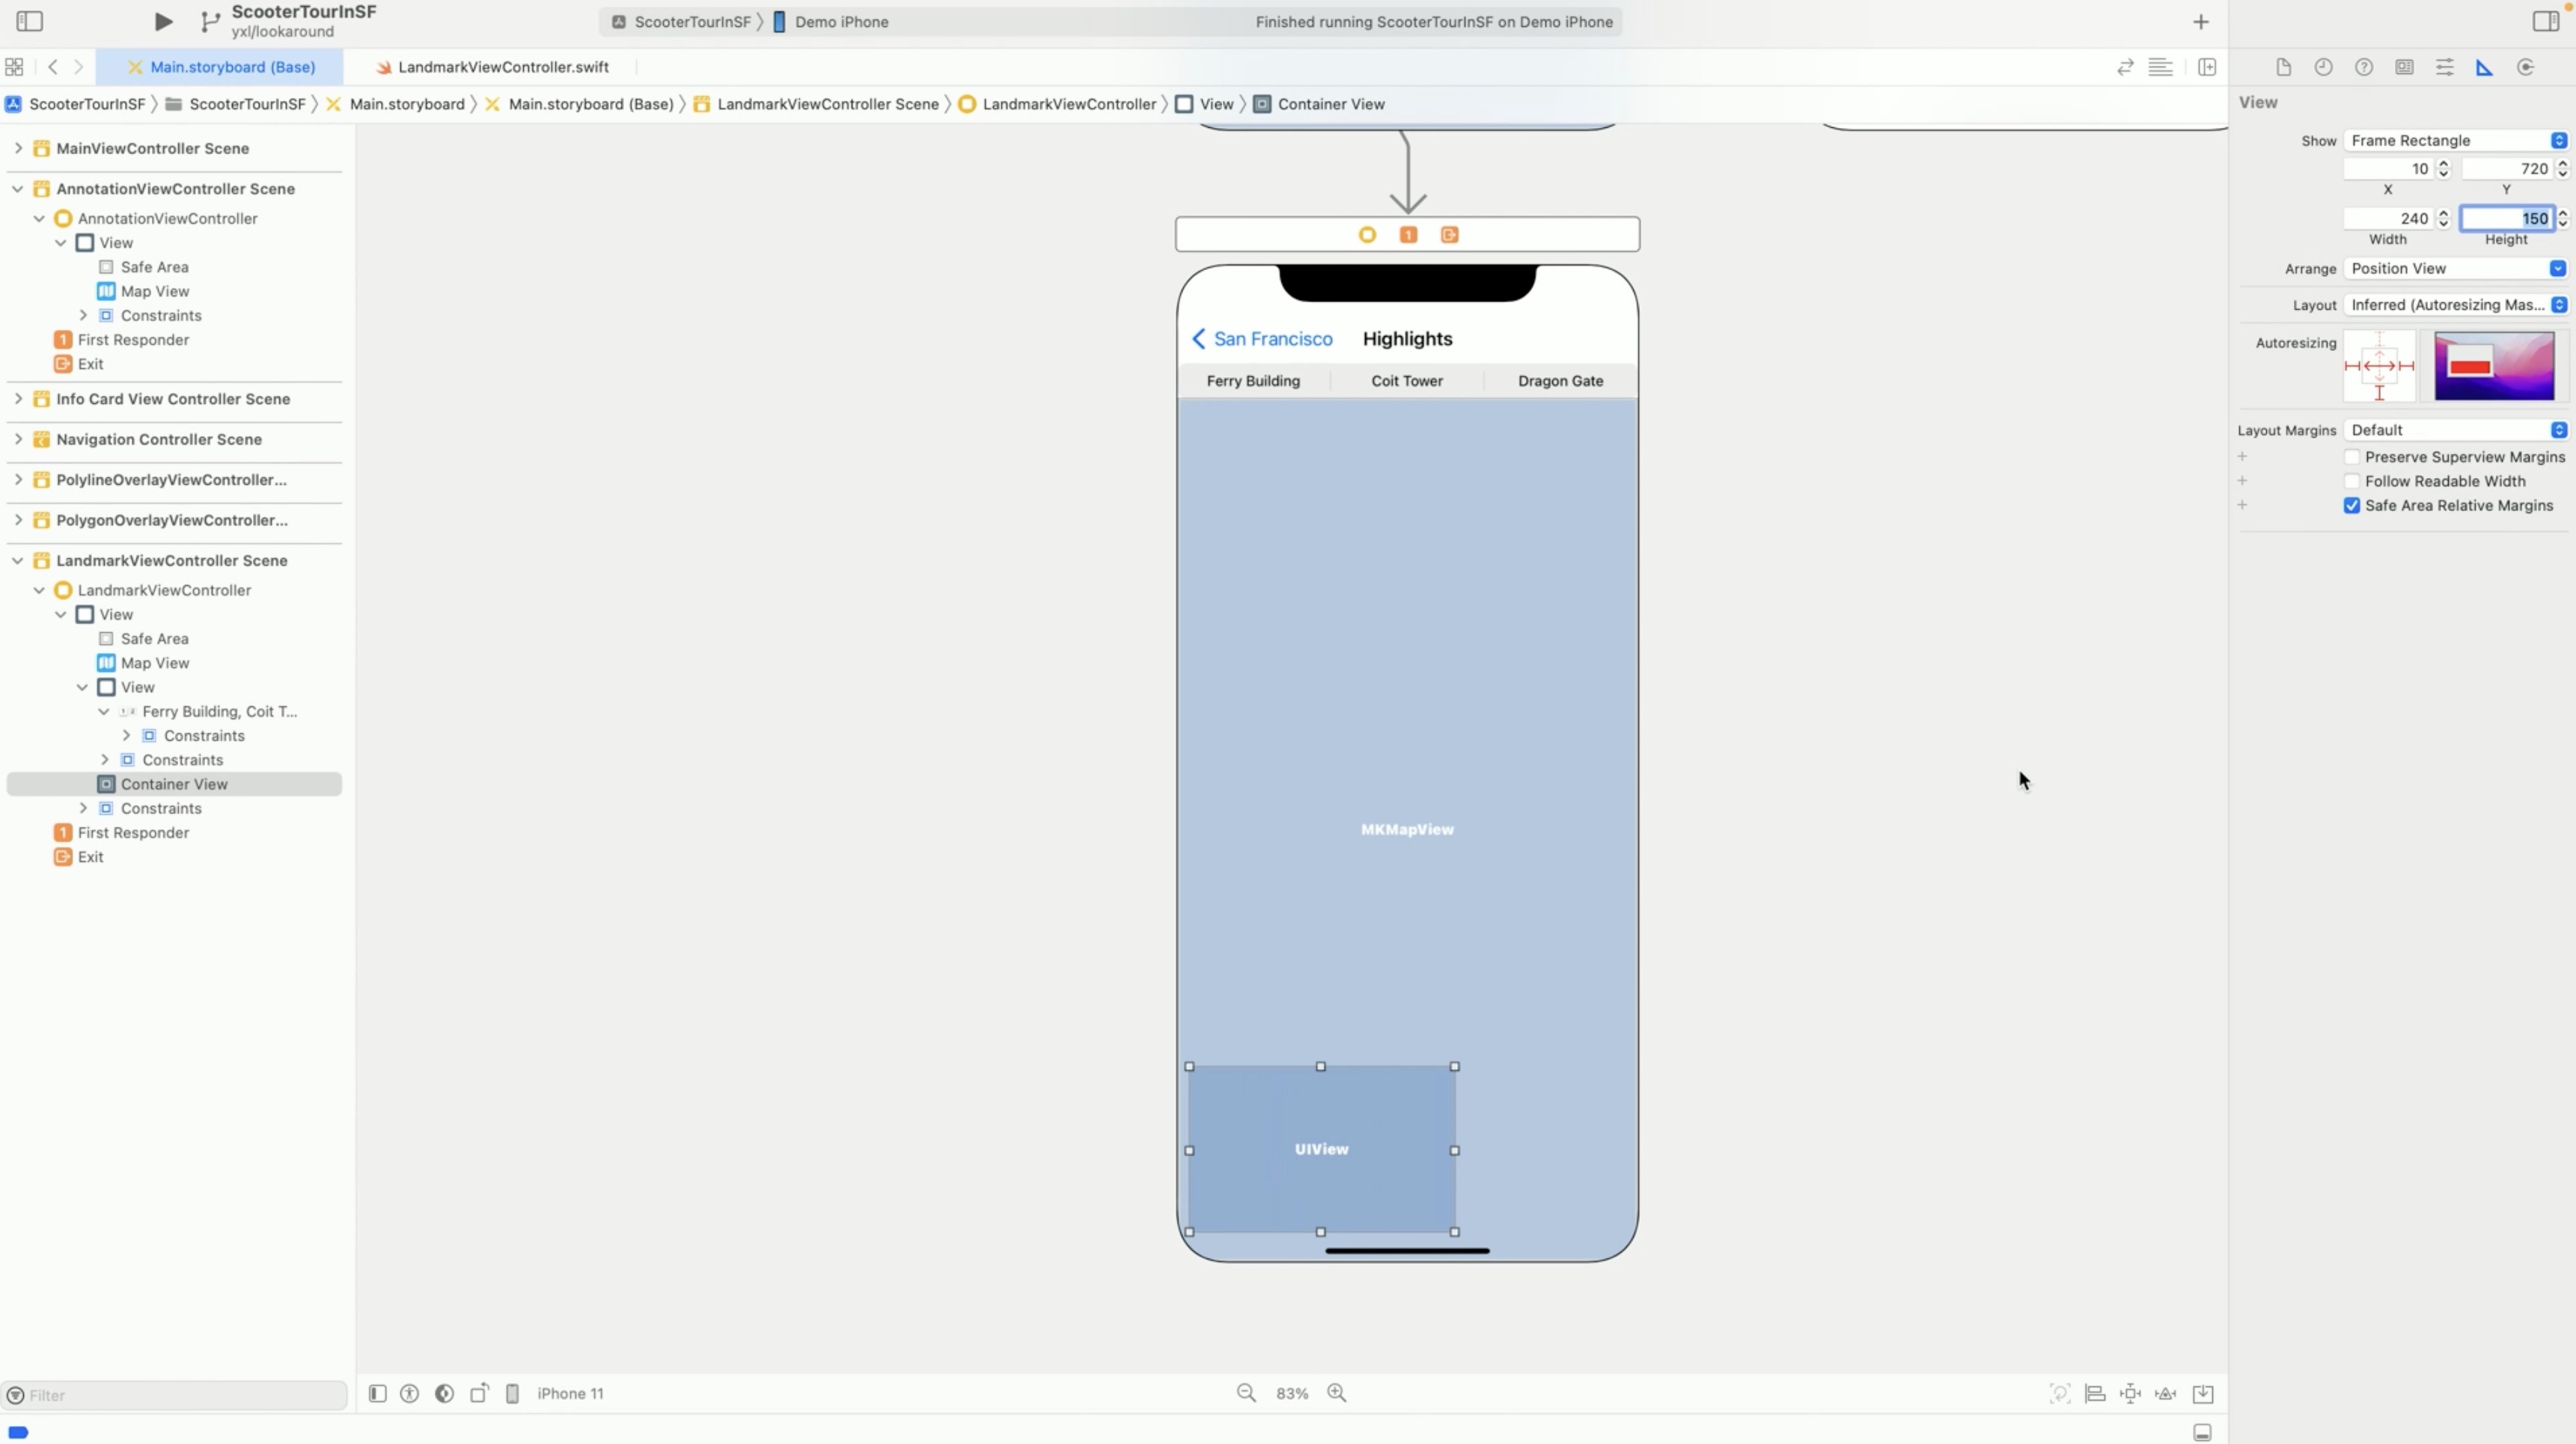
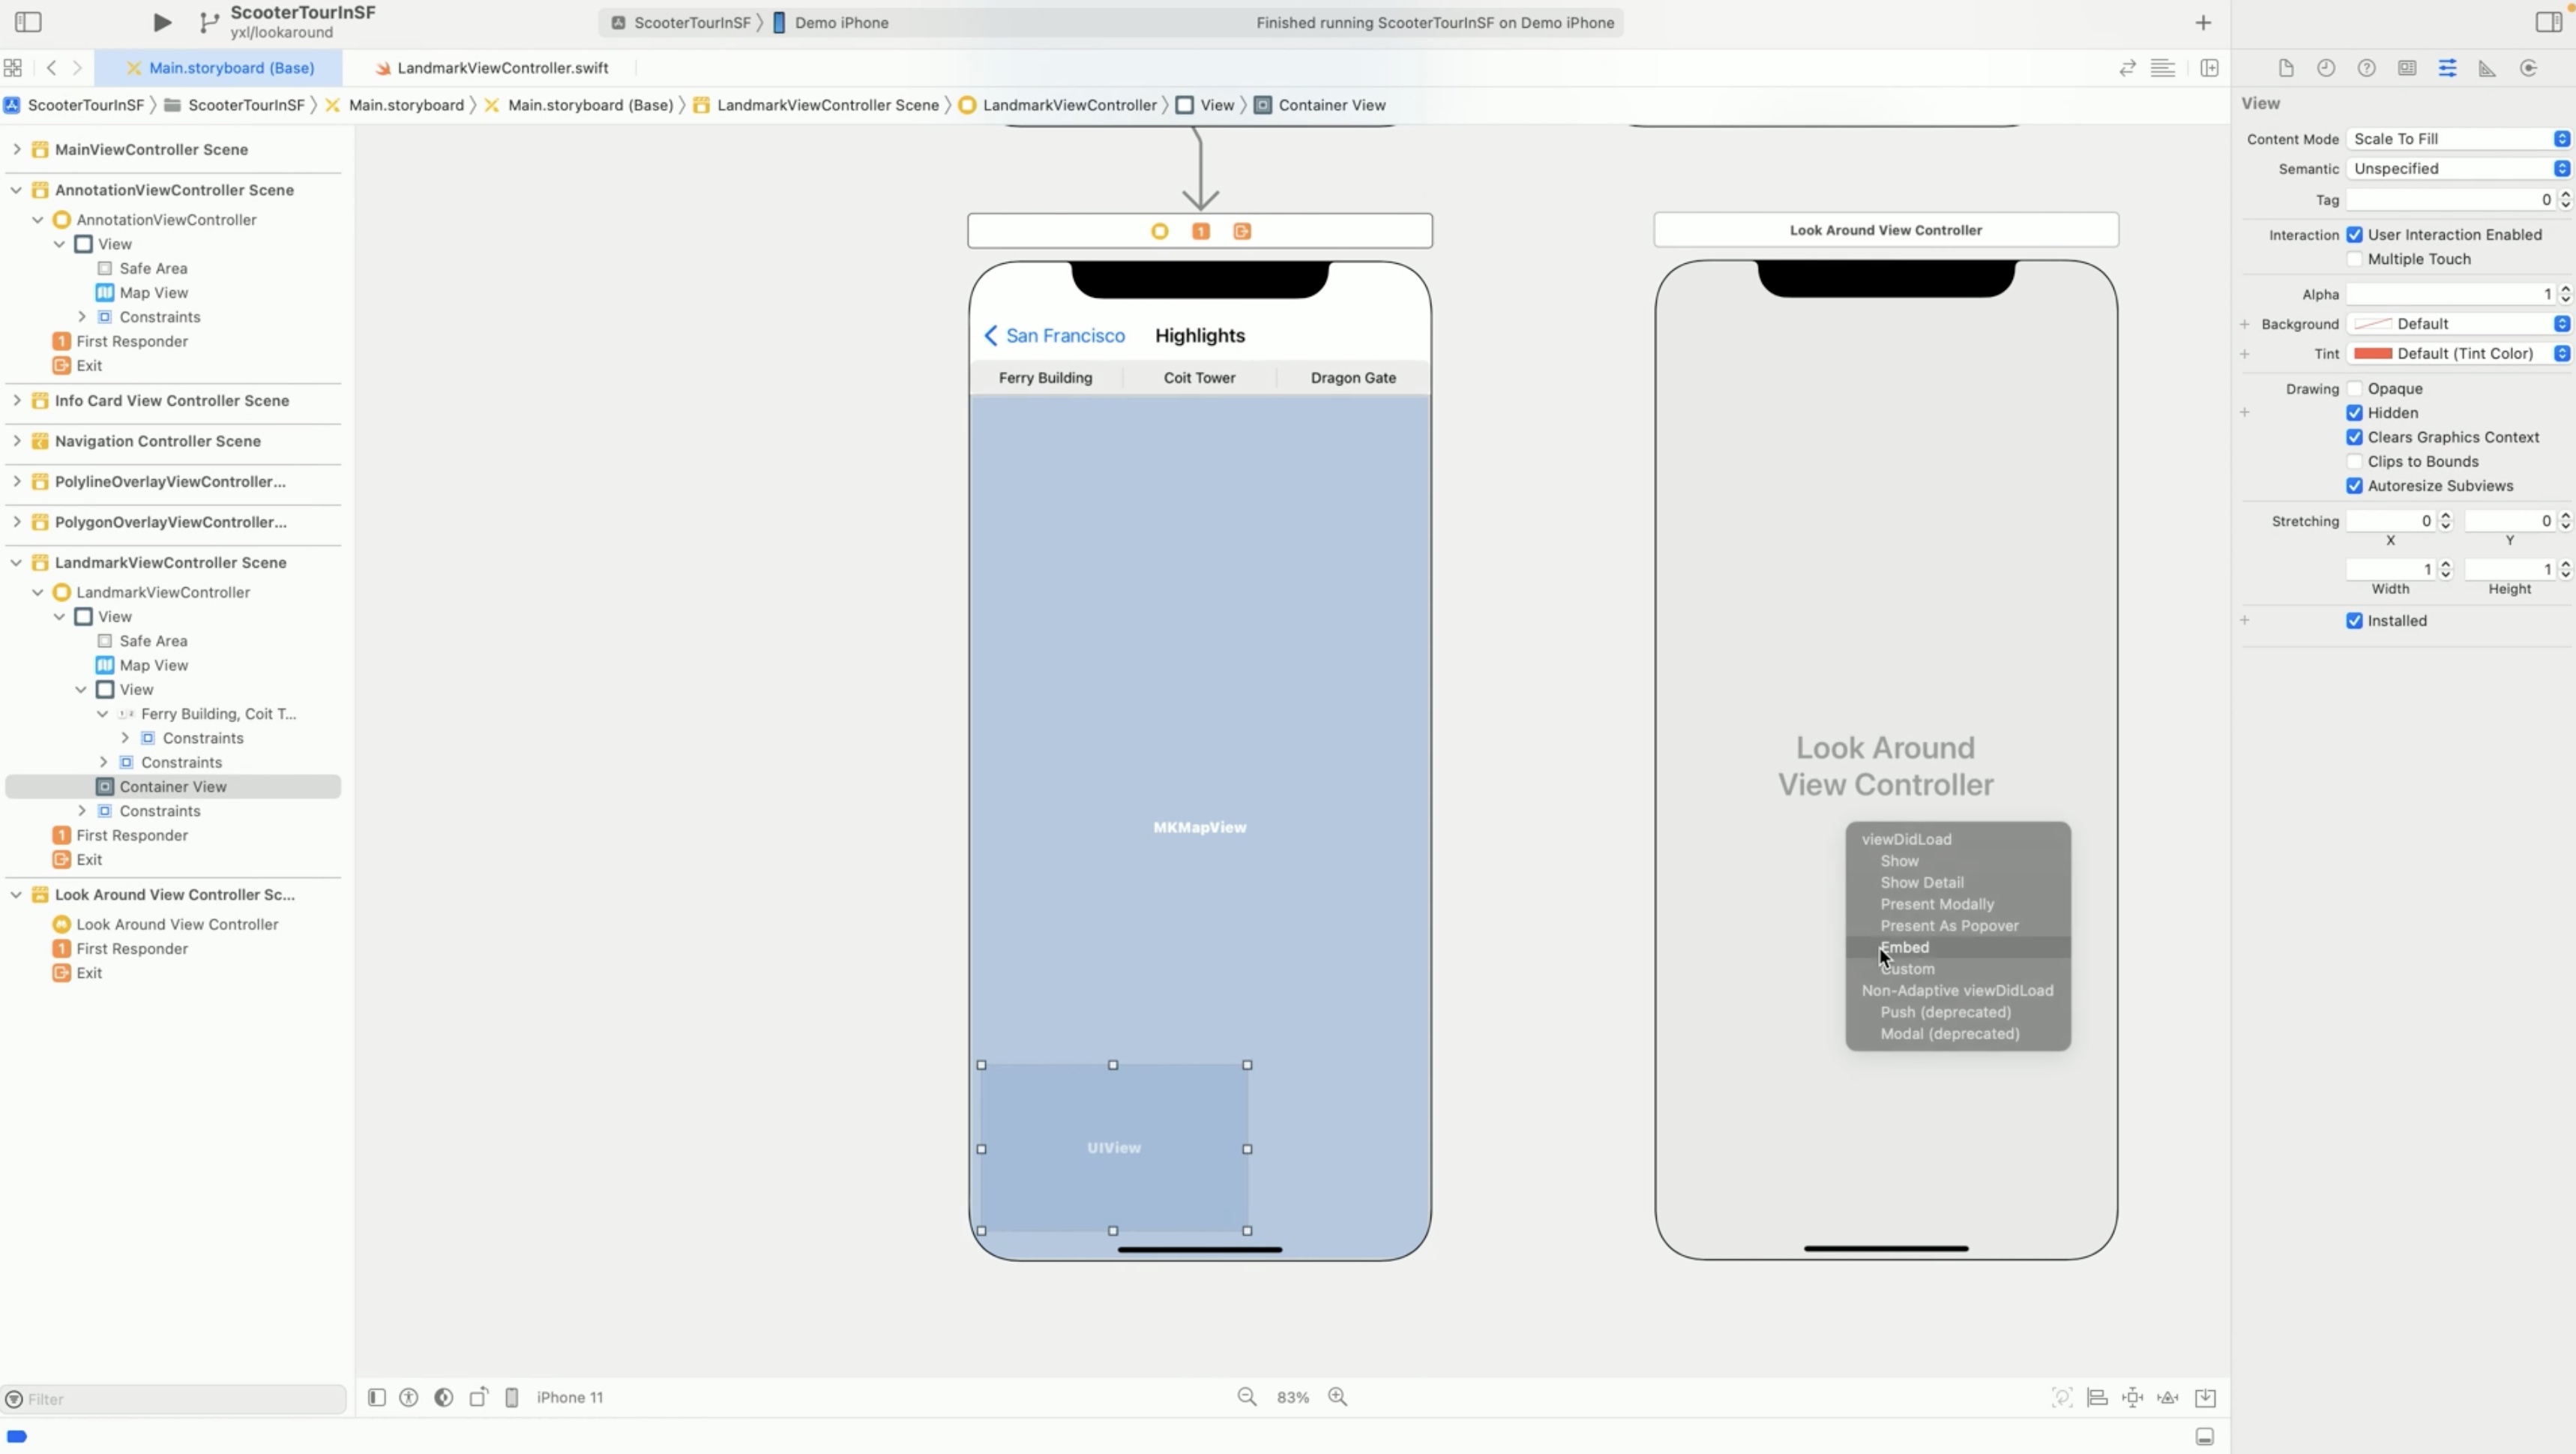
We already have a couple of San Francisco landmark names in the segment control bar on top of the screen. When users tap on one of them, we want to perform a camera animation to the tapped location. We also want to show a Look around preview at bottom left, which users can expand to full screen. Let's do it! First we need to add a container view for the Look Around preview.
Let's go to the size inspector. Let's give it a position and size.
We want to hide this preview at the beginning, so let's open the attributes inspector and check Hidden.
Next, we need to create a Look Around view controller...
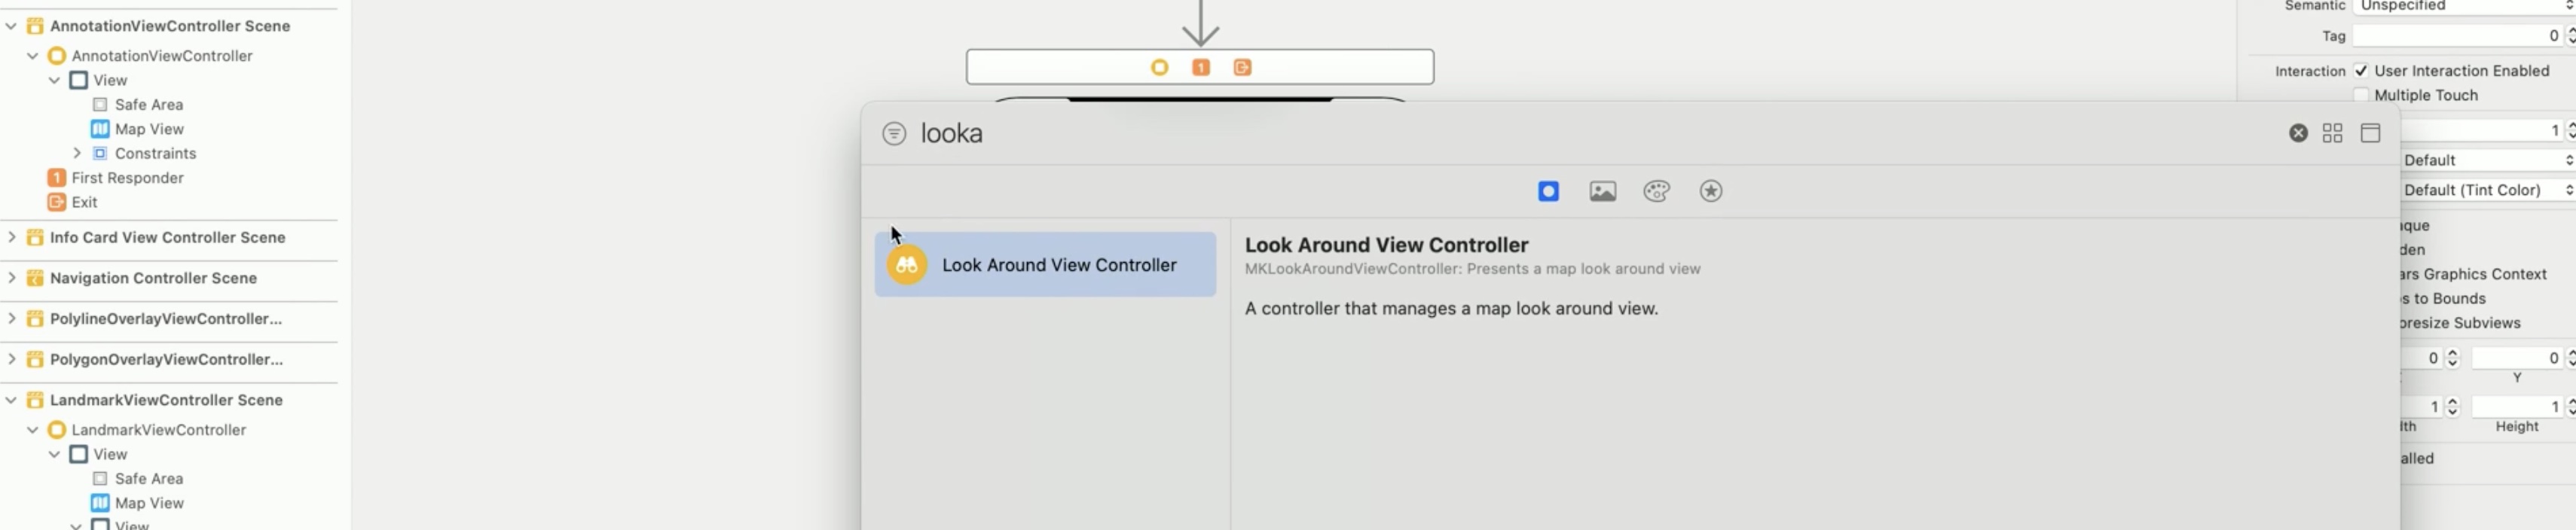
And embed it to the container view.
Same as any other segue, we need to give it an identifier.
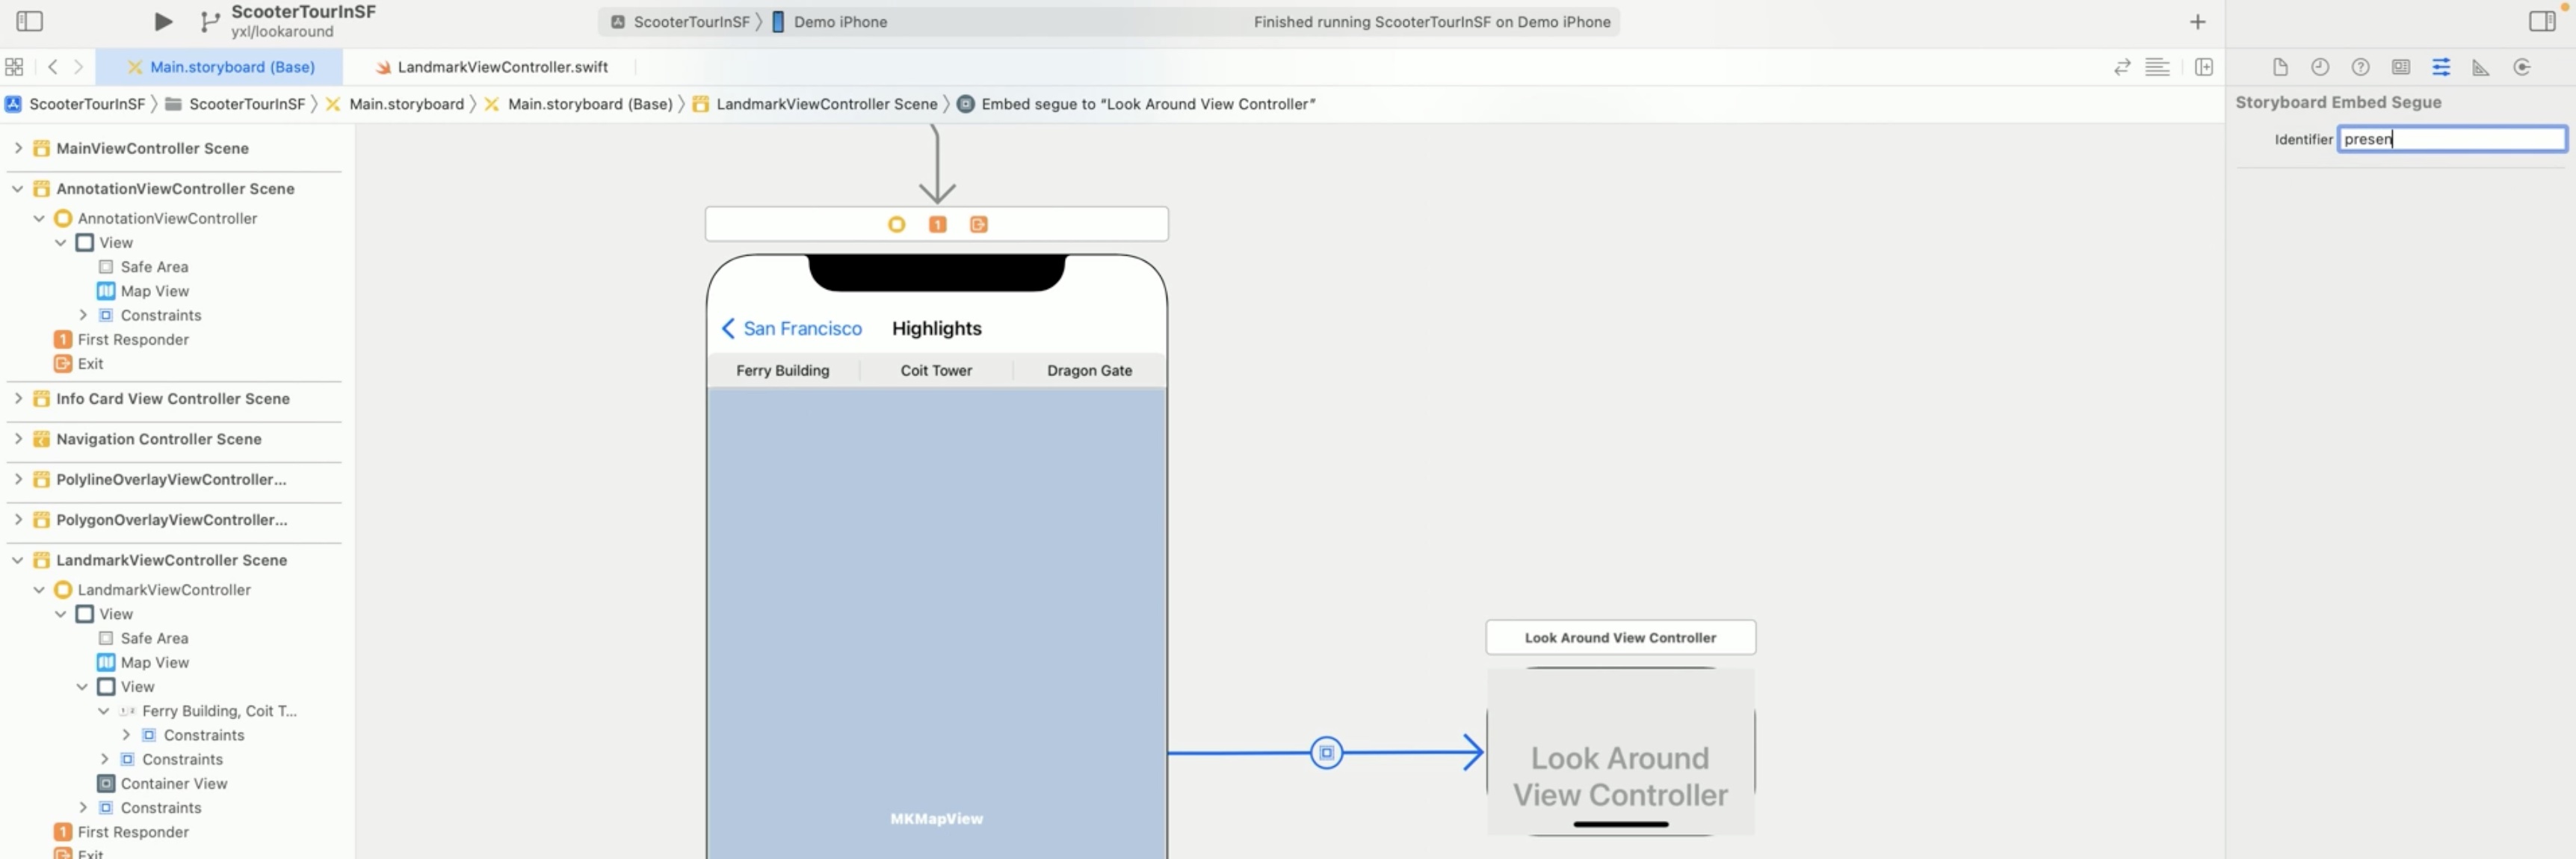
Let's call it presentLookAroundEmbedded. And import it to code so we can update its visibility later.
Let's name it "preview." Here, we already have a LookAroundViewController declared. We just need to grab the instance in the prepare function.
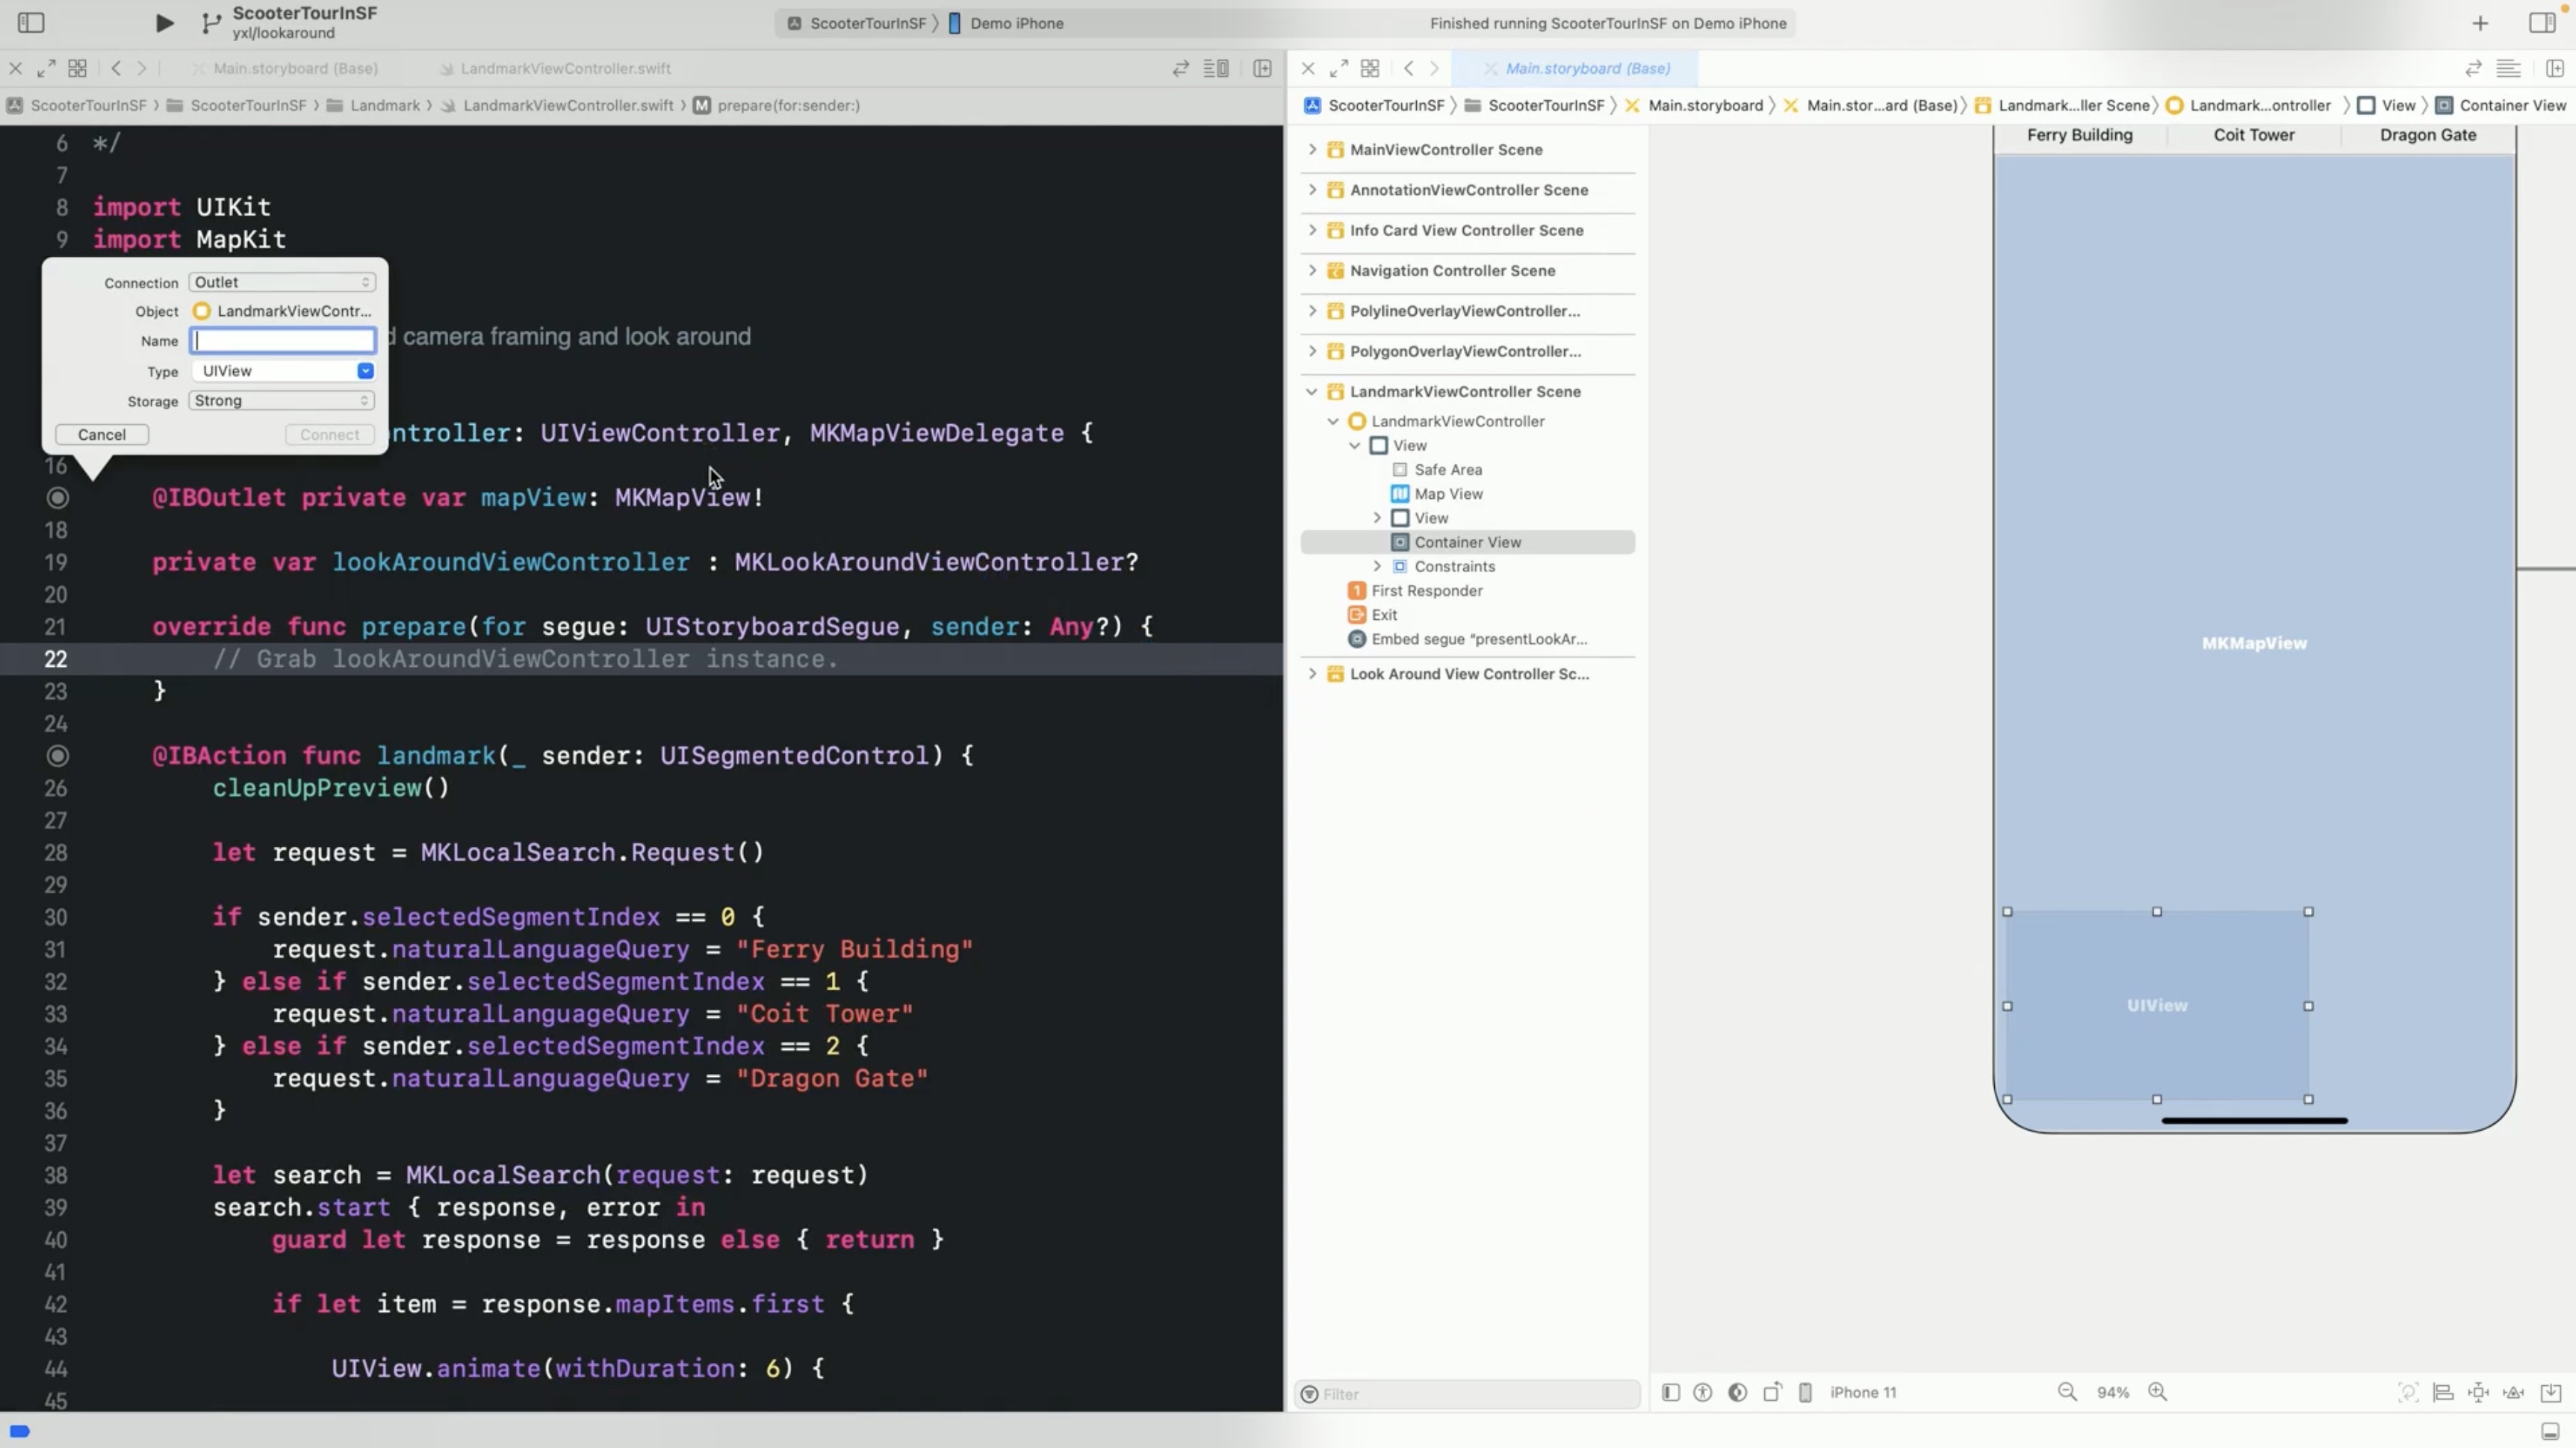
Make sure the segue identifier is matched.
override func prepare(for segue: UIStoryboardSegue, sender: Any?) {
    // Grab lookAroundViewController instance.
    if segue.identifier == "presentLookAroundEmbedded" {
        if let lookAroundViewController = segue.destination as? MKLookAroundViewController {
            self.lookAroundViewController = lookAroundViewController
            }
        }
    }
Then, in the segment control function, we'll create a local search with the landmark name. If the request succeeds, we will get a map item which will be used in the following camera animation and Look Around scene retrieval.
For camera animation, we first need to create a camera with the new API. MapCamera looking at map item. Let's use map view frame size for the view size, and set allow pitch to true. This will give us a pitch view to landmarks and a top-down view to other places. Assign the new camera. That's it.
@IBAction func landmark(_ sender: UISegmentedControl) {
    cleanUpPreview()

    let request = MKLocalSearch.Request()
    if sender.selectedSegmentIndex == 0 {
        request.naturalLanguageQuery = "Ferry Building"
    } else if sender. selectedSegmentIndex == 1 {
        request.naturalLanquageQuery = "Coit Tower"
    } else if sender.selectedSegmentIndex == 2 {
        request.naturalLanguageQuery = "Dragon Gate"
    }

    let search = MKLocalSearch (request: request)
    search.start { response, error in
        guard let response = response else { return }

        if let item = response.mapItems.first {

            UIView.animate(withDuration: 6) {

            // Camera animation
            let camera = MKMapCamera(lookingAt: item, forViewsize: self.mapView.frame.size, allowPitch: true)
            self.mapView.camera = camera
            ) completion: { _ in

                // Prepare LookAround preview.
                self.configureLookAroundScene(item)
                }
            }
        }
    }
}
Once the camera animation is completed, we'll show its Look Around preview.
First, we need to determine if the Look Around data is available for this map item. To do that, we need to use the new LookAroundSceneRequest class. Let's create our request and pass in the map item. Then perform the request.
If get scene request succeeds, then we assign the scene to our LookAroundViewController.
func configureLookAroundScene(_ item: MKMapItem) {
    guard let lookAroundViewController = self.lookAroundViewController else { return }
    let lookAroundRequest = MKLookAroundSceneRequest(mapItem: item)

    Task {
        // Create LookAround scene request.
        do {
            // Issue request.
            guard let lookAroundScene = try await lookAroundRequest.scene else { return }
            lookAroundViewController.scene = lookAroundScene

            // Show lookAround preview.
            self.preview.isHidden = false
        } catch {

        }
    }
}
If there is no error but we get nil for the scene, it means Look Around data is not available at the request location.
Check out also
Meet Apple Map Server APIs - WWDC22
Whats new for enterprise developer (Tech Talk) - WWDC22
 Twitter
 GitHub
 iosdev.space