Explore ARKit 4
 Sarthak Khillon
Description: ARKit 4 enables you to build the next generation of augmented reality apps to transform how people connect with the world around them. We’ll walk you through the latest improvements to Apple’s augmented reality platform, including how to use Location Anchors to connect virtual objects with a real-world longitude, latitude, and altitude. Discover how to harness the LiDAR Scanner on iPad Pro and obtain a depth map of your environment. And learn how to track faces in AR on more devices, including the iPad Air (3rd generation), iPad mini (5th generation), and all devices with the A12 Bionic chip or later that have a front-facing camera. To get the most out of this session, you should be familiar with how your apps can take advantage of LiDAR Scanner on iPad Pro. Watch “Advanced Scene Understanding in AR” for more information. Once you’ve learned how to leverage ARKit 4 in your iOS and iPadOS apps, explore realistic rendering improvements in “What’s New in RealityKit” and other ARKit features like People Occlusion and Motion Capture with “Introducing ARKit 3”.
New in ARKit 4
- Location anchors
- Scene geometry
- Depth API
- Object placement
- Face tracking improvements
1. Location Anchors
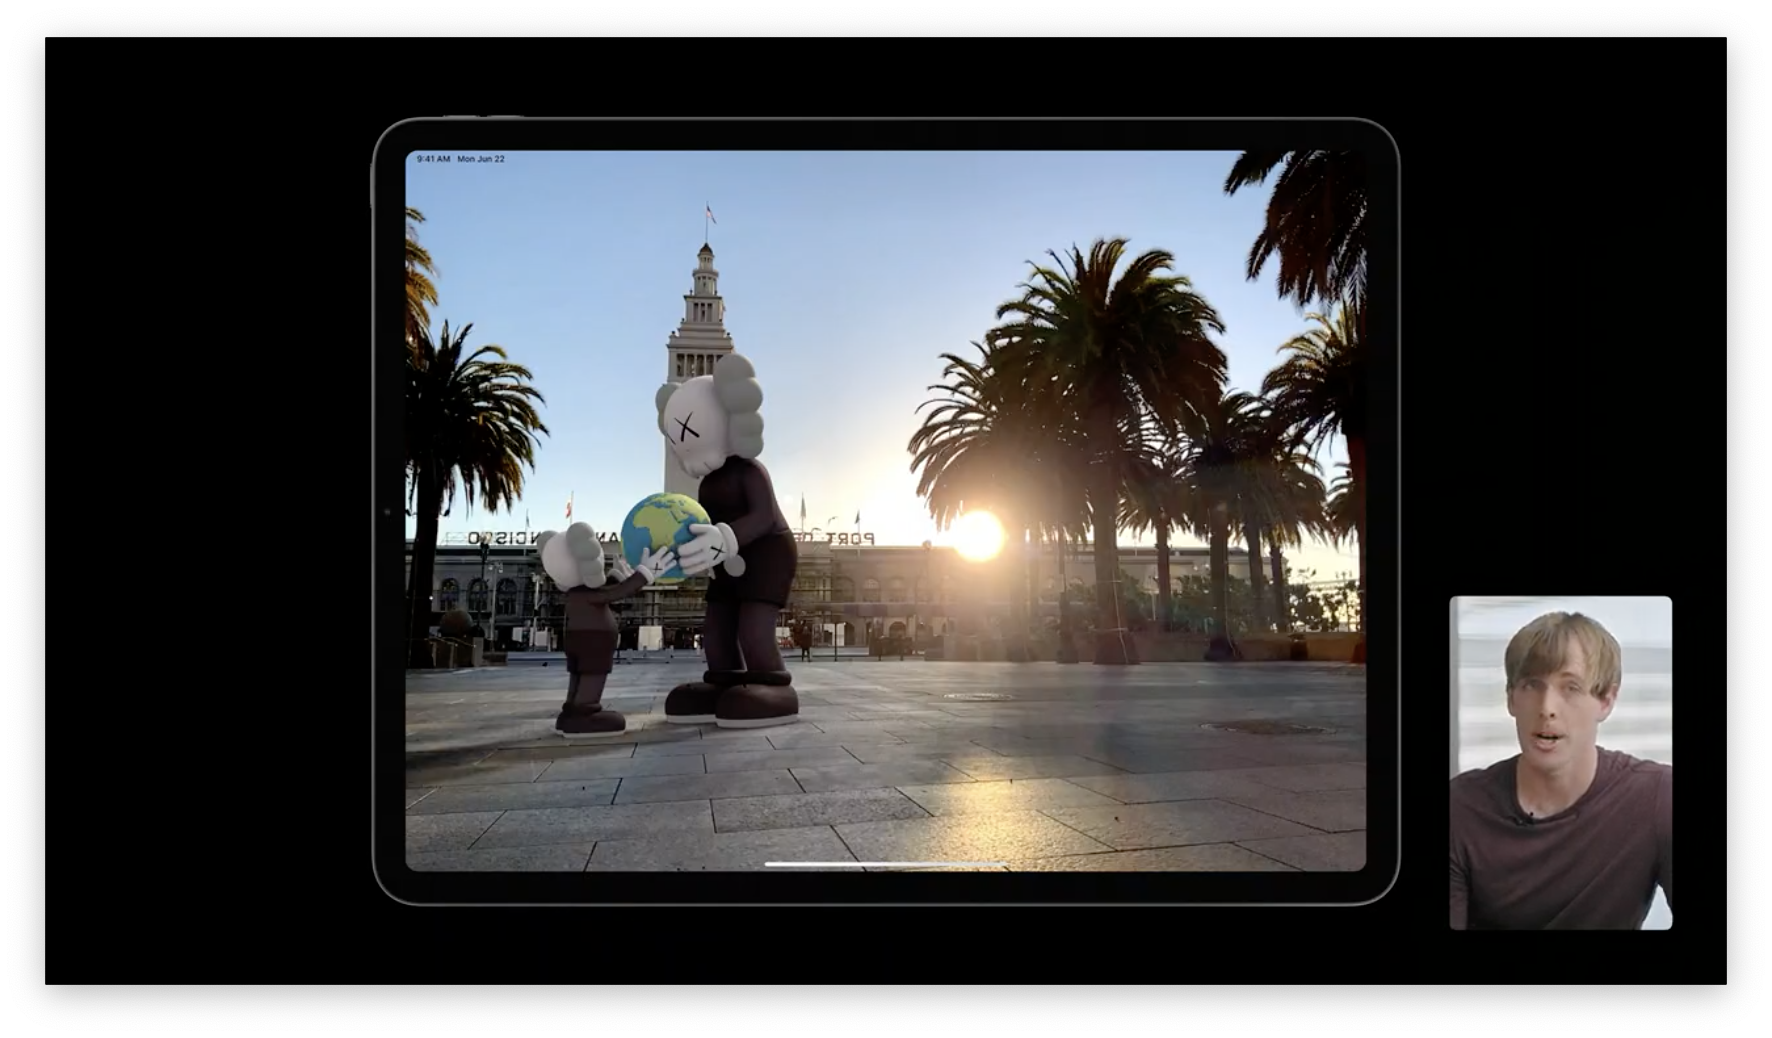
Up to this point, Apple has: - Introduced shared AR experiences - Brought people into AR with motion capture/people occlusion.
Now, location anchors allow us to create AR content with a longitude, latitidue, and altitude. That AR content is then placed in a real world location using Apple Maps. This is more accurate than possible with GPS due to advanced on-device Machine Learning.
This is all bundled in a new AR tracking configuration called ARGeoTrackingConfiguration. Geo-referenced AR content can then be added with ARGeoAnchors.
Here's an example of virtual art in front of the Ferry Building in San Francisco. This sculpture is bound to a location anchor.
How does this work?
When using geo-tracking, Apple downloads detailed map data for the user's region. Part of this is a localization map that contains feature points of the surrounding area that can be seen from the street.
The user's current location, known "street view" data, and camera feed are passed into an on-device ML engine.
This is much better in video form because they have great animations. Watch 3:55-4:25.
Location Anchor API
There's 3 main parts:
ARGeoTrackingConfigurationenables all the location anchor features. This configuration contains a subset of world-tracking features that are compatible with geo-tracking.- After starting an AR session with
ARGeoTrackingConfiguration, we'll be able to createARGeoAnchorobjects. This works like any other ARKit anchor. ARGeoTrackingStatusprovides valuable feedback to improve the geo-tracking experience. Developers should monitor this status!
To build a location anchor app, we need to:
- Check if geo-tracking is available.
- Add location anchors.
- Use the rendering engine to place virtual content.
- Handle geo-tracking state transitions that may need user intervention.
Checking geo-tracking availability
Devices must have the A12 Bionic chip or newer, as well as GPS. The user must also be in an area where Apple Maps has sufficient data to start a geo-tracking session.
Lastly, we need permissions for the camera and precise location.
// Check device support for geo-tracking.
guard ARGeoTrackingConfiguration.isSupported else {
  // Geo-tracking not supported on this device.
  return
}

// Check if current location is supported for geo-tracking.
ARGeoTrackingConfiguration.checkAvailability { (available, error) in
  guard available else {
    // Geo-tracking not supported at current location.
    return
  }

  // Run ARSession.
  let arView = ARView()

  // RealityKit defaults to `ARWorldTrackingConfiguration`,
  // so we need to specify a geo-tracking configuration.
  arView.session.run(ARGeoTrackingConfiguration())
}
Adding location anchors
ARGeoAnchor takes a longitude, latitude, and altitude. Altitude isn't necessary, and Maps can fill in "ground level". It's important to use 6 or more decimal places in longitude/latitude.
Let's add an anchor at the Ferry Building. For this example, we can just look up coordinates in the Maps app and let ARKit figure out the altitude:
// Create coordinates.
let coordinate = CLLocationCoordinate2D(latitude: 37.795313, longitude: -122.393792)

// Create location anchor.
let geoAnchor = ARGeoAnchor(name: "Ferry Building", coordinate: coordinate)

// Add location anchor to session.
arView.session.add(anchor: geoAnchor)

// Create a RealityKit anchor entity.
let geoAnchorEntity = AnchorEntity(anchor: geoAnchor)

// Anchor content under the RealityKit anchor.
geoAnchorEntity.addChildl(generateSignEntity())

// Add the RealityKit anchor to the scene.
arView.scene.addAnchor(geoAnchorEntity)
This is what we get:
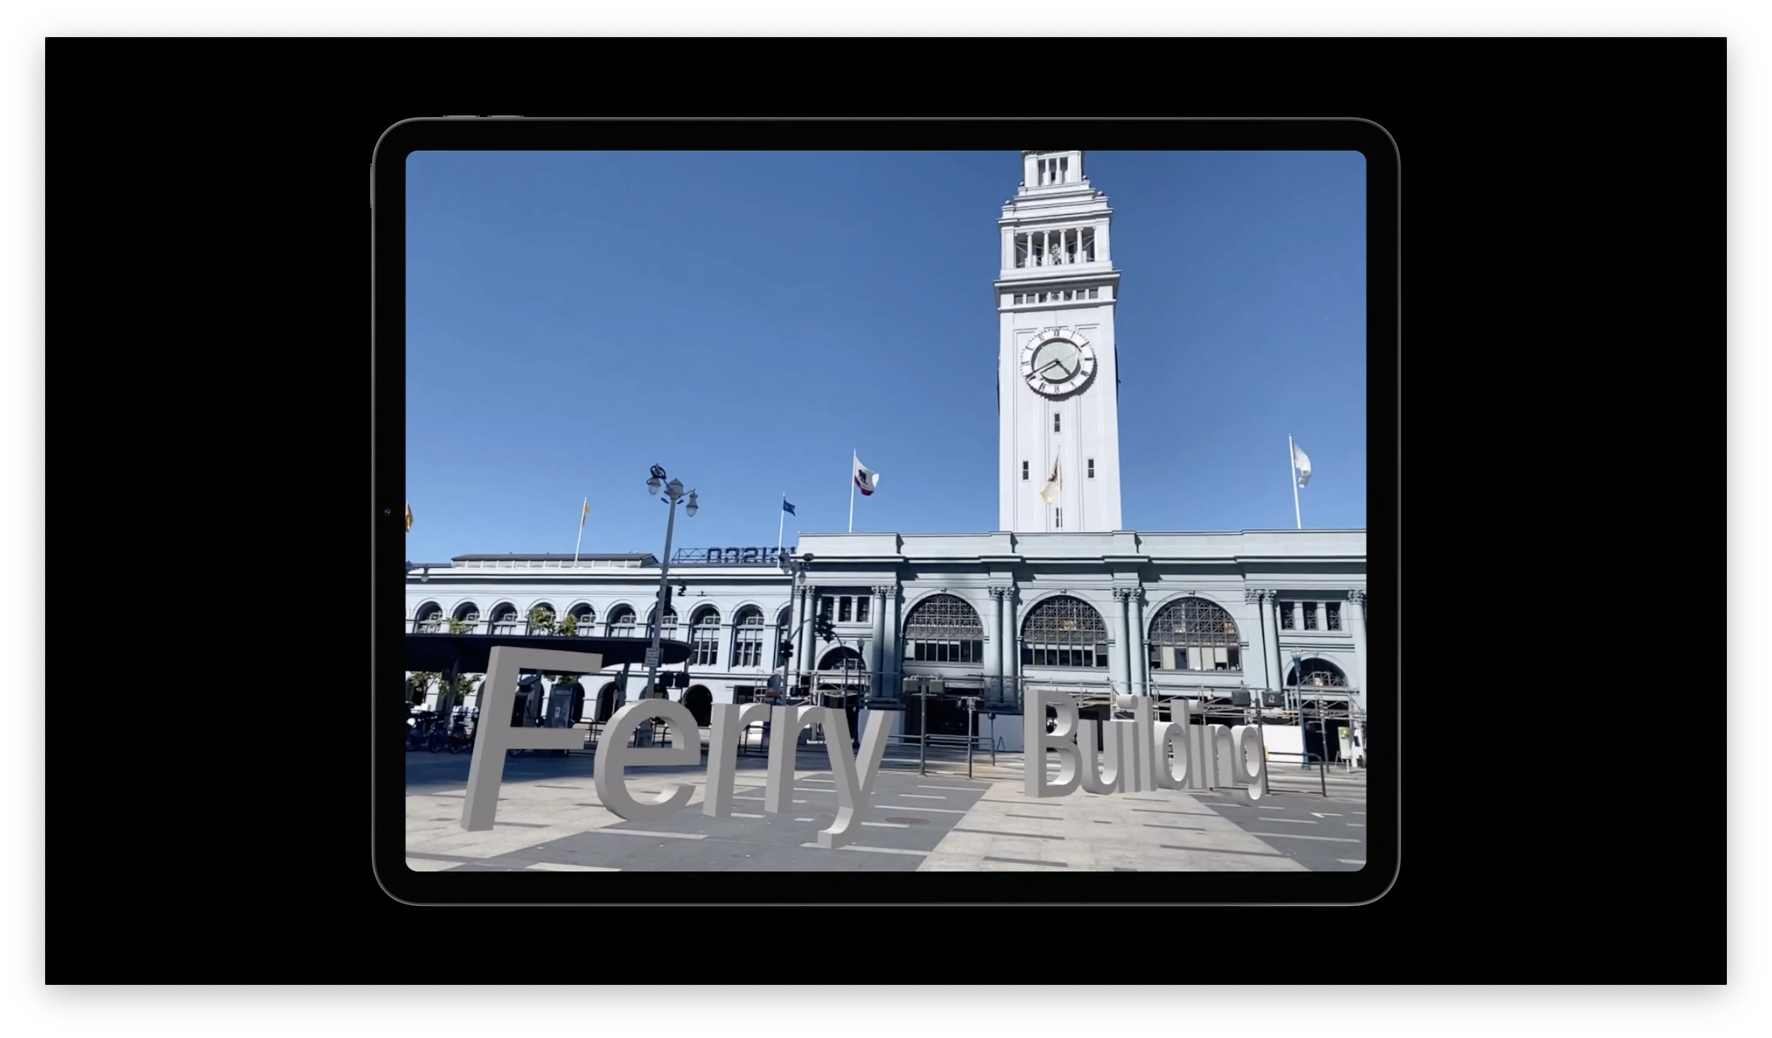
We want to be able to spot the Ferry Building from a distance, assuming we're inside the city. We want the text to face the city, not be rotated. We also want the text to float a few meters in the air so it can be seen better.
Positioning content
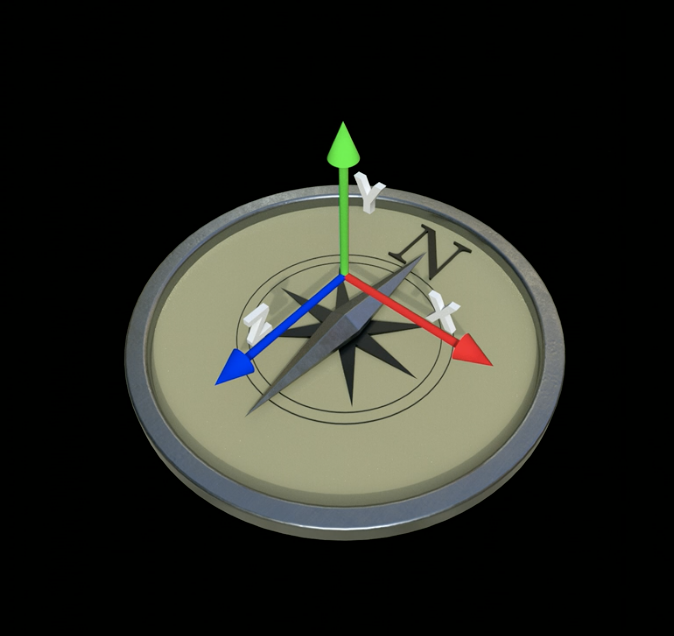
ARGeoAnchors are fixed to cardinal directions. Their axes are set on creation, and they remain unchanged for the rest of the session. The x axis always points East, the y axis always points up, and the z axis always points South.
Like all other anchors, ARGeoAnchors are immutable. This means we need to use the rendering engine to transform or translate anchors from their origins.
// Create a new entity for our virtual content.
let signEntity = generateSignEntity()
// Add the virtual content entity to the Geo Anchor entity.
geoAnchorEntity.addChild(signEntity)
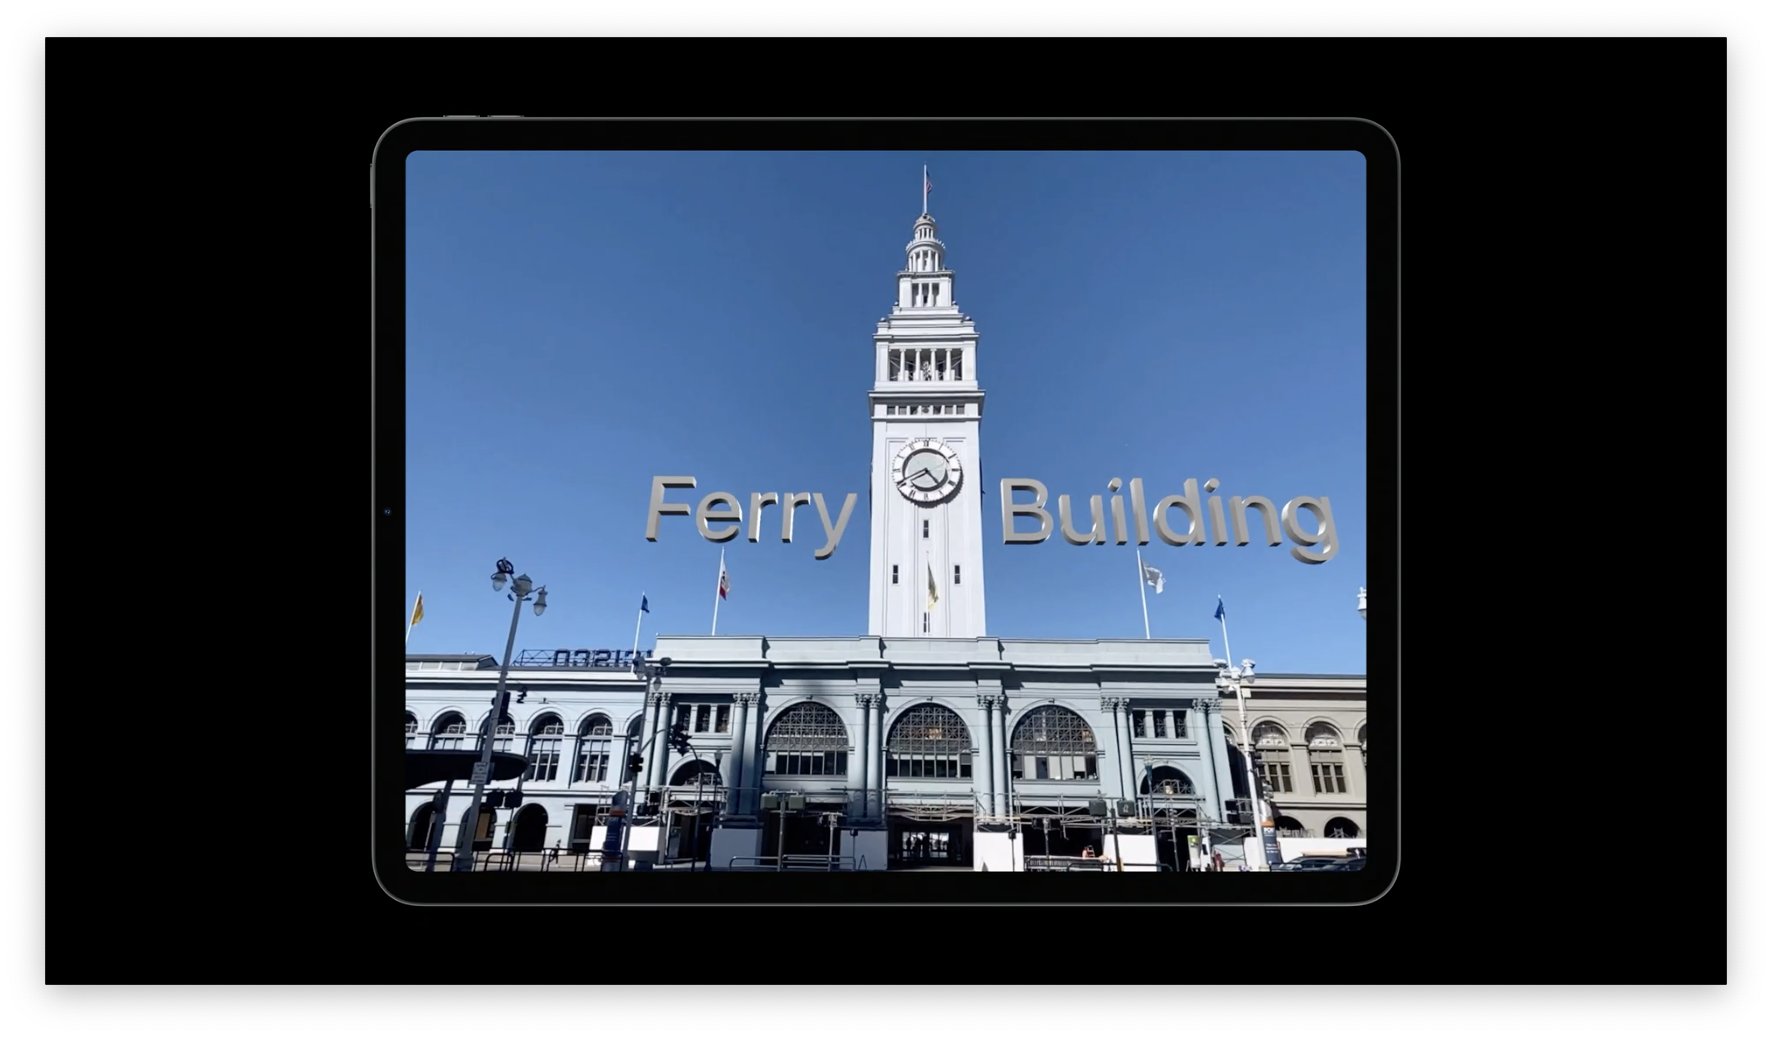
// Rotate text to face the city. The rotation angle is clockwise by a little less than 90 degrees.
let orientation = simd_quatf.init(angle: -Float.pi / 3.5, axis: SIMD3<Float>(0, 1, 0))
signEntity.setOrientation(orientation, relativeTo: geoAnchorEntity)
// Elevate text to 35 meters above ground level.
let position = SIMD3<Float>(0, 35, 0)
signEntity.setPosition(position, relativeTo: geoAnchorEntity)
Now, our text is higher in the air and much easier to read from a distance:
This is nice, but we're still missing some crucial information about the geo-tracking state that can ensure a great experience for the user.
Geo-tracking state transitions
When using the geo-tracking configuration, there's a new geo-tracking status object called ARGeoTrackingStatus, which is available on ARFrame and ARSessionObserver. This is similar to the ARWorldTrackingStatus available on ARCamera.
This object contains:
- A state that indicates how far along geo-tracking is during localization.
- A reason for the current state.
- An accuracy once geo-tracking localizes.
When an ARSession begins, ARGeoTrackingState starts at "Initializing". At this point, geo-tracking is waiting for world-tracking to initialize.
From this point, if geo-tracking isn't available in the current location, the state can immediately go to "Not available". We can usually avoid this state if we first check for availability.
Once geo-tracking moves to "Localizing", ARKit receives images and Maps data and tries to compute pose. However, during both "Initializing" and "Localizing" states, there could be issues that prevent localization. ARGeoTrackingStateReason contains reasons for these issues. Some possible reasons:
.devicePointedTooLow: Tell the user to raise the device..geoDataNotLoaded: Tell the user that a network connection is required.
For all possible reasons, look at ARGeoTrackingTypes.h.
In general, we want to encourage users to point devices at buildings and other stationary structures that are visible from the street. Parking lots, fields, and other dynamic areas have a lower chance of localizing.
After addressing any geo-tracking state issues, geo-tracking should become "Localized" and we can start our AR experience. Starting before this point could mean that objects jump to unintended locations.
Additionally, once geo-tracking is "Localized", accuracy information is available to help guage which experiences should be enabled.
It's important to always monitor ARGeoTrackingState because it's possible to move back to "Localizing" or "Initializing". For example, tracking could be lost or map data could no longer be available.
Jump to 13:30-13:40 to see the localization process.
Authorizing location anchors
Our app may get coordinates from our backend, but it's also possible to have users tap the screen to save their own point of interest. ARSession.getGeoLocation(forPoint:) allows us to get geographic coordinates for any point in ARKit coordinate space. This can come from a raycast or a location on a plane.
let session = ARSession()
let worldPosition = raycastLocationFromUserTap()
session.getGeoLocation(forPoint: worldPosition) { (location, altitude, error) in
  if let error = error {
    // Handle error...
  }

  let geoAnchor = ARGeoAnchor(coordinate: location, altitude: altitude)
}
Location anchor availability
Location anchors are available today in iOS 14 in major US cities:
- San Francisco Bay Area
- New York
- Chicago
- Miami
More cities are coming throughout the summer.
Devices must be an iPhone or iPad with A12 Bionic or newer and GPS capability.
For any apps that require location anchors exclusively, developers can limit visibility in the App Store with capability keys:
<key>UIRequiredDeviceCapabilities</key>
<array>
    <string>gps</string>
    <string>iphone-ipad-minimum-performance-a12</string>
</array>
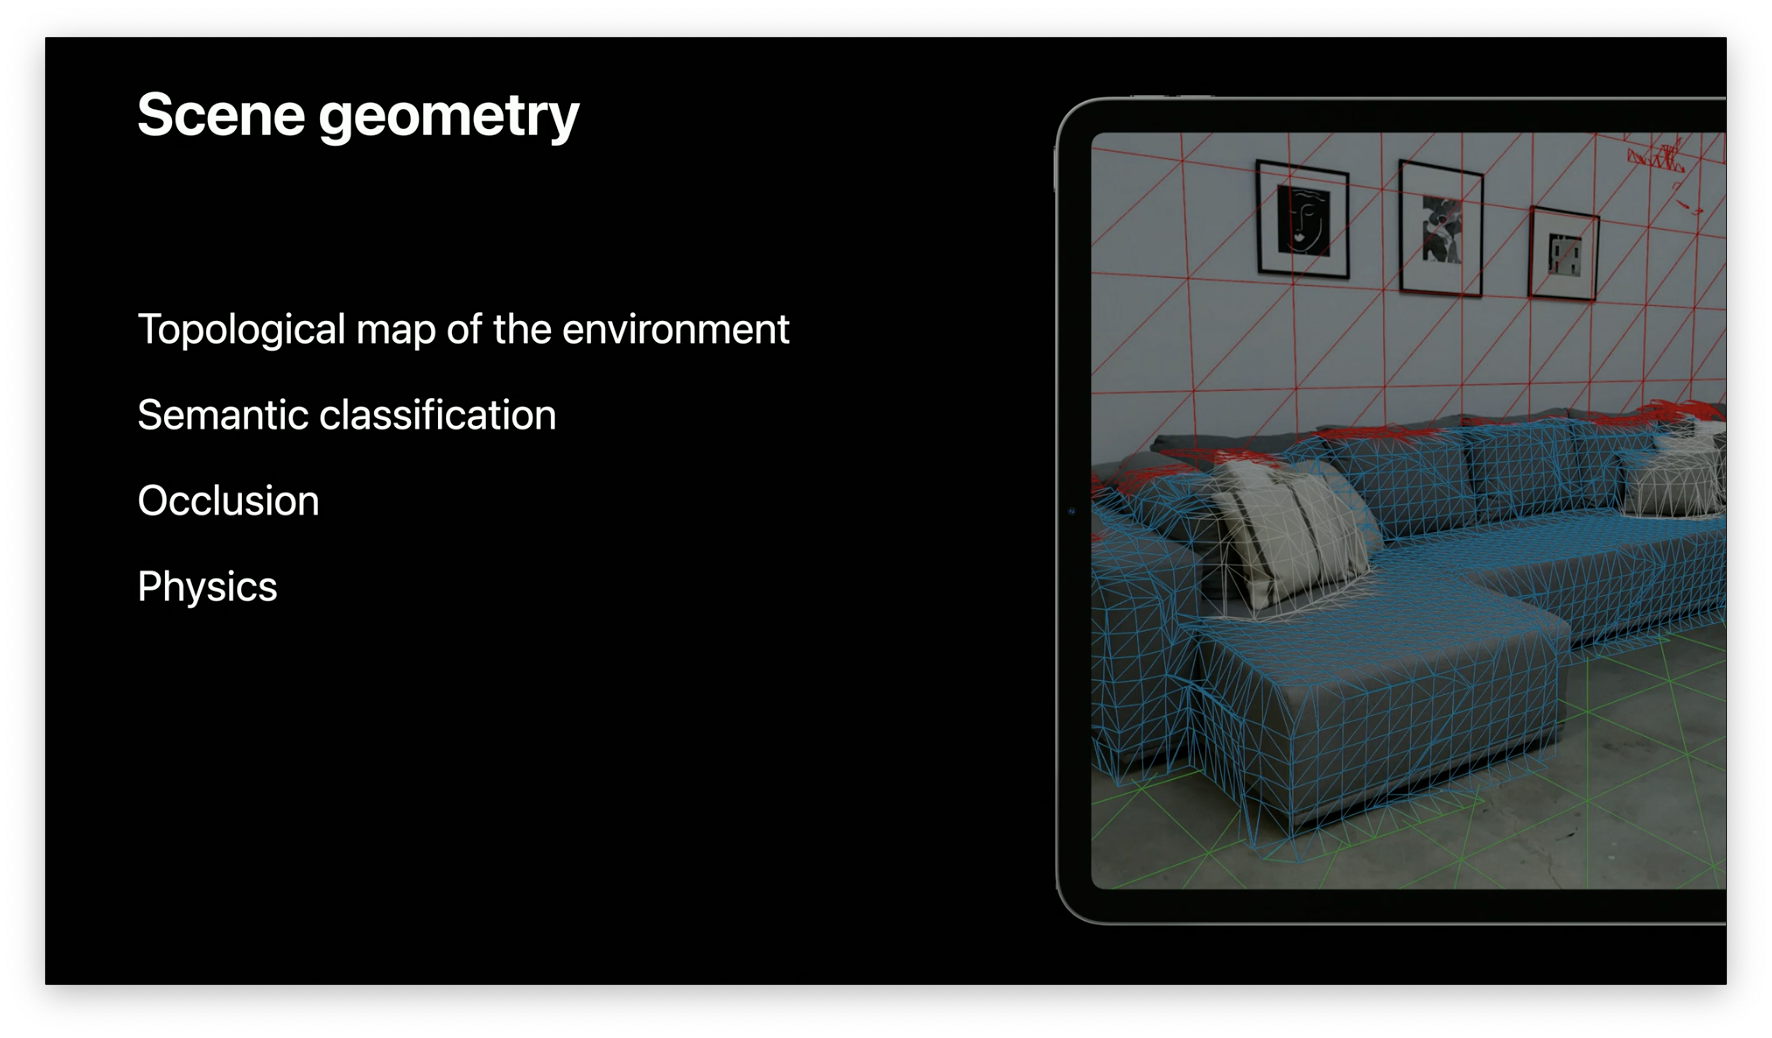
2. Scene Geometry
ARKit 3.5 introduced the Scene Geometry API powered by the LiDAR scanner on the new iPad Pro.
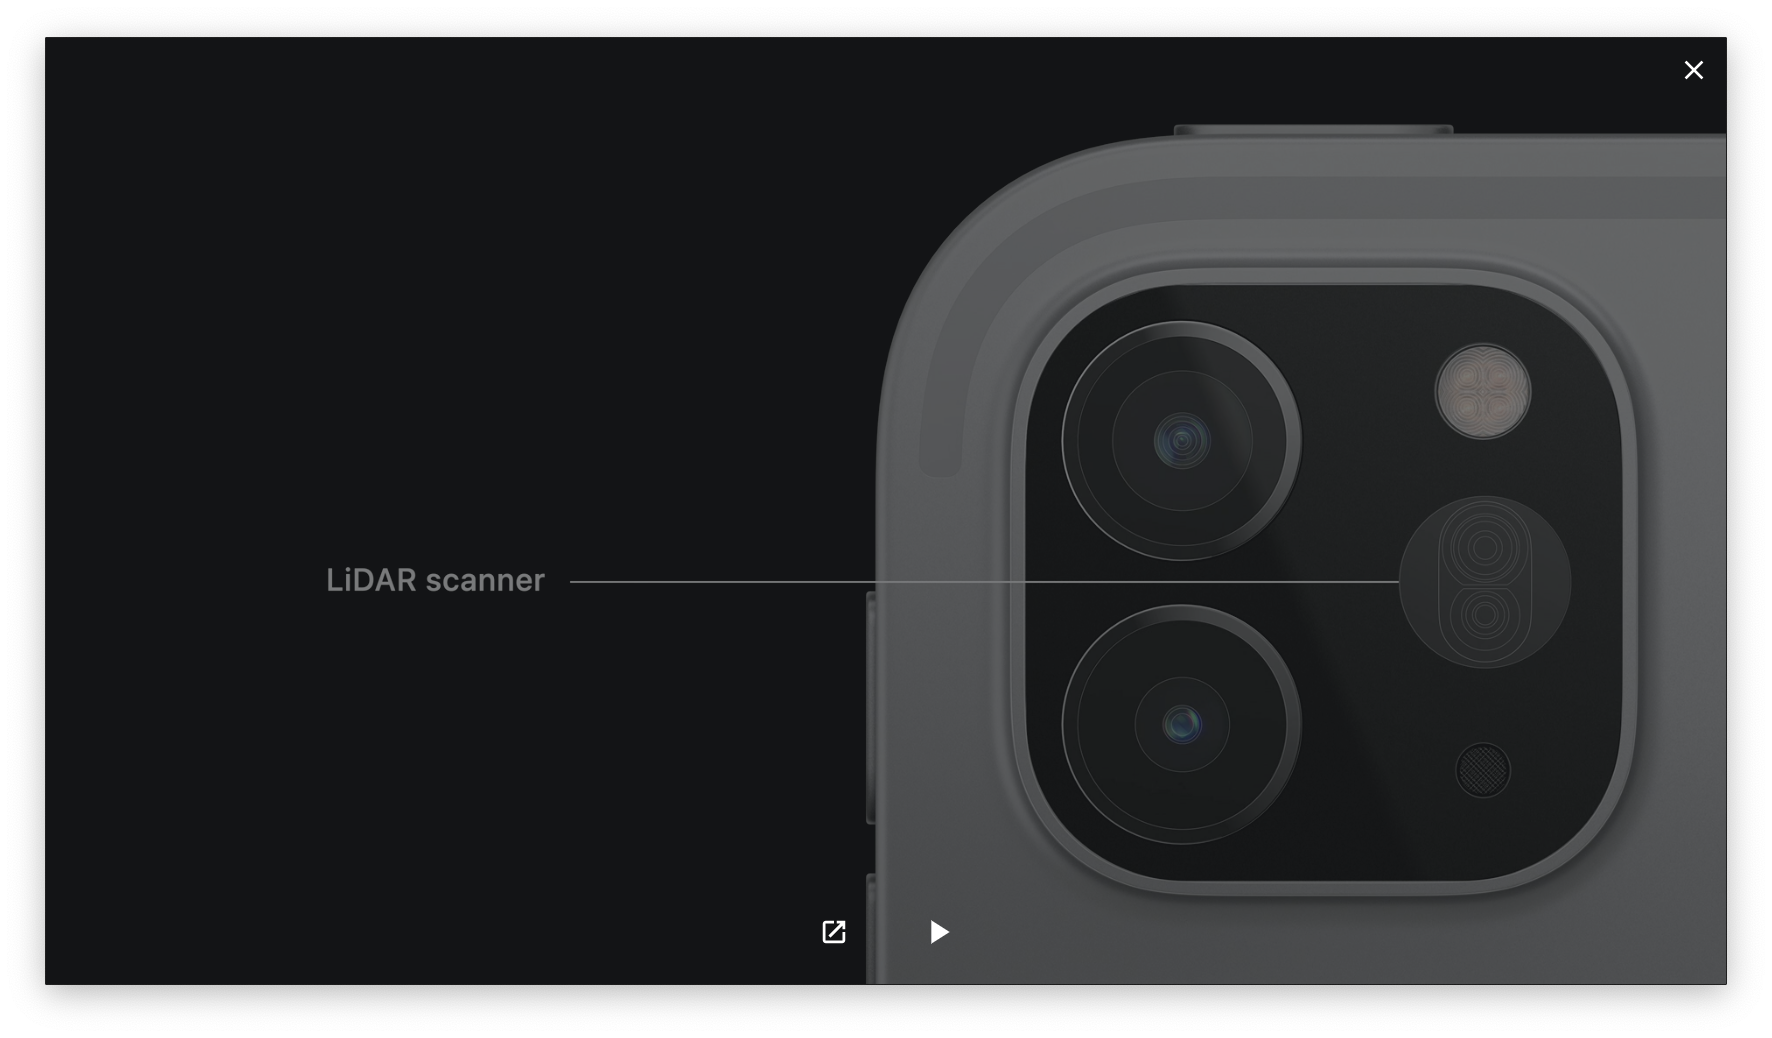
As a recap, the LiDAR scanner shoots light onto the surroundings and collects light reflected off of surfaces in the scene. Depth is estimated by measuring the time it took the light to reflect off the environment and hit the scanner again. This process runs millions of times per second.
The Scene Geometry API provides a topological map of the environment. This can be optionally fused with semantic classification, which enables apps to recognize and classify physical objects.
Together, these capabilities enable occlusion with virtual objects. They also enable realistic interactions between virtual and physical objects. Lastly, they can enable virtual lighting on real surfaces.
To see scene geometry in action, jump to 17:10-17:37 (it's cool!)
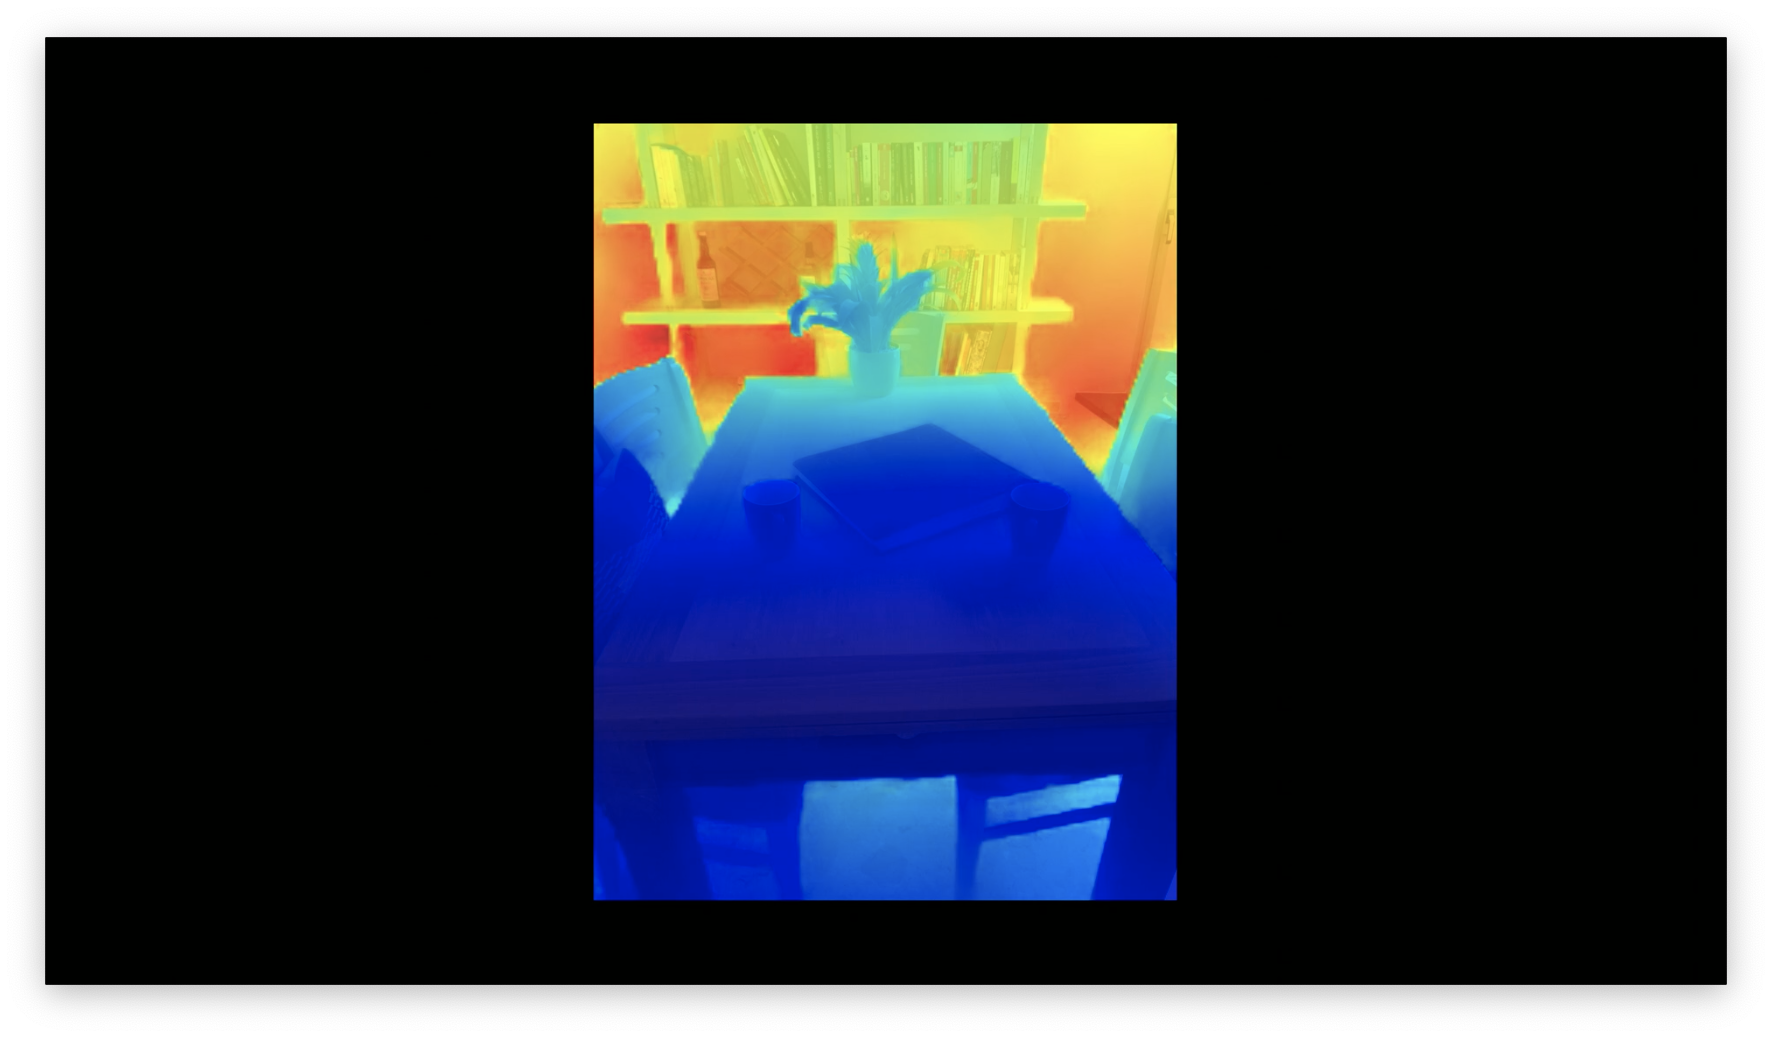
3. Depth
Scene geometry is built by leveraging depth data from the LiDAR scanner and on-device Machine Learning. In iOS 14, there is a new ARKit depth API that provides access to a dense depth image. In the depth image, each pixel corresponds to a depth in meters from the camera. These images are captured at the same rate as ARFrame, i.e. 60 fps.
Below is a debug image where blue is closer to the camera and red is farther away:
Accessing depth data
In iOS 14, each ARFrame has a new property sceneDepth, which provides an ARDepthData object. This is a container for 2 buffers: a depth map, and a confidence map.
The depth map is a CVPixelBuffer, where each pixel represents a depth in meters. This depth corresponds to a distance from the camera to a point in the world. Note that this map has a smaller resolution than ARFrame.capturedImage, but still preserves the aspect ratio.
The confidence map provides a confidence level for the depth of each pixel. This is necessary because the accuracy of depth is impacted by the surrounding environment. Challenging surfaces, such as highly reflective or highly absorbant surfaces, can lower accuracy. Each value is of type ARConfidenceLevel and can be .low, .medium, or .high.
Using the depth API
There is a new frame semantic called sceneDepth, which allows us to turn on the depth API:
let session = ARSession()
let configuration = ARWorldTrackingConfiguration()

// Check if configuration and device supports `.sceneDepth`.
if type(of: configuration).supportsFrameSemantics(.sceneDepth) {
  // Activate sceneDepth.
  configuration.frameSemantics = .sceneDepth
}

session.run(configuration)
We can then access the depth data in an ARSessionDelegate method.
// Accessing depth data.
func session(_ session: ARSession, didUpdate frame: ARFrame) {
  guard let depthData = frame.sceneDepth else { return }
  // Use depth data.
}
Additionally, in AR apps with people occlusion, there is another API that provides both depth and people occlusion:
let session = ARSession()
let configuration = ARWorldTrackingConfiguration()

// Build the set of required frame semantics.
let semantics: ARConfiguration.FrameSemantics = [.personSegmentationWithDepth]

// Check if configuration and device supports the required semantics.
if type(of: configuration).supportsFrameSemantics(semantics) {
  // Activate `.personSegmentationWithDepth` + `.sceneDepth`
  configuration.frameSemantics = semantics
}

session.run(configuration)
Point Cloud Demo App
To see a demo of a 3D point cloud app (also really cool!), jump to 21:25-22:25.
A key part of this app is a Metal vertex shader called unproject. This unprojects the depth data from the 2D depth map into 3D space. It also uses data from ARCamera and capturedImage to get a 3D point cloud, which is rendered using Metal.

Recap: Depth
- ARKit 4 introduces a new depth API
- There's a new frame semantic called
sceneDepthwhich enables depth data - Depth (and confidence) data is available at 60Hz
- Available on LiDAR devices
4. Object Placement
ARKit 3 introduced the raycasting API to make object placement easier. ARKit 4 uses the LiDAR scanner for more quicker and more precise raycasting. In iOS 14, raycasting is recommended over hit-testing.
Anatomy of a raycast
Raycasting requires a raycast query, which describes the behavior and directions of the ray used for raycasting. It is composed of:
- A raycast target, which describes the type of surface that the ray can intersect with.
- Existing planes are detected by ARKit, taking into account the size and shape of the plane.
- Infinite planes have no size or shape.
- Estimated planes are planes of arbitrary orientation formed from feature points around a surface.
- A target alignment: horizontal, vertical, or any.
There are 2 types of raycasts:
- Single, short raycasts. These are for one-time results.
- Tracked raycasts. As the name suggests, these are tracked continuously as ARKit's understanding of the world evolves.
Migrating from hit-testing to raycasting
In order to get the latest features for object placement, developers should migrate to raycasting.
// Hit-testing is deprecated:
arView.hitTest(
  point,
  types: [
    .existingPlaneUsingGeometry,
    .estimatedVerticalPlane,
    .estimatedHorizontalPlane
  ]
)

// Simplified object placement using raycasting:
let query = arView.makeRaycastQuery(
  from: point,
  allowing: .estimatedPlane.,
  alignment: .any
)!

let raycast = arView, session.trackedRaycast(query) { results in
  // result updates
}
5. Face Tracking
Face tracking allows us to detect faces from the front camera, overlay virtual content, and animate facial expressions in real-time. This is supported on all devices with the TrueDepth camera.
ARKit 4 brings face tracking support to devices without a TrueDepth camera as long as they have an A12 Bionic processor or later.
 Twitter
 GitHub
 www.linkedin.com