Configure and link your App Clips
 Federico Zanetello
Description: App Clips are small parts of an app that offer a streamlined, direct experience and help people get what they need at the right time. Learn how you can invoke an App Clip through real-world experiences like App Clip Codes, NFC, and QR codes, or have them appear digitally through apps like Maps or Safari. We’ll show you how to handle links in your App Clip and demonstrate how to set up your associated domains. And discover how you can configure App Clip experiences in App Store Connect, add App Clip banners to your website, and thoroughly test your App Clips through TestFlight. To get the most out of this session, you should have experience using Universal Links and associated domains. For a primer, watch “What’s New in Universal Links” from WWDC19.
Steps
From the user point of view:
- The user taps on a NFC tag
- The App Clip Experience of your app is displayed, describing the app clip and a button to open the app clip
- The user taps the Open button and launches the app clip
From the coder point of view:
- The NFC tag contains an URL that is registered with an App Clip experience in App Store Connect
- The system shows your App clip Experience images and description, meanwhile, your App Clip is being downloaded in the background
- Your App Clip is launched with an
NSUserActivityspecific for the current App Clip Experience
Where App Clips can appear
At the end of the day an App Clip Experience is tied to a registered URL.
We have many ways to get that URL:
- NFC tags
- QR codes
- Maps.app (for registered businesses)
- Nearby suggestions
- Safari.app (via a new smart banner for App Clips)
- Messages.app
- App Clip code (shown below, available later this year)

How to Setup a new App Clip
1. Configure web server and app clip for link handling
The association between your web site and your App Clip must be validated for the App Clip to be able to present content in place of the website's URL.
To securely associate your App Clip with the server, you will need the apple-app-site-association file on your web server (located under the .well-known directory).
This is the same process used with universal links, the only difference is that know we need to add a new appclips key with a list of all our app clip ids:
{
    "appclips": {
        "apps": [ "ABCDE12345.example.fruta.Clip" ]
    },

   ...
}
On the app side, we need to have an Associated Domains entitlement with the id appclips:yourwebsite.domain (where yourwebsite.domain is your website domain).
Then you have to update the code in your App Clip to handle links from incoming NSUserActivity:
import SwiftUI

@main
struct AppClip: App {
  var body: some Scene {
    WindowGroup {
     ContentView()
      .onContinueUserActivity(NSUserActivityTypeBrowsingWeb) { userActivity in
        guard
          let incomingURL = userActivity.webpageURL,
          let components = NSURLComponents(url: incomingURL, resolvingAgainstBaseURL: true)
        else {
            return
        }

        // Direct to the linked content in your app clip.
      }
    }
  }
}
Note that once the user downloads the app, when opening the App clip url now it's your main app that will need to handle the app clip url (you cannot have both the app clip and the app installed, as they're mutually exclusive).
2. Configure your App Clip Card Experience in App Store Connect
Each App Clip experience starts with the App Clip card that the user sees when they tap on an App Clip link:
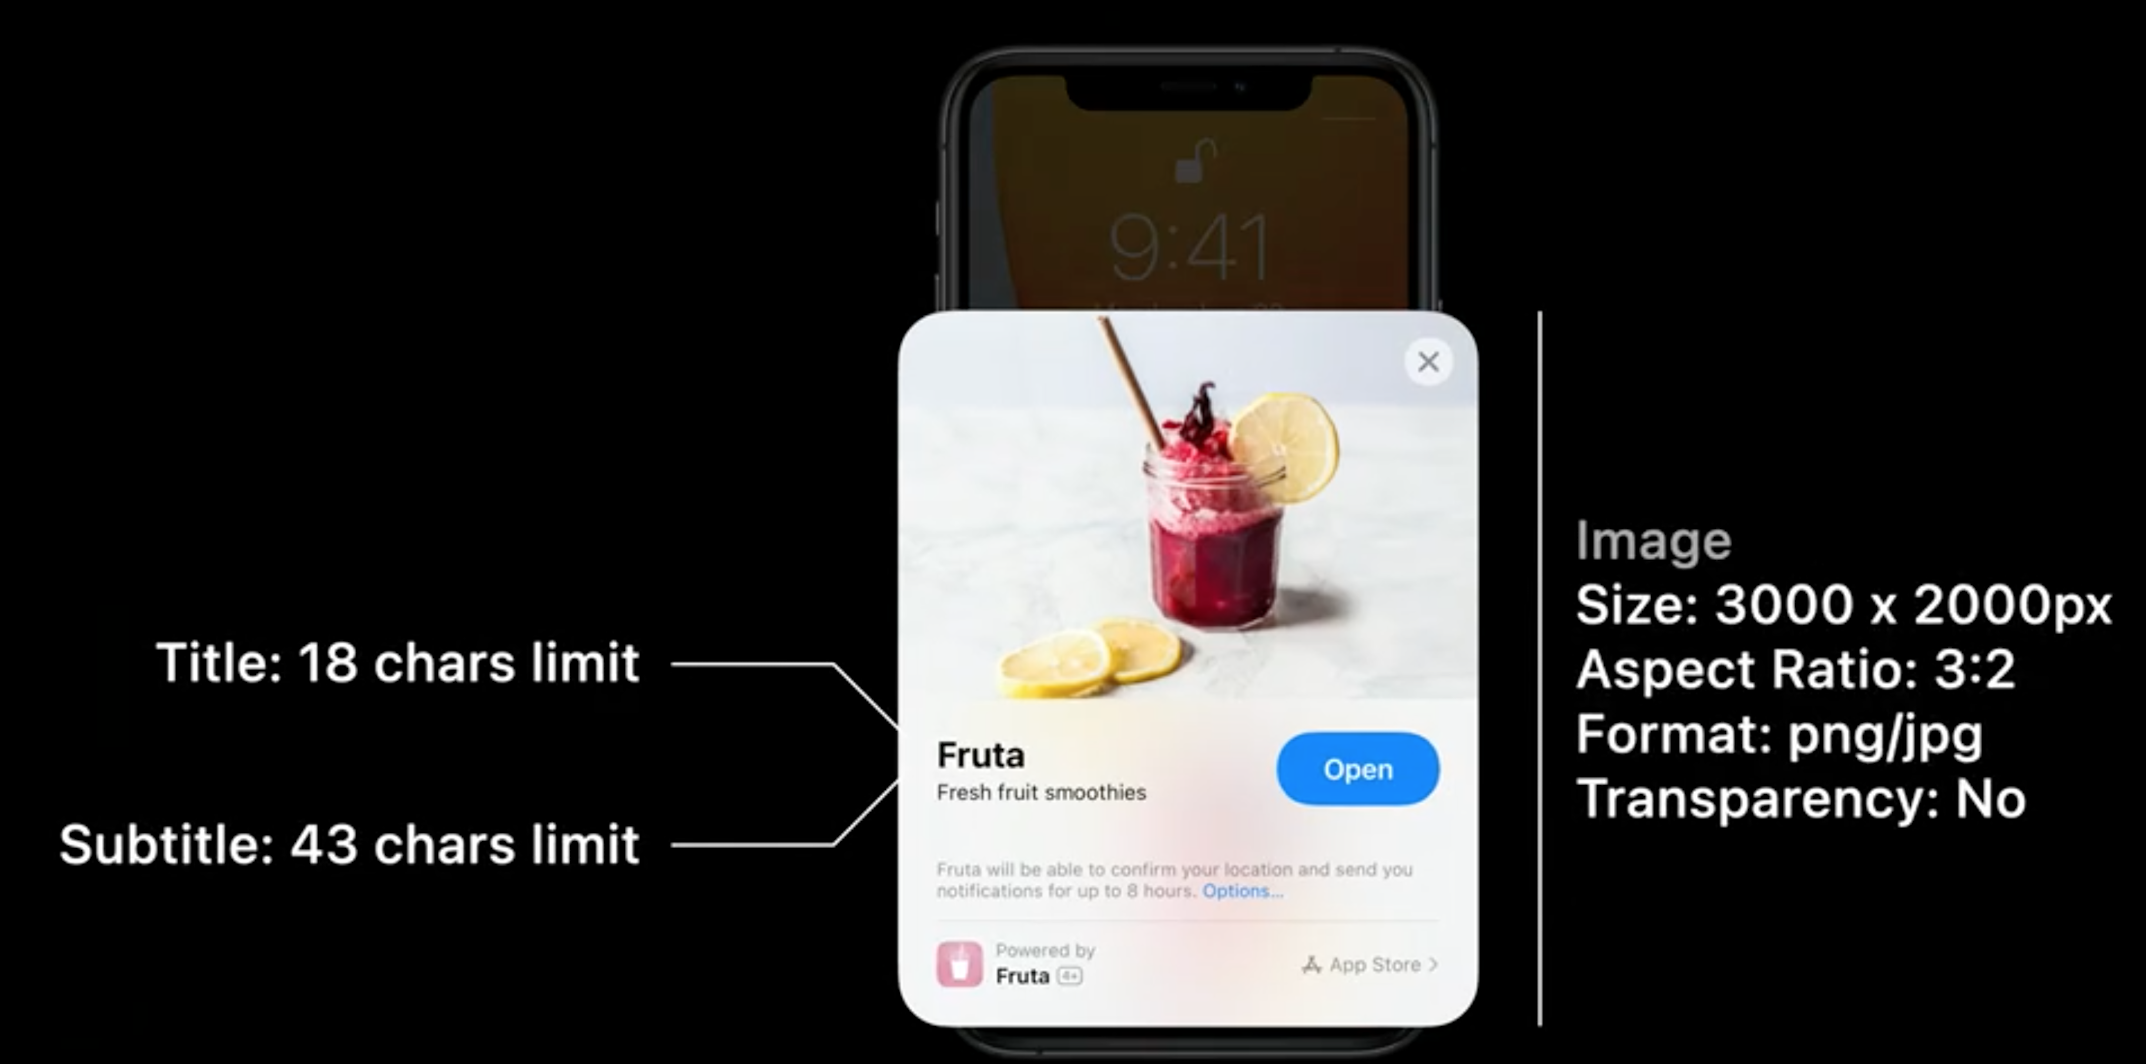
In App Store Connect the App Clip section will be shown only after you've uploaded a build that contains at least one App Clip:
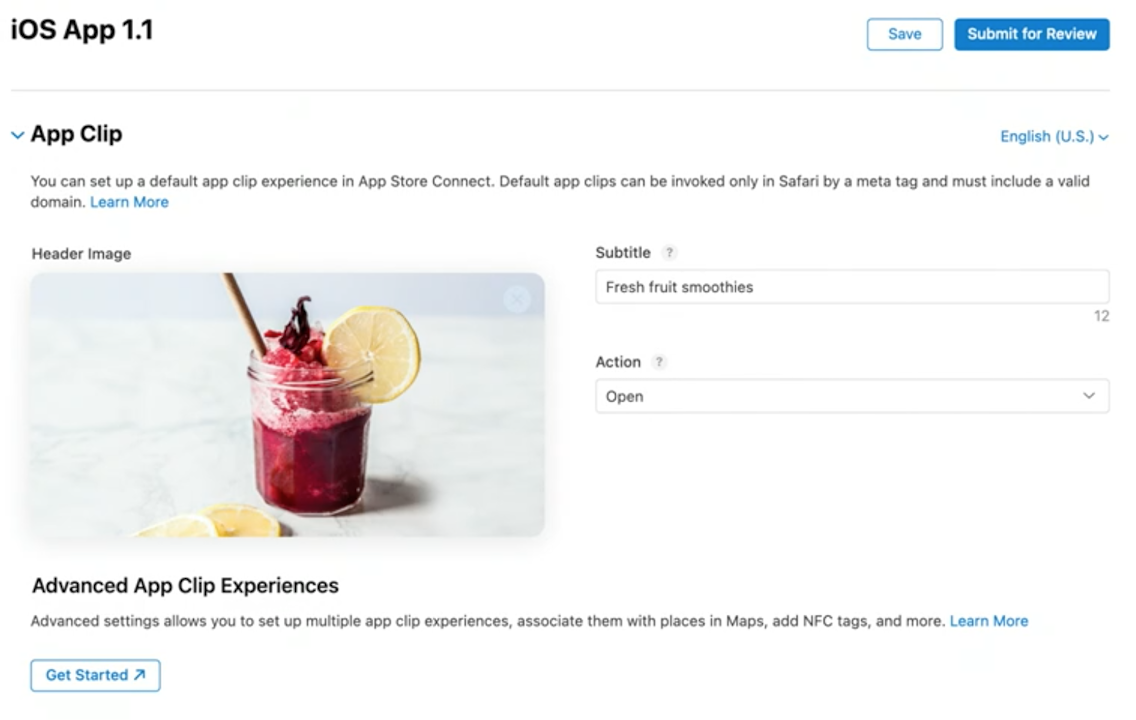
If you want your App Clip to be accessible from more than just Safari and Messages, you must set up an advanced App Clip experience by clicking the Get Started link above.
In this advanced experience is where you can set multiple urls for different experiences (e.g. a restaurant might have an experience to reserve a table, another to check the menu)
Note that you don't need exact url matches:
the App Clip Experience that has the most specific prefix match against a given url will be launched.
This is very important for example if you're renting bikes: each bike can have its own URL that differs only at the end, eg bike.app.renting/bike-id/500, bike.app.renting/bike-id/123 bike.app.renting/bike-id/66 etc
The app will only need to register bike.app.renting/ (or bike.app.renting/bike-id/) once.
Another example is if you're an app for a chain of shops, you can have the same url for all shops, and just a different postfix specifying the shop location to specify which shop the user is in.
3. (optional) Configure App Clip smart banners in your website
As before we need to add a meta tag in our webpage header:
<meta
  name="apple-itunes-app"
  content="app-clip-bundle-id=com.example.fruta.Clip, app-id=123456789"
>
Note that we pass both an app-clip-bundle-id and an app-id, the latter is for devices not running iOS 14.
How to test an App Clip
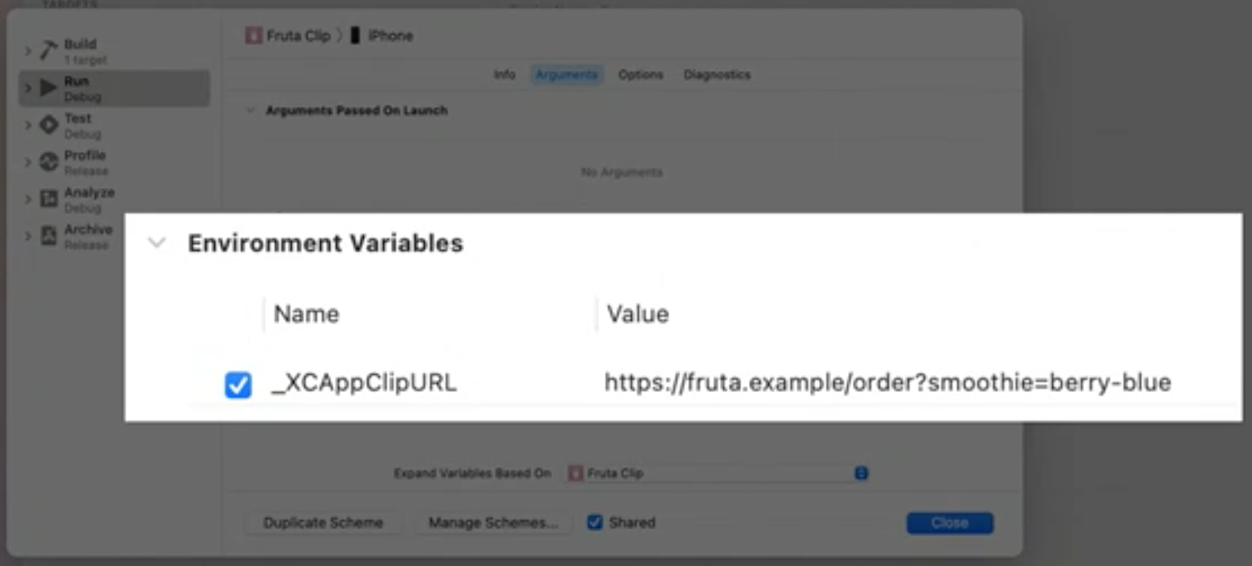
You can test the URL handling in your App Clip in Xcode.
To do so:
- Open up the scheme editor
- Select the Arguments tab.
- Under Environment Variables, set your
_XCAppClipURLvariable.
How to test an App Clip via TestFlight
In the TestFlight section of our app, we now also have an Add App Clip Invocation for us to define urls for testers to use:

 GitHub
 zntfdr.dev