Introducing Multiple Windows on iPad
 Federico Zanetello
Description: Multitasking is an exciting way to add power to your iPad app. It is easy to enable your app to run two instances of your interface side-by-side, and your customers will love it. Learn how to take your existing features like drag and drop and use them to easily create a second window. Find out how supporting multiple windows changes the app lifecycle and what that means for all applications. Hear about some common mistakes and how to solve them, setting you and your customers up for a fantastic experience.
Introduction
- On iPadOS 12 and earlier, when going to the app switcher, all we could see were apps (and apps in split view).
- From iPadOS 13 and later, what we see are windows, also called scenes (and scenes in split view).
- What is a scene? A scene is UI instance of our app, an app can have multiple scenes, potentially on screen at the same time.
- There must be a “default” scene where the user has to be able to do anything:
- If your app requires multiple scenes/windows in order to access all its functionality, then something went wrong.
- In Apple example, all scenes are exact clones of each other, this is possibly the right (and easiest) thing to do.
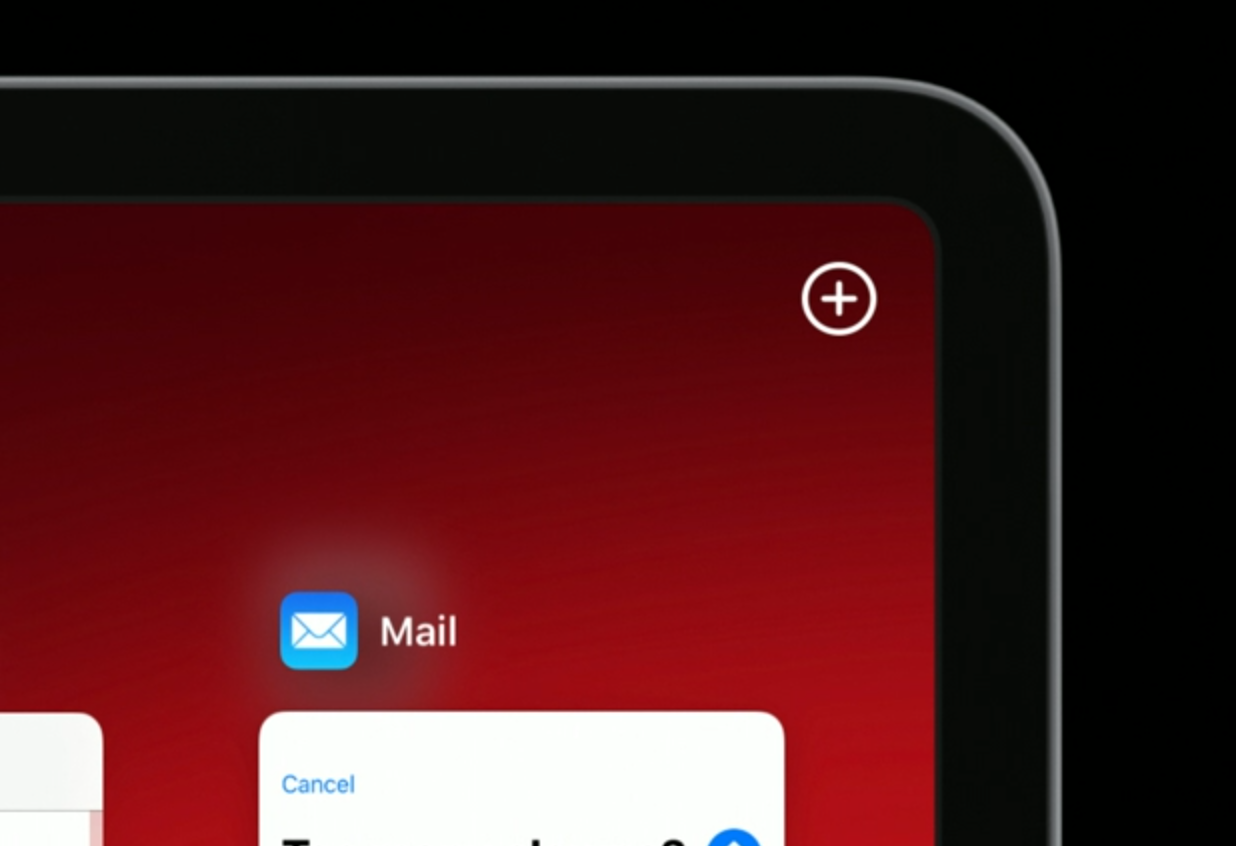
- An example of different scene is the “Compose Scene” in the mail.app: this scene serves the only purpose to write and send an email. It will even “auto explode” once the email has been sent.
- We can have multiple compose windows at the same time.
- Drag and drop between multiple windows of the same app is supported
Adoption
- First of all, we must always ask ourselves: does it make sense for our app to support Scenes?
Supporting multiple windows will make your iPad app much friendlier to macOS once you cross that bridge with Catalyst.
How to create new windows?
- Natively with iOS:
- Hold the app icon and drag it on the side of the screen
- Tap the + button on App Exposé:
- Custom actions (that our app must support):
- mainly by dragging and dropping things: cells, tabs etc
- by explicit user action e.g. a “Open in New Window” button.
Never force the user to use multiple window, make sure the user understands how to do whatever they need in the current window, and, alternatively, give an option to “Open in New Window”.
Behind The Scenes: UI Hierarchy
iOS 12 (and earlier) 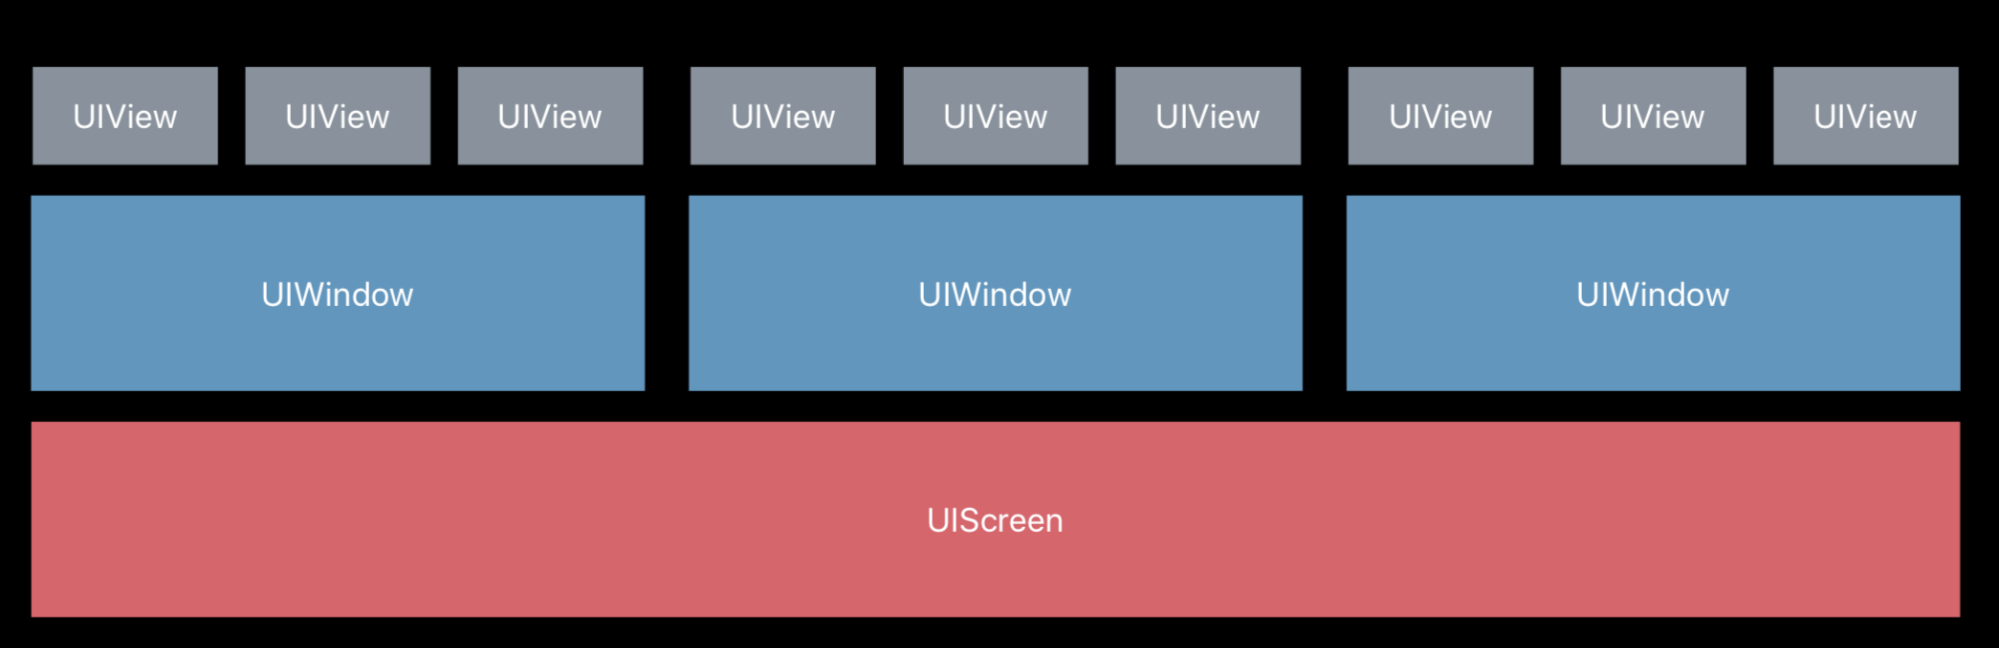
iOS 13 (and later) 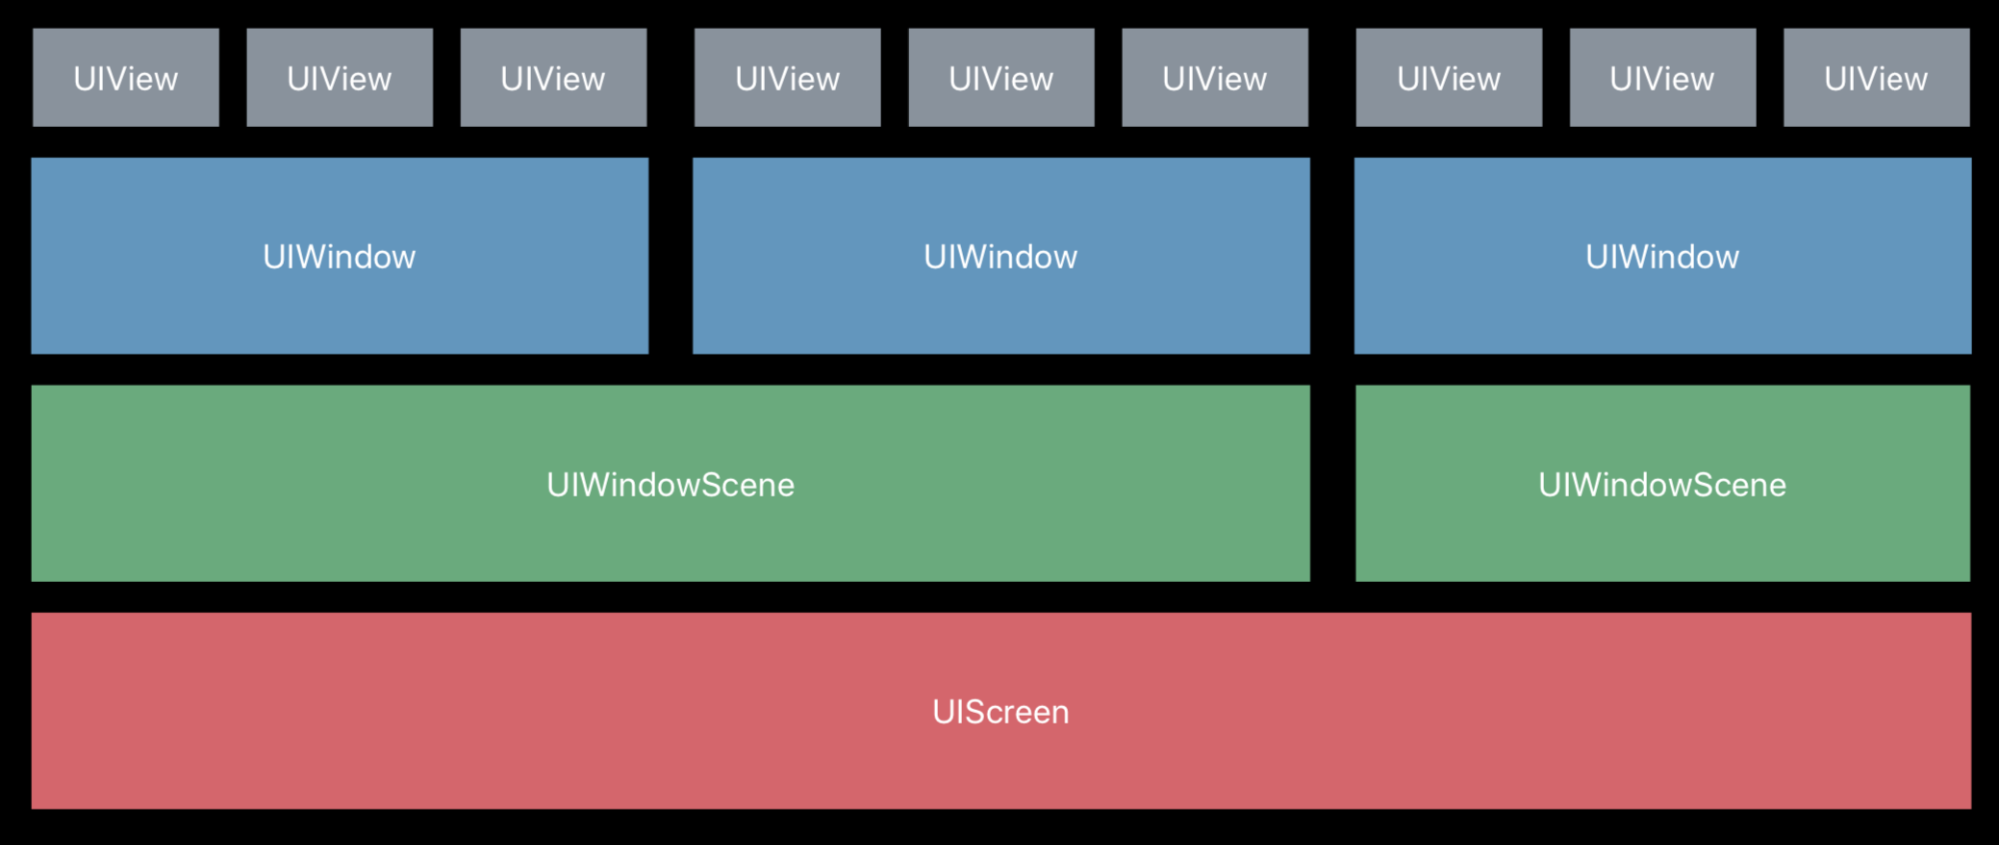
The new hierarchy looks like this: 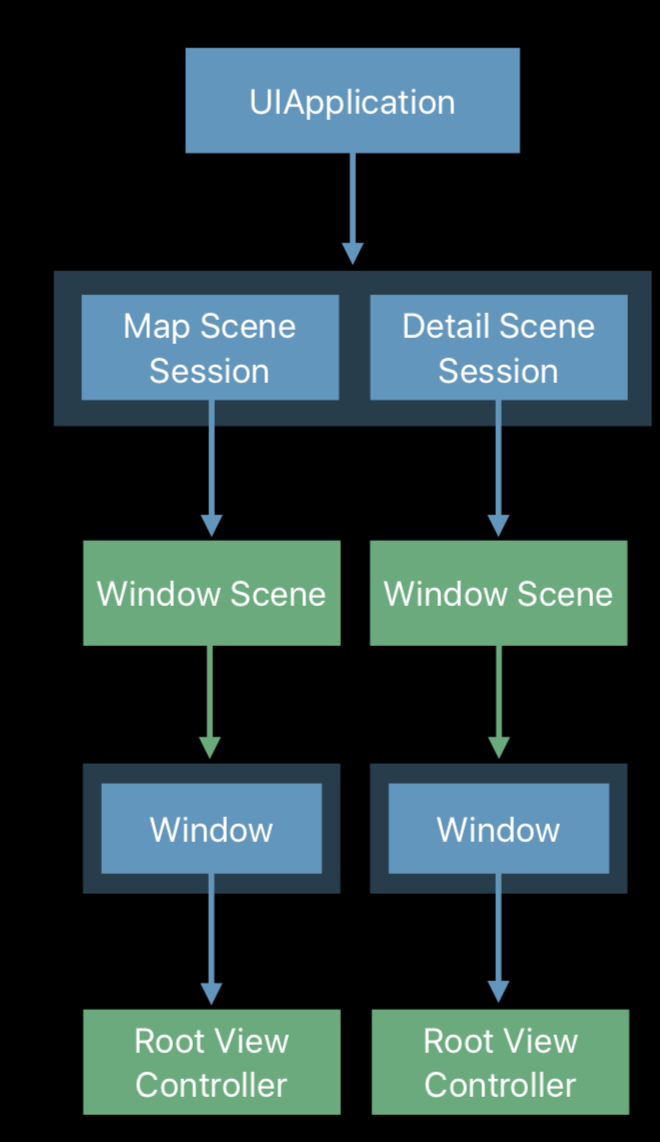
What’s New
Three new classes:
UIWindowSceneUISceneUISceneSession
A UIScene contains the UI and is created/destroyed by the system. A UIScene is aware of other scenes, every single scene is actually a UISceneSession.
UISceneSession
A UISceneSession is the persisted interface state. The UI itself can be created/destroyed by the system, however the UISceneSession remains as long as the app itself is killed, the scene kills itself, or the user closes the scene.
Each scene has a defined system role:
apparently, this is to say where the scene is. On the main device or in an external display.
Every time a new window is created/destroyed, your application is informed via the app delegate that a new session had been made/destroyed.
UIApplication vs UIScene
Since now we have multiple windows, many events that previously were delivered to the application delegate have been transferred to the scene delegate. (like for UIApplication, we normally don’t subclass the UIApplication but we implement a UIApplicationDelegate. In this we have a UISceneDelegate, which is a protocol that we implement ourselves in a custom UIResponder class).
Lots of things that were previously managed in the application delegate are now managed in the scene delegate (free refactoring!).
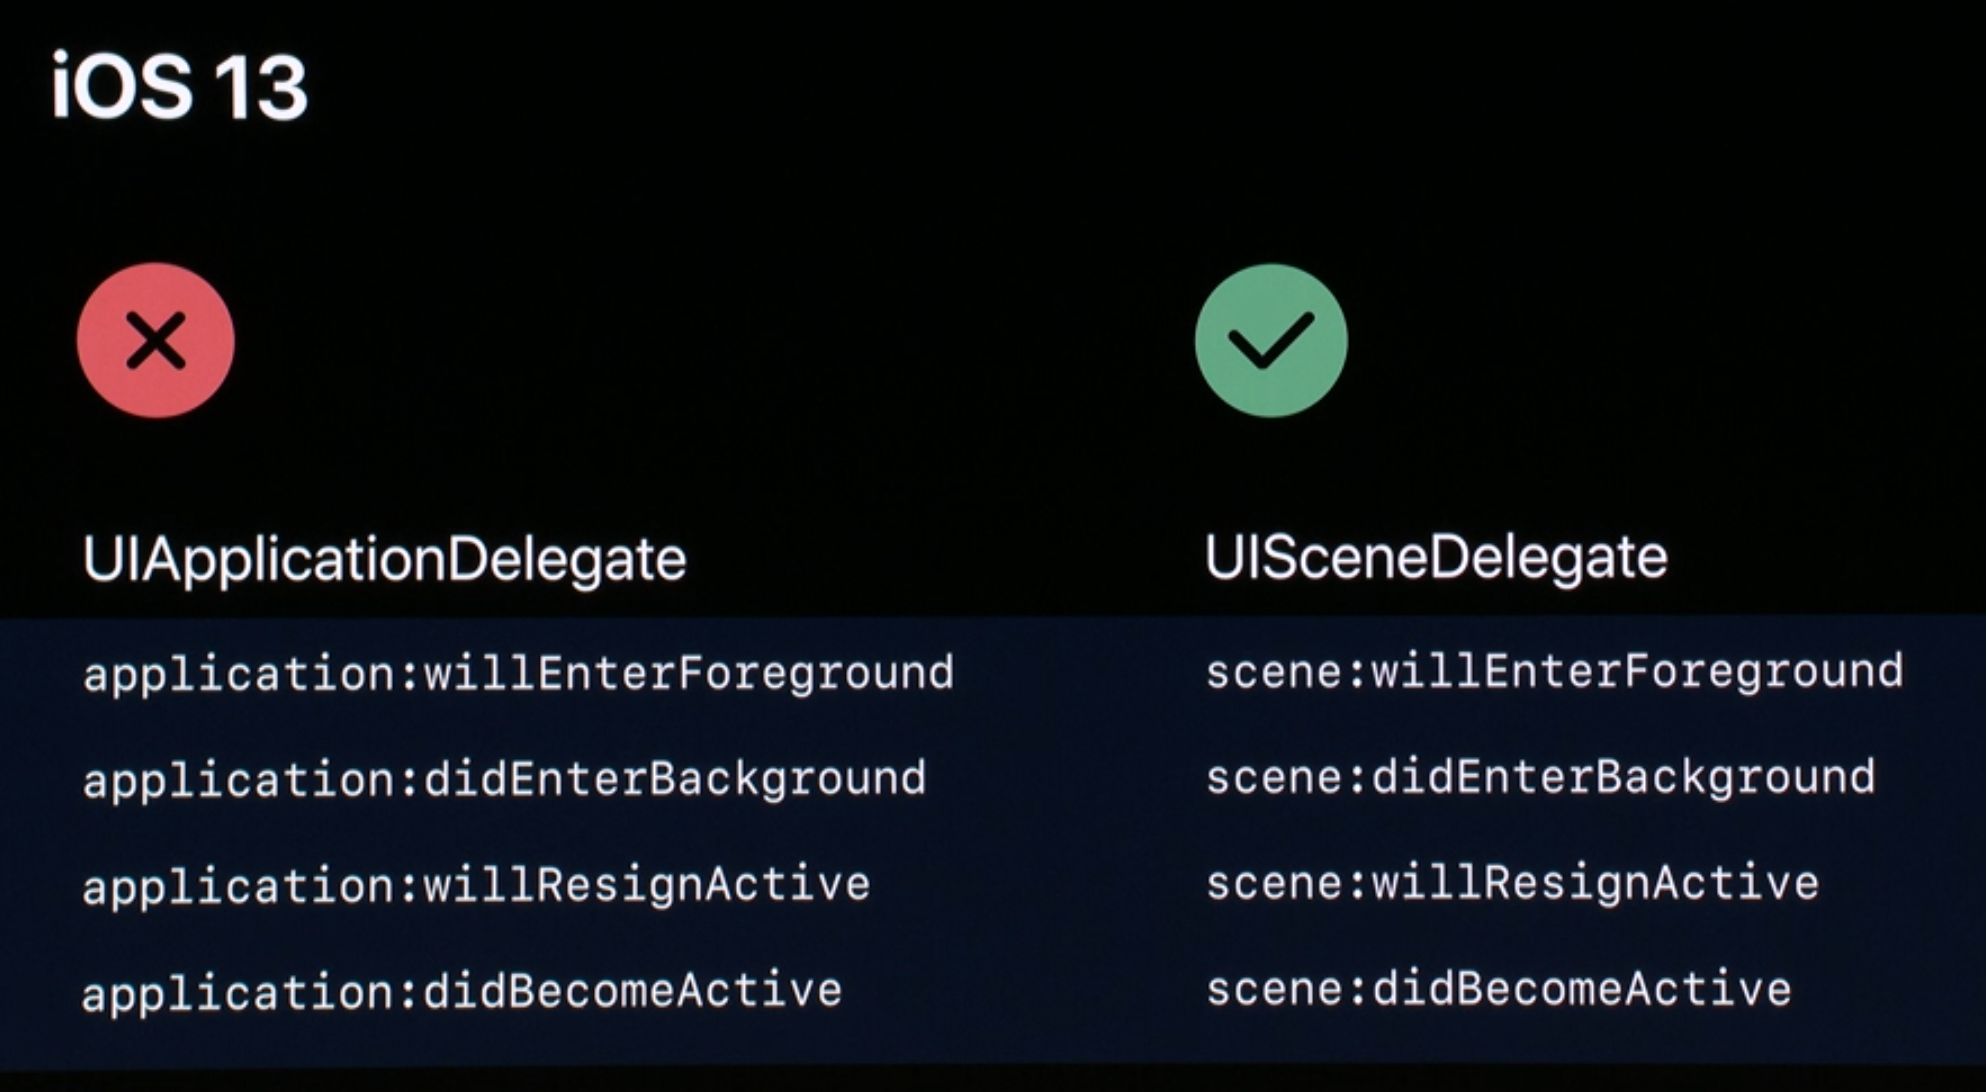
Also other things like the status bar state are now to be asked to the scene, not the application. Basically everything UI-related is on the scene.

NSUserActivity
- From now on the
NSUserActivityrestorations are no longer done in the application delegate but in the scene delegate. - To handle user activities, we must do so in our scene delegate on will connect:
func scene(
  _ scene: UIScene,
  willConnectTo session: UISceneSession,
  options connectionOptions: UIScene.ConnectionOptions
) {
  if let userActivity = connectionOptions.userActivities.first ?? session.stateRestorationActivity {
    configure(window: window, with: userActivity)
  }
}
- Note how we can also use the session for state restoration. Which means the
UISceneSessionwas destroyed by the system and now it’s being reinitialized.
Coding Time
First things first, we must enable multi windows support in the project: 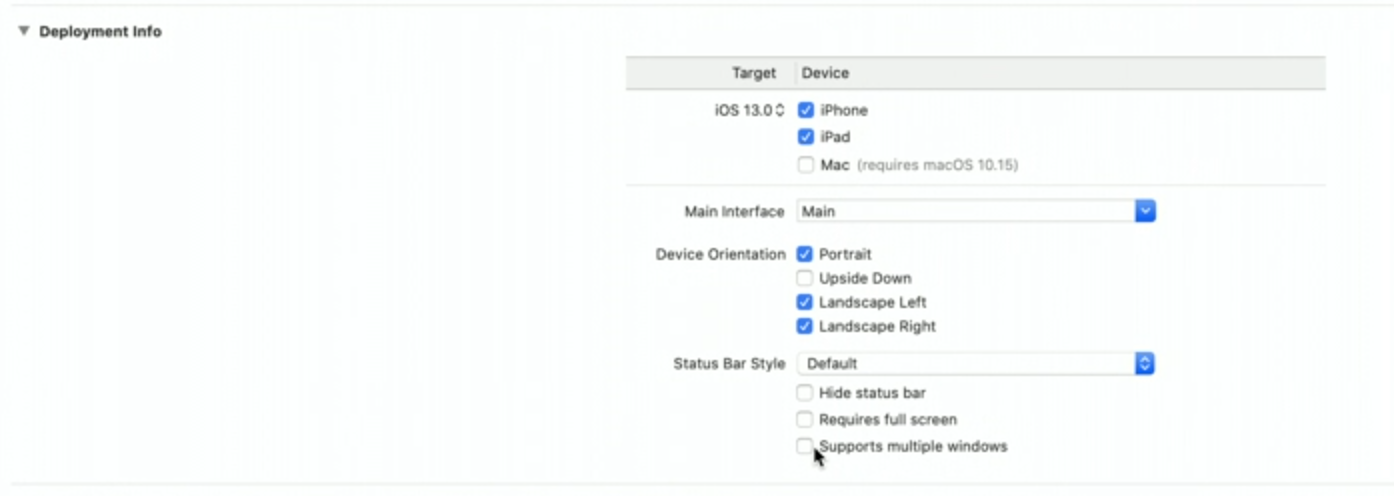
This updates the app info.plist manifest with a new key/value telling the system about window support.
Once this is done, it’s time to declare the different supported scenes, which can be done statically by adding different Scene Configurations in the info.plist.
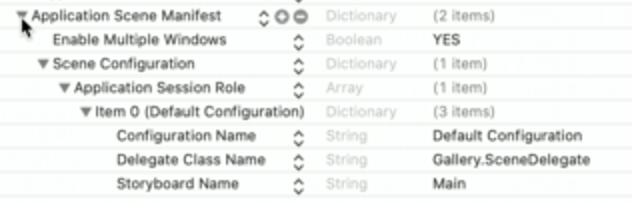
This can also be done via code.
Creating New Scenes (Programmatically)
Create new scenes (note that this and the following are called in UIApplication):
requestSceneSessionActivation(_:userActivity:options:errorHandler:)
- This will either create a new scene or bring forward an existing scene with that matches the give parameters.
- if we pass nil on the first parameter, we will create a new session/window
- the
userActivityparameter is used to pass the desired activity in the new scene (which will be used to “restore” the new scene to the proper state) - the
optionsparameter is used for example to pass which scene has triggered the call and more
// Open a New Window

@IBAction func handleLongPress(forDocumentAt url: URL) {
  if let existingSession = findSession(for: url) {
    UIApplication.shared.requestSceneSessionActivation(
      existingSession,
      userActivity: nil,
      options: nil
    )
  } else {
    let activity = NUserActivity(activityType: "com.example.MyApp.EditDocument")
    activity.userInfo["url"] = url

    UIApplication.shared.requestSceneSessionActivation(
      nil,
      userActivity: activity,
      options: nil
    )
  }
}
Once called, a new Scene session is created. However, iOS still doesn’t know what configuration you’d like to use in your new scene, which is why iOS lets you specify so by calling the app delegate configurationForSession: method.
In this method we will get the user activity that we passed in the requestSceneSessionActivation call, which then we can use to inspect and decide which configuration to return.
This method is also called on the first launch of the app as well, to let the app decide with what configuration we should fill in the first session.
This configuration specifies:
- What scene delegate...
- What storyboard...
- What scene subclass...
...you want to call the scene with.
You can declare these configurations dynamically in code or statically via info.plist.
If you use define them in the info plist, all you have to do in this method is decide which configuration to call and return it by explicitly saying the name of that config:
return UISceneConfiguration(name: "Default", sessionRole: connectingSceneSession.role)
This is because all the above is already declared in the info.plist (if you’ve chosen that route).
If the configuration declares a storyboard, then everything else will be done automatically.
The new scene delegate will receive a sceneWillConnectToSession: call with, again, the same UserActivity passed in order to restore the session.
If the session existed already, all of this is skipped and we jump straight to the scene delegate’s sceneWillConnectToSession: call. If the session was still connected (aka was not killed meanwhile by iOS) instead of sceneWillConnectToSession: the continueUserActivity: will be called (in the same scene delegate).
Note how in willConnect we need to setup the window ourselves:
  func scene (
    _ scene: UIScene,
    willConnectTo session: UISceneSession,
    options: .ConnectionOptions
  ) {
    window = UIWindow(windowScene: scene as! UIWindowScene)

    if let activity = options.userActivities.first ?? session.stateRestorationActivity {
      configure(window: window, with: activity)
    }
  }
On Scene Disconnection/Destruction
When the scene gets disconnected, it means that the system simply killed the scene (“claim back the resources”), before doing that, the scene delegate gets a last call sceneDidDisconnect:
In this method we should free any resource that was active because of this scene but was held somewhere else in the app. Don’t delete user data, as the scene might connect again in the future.
If the scene is destroyed (because the user swiped up from the app switcher or else) then the UIApplication delegate will be called and then, and only then, it is ok to delete the scene user data.
Updating Existing Scenes
This might be needed when a shared resources has been updated and the change should be reflected in other scenes as well.
It is used by iOS to capture a new snapshot of the scene (displayed in the app switcher).
Call requestSceneSessionRefresh(_:)
Close Scenes
Used to close the given scene (note how this is, again, called on UIApplication)
requestSceneSessionDestruction(_:options:errorHandler:)
The options let us specify an animation for the given scene destruction, this is cool to display the user what has happened to the scene data for example) .
Animation happens if the scene is in the foreground.
// Close a Window

func closeWindow(and action: DraftAction) {
  let options = UIWindowScene.DestructionRequestOptions()

  switch action {
    case .send: options.windowDismissalAnimation = .commit
    case .save: options.windowDismissalAnimation = .decline
    case .delete: options.windowDismissalAnimation = .standard
  }

  let session = view.window!.windowScene!.session
  UIApplication.shared.requestSceneSessionDestruction(session, options: options)
}
State restoration
- We use
NSUserActivity.
- We also have a
userInfodictionary that we can use, this can be used, for example, for per scene customization. ThisUISceneSessionuserInfois not wiped when our scene is destroyed.
- Apple suggests to put things that we currently set in
NSUserDefautlsin here (when it makes sense, for your app, use the map preference in here).
// State Restoration

class UISceneSession {
  var stateRestorationUserActivity: NSUserActivity

  var persistentIdentifier: String { get }

  /// Values must be property list type.
  var userInfo: [String: AnyHashable]
}
Choose Which Scene to Activate: UISceneActivationConditions
Let’s say that we receive a notification and the user taps on it. Which scene should the system choose to handle the notification?
UIScene come with a UISceneActivationConditions object that tells the system what the specific scene capabilities are.
UISceneActivationConditions comes in two parts:
- the CAN predicate
- the PREFER predicate
class UISceneActivationConditions : NSObject {
  var canActivateForTargetContentIdentifierPredicate : NSPredicate
  var prefersToActivateForTargetContentIdentifierPredicate : NSPredicate
}
The CAN predicate tells the system what kind of content the scene can display.
The PREFER predicate tells what content the scene prefers and at which level, so to choose between different available scenes.
Both predicates work around the TargetContentIdentifier, which is a (string) structured way to represent data in your model (think of it as a link).
Going back to the notification example, the system will run this string to each available scene in order to determine which scene to use.
From iOS 13, if push notifications come with a “notification-content-id” key, iOS will use that as the TargetContentIdentifier.
Other places where this is used (and where we must declare it):
UIApplicationShortcutItem(3d touch)NSUserActivity
Restrictions: NSPredicate
- Block Based Predicates
- Regular Expression Predicates
- The only keypath you can reference is
“SELF”
 GitHub
 zntfdr.dev