Introducing SwiftUI: Building Your First App
 Federico Zanetello
Description: See SwiftUI in action! Watch as engineers from the SwiftUI team build a fully-functioning app from scratch. Understand the philosophy driving this new framework and learn about the benefits of declarative-style programming. Take a look under the hood to understand how SwiftUI operates and learn how SwiftUI and Xcode 11 work together to help you to build great apps, faster.
Introducing SwiftUI
Command click on an element (via swift code or in the live preview) to ...:
- Embed it in something else
- Change layout (spacing, alignment, padding...)
- Extract it somewhere else (refactoring)
Modifiers
Lets us customize the way views look or behave.
Use NavigationView to wrap a view into a navigational view.
How Views Work
- They’re
Structs that conform to theViewprotocol - Behind the scenes, SwiftUI aggressively collapses our view hierarchy into an efficient data structure for rendering.
- A
Viewdefines a piece of UI - The
Viewprotocol only has one requirement: abodyproperty of typesome View. - SwiftUI knows when to fetch a new rendering of a view because, in addition to defining a piece of UI, a view defines its dependencies.
@State
When SwiftUI sees a view with a @State variable, it allocates storage for that variable on the view's behalf.
In the following memory diagram, the green section is our view memory, and the purple section is memory that SwiftUI is managing for us:
struct RoomDetail: View {
  let room: Room
  @State private var zoomed = false

  var body: some View {
    Image(room.imageName)
      .resizable()
      .aspectRatio(contentMode: . fit)
  }
}
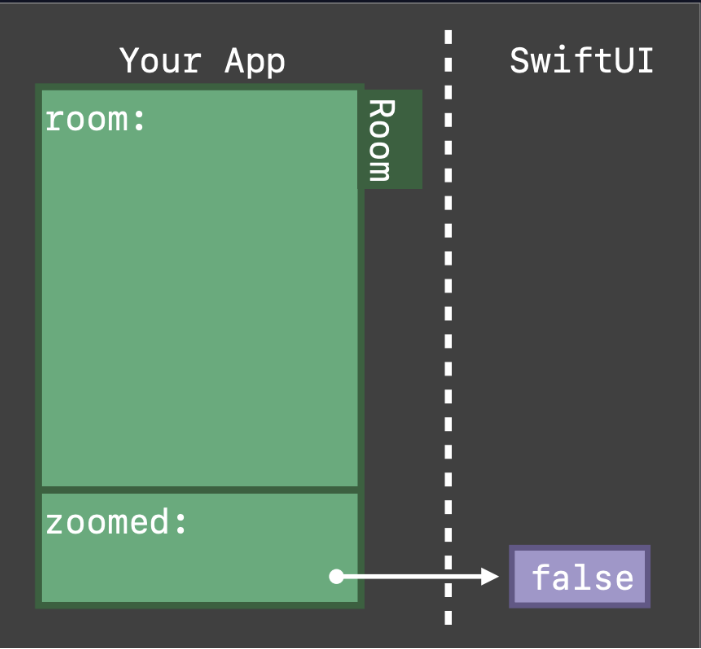
If the body property reads the @State property, SwiftUI knows that it’ll need to ask for a new body automatically.
ObservableObject
Has a objectWillChange property:
import Combine
import SwiftUI

class RoomStore: ObservableObject {
  var rooms: [Room] {
    willSet {
      objectWillChange.send()
    }
  }

  init(rooms: [Room] = []) {
    self.rooms = rooms
  }

  // This declaration is synthesized by conforming to `ObservableObject`,
  // no need to declare it.
  var objectWillChange = ObservableObjectPublisher()
}
Later on we can use a @ObservedObject property wrapper with an ObservableObject instance to tell SwiftUI to observe for changes and, potentially, trigger a new rendering of the view if necessary.
Live View Protips
- Use
Groupin the previews screen to show multiple views.
- Preview multiple category sizes:
struct ContentView_Previews: PreviewProvider {
  static var previews: some View {
    Group {
      ContentView(store: RoomStore(rooms: testData))

      ContentView(store: RoomStore(rooms: testData))
        .environment(\.sizeCategory, .extraExtraExtraLarge)
    }
  }
}
- Preview Light/Dark mode:
struct ContentView_Previews: PreviewProvider {
  static var previews: some View {
    Group {
      ContentView(store: RoomStore(rooms: testData))

      ContentView(store: RoomStore(rooms: testData))
        .environment(\.colorScheme, .dark)
    }
  }
}
- Preview multiple localizations:
struct ContentView_Previews: PreviewProvider {
  static var previews: some View {
    Group {
      ContentView(store: RoomStore(rooms: testData))

      ContentView(store: RoomStore(rooms: testData))
        .environment(\.layoutDirection, .rightToLeft)
        .environment(\.locale, Locale(idenfifier: "ar"))
    }
  }
}
 GitHub
 zntfdr.dev