Understanding UIKit Rendering
 Federico Zanetello
Description: UIKit has strong ties to Core Animation, and an understanding of this relationship can provide important insight into the behavior and performance of your UIKit application. We'll walk through the fundamentals of UIView and CALayer geometry, convert a pure Core Animation application to use UIKit, and explore some tools Core Animation offers to enhance your application's appearance and performance. Learn various techniques to provide optimal edge anti-aliasing, group opacity, clipping, shadows and more.
UIView and CALayer
UIViewandCALayerhave a separate hierarchy- each
UIViewis backed by aCALayer - different
UIViewsubclasses might use a differentCALayersubclass. The recommended way is to add anotherCALayeras a sub-layer of theUIView'sCALayer
Geometry differences
UIViews use UIKit points (where points != pixels), while CALayers use the actual pixels size.
For example, a full screen UIView on iPhone 4 has 320x480 points, but the CALayer size will be 640x960.
The origin on UIView is always top left (on portrait in 2011, in newer version of iOS it will be always top-left, regardless of the orientation), while on CALayer might be different (e.g. top right on portrait on the original iPad, bottom left on the iPad 2). It's recommended to always use UIKit for sizing, positioning, as it will be more consistent.
UIView's frame
UIView's frame is the smallest rectangle that fully encloses that view from the UIView's superview coordinate system.
By default, this is equivalent to the location (frame.origin) and size (frame.size) of the UIView in its superview.
UIView's frame is a computed property. Setting a view frame changes the view's..:
- ...
center, which is a point in thesuperviewwhich defines the location of the center of your view - ...
bounds, which is aCGRectin the view's own coordinate space, theframe.sizeis set on thebounds.sizeand represent the view size before taking account of any transform applied to the view
Note that the frame takes in consideration any transform applied to the view.
If we scale the sub-view to 50% for example, the frame will report a frame.size that is half the bounds.size, and an frame.origin that is the shifted to according to the new size and the old center point. If we rotate the sub-view, the frame will need to enlarge to cover all the corners of the rotated view.
This is because any transform is applied according to the center to the view.
Components of frame
UIView Property | CALayer Property | Coordinate Space |
|---|---|---|
bounds.size | bounds.size | View |
center | position | Superview |
transform | affineTransform | Superview |
transform3D | transform | Superlayer |
anchorPoint | Layer (Unit Coordinates) |
CALayer's anchorPoint is a point in the CALayer defined in unit coordinates that determines the point in the view that will get anchored to the superview at that view position. In other words, it tells what is the location in the layer that corresponds to the CALayer's position.
UIView's bounds origin
When it's not zero, you can consider it as applying a translation (of origin) to all the subviews of that view. In other words, this changes the point in the view own coordinate system that is visible at the top left of the frame.
In conclusion, bounds define which portion of the view coordinate system is visible in the view's frame.
Drawing
What we render on screen is UIView's (CA)layer contents property (view.layer.contents). UIView provides various wrappers around this property, and you almost never set its content directly yourself.
The most common ways to render things on screen is to:
- (for static content) use
UIImageView - (for dynamic content) subclass
UIViewand override/implementdrawRect:(which is drawing withCoreGraphics)
Note that UIImageView can animate and usually is more memory efficient (like tiling and stretching images)
CATransaction
- Used behind the scenes in
UIView/CALayer - when we change something in
UIView/CALayer, an implicitCATransactionwill start, and that same transaction will commit at the end of that run loop
Quality and Performance
The best thing we can do to improve our UI app performance is to avoid offscreen rendering.
Ideally our screens would render without any offscreen passes, however this doesn't happen because we need to do some extra work on our views such as blending, transparency, clipping, transforming etc.
One way to solve this is to use layer rasterization, via [CALayer setShouldRasterize:], which tells Core Animation to cache/buffer the first rendering and use it for the next renderings.
Clipping and masking
- [CALayer cornerRadius]- [CALayer mask]- [UIView clipsToBounds](- [CALayer masksToBounds])
For example when we set the layer cornerRadius, this cause offscreen passes when the layer (view) contains sub-layers (subviews).
Tricks to avoid offscreen passes:
- [CALayer contentsRect], defines what part of the content gets rendered- [UIView drawRect:], we render our expensive mask/cornerradius etx upfront, to avoid having to do them at each frame- Transparent overlay, add a transparent layer on top of yours that masks the part you want to hide from your layer
Group opacity
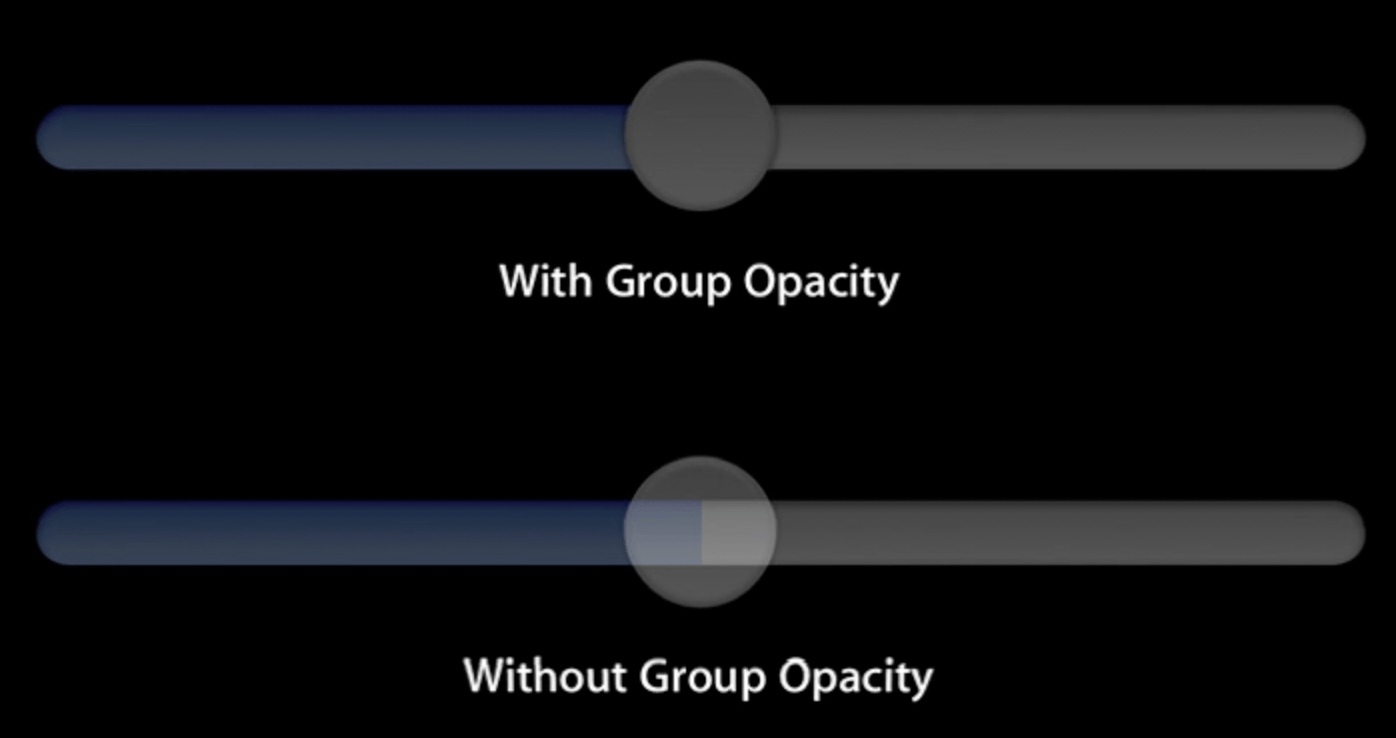
Using group opacity, will flat the view before applying the alpha to it.
When we apply an alpha to a UIView, UIKit multiplies recursively that alpha to all subviews.
To enable group opacity on UIKit, use one of the following:
- set UIViewGroupOpacity in your Info.plist
- Pre-render in
drawRect: - (static content) set
layer.shouldRasterize = YES
Shadows
layer.shadowOffset and layer.shadowColor are very convenient, but very expensive.
To improve use:
- [CALayer shadowPath]- [CALayer shouldRasterize]- CoreGraphics shadows via
CGContextSetShadow(indrawRect:)
Edge anti-aliasing
- Set
UIViewEdgeAntialiasingkey in your Info.plist - Fake it with a pixel border
 GitHub
 zntfdr.dev